Sebo 470 Comfort User manual
MADE IN GERMANY
MADE IN GERMANY
SEBO 470 ELECTRONIC
STOP
1
1
2
3
4
Bürstenkontrolle
Brush control
Contrôle de la brosse
GEBRAUCHSANWEISUNG / INSTRUCTION MANUAL
Technische Daten
Staubsauger:
Gebläsemotor....................................... 1000 Watt
max ...................................... 1300 Watt
Unterdruck .......................................... 230 mbar
(2350 mm WS)
Luftmenge ............................................ 52 l/s
Filtertüte ............................................. 5,0 liter, 3-lagig
Bürstenmotor....................................... 200 Watt
Arbeitsbreite ........................................ 460 mm
Borstenstreifen .................................... auswechselbar
Bürstenantrieb .................................... Zahnriemen mit
elektrischem
Überlastungsschutz
Höhe .................................................... 1225 mm
Breite ................................................... 460 mm
Gewicht ................................................ 9,3 kg
Vibrationspegel ................................... <= 2,5 m/s2
Schalldruckpegel ................................. 69 dB(A)
Schutzklasse ....................................... II, doppelt isoliert
Arbeiten an der elektrischen Installation dürfen nur von Sach-
kundigen ausgeführt werden.
Vacuum Cleaner:
Vacuum Motor................................................1000 Watt
max................................................1300 Watt
Suction...........................................................230 mbar
(2350 mm WS)
Air Flow .........................................................52 l/s
Filter Bag.......................................................5,0 litres, 3-layer
Brush motor ..................................................200 Watt
Working width................................................460 mm
Brush strip.....................................................replaceable
Brush drive....................................................non slip drive belt
with electronic
overload protection
Height ...........................................................1225 mm
Width ............................................................460 mm
Weight ...........................................................9,3 kg
Vibration level ...............................................<= 2,5 m/s2
Sound pressure level ....................................69 dB(A)
Protection .....................................................double insulated
For Service please contact your supplier or the address below.
Technical Details
2
2
1
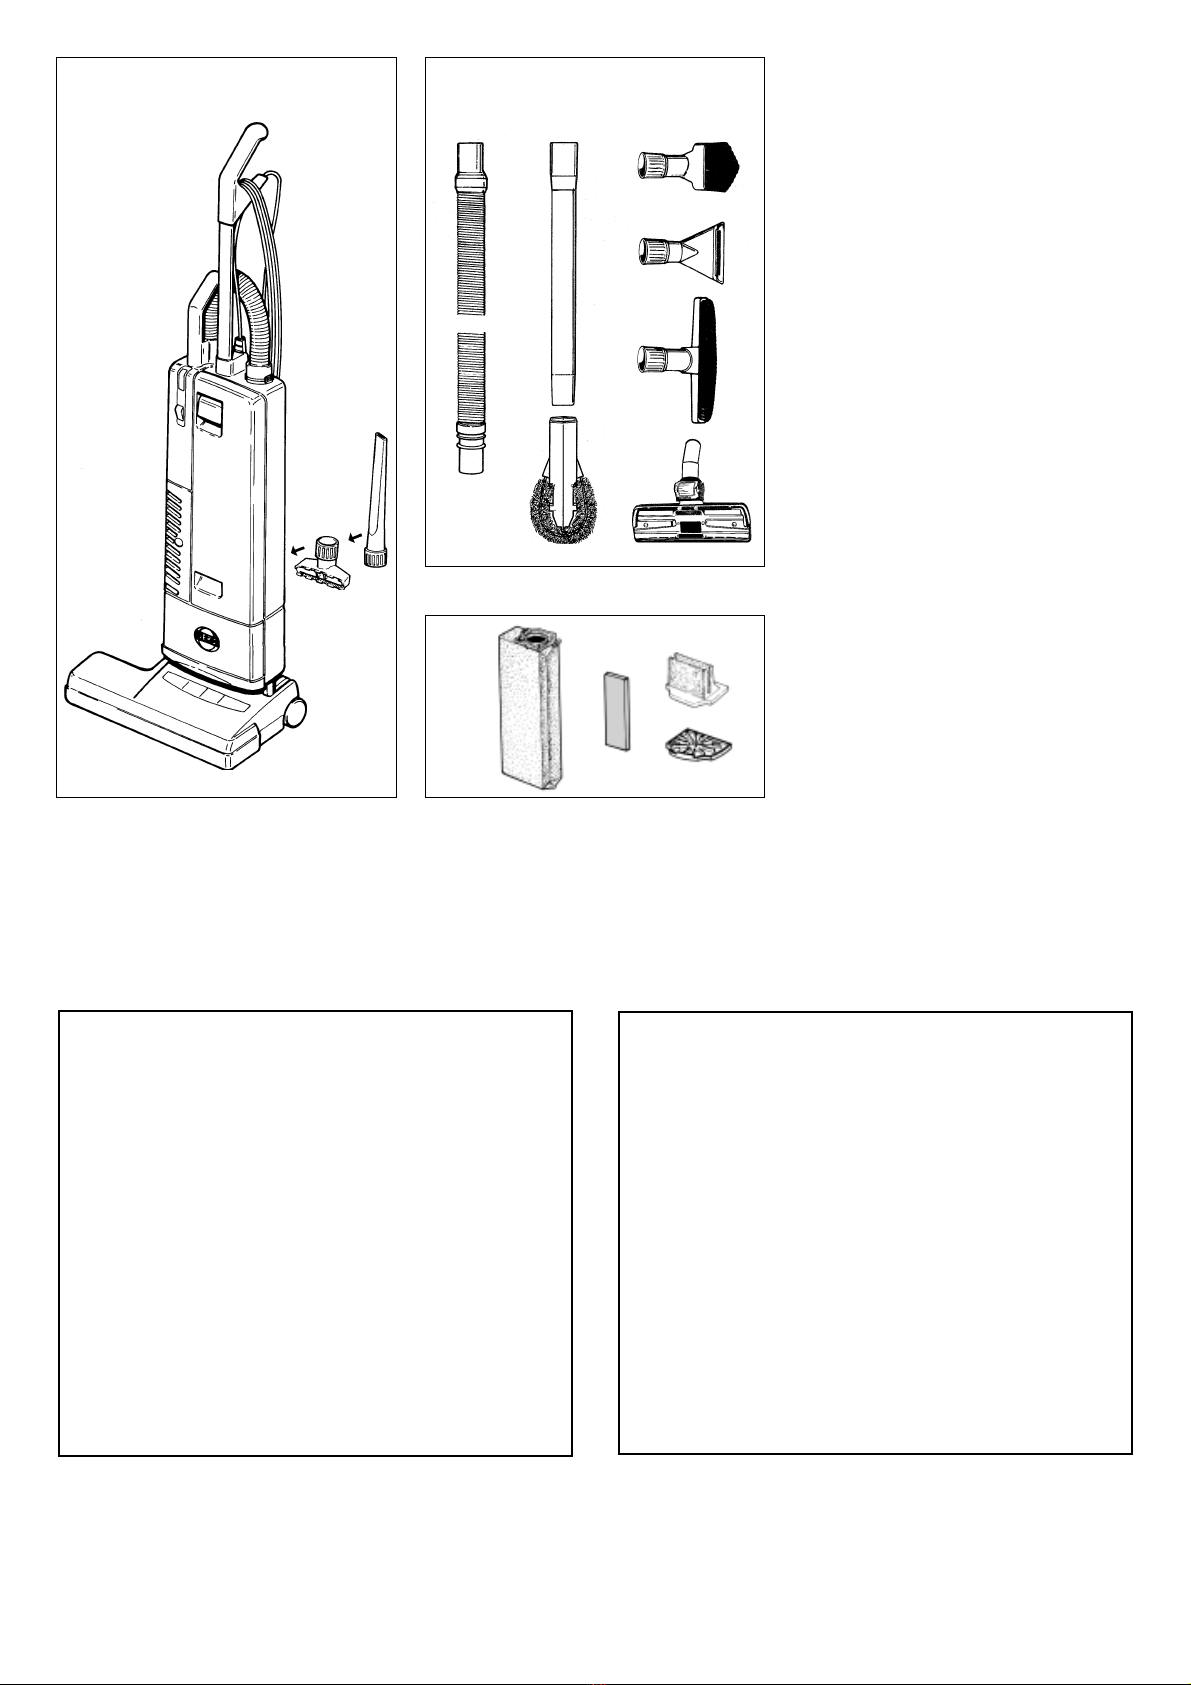
A Zubehör
11491 Polsterdüse
21092 Fugendüse
B Sonderzubehör
11495 Verlängerungsschlauch
21084 Verlängerugsrohr
31094 Staubpinsel
41090 Flachposterdüse
51325 Wand- und Polsterbürste
61383 Kombi-Bodendüse
71496 Heizkörperpinsel
C Service -Teile
15093 Filtertüte
21878 Abluftfilter
31825 Motorfilter
41875 Mikrofilter
A Attachments
11491 Upholstery Nozzle
21092 Crevice Nozzle
B Optional Attachments
11495 Extension Hose
21084 Straight Tube
31094 Dusting Brush
41090 Upholstery Nozzle, special
51325 Wall- and Floor Brush
61383 Combination Nozzle
71496 Radiator Brush
C Service Parts
15093 Paper Bag
21878 Exhaust Filter
31825 Vacuum Motor Filter
41875 Micro Filter
A selection of attachments is available as a kit
A B
C
4
1 2
3
3
4
5
6
1 2
7
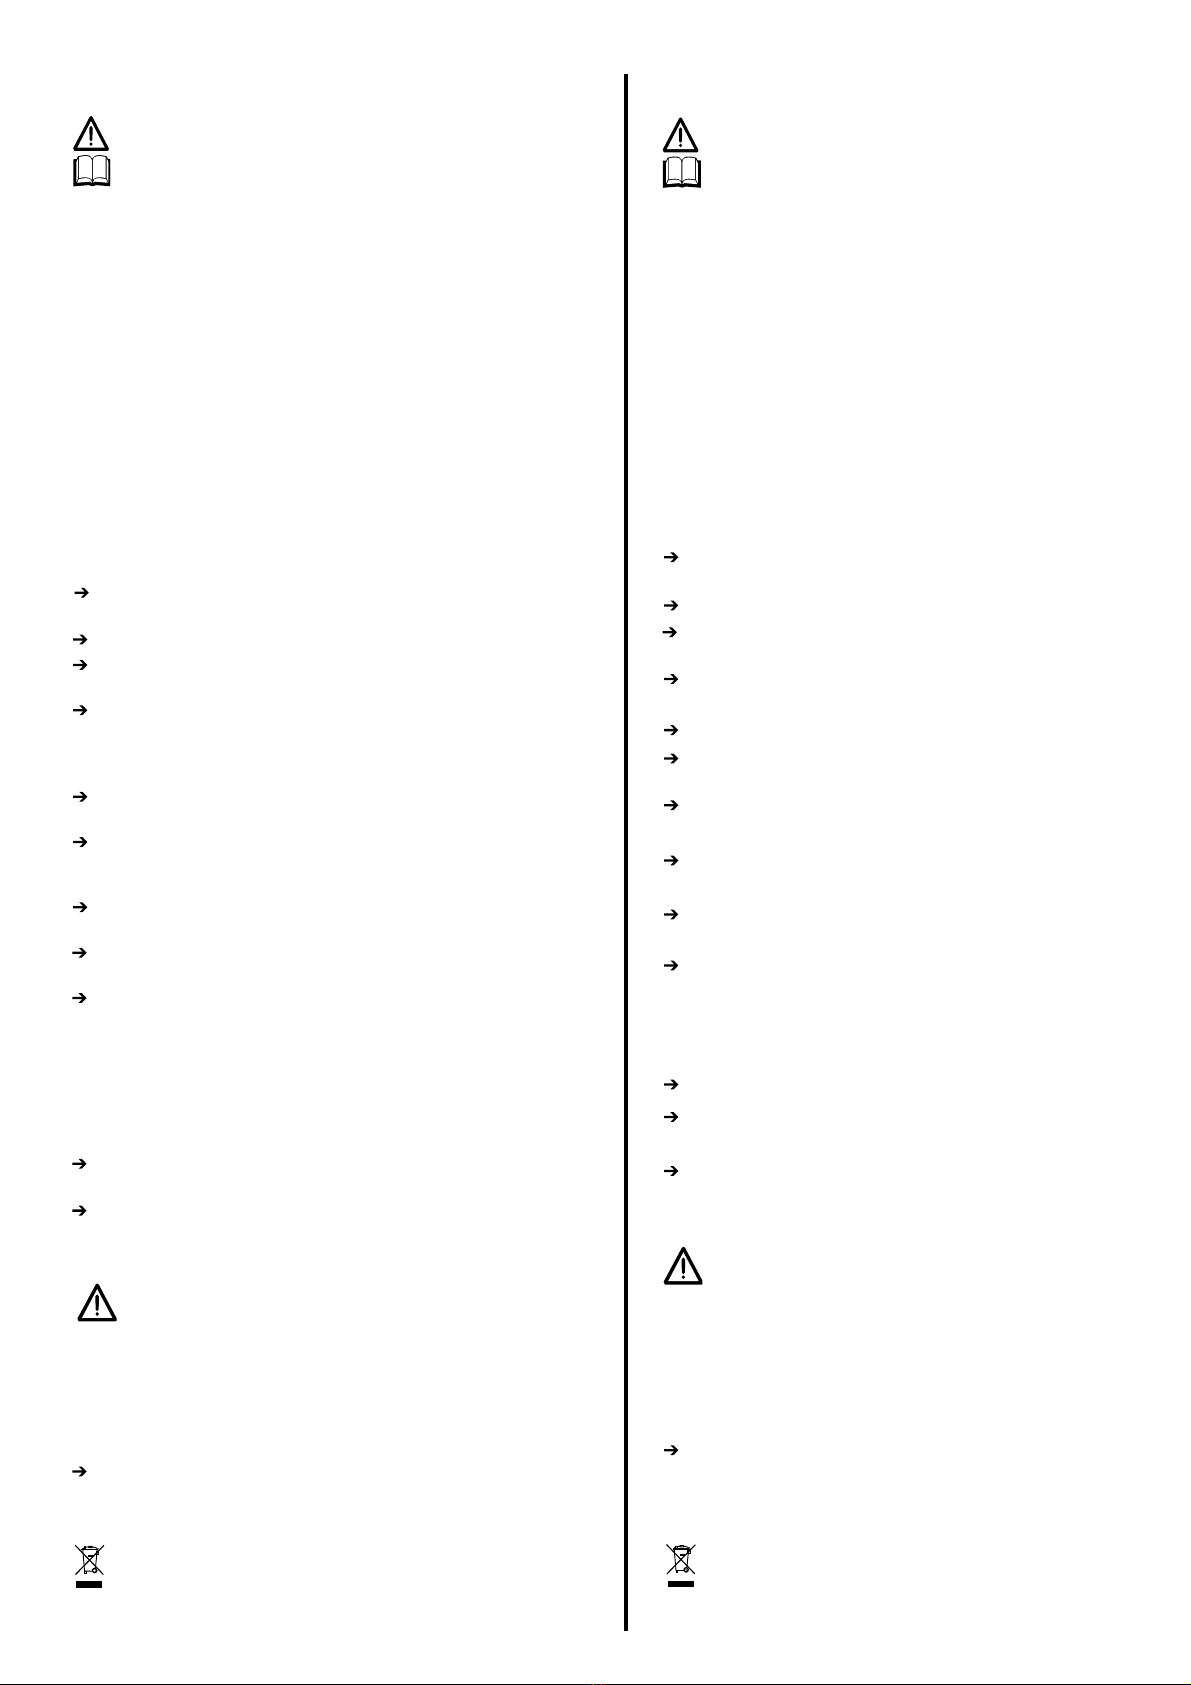
Original Bedienungsanleitung
Lesen Sie bitte diese Gebrauchsanweisung und
beachten Sie die darin enthaltenen Gebrauchs-,
Sicherheits- und Warnhinweise, bevor Sie das Gerät
in Betrieb nehmen.
Sicherheitshinweise
Die Gebrauchsanweisung bitte gut aufbewahren. Wird das Gerät
an Dritte weitergegeben, muss unbedingt die Gebrauchsanwei-
sung mit übergeben werden.
Die Benutzung des Gerätes geschieht auf eigene Verantwortung.
Der Hersteller haftet nicht für Schäden, die durch falsche Be-
dienung oder nicht bestimmungsgemäßen Gebrauch verursacht
werden.
Diese Maschine ist für gewerbliche Zwecke bestimmt. z.B. Ho-
tels, Schulen, Krankenhäusern, Fabriken, Büros, Geschäften.
Dieses Gerät ist nicht dafür bestimmt, durch Personen (ein-
schließlich Kinder) mit eingeschränkten physischen, sensori-
schen oder geistigen Fähigkeiten oder mangels Erfahrung und/
oder mangels Wissen benutzt zu werden, es sei denn, sie werden
durch eine für ihre Sicherheit zuständige Person beaufsichtigt
oder erhalten von ihr Anweisungen, wie das Gerät zu benutzen
ist.
Kinder sollten beaufsichtigt werden, um sicherzustellen,
dass sie nicht mit dem Staubsauger spielen.
Menschen oder Tiere nicht ab- bzw. aufsaugen.
Nicht zur Aufnahme von gefährlichem oder gesundheitsge-
fährdendem Staub geeignet.
Keine scharfen, leicht entflammbaren, explosiven und
gesundheitsschädlichen Stoffe oder Gase aufsaugen. Nur zur
Reinigung trockener Flächen. Nichts Glühendes oder Heißes
aufsaugen.
Niemals bei angeschlossenem oder laufenden Gerät an die
Bürste fassen!
Dieser Staubsauger ist nur zur Trockenanwendung bestimmt
und darf nicht im Freien und unter nassen Bedingungen ver-
wendet oder aufbewahrt werden.
Nach Benutzung des Gerätes den Staubsauger ausschalten
und den Netzstecker ziehen.
Den Staubsauger nur gemäß der Anschlusswerte des Typen-
schildes anschließen und betreiben.
Die Netzanschlussleitung ist regelmäßig auf Beschädigung
zu untersuchen, wie z.B. Rissbildung oder Alterung. Falls
eine Beschädigung festgestellt wird, muss diese Leitung vor
weiterem Gebrauch des Staubsaugers durch den Hersteller,
seinen Kundendienst oder von qualifiziertem Service perso-
nal ersetzt werden, um Gefährdungen zu vermeiden. Hierzu
darf nur der vom Hersteller festgelegte Leitungstyp verwen-
det werden.
Mit eingeschaltetem Gerät nicht über die Anschlussleitung
fahren.
Vor Hitzequellen, Feuchtigkeit und Wasser schützen und nur
trocken oder mit einem leicht feuchten Tuch reinigen.
Vor allen Arbeiten am Staubsauger:
Erst das Gerät ausschalten und den Netzstecker ziehen.
Reparaturen und Ersatzteileaustausch am Staubsauger
dürfen nur von Fachkräften ausgeführt werden.
Das Gerät darf nur mit original SEBO Filtertüten und original
SEBO Ersatz- und Verschleißteilen betrieben werden. Nur die
Verwendung von Originalteilen für dieses Produkt berechtigt
zu Garantieleistungen und gewährleistet die Betriebssicherheit
des Gerätes. Änderungen am Staubsauger sind nicht zulässig.
Die Steckdose am Staubsauger ist nur für original Zubehör
zu verwenden.
Sie können dieses Gerät kostenlos an jeder öffentlichen Sam-
melstelle abgeben. Weitere Informationen erhalten Sie durch
Ihre Kommune. Elektroaltgeräte gehören nicht in den Restmüll.
Original instruction manual
Please read these instructions and also the
Floor maintenance guide carefully before
using the machine.
Safety Instructions
Please save these instructions. If you pass the machine to
a third party, please pass these on as well. The use of the
machine is at your own risk. The manufacturer / supplier
is not liable for any injury or damage caused by incorrect
usage of the machine.
This vacuum cleaner must only used for normal domestic
household purposes.
This appliance is not intended for use by persons (including
children) with reduced physical, sensory or mental capa-
bilities, or lack of experience and knowledge, unless they
have been given supervision or instruction concerning use
of the appliance by a person responsible for their safety.
Children and pets must be strictly supervised, and
must not play with the appliance.
Do not use on people or animals.
This machine must not be used for picking up hazar-
dous or harmful dust.
Do not use in the presence of flammable, explosive or
harmful materials and gases.
Do not pick up hot material, such as fire ash.
Do not touch the brush roller while the machine is
plugged in.
Use on dry surfaces only. Do not store outdoors or in
damp conditions.
Always turn off and unplug the machine when it is not
in use.
Use your SEBO machine only at the voltage stated on
the type plate.
Inspect the mains cable at regular intervals for dama-
ge or signs of wear. If the mains cable is damaged it
must be replaced with a genuine SEBO part. For safety
reasons this must be done by a SEBO service repre-
sentative or an authorized Service technician.
Do not run over the cable.
Electrical appliance, do not expose to liquid, moisture
or heat.
Before using the vacuum cleaner, always check for
any signs of damage, especially to the mains cable. Do
not use a damaged machine.
Always turn off and unplug the machine before un-
dertaking any maintenance. All repairs within the
guarantee period should be performed by an au-
thorized SEBO service representative.
This machine should only be operated with genuine
SEBO filter bags, filters and replacement parts. The use
of non-genuine parts will waive the warranty for this
product and could pose a serious safety risk
Use only genuine SEBO Attachments.
For disposal of used appliances, please follow the advice of
your local authority.
3
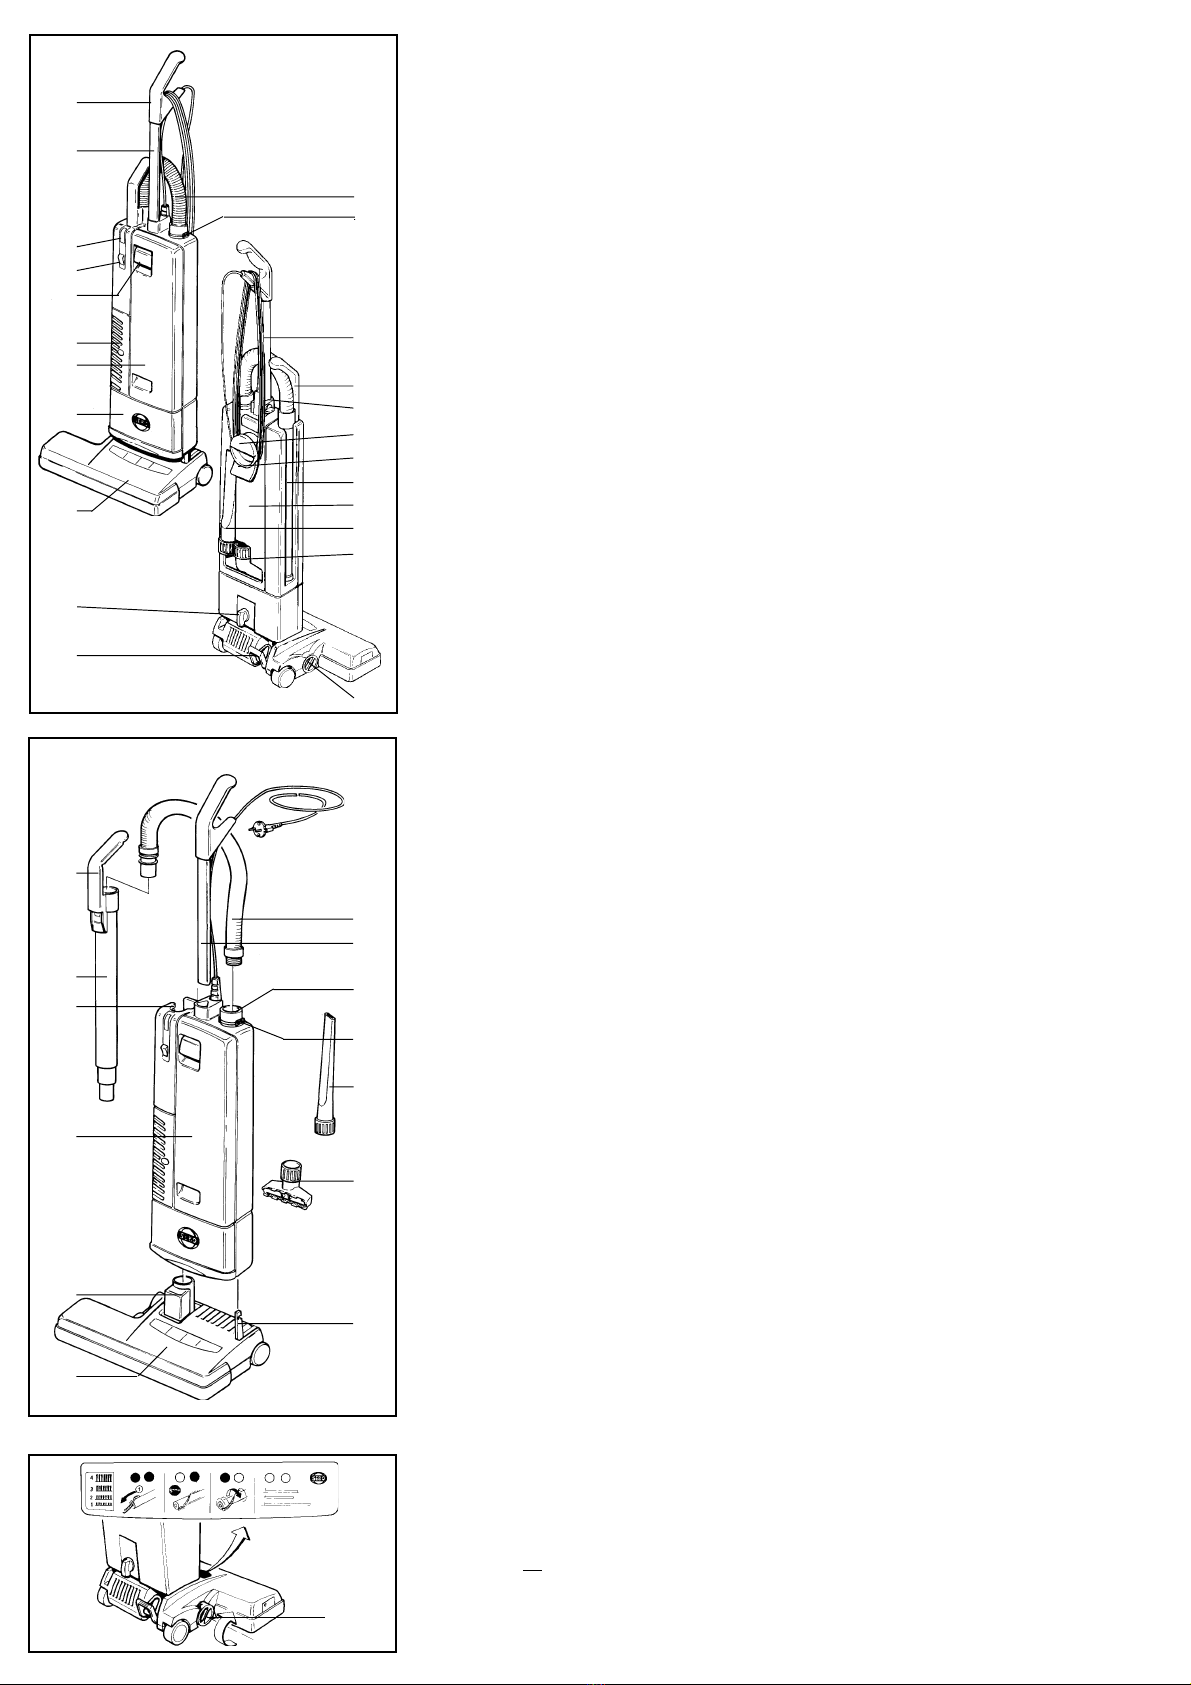
Universalstaubsauger 470 electronic
1 Griff
2 Stiel
3 Filterfüllanzeige
4 Schalter
5 Deckelschloß
6 Ausblasgitter
7 Deckel
8 Motordeckel
9 Elektrobürste
10 Verriegelungsknopf
11 Rastpedal
12 Schlauch
13 Sicherungsring
14 Anschlußleitung
15 Handgriff des Teleskopsaugrohres
16 Exzenterhebel
17 Griffmulde / Tragegriff
18 Leitungshaken
19 Teleskopsaugrohr
20 Filtergehäuse
21 Fugendüse
22 Polsterdüse
23 Stellknopf
1 Handle grip
2 Handle assembly
3 Bag full indicator
4 On / Off switch
5 Cover release latch
6 Exhaust filter cover
7 Front cover
8 Motor cover
9 Power head
10 Locking catch
11 Foot pedal
12 Hose
13 Retaining ring
14 Cable
15 Attachment tube handle
16 Handle catch
17 Carrying handle
18 Cable hook
19 Attachment tube
20 Dust bag housing
21 Crevice nozzle
22 Upholstery nozzle
23 Pile adjustment knob
Carpet Vacuum
Inbetriebnahme / Preparation Bürstenkontrolle
Die Bürstenkontrolle überwacht ständig die
Funktion der Bürste.
Grün-Licht: Bürste arbeitet gut
Grün- und Rot-Licht: Teppichbürste durch
Drehen des Stellknopfes (23) auf niedrigere
Zahl einstellen.
Bei Stellung 1.... Grün- und Rotlicht muß
der Bürstenstreifen gewechselt werden.
Rot-Licht: Die Bürste wurde blockiert oder
überlastet. Gerät ausschalten, Netzstecker
ziehen, Bürste auf Verunreinigung prüfen.
23
Brush controller
The electronic brush controller monitors the
operation of the brush.
Green light: Brush correctly set and running.
Green light and red light: Adjust the brush
setting by turning the Pile adjustment knob (23)
to a lower number.
If the lights still show at position number one
the brush strip is worn out and must be replaced.
Red light: The brush has become blocked and
is not turning. Switch off. Unplug from the outlet
and clear the blockage.
1
2
3
4
5
6
7
8
9
10
11
15
19
24
20
26
9
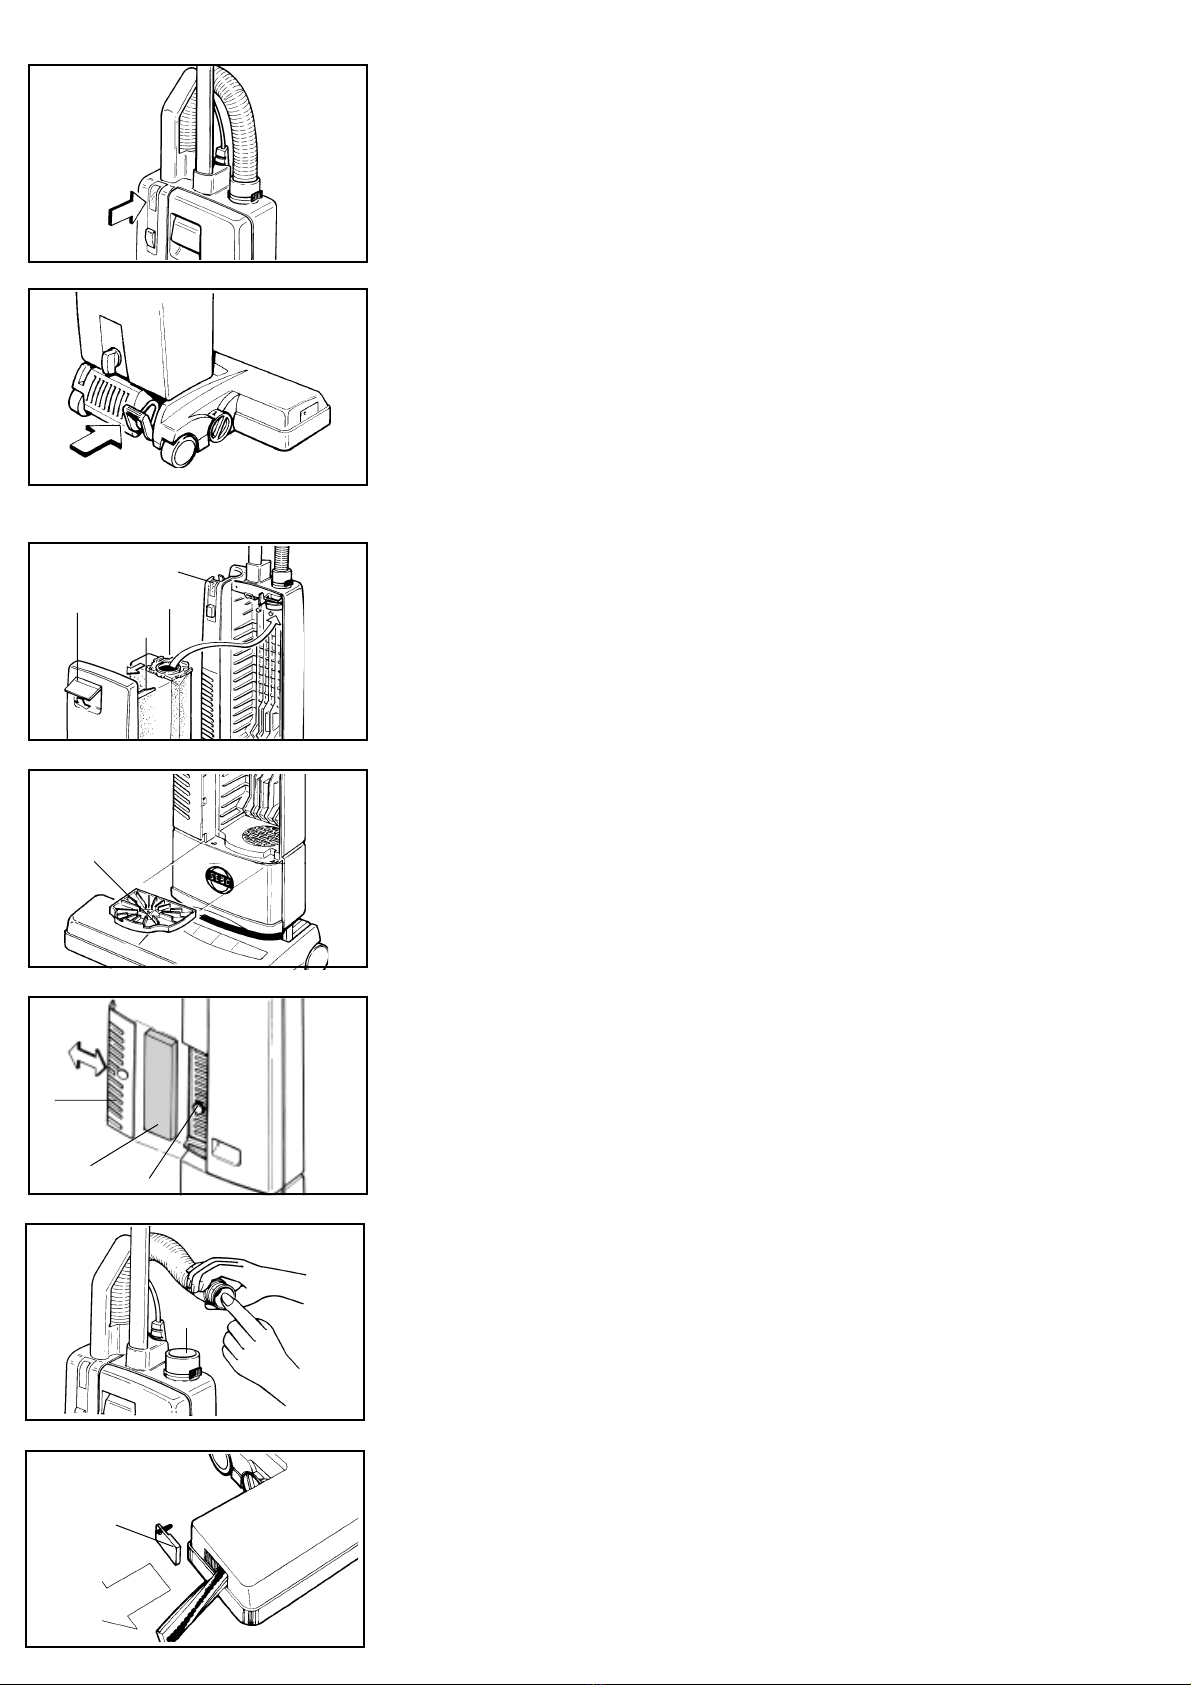
Inbetriebnahme
Elektrobürste (9) auf ebene Unterlage
stellen, Gelenk (26) und Gelenkarm (27)
senkrecht aufrichten. Verriegelungsknopf
(10) am Filtergehäuse (20) ca. 45°nach links
drehen, Filtergehäuse senkrecht auf Gelenk
und Gelenkarm aufstecken und
Verrriegelungsknopf wieder nach rechts in
senkrechte Stellung drehen.
Für die Stielbefestigung den Exzenterhebel
(16) am Filtergehäuse(20) nach vorn drehen,
Stiel (2) in Aufnahme im Filtergehäuse
stecken bis der Stiel im Gehäusegrund
aufstößt, Exzenterhebel nach hinten drehen.
Teleskopsaugrohr (19) in seitliche Gehäuse-
mulde einführen und nach unten in die
Gehäuseöffnung drücken, der Handgriff des
Teleskopsaugrohres (15) muß sich dabei
über den Nocken (24) schieben. Die
passende Schlauchseite in das Teleskop-
saugrohr (19) einführen.
Zum Anschließen des Schlauches (12) an
das Filtergehäuse, das Ende mit der
schwarzen Buchse in die Verbindungshülse
(25) einführen und ganz einschieben. Zum
Lösen des Schlauchs den Sicherungsring
(13) an den Griffflächen zusammendrücken.
Assembling the vacuum cleaner
Put the power head (9) on the floor with swivel
neck (26) and support lever (27) upright. Turn
the locking catch (10) on the filter bag housing
(20) to the left and place it carefully on the
swivel neck and the support lever. Then turn
the locking catch back.
To lock the handle turn the handle catch (16)
at the handle joint of the filter bag housing (20)
forward, then slide the handle assembly (2) in
as far as possible and lock it with the handle
catch.
Insert the attachment tube (19) into its storage
position on the side of the machine. The
attachment tube handle (15) must be placed
on the projection (24). Slide the proper end of
the hose into the tube (19).
To connect the hose with the filter bag housing
insert the black hose end into the connecting
tube (25) and slide it in completely. To unlock
the hose press the retaining ring (13) at the
projecting sections.
12
2
25
13
21
22
27
12
13
14
15
16
17
18
19
20
21
22
23
Inbetriebnahme / Preparation
Filterfüllanzeige
Bei Aufleuchten der Kontrolleuchte (3) bitte
prüfen:
a) ist die Filtertüte voll ?
b) ist die Teppichbürste verstopft ?
c) ist der Saugschlauch verstopft ?
Entweder Filtertüte wechseln oder Verstop-
fung beseitigen. Es liegt keine Störung vor,
wenn beim Saugen mit dem Saugschlauch
das Handrohr verschlossen wird und die
Lampe aufleuchtet.
Gelenkraste
Die Gelenkraste (11) arretiert den Universal-
sauger in senkrechter Ruhestellung, zum
Arbeiten Rastpedal treten und Gerät nach
hinten kippen.
Wartung / Maintenance
Filtertüten wechseln
Filtertüte bei Rotlicht (3) wechseln. Deckel-
schloß (5) - nach vorn ziehen und Deckel vom
Gehäuse abnehmen. Rastenlaschen seitlich
an der Filterplatte (28) zusammendrücken und
die Filtertüte aus dem Filterhalter (29) ziehen.
Neue Filtertüte in die Führung des Filterhalters
einschieben und fest nach hinten drücken.
Deckel wieder in das Gehäuse einhängen und
zuklappen, jetzt Deckelschloß schließen.
Motorschutzfilter wechseln
Motorschutzfilter (30, Art.-Nr. 1825) bei
Verschmutzung durch Ausklopfen reinigen.
Nach etwa 20 Filtertüten wechseln . Motor-
schutzfilter vorn in der Mitte leicht anheben
und aus der Führung ziehen. Anstelle des
Motorschutzfilters ist ein Hospital-Grade-
Mikrofilter erhältlich (Art.-Nr. 1875).
Abluftfilter wechseln
Den Abluftfilter (31, Art.-Nr. 1878) immer
zusammen mit dem Motorschutzfilter (30),
bzw. Mikrofilter wechseln. Dazu den Rast-
knopf (45) drückenund das Ausblasgitter (6)
zur Seite abziehen.
Das Gerät niemals ohne Filter betreiben.
3
11
3
5 28
29
30
6
31 45
Filter level indicator
If warning light (3) comes on check:
a) Is the dust bag full ?
b) Is there a blockage in the hose or power
head ?
Swivel neck latch
To release the machine from the upright
position depress the foot pedal (11)
Changing the paper bag
If red light (3) shows, change paper filter
bag. To do this first pull cover release latch
(5) - forward and lift the cover from the dust
bag housing. Slide the dust bag sealing plate
(28) from the holder (29). Slide the sealing
plate (28) of a new bag into the holder and
push firmly in. Insert cover into dust bag
housing. Push it forward then lock it in place
by pushing down the cover release latch.
Do not re-use bags.
Do not wash filters.
Changing the motor filter
Motor filter (30, Art.-Nr. 1825) needs to be
replaced latest after the use of 20 filter bags.
Lift the front of the filter slightly and slide it out
of its slots. Instead of the motor filter a
‘Hospital-Grade‘-microfilter is available
(Art.-Nr. 1875).
Changing the exhaust filter
Change the exhaust filter (31, Art.-Nr.1878)
always with the motor filter (30). Press the
button and slide the exhaust cover (6) to the
side.
Never use the machine without correctly
attached filters.
Verstopfungen beseitigen
Verstopfungen im Schlauch werden entfernt,
in dem der Schlauch mit dem im Teleskop-
rohr befindlichen Ende in die Verbindungs-
hülse (25) gesteckt wird. Das dann freie Ende
einige Male bei eingeschaltetem Gerät mit
der Handfläche verschließen und wieder frei
geben. Niemals versuchen den Pfropfen mit
einem Stab herauszudrücken.
Borstenstreifen wechseln
Zum Borstenstreifenwechsel die Verschluß-
kappe (32) von der Teppichbürste abschrau-
ben. Bürstenwalze so drehen, daß sich der
Borstenstreifen durch das seitliche Loch
herausschieben läßt. Neuen Borstenstreifen
ganz einschieben und Verschlußkappe
wieder anschrauben.
Clearing blockages
Blockages in the hose can cleared by taking
the hose off the machine and replacing it the
wrong way round in the connecting tube (25),
holding it upright with one hand blocking the
top and switching on the machine. If
necessary rapidly lift your hand on and off
the end of the hose.
Changing the brush strip
To replace brush strip: Remove brush strip
cover (32). Turn brush roller so that the brush
strip can then be pulled out. Ensure that the
new brush strip is fully inserted.
N.B. Replace the brush strip before the
bristles wear down to the level of the support
rod.
25
32
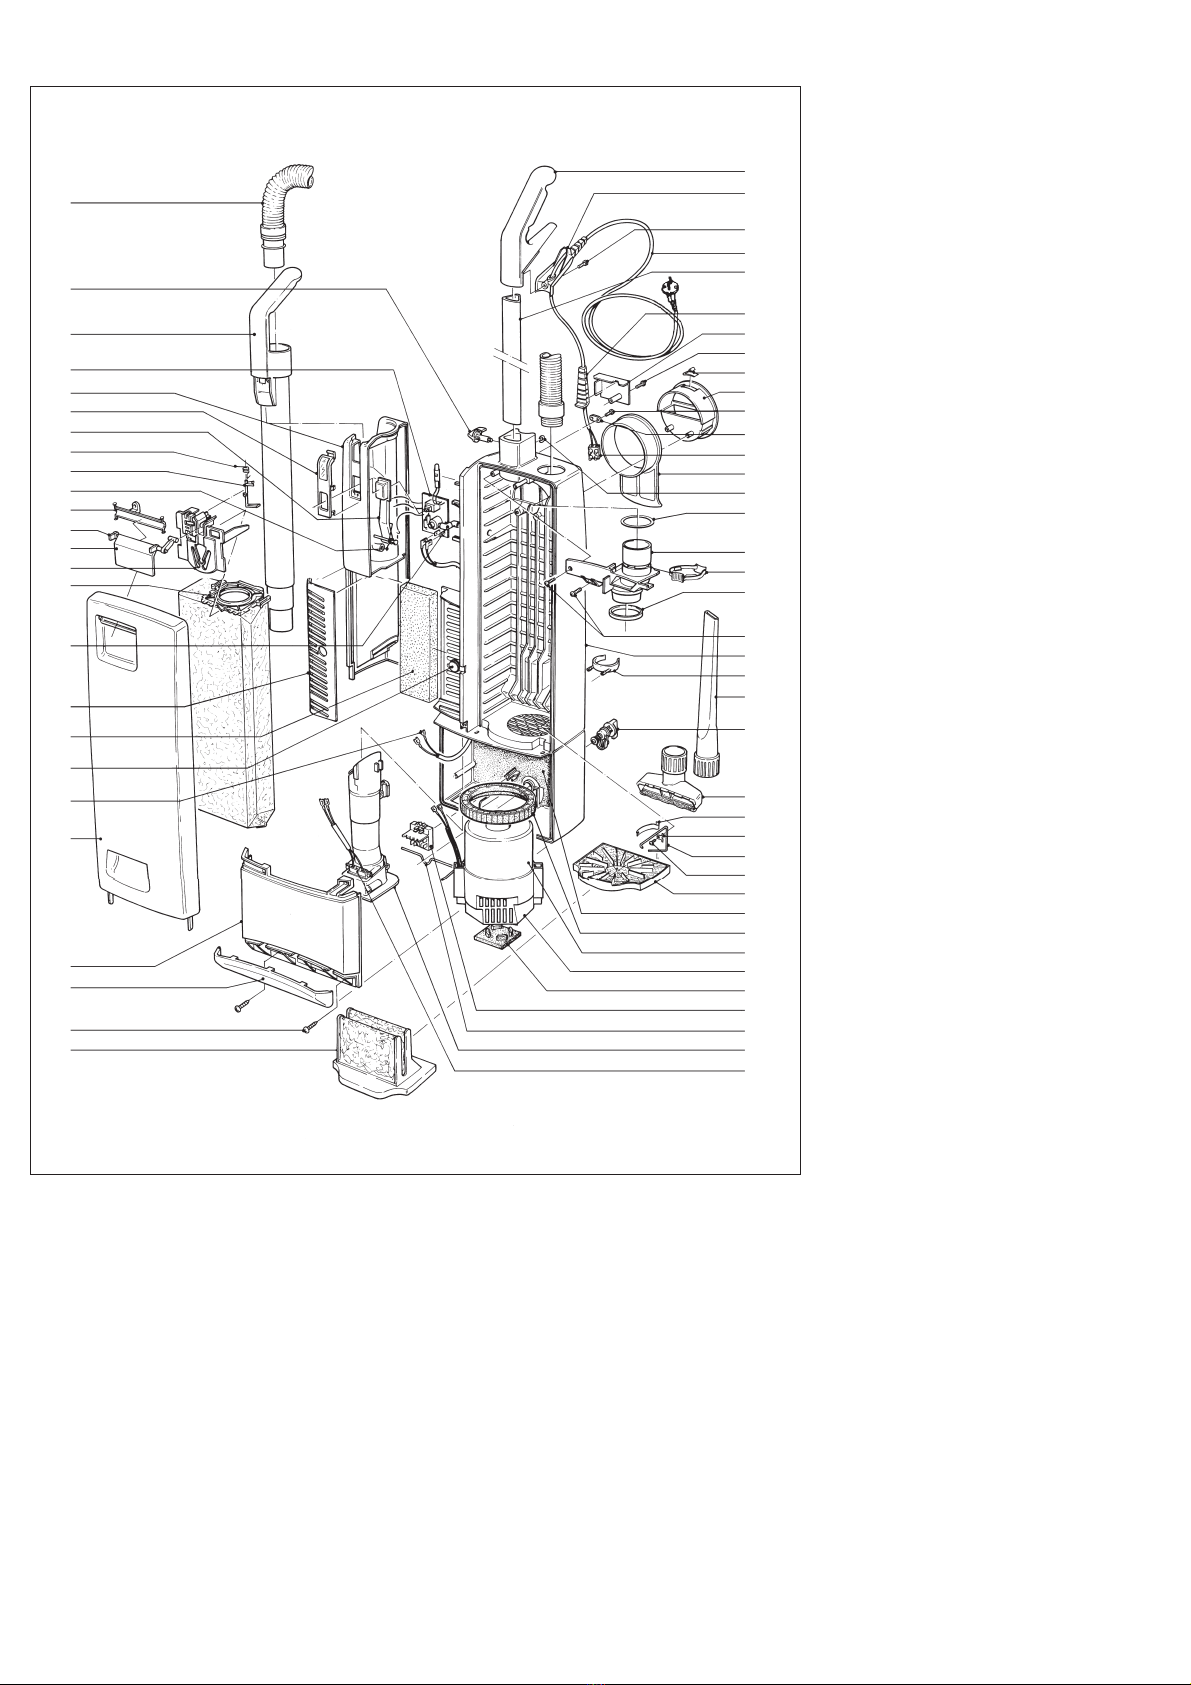
Pos. Product- Description
Code
1 1037 EH Handle grip (incl. Pos. 2)
2 1596 hg Handle grip back with grommet
3 0127 ER Screw Taptite M 4 x 10
4 1870 dg Cable with EU-Plug
1872 dg Cable with GB-Plug
1873 dg Cable with ZA-Plug
1874 hg Cable with AUS-Plug
1911 Cable with USA-Plug
5 1848 Handle tube
6 1831 hg Dust bag housing
7 1835 dg Internal cover
8 5289 Seal
9 5043 Seal
10 5424 dg Retaining ring
11 1823 hg Attachment clip
12 5359 dg Grommet
13 0502 Terminal block
14 1030 UL Cable clamp
15 1812 hg Cover
16 1814 hg Carrying handle
17 5146 Stop spring
18 1813 hg Cable hook
19 1859 dg Handle catch
55
19
54
35
37
38
39
51
52
40
49
48
47
50
53
36
43
42
61
41
46
44
45
58
60
1
2
3
4
5
12
15
58
17
16
59
14
13
18
20
9
7
10
8
58
6
11
57
21
56
31
32
33
58
34
26
27
28
29
30
23
22
24
25
Pos. Product- Description
Code
20 0161 ER Clip 4 DIN 6799
21 0850 dg Locking catch
22 1811 Locking rod
23 1012 N Terminal block
24 1807 hg Connector
25 1836 Female contact holder
26 1851 Sound insulation
27 1047 Vacuum motor seal
28 1844 Vacuum motor 230 V (incl. Pos. 29 + 30)
1845 Vacuum motor 240 V (incl. Pos. 29 + 30)
1843/2 Vacuum motor 120 V (incl. Pos. 29 + 30)
05118 S Carbon brush vac motor (230 / 240 V)
05117 S Carbon brush vac motor (120 V)
29 1821 Motor cover
30 1822-1 Support for Motor
31 1027 Leaf spring
32 1073 Clamp
33 1824 Connecting rod
34 1825 Vacuum motor filter
35 1934 ER Printed circuit board 230 / 240 V
36 1860 Fitting
37 1852 hg Suction pipe cover
38 1869 hg Lens, bag light indicator
Pos. Teile- Benennung
Nr.
1 1037 EH Griff (incl. Pos. 2)
2 1596 hg Griffabdeckung
3 0127 ER Spiralformschraube M 4 x 10
4 1870 dg Anschlußleitung m. K-Stecker
1871 dg Anschlußleitung m. CH-Stecker
5 1848 Stiel
6 1831 hg Gehäuse
7 1835 dg Abdeckung, vorm.
(incl. Pos. 8 + 9)
8 5289 Dichtring
9 5043 Dichtring
10 5424 dg Sicherungsring
11 1823 hg Zubehörclip
12 5359 dg Kabeltülle
13 0502 Klemmleiste 2-pol.
14 1030 UL Zugentlastungsschelle
15 1812 hg Deckel
16 1814 hg Kabelhakenaufnahme
17 5146 Kabelhakenfeder
18 1813 hg Kabelhaken
19 1859 dg Exzenterhebel
20 0161 ER Sicherungsscheibe
21 0850 dg Verriegelungsknopf, kpl.
22 1811 Verriegelungsstange
23 1012 N Kontaktsockel, kpl.
24 1807 hg Verbindungsstück
25 1836 Kontaktaufnahme, kpl.
26 1851 Schalldämmungsmatte
27 1047 Gebläsedichtung
28 1844 Gebläsemotor 230 V
(incl. Pos. 29 + 30)
05118 S Kohlebürsten-Set
29 1821 Schalldämpfer
30 1822-1 Stützgummi
31 1027 Blattfeder
32 1073 Lasche
33 1824 Motorfiltergestänge
34 1825 Motorfilter
35 1934 ER Leiterplatte 230 / 240 V
36 1860 Verbindungsstück
37 1852 hg Saugrohrführung, vorm.
38 1869 hg Lampenabdeckung, vorm.
39 1830 dg Schaltertaste
40 1862 Schenkelfeder
41 1833 Innenleitung
42 1878 Abluftfilter
43 1802 hg Ausblasgitter
44 1853 SE Motordeckel, vorm.
45 1804 hg Stoßschutz
46 1846 hg Deckel, kpl.
47 1818 dg Schließhebel
48 6040 Dichtung
49 1819 Lagerdeckel
50 1847 Filterhalter, kpl.
51 5091 Drehfeder
52 1817 Sperrhebel
53 5093 N Filtertüte
54 5045 dg Handsaugrohr
55 5040 hg Schlauch
56 1491 dg Polsterdüse
57 1092 dg Fugendüse
58 0102 ER Linsenblechschraube 3,9 x 13
59 0103 ER Linsenblechschraube 3,9 x 16
60 1875 Mikrofilter (Sonderzubehör)
61 1884 hg Rastknopf
Pos. Product- Description
Code
39 1830 dg Switch button
40 1862 Return spring
41 1833 Internal cable
42 1878 Exhaust filter
43 1802 hg Exhaust filter cover
44 1853 SE Motor cover
45 1804 hg Dust bag housing bumper base
46 1846 hg Front cover cpl.
47 1818 dg Cover release
48 6040 Seal
49 1819 Cover
50 1847 Bag holder
51 5091 Safety catch spring
52 1817 Safety catch
53 5093 N Paper bag (packed in 10)
54 5045 dg Extension tube without hose
55 5040 hg Hose
56 1491 dg Upholstry nozzle
57 1092 dg Crevice nozzle
58 0102 ER Screw 3,9 x 13
59 0103 ER Screw 3,9 x 16
60 1875 Micro filter (Optional)
61 1884 hg Retaining button
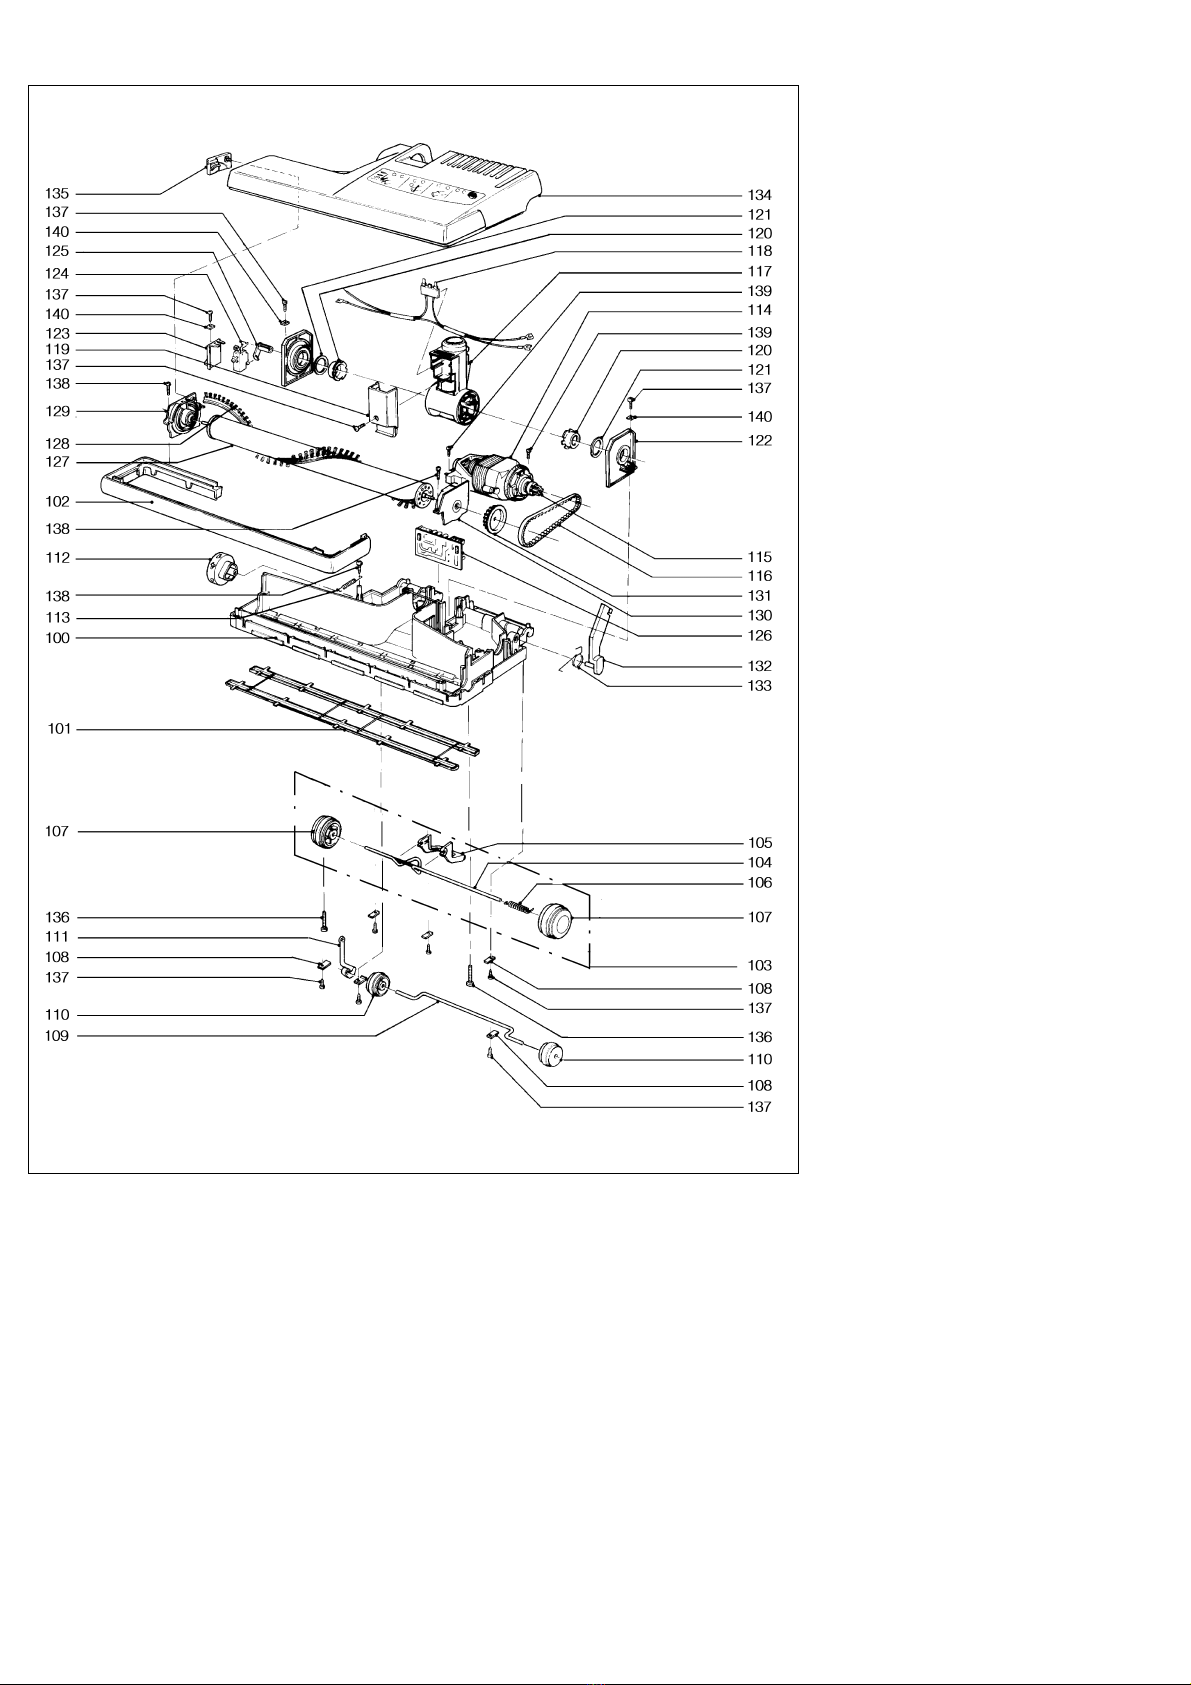
Pos. Teile- Benennung
Nr.
100 4611 hg Unterteil
101 4004 ER Bodenleiste
102 4522 hg Stossbandage
103 4617 hg Achse, kpl.
104 4523 Achse
105 2528 or Rastpedal
106 2010 Drehfeder
107 4603 hg Laufrolle
108 2014 Lasche
109 4006 Stellachse
110 2608 hg Stellrolle
111 4012 Stellhebel
112 2622 hg Stellknopf
113 4019 Zugfeder (Stellhebel)
114 4069 ER Bürstenmotor 230 V
05084 S Kohlebürsten-Set
115 2025 Zahnriemenritzel
116 4024 Zahnriemen
117 4605 hg Gelenk, kpl.
118 4606 Flachsteckeraufnahme, kpl.
119 2602 hg Gelenkdeckel
120 2467 Gelenklagerbuchse
121 0155 ER Paßscheibe
122 2613 Gelenklager
123 2453 Schalterhalter
124 0531/1 Mikroschalter
125 4601 Schalthebel
126 4533 ER Leiterplatte 230 V
127 4033 ER Bürstenwalze mit Streifen
128 4028 Bürstenstreifen
129 2047 Loslager
130 2091 Festlager
131 2458 Antriebsrad
132 2629 hg Gelenkarm
133 2545 Drehfeder
134 4613 SE Oberteil, kpl.
135 2542 Verschlusskappe
136 0111 ER Linsenschraube M 5 x 30
137 0102 ER Linsenblechschraube 3,9 x 13
138 0103 ER Linsenblechschraube 3,9 x 16
139 0174 ER Linsenblechschraube 3,9 x 22
140 0141 ER Klemmscheibe
Pos. Product- Description
Code
100 4611 hg Chassis
101 4004 ER Metal plate
102 4522 hg Bumper
103 4617 hg Axle, cpl.
104 4523 Axle
105 2528 or Foot pedal
106 2010 Axle spring
107 4603 hg Wheel
108 2014 Axle clamp
109 4006 Pile adjustment axle
110 2608 hg Pile adjustment wheel
111 4012 Pile adjustment lever
112 2622 hg Pile adjustment button
113 4019 Spring
114 4069 ER Brush motor 230 V
4070 ER Brush motor 240 V
4022 ER Brush motor 120 V
05084 S Carbon brush motor (230/240 V)
05095 S Carbon brush motor (120 V)
115 2025 Motor pulley
116 4024 Drive belt
117 4605 hg Swivel neck assembly
118 4606 Wire on swivel neck, cpl.
119 2602 hg Swivel neck cover
Pos. Product- Description
Code
120 2467 Swivel neck plastic bear
121 0155 ER Washer
122 2613 Swivel support
123 2453 Micro switch support
124 0531/1 Micro switch
125 4601 Switch lever
126 4533 ER Electronic controller 230 V
4534 ER Electronic controller 240 V
127 4033 ER Brush assembly
128 4028 Brush strip
129 2047 Bearing block R.H.
130 2091 Bearing block L.H.
131 2458 Brush roller pulley
132 2629 hg Support lever
133 2545 Return spring
134 4613 SE Cover, cpl.
135 2542 Brush strip cover
136 0111 ER Screw M 5 x 30
137 0102 ER Screw 3,9 x 13
138 0103 ER Screw 3,9 x 16
139 0174 ER Screw 3,9 x 22
140 0141 ER Washer
SEBO (UK) Ltd - The Merlin Centre
Cressex Business Park, High Wyc mbe, Bucks HP12 3QL.
Ph ne: 0 14 94 - 46 55 33 , Fax: 0 14 94 - 46 10 44, www.seb .c .uk
©2010 SEBO Stein&C . GmbH ®Registered Trademark. Subject t change.
SEBO Stein&C . GmbH, Wülfrather Straße 47-49, 42553 Velbert, Germany
Telef n +49 (0) 20 53 / 89 81, Telefax +49 (0) 20 53 / 89 85, www.seb .de
©2010 SEBO Stein&C . GmbH ®Eingetragenes Warenzeichen. Technische Änderungen v rbehalten.
MADE IN GERMANY
8
Art.-No. 06253D-11.2010
Other manuals for 470 Comfort
1
Table of contents
Other Sebo Vacuum Cleaner manuals

Sebo
Sebo Vacuum Cleaner User manual

Sebo
Sebo X-Series User manual

Sebo
Sebo Professional G2 User manual

Sebo
Sebo Automatic XP2 User manual

Sebo
Sebo ET-C User manual

Sebo
Sebo 300 EVOLUTION User manual

Sebo
Sebo Professional G1 User manual

Sebo
Sebo BS 36 Comfort User manual

Sebo
Sebo AIRBELT E1 BOOST User manual

Sebo
Sebo 470 Comfort User manual


