Secabo TS5 Economy User manual

OPERATING INSTRUCTIONS
for the modular transfer press
Secabo TS5 Economy
Congratulations on the purchase of your Secabo heat press!
To ensure that you can start production smoothly with your machine, please read these operating
instructions carefully.
Any form of reproduction of these operating instructions requires the written permission of Nepata
Vertrieb GmbH. Technical data and product features are subject to change and errors excepted.
Nepata Vertrieb GmbH accepts no liability for direct or indirect damage resulting from the use of
this product.
Version 1.0 (13.10.2022)
1

Nepata Vertrieb GmbH | Hochstatt 6-8 | 85283 Wolnzach | Germany | [email protected] | www.secabo.com
2
Safety Precautions
Please read these instructions and precautions carefully before operating the unit for the first
time!
●Never put your hands into the heat press when it is connected to the power supply,
especially when it is switched on and heated up - risk of burns!
●Never open the housing and do not make any changes to the unit yourself.
●Should it be necessary to open the heating plate cover after explicit request by the Nepata
Vertrieb GmbH customer service, it is recommended to wear respiratory protection and to
handle the insulation wool inside with gloves. The possible disposal of the insulation wool
should only be carried out in a closed bag.
●Make sure that neither liquids nor metal objects get inside the heat press.
●Make sure that the socket outlet used is earthed. Note that a heat press may only be
operated from a socket outlet that is earthed by a
The unit is protected by a residual current circuit breaker.
●Disconnect the heat press from the mains when not in use.
●Always operate the heat press out of the reach of children and never leave the machine
switched on unattended.
●Make sure that the unit is only used in dry rooms.
If you are unable to meet one or more of the above safety requirements, or if you are
unsure whether they all apply, please contact our technical support.
Nepata Vertrieb GmbH | Hochstatt 6-8 | 85283 Wolnzach | Germany | [email protected] | www.secabo.com
3
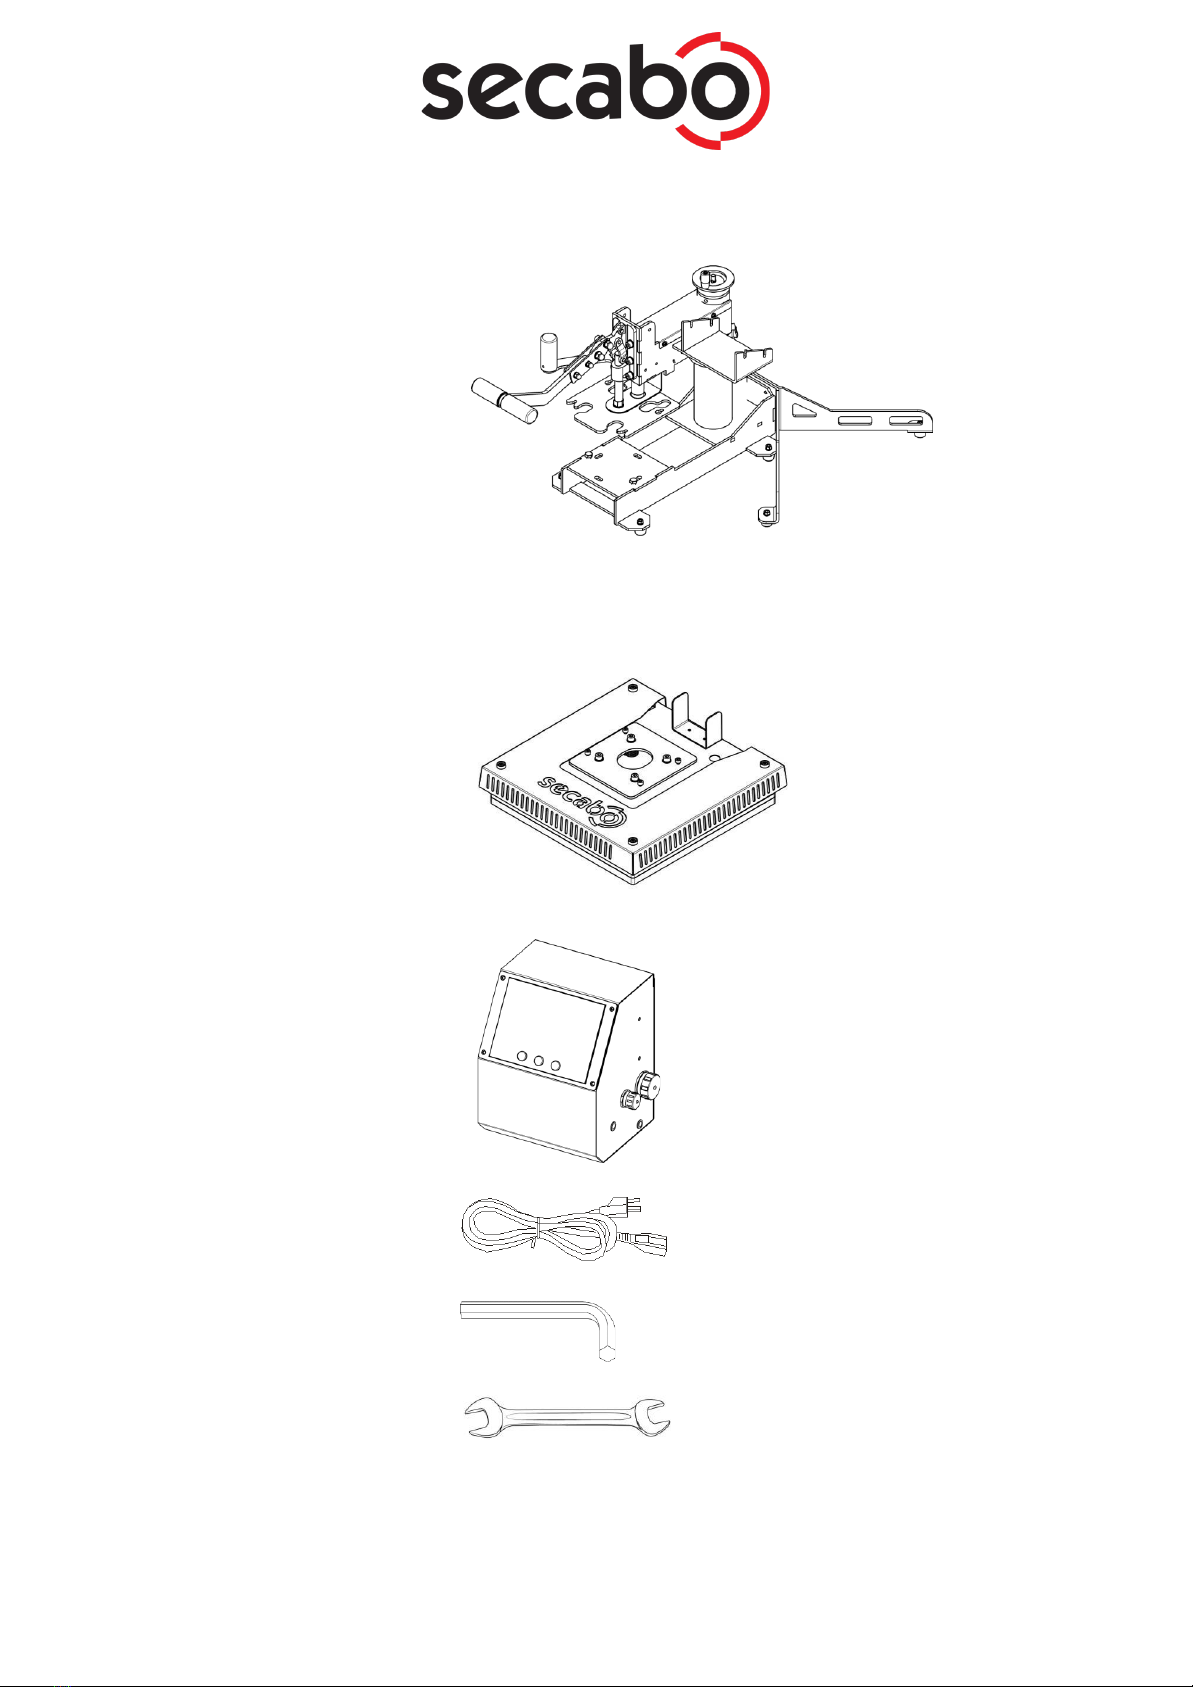
Scope of delivery
Frame of the transfer press
Hot plate and base plate
HP5 - 38cm x 38cm
Controller Box
CL01
C13 cold appliance connection
cable
Allen key size 5 for M6
hexagon socket screws
Double open-end spanner 13 for M8 hexagon
head screws

Nepata Vertrieb GmbH | Hochstatt 6-8 | 85283 Wolnzach | Germany | [email protected] | www.secabo.com
4
Device description
a. Main switch
b. LCD display
c. Control panel with push buttons
d. Hand crank for pressure adjustment
e. Press lever
f. Hot plate cover and hot plate
g. Base plate
h. IEC socket
i. Hot plate connection
j. Support feet
Nepata Vertrieb GmbH | Hochstatt 6-8 | 85283 Wolnzach | Germany | [email protected] | www.secabo.com
5
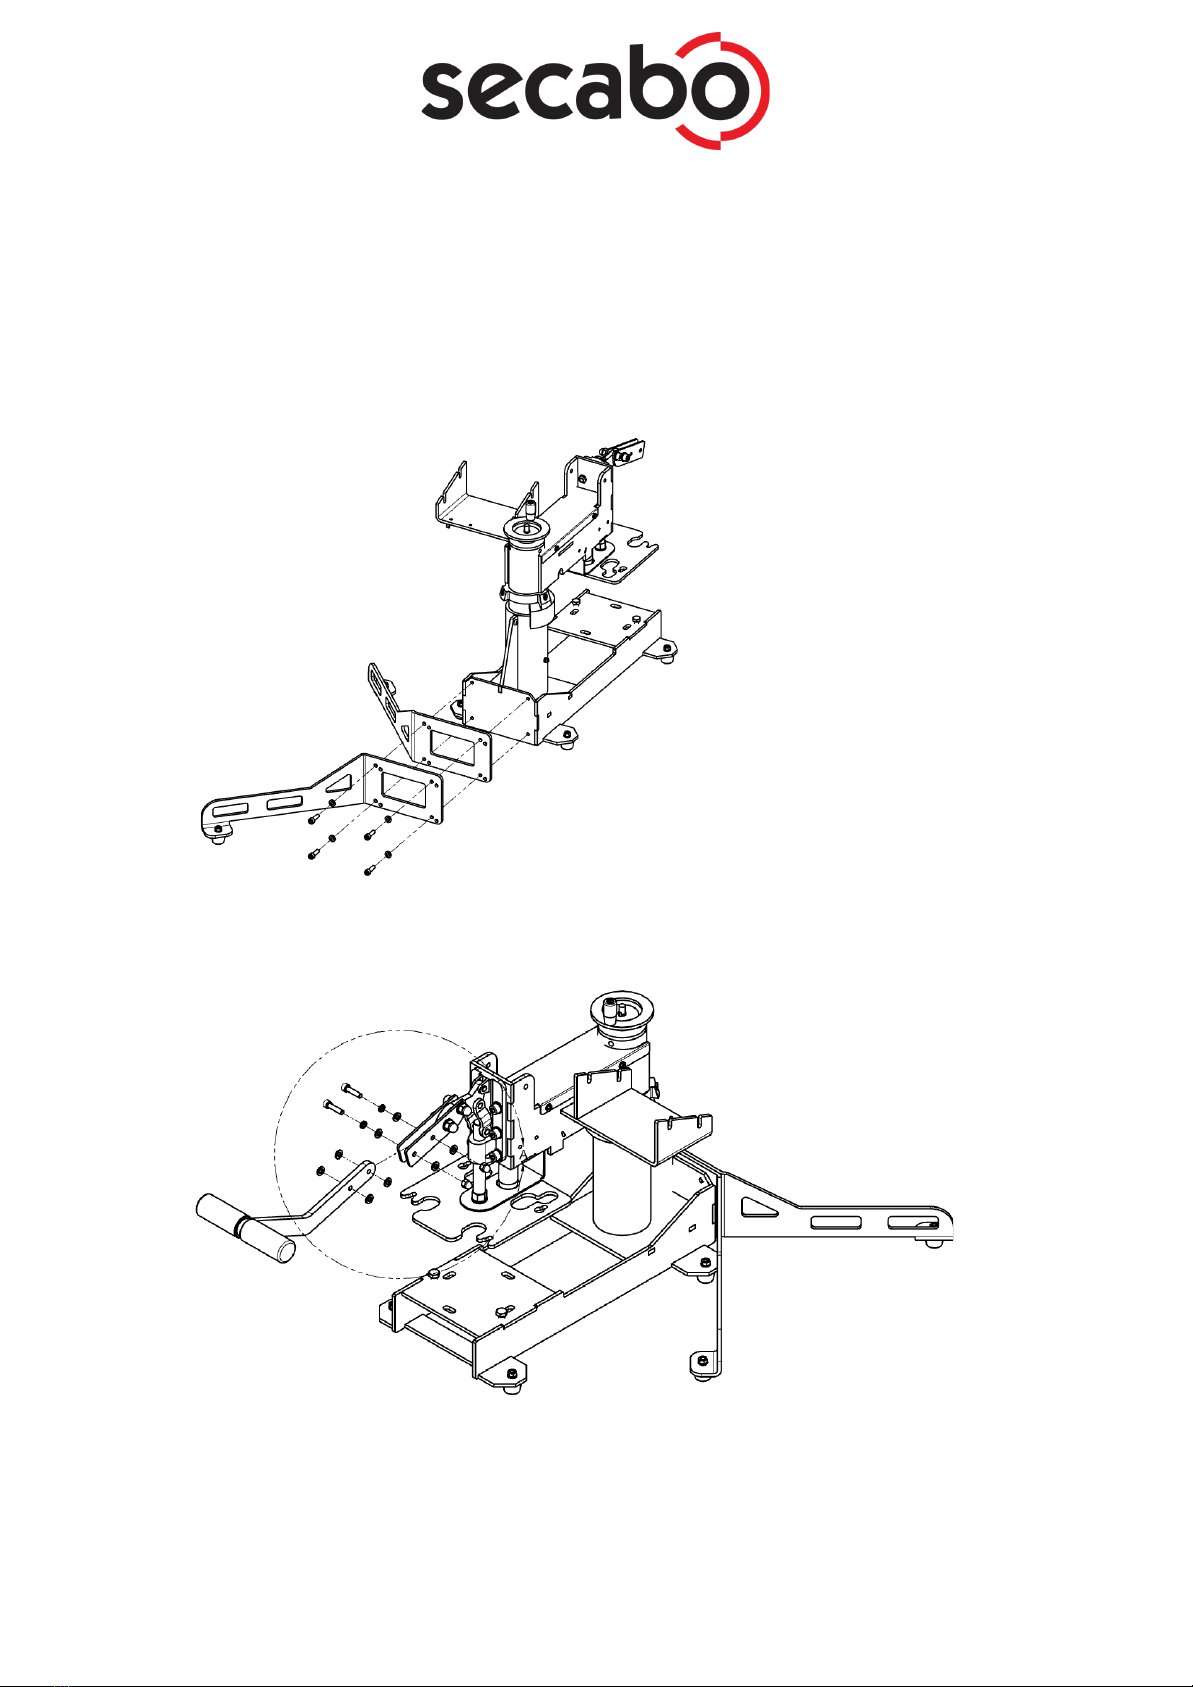
Assembly and commissioning
●Place the stand of the TS5E securely on a stable table.
●Please remove the cable tie, which serves as an anti-twist device, at the very end!
●Mount the enclosed support feet as shown in the illustration below. Use the 4 M6
washers and 4 M6x20 screws.
●Connect the press lever to the frame of the TS5E using screws and washers.

Nepata Vertrieb GmbH | Hochstatt 6-8 | 85283 Wolnzach | Germany | [email protected] | www.secabo.com
6
●Now attach the swivel handle as shown in the illustration. Use the two M6x16 mm
screws and the two M6 washers for this. After this step you can remove the cable tie
so that you can swing the heat press open.

Nepata Vertrieb GmbH | Hochstatt 6-8 | 85283 Wolnzach | Germany | [email protected] | www.secabo.com
7
●Lift the base plate over the frame of the TS5E and thread the screw heads of the
hexagonal screws through the keyhole milled holes on the adapter plate on the underside
of the base plate. (For simplicity, the illustration shows only the adapter). Slide the base
plate in the direction of the arrow until it touches the screws and tighten the screws.

Nepata Vertrieb GmbH | Hochstatt 6-8 | 85283 Wolnzach | Germany | [email protected] | www.secabo.com
8
●Position the HP5 heating plate diagonally in front of the connection flange below
the press lever on the rack and thread the 4 outside screw heads into the
keyhole milled holes on the flange plate.
●Carefully tighten the screws with the Allen key supplied. Caution, the heating plate can
fall down as long as the screws are not tightened! Risk of injury!
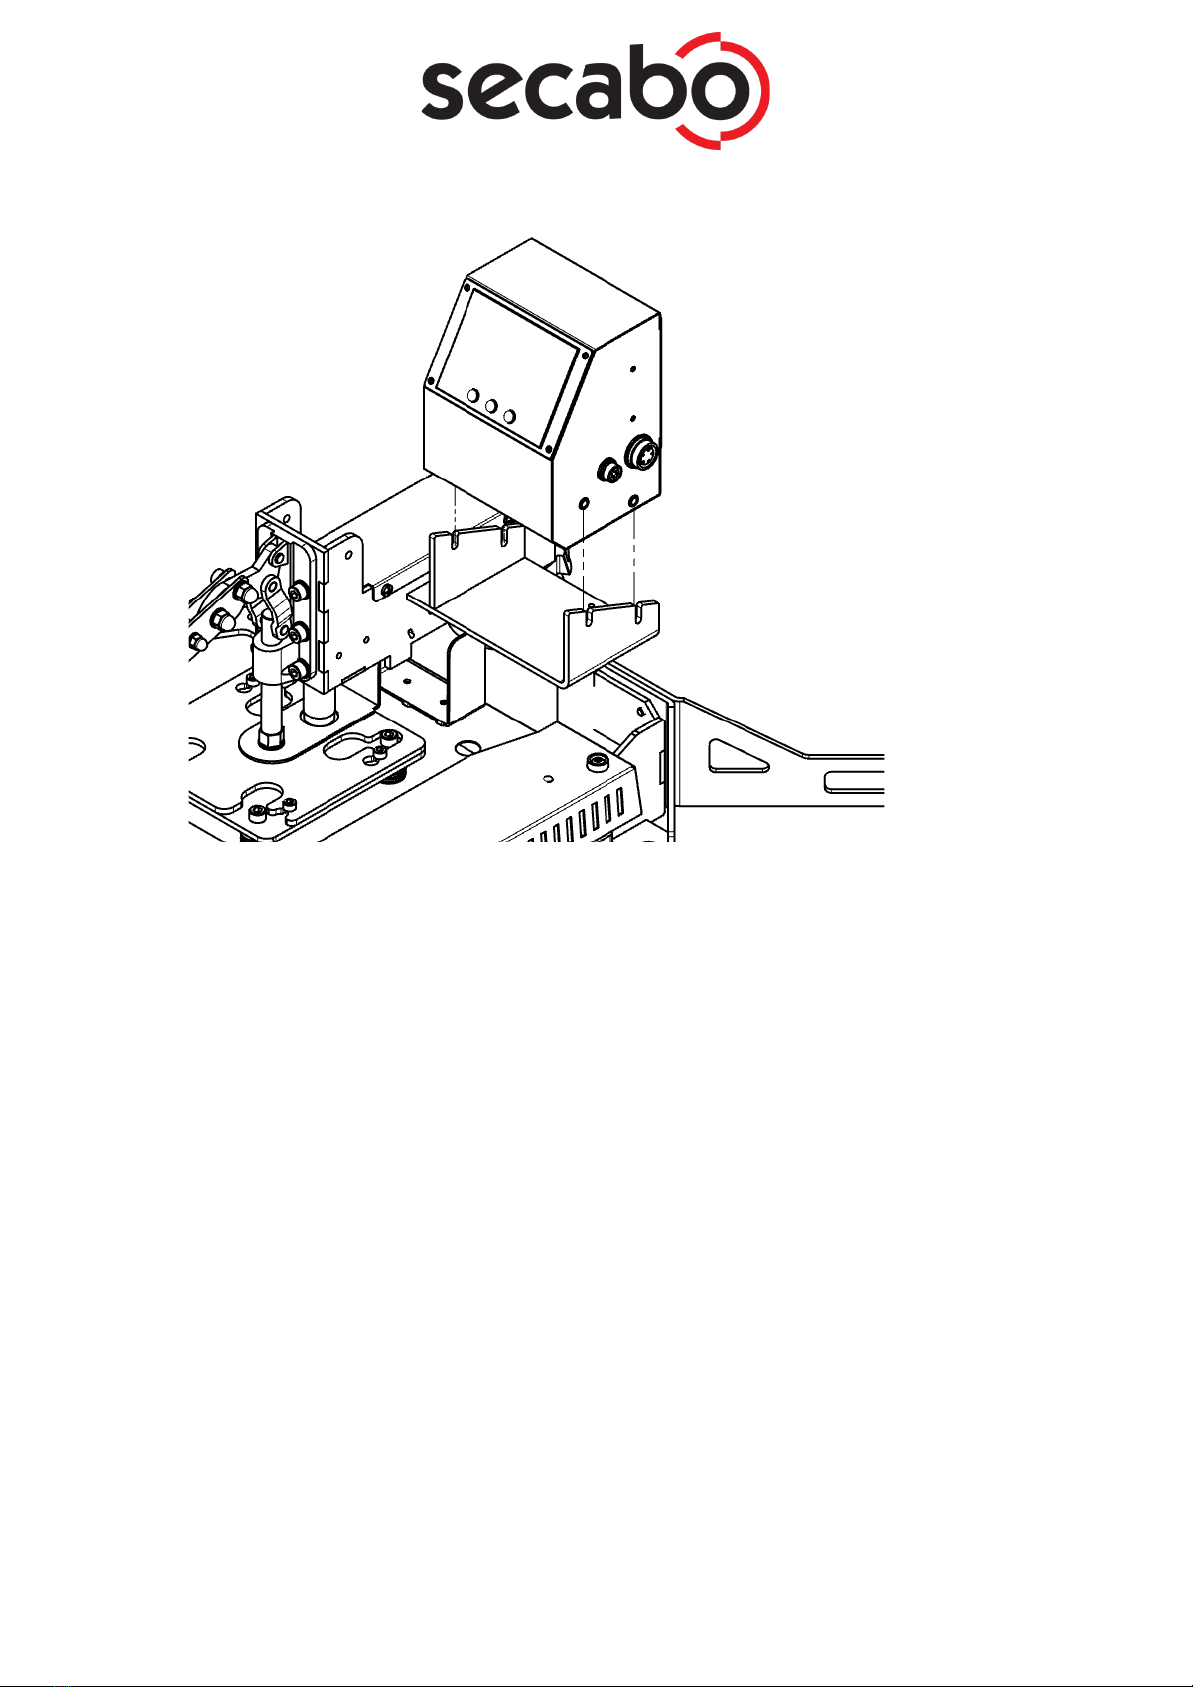
●Place the controller as shown in the picture below, before doing this loosen the
thumbscrews so that there is enough space between the screw and the controller box.
After placement, please tighten the thumbscrews so that the controller is fixed.
Nepata Vertrieb GmbH | Hochstatt 6-8 | 85283 Wolnzach | Germany | [email protected] | www.secabo.com
9
●Attach the large 5-pin plug from the surface of the heating plate to the matching socket
on the outside right of the CL01 controller box.
●Now attach the protective conductor cable (earthing) of the controller box to the
connection point under the receptacle of the controller box (not shown). Attention, this
must never be neglected!
●Plug the supplied C13 IEC power cable into the back of the CL01 controller box and
connect it to an earthed socket, which must have an earthed connection and a fuse as well
as an earth leakage circuit breaker.
The TS5E transfer press is now ready for operation.
Controller components and operation

Nepata Vertrieb GmbH | Hochstatt 6-8 | 85283 Wolnzach | Germany | [email protected] | www.secabo.com
10
Operation of the controller
●Connect the TS5E Transfer Press to the mains using the power cable supplied.
●Switch on the TS5E heat press.
●OFF" appears in the display.
●After switching on, "-f-" (Fahrenheit) or "-c-" (Celsius) appears.
●Use the arrow keys to select the desired temperature unit.
●Press the "OK" button. Now the "Temp" LED lights up.
●Use the arrow keys to select the desired temperature.
●Press the "OK" button. Now the "Time" LED lights up.
●Use the arrow keys to select the desired duration of the pressing process.
●Press the "OK" button. The display initially shows LO, from 100°C the current temperature
of the TS5E heat press is displayed. The press now heats up to the set temperature.
●An acoustic signal sounds when the heat press is heated up.
●Now the transfer press can be closed via the press lever to carry out transfers.
●When closing, the timer starts counting down.
●After the timer has expired, there is also an acoustic signal, after which you can open
the press.

Nepata Vertrieb GmbH | Hochstatt 6-8 | 85283 Wolnzach | Germany | [email protected] | www.secabo.com
11
Notes
●Note that the heating plate and the transfer objects are hot and there is a risk
of burns.
●Switch off the heat press when you do not need it.
Operation of the heat press
Carry out transfers
●Switch on the heat press via the main switch.
●The press now heats up to the set temperature.
●For information on how to change the settings on the controller, see the
previous chapters.
●After heating up, you can make the first transfers. The timer starts running as soon as the
press is closed with the press lever.
●3 seconds before the set time expires, a warning signal sounds (if activated in the
settings), after which the press can be opened.
●You can regulate the contact pressure by increasing or decreasing the distance between
the heating plate and the base plate by turning the hand crank on the top of the press.
Turning clockwise increases the contact pressure and turning anticlockwise decreases it.
●No setting can or should be changed during the pressing process.
Note: Please note that it takes a certain amount of time for the press to cool down again after
it has been switched off. There is a risk of burns until it has cooled down completely!

Nepata Vertrieb GmbH | Hochstatt 6-8 | 85283 Wolnzach | Germany | [email protected] | www.secabo.com
12
Maintenance and cleaning
All maintenance work should be carried out with the press switched off and cooled down. The plug
must be removed from the socket beforehand. Only carry out maintenance work after consulting
our technical support.
The press should be cleaned regularly with a soft cloth and a mild household cleaner to remove
adhesive residue, dust, etc. Do not use scouring pads, solvents or petrol!
Recommended times and temperatures
These values are only approximate, may vary from material to material and must be checked
before pressing.
Material
Temperature
Print
Pressing time
Flock foil
170°C - 185°C
338°F - 365°F
light-medium
25s
Flex foil
160°C - 170°C
320°F - 338°F
medium-high
25s
Sublimation flex
180°C - 195°C
356°F - 383°F
medium-high
10s - 35s
Sublimation on
cups
200°C
392°F
medium-high
150s - 180s
Sublimation on
200°C
high
120s - 480s
Tiles
392°F
(depending on the thickness of
the material)
Sublimation on
Piuzzles
200°C
392°F
light-medium
25s
Sublimation on
mouse pads
200°C
392°F
medium
20s - 40s
Sublimation on
textiles
200°C
392°F
medium-high
30s - 50s
Sublimation on
200°C
high
10s - 50s
Metal plates
392°F
(depending on the thickness of
the material)

Nepata Vertrieb GmbH | Hochstatt 6-8 | 85283 Wolnzach | Germany | [email protected] | www.secabo.com
13
Important note: Before each production, own tests should be made with the respective
transfer materials and carrier media. The above values and the manufacturer's
specifications are only indicative. Washing resistance and behaviour during transfer must
be determined in separate tests.
No guarantee can be derived from the recommended values. It is always up to the user to
determine and apply the settings that apply under his or her specific conditions.
Note for textile finishes: After the pressing process, the textiles must cool down before any
backing media can be removed from the transfer material. The hotmelt adhesive in the
transfer material has only developed its adhesive strength when cold. If the adhesive does
not adhere when cold, the pressing process may have been too cold or too short.

Nepata Vertrieb GmbH | Hochstatt 6-8 | 85283 Wolnzach | Germany | [email protected] | www.secabo.com
14
Technical data
Transfer press
Secabo TS5E
Type
manually opening modular folding press
Size work surface
38cm x 38cm
Pivot angle:
105 °, opening to the right
Max. Temperature
225 °C
Max. Time preselection
999s
Max. Working pressure
180 g/cm²
Pressure setting
Height adjustment of the heating plate by means of a
hand crank
Power supply
AC voltage 230V / 50Hz - 60Hz, 2 kW
Surroundings
+5°C - +35°C/ 30% - 70% humidity
Weight
37.5 kg
Weight with packaging
41 kg
Dimensions
with foot stabiliser:
W: 510 mm x D:800 mm H:530 mm
Dimensions open
(W x H x D)
W: 700 mm x D:818 mm H:685 mm

Nepata Vertrieb GmbH | Hochstatt 6-8 | 85283 Wolnzach | Germany | [email protected] | www.secabo.com
15
Declaration of Conformity - Statement of Conformity
We hereby declare on our sole responsibility that the product described under
"Technical data" complies with the provisions of the following EC
directives and standards:
We herewith declare under sole responsibility that the under "technical
data" mentioned product meet the provisions of the following EC
Directives and Harmonized Standards:
EG-Richtlinien / EC directives:
2014/35/EC Low Voltage Directive / 2014/35/EC
Low Voltage Directive
98/37/EG Maschinenrichtlinie (2006/42/EG vom 12/29/2009) /
98/37/EC Directive on machinery (from 2009-12-29: 2006/42/EC)
Norm / Standard: EN 60204-1:2006
Technische Dokumente bei / Technical documents at:
Nepata Vertrieb GmbH, Hochstatt 6-8, 85283 Wolnzach, Germany
Dipl. Ing. Fabian Franke
Dipl. Ing.(FH) Bernhard Schmidt
Table of contents
Other Secabo Power Tools manuals

Secabo
Secabo TC1 User manual

Secabo
Secabo TCC SMART User manual

Secabo
Secabo TC5 Smart User manual

Secabo
Secabo TC5 Smart User manual

Secabo
Secabo TCC Lite User manual

Secabo
Secabo TS-38 User manual

Secabo
Secabo TS7 User manual

Secabo
Secabo TC D2 User manual

Secabo
Secabo TMUG User manual

Secabo
Secabo TC5 Smart User manual


