Secabo TS-38 User manual

OPERATING INSTRUCTIONS
for heat press
Secabo TS-38
Congratulations on purchasing a Secabo heat press!
Please read these operating instructions carefully to ensure that you can start
production with your machine without problems.
Reproduction of these operating instructions in any form requires written approval by
Nepata Vertrieb mbH. We reserve all rights to modify the technical data and
product features without prior notice. We cannot assume any liability for printing
errors.
Nepata Vertrieb mbH does not assume any liability for direct or indirect damage
resulting from use of this product.
Version 1.1 (27.02.2008)

Table of Contents
Table of ContentsTable of Contents
Table of Contents
1
11
1
Safety Precautions
Safety PrecautionsSafety Precautions
Safety Precautions ................................
................................................................
................................................................
................................................................
.............................................
..........................
............. 2
22
2
2
22
2
Scope of Delivery
Scope of DeliveryScope of Delivery
Scope of Delivery ................................
................................................................
................................................................
................................................................
..............................................
............................
.............. 3
33
3
3
33
3
Description of Machine
Description of MachineDescription of Machine
Description of Machine ................................
................................................................
................................................................
................................................................
......................................
............
...... 4
44
4
4
44
4
Operation
OperationOperation
Operation ................................
................................................................
................................................................
................................................................
........................................................
................................................
........................ 5
55
5
5
55
5
Maintenance and Cleaning
Maintenance and CleaningMaintenance and Cleaning
Maintenance and Cleaning................................
................................................................
................................................................
................................................................
.................................
..
. 6
66
6
6
66
6
Recommended Times and Temperatures
Recommended Times and TemperaturesRecommended Times and Temperatures
Recommended Times and Temperatures ................................
................................................................
...............................................
..............................
............... 7
77
7
7
77
7
Technical D
Technical DTechnical D
Technical Data
ataata
ata................................
................................................................
................................................................
................................................................
..................................................
....................................
.................. 9
99
9

2
1Safety Precautions
Please read these instructions and safety precautions carefully before starting up
your machine for the first time!
•Never reach into the heat press with your hands when it is connected to the
power supply, particularly when it is switched on and heated up – danger of
severe burns!
•Never open the housing or attempt to modify the machine yourself.
•Ensure that liquids and metal objects do not get into the inside of the heat
press.
•Ensure that the power socket used is grounded. Note that it is only
permissible to operate a heat press from a power socket protected by a
ground fault protection switch.
•Disconnect the power plug if the machine is not to be used for a longer
period of time.
•Never operate the heat press within the reach of children and never leave the
machine unsupervised when switched on.
•Ensure that the machine is used only in dry rooms.
If you cannot observe one or more of the safety precautions above, or if you are not
sure whether all points are satisfied, please contact our Technical Support
Department.

3
2Sco e of Delivery
Please check right at the beginning whether the following items have been delivered
completely:
Item Quantity
heat press 1
220V connecting
cable 1
operating
instructions 1
hex-wrench 1
4
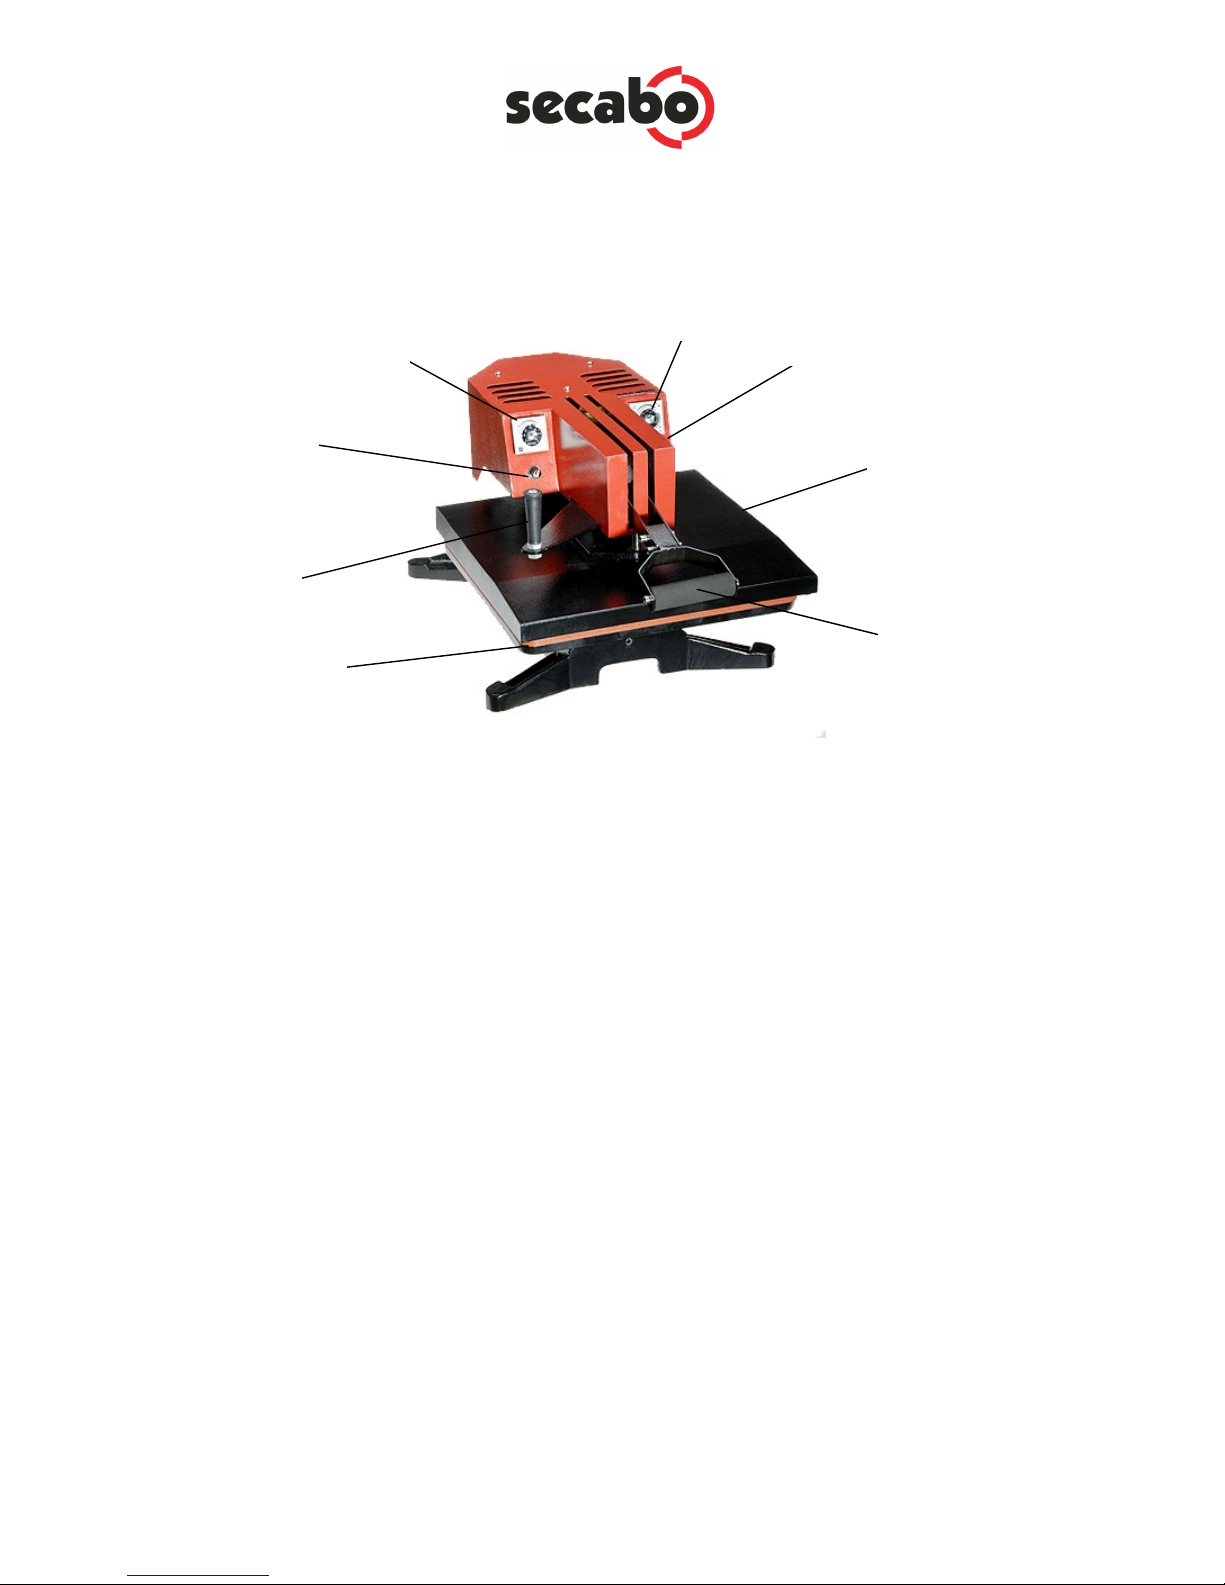
3Descri tion of Machine
a) Fuse
b) Time control knob
c) Temperature control knob
d) Rocker switch (not visible)
e) Heat plate
f) Press lever
g) Working surface
h) Turning handle
d
b
a
h
g
f
e
c
5
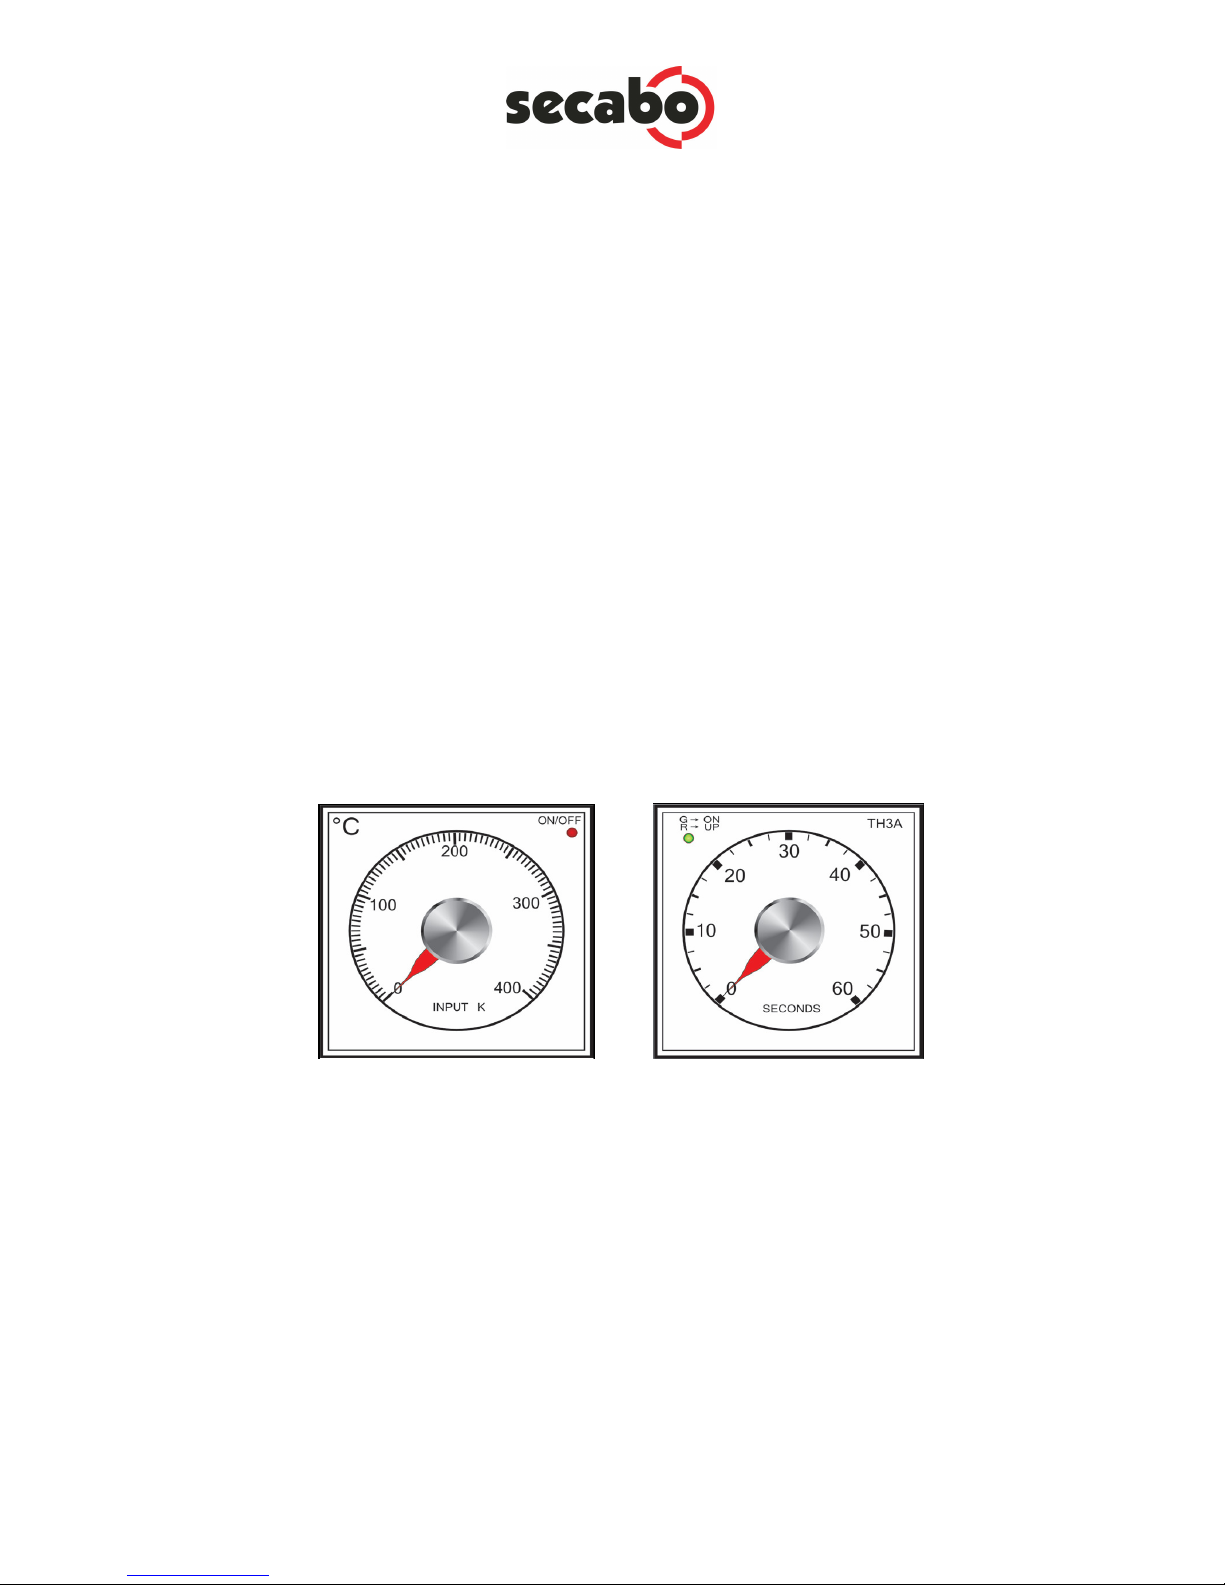
4O eration
•Connect the heat press to a 230 V power socket using the connection cable
supplied.
•Switch on the press with the red rocker switch.
•After switching on the press heats up automatically to the set temperature,
which can be changed at any time on the temperature control knob. A small
light on the temperature control knob illuminates as long as the press is
heating up.
•You can adjust the contact pressure by turning the large threaded ring below
the pressing plate up (to increase the pressure) or down (to reduce the
pressure). After adjusting the pressure it is necessary to arrest the lower
pressing plate with the Allen screw located on the end below the threaded
ring on the base of the press.
•As soon as the press is heated up completely you can stating making the first
transfers. For this purpose select the desired pressing time on the time control
knob. The timer starts running as soon as the press is closed with the press
lever. After expiration of the set time a warning signal sounds.
Temperature control knob Time control knob
Note
NoteNote
Note:
: :
: When the press is closed without textile in it, a vacuum develops which
When the press is closed without textile in it, a vacuum develops which When the press is closed without textile in it, a vacuum develops which
When the press is closed without textile in it, a vacuum develops which
can lead to a loud noise when the upper plate is raised when opening the press.
can lead to a loud noise when the upper plate is raised when opening the press.can lead to a loud noise when the upper plate is raised when opening the press.
can lead to a loud noise when the upper plate is raised when opening the press.
Note
NoteNote
Note:
: :
: A
AA
Actuate the press lever only when the press has been
ctuate the press lever only when the press has been ctuate the press lever only when the press has been
ctuate the press lever only when the press has been swivelled
swivelledswivelled
swivelled in
in in
in
completely; i.e. the upper and lower pressing plates are directly above one
completely; i.e. the upper and lower pressing plates are directly above one completely; i.e. the upper and lower pressing plates are directly above one
completely; i.e. the upper and lower pressing plates are directly above one
another.
another.another.
another.
Note
NoteNote
Note:
::
:
The heat press has to cool down after use, which can take some time.
The heat press has to cool down after use, which can take some time.The heat press has to cool down after use, which can take some time.
The heat press has to cool down after use, which can take some time.

6
5Maintenance and Cleaning
Maintenance work should always be accomplished with the press switched off and
cooled down. Disconnect the plug from the power socket before staring work.
Clean the press regularly with a soft cloth and mild household cleaner to remove
adhesive residues, etc. Never use scouring sponges, solvents or gasoline!

7
6Recommended Times and Tem eratures
These values serve only as guidelines; they can vary from material to material and
should always be checked before pressing.
Material
MaterialMaterial
Material
Temperature
TemperatureTemperature
Temperature
Pressure
PressurePressure
Pressure
Time
TimeTime
Time
Flock vinyl
Flock vinylFlock vinyl
Flock vinyl
170° C - 185°C little - medium 25s
Flex vinyl
Flex vinylFlex vinyl
Flex vinyl
160°C - 170°C medium- high 25s
Sublimation flex
Sublimation flexSublimation flex
Sublimation flex
180°C - 195°C medium - high 10s - 35s
Sublimation
Sublimation Sublimation
Sublimation on
onon
on
mugs
mugsmugs
mugs
200°C medium - high 150s - 180s
Sublimation
Sublimation Sublimation
Sublimation on
onon
on
tiles
tilestiles
tiles
200°C high 120s - 480s
(depends on gauge of the material)
Sublimation
Sublimation Sublimation
Sublimation on
onon
on
puzzles
puzzlespuzzles
puzzles
200°C little - medium 25s
Sublimation
Sublimation Sublimation
Sublimation on
onon
on
m
mm
mousepads
ousepads ousepads
ousepads
200°C medium 20s - 40s
Sublimation
Sublimation Sublimation
Sublimation on
onon
on
garments
garmentsgarments
garments
200°C medium - high 30s - 50s
Sublimation
Sublimation Sublimation
Sublimation on
onon
on
metal panels
metal panelsmetal panels
metal panels
200°C high 10s - 50s
(depends on gauge of the material)

8
Important note: Prior to any production you should test the transfer material and
Important note: Prior to any production you should test the transfer material and Important note: Prior to any production you should test the transfer material and
Important note: Prior to any production you should test the transfer material and
the
the the
the carrier. The given times and pressures in this manual are not subject to any
carrier. The given times and pressures in this manual are not subject to any carrier. The given times and pressures in this manual are not subject to any
carrier. The given times and pressures in this manual are not subject to any
warranty.
warranty.warranty.
warranty.
Note
NoteNote
Note for textile transfers
for textile transfers for textile transfers
for textile transfers: After pressing it is necessary for the textil
: After pressing it is necessary for the textil: After pressing it is necessary for the textil
: After pressing it is necessary for the textiles to cool
es to cool es to cool
es to cool
down before removing any type of backing from the transfer material.
down before removing any type of backing from the transfer material.down before removing any type of backing from the transfer material.
down before removing any type of backing from the transfer material.
The hot glue in the transfer material develops its adhesive force only in the cold
The hot glue in the transfer material develops its adhesive force only in the cold The hot glue in the transfer material develops its adhesive force only in the cold
The hot glue in the transfer material develops its adhesive force only in the cold
state. If the adhesive does not stick in the cold state, it may have been pressed
state. If the adhesive does not stick in the cold state, it may have been pressed state. If the adhesive does not stick in the cold state, it may have been pressed
state. If the adhesive does not stick in the cold state, it may have been pressed
too cold or
too cold ortoo cold or
too cold or for too short a time.
for too short a time. for too short a time.
for too short a time.

9
7Technical Data
TS
TSTS
TS-
--
-38
3838
38
size of work plate 38cm x 38cm
swiveling radius 0°-90°
max. temperature 200°C
max. time setting 60s
max. pressure 500g/cm²
operating voltage 230V / 2000W
fuse 10A
weight 38kg

10
Nepata Vertrieb mbH
www.secabo.de
Raiffeisenstr. 15a
85276 Pfaffenhofen a.d. Ilm
ermany
Table of contents
Other Secabo Power Tools manuals

Secabo
Secabo TS7 User manual

Secabo
Secabo TMUG User manual

Secabo
Secabo TC5 Smart User manual

Secabo
Secabo TM2 User manual

Secabo
Secabo TCC Lite User manual

Secabo
Secabo TC D2 User manual

Secabo
Secabo TC5 Smart User manual

Secabo
Secabo TCC SMART User manual

Secabo
Secabo TS5 Economy User manual

Secabo
Secabo TC5 Smart User manual


