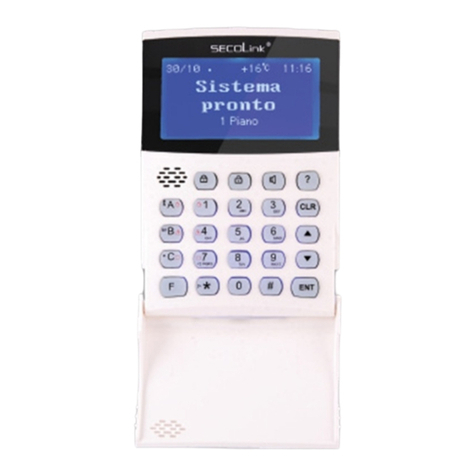
SECOLink KM20B Product information sheet

Short user manual
KM20B, KM20BT keypadsKM20B, KM20BT keypads
Intruder alarm system
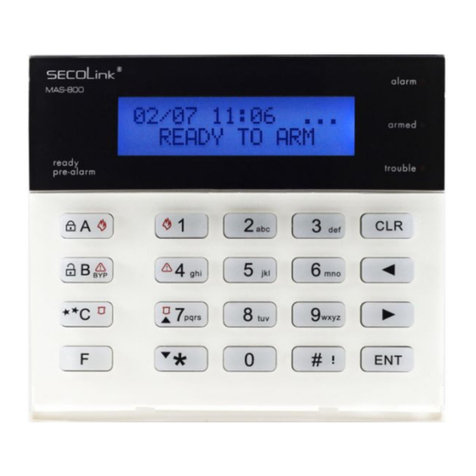
Yoursecuritysystemincludesacontrolpanel,keypadand/ormodules,varioussensorsanddetectors.ThekeypadsKM20BorKM20BTare
wiredkeypads andusually are mountedby the mainentry/exit location. Itcan be usedto arm/disarm andperform other systemoperations.
The alphanumerical LCD display and four LED indicators show the status from your security system. The keypads built-in buzzer indicates
entry/exitdelay,chimeandalarmsituations.Userinterfacemenu,zonesandeventsaredisplayedinEnglishorotherlanguages.
Away arming mode – A
Use this mode for premises protection when no one will be staying inside. When armed in Away mode, all zones will be secure
and the system will sound an alarm if a protected zone is violated. User must disarm the system within the entry delay period or
analarmwilloccur.TherearethreewaystoarmyoursecuritysystemsAwayarmingmode:
Functional keys
(F-keys)
System's state
LED indicators
This key is used for zone review,
also for marking the partitions (areas)
and other elements of the system
(for example for marking a zone,
which will be bypassed)
pre-alarm
ready trouble
armed
alarm
A
B
C
F
1
4
7
2
5
8
0
3
6
9
#
CLR
ENT
!!!!
MAS-800
Pre-alarm / Ready to
arm LED indicator
Main menu
navigation keys There are 4 partitions in the system:
- the first partition is armed in the Stay mode,
- the second partition is armed in the Night mode,
- the third partition is armed in the Max Away mode,
- the fourth partition is armed in the Away mode.
Status of the system: Entry Doors are open.
Date Time
Emergency keys
This key is used for partition review,
also for marking all partitions or
selecting another element
(e.g., selecting a user) Status of the system: SYSTEM IS ARMED
There is 1 partition in the
system. This partition isn’t
armed and there is one
zone, which is being violated.
Environment temperature
(for KM20BT)
Functional keys for quick and comfortable control of the system
SECOLINK security system comes with a standard set of function keys (F- keys) described below. You will be able to carry out most
frequently used functions by the use of one or two buttons. This will allow you to avoid system management via Menu. During the
installation you will have an option to create individual F- keys, which can be adapted for the needs of the protected building and the user.
ToviewthecurrentlistofF-keys,press key,andthenkeeppressing and keys.
F
12/09 08:11 ....
READY TO ARM
12/09 08:11:21 !
! Entry doors
o
+22 C 08:11
SYSTEM IS ARMED
Ways of arming
Use toactivateafunctionwhichiscontrolledbyF-key,use keytoexittheF-keymenu.
ENT CLR
The system can be armed in three ways: F - key, via Menu, or by entering a PIN code (symbol is used to prompt you to enter your PIN
code). System functions, which are controlled by F-key, can be activated by pressing F-key and , or by pressing and holding the last
letter/number of the F-key combination. When Arming is activated via Menu, it is necessary to mark the partitions (areas), which will be
armed (use keys , , , or to mark a particular partition (area), or use to mark all partitions and proceed by confirming the
selectionswithkey ).IfarmingisactivatedbyenteringaPINcode,yoursystemwillbearmedinAwaymode.
ENT
1
2 3
4
!!
ENT
12/09 08:11 ..
READY TO ARM
Arming:
PIN:ÜÜÜÜ To Exit:
030 seconds
Main Menu:
| Arming }Arming:
| Night }Arming:
| All partitions }
Enter your PIN code .
Press key.
ENT
Press key.
ENT
Press key.
F-key:forEUcountries– , .
A
ENT
PINcode: .
viaMenu: ,Arming , Allpartitions , .
ENT ENT ENT
12/09 08:11 ..
READY TO ARM PIN code entering.
Arming:
PIN:ÜÜÜÜ
F - key A
AWAY, arming
Press key.
A
12/09 08:11 ..
READY TO ARM Press key.
ENT
AWAY, arming To Exit:
PIN:ÜÜÜÜ 030 seconds
Enter your PIN code .
Press key.
ENT
Enter your PIN code .
F - key F F - key A F - key AA F - key AAA
AWAY, arming STAY, arming MAX AWAY, arming
Press key.
F
12/09 08:11 ....
READY TO ARM
Press key. A - Away arming mode.
Press key. AA - Stay arming mode.
Press key. AAA - Max Away arming
mode.Press key.
Page 1
Leave the premise.
To Exit:
030 seconds
Leave the premise.
Leave the premise.
F-key:fornonEUcountries– .
A
ENT
F - key A
AWAY, arming
Press key.
A
12/09 08:11 ..
READY TO ARM Press key.
ENT
To Exit:
030 seconds
Leave the premise.

Stay arming mode – AA
Use this mode when you are staying at home, but expect someone to use the entrance door later. Interior zones will not be
protected and you may freely move throughout the premises. Late arrivals can enter through the designated entrance door
without causing an alarm, but they must disarm the system within the entry delay period or an alarm will occur. There are two
waystoarmyoursecuritysystemsStayarmingmode:
F-key:forEUcountries– , ;fornon EU countriesisavailable .
via Menu: , Arming , Stay , , Parts: .
A A
ENT
A A
ENT
ENT ENT ENT ENT
Max Away arming mode – AAA
Use this mode when no one will be staying on the premises for a long period of time (e.g.,vacations). Close all protected
perimeterwindowsand doorsbeforearming. Whenarmedin MaxAwaymode,allzones willbesecure, entrydelayis turnedoff,
and the system will sound an alarm if a protected zone is violated. There are two ways to arm your security systems MaxAway
armingmode:
F-key: , .
viaMenu: ,Arming ,MaxAway , ,Parts: .
AAA
ENT
ENT ENT ENT ENT
Night arming mode – C
Use this arming when you are staying inside the premises and require increased security. Interior zones are left disarmed and
you may freely throughout the premises. In the event of someone opening the door there will not be and entry delay and the
alarm will sound. This arming mode is effective when doors and windows are secured with opening sensors, or glass break
detectorsareinstalled.TherearetwowaystoarmNightArmingmode:
F-key:forEU countries– , ;fornonEUcountriesisavailable .
viaMenu: ,Arming ,Night , , .
C
ENT
C
ENT
ENT ENT ENT ENT
Short user manual
KM20B, KM20BT keypadsKM20B, KM20BT keypads
Intruder alarm system
Forced Arming – F , AAAA
Usethis armingmodewhen zonesare violatedorany ofthe sensorsarebroken.All theremainingsensors willbe armed.There
willbeanentrydelayafteropeningtheentry/exitdoor.TherearetwowaystoarmsecuritysystemsForcedarmingmode:
F-key:forEUcountries– , ;fornonEUcountriesisavailable .
viaMenu: ,Arming ,ForcedArming , .
F
ENT
F
ENT
ENT ENT ENT
Partial Arming
F-key:forEUcountries– , , .
A
1
ENT
Partitions allows you to break up a large area into smaller sections. Use this to arm certain areas of the premise
whileleaving other areasdisarmed, or tolimit otheruseraccess inspecificareas. Forexample:Analarmsystem isinstalledina
two-story house. During night time the ground floor isn't being used and all sensors of this partition are armed.There will be an
entry delay in the event of someone opening the door. Below is an example of how to arm a first partition (one of two) inAway
mode.
arming mode
F - key A
F - key A
AWAY, arming
AWAY, arming
Press key.
A
Press key.
A
12/09 08:11 ..
READY TO ARM
12/09 08:11 ..
READY TO ARM
Press key.
1
Press key.
1
Ground floor
Ground floor
First partition is selected.
Press key.
ENT
First partition is selected.
Press key.
ENT
Away:
PIN:ÜÜÜÜ
Enter your PIN code .
F-key:fornonEUcountriesisavailable .
A
1
ENT
viaMenu: ,Arming , Away , , .
ENT ENT ENT
1
12/09 08:11 ..
READY TO ARM
12/09 08:11 ....
READY TO ARM
Main Menu:
| Arming }
Main Menu:
| Arming }
Arming:
| Night }
Arming:
| Pre-alarm }
Arming:
| Away }
Press key.
ENT
Press key.
ENT
Press key.
ENT
Press twice key.
Press key twice.
Press key.
ENT
Away:
PIN:ÜÜÜÜ
Pre-alarm:
PIN:ÜÜÜÜ
Press key.
ENT
Enter your PIN code .
Enter your PIN code .
Ground floor
Press key.
1
Ground floor
First partition is selected.
Press key.
ENT
Arming and disarming of security barrier, Pre-alarm mode
Microwaveorinfrared raysbasedsecuritybarriers, outdoorPIRdetectors,which areconnectedtothe system,canbearmed by
Pre-alarm mode. In the event of someone crossing this electrical barrier the system will sound an alarm without sending an
alarmmessagetoCentralMonitoringStation.ThePre-alarmmodecanbeturnedonandturnedoffinthesamewayasdescribed
below. For a more convenient control of Pre-alarm mode it is recommended to create special F-keys during and installation
process.
Ground floor
To select press key.
Press to confirm.
1
ENT
viaMenu: ,Pre-alarm , ,Parts: , .
ENT ENT
1
ENT
Parts:#2
Parts:#2
Parts:12 Parts:#2
Parts:X2
To Exit:
030 seconds
Leave the premise.
To Exit:
030 seconds
Leave the premise.
To Exit:
030 seconds
Leave the premise.
Page 2

Short user manual
KM20B, KM20BT keypadsKM20B, KM20BT keypads
Intruder alarm system
Bypassing zone – B
Bypassing a zone allows you to leave a door or window opened while arming the rest of your security system. There are two
different types of bypass: temporal or permanent. Temporal bypass is used for a one time arming and disarming cycle.
Permanent bypass is used until the user unbypasses the zone. Enter the zone number you would like to bypass.THIS MUST
BE A TWO DIGITNUMBER.The zone willbe markedas " ".Tobypassthe zone fora long time(permanent) the lastnumber
should be pressed and held for 2 sec. The zone will be marked as " ". When all zones are marked press key. The same actions can be
performedby choosing thezone withthe keys or andby marking withthe key (short press- temporal,long -permanent).Bypass
procedurecanbemade:
ENT
Abort arming
Clear key is used for selecting and aborting procedures. For example, if the exit delay is in process and you want to abort
armingpresstheclear key,enterPINcode,andconfirmitwith key.
CLR
CLR ENT
trouble
armed
alarm
Arming system with troubles
EUstandardsdonotallowtheuseofatroubledsecuritysystem.YellowLEDlightonkeypadwillturnonandarmingofthesystem
with previously described ways will not be possible. It is necessary to immediately eliminate system troubles, inform CMS, and
thecompanythathadinstalledyour system.Thesystem detectstroubles ofitsownmodulesaswell asothercommonproblems
suchas230V disappearanceinACline,adisconnected phonelinedueto repairs,orabattery discharge.Inexceptionalcases it
is possible to bypass certain troubles for a short period of time and arm the system as usual. To arm a system with troubles
pleasedothefollowing:
Press the key once and a message describing system troubles will be shown on the display. Press key again and the
yellow trouble LED light will start to blink rapidly. Blinking duration is 30 seconds and during this time it is possible to activate
Armingofyoursystemasusual.
CLR CLR
Emergency keys
To activate an emergency function press at once two event specific keyslisted below and hold it for at least 1 second. Premises
mustbesecured byCMSfor thesefunctionsto activate.Anaudibleemergency loudsirenwill occurshowinga relatedmessage
onthekeypadscreen.
Fire alarm: + .
Medical alarm: + .
Panic alarm: + .
A 1
B
!!
4
!!
C 7
To Disarm the System Using Your PIN Code Upon Entering the Premise
Entry delay gives you time to disarm the system when you enter through the designated entrance door. You must disarm the
system before the entry delay period ends to avoid an alarm occurrence. There are three ways to disarm the system using your
PINcode:
F-key: ,or , .
PINcode: .
viaMenu: ,Disarming ,Allpartitions , .
F0
ENT
B
!!
B
!!
ENT
ENT ENT ENT
12/09 08:11 ....
READY TO ARM
12/09 08:11 ....
READY TO ARM
F - key B
F - key B
Bypassing Zones
Bypassing Zones
Press key.
B
!!
Press key.
B
!!
Press key.
ENT
Press key.
ENT
Zone named Window is
violated (!)
Zone named Window is
violated (!)
Window
Window
Window
Window
Window
Window
Zone:!2345
Zone:!2345
Zone:!2345
Zone:!2345
Zone:x2345
Zone:X2345
Press key.
Press key and hold it
for 2 seconds.
Zone is bypassed
temporary
Zone is bypassed
permanently
F-key: ,markthezonewith ... or , .
B
!!
ENT
0 9
ENT
viaMenu: ,ZoneBypass , ,markthezonewith ... or , .
ENT ENT
0 9
ENT
Partial disarming
Partial disarming is used when you want to disarm certain areas while leaving other areas armed, or to limit access to certain
areastootherusers.Belowisanexampleexplaininghowtodisarmafirstpartitionoftwo.
F-key: ,, or , , .
F0
1
ENT ENT
B
!!
B
!!
1
ENT ENT
viaMenu: ,Disarming , Selectedpartit , , .
ENT ENT ENT
1
ENT
Entry Delay
030 seconds Main Menu:
| Arming }Main Menu:
| Disarming }Disarming: Disarming:
| |All partitions Selected parti} }
Press key.
ENT
Press key. Press key.
ENT
Press key. Press key.
ENT
Enter your PIN code .
Press , keys.
F0
F - key F0 Selected partit:
DISARMING all PIN:ÜÜÜÜ
Press key.
1
Enter your PIN code . Press key.
ENT
First partition is
disarmed.
Ground floor
Parts:1# 12/09 08:11 .#
PARTIALLY ARMED
Entry Delay
030 seconds
Selected partit:
PIN:ÜÜÜÜ Ground floor
Parts:1# 12/09 08:11 .#
PARTIALLY ARMED
Press , then key.
1
ENT
First partition is
disarmed.
Page 3

Short user manual
KM20B, KM20BT keypadsKM20B, KM20BT keypads
Intruder alarm system
Duringanalarmoccurrencethekeypadscreen willdisplayamessage“Alarm!!!”withanexplanationand reasonsthatcausedit.
Red alarm LED light will turn on, the siren will start to sound aloud, and a report about the alarm will be sent to CMS or (and) the
user.TherearetwowaystoclearthealarmandturnofftheredcoloredLEDlight.
, - this type of clearing will stop the siren sound, turn off the red LED light, and the system will return to the prior pre-
alarm status. The system will cause an alarm if the system has a smoke detector and an alarm was caused by smoke from
domestic reasons whether it was armed or disarmed. It is possible to clear this type of alarm by bypassing the smoke detector
(seepage3,"Bypassingzone-B").
- this type of clearing will stop the siren sound, turn off the red LED light, and the system will be disarmed, even if it was
armed previously by entering the PIN code. It is not recommended to use a PIN code for alarm clearing when all partitions
(areas)controlledbytheuseraredisarmedduetoapossiblecasualarming.
CLR
Alarm clearing
trouble
armed
alarm
Event log review – F30, F31
All events related to protected premises and statuses of the system are stored in the event log. This log will display all events
chronologically and includes information such as types of alarms, troubles or breakages, control events, and more. Use key
toswitchbetweendifferentdatesandtimes.Use or keystoviewnextorpreviousevents.
Alarmevents:
F-key: .
viaMenu: EventLog ,AlarmEvents , .
Faultevents:
F-key: .
viaMenu: EventLog , Troubleevents , .
F
30
ENT
ENT ENT ENT
F
3
1
ENT
ENT ENT ENT
Electronic notebook (memo) review - F09
Aninstallermayincludeallimportantcontactinformation(e.g.,phonenumber,email)onyourkeypad.Toreview:
F-key: ,[1record] ,[2record] ,[3record] ,[4record] ,[5record] .
via Menu: Memo ,[1record] ,[2record] ,[3record] ,[4record] ,[5record] .
F0
9
ENT
ENT ENT
Temperature correction on keypad display – F11 (only KM20BT)
If the keypad shows an incorrect environment temperature it is recommended to make temperature corrections. This can be
done by entering the value of the temperature measured with domestic thermometers. There are two ways to correct (update)
temperaturesettings:
F-key: , ,enter temperaturevalueandpress .
viaMenu: , Settings , TemperatureCo , , ,(enter temperaturevalue) .
F
1 1
ENT ENT
ENT ENT ENT ENT ENT
Sensor operation testing, testing zones – F22
Violated zones (#) can be checked by pressing the ,keys. To end testing press .
CLR
Itisrecommendedtoperformsensoroperating testingatleastoncepermonth.Duringtestingitwill benecessarytomakesome
typeof violation inorder tocheck thefunctionality of availablesensors. Forexample: Opening a door orwindows withmagnetic
contacts, stimulating movement near the motion sensors, or by hard clapping of hands to test the glass break detectors.There
aretwowaystobegintesting:
12/09 08:11 ....
READY TO ARM F - key F22
Testing ZONES
Press keys.
F
2222 2222
Press key.
ENT
Enter your PIN code .
PIN:ÜÜÜÜ Door Door
Burg. Zone Test: Zone:12345 Zone:#2345
Testing zone is not
violated.Testing zone is violated.
F-key: , .
F
2222 2222
ENT
via Menu: , Tests , Burg. Zone Tes , .
ENT ENT ENT
Permission to make changes of the system (service mode entry) – F33
An installer will have a permission to make changes of the system settings only after a user approves it by entering a PIN
code for security reasons. There are two ways to allow the installer to begin settings changes:
F-key: , .
via Menu: , Service mode , .
F
3 3
ENT
ENT ENT
Activated User PIN code changing – F20
A manufacturer will provide in a sequential order generated default 4-digit PIN code of the system, unique to each user and
related to his number in our system. For example: First users default PIN code will be 0001, second users default PIN code will
be0002,andsoon.ItisstronglyrecommendedtochangeyourdefaultPINcodeinoneofthesetwoways:
F-key: , enteryourpresentPIN,NewPIN:, enternewPIN,Repeat:, repeatthenewPIN.
viaMenu: , Settings , Users ,ChangePIN , enteryour present PIN,New PIN:,enter newPIN,
Repeat:,repeatthenewPIN,Changed.
For example: User of the system has a PIN code 1234. This code seems unsafe to him and he desires to change it to 3762. He
should start by pressing function keys, entering 1234, then entering 3762, and 3762 for a confirmation. PIN code
hasbeenchanged.
F
20
ENT
ENT ENT ENT ENT
F
20
ENT
Setting Date and time – F21
F-key: ,DateandTime ,(enterdateandtime) .
ViaMenu: , Settings ,DateandTime , ,(enterdateandtime) .
F
2
1
ENT ENT
ENT ENT ENT ENT
Page 4

Short user manual
KM20B, KM20BT keypadsKM20B, KM20BT keypads
Intruder alarm system
Chime mode
This feature can be used only while the intruder alarm system is disarmed. Your system can be set to alert you by sound or
lighting of the LCD display and keys when doors or windows are being opened, or during any violation of the selected zone. To
select which zone will feature a Chime function press key on a selected zone which will then be marked by . To enable this
functionpleasedothefollowing:
viaMenu: , Settings , ,Chime , .
ENT ENT ENT
Activated Users’ review – F23
It is recommended to review how many users can control the system after an installation.There are two ways to view activated
users:
System compliance and warranty
Kodinis Raktas UAB, manufacturer of SECOLINK IntruderAlarm System, offers a Warranty for a term of twenty-four months. It
declares, that product SECOLINK complies with essential EU directive and EU standards EN 50131-1. For more information
visitmanufacturers website atwww.kodinis.lt,or www.secolink.eufor acomplete text of declaration. SECOLINKIntruderAlarm
SystemisdesignedandmanufacturedinLithuania.
Mainfeatures:
Arm/disarmyourobject;
Receivealarm,troubleandothernotifications;
Monitoryourobjectstatus;
Bypasszones;
Controlyourdevices;
Locateyourcar(GSW-CAN);
Exploreeventlog:alarms,troubles,otherevents;
Controlupto4objects(home,business,car);
Videocliptoverifyanalarm;
Smartinterface-yourmostrecentlyusedcommands.
Smart phone application (GSVx module must be installed)
SECOLINK application allows the user to control and monitor SECOLINK security system from the users smartphone (GSVx
modulemustbeinstalled).Boththeintruderalarmsystemandcaralarmsystemcanbecontrolledbytheapplication.Application
usesSMSand/ordataservice,chargesmayapply.
for iPhone:
Links to download:
for Android:
Keypad display and keys backlight changing – F10
Keypad users have an option to select on which conditions the keypad will be illuminated.Available settings: LCD & keypad -
keypaddisplay andkeypadarealwaysbacklighted;LCD-keypaddisplayisalwaysbacklighted;Auto-keypadkeysanddisplay
illuminateafteranykeypadkeyisbeingpressed,duringentry/exitdelay,incaseofanalarmorwhenChimezoneisviolated.
F-key: ,KeypadSettings, Light ,LCD&keypad ,Changed.
viaMenu: , Settings , Keypadsettings , Light ,LCD&keypad ,Changed.
F
1
0
ENT ENT ENT
ENT ENT ENT ENT ENT
F-key: ,EditUsers , Status, ... .
F
2
3
ENT
F - key F23
Setting USERS
Press key.
F
2
3
12/09 08:11 ..
READY TO ARM Press key.
ENT
User 01 Enabled
Press key.
Edit Users:
PIN:ÜÜÜÜ
Enter your PIN code .
U01 U01Name Status
User 01 is enabled.
Press key.
| |} }
Enabled Disabled Enabled
U02 U03 U04Status Status Status
User 02 is enabled.
Press key. User 03 is enabled.
Press key. User 04 is disabled.
Press key.
| | |} } }
ViaMenu: , Settings , Users , EditUsers , , Status, ... .
LCDscreen willdisplay auser number(e.g., U01)and status (e.g.,Enabled orDisabled).All userswith anEnabled statuscancontrol the
systemoritspartitions(areas).
ENT ENT ENT ENT
Page 5
Rev.10/03/16K
Other manuals for KM20B
2
This manual suits for next models
1
Other SECOLink Keypad manuals
