Securemme DSMART User manual
SMART
INDICE CONTENUTI
INDEX
Contenuto della confezione 1
Package content
Descrizione 2
Description
Caratteristiche tecniche 3
Technical features
Avvertenze 4
Warnings
Installazione 5
Installation
Configurazione installatore 7
Installer set
Configurazione proprietario 12
Owner configuration
Collegamento rete elettrica 19
Power Grid Schedule
Condizioni di garanzia 20
Warranty conditons
Dima 21
Power Grid Schedule
www.securemme.it [email protected]

CONTENUTO DELLA CONFEZIONE
PACKAGE CONTENT
(1) SCHEDA ELETTRONICA (cod. PL8000KXXXXSH) + GRUPPO MOTORE (cod. MR8000KZA7038) 1 pz.
CIRCUIT BOARD (cod. PL8000KXXXXSH) + MOTOR (cod. MR8000KZA7038)
(2) PLACCA SUPPORTO BATTERIA (cod. PK8000KXXXXCT) 1 pz.
SUPPORT BATTERY PLATE (cod. PK8000KXXXXCT)
(3) MANIGLIA (cod. 5000XXX) 1 pz.
HANDLE (cod. 5000XXX)
(4) POMOLO PER CILINDRO (cod. 5032XXX) 1 pz.
KNOB FOR CYLINDER (cod. 5032XXX)
(5) VITE FISSAGGIO PLACCA SUPPORTO BATTERIA (cod. VT80M3XZB25XX) 1 pz.
FIXING SCREW FOR SUPPORT BATTERY PLATE (cod. VT80M3XZB25XX)
(6) BATTERIA RICARICABILE (cod. PP8000KXXXXBT) 1 pz.
RECHARGEABLE BATTERY (cod. PP8000KXXXXBT)
(7) CARICABATTERIE (cod. CB8000XBKXXXX) 1 pz.
CHARGER (cod. CB8000XBKXXXX)
(8) MAGNETE ADESIVO (cod. MG8000XXXXXPO) 1 pz.
ADHESIVE MAGNET (cod. MG8000XXXXXPO)
1 23 4
6 78 5

www.securemme.it [email protected]
DESCRIZIONE
DSMART è il nuovo dispositivo per automatizzare
serrature a cilindro europeo (interasse maniglia centro
chiave 85 mm). Il dispositivo è applicabile a tutti i
cilindri europei con il codolo diametro 8 mm. Facile da
installare, non richiede collegamenti alla rete elettrica,
alimentazione a batteria. Tecnologia Bluetooth sicura
e criptata.
APERTURA DELLA PORTA TRAMITE:
Smartphone: scarica l’applicazione D-SMART da
sistemi Apple, Android e Windows Phone per gestire gli
accessi e configurare la porta.
Tastiera numerica: codice personalizzabile per ogni
utente gestibile con fasce orarie. (OPTIONAL)
Transponder: chiave elettronica formato portachiavi
con tecnologia Q5. (OPTIONAL)
Telecomando: per apertura in prossimità. (OPTIONAL)
Controlla e limita gli accessi degli utenti abilitati
all’ingresso.
DESCRIPTION
DSMART is the new device used to motorize locks
with European cylinder (interspace handle-key center
85 mm). The device can be installed on all European
cylinder with an 8 mm diameter removable knob.
Easy to install, it doesn’t require any connection with
mains, supply or battery. Safe and encrypted Bluetooth
technology.
OPENING OF THE DOOR WITH:
Smartphone: download the D-SMART application
from the Apple, Android and Windows Phone stores to
manage the access and to configurate the door.
Numeric keypad: customizable code for every user
with time slots. (OPTIONAL)
Transponder: key ring format electronic key with Q5
technology. (OPTIONAL)
Remote: for an opening near the door. (OPTIONAL)
Check and limit the access of the users previously
enabled.
MANIGLIA
HANDLE
PULSANTE INTERNO APERTURA
OPENING INTERNAL BUTTON
CONNETTORE RICARICA BATTERIA
OPENING BATTERY RECHARGE CONNECTOR
BATTERIA RICARICABILE ESTRAIBILE
REMOVABLE RECHARGEABLE BATTERY
LED INDICATORE
(lampeggia quando la batteria è scarica)
LED INDICATOR
(flashes when the battery level is low)
PULSANTE INTERNO CHIUSURA
CLOSING INTERNAL BUTTON
POMOLO CILINDRO
per apertura e chiusura manuale
CYLINDER KNOB
for manual and opening closing
2
IT EN
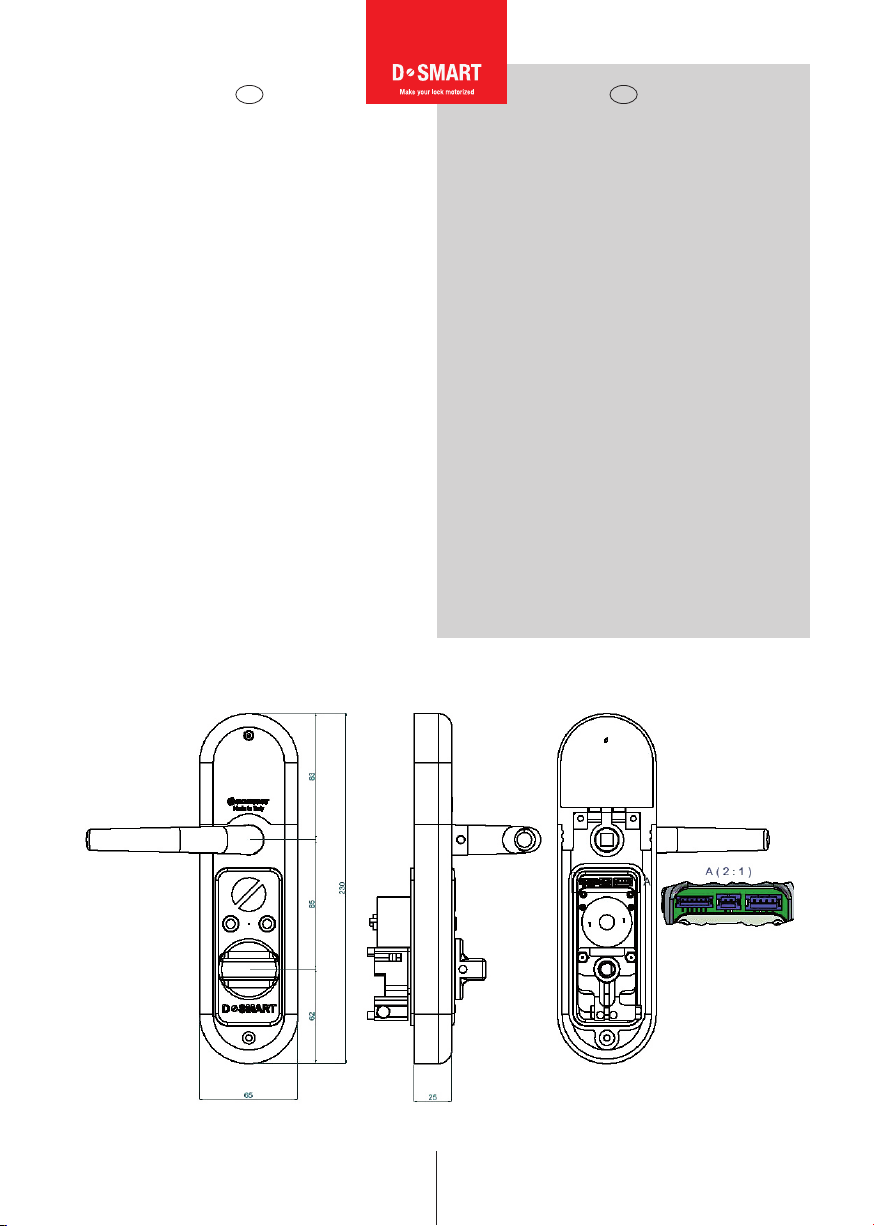
CARATTERISTICHE TECNICHE
Dimensioni: 230 mm x 65 mm x 25 mm.
Scheda elettronica: Tecnologia Bluetooth BT (4.1).
Frequenza di comunicazione: 2.4 GHz.
Tipo di batteria: Ricaricabile ioni di Litio (Li-Ion).
Caratteristiche batteria: 3.7 V, 3700mAh
(utilizzare solo batterie e carica batterie Securemme).
Caratteristiche di alimentazione: ingresso AC 100
- 240 VAC; uscita 4.2 VDC,1 A; 50-60Hz.
Tempo di ricarica batteria: circa 6 ore.
Temperatura di utilizzo: -10°C ~ +45°C.
Durata stimata: 700 Aperture/Chiusure.
Sistemi supportati: Ios 8 o versioni successive;
Android 4.4 o versioni successive; Windows Phone 10
o versioni successive.
Descrizione connettori: 1 = connettore alimentazione;
2 = connettore motore; 3 = connettore tastiera esterna.
Tastiera esterna: apertura digitando 0 (accensione
sistema) + codice, chiusura digitando 0 (accensione
sistema) + R.
Sicurezza: dopo 3 tentativi di apertura errati o impropri
il dispositivo si blocca per 10 minuti.
www.securemme.it [email protected]
TECHNICAL FEATURES
Dimensions: 230 mm x 65 mm x 25 mm.
Circuit board: Bluetooth technology BT (4.1).
Communication frequency: 2.4 GHz.
Battery type: Lithium ion rechargeable battery (Li-Ion).
Battery features: 3.7 V , 3700mAh
(use only Securemme battery and charger).
Supply features: input AC 100 - 240 VAC; output 4.2
VDC,1 A; 50-60Hz.
Battery recharge time: around 6 hours.
Operatine temperature: -10°C ~ +45°C.
Estimated lifetime: 700 Opening/Closing
Supported systems: Ios 8 or later versions; Android
4.4 or later versions; Windows Phone 10 or later
versions.
Connectors description: 1 = supply connector;
2 = motor connector; 3 = external number keypad
connector.
Internal keypad: opening by pressing 0 (system ignition)
+ code, closing by pressing 0 (system ignition) + R.
Security: after 3 wrong or improper opening attemps
the device is blocked for 10 minutes.
3
IT EN
3 2 1
www.securemme.it [email protected]
AVVERTENZE
- La non osservanza di quanto descritto in questo manuale
di installazione, ne pregiudica il corretto funzionamento
con la conseguente perdita della garanzia del prodotto.
- Ogni altro uso è da considerarsi improprio e pericoloso.
- Non invertire la polarità dei contatti metallici presenti
su placca e/o batteria.
- Non effettuare lavorazioni sulla porta con il dispositivo
installato, per evitare che residui di legno o di metallo
possano infiltrarsi nello stesso.
- Maneggiare con cura la batteria.
- Il prodotto può essere destinato solo all’uso per il quale
è stato espressamente concepito e cioè con batterie e
carica batterie originali Securemme.
- Controllo elettronico movimentazione motore limitato
in corrente.
- L’esecuzione del collegamento del prodotto deve essere
eseguito nel rispetto delle norme vigenti.
- Prima di effettuare qualsiasi operazione di manutenzione
del prodotto, scollegare la batteria.
- In caso di guasto e/o cattivo funzionamento del prodot-
to togliere la batteria ed utilizzare la chiave meccanica.
- Per eventuale assistenza tecnica, rivolgersi unicamente
a Securemme o ad un centro di assistenza tecnica auto-
rizzato da Securemme.
- Securemme s.r.l. si riserva il diritto di apportare tutte
le modifiche che ritiene opportune al prodotto ed al ma-
nuale istruzioni senza preavviso, al fine di migliorarne la
qualità o per esigenze produttive e commerciali.
SMALTIMENTO
a) Il prodotto non va smaltito insieme ai rifiuti domestici. Alla fine del
suo ciclo di vita, smaltire il prodotto in conformità alle normative vigenti
in materia.
b) Batteria ricaricabile : In qualità di utente finale avete l’obbligo (Ordinanza
batterie) di restituire tutte le batterie ricaricabili usate; lo smaltimento nei
rifiuti domestici è vietato. Le batterie ricaricabili contaminate sono eti-
chettate con un apposito simbolo indicante che lo smaltimento nei rifiuti
domestici è proibito. Le designazioni per i metalli pesanti coinvolti sono:
Cd = Cadmio, Hg = Mercurio, Pb = Piombo (le designazioni si trovano
sulla batteria ricaricabile, ad es. al di sotto del simbolo del bidone della
spazzatura riportato sulla sinistra). È possibile portare le batterie ricarica-
bili esaurite gratuitamente presso un centro di smaltimento autorizzato
nella propria zona. In questo modo si rispettano le disposizioni legali e si
contribuisce alla tutela dell’ambiente.
WARNINGS
- Failing to comply what is written in this instructions
manual, may affect the proper functioning and the
subsequent lost of the warranty.
- Any other use is to be considered improper or dangerous.
- Do not reverse the polarity of the metallic contacts on
the plate and/or the battery.
- Do not make any working on the door with the device
installed, in order to avoid wood or metal traces that can
infiltrate in it.
- Handle with care the battery.
- The device can be used for the purpose it was designed
for, that is with Securemme battery and charger.
- Movement of the motor electronically controlled.
- The connection of all the links must be performed in
compliance with the existing rules.
- Before performing any maintenance on the product,
disconnect the battery.
- In case of failure and/or malfunctioning of the product
remove the battery and use the mechanical key.
- For any service, contact only Securemme or an
authorized assistance center previously authorized by
Securemme.
- Securemme S.r.l. reserves the right to make any
changes to the product and to the user’s manual it
deems appropriate, in order to improve the quality or for
production and commercial needs.
DISPOSAL
a) The product can not be disposed among the household waste.
At the end of the cycle of its life, dispose the product according to the
current regulations.
b) Rechargeable battery : as final user you have the obligation
(accordino to the Battery Regulation) of returning all the rechargeable
batteries that were used before; the disposal among the household
waste is forbidden. The contaminated rechargeable batteries are
labeled with a special symbol that indicates that cannot be disposed
among the household waste. The designations for involved heavy
metals are: Cd = Cadmium, Hg = Mercury, Pb = Lead (the designations
can be found on the rechargeable battery, as instance under the
waste bin symbol reported on the left). It is possibile to freely take
all the used batteries to a local authorized disposal center. In these
ways all the legal dispositions are followed and you contribuite to the
environmental protection.
4
IT EN
INSTALLAZIONE
Prima di procedere, effettuare la ricarica completa della
batteria (fino all’accensione del led verde sul caricabat-
teria).
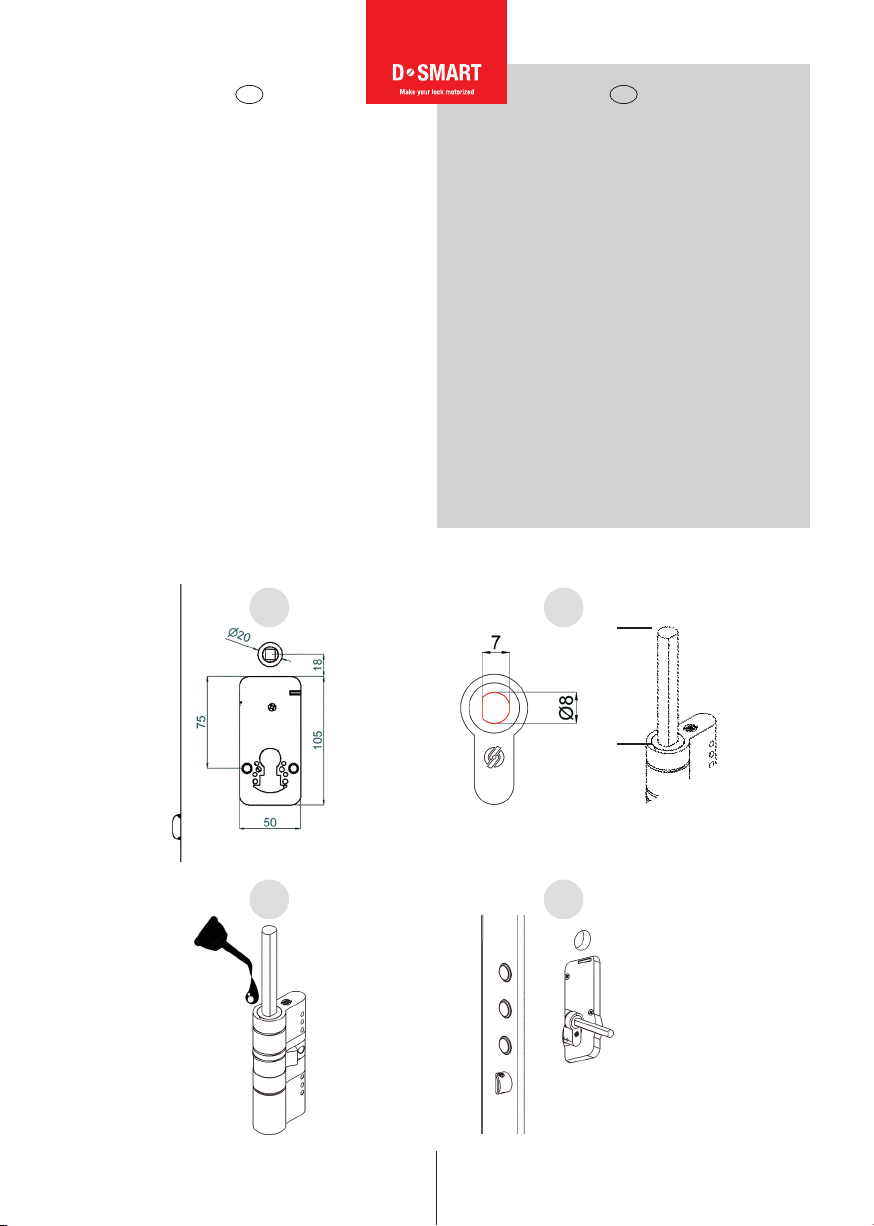
1. Eseguire un taglio nel pannello interno come in fig. 1,
avente dimensioni di 50 x 105 mm, per alloggio gruppo
motore. Ritagliare la dima in carta disponibile a pag. 21
e posizionarla sul pannello interno porta. Sul pannello
lato esterno predisporre un foro da 20 mm solo se in
possesso della tastiera esterna-lettore di transponder,
inserire il cavo dal lato esterno verso il taglio interno e
collegare il cavo nella scheda elettronica in posizione 3
(vedi pag. 3).
2. Utilizzare un cilindro con il gambo rasabile “prefe-
ribilmente Securemme” e assicurarsi delle dimensioni.
3. Per un buon funzionamento del prodotto, si racco-
manda la lubrificazione del gambo nella zona di rotazione.
4. Montare il cilindro sulla serratura e fissarlo.
www.securemme.it [email protected]
INSTALLATION
Before you proceed, fully recharge the battery (until the
led on the charger becomes green).
1. Make a cut in the inner panel as shown in fig. 1, having
dimensions of 50 x 105 mm, to housing the motor unit.
Cut out the paper template available on page 21 and
place it on the inner door panel. On the external panel
prepare a 20 mm hole only if you have the external
numeric keypad-transponder reader, insert the cable
from the external side to the internal cut and connect
the cable to the circuit board in position 3 (see page 3).
2. Use a cylinder with knob predisposition (preferably a
Securemme one) and make sure that the size is correct.
3. For a correct operation of the product, the lubrification
of the stem in the rotation area is recommended.
4. Install the cylinder on the lock and fix it.
5
LATO INTERNO
INTERNAL SIDE Foro maniglia
Handle hole
1 2
3 4
IT EN
min. 52 mm

www.securemme.it [email protected]
5. Applicare il gruppo motore sul gambo del cilindro fino
in battuta sulla serratura, assicurandosi dell’allinea-
mento del piano del gambo con il gruppo motore.
6. Fissare il gruppo motore, serrando l’apposita vite con
una chiave esagonale da 8 mm.
7. Appoggiare sul pannello la placca supporto batterie
8. Montare e avvitare la maniglia e il pomolo sul cilindro
9. Fissare sul pannello con le 3 viti autofilettanti in dota-
zione la placca supporto batteria
10. Inserire la batteria fino in battuta e provare a fare la
prima manovra, cliccando il tasto di apertura e chiusura.
5. Install the housing motor on the stem of the cylinder
until it stops, ensuring the alignment of the flat surface
of the stem with the housing motor.
6. Fix the housing motor by tightening the screw with a
8 mm hex wrench.
7. Place the battery support plate on the panel.
8. Install and thighten the handle and the knob on the
cylinder
9. Fix on the panel the battery support plate with the 3
screws provided.
10. Insert the battery until is stops and try to make the
first test, by pressing the opening and closing buttons.
6
9
IT EN
5 6 7
8 10
CONFIGURAZIONE D-SMART
Installatore
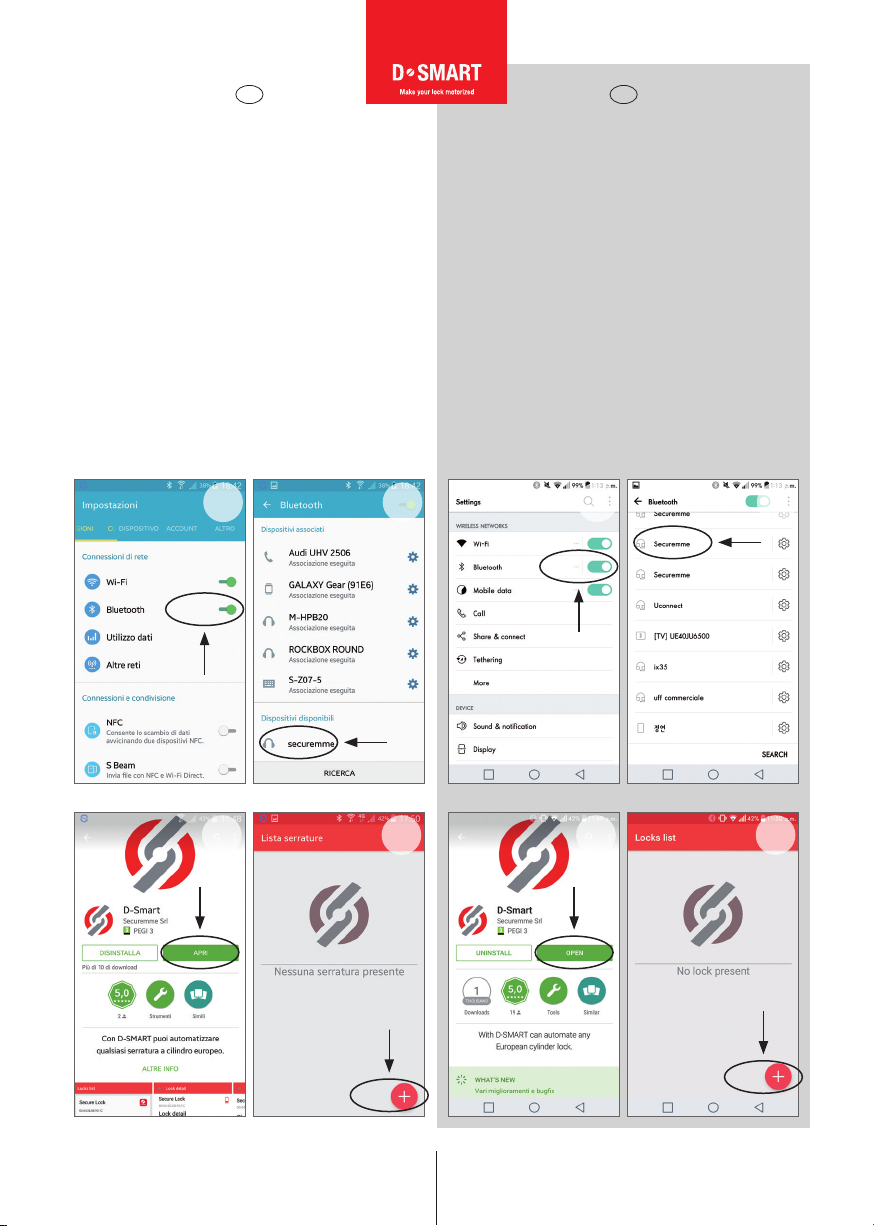
11. Accendere il bluetooth dello smartphone e ricercare
nuovi dispositivi.
12. Abbinarsi al dispositivo indicato con nome di default
Securemme.
13. Scaricare l’apposita applicazione su smartphone,
digitando Dsmart oppure Securemme negli store Ios
Android - Windows Phone ed aprirla.
14. Aggiungere un nuovo dispositivo cliccando su +
(Associa altre serrature).
www.securemme.it [email protected]
D-SMART CONFIGURATION
Installer
11. Turn the smartphone bluetooth on and scan for new
devices.
12. Connect it with the device having the default name
Securemme.
13. Download the specific smartphone application by
typing Dsmart or Securemme into the Ios, Android and
Windows Phone storse, then open it.
14. Add a new device by clicking on + (Add lock).
7
IT EN
11 12
13 14
11 12
13 14
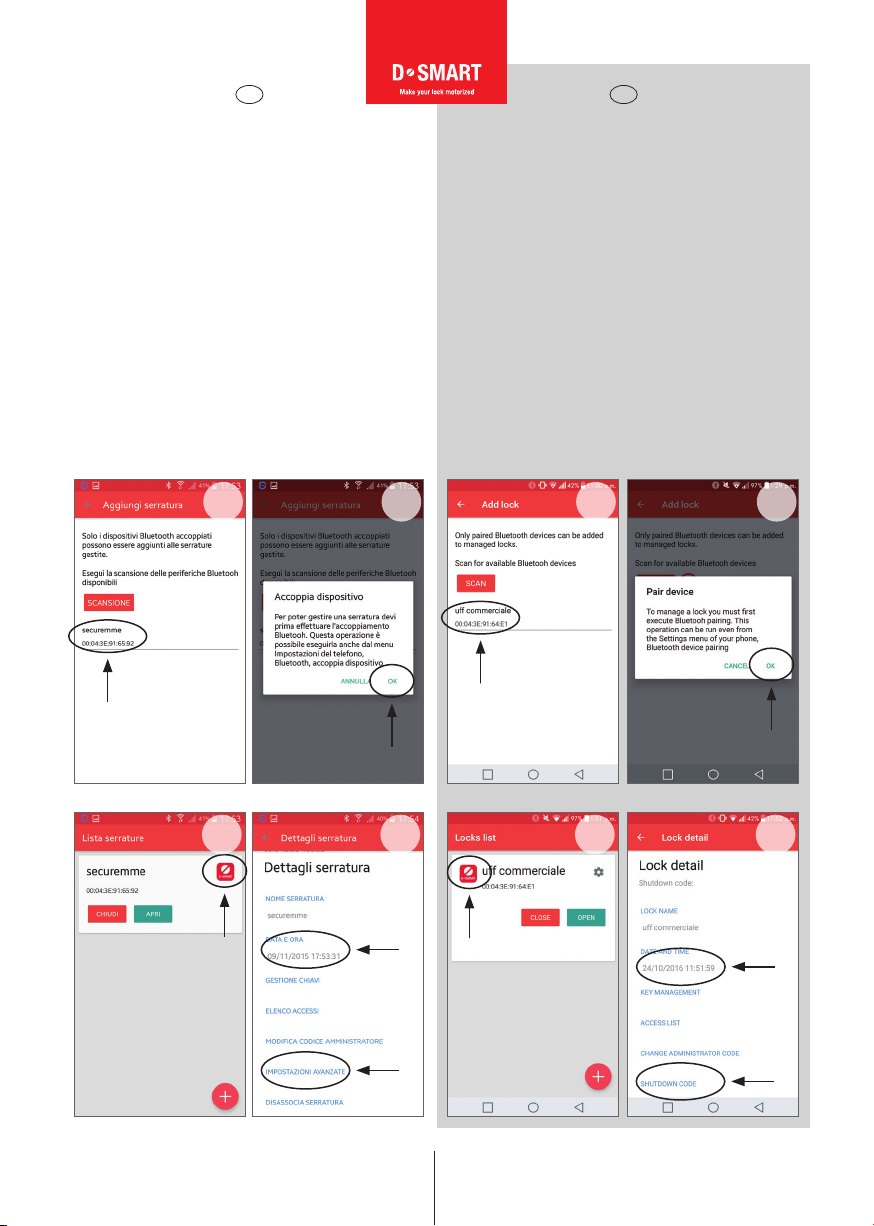
15. Cliccare su scansione per trovare il dispositivo
Securemme con il suo indirizzo relativo.
16. Cliccare su Securemme e associare il dispositivo
con lo smartphone.
17. Cliccare sul logo impostazioni per accedere a
dettagli serratura.
18. Cliccare data e ora e salvare per sincronizzare l’ora
con il dispositivo.
15. Click on Scan to find the Securemme device with its
relative address.
16. Click on Securemme and connect the device with
the smartphone.
17. Click on the logo settings to get access to the lock
detail.
18. Click on date and time and save to synchronize the
time with the device.
IT EN
www.securemme.it [email protected]
8
15 16
17 18
8
15 16
17 18
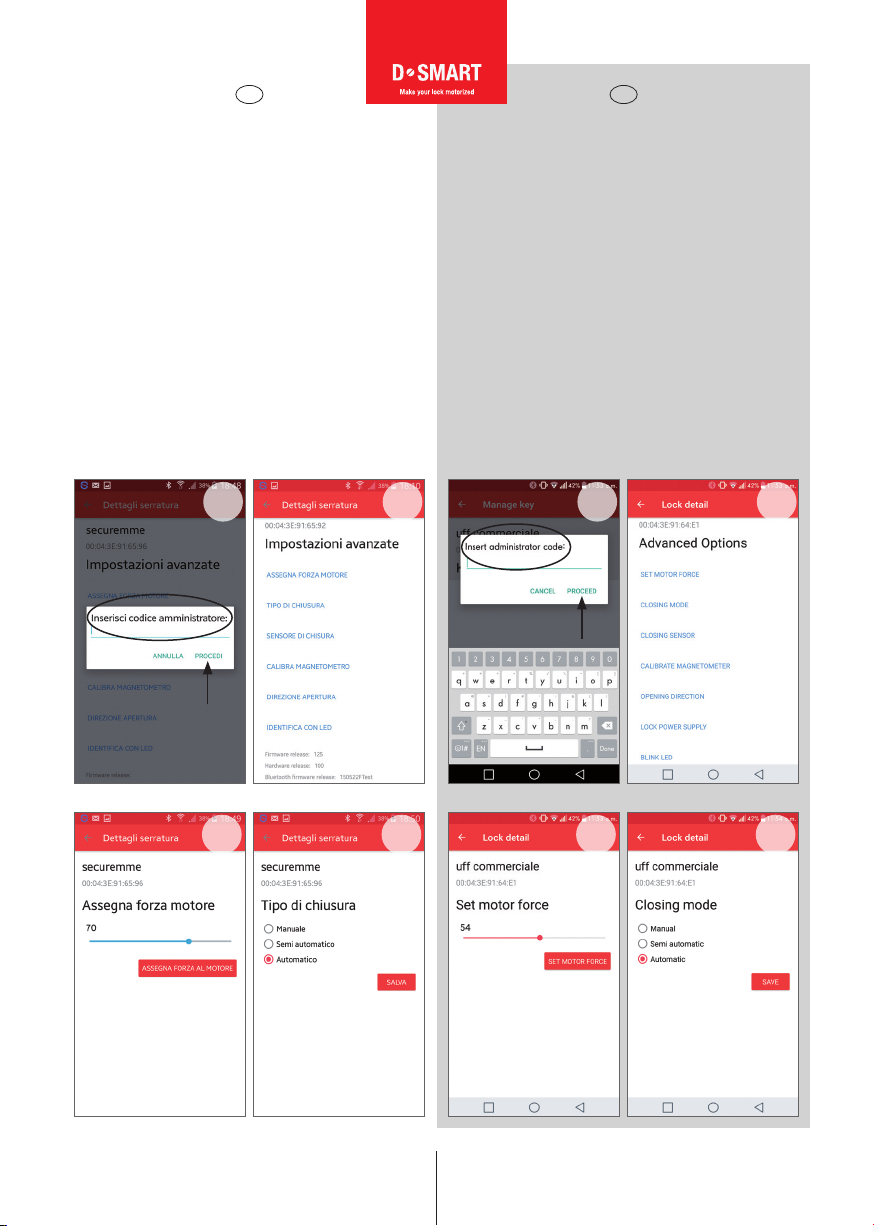
19. Inserire il codice amministratore: master.
20. Cliccare impostazioni avanzate per la configurazione
della porta.
21. Assegna forza motore: la forza è già impostata su
un valore di default standard, è possibile aumentare
in percentuale la potenza del 15% in caso di maggiori
attriti. Si ricorda che aumentando la forza del motore
aumenteranno anche i consumi della batteria.
22. Tipo di chiusura: Manuale= chiusura della serratura
anche a porta aperta (senza magnete); Semiautomatico=
chiusura della serratura cliccando il pulsante rosso solo
a porta chiusa (è necessario applicare il magnete); Au-
tomatico=chiusura automatica della serratura ad ogni
chiusura della porta (è necessario applicare il magnete).
19. Insert the administrator code: master.
20. Click on Advanced options for the configuration of
the door.
21. Set the motor power: the power is set on a
standard default value, it is possibile to increase this
value of 15% in case of more friction. Please note that
an increase of the power corresponds to an increase of
the battery drain.
22. Closing mode: Manual= closing of the lock even
with door opened (without magnet); Semiautomatic=
closing of the lock by clicking on the red button only
with door closed (it is necessary to affix the magnet);
Automatic= closing of the lock everytime the door is
closed (it is necessary to affix the magnet).
IT EN
19 20
21 22
19 20
21 22
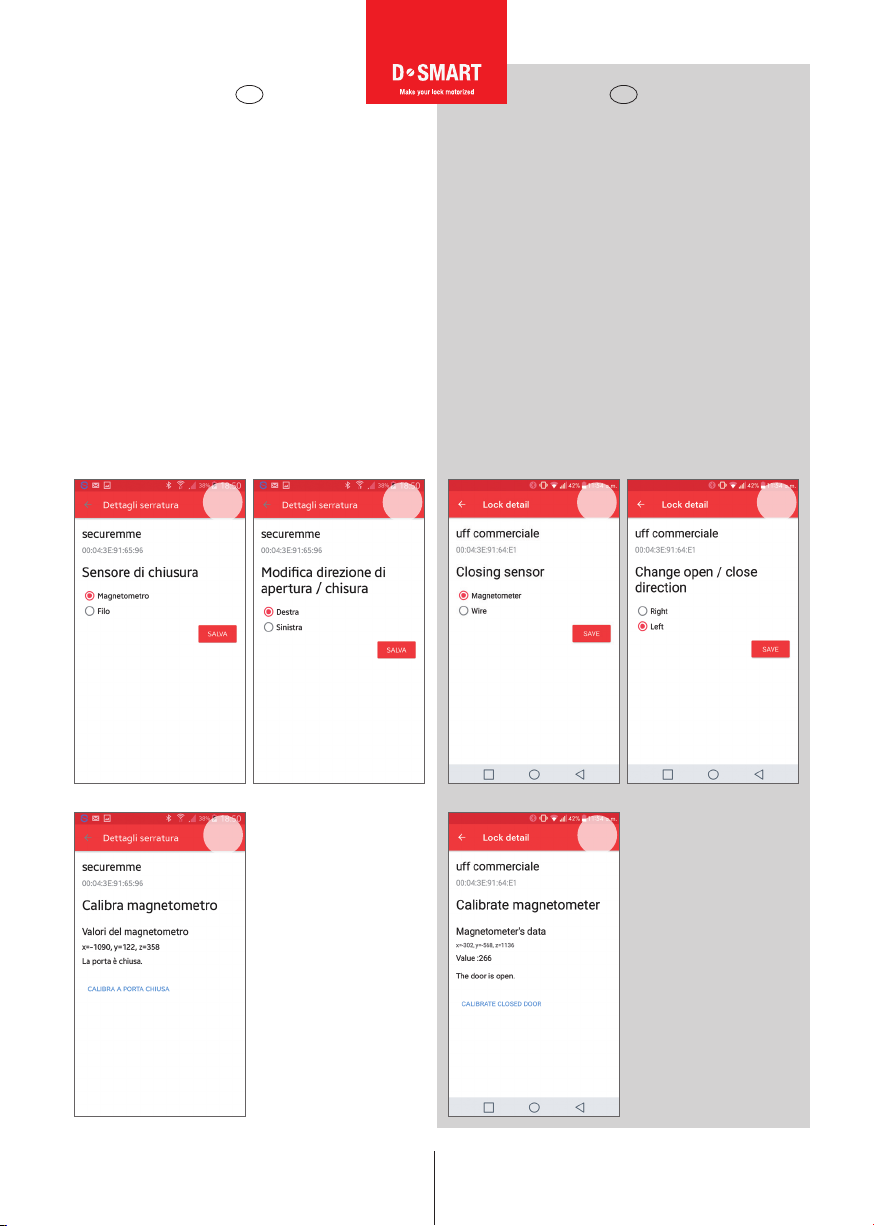
23. Sensore di chiusura: utilizzare di default il magneto-
metro (applicare il magnete adesivo sul telaio della porta).
24. Direzione apertura porta: impostare destra o sinistra
in base alla mano della porta
25. Calibra magnetometro: applicare sul telaio il ma-
gnete dotazione, posizionandolo in centro al telaio e in
linea d’asse con la maniglia (vedi figura a pag. 11);
chiudere la porta e cliccare il comando calibra a porta
chiusa. I valori dei tre assi x, y, z, verranno memorizzati.
Si ricorda di verificare che i valori acquisiti con la porta
chiusa siano differenti rispetto ai valori con porta aperta.
23. Closing sensor: use the default magnetometer (affix
the magnet on the door frame).
24. Opening direction: set right or left according to the
door orientation.
25. Calibrate magnometer: Apply the magnet on the
frame, by placing it in the moddle of it in line with the
handle (see Fig. 11); close the door and click on the
command when the door is closed. The values of the
three axis x, y, z will be memorized. Remember to check
that the acquainted data with closed door is different
when the door is open.
IT EN
www.securemme.it [email protected]
10
23 24
25
23 24
25
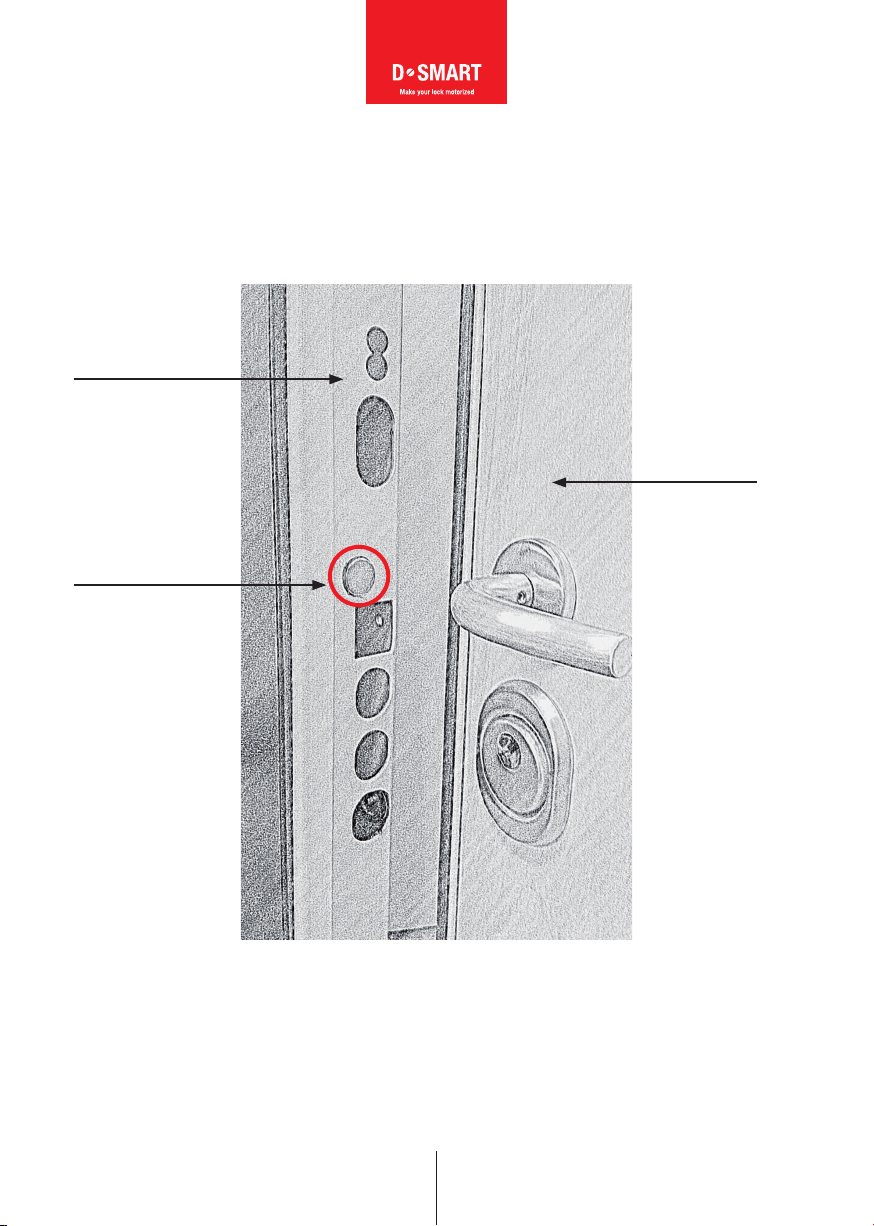
TELAIO
DOOR FRAME
MAGNETE ADESIVO
(posizionare in centro
al telaio, in linea d’asse
con la maniglia).
ADHESIVE MAGNET
(put it in the middle of
the frame, in line with
the handle axis).
PORTA
DOOR
fig. 11

CONFIGURAZIONE D-SMART
Proprietario
26. Attivare il bluetooth dello smartphone e ricercare
nuovi dispositivi.
27. Abbinarsi al dispositivo indicato con nome di default
Securemme.
28. Scaricare l’applicazione su smartphone, digitando
Dsmart oppure Securemme negli store Ios-Android-
Windows Phone ed aprirla.
29. Aggiungere un nuovo dispositivo cliccando su +.
D-SMART CONFIGURATION
User
26. Activate the smartphone bluetooth and scan for new
devices.
27. Connect it with the device having the default name
Securemme.
28. Download the specific smartphone application by
typing Dsmart or Securemme into the Ios, Android and
Windows Phone store, then open it.
29. Add a new device by clicking on +.
www.securemme.it [email protected]
26 27
28 29
12
IT EN
26 27
28 29

www.securemme.it [email protected]
30 31
32 33
13
30. Cliccare su Scansione per trovare il dispositivo
Securemme con il suo indirizzo relativo.
31. Accoppiare il dispositivo con lo smartphone.
32. Cliccare sul logo Impostazioni per accedere a
Dettagli serratura.
33. Cliccare su MODIFICA CODICE AMMINISTRATORE.
34. Attenzione: per la sicurezza del dispositivo cam-
biare la password di fabbrica (master) con una nuova
password che deve essere compresa tra 6 e 10 caratteri
e deve contenere almeno una lettera e un numero.
30. Click on Scan to find the Securemme device with
its relative address.
31. Connect the device with the smartphone.
32. Click on the logo settings to get access to the lock
detail.
33. Click on CHANGE ADMINISTRATOR CODE.
34. Attention: for the safety of the device change the
factory master password (master) with a new password
that must be between 6 and 10 characters and must
contain at least a letter and a number.
IT EN
30 31
32 33

www.securemme.it [email protected]
14
35
36 37
Cliccare Aggiorna codice amministratore. Si rac-
comanda di trascrivere e mantenere in un luogo
sicuro la nuova password. In caso di smarrimen-
to della password proprietario non ne sarà più
possibile il recupero e quindi sarà necessario
l’intervento dell’assistenza tecnica.
35. Ritornare in Dettagli serratura e cliccare Gestione
chiavi per la creazione degli utenti.
36. Cliccare su +per aggiungere nuovi utenti (nuove
chiavi). Possibilità di abilitare o disabilitare i singoli
utenti o tutti gli utenti contemporaneamente
37. Comporre il nuovo nome utente e relativa password
(la password deve essere compresa tra 6 e 10 caratteri
e deve contenere almeno una lettera e un numero), con-
fermare la password creata, e salvare il nuovo utente.
Click on Update administrator code. It is recommended
to write down and to keep in a safe place the
new personal password. If the password is lost it
won’t be possibile to recover it and the intervention
of the technical assistance will be necessary.
35. Go back to Lock detail and click Key Managment
to adding new users.
36. Click on +to add new users (New keys). Chance to
enable or disable either a single user or all the users at
the same time.
37. Digit the new user name and password (the
password must be between 6 and 10 characters and
must contain at least a letter and a number), confirm the
new password and save the new user.
IT EN
34 35
36 37
34
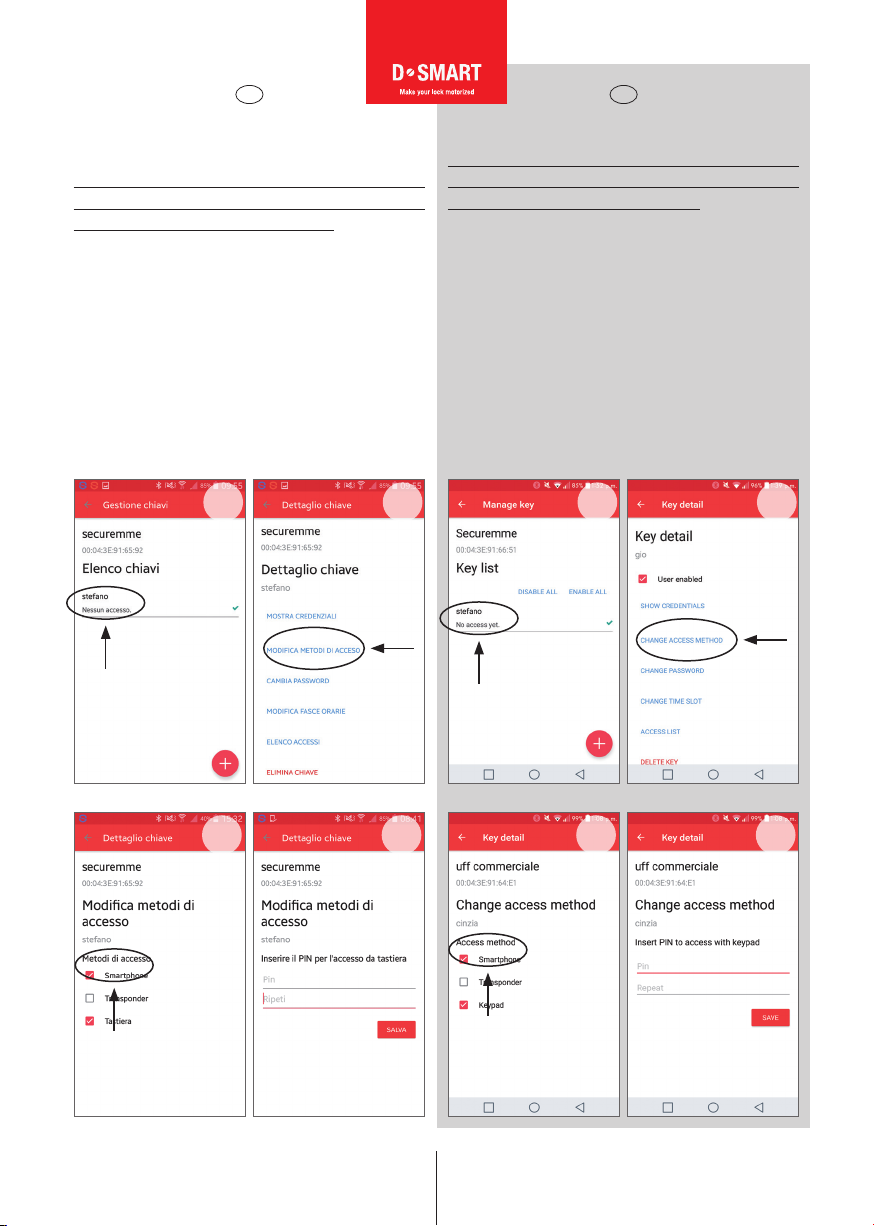
38. Impostato il primo utente cliccare per entrare nei
dettagli.
N.B. Anche il proprietario/amministratore della porta
deve possedere delle credenziali per l’accesso con
smartphone, transponder e/o tastiera.
39. Nel menù Dettaglio chiave cliccare su Modifica
metodi di accesso.
40. Abilitare l’utente per le opzioni desiderate:
smartphone, transponder e/o tastiera.
41. Per il transponder, selezionare l’opzione desiderata
sulla casella e avvicinare il transponder alla tastiera
esterna. Il dispositivo darà conferma tirando lo scrocco
della serratura. Per la tastiera, impostare il codice di
almeno 4 cifre e confermare.
38. Once added the first user enter in Key detail.
N.B. Also the owner/administrator of the door must
know the credentials to access with the smartphone,
transponder and/or numeric keypad.
39. In the menu Key Detail click on Change Access
Method.
40. Enable the user to the desired options: smartphone,
transponder and/or numeric keypad.
41. For the transponder, check the field on the application
and put the transponder next to the external numeric
kaypad. The device will give you a confirmation by
authomatically opening the latch of the lock. For the
numeric keypad, set the code of at least 4 characters
and confirm it.
IT EN
40 41
38 39
40 41
38 39
www.securemme.it [email protected]
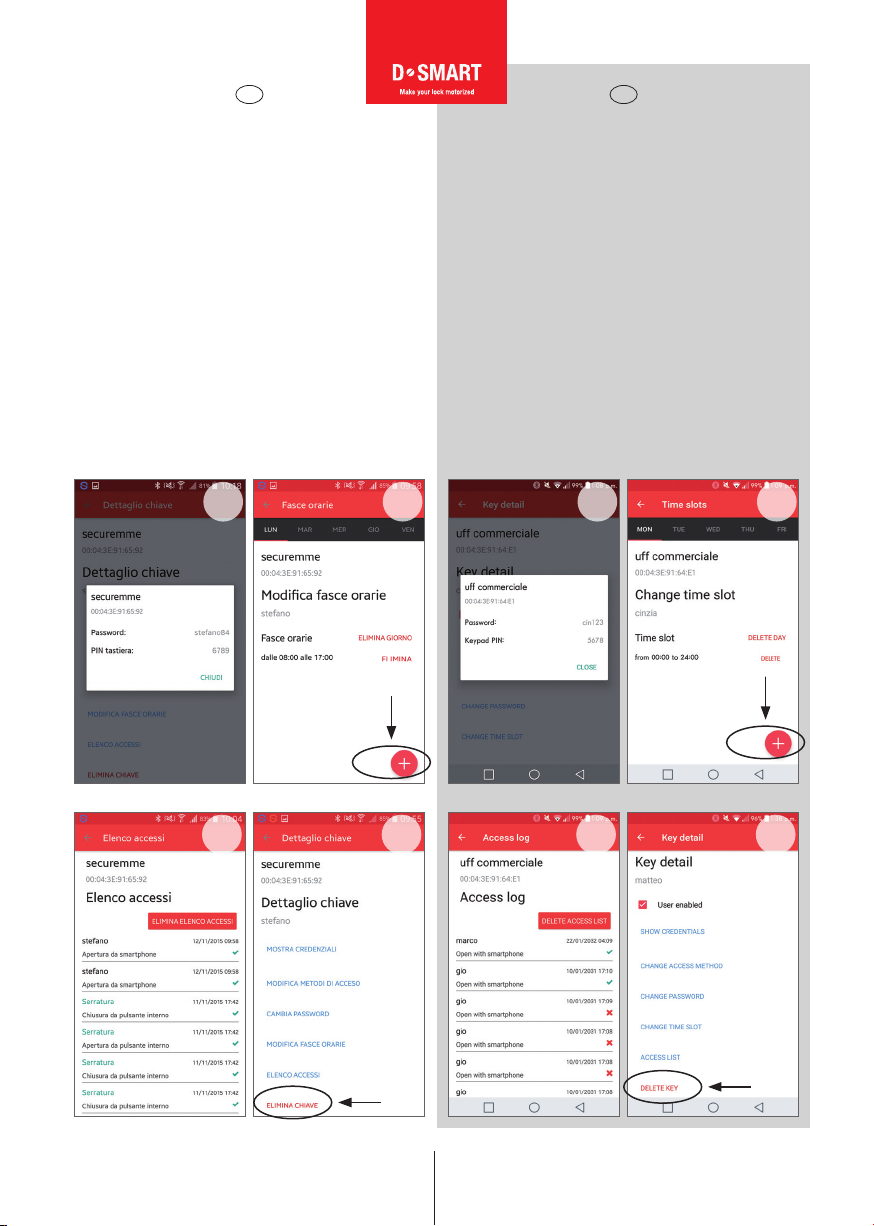
42. Verificare le credenziali utente cliccando Mostra
credenziali.
43. Cliccando su modifica fasce orarie è possibile abi-
litare ogni singolo utente a più fasce orarie per ogni
singolo giorno della settimana (da lunedì a domenica).
44. In Elenco accessi è possibile visualizzare gli ultimi
30 ingressi di ogni singolo utente: ogni ingresso auto-
rizzato risulta visualizzato una spunta di colore verde,
mentre eventuali tentativi di ingresso non autorizzato
saranno visualizzati con una Xdi colore rosso.
45. Elimina utente: tornare al menù Dettaglio chiave e
cliccare Elimina chiave.
Possibilità di disabilitare temporaneamente l’utente per
riabilitarlo in un secondo momento.
42. Check the user’s credentials by clicking on Show
Credentials.
43. By clicking on change time slot is possible to enable
every single user to more than one time slot per day
(from Monday to Sunday).
44. In Access List you can see the last 30 accesses
of every single user: next to every authorized access a
green tick is present, while next to an anuthorized one
there will be a red cross (X).
45. Delete User: go back to the Key details menu and
click on Delete Key.
Chance to temporarily disable the user and to enable
him at a later time.
42
44
43
45
16
IT EN
42
44
43
45
www.securemme.it [email protected]
46 47
48 49
17
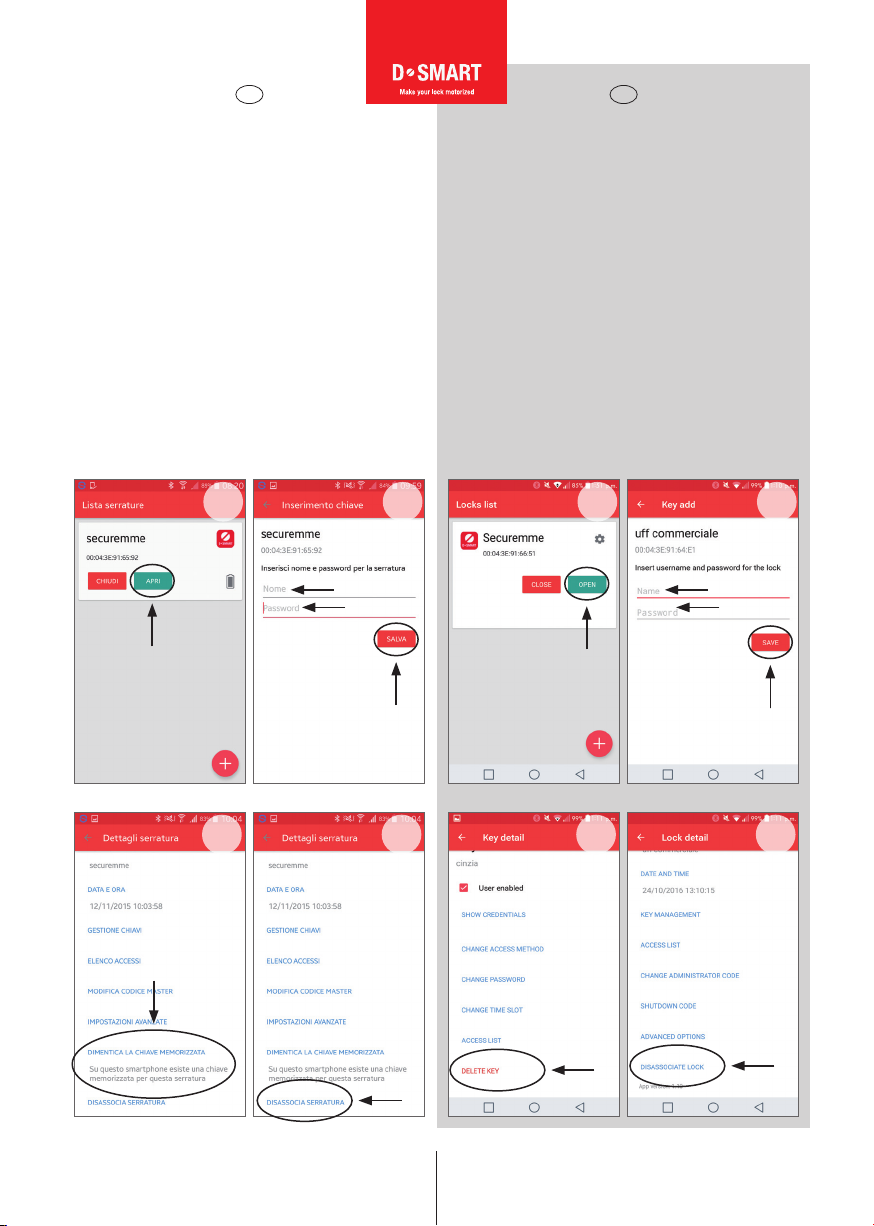
46. Primo accesso utente con smartphone: tornare
alla pagina iniziale, cliccare Apri e solo la prima volta
verranno richieste le credenziali UTENTE create in pre-
cedenza.
47. Inserire le proprie credenziali (Nome e Password) e
successivamente cliccare su Salva.
48. Nel caso di digitazione errata Nome e/o Password,
entrare nel menù Dettagli serratura e cliccare Dimen-
tica chiave memorizzata (tornare al punto 46 e ripe-
tere l’operazione)
49. Per eliminare la serratura accreditata nel proprio
smartphone cliccare Disassocia serratura.
46. First user access with smartphone: go back to the
homepage, click Open and only for the first time the
user’s credential previously created should be filled in.
47. Fill in the personal credentials (Name and Password)
then click on Save.
48. In the case of faulty entry of Name and/or Password,
go to the Lock Detail menu and click on Forget
Stored Key (go back to point 46 and repeat the same
operation).
49. To Eliminate the lock previously connected to your
device click on Disassociate Lock.
IT EN
46 47
48 49
www.securemme.it [email protected]
50. TASTIERA ESTERNA
Apertura porta con codice:
Digitare il tasto 0 + codice utente + E
Chiusura porta:
Digitare il tasto 0 + R
Apertura con transponder:
Digitare il tasto 0 e appoggiare il transponder al centro
della tastiera
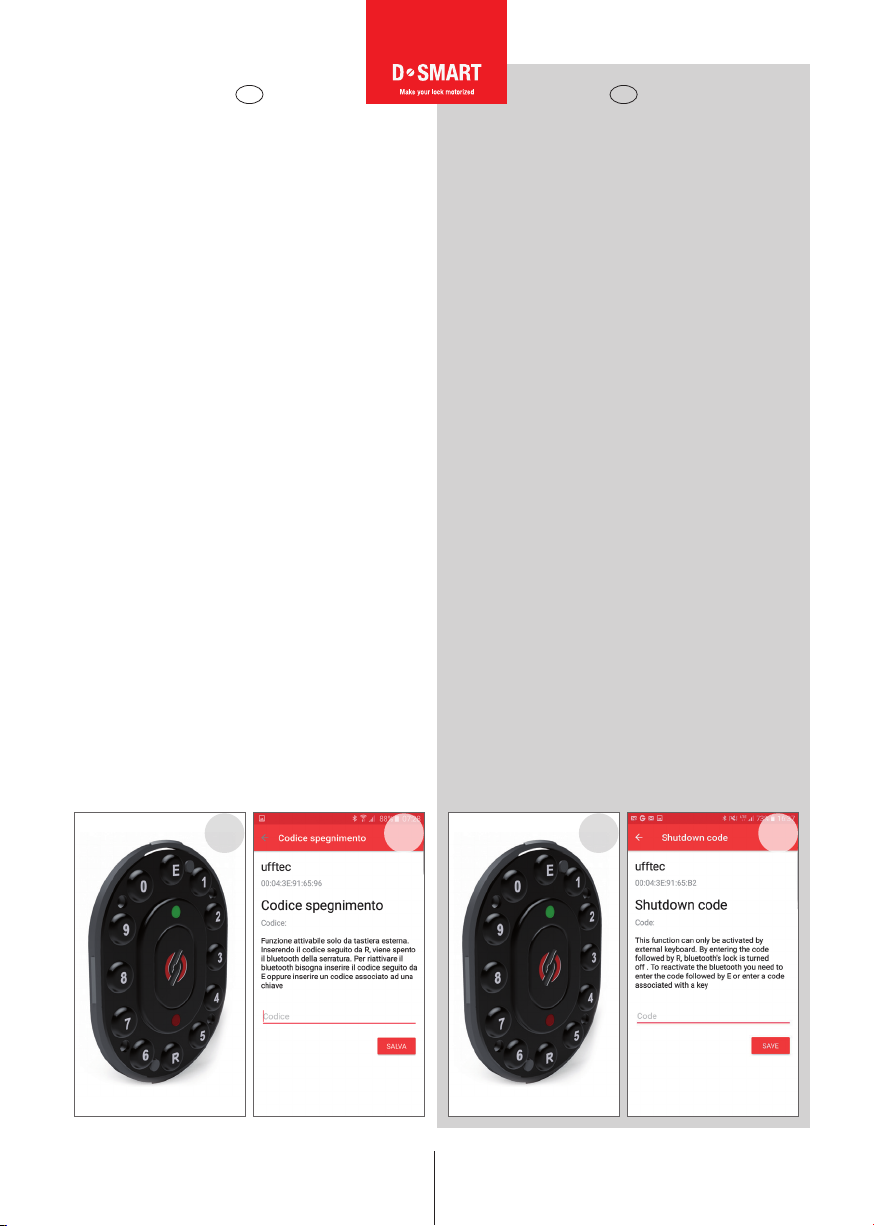
51. FUNZIONI SPECIALI:
Inserendo il codice spegnimento seguito da R, viene
spento il bluetooth della serratura.
Per riattivare il bluetooth bisogna inserire il codice
seguito da E, oppure inserire un codice associato ad
una chiave.
50. EXTERNAL NUMERIC KEYPAD
Door opening with password:
Press 0 + password + E
Door closing:
Press 0 + R
Door opening with transponder:
Press 0 and place the transponder in the middle of the
numeric keypad
51. SPECIAL FUNCTIONS:
By digiting the password followed by R, the bluetooth
system will turn off. To turn it on again you must insert
the shutdown code and then press E, or you can insert
a code associated to a key.
18
IT EN
50 5151 50
Table of contents
Other Securemme Door Lock manuals


Popular Door Lock manuals by other brands

M&C
M&C DCE43M2M Assembly manual

Ingersoll-Rand
Ingersoll-Rand Schlage F Series quick start guide

Extel
Extel WECA 90201.4 manual

Iseo
Iseo Zero1 Thesis 2.0 Standard instruction manual

Allegion
Allegion SCHLAGE Element Series installation instructions

Major Manufacturing
Major Manufacturing HIT-41 SERIES instructions

Bauma
Bauma BM600 installation manual

LSDA
LSDA R/V installation instructions

CISA
CISA PRESTIGE 59301 Series instruction sheet

Simons Voss Technologies
Simons Voss Technologies WaveNet Lock-Node SH 3062 quick guide

Philips
Philips EasyKey Alpha Series user manual

Rogers
Rogers Weiser Touchscreen Manufacturer's installation guide


