Securemme DSMART 2.0 User manual

2.0
DIMENTICA LE
CHIAVI!
APRIRE È
D
SMART
2.0
Patented
www.securemme.it
FORGET THE
KEYS
OPEN WITH
D
SMART
ISTRUZIONI | INSTRUCTIONS

www.securemme.it [email protected]
2.0
INDICE CONTENUTI
INDEX
Avvertenze | Warnings 1
Descrizione Smart Lock | Description of the product 2
Dsmart 2.0 da applicare | Dsmart 2.0 to be directly applied on the door 8100 3
8110
Installazione | Installation 8100 4
8110
Dsmart 2.0 da incasso | Recessed Dsmart 2.0 models 8120 6
8130
Installazione | Installation 8120 7
8130
Installazione elettrica | Electrical installation 9
Installazione magnete sul telaio porta | Magnet installation on the door frame 10
Installazione tastiera | Keyboard installation 11
Installazione lettore transponder | Transponder reader installation 12
Installazione lettore impronte digitali | Fingerprint reader installation 13
Installazione Smart Bridge | Smart Bridge installation 15
Legenda funzioni rapide Dsmart 2.0 | Dsmart 2.0 functions legend 16
Opzioni disponibili: crea una nuova chiave | Available options: create a new key 17
Funzioni rapide | Quick functions 18-19
INSTALLATORE - Configurazione Smart Lock | INSTALLER - smart lock configuration 20
PROPRIETARIO Configurazione Smart Lock | OWNER smart lock configuration 26
UTENTE Configurazione Smart Lock | USER smart lock configuration 29
Dsmart Guest Key Configurazione | Dsmart Guest Key configuration 31
Gestione chiavi virtuali Dsmart Guest Key | Virtual key management 32
Configurazione e abbinamento smart lock con Dsmart Guest Key 33
Configuration and pairing with Dsmart Guest Key
Funzionamento e programmazione Dsmart Guest Key 34
Operation and programming Dsmark Guest Key
Condizioni di garanzia | Warranty conditions 38
Dima Dsmart | Template dsmart 39

AVVERTENZE
- La non osservanza di quanto descritto in questo manuale
di installazione, ne pregiudica il corretto funzionamento con
la conseguente perdita della garanzia del prodotto.
- Ogni altro uso è da considerarsi improprio e pericoloso.
- Non invertire la polarità dei contatti metallici presenti su
placca e/o batteria.
- Non effettuare lavorazioni sulla porta con il dispositivo
installato, per evitare che residui di legno o di metallo
possano infiltrarsi nello stesso.
- Maneggiare con cura la batteria.
- Il prodotto può essere destinato solo all’uso per il quale è
stato espressamente concepito e cioè con batterie e carica
batterie originali Securemme.
- Controllo elettronico movimentazione motore limitato in
corrente.
- L’esecuzione del collegamento del prodotto deve essere
eseguito nel rispetto delle norme vigenti.
- Prima di effettuare qualsiasi operazione di manutenzione
del prodotto, scollegare la batteria.
- In caso di guasto e/o cattivo funzionamento del prodotto
togliere la batteria ed utilizzare la chiave meccanica.
- Per eventuale assistenza tecnica, rivolgersi unicamente
a Securemme o ad un centro di assistenza tecnica
autorizzato da Securemme.
- Securemme s.r.l. si riserva il diritto di apportare tutte le
modifiche che ritiene opportune al prodotto ed al manuale
istruzioni senza preavviso, al fine di migliorarne la qualità o
per esigenze produttive e commerciali.
SMALTIMENTO
a) Il prodotto non va smaltito insieme ai rifiuti domestici. Alla fine del
suo ciclo di vita, smaltire il prodotto in conformità alle normative vigenti
in materia.
b) Batteria ricaricabile: In qualità di utente finale avete l’obbligo (Ordinanza
batterie) di restituire tutte le batterie ricaricabili usate; lo smaltimento
nei rifiuti domestici è vietato. Le batterie ricaricabili contaminate sono
etichettate con un apposito simbolo indicante che lo smaltimento nei
rifiuti domestici è proibito. Le designazioni per i metalli pesanti coinvolti
sono: Cd = Cadmio, Hg = Mercurio, Pb = Piombo (le designazioni si
trovano sulla batteria ricaricabile, ad es. al di sotto del simbolo del bidone
della spazzatura riportato sulla sinistra). È possibile portare le batterie
ricaricabili esaurite gratuitamente presso un centro di smaltimento
autorizzato nella propria zona. In questo modo si rispettano le disposizioni
legali e si contribuisce alla tutela dell’ambiente.
2.0
IT EN
WARNINGS
- Failing to comply what is written in this instructions
manual, may affect the proper functioning and the
subsequent losing of the warranty.
- Any other use is to be considered improper or
dangerous.
- Do not reverse the polarity of the metallic contacts on
the plate and/or the battery.
- Do not make any working on the door with the device
installed, in order to avoid creating some wood or metal
traces that can infiltrate in it.
- Handle the battery with care.
- The device can be used for the purpose it was designed
for, that is with Securemme battery and charger.
- Movement of the motor electronically controlled.
- The connection of all the links must be performed in
compliance with the existing rules.
- Before performing any maintenance on the product,
disconnect the battery.
- In case of failure and/or malfunctioning of the product
remove the battery and use the mechanical key.
- For any service, contact only Securemme or an
authorized assistance center previously authorized by
Securemme.
- Securemme S.r.l. reserves the right to make any
changes to the product and to the user’s manual it
deems appropriate, in order to improve the quality or for
production and commercial needs.
DISPOSAL
a) The product can not be disposed among the household waste. At
the end of the cycle of its life, dispose the product according to the
current regulations.
b) Rechargeable battery: as final user you have the obligation (accordino
to the Battery Regulation) of returning all the rechargeable batteries
that were used before; the disposal among the household waste is
forbidden. The contaminated rechargeable batteries are labeled with
a special symbol that indicates that cannot be disposed among the
household waste. The designations for involved heavy metals are: Cd
= Cadmium, Hg = Mercury, Pb = Lead (the designations can be found
on the rechargeable battery, as instance under the waste bin symbol
reported on the left). It is possibile to freely take all the used batteries to
a local authorized disposal center. In these ways all the legal dispositions
are followed and you contribuite to the environmental protection.
www.securemme.it [email protected]
DESCRIZIONE
Smart Lock
Dsmart 2.0 è l’innovativa Smart Lock che automatizza
qualsiasi serratura a cilindro europeo con codolo
diametro 8 mm. Facile da installare, disponibile in
versione cablata a rete elettrica o a batteria al litio
ricaricabile. Tecnologia Bluetooth 5.0 sicura e criptata.
La comunicazione della Smart Lock e il suo grado
di sicurezza sono paragonabili a quella del settore
dell’online banking.
APERTURA DELLA PORTA TRAMITE:
Smartphone: scarica l’applicazione Dsmart 2.0 da
Apple store o Google Play per gestire gli accessi e
configurare la tua porta.
Tastiera numerica: codice personalizzabile per ogni
utente, gestibile con fasce orarie. (OPTIONAL)
Transponder: chiave elettronica formato portachiavi.
Abbinabile con l’acquisto del lettore TAG. (OPTIONAL)
Lettore d’impronte: impronta personalizzabile per
ogni utente con fasce orarie. (OPTIONAL)
Dsmart Bridge: collega in rete la Smart Lock per
controllarla e gestirla da remoto. (OPTIONAL)
Contatto esterno: collega il citofono/pulsante tramite un
contatto pulito (solo nella versione elettrica).
Smart relè: possibilità di gestire un’uscita relè.
Disponibile solo nella versione elettrica.
2
2.0
IT EN
2.0
DESCRIPTION
Smart Lock
Dsmart 2.0 is the innovative Smart Lock that automates
any European cylinder lock with diameter 8 mm knob
predisposition tang. The device is easy to install,
available in Wired version or rechargeable version, with
lithium battery. Secure and encrypted Bluetooth 5.0
technology. The degree of security of the communication
system of the Smart Lock is comparable to the security
level of online banking industry.
OPENING THE DOOR USING:
Smartphone: download the Dsmart 2.0 application
from Apple store or Google Play to manage logins and
configure your door.
Numeric keypad: customizable code for each user,
manageable with time bands. (OPTIONAL)
Transponder: electronic key fob format. Can be combined
with the purchase of the TAG reader. (OPTIONAL)
Fingerprint reader: customizable fingerprint for each
user with time slots. (OPTIONAL)
Dsmart Bridge: Networks the Smart Lock; you can
control it and manage it remotely. (OPTIONAL)
External contact: connects the intercom / button via a
clean contact (only in the electric version).
Smart relay: ability to manage a relay output. Available
only in the electric version.

40
67
144
40
55
DSMART 2.0 DA APPLICARE
8100 - 8110
CARATTERISTICHE TECNICHE
Dimensioni: 144 mm x 67 mm x 55 mm.
Scheda elettronica: Tecnologia Bluetooth BT (5.0).
Sistemi supportati: Ios (Apple) 10 e versioni
successive; Android (Google) 4.4 e versioni successive.
Possibilità di montare Dsmart 2.0 in differenti angolazioni
0°, 90°,180°.
Temperatura di utilizzo: -10°C ~ +45°C.
Smart Lock 8100
Tipo di batteria: Ricaricabile ioni di Litio (Li-Ion).
Caratteristiche batteria: 3.7 V, 4200mAh
(utilizzare solo batterie e carica batterie Securemme).
Tempo di ricarica batteria: circa 6 ore.
Durata stimata batterie: 8 mesi circa (calcolo stimato
su 10 aperture giornaliere). Effettuare una carica
completa della batteria, prima del suo utilizzo.
Smart Lock 8110
Caratteristiche di alimentazione: ingresso AC 100-
240 VAC; uscita 4.2 VDC,1 A; 50-60Hz.
2.0
PULSANTE APERTURA-CHIUSURA
OPENING-CLOSING BOTTON
CARICA BATTERIA
BATTERY CHARGING
POMOLO PER APERTURA MANUALE
KNOB FOR MANUAL OPENING
IT EN
DSMART 2.0 TO BE DIRECTLY APPLIED
ON THE DOOR 8100 - 8110
TECHNICAL FEATURES
Dimensions: 144mm x 67mm x 55mm.
Electronic board: Bluetooth BT technology (5.0).
Supported systems: Ios (Apple) 10 and following
versions; Android (Google) 4.4 and later.
Possibility to apply Dsmart 2.0 in different angles
0 °, 90 °, 180 °.
Usage temperature: -10 ° C ~ + 45 ° C.
Smart Lock 8100
Battery type: Rechargeable Lithium-ion (Li-Ion).
Battery features: 3.7V, 4200mAh
(use only Securemme batteries and chargers).
Battery charging time: about 6 hours.
Estimated battery life: about 8 months (average
usage: 10 daily openings). Complete the charging cycle
before usage.
Smart Lock 8110
Power supply characteristics: AC input 100-
240 VAC; 4.2 VDC, 1 A output; 50-60Hz.

INSTALLAZIONE
8100 - 8110
1. Utilizzare un cilindro con il gambo rasabile e
assicurarsi delle dimensioni indicate in figura 1.
Per un buon funzionamento del prodotto, si consiglia un
cilindro Securemme e si raccomanda la lubrificazione
del gambo nella zona di rotazione.
2. Monta il cilindro sulla serratura e fissalo.
3. Applica il dispositivo sul cilindro fino alla battuta della
serratura.
4. Misura la sporgenza (X) tra pannello e dispositivo.
Taglia sulla prolunga in plastica la misura (X) come nel
dettaglio A.
www.securemme.it [email protected]
4
2.0
34
min. 52 mm
1 2
A
IT EN
INSTALLATION
8100 - 8110
1. Use a cylinder with adjustable stem and check the
correct dimensions (figure 1).
For a good functioning of the product, we recommend
the usage of a Securemme cylinder. Lubrication in the
rotation area of the stem is also recommended.
2. Mount the cylinder on the lock and secure it.
3. Apply the device on the cylinder up to the stop door
lock.
4. Measure the protrusion (X) between the panel and the
device. Cut measurement (X) on the plastic extension as
in detail A.
5. Taglia codolo cilindro lasciando 16 mm dal pannello
(oppure utilizza la dima plastica in dotazione).
6. Applica il giunto meccanico sul codolo del cilindro e
avvitalo con la brugola.
7. Fissa il dispositivo sul pannello con le viti in dotazione
e connetti il cavo della batteria.
8. Applica la cover.
9. Effettua una carica completa della batteria, prima
del suo utilizzo.
7 8
6
2.0
5
IT EN
5. Cut the cylinder shank leaving 16 mm from the panel
(or use the supplied plastic template).
6. Apply the mechanical joint to the cylinder shank and
screw it with the Allen key.
7. Secure the device to the panel with the supplied
screws and connect the battery cable.
8. Apply the cover.
9. Fully charge the battery before usage.
6www.securemme.it [email protected]
2.0
DSMART 2.0 DA INCASSO
8120 - 8130
CARATTERISTICHE TECNICHE
Dimensioni: 119 mm x 68 mm x 16 mm.
Scheda elettronica: Tecnologia Bluetooth BT (5.0).
Sistemi supportati: Ios (Apple) 10 e versioni
successive; Android (Google) 4.4 o versioni successive.
Temperatura di utilizzo: -10°C ~ +45°C.
Smart Lock 8120
Tipo di batteria: Ricaricabile ioni di Litio (Li-Ion).
Caratteristiche batteria: 3.7 V, 4200mAh
(utilizzare solo batterie e carica batterie Securemme).
Tempo di ricarica batteria: circa 6 ore.
Durata stimata batterie: 8 mesi circa (calcolo stimato
su 10 aperture giornaliere). Effettuare una carica
completa della batteria, prima del suo utilizzo.
Smart Lock 8130
Caratteristiche di alimentazione: ingresso AC 100-
240 VAC; uscita 4.2 VDC,1 A; 50-60Hz.
PULSANTE APERTURA-CHIUSURA
OPENING-CLOSING BOTTON
68
119
41
16
POMOLO PER APERTURA MANUALE
KNOB FOR MANUAL OPENING
BATTERIA
BATTERY
IT EN
RECESSED DSMART 2.0
8120 - 8130
TECHNICAL FEATURES
Size: 119mm x 68mm x 16mm.
Electronic board: Bluetooth BT technology (5.0).
Supported systems: Ios (Apple) 10 and following
versions; Android (Google) 4.4 or later.
Usage temperature: -10 ° C ~ + 45 ° C.
Smart Lock 8120
Battery type: Rechargeable Lithium-ion (Li-Ion).
Battery features: 3.7V, 4200mAh
(use only Securemme batteries and chargers).
Battery charging time: about 6 hours.
Estimated battery life: about 8 months (average
usage: 10 daily openings). Complete the charging
cycle before usage.
Smart Lock 8130
Power supply characteristics: AC input 100-
240 VAC; 4.2 VDC, 1 A output; 50-60Hz.

INSTALLAZIONE
8120 - 8130
1. Esegui un taglio nel pannello interno come in fig. 1,
per l’alloggio del gruppo motore. (Ritaglia la dima in
carta disponibile a pag. 39 e posizionala sul pannello
interno porta per aiutarti).
2. Utilizza un cilindro con il gambo rasabile e assicurati
delle dimensioni indicate in figura 2.
Per un buon funzionamento del prodotto, si consiglia un
cilindro Securemme e si raccomanda la lubrificazione
del gambo nella zona di rotazione.
3. Monta il cilindro sulla serratura e fissalo.
2.0
7
min. 52 mm
2 3
31
68
99
48
Lato pannello INTERNO abitazione
INTERNAL panel side
1B
Ø 46
For 8120 version: After you carefully checking the
dimension of the battery, cut out a Ø 46 mm hole in
the panel.
1A
IT EN
INSTALLATION
8120 - 8130
1. Cut the internal panel as shown in fig. 1 for inserting
the motor unit. (you cut the template that you find at
p. 39 and place it on the inside panel door).
2. Use a cylinder with adjustable stem and check the
correct dimensions (figure 2).
For a good functioning of the product, we recommend
the usage of a Securemme cylinder. Lubrication in the
rotation area of the stem is also recommended.
3. Mount the cylinder on the lock and secure it.
www.securemme.it [email protected]
4. Applica il gruppo motore sul gambo del cilindro fino in
battuta sulla serratura, assicurandoti dell’allineamento
del piano del gambo con il gruppo motore.
5. Fissa il gruppo motore, serrando l’apposita vite con
una chiave esagonale da 7 mm.
6. Monta il pomolo sul cilindro. Fissa sul pannello il
supporto plastico e avvitalo con le viti in dotazione.
7. Applica sul supporto plastico la placca metallica.
8
7
2.0
5
6
4
IT EN
4. Apply the power unit to the cylinder stem up against
the lock, making sure of alignment of the stem with the
motor unit.
5. Secure the motor unit, tightening the appropriate
screw with a 7mm hex wrench.
6. Mount the knob on the cylinder. Secure the plastic
support on the panel with the supplied screws.
7. Apply the metal plate to the plastic support.
7
6
5
4
3
2
1
L V+N V-
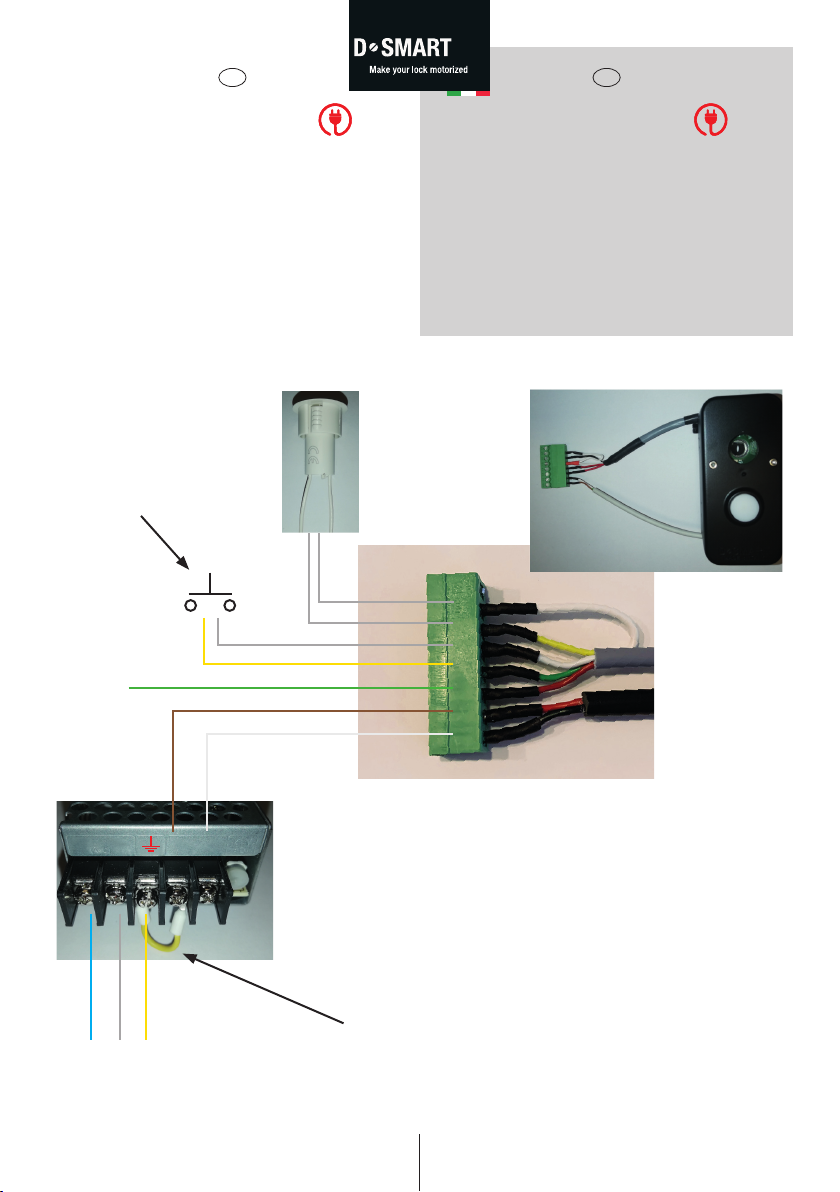
INSTALLAZIONE ELETTRICA
DESCRIZIONE MORSETTIERA
1- alimentazione V +
2- alimentazione V -
3- out Relè
4- apertura remota (contatto pulito)
5- apertura remota (contatto pulito)
6- sensore porta chiusa
7- sensore porta chiusa
2.0
ATTENZIONE:
Non rimuovere il collegamento
tra il V e la massa a terra
ATTENTION:
Do not remove the link between
the V and the ground mass
Sensore
magnetico
(porta)
Magnetic
sensor
(door)
Collegamento citofono: utilizzare
un relè che trasforma il contatto
alimentato in contatto pulito
Intercom connection: use a relay
that transforms the contact
powered in clean contact
Output relè
Output relay
Output
+4,2 Vdc
Input apertura remota
Input remote control
Alimentatore
Power supply
INPUT
100 – 240 VAC
IT EN
ELECTRICAL INSTALLATION
TERMINAL BLOCK DESCRIPTION
1- power supply V +
2- power supply V -
3- out Relay
4- remote opening (clean contact)
5- remote opening (clean contact)
6- closed door sensor
7- closed door sensor

INSTALLAZIONE MAGNETE SUL
TELAIO PORTA. Per versione
In dotazione è presente il sensore da incasso e il sensore
magnetico adesivo. Fora la porta con una punta da 19
mm, inserisci il magnete a filo e collegalo nel morsetto
(posizione 6-7 pag. 9) inserito in precedenza nella porta.
Applica il magnete adesivo sul telaio in corrispondenza
del magnete a filo inserito in precedenza. Verifica che
non ci siano più di 8 mm tra i due magneti per il corretto
funzionamento.
(Vedi configurazione installatore pag. 20-22)
www.securemme.it [email protected]
10
TELAIO
FRAME
MAGNETE ADESIVO
(posizionare in centro
al telaio, in linea d’asse
con la maniglia).
ADHESIVE MAGNET
(place in the center
of the frame, in axis
with the handle).
PORTA
DOOR
2.0
IT EN
MAGNET INSTALLATION ON THE
DOOR FRAME. For version
The build-in sensor and the Adhesive magnetic sensor.
Pierce the door with a 19mm bit, insert the magnet
flush and connect it to the clamp (position 6-7 page 9)
previously inserted in the door.
Apply the adhesive magnet to the matching frame of the
wire magnet previouosly inserted. for correct operation
check that there are no more than 8mm between the
two magnets.
(See installer configuration on pages 20-22)
2.0
BATTERIA AAA
BATTERY AAA
1
2
5
TASTO ACCOPPIAMENTO BT
PAIRING BT BUTTON
POWER
UTILIZZO TASTIERA
APERTURA: accensione con il tasto power + codice
utente + E.
CHIUSURA: accensione con il tasto power + E.
DISATTIVAZIONE SUONO: Accensione tasto power +
codice 1234567 + E.
ATTIVAZIONE SUONO: Accensione tasto power +
codice 7654321 + E.
AVVISO BATTERIA SCARICA: Durante l’inserimento del
codice, i led cambiano colore da verdi diventano rossi. Per
attivazione codici tastiera - crea nuova chiave, vedi pag.
17 funzioni rapide o pag. 28.
Durata stimata circa 8 mesi (calcolo stimato con 10
aperture giornaliere). Si raccomanda di utilizzare batterie
ENERGIZER L92 lithium AAA, VARTA o compatibili.
Possibilità di alimentare la tastiera direttamente tramite
Dsmart. In questo caso rimuovere le batterie e richiedere
apposito cavo. (OPTIONAL).
IT EN
INSTALLAZIONE TASTIERA
Descrizione:
Tastiera senza fili wireless, comunicazione bluetooth
con la Smart Lock. Si raccomanda di installarla nel
raggio d’azione di 1 m.
1. Applica la base tramite le viti in dotazione.
2. Inserisci le batterie in dotazione dietro la tastiera.
3. Accoppia la tastiera al dispositivo seguendo la procedura
guidata su smartphone. (Vedi pag. 24 punto 1.19)
4. Inserisci a pressione la tastiera sulla base.
5. Inserisci la vite di sicurezza sul fondo.
KEYBOARD INSTALLATION
Description:
Wireless keyboard, bluetooth communication with the
Smart Lock. It is recommended to install it in the radius
of action of 1 m.
1. Apply the base using the supplied screws.
2. Insert the supplied batteries in the back space of the
keyboard.
3. Connect the keyboard to your device by following
guided procedure on your smartphone. (See page 24)
4. Inset the keyboard onto its base by pressing.
5. Insert the safety screw on the bottom.
USE OF THE KEYBOARD
OPENING: switch on with the power button + code
user + E.
CLOSING: switch on with the power button + E.
SOUND DEACTIVATION: Power button + code 1234567
+ E.
SOUND ACTIVATION: Power button on + code
7654321 + E.
LOW BATTERY WARNING: While inserting the code,
the LED will change color from green to red. To activate
codes - create a new key - go to page 17 quick functions,
or to page 28.
Estimated Duration about 8 months (estimated with 10
daily openings). It is recommended to use ENERGIZER
batteries L92 lithium AAA, VARTA or compatible.
Possibility of power the keyboard directly via Dsmart. In
this case, remove the batteries and request a special one
cable. (OPTIONAL).
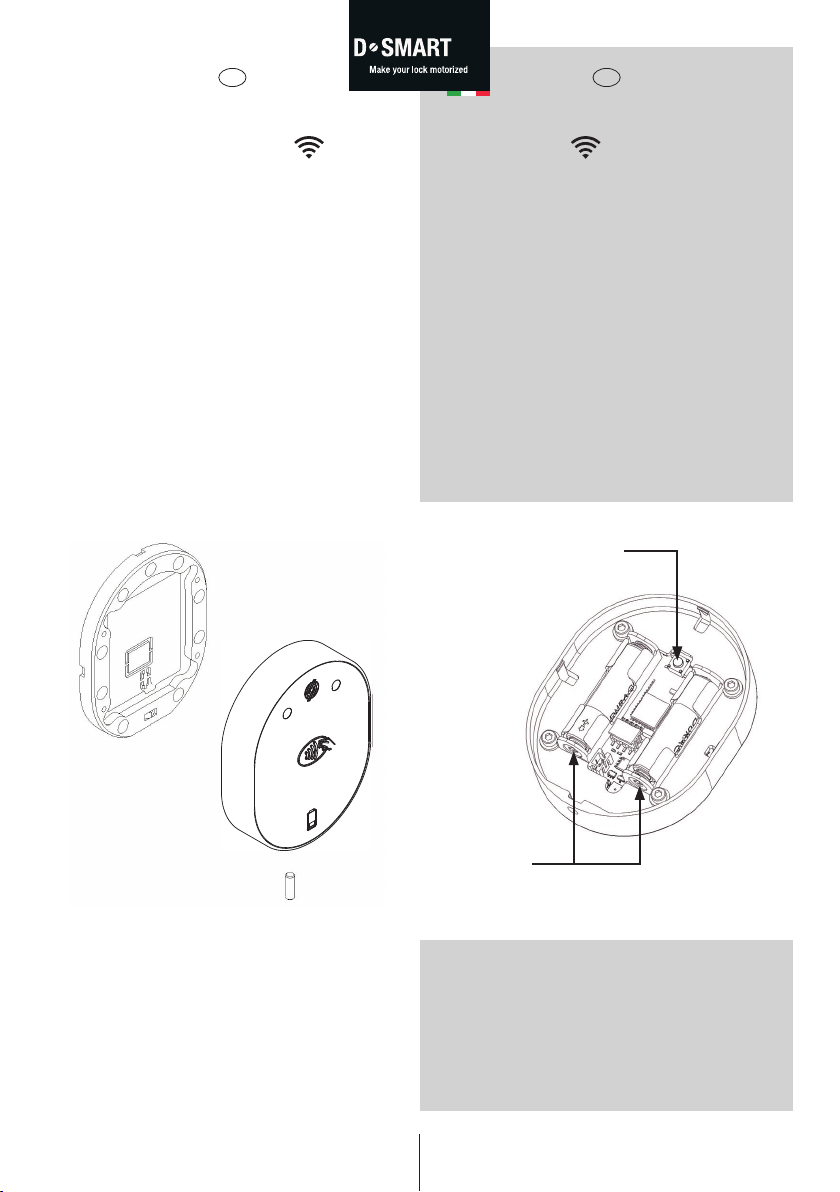
INSTALLAZIONE
LETTORE TRANSPONDER
Lettore transponder wireless, con tecnologia Mifare
Classic comunicazione bluetooth con la Smart Lock.
Si raccomanda di installarla nel raggio d’azione di 1
m. Attenzione è possibile attivare solo transponder
codificati originali Securemme.
1. Applica la base tramite le viti in dotazione.
2. Inserisci le batterie (AAA) in dotazione dietro il lettore.
3. Accoppia il lettore al dispositivo seguendo la
procedura guidata su smartphone.
4. Inserisci a pressione il lettore sulla base.
5. Inserisci la vite di sicurezza sul fondo.
Spazio e Possibilità di creare fino a 150 transponder
con fasce orarie differenti e personalizzabili.
Sistema No touch system - eviti di toccare maniglie e porte.
www.securemme.it [email protected]
AVVISO BATTERIA SCARICA: Durante l’apertura con
il transponder il led batteria lampeggia di rosso. Durata
stimata circa 8 mesi (calcolo stimato con 10 aperture
giornaliere). Si raccomanda di utilizzare batterie
ENERGIZER L92 lithium AAA, VARTA o compatibili.
Per creare nuove chiavi transponder vedi pag. 16
funzioni rapide o pag. 28 punto 2.8.
2.0
12
BATTERIA AAA
BATTERY AAA
1
2
5
TASTO ACCOPPIAMENTO BT
PAIRING BT BUTTON
IT EN
TRANSPONDER READER
INSTALLATION
Transponder reader with Mifare Classic technology
bluetooth communication with the Smart Lock. We
recommend the installation within a range of 1 m from
the Dsmart device. Warning: it is possible to activate
only original Securemme trasponders.
1. Apply the base using the supplied screws.
2. Insert the supplied batteries (AAA) behind the reader.
3. Connect the trasponder reader to your device by
following the guided procedure on smartphone.
4. Press the reader onto the base.
5. Insert the safety screw on the bottom.
Up to 150 transponders with different time customizable
slots. MIFARE technology and No touch system - avoid
touching handles and doors.
LOW BATTERY WARNING: When opening with the
transponder the battery led flashes red. Duration
estimated about 8 months (calculation estimated
with 10 openings every day). It is recommended to
use batteries ENERGIZER L92 lithium AAA, VARTA or
compatible. To create new transponder keys go to page
16 quick functions or to page 28, paragraph 2.8.
BATTERIA AAA
BATTERY AAA
1
2
5
TASTO ACCOPPIAMENTO BT
PAIRING BT BUTTON
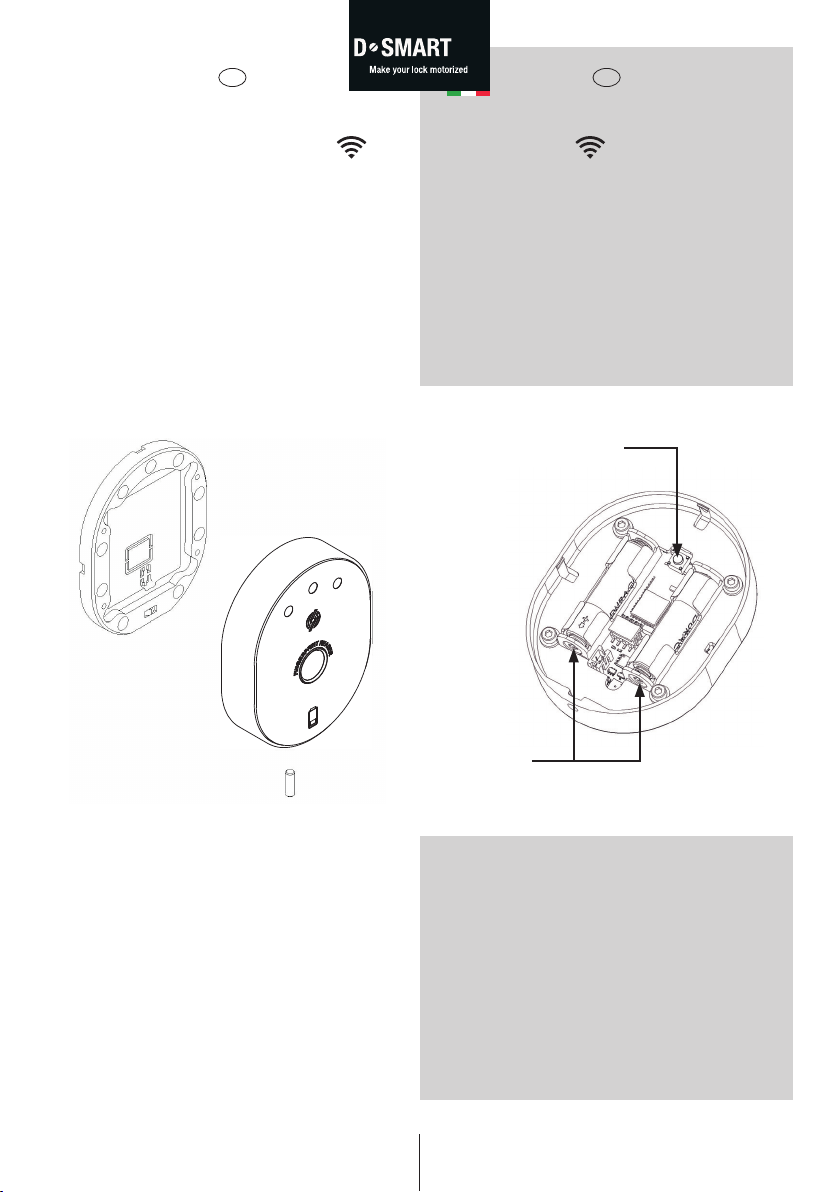
INSTALLAZIONE
LETTORE IMPRONTE DIGITALI
Lettore di impronte capacitivo wireless, comunicazione
bluetooth con la Smart Lock.Si raccomanda di installarla
nel raggio d’azione di 1 m.
1. Applica la base tramite le viti in dotazione.
2. Inserisci le batterie (AAA) in dotazione dietro il lettore.
3. Accoppia il lettore al dispositivo seguendo la
procedura guidata su smartphone.
4. Inserisci a pressione il lettore sulla base.
5. Inserisci la vite di sicurezza sul fondo.
2.0
AUTO SENSING
La funzione attiva il lettore solo quando il dito viene
appoggiato sul lettore risparmiando energia alle batterie.
COMUNICAZIONE CRIPTATA
La comunicazione tra il lettore e la serratura è criptata
con protocollo di alta sicurezza.
SENSORE CAPACITIVO
Questo sensore distingue un’impronta digitale reale
da una “contraffatta” realizzata artificialmente per
ingannare il lettore biometrico, il che rende il sistema
molto sicuro.
IT EN
FINGERPRINT READER
INSTALLATION
Capacitive fingerprint reader, bluetooth communication
with the Smart Lock. It is recommended to install it in
the radius action of 1 m.
1. Apply the base using the supplied screws.
2. Insert the supplied batteries (AAA) behind the reader.
3. Connect the reader to your device by following the
guided procedure on smartphone.
4. Press the reader onto the base.
5. Insert the safety screw on the bottom.
AUTO SENSING
The function activates the reader only when you put the
finger on the reader, saving battery power.
ENCRYPTED COMMUNICATION
Communication between the reader and the lock is
encrypted with high security protocol.
CAPACITIVE SENSOR
This sensor distinguishes a real fingerprint from a
“counterfeit” fingerprint, created in order to trick the
biometric reader, the system is very safe.
AVVERTENZE
Se il dito è sporco, danneggiato o bagnato può non
funzionare correttamente in fase di apertura l’appoggio
del dito deve avvenire nello stesso modo in cui è stato
memorizzato.
AVVISO BATTERIA SCARICA: Durante l’apertura con il
dito il led della batteria lampeggia di rosso.
Durata stimata circa 8 mesi (calcolo stimato con 10
aperture giornaliere). Si raccomanda di utilizzare batterie
ENERGIZER L92 lithium AAA, VARTA o compatibili.
CONFIGURAZIONE LETTORE
Crea una nuova chiave impronta digitale.
1. Entra nell App Dsmart 2.0.
2. Seleziona opzioni disponibile (vedi punto 2 di pag. 16).
3. Seleziona se sei Proprietario o Utente e inserisci il
codice di sicurezza personale precedentemente attivato.
4. Entra nel menù portachiavi, seleziona “crea” una
nuova chiave e associa, mentre il led interno sulla Smart
Lock lampeggia posiziona il dito sul lettore di impronta
fino quando si accende il led della batteria (verde).
a. Rimuovi il dito dal lettore e tocca una prima volta fino
a quando non si accende il primo led in alto (verde).
b. Rimuovi il dito dal lettore e toccare una seconda
volta fino a quando non si accende il secondo led in
alto (verde).
c. Rimuovere il dito dal lettore e toccare una terza volta
fino a quando non si accende il led in alto (verde). La
procedura è terminata quando il led sulla Smart Lock
termina di lampeggiare.
ELIMINAZIONE IMPRONTA: Entra nel menù portachiavi,
selezionare la chiave, cliccare elimina.
APERTURA: Appoggiare il dito sul lettore di impronte,
attendere conferma dei 3 led (verdi) in alto.
www.securemme.it [email protected]
2.0
14
IT EN
WARNINGS
If your finger is dirty, damaged or wet the system may
not function correctly. Every time you want to unlock the
door you should place the finger on the reader as you
did the first time.
LOW BATTERY WARNING: When your finger is placed
on the device the battery led flashes red. Estimated
duration about 8 months (calculation estimated with
10 daily openings). It is recommended to use batteries
ENERGIZER L92 lithium AAA, VARTA or compatible.
READER CONFIGURATION
Create a new fingerprint key.
1. Enter the Dsmart 2.0 App.
2. Select available options (see point 2 on page 16).
3. Select if you are Owner or User and enter the previously
activated personal security code.
4. Enter the keychain menu, select “create” one new
key and associate. While the internal LED on the Smart
Lock flashes place your finger on the fingerprint reader
until the battery led (green) lights up.
a. Remove your finger from the reader and put it again on
the reader until the first led at the top (green) lights up.
b. Remove your finger from the reader and tap a second
time until the second led lights up (green).
c. Remove your finger from the reader and tap a third
time until the LED at the top (green) lights up. The
procedure is finished when the LED on the Smart Lock
stops flashing.
DEACTIVATION OF ONE FINGERPRINT: Enter the
keychain menu, select the key, click delete.
OPENING: Place your finger on the fingerprint reader,
wait for confirmation of the 3 LEDs (green) at the top.

SMART BRIDGE wireless
Collega in rete la Smart Lock per gestirla e controllarla
da remoto. Comunicazione bluetooth.
È il dispositivo che permette di gestire e controllare da
remoto la Smart Lock, tramite smartphone, tablet o
computer.
15
www.securemme.it [email protected]
2.0
SMART
IT EN
SMART BRIDGE wireless
Connects the Smart Lock to the network to manage and
control it remotely. Bluetooth communication.
It is the device that allows you to manage and remotely
control your Smart Lock, via smartphone, tablet or
computer.
www.securemme.it [email protected]
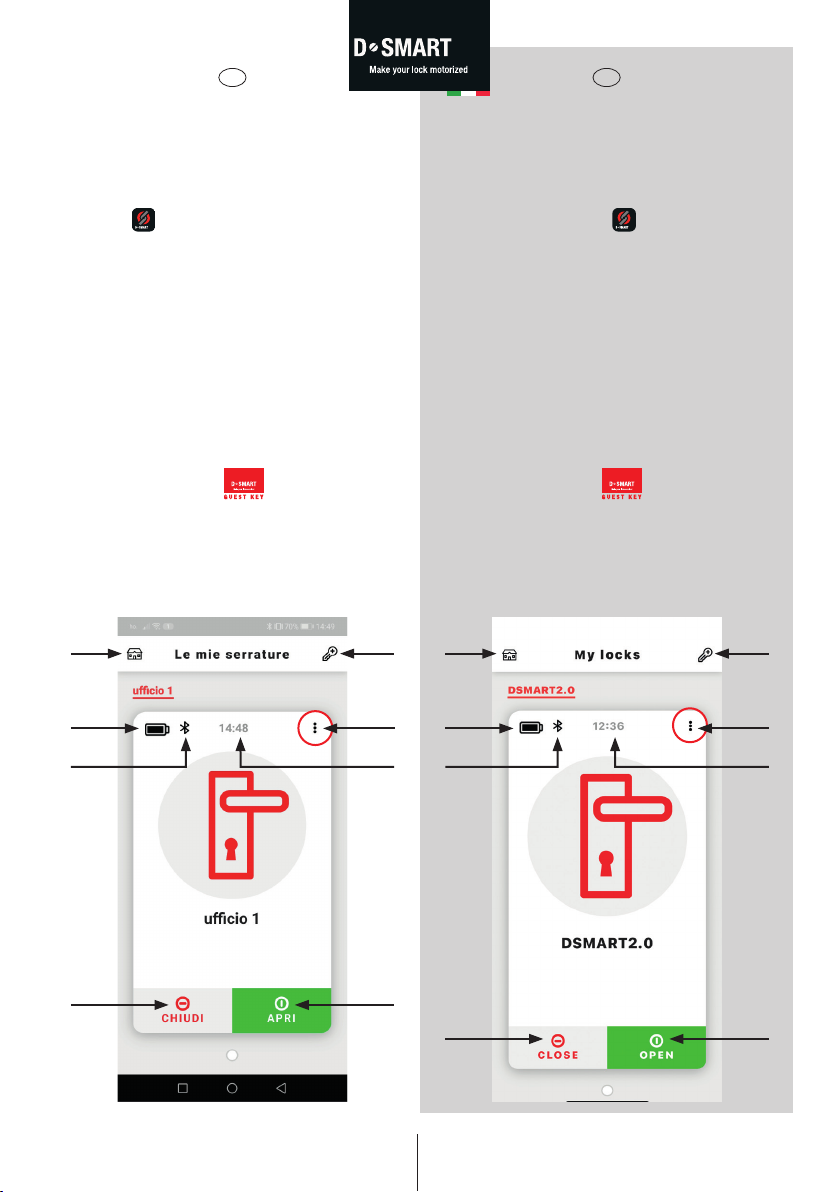
LEGENDA FUNZIONI RAPIDE
Dsmart 2.0
1. Aggiungi una nuova Smart Lock. Entra nella tua app
Dsmart 2.0 , e clicca su.
2. Opzioni disponibili (seleziona se sei Proprietario o
Utente) e inserisci il codice di sicurezza personale
precedentemente attivato.
3. Orario dispositivo (viene aggiornata l’ora automati-
camente entrando con lo smartphone.
4. Apertura Smart Lock.
5. Chiusura Smart Lock.
6. Serratura connessa (logo nero) serratura disconnes-
sa (logo grigio).
7. Indicatore livello batteria (se versione con batteria).
8. Web app Dsmart 2.0: Accesso diretto al sito
Securemme.it/dsmart/
16
2.0
2.0
IT EN
QUICK FUNCTIONS LEGEND
Dsmart 2.0
1. Add a new Smart Lock.
Enter yours Dsmart 2.0 app , and click on.
2. Available options (select if you are Owner or User
and enter your personal security code previously
activated.
3. Device time (the time is updated automatically
entering with the smartphone).
4. Smart Lock opening.
5. Smart Lock closure.
6. Lock connected (black logo) lock disconnected
(gray logo).
7. Battery level indicator (if version with battery).
8. Web app Dsmart 2.0: Direct access to the website
Securemme.it/dsmart/
2.0
1
6
8
7
3
45
2
OPZIONI
DISPONIBILI
1
6
8
7
3
45
2
AVAILABLE
OPTIONS
www.securemme.it [email protected]
2.0
17
IT EN
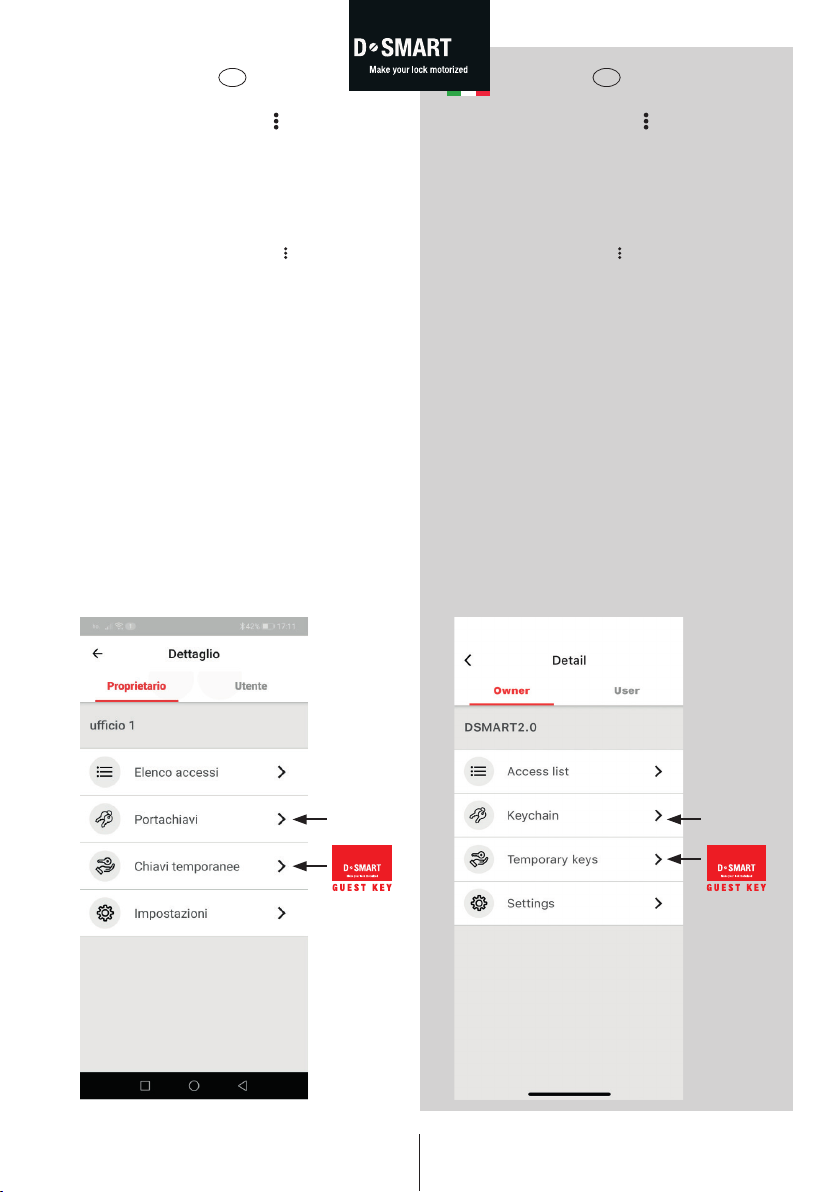
OPZIONI DISPONIBILI ( )
1. Crea una nuova chiave, funzione per abilitare una
apertura con smartphone/ trasponder/codice numerico/
impronta digitale.
1. Entra nell’App Dsmart 2.0.
2. Seleziona opzioni disponibili ( ) (vedi punto 2 di
pag. 16)
3. Seleziona se sei Proprietario o Utente e inserisci
il codice di sicurezza personale precedentemente
attivato.
4. Entra nel menù portachiavi, seleziona ciò che vuoi
abilitare (smartphone, transponder, codice numerico,
impronta digitale) e segui la procedura guidata.
5. A fine procedure sarà attiva la nuova chiave.
AVAILABLE OPTIONS ( )
1. Create a new key, function to enable one opening
with smartphone / transponder / numeric code /
Fingerprint.
1. Enter the Dsmart 2.0 App.
2. Select available options ( ) (see point 2 of page 16)
3. Select if you are Owner or User and enter the
previously activated personal security code.
4. Enter the keychain menu, select what device you
want to enable (smartphone, transponder, numeric
code, fingerprint) and follow the guided procedure.
5. At the end of the procedure the new key will be
activated.
1
Vedi pag.32
1
See page 32

Table of contents
Other Securemme Door Lock manuals


Popular Door Lock manuals by other brands


SDC
SDC S6300 Series installation instructions

CRP Securities
CRP Securities CAL-ROYAL Grade1 Installation and programming instructions

JAKO
JAKO RD101CP installation guide

SSS Siedle
SSS Siedle Siedle Steel SSM 611-01 Product information

Lloyd's
Lloyd's LC-1298 Quick installation guide

HavenLock
HavenLock HAVEN LOCKDOWN quick start guide


