Senal UC4-B User manual

USER’S GUIDE
UC4-B
Multi-Pattern USB Microphone
Table of Contents:
Introduction ..............................3
Precautions ..............................4
Overview ...................................5
Assembling the UC4-B ........6
Mounting the UC4-B on
a Microphone Stand ..............6
Windows Set-Up ................7-8
Mac OS Set-Up ........................9
Recording with
the UC4-B ...............................10
Selecting a
Polar Pattern ..................... 11-12
Troubleshooting .................... 13
Frequency Charts ........... 14-15
Specifications .................. 16-17
Warranty ..................................18

2

Introduction .....................................................................................................
Thank you for choosing Senal.
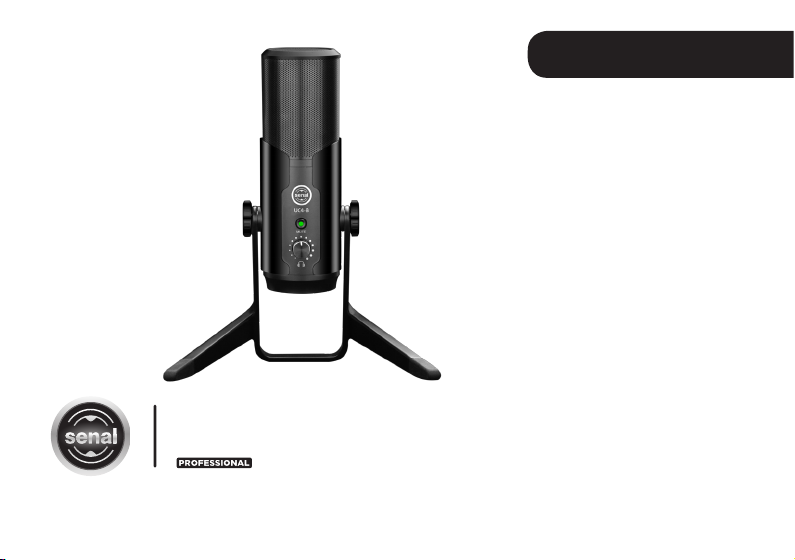
The UC4-B is the ideal microphone for so many different applications, it’s
impossible to list them all. Podcasts, voiceovers, instruments, rehearsals, and
broadcasts are just some of the great uses for this versatile mic.
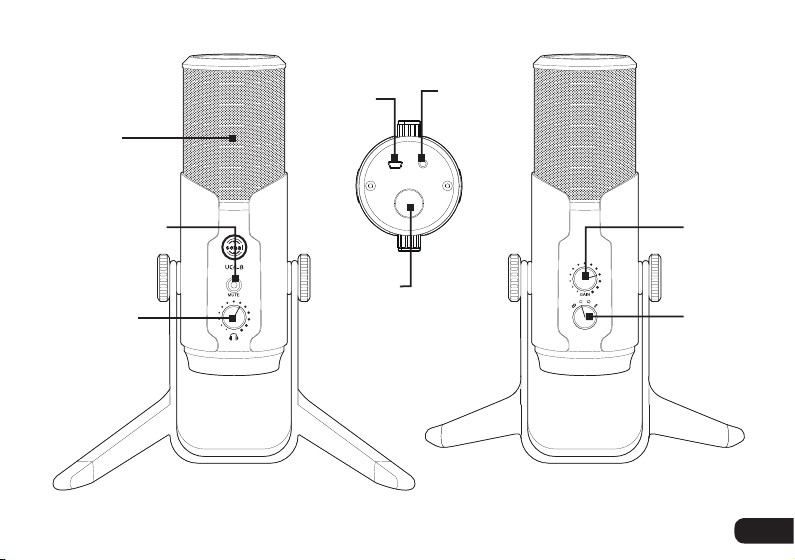
The UC4-B features an internal analog-to-digital converter that offers 16/24-bit depth and
up to 192 kHz resolution for stunning, accurate, and robust sound. An innovative triple-
capsule array allows you to record in stereo to capture ambient sound, or select between
cardioid, bidirectional, or omnidirectional polar patterns. Whether you’re recording
a solo voice, instrument, interview, or meeting, the UC4-B has a setting to perfectly
capture the sound. And the headphone output provides latency-free monitoring. The
microphone connects directly to a USB port on your computer, so phantom power or
an additional A/D converter isn’t necessary. Plug-and-play connectivity and simple,
intuitive controls will have you recording broadcast-quality sound in seconds.
3

..................................................................................................... Precautions
Precautions
• Please read and follow these instructions, and keep this manual in a safe place.
• Exposure to high sound levels can cause permanent hearing loss.
Avoid listening at high volumes for extended periods.
• Keep this product away from water and flammable gases or liquids.
• Do not attempt to disassemble or repair this product yourself. There are
components inside that can produce a hazardous electric shock.
• Handle this product with care.
• Clean this product with only a soft, dry cloth.
• Make sure that this product is intact and that there are no missing parts.
• All images are for illustrative purposes only.
4

Overview .......................................................................................................
Overview
Microphone
capsules
Mute switch and
power indicator
Headphone
volume control
Gain
control
Polar pattern
selector
Mini USB
port
Headphone
output
5/8 in.
mic stand socket
5

................................................................................ Assembling / Mounting the UC4-B
Assembling the UC4-B
The mic stand’s feet should extend out toward the front of the
microphone. To save space on your desktop, the microphone can
be mounted with the feet pointing toward the back.
1. Place the washers on either side of the microphone.
The metal side should face out.
2. Place the microphone and washers into the desktop
stand, and align the attachment holes.
3. Screw in the thumbscrews on both sides, and tighten until secure.
Mounting the UC4-B on a Microphone Stand
1. Remove the microphone from the desktop stand
by unscrewing the thumbscrews.
2. If the microphone stand’s threaded mount includes a locking
washer, turn it clockwise until it’s at the bottom of the threads.
3. Screw the UC4-B onto the mic stand.
4. Tighten the connection by rotating the locking washer counterclockwise until secure.
6

Windows 10 Set-Up ..............................................................................................
Windows Set-Up
Use the included USB cable to plug the UC4-B into your computer. Once the connection
is made, the power indicator on the front of the microphone will glow green.
Your computer will automatically detect the UC4-B. If your computer is
connected to the internet, it will download the appropriate driver.
To set the UC4-B as the default mic, follow these steps.
Windows 10
1. Go to the Control Panel, and open the Hardware and Sound control panel.
2. Click on Sound in the list of control panels.
3. Click on the Recording tab, and select the UC4-B microphone in the list.
4. Click on the Properties button at the bottom of the window.
5. In the Properties window, click on the Levels tab, and set the microphone level
to 100% as a starting point. Once this is set, you can adjust the gain level with
the gain control knob on the microphone. If the signal from the microphone is
distorted or too loud, you can return to this window to decrease the volume.
6. Click OK to save the changes and exit.
7

.......................................................................................... Windows XP / 7 Set-Up
Windows XP
1. Go to the Control Panel, and double-click on the Sounds and Audio Devices icon. Then click on
the Sound icon.
2. Click on the Audio tab. Select the UC4-B microphone as the default device in both the Sound
playback and Sound recording drop-down menus.
3. Click OK to save the changes and exit.
Windows 7
1. Go to the Control Panel, and select the Hardware and Sound icon. Then click on the Sound icon.
2. In the Sound Preferences window, select the UC4-B microphone under the Playback and
Recording tabs.
3. After you have selected the UC4-B under the Recording tab, click on the Properties button.
4. In the Microphone Properties window, click on the Levels tab, and set your microphone
volume to 100%. Once this is set, you can adjust the gain level with the gain control knob
on the microphone.
5. Click on the Advanced tab. Select a sample rate from 44.1 to 192 kHz, and a bit rate of 16 or 24
for your recording. Click OK to set your selections, and exit the Control Panel.
8

Mac OS Set-Up ..................................................................................................
Mac OS Set-Up
1. Use the included USB cable to plug the UC4-B into your computer. Once the connection
is made, the power indicator on the front of the microphone will glow green.
2. Open the System Preferences window, and double-click on the Sound icon.
3. In the Sound preferences window, select the UC4-B microphone under the input and output tabs.
4. In the Input screen, set the input and output volumes to 100%. Once this is set,
you can adjust the gain level with the gain control knob on the microphone.
5. Close the Sound Preferences, and quit system preferences.
6. Access your recording software to select the sample rate and bit depth for your recording.
9

....................................................................................................... Recording
Recording with the UC4-B
Gain Control
Use the gain control knob to adjust the UC4-B’s input gain.
Higher gain is usually preferable when recording quiet subjects, and lower gain is preferable
for loud subjects, although your needs will depend upon your specific scenario.
Monitoring with Your Headphones
Plug your headphones directly into the UC4-B’s headphone jack on the bottom of the microphone,
and use the volume control on the front of the microphone to adjust the headphone volume.
Monitoring via the microphone’s headphone output prevents the latency that
often occurs when monitoring through a computer’s headphone jack.
Tip: To avoid an accidental burst of high volume, make sure to turn the
headphone volume down before plugging in your headphones.
Mute Button
Press the mute button to stop transmitting signal. The power
indicator will glow red when the microphone is muted.
Press the mute button again to unmute the microphone. The power indicator will glow green.
10

Polar-Pattern Selection ..........................................................................................
Selecting a Polar Pattern
The polar-pattern selector on the back of the microphone allows you to select
one of four patterns: stereo, cardioid, bidirectional, and omnidirectional.
The Senal logo is on the front of the microphone.
Stereo
The dual capsules in the microphone are deployed in an XY pattern for a
wide stereo spread and a realistic sonic image. Stereo mode is perfect when
you’re recording a musical ensemble, dialog, or general ambiance.
Point the microphone directly at the sound source so equal signal will be recorded
on both channels. If you prefer to change the stereo balance of your sound
to favor one channel, reposition the microphone to the left or right.
Cardioid
Cardioid mode captures sound that’s directly in front of the microphone while
rejecting off-axis sound. A cardioid polar pattern delivers a present and rich sound
without the atmosphere or ambiance you hear in other polar patterns.
The cardioid polar pattern is best for recording voiceovers, vocals,
podcasts, or if you’re in a noisy environment.
11

.......................................................................................... Polar-Pattern Selection
Bidirectional
Bidirectional mode captures sound directly in front of and directly behind the microphone
while it rejects sound from the sides. The bidirectional polar pattern is a time- and
space-saver because you can record two subjects with a single microphone.
Bidirectional polar pattern is best for recording interviews, conversations, or vocal duets.
It will deliver a natural sound that would ordinarily require two microphones.
Omnidirectional
In omnidirectional mode, the microphone picks up sound in a 360° pattern. Sounds
are equally clear and loud no matter with direction they come from. Omnidirectional
polar pattern also picks up the most ambiance and room noise, so the omnidirectional
setting is usually most effective in rooms with adequate acoustic treatment.
The omnidirectional polar pattern is best when recording a large meeting or
conversation, band rehearsal, or multiple people sitting around a conference table.
12

Troubleshooting .................................................................................................
Problem Solution
The microphone
does not turn on.
Make sure the USB cable is completely plugged into the computer’s
and the UC4-B’s USB ports.
I don’t hear
anything in the
headphones, or
the headphones
are too quiet.
Make sure the headphones are completely plugged into the headphone
jack on the bottom of the microphone.
If the power indicator glows red, the mute button is engaged. Press the
mute button to unmute the microphone. The power indicator will glow
green.
Turn up the headphone volume on the front of the microphone.
Turn up the master volume on your computer.
If your headphones have a built-in volume control, turn it up.
The sound is
distorted.
Turn down the UC4-B’s gain control.
Move the microphone farther away from the sound source.
Troubleshooting
13

. . . . . . . . . . . . . . . . . . . . . . . . . . . . . . . . . . . . . . . . . . . . . . . . . . . . . . . . . . . . . . . . . . . . . . . . . . . . . . . . . . . . . . . . . . . . . . . . . Omni / Cardioid
0°
30°
60°
90°
120°
150°
180°
210°
240°
270°
300°
330°
0°
30°
60°
90°
120°
150°
180°
210°
240°
270°
300°
330°
50 100 200 500 1K 2K 5K 10K 20K
-20
-15
-10
-0
-5
5
10
50 100 200 500 1K 2K 5K 10K 20K
-20
-15
-10
-0
-5
5
10
0°
30°
60°
90°
120°
150°
180°
210°
240°
270°
300°
330°
0°
30°
60°
90°
120°
150°
180°
210°
240°
270°
300°
330°
0°
30°
60°
90°
120°
150°
180°
210°
240°
270°
300°
330°
50 100 200 500 1K 2K 5K 10K 20K
-20
-15
-10
-0
-5
5
10
50 100 200 500 1K 2K 5K 10K 20K
-20
-15
-10
-0
-5
5
10
Polar Pattern
Polar Pattern
Frequency Response
Frequency Response
Hz
dB
Hz
dB
Hz
dB
Hz
dB
Stereo
L Channel R Channel
Omni
Cardioid
Bidirectional
14

Bidirectional / Stereo ............................................................................................
0°
30°
60°
90°
120°
150°
180°
210°
240°
270°
300°
330°
0°
30°
60°
90°
120°
150°
180°
210°
240°
270°
300°
330°
50 100 200 500 1K 2K 5K 10K 20K
-20
-15
-10
-0
-5
5
10
50 100 200 500 1K 2K 5K 10K 20K
-20
-15
-10
-0
-5
5
10
0°
30°
60°
90°
120°
150°
180°
210°
240°
270°
300°
330°
0°
30°
60°
90°
120°
150°
180°
210°
240°
270°
300°
330°
0°
30°
60°
90°
120°
150°
180°
210°
240°
270°
300°
330°
50 100 200 500 1K 2K 5K 10K 20K
-20
-15
-10
-0
-5
5
10
50 100 200 500 1K 2K 5K 10K 20K
-20
-15
-10
-0
-5
5
10
Polar Pattern
Polar Pattern
Frequency Response
Frequency Response
Hz
dB
Hz
dB
Hz
dB
Hz
dB
Stereo
L Channel R Channel
Omni
Cardioid
Bidirectional
15

. . . . . . . . . . . . . . . . . . . . . . . . . . . . . . . . . . . . . . . . . . . . . . . . . . . . . . . . . . . . . . . . . . . . . . . . . . . . . . . . . . . . . . . . . . . . . . . . . . . Specifications
Transducer Condenser (×3)
Capsule Diaphragm 16 mm (×3)
Polar Pattern Stereo, cardioid, bidirectional, omnidirectional
Pattern Selection Switchable
Frequency Response 20 Hz to 20 kHz
Sensitivity 5.6 mV (1 V/Pa @ 1 kHz)
Maximum SPL 120 dB (THD: 0.5% 1 kHz)
Output Impedance 32 Ω
Power Output 100 mW
Bit Depth 16 or 24 bit
Sample Rate 44.1 to 192 kHz
Operating System Support Windows 7 or later, OSX 10.9 or later
Available Port USB
Analog Performance
Digital Performance
16

Specifications ...................................................................................................
Output Connector Mini USB
Operating Current Consumption 500 mA
Operating Voltage 5 V
Data Transmission Speed USB 2.0
Controls Headphone volume knob
Gain knob
Polar-pattern selector
Mute switch
USB Cable Length 7.5 ft. (2.3 m)
Length 7.1 in. (18.1 cm)
Diameter 2.4 in. (6.1 cm)
Weight 2.5 lb. (1.13 kg) with stand
General Specifications
17

. . . . . . . . . . . . . . . . . . . . . . . . . . . . . . . . . . . . . . . . . . . . . . . . . . . . . . . . . . . . . . . . . . . . . . . . . . . . . . . . . . . . . . . . . . . . . . . . . . . . . . . . Warranty
GG1
One-Year Limited Warranty
This Senal product is warranted to the original purchaser to be free from defects in materials and workmanship
under normal consumer use for a period of one (1) year from the original purchase date or thirty (30) days
after replacement, whichever occurs later. The warranty provider’s responsibility with respect to this limited
warranty shall be limited solely to repair or replacement, at the provider’s discretion, of any product that fails
during normal use of this product in its intended manner and in its intended environment. Inoperability of the
product or part(s) shall be determined by the warranty provider. If the product has been discontinued, the
warranty provider reserves the right to replace it with a model of equivalent quality and function.
This warranty does not cover damage or defect caused by misuse, neglect, accident, alteration, abuse,
improper installation or maintenance. EXCEPT AS PROVIDED HEREIN, THE WARRANTY PROVIDER MAKES
NEITHER ANY EXPRESS WARRANTIES NOR ANY IMPLIED WARRANTIES, INCLUDING BUT NOT LIMITED
TO ANY IMPLIED WARRANTY OF MERCHANTABILITY OR FITNESS FOR A PARTICULAR PURPOSE. This
warranty provides you with specific legal rights, and you may also have additional rights that vary from state
to state.
To obtain warranty coverage, contact the Senal Customer Service Department to obtain a return merchandise
authorization (“RMA”) number, and return the defective product to Senal along with the RMA number and
proof of purchase. Shipment of the defective product is at the purchaser’s own risk and expense.
For more information or to arrange service, visit www.senalsound.com or call Customer Service at 212-594-2353.
Product warranty provided by the Gradus Group.
www.gradusgroup.com
Senal is a registered trademark of the Gradus Group. © 2018 Gradus Group LLC. All Rights Reserved.
18

19

www.senalsound.com
Table of contents
Other Senal Microphone manuals

Senal
Senal CXBM-620 User manual

Senal
Senal MXGN Series User manual

Senal
Senal ub-440 User manual

Senal
Senal ub-440 User manual

Senal
Senal SCI-3212 User manual

Senal
Senal SCS-98 User manual

Senal
Senal scm-660 User manual

Senal
Senal CXGN Series User manual

Senal
Senal MC24-EL User manual

Senal
Senal ENG-18R User manual