Senal MXGN Series User manual

Table of Contents:
Introduction .............................2
Precautions ..............................3
Overview ................................. 4
Instructions..........................5-9
Specifications........................10
Troubleshooting ....................11
Warranty .................................12
USER’S GUIDE
MXGN SERIES
CARDIOID GOOSENECK
MICROPHONE WITH INTEGRATED BASE

2
▪ ▪ ▪ ▪ ▪ ▪ ▪ ▪ ▪ ▪ ▪ ▪ ▪ ▪ ▪ ▪ ▪ ▪ ▪ ▪ ▪ ▪ ▪ ▪ ▪ ▪ ▪ ▪ ▪ ▪ ▪ ▪ ▪ ▪ ▪ ▪ ▪ ▪ ▪ ▪ ▪ ▪ ▪ ▪ ▪ ▪ ▪ ▪ ▪ ▪ ▪ ▪ ▪ ▪ ▪ ▪ ▪ ▪ ▪ ▪ ▪ ▪ ▪ ▪ ▪ ▪ ▪ ▪ ▪ ▪ ▪ ▪ ▪ ▪ ▪ ▪ ▪ ▪ ▪ ▪ ▪ ▪ ▪ ▪ ▪
Introduction
Thank you for choosing Senal.
Senal’s MXGN-series Professional Gooseneck Microphones are sleek microphones that are
designed with optimized frequency response and sensitivity ideal for capturing voices.
The included cardioid microphone capsule is perfect for video conferences, lectures,
and meetings. To adapt your microphone for other conference, speaking, or desktop
applications, the MXGN-series is designed for interchangeable omnidirectional and
supercardioid capsules (available separately).
The MXGN-series microphones integrate into most AV conferencing systems or sound
systems. For quiet and professional audio, balanced output rejects unwanted RF and
EM interference and noise, even over long cable runs, and a low-cut filter minimizes
room noise and low-end rumble. A programmable touch pad mutes or activates the
microphone with a gentle finger tap, and an LED ring light located on the gooseneck is
a visual indicator of the mic’s status. For public speaking applications, the microphones’
stylish and slim appearance won’t obscure or distract attention away from the person
behind the microphone.

3
Precautions
▪ ▪ ▪ ▪ ▪ ▪ ▪ ▪ ▪ ▪ ▪ ▪ ▪ ▪ ▪ ▪ ▪ ▪ ▪ ▪ ▪ ▪ ▪ ▪ ▪ ▪ ▪ ▪ ▪ ▪ ▪ ▪ ▪ ▪ ▪ ▪ ▪ ▪ ▪ ▪ ▪ ▪ ▪ ▪ ▪ ▪ ▪ ▪ ▪ ▪ ▪ ▪ ▪ ▪ ▪ ▪ ▪ ▪ ▪ ▪ ▪ ▪ ▪ ▪ ▪ ▪ ▪ ▪ ▪ ▪ ▪ ▪ ▪ ▪ ▪ ▪ ▪ ▪ ▪ ▪ ▪ ▪ ▪ ▪ ▪ ▪
Precautions
• Please read and follow these instructions, and keep this manual in a safe place.
• Keep this product away from water and any flammable gases or liquids.
• Do not attempt to disassemble or repair this product.
• Handle this product with care.
• Use only parts provided by the manufacturer.
• Clean this product with only a soft, dry cloth.
• Make sure that this product is intact and that there are no missing parts.
• All images are for illustrative purposes only.

4
LOCK
MUTE
TALK
FLAT
LOW CUT
▪ ▪ ▪ ▪ ▪ ▪ ▪ ▪ ▪ ▪ ▪ ▪ ▪ ▪ ▪ ▪ ▪ ▪ ▪ ▪ ▪ ▪ ▪ ▪ ▪ ▪ ▪ ▪ ▪ ▪ ▪ ▪ ▪ ▪ ▪ ▪ ▪ ▪ ▪ ▪ ▪ ▪ ▪ ▪ ▪ ▪ ▪ ▪ ▪ ▪ ▪ ▪ ▪ ▪ ▪ ▪ ▪ ▪ ▪ ▪ ▪ ▪ ▪ ▪ ▪ ▪ ▪ ▪ ▪ ▪ ▪ ▪ ▪ ▪ ▪ ▪ ▪ ▪ ▪ ▪ ▪ ▪ ▪ ▪ ▪ ▪ ▪
Overview
Overview
Removable
microphone
capsule
Windscreen
Low-cut filter Talk/Mute selector
Gooseneck
arm
Microphone
base
Touch pad
LED ring
light
5
Instructions
▪ ▪ ▪ ▪ ▪ ▪ ▪ ▪ ▪ ▪ ▪ ▪ ▪ ▪ ▪ ▪ ▪ ▪ ▪ ▪ ▪ ▪ ▪ ▪ ▪ ▪ ▪ ▪ ▪ ▪ ▪ ▪ ▪ ▪ ▪ ▪ ▪ ▪ ▪ ▪ ▪ ▪ ▪ ▪ ▪ ▪ ▪ ▪ ▪ ▪ ▪ ▪ ▪ ▪ ▪ ▪ ▪ ▪ ▪ ▪ ▪ ▪ ▪ ▪ ▪ ▪ ▪ ▪ ▪ ▪ ▪ ▪ ▪ ▪ ▪ ▪ ▪ ▪ ▪ ▪ ▪ ▪ ▪ ▪ ▪ ▪
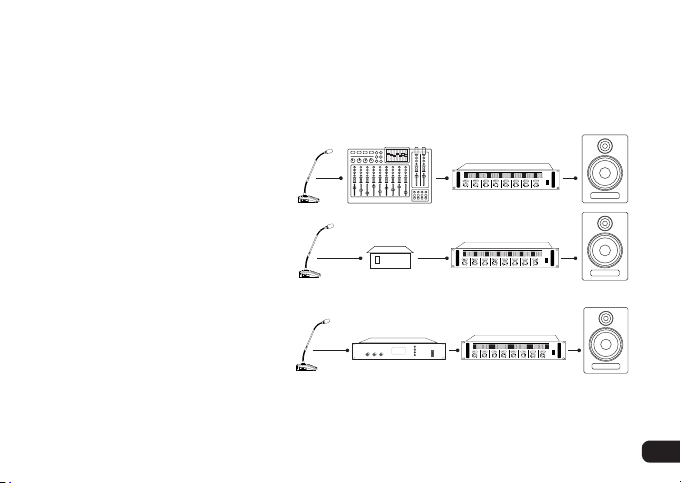
Setting Up the MXGN Gooseneck Microphone
Each application of the MXGN Microphone will be slightly different.
The following scenarios cover frequently used setups.
Live Lecture/Sound Reinforcement
This is ideal in an auditorium or
house of worship where a voice
needs to be amplified for an
audience.
Note: MXGN microphones need
phantom power in order
to operate.
Video and Audio Conferencing
MXGN microphones are
compatible with most audio and
video conferencing systems. Refer
to the conferencing system’s user
manual for setup instructions.
Mixing console
Power amplifier
LOCK
MUTE
TALK
Phantom
power supply Power amplifier
LOCK
MUTE
TALK
Remote video
conference system Power amplifier
LOCK
MUTE
TALK

6
▪ ▪ ▪ ▪ ▪ ▪ ▪ ▪ ▪ ▪ ▪ ▪ ▪ ▪ ▪ ▪ ▪ ▪ ▪ ▪ ▪ ▪ ▪ ▪ ▪ ▪ ▪ ▪ ▪ ▪ ▪ ▪ ▪ ▪ ▪ ▪ ▪ ▪ ▪ ▪ ▪ ▪ ▪ ▪ ▪ ▪ ▪ ▪ ▪ ▪ ▪ ▪ ▪ ▪ ▪ ▪ ▪ ▪ ▪ ▪ ▪ ▪ ▪ ▪ ▪ ▪ ▪ ▪ ▪ ▪ ▪ ▪ ▪ ▪ ▪ ▪ ▪ ▪ ▪ ▪ ▪ ▪ ▪ ▪ ▪
Instructions
Powering the MXGN Microphone
The MXGN microphones operate on phantom power. Once connected to the power
source, the MXGN mic is ready to work.
Important! When integrating the MXGN microphone into a video or audio conferencing
system, or using it with a mixing board, make sure that phantom power is enabled.
Optional Mic Capsules
The MXGN-12 and MXGN-18 include a cardioid mic capsule. Omnidirectional (MXGN-ICO)
and supercardioid (MXGN-ICS) capsules are available separately.
To exchange capsules, unscrew the capsule that’s attached to the gooseneck, and screw
on the replacement capsule. Be sure not to overtighten the capsule when installing it.
Cardioid Polar Pattern
The cardioid capsule lessens off-axis noise. Use it in rooms with inadequate acoustic
treatment or in spaces where background noise is problematic. The MXGN will capture
the voice of the person sitting directly in front it while it minimizes room noise and
reverberation.
Omnidirectional Polar Pattern
The omnidirectional capsule picks up sound in a 360-degree pattern. Use it in quiet
rooms with adequate acoustic treatment. The microphone will pick up all participants
seated on the same side of a table. Alternatively, it can be used to capture several
people seated around the microphone.

7
Instructions
▪ ▪ ▪ ▪ ▪ ▪ ▪ ▪ ▪ ▪ ▪ ▪ ▪ ▪ ▪ ▪ ▪ ▪ ▪ ▪ ▪ ▪ ▪ ▪ ▪ ▪ ▪ ▪ ▪ ▪ ▪ ▪ ▪ ▪ ▪ ▪ ▪ ▪ ▪ ▪ ▪ ▪ ▪ ▪ ▪ ▪ ▪ ▪ ▪ ▪ ▪ ▪ ▪ ▪ ▪ ▪ ▪ ▪ ▪ ▪ ▪ ▪ ▪ ▪ ▪ ▪ ▪ ▪ ▪ ▪ ▪ ▪ ▪ ▪ ▪ ▪ ▪ ▪ ▪ ▪ ▪ ▪ ▪ ▪ ▪ ▪
Supercardioid Polar Pattern
The supercardioid capsule has a slightly narrower pickup field and rejects more off-
axis noise than the cardioid capsule. This capsule is an excellent choice for a stationary
lecturer at a podium or for speaking in high-noise environments. It can be used in a multi-
microphone setup, providing that it’s pointed directly at the person using it.
Using the MXGN Gooseneck Microphone
Using the Windscreen
The MXGN microphone should always be used with the included foam windscreen. It
prevents the vocal pops that occur with the letters P and B, and it protects the mic
capsule from corrosive moisture.
To install the windscreen, slip it over the microphone capsule.
Microphone Placement
The optimum placement for the microphone is 6 to 12 inches from the source.
Ideally, the microphone should be pointed directly toward the source for capturing the
best sound.
Always point the microphones away from speakers and other sources of unwanted noise.

8
▪ ▪ ▪ ▪ ▪ ▪ ▪ ▪ ▪ ▪ ▪ ▪ ▪ ▪ ▪ ▪ ▪ ▪ ▪ ▪ ▪ ▪ ▪ ▪ ▪ ▪ ▪ ▪ ▪ ▪ ▪ ▪ ▪ ▪ ▪ ▪ ▪ ▪ ▪ ▪ ▪ ▪ ▪ ▪ ▪ ▪ ▪ ▪ ▪ ▪ ▪ ▪ ▪ ▪ ▪ ▪ ▪ ▪ ▪ ▪ ▪ ▪ ▪ ▪ ▪ ▪ ▪ ▪ ▪ ▪ ▪ ▪ ▪ ▪ ▪ ▪ ▪ ▪ ▪ ▪ ▪ ▪ ▪ ▪ ▪
Instructions
Powering the MXGN Microphone
The MXGN microphones operate on phantom power. Once connected to the power
source, the MXGN mic is ready to work.
Important! When integrating the MXGN microphone into a video or audio conferencing
system, or using it with a mixing board, make sure that phantom power is enabled.
Low-Cut Filter
Activate the low-cut filter when using the microphone in rooms with inadequate acoustic
treatment or constant noise from air conditioning, fans, or lights.
To filter out low frequencies, move the selector switch to the Low Cut position. Moving
the selector to the Flat position turns off the low-cut filter.
Talk/Mute
Move the switch to select the talk/mute function of the touch pad.
When the LED ring light is on, the microphone is on.
When is the LED ring light is off, the microphone is muted.
The touch pad on the microphone’s base controls the programmable mute function.
There are three programming options.

9
Instructions
▪ ▪ ▪ ▪ ▪ ▪ ▪ ▪ ▪ ▪ ▪ ▪ ▪ ▪ ▪ ▪ ▪ ▪ ▪ ▪ ▪ ▪ ▪ ▪ ▪ ▪ ▪ ▪ ▪ ▪ ▪ ▪ ▪ ▪ ▪ ▪ ▪ ▪ ▪ ▪ ▪ ▪ ▪ ▪ ▪ ▪ ▪ ▪ ▪ ▪ ▪ ▪ ▪ ▪ ▪ ▪ ▪ ▪ ▪ ▪ ▪ ▪ ▪ ▪ ▪ ▪ ▪ ▪ ▪ ▪ ▪ ▪ ▪ ▪ ▪ ▪ ▪ ▪ ▪ ▪ ▪ ▪ ▪ ▪ ▪ ▪
Mute
In Mute mode, the microphone is always active. Touch and hold the sensor pad to mute
the microphone, and release to activate the microphone again.
This function is useful for momentarily muting the microphone if you need to cough, or
to say something that isn’t heard by other participants.
Talk
In Talk mode, the microphone is always muted. Touch and hold the sensor pad to activate
the microphone, and release to mute the microphone again.
This function is useful for a participant that needs to speak only occasionally. Keeping the
microphone defaulted to mute prevents too many open microphones at one time, and
minimizes the chance of feedback, excessive noise, or interference.
Lock
Tap the sensor pad to change the microphone’s status. The microphone will stay on or
muted until you touch the sensor pad again.
Selecting Lock is ideal for meetings where conversation between participants is
expected. Alternatively, each participant can activate the microphone to speak
individually, and then mute the microphone to listen to the other remarks.

10
▪ ▪ ▪ ▪ ▪ ▪ ▪ ▪ ▪ ▪ ▪ ▪ ▪ ▪ ▪ ▪ ▪ ▪ ▪ ▪ ▪ ▪ ▪ ▪ ▪ ▪ ▪ ▪ ▪ ▪ ▪ ▪ ▪ ▪ ▪ ▪ ▪ ▪ ▪ ▪ ▪ ▪ ▪ ▪ ▪ ▪ ▪ ▪ ▪ ▪ ▪ ▪ ▪ ▪ ▪ ▪ ▪ ▪ ▪ ▪ ▪ ▪ ▪ ▪ ▪ ▪ ▪ ▪ ▪ ▪ ▪ ▪ ▪ ▪ ▪ ▪ ▪ ▪ ▪ ▪ ▪ ▪ ▪ ▪ ▪
Specications
▪ ▪ ▪ ▪ ▪ ▪ ▪ ▪ ▪ ▪ ▪ ▪ ▪ ▪ ▪ ▪ ▪ ▪ ▪ ▪ ▪ ▪ ▪ ▪ ▪ ▪ ▪ ▪ ▪ ▪ ▪ ▪ ▪ ▪ ▪ ▪ ▪ ▪ ▪ ▪ ▪ ▪ ▪ ▪ ▪ ▪ ▪ ▪ ▪ ▪ ▪ ▪ ▪ ▪ ▪ ▪ ▪ ▪ ▪ ▪ ▪ ▪ ▪ ▪ ▪ ▪ ▪ ▪ ▪ ▪ ▪ ▪ ▪ ▪ ▪ ▪ ▪ ▪ ▪ ▪ ▪ ▪ ▪ ▪
Specications
Transducer Back electret condenser
Polar Pattern Cardioid
Frequency Response 50 Hz to 18 kHz
Maximum Input Level 120 dB (@1 kHz, THD <1%)
Sensitivity -38 dB ±3 dB (0 dB = 1 V / Pa @1 kHz)
Low-Cut Filter -20 dB @ 100 Hz
Output Impedance 100 Ω
Power Requirements Phantom power DC 12 to 48 V
Output Connector XLR 3-pin male
Mute Switch Programmable touch pad
Housing Material Metal
Dimensions (H × W × D) Base: 1.6 × 3.6 × 5.6 in. (4.1 × 9.1 × 14.2 cm)
Gooseneck Length MXGN-12C: 12 in. (30.5 cm)
MXGN-18C: 18 in. (45.7 cm)
Weight MXGN-12C: 1.53 lb. (694.6 g)
MXGN-18C: 1.73 lb. (784.7 g)
Specifications
This manual suits for next models
2
Table of contents
Other Senal Microphone manuals

Senal
Senal OLM-2 User manual

Senal
Senal SMS-45 User manual

Senal
Senal SCI-3212 User manual

Senal
Senal ub-440 User manual

Senal
Senal UEM-155 User manual

Senal
Senal SC-550X User manual

Senal
Senal scm-660 User manual

Senal
Senal MC5-MS User manual

Senal
Senal SCS-98 User manual

Senal
Senal Professional MX Series User manual


