Shure MV88+ User manual

1/36
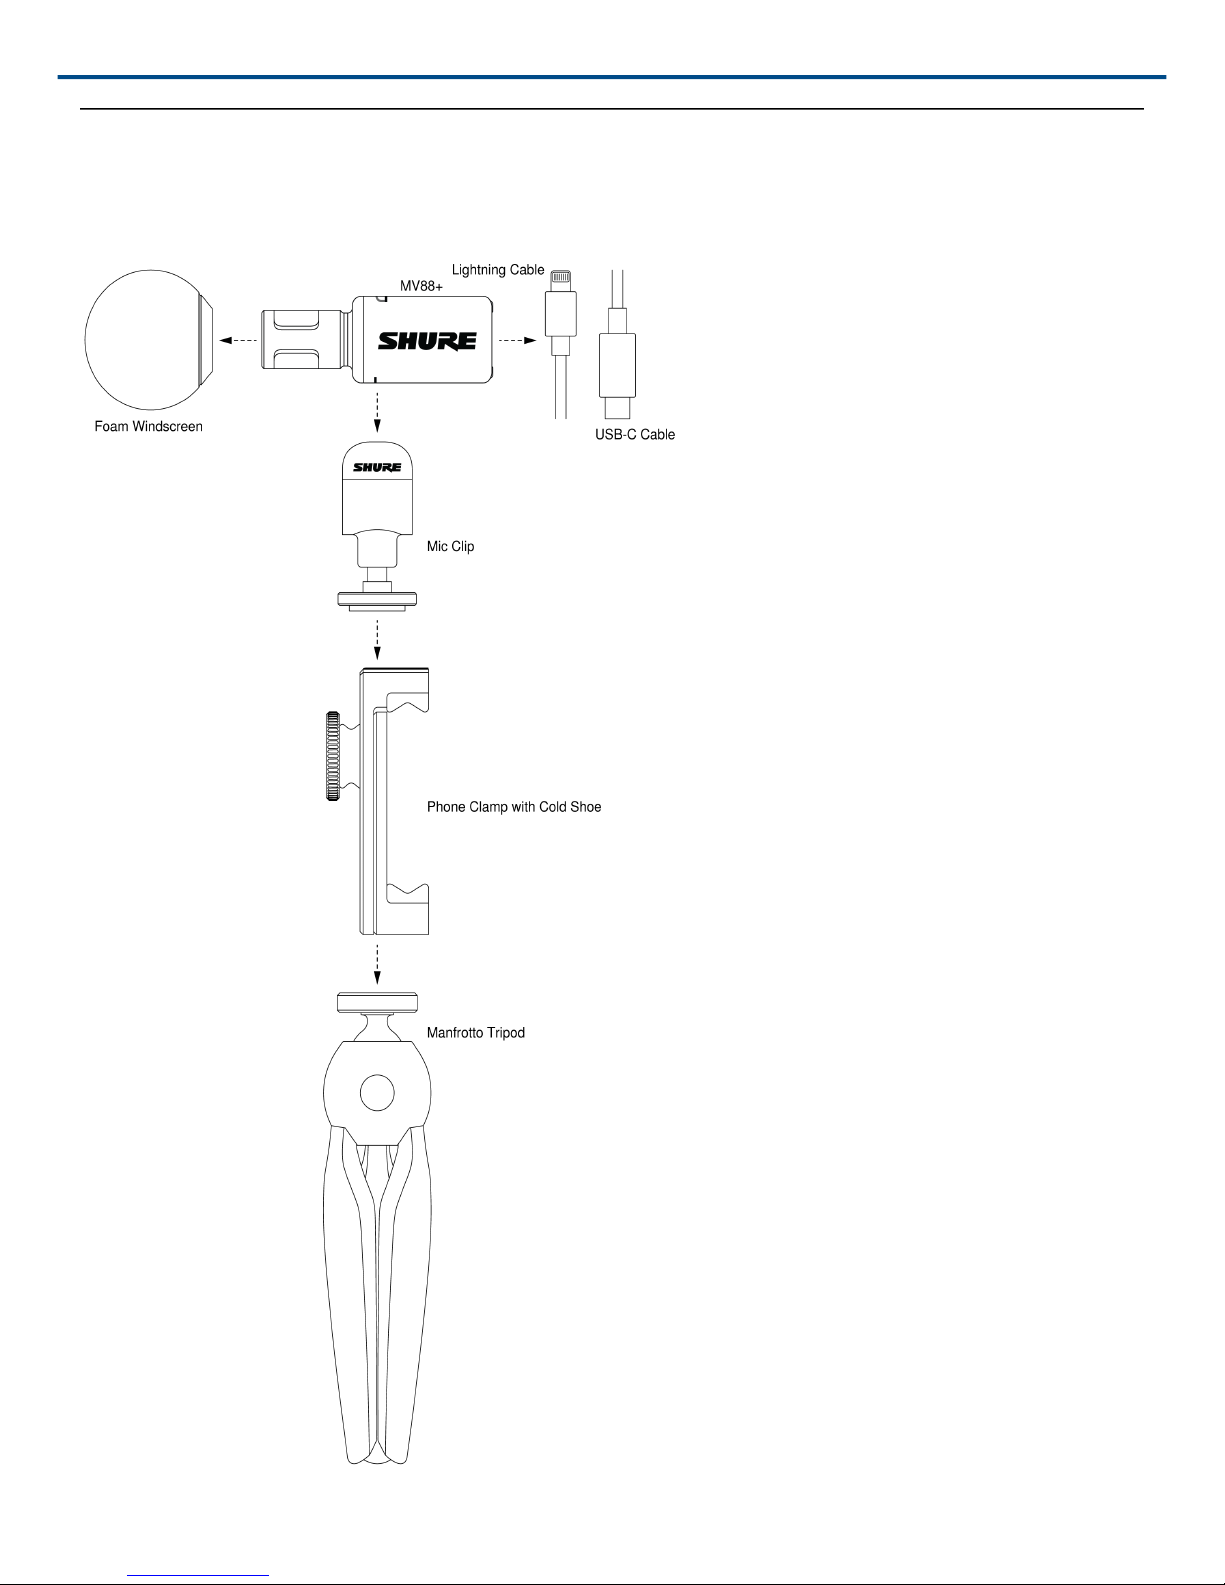
MV88plus -- MV88+ Video Kit
General Description
The Shure MV88+ is a professional quality condenser microphone that plugs directly into a mobile device using a
Lightning or USB-C connector. Two microphone capsules in a Mid-Side configuration provide an adjustable
stereo image, suitable for capturing a variety of sources, including music and speech. The Shure MOTIV app al
lows you to customize your sound with digital signal processing (DSP), preset mode selection, gain adjustment,
compression, and stereo width control.
Features
Mid-Side Stereo
Supports the classic mid-side stereo recording technique. Uses coincident cardioid and bidirectional capsules to
adjust the stereo width while providing excellent mono capability.
Plug-and-Play Operation
Compatible with iOS, Android, PC and Mac devices.
Note: See https://xwww.shure.com/MOTIVcompatibility (https://www.shure.com/MOTIVcompatibility) for informa
tion on recommended Android devices.
Compact and Durable
Lightweight, all-metal construction and small enough to carry anywhere. Like all Shure products, ensures reliability
in the field.
Flexible Recording Control with the Shure MOTIV App
The Shure MOTIV recording app controls microphone settings, such as gain, stereo width, and preset modes, and
includes the following features:
•Landscape or portrait record options
•Basic audio editing
•Markers for keeping track of audio
•Dark theme for low-light recording situations
•Support for all MOTIV microphones
•Five band equalizer
•Live streaming capability
• Dropbox™, AirPlay and Bluetooth support
•Factory and custom user presets
•Multiple bit depth and sample rate options
®
® ®

Shure Incorporated
2/36
Quick Setup
Mounting the Microphone

Shure Incorporated
3/36
Note: Use the knob on the back of the phone clamp to keep the cable in place and out of the way of the camera.
Recording Audio with the Shure MOTIV app.
Use the MOTIV app to change microphone settings and to record and edit your audio.
1. Adjust your microphone settings.
Select a preset mode that matches your recording situation. Set mic gain and stereo width to optimize audio
recordings. See "Aiming the Microphone" for mic placement information and "The Shure MOTIV App" for infor
mation on adjusting compression, equalization, and more.
2. Set your device to Airplane Mode and Do Not Disturb.
This allows you to record with no audio interruptions from phone calls or app notifications.
3. Test your settings.
Make a test recording. Listen to playback and adjust your settings as needed. Once you start recording, only
mic gain can be adjusted.
4. Press the red Record button to begin recording.
The microphone retains settings from the last time you used the Shure MOTIV app.
The MV88+ Microphone
The MV88+ features two capsules: one capsule has a cardioid pattern and picks up sound directly in front of the
microphone. The other is bidirectional and captures sound from the left and right sides.
Microphone Cartridge

Shure Incorporated
4/36
Microphone Orientation
Rotate the microphone barrel in the mic clip to ensure that your stereo recordings are accurate. Point the front of
the microphone toward the sound source. For landscape (horizontal) recording, position the L and R indicators to
the right and left. For portrait (vertical) recording, simply rotate the microphone barrel in the mic clip.
Note: The app has a Left-Right Channel Swap to flip the audio channels.
MV88+ Outputs
•3.5mm monitor output for connecting to headphones and earphones
•Send audio to your recording device using the micro-B USB port
MV88+ LEDs
iOS Android/Mac/PC
Green: Mic active, audio flowing Green: Power is on
Amber: Error
Flash Amber: Firmware is updating
Red: Microphone is muted
Flash Red: Audio is clipping
Aiming the Microphone
The following suggestions are for typical use cases. Keep in mind that there are many effective ways to record a
source. Experiment to find what works best for you. The MV88+ fits into a standard A25D mic clip. So, you can
place it anywhere that you can put a mic stand.

Shure Incorporated
5/36
Tip: For correct stereo orientation, ensure that the Shure name is clearly visible on the top of the microphone. If
the name is not visible, adjust the microphone accordingly.
Audio Recording
Position your recording device so you can monitor the recording. Aim the front of the microphone toward the
source, with left and right sides of the microphone barrel facing the appropriate directions.
Landscape (Horizontal)
Aim the front of the microphone toward the source. Ensure that the left and right sides of the microphone barrel
are facing the appropriate sides.

Shure Incorporated
6/36
Audio Interview (Tabletop)
Attach the mic clip directly onto the Manfrotto mic stand. Select the MONO BIDIRECTIONAL polar pattern in the
Shure MOTIV app. Point one side of the microphone barrel toward the subject and the other toward the interview
er.

Shure Incorporated
7/36
Video Interview
•To record audio from on-camera audio only, select the CARDIOID polar pattern and point the microphone to
ward your subject.

Shure Incorporated
8/36
•To capture the voices of both the on-camera subject and the off-camera interviewer, select the MONO
BIDIRECTIONAL polar pattern in the app. Position the microphone with the left and right sides facing each per
son.
Handheld Recording
The legs collapse to create a portable hand-held stand.

Shure Incorporated
9/36

Shure Incorporated
10/36
The Shure MOTIV App
Use the Shure MOTIV app to change microphone settings and to record, edit, and share audio. The device stores
the most recently used settings for quick setup each time you record.
Tip: Turn on Airplane Mode and Do Not Disturb to prevent interruptions to the recording caused by phone calls,
text messages, or alerts.
Mic Setup
Tap Mic Setup on the navigation bar to access microphone controls

Shure Incorporated
11/36

Shure Incorporated
12/36
①Lock Mode Toggle between Locked and Unlocked settings to prevent accidental changes to settings when
handling your device during recording. When mic settings are Locked, the setting screen is grayed out.
②Mic/Record Status When the app is recording, a red dot flashes next to the name of the connected micro
phone. The icons display the effects are in use.
③Input Meter Displays the strength of the input signal and whether that signal is mono or stereo. The loudest
peaks should reach within the target range (indicated by the shaded region between -12 and 0 dB).
④Microphone Gain/Monitor Mix Button Adjust the mic gain slider to set the volume of the sound source. Tap
the button to access monitor mix settings. See "Monitor Mix Blend" on monitor adjustment.
⑤Preset Modes Set stereo width, equalization, and compression for specific applications. See "Preset Modes"
for more information.
⑥Polar Pattern Selection Swipe to choose your pick-up pattern. Use the handles to adjust the width of the
stereo image.
Tip: Consider the location of the microphone and the size of the sound source when adjusting the width. For ex
ample, a large orchestra or ensemble recording benefits from a wide stereo image, which increases separation be
tween instruments. Speech benefits from a narrow width, which improves clarity and rejects ambient (room)
sound.
⑦Stereo Width Handles Use the dots to quickly set stereo width.
⑧Advanced Features Fine tune your audio recording with limiter and compressor controls, high pass filter, left-
right swap, and equalization settings.
⑨Navigation Bar Tap to access Mic Setup, Record, and My Recordings screens.
Preset Modes
Five selectable modes optimize settings for gain, stereo width, equalization, and compression. Set the microphone
level and try the modes to find which sounds best. Preset modes can affect the strength of the input signal, so ad
just the microphone level as needed after changing presets.
Mode Application Characteristics
Speech
speech Narrow stereo width to reject background noise, equalization that empha
sizes clarity and fullness, and gentle compression.
Singing
solo or group vocal
performances
Medium stereo width with subtle equalization to add richness and clarity
for a natural sound.

Shure Incorporated
13/36
Mode Application Characteristics
Flat
any An unprocessed signal (no equalization or compression settings used).
Adds flexibility when processing the audio after recording.
Acoustic
acoustic instruments
and quiet music
Medium stereo width with transparent compression to smooth out volume
spikes and bring out quiet passages. The equalizer setting emphasizes
detail and an overall natural sound.
Band
live performance and
louder sources
Wide stereo to increase separation between sources. Equalization further
improves definition by reducing frequencies that can make the instrumen
tation sound crowded.
Polar Pattern Selection (Stereo and Mono Settings)
The following demonstrates microphone capsule pick-up patterns. When operating in a mono mode, stereo width
is not adjustable.
Stereo Front = On
Sides = On
Mono Cardioid Front = On
Sides = Off
Mono Bidirectional Front = Off
Sides = On

Shure Incorporated
14/36
Raw Mid-Side Front = On
Sides = On
See "Raw Mid-Side Output" for
more information.
Raw Mid-Side Output
For increased post-processing flexibility, use the Raw Mid-Side setting. This records signal a 2-channel signal with
a stereo image that can be adjusted even after the tracks have been recorded:
Left: Cardioid (front)
Right: Bidirectional (sides)
Use the Raw Mid-Side setting with audio recording applications that have a mid-side stereo matrix decoder. Or use
the manual decoding instructions to adjust the stereo image of the recorded tracks.
Manual Decoding and Stereo Width Adjustment
If your digital audio workstation software (DAW) has no midside decoder, use these steps to adjust and manipu
late the stereo image:
1. Extract the left and right audio signals from the 2-channel Raw Mid-Side file as individual mono tracks.
2. Create 3 blank audio tracks:
First track Use the audio signal (front/cardioid) from the left channel only as a mono
track, panned to the center.
Second track Use the audio signal (side/bidirectional) from the right channel only as a
mono track, panned all the way to the left.
Third track Copy the side/bidirectional signal from the second track. Pan this track all
the way to the right and reverse the phase.
3. Group the right and left side tracks, and set the volume at the same level for simultaneous adjustment. Increas
ing the volume of the grouped tracks increases the stereo width, while decreasing their volume narrows the
width.
Advanced tip: Using compression with a fast attack setting on the grouped tracks keeps transients (the first part
of a sound, such as when a drum stick strikes a cymbal) toward the center of the stereo image and allows them to
expand within the stereo field as the sound decays.

Shure Incorporated
15/36
Manual Decoding of Raw Mid-Side Audio
Monitor Mix Blend
Tap the Monitor Mix button to view monitoring controls.
Use the monitor mix slider to determine how much of each input you hear. For best results, start monitoring at the
midpoint and adjust.
•Move the slider towards the microphone icon (MIC) to hear more of the currently recorded audio.
•Move the slider towards the device icon (PLAYBACK) to hear more of the previously recorded audio.
Left-Right Channel Swap
For stereo recordings, use Left - Right Swap to flip the left and right audio channels to match the stereo image to
the video. For example, when using video to record yourself.
Tip: Use the L and R indicators on the microphone barrel. This way you can set Left - Right Swap before you start
to record.

Shure Incorporated
16/36
Equalizer, Limiter, and Compressor
Fine tune your equalizer, limiter, and compressor settings. Change the preset modes to hear the DSP changes,
and adjust individual settings to dial in your sound.
Note: Equalization within presets will not be displayed. However, the EQ icon in the Mic Setup screen displays
user-selected equalization.
EQ persists between preset mode changes.
Choose no compression, or select light, medium, or heavy settings.
Selecting Low-Frequency Response
A threeposition switch on the back of the microphone lets you adjust the lowfrequency response. Use the lowfre
quency filter to reduce wind noise, room noise, or proximity effect.
Flat response. Provides the most natural sound in most applications.
Low frequency cutoff. Provides a 6 dBperoctave cutoff at 75 Hz. Helps eliminate floor rumble and lowfrequen
cy room noise from heating and air conditioning systems. This setting may also be used to compensate for proxim
ity effect or to reduce low frequencies that make an instrument sound dull or muddy.
Low frequency rolloff. Provides a 6 dBperoctave rolloff filter at 150 Hz. Use this to compensate for proximity ef
fect or to reduce low frequencies that could make an instrument sound dull or muddy.

Shure Incorporated
17/36
Demo Mode
Demo mode allows you to try out the functionality of all devices in the MOTIV series. Explore their features in the
Shure MOTIV app without a microphone plugged in.
Note: Settings in demo mode are for demonstration and are not saved within the app. Demo mode is only avail
able when there is no microphone plugged in to the device.
Record
Tap Record on the navigation bar to access the record button and timeline.

Shure Incorporated
18/36
Record Settings
①Connected Device Status

Shure Incorporated
19/36
Status displays the MOTIV device or whether audio is received from the builtin microphone. Red flashing dot indi
cates that recording is in progress.
②Settings Status
Displays the icons for currently enabled advanced settings.
③Microphone Gain
Adjust the volume of the sound source. Keep levels in the target range (indicated by the shaded region of the input
meter).
④Timeline Display
Displays the waveform of the sound while recording.
•Stereo Recording: A complete waveform is shown.
•Mono Recording: Half of the waveform is shown.
⑤Record Time Remaining
⑥Bit Depth and Sample Rate
Use the dropdown menu to select your bit depth and sample rate. See "Bit Depth and Sample Rate" for more in
formation.
⑦Track Information
Displays the name, file type, and size of the current recording.
⑧Record Control Bar
The Marker button, a Record/Pause button, and the Done check mark button.
Note: The maximum file size for a recording is 2GB, approximately 2 hours of record time. This limitation maxi
mizes app performance. Continuous recording for more than 2 hours will generate a second file.
Bit Depth and Sample Rate
Find the Bit Depth and Sample Rate settings in the drop-down menu on the right side of the record window. Select
a lower sample rate when it is useful to have a smaller file, for example, when recording speech or a podcast for
download. Select a higher sample rate for music and dynamic recordings.
If no alternate is selected, MOTIV will record audio at 24/48 kHz. However, the following bit depths and sample
rates are supported.
Bit Depth Sampling Rate
24 48 kHz
24 44.1 kHz

Shure Incorporated
20/36
Bit Depth Sampling Rate
16 48 kHz
16 44.1 kHz
Recording Tips
Turn On Airplane Mode and Do Not Disturb
When you plug a MOTIV device into your iOS device, a warning message prompts you to enable Airplane Mode
and Do Not Disturb mode. It's important to do this to avoid recording interference from phone calls, messages, and
various notifications. Tap X to dismiss this warning message.
Note: Leave Airplane Mode off to add geolocation information to your audio file.
Use Lock Mode to Lock In Your Sound
When you've tested your audio and have found the levels that you like, turn on Lock mode to prevent accidental
adjustment, and ensure that your audio quality remains consistent.
Record in Mono
Record in mono to increase your available record time or when recording a single source, like vocals, that would
benefit from less ambient noise. Select the Mono Cardioid or Mono Bidirectional polar pattern and audio from all
capsules are summed to a single channel. The input meter will indicate mono recording by displaying the top half
of the waveform. MOTIV supports third-party microphones with mono recording.
Record in Stereo
Rotate the MV88+ barrel in the mic clip to accommodate portrait or landscape recording. L and R are labeled to
show stereo orientation of the microphone. The stereo image is accurate if the Shure logo is facing upward.
Use the Dark Theme
Select the Dark appearance option to change the app from light gray to dark gray. The darker display is ideal for
discreet recording in low-light situations.
You can access the Dark setting by going to Menu > Settings > Appearance > Dark .
Capture the Complete Performance
To ensure that you capture the entire sound source, start your recording before the performance starts and edit the
recording later to trim any silence.
Other manuals for MV88+
10
Table of contents
Other Shure Microphone manuals

Shure
Shure PGA 48 User manual

Shure
Shure KSM8 Dualdyne User manual

Shure
Shure SM89 User manual

Shure
Shure CVG Series User manual

Shure
Shure BETA 58A User manual

Shure
Shure 444T User manual

Shure
Shure SM31FH User manual

Shure
Shure BETA 87A User manual

Shure
Shure PG27-USB Installation guide

Shure
Shure KSM32 User manual

Shure
Shure PGA 48 User manual

Shure
Shure SM10A User manual

Shure
Shure PG 30 User manual

Shure
Shure MV88+ User manual

Shure
Shure Microflex Advance MXA910 User manual

Shure
Shure MV88+ User manual

Shure
Shure Microflex MX395 User manual

Shure
Shure MV5 User manual

Shure
Shure 562 User manual

Shure
Shure PG42 User manual