Senal SMS-45 User manual

Table of Contents:
Introduction ......................................2
Overview ...........................................3
Precautions .......................................4
Installing the Battery ....................5
Mounting the SMS-45
and Turning It On .......................6-7
Using the High-Pass Filter ..........8
Recording ..................................... 8-9
The Desktop Stand ........................9
Troubleshooting ............................10
Specifications .................................11
Warranty .......................................... 12
USER’S GUIDE
SMS-45

2
Thank you for choosing Senal.
The Senal SMS-45 Mini Shotgun Microphone is a compact, lightweight, and durable directional stereo
microphone designed for recording live audio directly into a DSLR camera, camcorder, or portable
recorder. The SMS-45 features two condenser cardioid capsules arranged in an X-Y pattern for
capturing pristine audio with realistic stereo imaging. The microphone is designed for either battery-
powered operation or plug-and-play operation when used with cameras or portable recorders that
provide power from the mic input. The SMS-45 can be used for any recording requiring a boom pole,
and it attaches to a camera’s shoe mount making it a versatile and sturdy tool for a variety of field and
studio recording projects.
Among the benefits you’ll enjoy:
▪ Compact mini shotgun design
▪ Solid aluminum construction for durability
▪ Two cardioid condenser capsules in X-Y pattern for natural stereo imaging
▪ 5/8" threaded socket for boom pole mounting
▪ Shoe mount adapter with locking wheel
▪ Rubber shock resistant mic holder for reduced noise when recording
▪ Plug and play operation or battery-powered operation
▪ ▪ ▪ ▪ ▪ ▪ ▪ ▪ ▪ ▪ ▪ ▪ ▪ ▪ ▪ ▪ ▪ ▪ ▪ ▪ ▪ ▪ ▪ ▪ ▪ ▪ ▪ ▪ ▪ ▪ ▪ ▪ ▪ ▪ ▪ ▪ ▪ ▪ ▪ ▪ ▪ ▪ ▪ ▪ ▪ ▪ ▪ ▪ ▪ ▪ ▪ ▪ ▪ ▪ ▪ ▪ ▪ ▪ ▪ ▪ ▪ ▪ ▪ ▪ ▪ ▪ ▪ ▪ ▪ ▪ ▪ ▪ ▪ ▪ ▪ ▪ ▪ ▪ ▪ ▪ ▪ ▪ ▪ ▪ ▪ ▪ ▪ ▪ ▪ ▪ ▪ ▪ ▪ ▪ ▪ ▪ ▪
Introduction
3
SMS-45
SMS-45
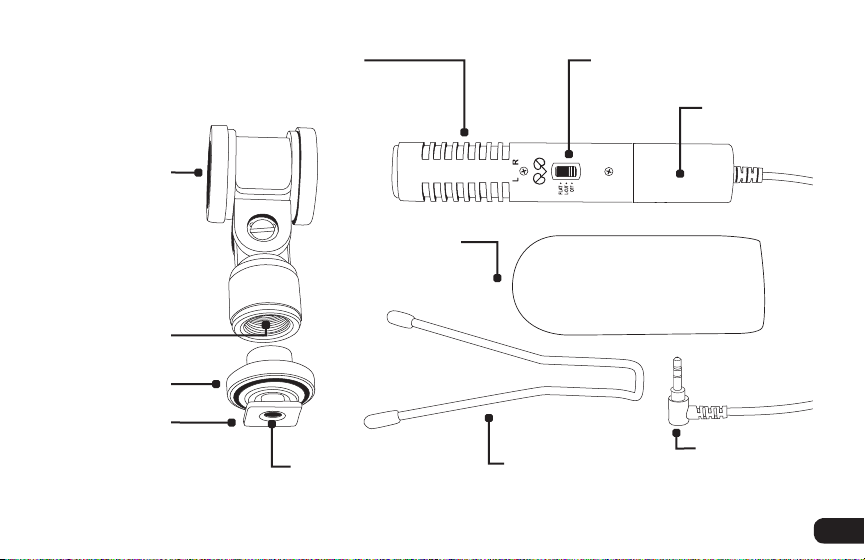
Overview
Microphone
holder
Threaded
post
Desktop
stand
Battery
compartment
Overview
▪ ▪ ▪ ▪ ▪ ▪ ▪ ▪ ▪ ▪ ▪ ▪ ▪ ▪ ▪ ▪ ▪ ▪ ▪ ▪ ▪ ▪ ▪ ▪ ▪ ▪ ▪ ▪ ▪ ▪ ▪ ▪ ▪ ▪ ▪ ▪ ▪ ▪ ▪ ▪ ▪ ▪ ▪ ▪ ▪ ▪ ▪ ▪ ▪ ▪ ▪ ▪ ▪ ▪ ▪ ▪ ▪ ▪ ▪ ▪ ▪ ▪ ▪ ▪ ▪ ▪ ▪ ▪ ▪ ▪ ▪ ▪ ▪ ▪ ▪ ▪ ▪ ▪ ▪ ▪ ▪ ▪ ▪ ▪ ▪ ▪ ▪ ▪ ▪ ▪ ▪ ▪ ▪ ▪ ▪ ▪ ▪ ▪ ▪
5/8" threaded
socket
Also Included:
Carry bag
Microphone
ports
Power switch/
High-pass filter
1/8" (3.5 mm)
stereo mini
connector
Locking wheel
Mounting foot
Foam
windscreen

4
Precautions
▪ Please read and follow these instructions and keep this manual in a safe place.
▪ Keep this product away from water and flammable gasses or liquids.
▪ Use only the batteries recommended by this manual.
▪ Do not attempt to disassemble or repair this product yourself.
▪ Handle this product with care.
▪ Clean this product only with a soft dry cloth.
▪ Make sure that this product is intact and that there are no missing parts.
▪ To avoid damaging the product, remove the battery during long periods of non-use.
▪ All photos are for illustrative purposes only.
▪ ▪ ▪ ▪ ▪ ▪ ▪ ▪ ▪ ▪ ▪ ▪ ▪ ▪ ▪ ▪ ▪ ▪ ▪ ▪ ▪ ▪ ▪ ▪ ▪ ▪ ▪ ▪ ▪ ▪ ▪ ▪ ▪ ▪ ▪ ▪ ▪ ▪ ▪ ▪ ▪ ▪ ▪ ▪ ▪ ▪ ▪ ▪ ▪ ▪ ▪ ▪ ▪ ▪ ▪ ▪ ▪ ▪ ▪ ▪ ▪ ▪ ▪ ▪ ▪ ▪ ▪ ▪ ▪ ▪ ▪ ▪ ▪ ▪ ▪ ▪ ▪ ▪ ▪ ▪ ▪ ▪ ▪ ▪ ▪ ▪ ▪ ▪ ▪ ▪ ▪ ▪ ▪ ▪ ▪ ▪ ▪
Precautions

5
Installing the Battery
▪ ▪ ▪ ▪ ▪ ▪ ▪ ▪ ▪ ▪ ▪ ▪ ▪ ▪ ▪ ▪ ▪ ▪ ▪ ▪ ▪ ▪ ▪ ▪ ▪ ▪ ▪ ▪ ▪ ▪ ▪ ▪ ▪ ▪ ▪ ▪ ▪ ▪ ▪ ▪ ▪ ▪ ▪ ▪ ▪ ▪ ▪ ▪ ▪ ▪ ▪ ▪ ▪ ▪ ▪ ▪ ▪ ▪ ▪ ▪ ▪ ▪ ▪ ▪ ▪ ▪ ▪ ▪ ▪ ▪ ▪ ▪ ▪ ▪ ▪ ▪ ▪ ▪ ▪ ▪ ▪ ▪ ▪ ▪ ▪ ▪ ▪ ▪ ▪
Installing the Battery
The SMS-45 microphone runs on one LR44 button cell battery. To install the battery, make sure the
SMS-45 is turned off and follow these steps:
1. Unscrew the base of the microphone to access the battery compartment.
2. Insert the new battery in the orientation indicated by the illustration on the side of the housing.
3. Replace the protective cover by screwing it back onto the base of the microphone.
SMS-45
SMS-45

6
Mounting the SMS-45 and Turning It On
To attach the microphone to a camera with
the shoe mount adapter, make sure the
SMS-45 is turned off and follow these steps:
1. Rotate the locking wheel counterclockwise
to loosen it.
2. Slide the shoe mount adapter all the way
into your camera’s shoe mount.
3. Tighten the locking wheel by rotating it
clockwise until secure.
4. Insert the microphone into the mic holder
making sure that the power/high-pass filter
switch is accessible.
▪ ▪ ▪ ▪ ▪ ▪ ▪ ▪ ▪ ▪ ▪ ▪ ▪ ▪ ▪ ▪ ▪ ▪ ▪ ▪ ▪ ▪ ▪ ▪ ▪ ▪ ▪ ▪ ▪ ▪ ▪ ▪ ▪ ▪ ▪ ▪ ▪ ▪ ▪ ▪ ▪ ▪ ▪ ▪ ▪ ▪ ▪ ▪ ▪ ▪ ▪ ▪ ▪ ▪ ▪ ▪ ▪ ▪ ▪ ▪ ▪ ▪ ▪ ▪ ▪ ▪ ▪ ▪ ▪ ▪ ▪ ▪ ▪ ▪
Mounting the SMS-45 and Turning It On

7
Mounting the SMS-45 and Turning It On
▪ ▪ ▪ ▪ ▪ ▪ ▪ ▪ ▪ ▪ ▪ ▪ ▪ ▪ ▪ ▪ ▪ ▪ ▪ ▪ ▪ ▪ ▪ ▪ ▪ ▪ ▪ ▪ ▪ ▪ ▪ ▪ ▪ ▪ ▪ ▪ ▪ ▪ ▪ ▪ ▪ ▪ ▪ ▪ ▪ ▪ ▪ ▪ ▪ ▪ ▪ ▪ ▪ ▪ ▪ ▪ ▪ ▪ ▪ ▪ ▪ ▪ ▪ ▪ ▪ ▪ ▪ ▪ ▪ ▪ ▪ ▪ ▪ ▪ ▪
To attach the microphone to a boom pole make sure the
SMS-45 is turned off and follow these steps:
1. Match the threaded post on the end of the boom
pole with the threaded socket of the SMS-45’s mic
holder.
2. Screw the boom pole into the threaded socket until
it is secure.
3. Insert the microphone into the mic holder making
sure that the power/high-pass filter switch is
accessible.
To switch the microphone on, set the power switch to
either the L-CUT or FLAT position.

8
Using the High-Pass Filter
The high-pass filter attenuates noise below 80 Hz. This helps prevent the microphone from recording
low-frequency noises like the rumble of an air conditioner, blower, or fan.
To turn on the high-pass filter, slide the switch on the microphone to the L-CUT position. To turn off the
high-pass filter, slide the switch to the FLAT position.
Recording
1. Plug the 3.5 mm stereo mini connector into the audio input jack of your camera or portable
recorder.
2. Place the foam windscreen over the microphone.
3. Slide the power/high-pass filter.
4. Switch to the FLAT or L-CUT position.
5. You are now ready to record. Consult the instructions of your camera or recording device for
directions on recording.
▪ ▪ ▪ ▪ ▪ ▪ ▪ ▪ ▪ ▪ ▪ ▪ ▪ ▪ ▪ ▪ ▪ ▪ ▪ ▪ ▪ ▪ ▪ ▪ ▪ ▪ ▪ ▪ ▪ ▪ ▪ ▪ ▪ ▪ ▪ ▪ ▪ ▪ ▪ ▪ ▪ ▪ ▪ ▪ ▪ ▪ ▪ ▪ ▪ ▪ ▪ ▪ ▪ ▪ ▪ ▪ ▪ ▪ ▪ ▪ ▪ ▪ ▪ ▪ ▪ ▪ ▪ ▪ ▪ ▪ ▪ ▪ ▪ ▪ ▪
Using the High-Pass Filter / Recording

9
Recording / The Desktop Mic Stand
▪ ▪ ▪ ▪ ▪ ▪ ▪ ▪ ▪ ▪ ▪ ▪ ▪ ▪ ▪ ▪ ▪ ▪ ▪ ▪ ▪ ▪ ▪ ▪ ▪ ▪ ▪ ▪ ▪ ▪ ▪ ▪ ▪ ▪ ▪ ▪ ▪ ▪ ▪ ▪ ▪ ▪ ▪ ▪ ▪ ▪ ▪ ▪ ▪ ▪ ▪ ▪ ▪ ▪ ▪ ▪ ▪ ▪ ▪ ▪ ▪ ▪ ▪ ▪ ▪ ▪ ▪ ▪ ▪ ▪ ▪ ▪ ▪ ▪ ▪ ▪ ▪ ▪
Recording Tips:
▪ The foam windscreen should always be used to diminish vocal plosives and wind noise.
▪ It is always advisable to do a test recording first and listen to the playback before recording a
complete take.
The Desktop Mic Stand
The SMS-45 can be used as a stand-alone microphone. For tabletop placement of the microphone
follow these steps:
1. Attach the shoe-mount adapter by screwing in the
5/8" threaded post of the adapter into the 5/8"
threaded socket of the mic holder.
2. With the closed end of the mic stand slanted down
toward the table top, slide the microphone just
above the mounting foot onto the stand so that it
rests on the flat section of the legs.
3. Tighten the locking wheel by rotating it clockwise.
SMS-45
SMS-45

10
▪ ▪ ▪ ▪ ▪ ▪ ▪ ▪ ▪ ▪ ▪ ▪ ▪ ▪ ▪ ▪ ▪ ▪ ▪ ▪ ▪ ▪ ▪ ▪ ▪ ▪ ▪ ▪ ▪ ▪ ▪ ▪ ▪ ▪ ▪ ▪ ▪ ▪ ▪ ▪ ▪ ▪ ▪ ▪ ▪ ▪ ▪ ▪ ▪ ▪ ▪ ▪ ▪ ▪ ▪ ▪ ▪ ▪ ▪ ▪ ▪ ▪ ▪ ▪ ▪ ▪ ▪ ▪ ▪ ▪ ▪ ▪ ▪ ▪ ▪ ▪ ▪ ▪ ▪ ▪ ▪ ▪ ▪ ▪ ▪ ▪ ▪ ▪ ▪ ▪ ▪ ▪ ▪
Troubleshooting
Troubleshooting
Problem Solution
The microphone is stuck in the
camera’s shoe mount.
Make sure the locking wheel is fully loosened.
No sound was recorded. Make sure that a fresh battery is installed, and it is correctly
orientated in the battery compartment.
Make sure the switch on the microphone is set to either the
FLAT or L-CUT position.
The sound is distorted. Make sure the microphone’s audio connection is fully plugged into
the audio input jack of your camera or portable recorder.
If the level is too high, decrease the mic gain on your camera or
recording device.
The recording level is too low. Increase the mic gain control on your camera or recording device.
There is too much rumble or
room noise.
Slide the switch on the microphone to the L-CUT position.
Turn off electric appliances like air conditioners, blowers, and fans.
Table of contents
Other Senal Microphone manuals

Senal
Senal MXGN Series User manual

Senal
Senal MS-66-K User manual

Senal
Senal CXGN Series User manual

Senal
Senal scm-660 User manual

Senal
Senal MC24-EL User manual

Senal
Senal SC-550X User manual

Senal
Senal ub-440 User manual

Senal
Senal UEM-155 User manual

Senal
Senal SCS-98 User manual

Senal
Senal OLM-2 User manual


