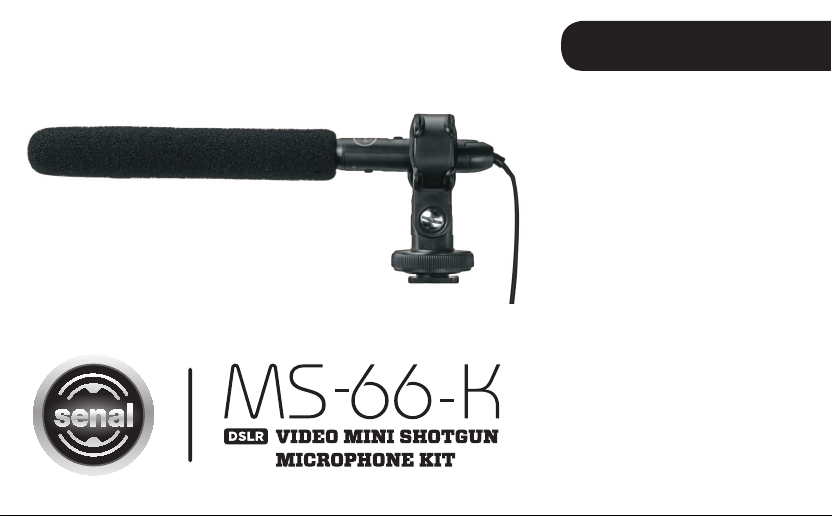
Senal MS-66-K User manual

Table of Contents:
Introduction............................... 2
Overview .................................... 3
Precautions................................4
Installing Batteries .................. 5
Mounting the MS-66-K
and Turning It On ................6-7
Using the Gain Boost.............8
The Windscreen....................... 8
Replacing the Shock
Mount Suspenders..................9
Troubleshooting.....................10
Specifications .......................... 11
Warranty................................... 12
USER’S GUIDE

2
Thank you for choosing Senal.
The Senal MS-66-K DSLR-Video Mini Shotgun Microphone Kit is designed for recording live audio
directly into your DSLR or Camcorder. The MS-66-K’s hypercardioid polar pattern and line + gradient
design optimize the microphone to focus on the subject while rejecting off-axis sound. Ideal for
run-and-gun productions like recording interviews and events indoors or in the field, the MS-66-K
attaches to your camera’s shoe mount or to a boom pole and plugs into the camera’s audio input jack
to deliver natural, professional-quality sound.
Among the benefits you’ll enjoy:
▪Convenient, pen-sized microphone
• Hypercardioid polar pattern
• Adjustable gain
• Included shock mount
• Shoe-mount adapter with 1/4″-20 threaded socket
• Approximately 100 hours of battery life
▪▪▪▪▪▪▪▪▪▪▪▪▪▪▪▪▪▪▪▪▪▪▪▪▪▪▪▪▪▪▪▪▪▪▪▪▪▪▪▪▪▪▪▪▪▪▪▪▪▪▪▪▪▪▪▪▪▪▪▪▪▪▪▪▪▪▪▪▪▪▪▪▪▪▪▪▪▪▪▪▪▪▪▪▪▪▪▪▪▪▪▪▪▪▪▪▪
Introduction

3
Overview
Also Included:
Foam windscreen
Two (2) 377 button cell
batteries
Two (2) replacement shock
mount suspenders
User manual
Power switch
Microphone
ports
Gain switch
Shock mount
Battery compartment cover
1/4″-20 threaded
socket
Shoe-mount adapter
Locking wheel
Overview
▪▪▪▪▪▪▪▪▪▪▪▪▪▪▪▪▪▪▪▪▪▪▪▪▪▪▪▪▪▪▪▪▪▪▪▪▪▪▪▪▪▪▪▪▪▪▪▪▪▪▪▪▪▪▪▪▪▪▪▪▪▪▪▪▪▪▪▪▪▪▪▪▪▪▪▪▪▪▪▪▪▪▪▪▪▪▪▪▪▪▪▪▪▪▪▪▪▪▪
3.5 mm audio
connection

4
Precautions
▪Please read and follow these instructions and keep this manual in a safe place.
▪Keep this product away from water and flammable gases or liquids.
▪Do not attempt to disassemble or repair this product yourself.
▪Handle this product with care.
▪Clean this product with only a soft, dry cloth.
▪Make sure that this product is intact and that there are no missing parts.
▪All photos are for illustrative purposes only.
▪▪▪▪▪▪▪▪▪▪▪▪▪▪▪▪▪▪▪▪▪▪▪▪▪▪▪▪▪▪▪▪▪▪▪▪▪▪▪▪▪▪▪▪▪▪▪▪▪▪▪▪▪▪▪▪▪▪▪▪▪▪▪▪▪▪▪▪▪▪▪▪▪▪▪▪▪▪▪▪▪▪▪▪▪▪▪▪▪▪▪▪▪▪▪▪▪
Precautions

5
Installing Batteries
▪▪▪▪▪▪▪▪▪▪▪▪▪▪▪▪▪▪▪▪▪▪▪▪▪▪▪▪▪▪▪▪▪▪▪▪▪▪▪▪▪▪▪▪▪▪▪▪▪▪▪▪▪▪▪▪▪▪▪▪▪▪▪▪▪▪▪▪▪▪▪▪▪▪▪▪▪▪▪▪▪▪▪▪▪▪▪▪▪▪▪
Installing Batteries
The MS-66-K comes with two 377 button cell batteries pre-installed. Before using the microphone
for the first time, open the battery compartment and remove the insulation sheet from between the
batteries.
To replace batteries, make sure the MS-66-K is turned off and follow these steps:
1. Open the battery compartment cover from the notch
at the base of the microphone.
2. Remove the old batteries.
3. Insert fresh batteries in the orientation indicated by the illustration inside the compartment.
4. Insert the bottom tab of the battery compartment cover first. Close the battery compartment by
pressing the cover firmly into place.
Important!
Replace both batteries at the same time. Do not mix battery types or brands or use old and new
batteries together.

6
Mounting the MS-66-K and Turning It On
To mount the microphone to your camera, make sure the MS-66-K is turned off and follow these steps:
1. Rotate the shock mount’s locking wheel counterclockwise to loosen it.
2. Slide the shoe-mount adapter all the way into your
camera’s shoe mount.
3. Rotate the locking wheel clockwise until secure.
4. Insert the microphone into the shock mount so the
suspenders grip the base of the microphone.
Note: Make sure the microphone barrel is not touching the
shock mount suspenders, as this may produce disruptive
noise when recording.
5. Insert the microphone’s 3.5 mm audio connection into
your camera’s audio input jack.
Tip: You can adjust the angle of the shock mount to tilt the microphone up or down.
▪▪▪▪▪▪▪▪▪▪▪▪▪▪▪▪▪▪▪▪▪▪▪▪▪▪▪▪▪▪▪▪▪▪▪▪▪▪▪▪▪▪▪▪▪▪▪▪▪▪▪▪▪▪▪▪▪▪▪▪▪▪▪▪▪▪▪▪▪▪▪▪▪
Mounting the MS-66-K and Turning It On

7
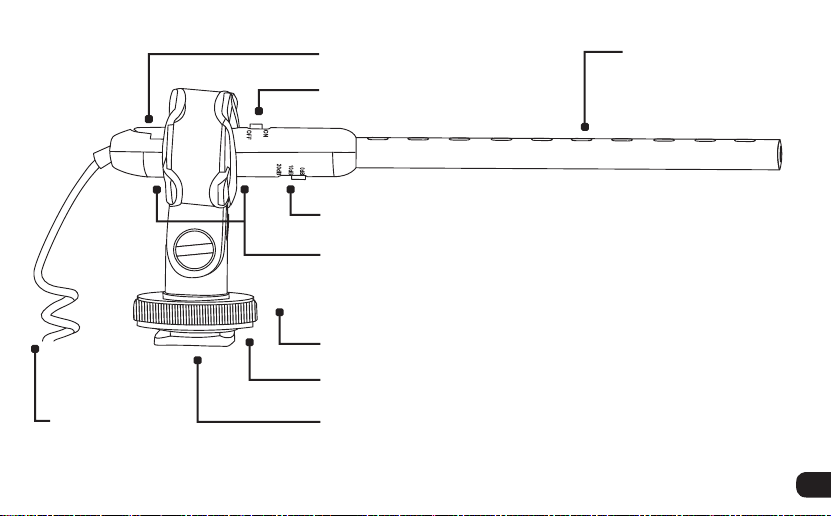
To mount the microphone to an optional boom pole, make sure the MS-66-K is turned off and follow
these steps:
1. Match the threaded post on the end of the boom
pole with the threaded socket in the MS-66-K’s
shoe-mount adapter.
2. Screw the boom pole into the threaded socket until secure.
3. Insert the microphone into the shock mount so the suspenders grip the base of the microphone.
Note: Make sure the microphone barrel is not touching the shock mount suspenders, as this may
produce disruptive noise when recording.
4. Insert the microphone’s 3.5 mm audio connection into the female end of a 3.5 mm stereo extension
cable (sold separately).
Note: Make sure the extension cable is long enough to reach from your audio recorder to the
microphone at the end of the boom pole.
5.
Insert the extension cable’s 3.5 mm male audio connection into your audio recorder’s audio input jack.
To turn the microphone on, slide the power switch to the ON position.
Mounting the MS-66-K and Turning It On
▪▪▪▪▪▪▪▪▪▪▪▪▪▪▪▪▪▪▪▪▪▪▪▪▪▪▪▪▪▪▪▪▪▪▪▪▪▪▪▪▪▪▪▪▪▪▪▪▪▪▪▪▪▪▪▪▪▪▪▪▪▪▪▪▪▪▪▪▪▪▪▪▪▪

8
Using the Gain Boost
The gain boost switch increases the microphone’s gain and can be useful for picking up low-level or
distant sounds in a quiet environment. The gain boost switch has three stages: 0 dB, 10 dB, and 20 dB.
To boost the microphone’s gain by 10 decibels, slide the gain boost switch so it rests under the 10 dB
marking. To boost the microphone’s gain by 20 decibels, slide the gain boost switch so it rests
under the 20 dB marking. To turn off the gain boost, slide the switch so it rests under the 0 dB
marking.
The Windscreen
The MS-66-K comes with a foam windscreen that helps reduce wind noise. To
fit the windscreen onto the microphone, gently push it onto the microphone
barrel. Make sure that the windscreen covers all the ports on the sides of the
microphone barrel.
▪▪▪▪▪▪▪▪▪▪▪▪▪▪▪▪▪▪▪▪▪▪▪▪▪▪▪▪▪▪▪▪▪▪▪▪▪▪▪▪▪▪▪▪▪▪▪▪▪▪▪▪▪▪▪▪▪▪▪▪▪▪▪▪▪▪▪▪▪▪▪▪▪▪▪
Using the Gain Boost/The Windscreen

9
Replacing the Shock Mount Suspenders
The MS-66-K’s shock mount isolates the microphone from your camera or
boom pole. This helps prevent the microphone from picking up vibrations in
the camera or the boom, which can cause disruptive and unwanted noise in
your recording.
The MS-66-K comes with replacement suspenders for the shock mount. To
replace the suspenders, follow these steps:
1. Remove the old suspenders from the shock mount and set them aside.
2. Hook a new suspender around one of the tabs and stretch the suspender
across the opening of the shock mount to hook it around the opposite tab.
3. Repeat step 2 for the second suspender. The two suspenders should form
an X shape across the opening of the shock mount.
Replacing the Shock Mount Suspenders
▪▪▪▪▪▪▪▪▪▪▪▪▪▪▪▪▪▪▪▪▪▪▪▪▪▪▪▪▪▪▪▪▪▪▪▪▪▪▪▪▪▪▪▪▪▪▪▪▪▪▪▪▪▪▪▪▪▪▪▪▪▪▪▪▪▪▪▪▪▪▪▪▪▪▪

10
Troubleshooting
Problem Solution
The shock mount is stuck in the
camera’s shoe mount.
Make sure the shock mount’s locking wheel is fully loosened.
The microphone will not turn on. Make sure that fresh batteries are installed, and that they are
in the proper orientation.
The sound is distorted or there is
noise in the recording.
Make sure the microphone’s audio connection cable is fully
plugged into your camera’s audio input jack.
Turn off the gain boost on the microphone.
Make sure that the microphone is properly mounted in the shock
mount and that the barrel is not touching the suspenders.
▪▪▪▪▪▪▪▪▪▪▪▪▪▪▪▪▪▪▪▪▪▪▪▪▪▪▪▪▪▪▪▪▪▪▪▪▪▪▪▪▪▪▪▪▪▪▪▪▪▪▪▪▪▪▪▪▪▪▪▪▪▪▪▪▪▪▪▪▪▪▪▪▪▪▪▪▪▪▪▪▪▪▪▪▪▪▪▪▪▪▪▪▪
Troubleshooting

11
Specifications
Transducer type: Back Electret Condenser
Pattern: Hypercardioid
Frequency response: 50 Hz to 18 kHz
Impedance: 1000 Ω±30%
Sensitivity: -41 dB/Pa ±3 dB
SPL: 124 dB, 1 kHz @ 1% T.H.D.
Audio connection: 3.5 mm (1/8″) stereo
Cable: Fixed, 7″(2″straight + 3″coiled + 2″straight)
Power requirement: Two 377 (SR6265W) button cell batteries
Battery life: Approx. 100 hours continual use
Size: 0.47″×6.42″(12 ×163 mm)
Weight (microphone only): 1.4 oz. (39 g)
Specifications
▪▪▪▪▪▪▪▪▪▪▪▪▪▪▪▪▪▪▪▪▪▪▪▪▪▪▪▪▪▪▪▪▪▪▪▪▪▪▪▪▪▪▪▪▪▪▪▪▪▪▪▪▪▪▪▪▪▪▪▪▪▪▪▪▪▪▪▪▪▪▪▪▪▪▪▪▪▪▪▪▪▪▪▪▪▪▪▪▪▪▪▪▪▪▪

Warranty
Senal provides a limited warranty that this product is free from defects in materials and workmanship
to the original purchaser under normal use for a period of ten (10) years from the original purchase
date or thirty (30) days after replacement whichever occurs later. Our responsibility with respect to
this limited warranty shall be limited solely to repair or replacement, at its option, of any product which
fails during normal consumer use.
To obtain warranty coverage during the Warranty Period, contact your place of purchase (“Seller”) to
obtain a return merchandise authorization (“RMA”) number, and return to Seller the defective product
along with proof of purchase and the RMA number.
This warranty does not extend to damage or failure which results from misuse, neglect, accident,
alteration, abuse, improper installation or maintenance. EXCEPT AS PROVIDED HEREIN, SENAL
MAKES NEITHER ANY EXPRESS WARRANTIES NOR ANY IMPLIED WARRANTIES, INCLUDING
BUT NOT LIMITED TO ANY IMPLIED WARRANTY OF MERCHANTABILITY OR FITNESS FOR A
PARTICULAR PURPOSE. This warranty provides you with specific legal rights, and you may also have
additional rights which vary from state to state.
© Copyright 2013 Gradus Group
All other trademarks are the property of their respective owners.
All photos are for illustrative purposes only.
www.senalsound.com
Table of contents
Other Senal Microphone manuals

Senal
Senal ub-440 User manual

Senal
Senal CXGN Series User manual

Senal
Senal MXGN Series User manual

Senal
Senal CL6 User manual

Senal
Senal SMS-45 User manual

Senal
Senal ENG-18R User manual

Senal
Senal UC4-B User manual

Senal
Senal MC5-MS User manual

Senal
Senal scm-660 User manual

Senal
Senal CXBM-620 User manual
Popular Microphone manuals by other brands

Shure
Shure Microflex MX400 Series user guide

Uniden
Uniden UMRMIC owner's manual

The Singing Machine
The Singing Machine CPK565 user manual

Sennheiser
Sennheiser EVOLUTION WIRELESS EW 100 instruction manual

Neumann.Berlin
Neumann.Berlin BCM 705 operating manual

Electro-Voice
Electro-Voice RE1000 Specification sheet