Senal SCM-600 User manual

Table of Contents:
Introduction ����������������������������������������������������������������������������������������������� 2
Overview ����������������������������������������������������������������������������������������������������3
Precautions ������������������������������������������������������������������������������������������������4
Mounting the Microphone ������������������������������������������������������������������� 5
Positioning the Microphone ����������������������������������������������������������������6
High-Pass Filter ����������������������������������������������������������������������������������������6
Attenuation Pad ���������������������������������������������������������������������������������������6
Connecting the Microphone ��������������������������������������������������������������� 7
Troubleshooting ��������������������������������������������������������������������������������������� 8
Specifications �������������������������������������������������������������������������������������9-10
Warranty ���������������������������������������������������������������������������������������������������� 11
USER’S GUIDE
SCM-600

2
Thank you for choosing Senal.
The Senal SCM-600 is a professional-grade, large-diaphragm, true condenser microphone� Its 1�3″
gold-plated transducer element is designed to give detailed and accurate sound reproduction in
studio applications� Its full, rich tone and clarity make it an ideal microphone for studio recording,
broadcasting, podcasting, or live recording� With a wide dynamic range and high SPL of 140 dB, this
microphone captures vocals and instruments accurately and with pristine clarity�
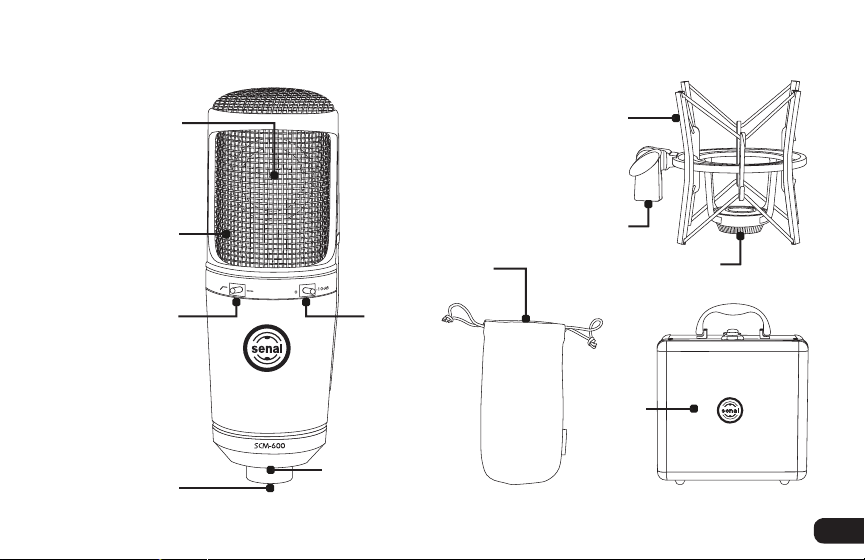
The SCM-600’s cardioid polar pattern minimizes off-axis noise and reflections� An onboard -10 dB
attenuation pad allows you to achieve optimal signal levels when in front of loud sound sources such
as guitar cabinets or singers� The 80 Hz high-pass filter rolls off unwanted low-frequency noise and
rumble caused by room noise, air conditioners, fans, or microphone movement�
The included shock mount reduces unwanted vibrations that can radiate up through the mic stand
when ultimate sensitivity is required� Rugged all-metal construction provides durability during
transport or in demanding studio conditions, and the aluminum case with high-density foam cutouts
and protective pouch add additional protection�
▪ ▪ ▪ ▪ ▪ ▪ ▪ ▪ ▪ ▪ ▪ ▪ ▪ ▪ ▪ ▪ ▪ ▪ ▪ ▪ ▪ ▪ ▪ ▪ ▪ ▪ ▪ ▪ ▪ ▪ ▪ ▪ ▪ ▪ ▪ ▪ ▪ ▪ ▪ ▪ ▪ ▪ ▪ ▪ ▪ ▪ ▪ ▪ ▪ ▪ ▪ ▪ ▪ ▪ ▪ ▪ ▪ ▪ ▪ ▪ ▪ ▪ ▪ ▪ ▪ ▪ ▪ ▪ ▪ ▪ ▪ ▪ ▪ ▪ ▪ ▪ ▪ ▪ ▪ ▪ ▪ ▪ ▪ ▪ ▪ ▪ ▪ ▪ ▪ ▪ ▪ ▪ ▪ ▪ ▪ ▪ ▪
Introduction

3
Overview
Overview
▪ ▪ ▪ ▪ ▪ ▪ ▪ ▪ ▪ ▪ ▪ ▪ ▪ ▪ ▪ ▪ ▪ ▪ ▪ ▪ ▪ ▪ ▪ ▪ ▪ ▪ ▪ ▪ ▪ ▪ ▪ ▪ ▪ ▪ ▪ ▪ ▪ ▪ ▪ ▪ ▪ ▪ ▪ ▪ ▪ ▪ ▪ ▪ ▪ ▪ ▪ ▪ ▪ ▪ ▪ ▪ ▪ ▪ ▪ ▪ ▪ ▪ ▪ ▪ ▪ ▪ ▪ ▪ ▪ ▪ ▪ ▪ ▪ ▪ ▪ ▪ ▪ ▪ ▪ ▪ ▪ ▪ ▪ ▪ ▪ ▪ ▪ ▪ ▪ ▪ ▪ ▪ ▪ ▪ ▪ ▪ ▪ ▪ ▪
1.3″ gold-plated
diaphragm
condenser
transducer
Grille
Threaded
mount
Gold-plated
XLR connector
Shock
mount
Carry
case
High-pass
filter
switch
5/8″ male to
3/8″ female
adapter
Shock-mount
thread
-10 dB
pad
switch
Protective
pouch/
dustcover

4
Precautions
▪ Please read and follow these instructions and keep this manual in a safe place�
▪ Exposure to high sound levels can cause permanent hearing loss� Avoid listening at high volumes
for extended periods�
▪ Keep this product away from water and flammable gases or liquids�
▪ Do not attempt to disassemble or repair this product yourself�
▪ Handle this product with care�
▪ Clean this product with only a soft, dry cloth�
▪ To avoid damage to this product, be careful not to overtighten or improperly thread any of the
threaded fittings�
▪ Make sure this product is intact and that there are no missing parts�
▪ ▪ ▪ ▪ ▪ ▪ ▪ ▪ ▪ ▪ ▪ ▪ ▪ ▪ ▪ ▪ ▪ ▪ ▪ ▪ ▪ ▪ ▪ ▪ ▪ ▪ ▪ ▪ ▪ ▪ ▪ ▪ ▪ ▪ ▪ ▪ ▪ ▪ ▪ ▪ ▪ ▪ ▪ ▪ ▪ ▪ ▪ ▪ ▪ ▪ ▪ ▪ ▪ ▪ ▪ ▪ ▪ ▪ ▪ ▪ ▪ ▪ ▪ ▪ ▪ ▪ ▪ ▪ ▪ ▪ ▪ ▪ ▪ ▪ ▪ ▪ ▪ ▪ ▪ ▪ ▪ ▪ ▪ ▪ ▪ ▪ ▪ ▪ ▪ ▪ ▪ ▪ ▪ ▪ ▪ ▪ ▪
Precautions

5
Mounting the Microphone
▪ ▪ ▪ ▪ ▪ ▪ ▪ ▪ ▪ ▪ ▪ ▪ ▪ ▪ ▪ ▪ ▪ ▪ ▪ ▪ ▪ ▪ ▪ ▪ ▪ ▪ ▪ ▪ ▪ ▪ ▪ ▪ ▪ ▪ ▪ ▪ ▪ ▪ ▪ ▪ ▪ ▪ ▪ ▪ ▪ ▪ ▪ ▪ ▪ ▪ ▪ ▪ ▪ ▪ ▪ ▪ ▪ ▪ ▪ ▪ ▪ ▪ ▪ ▪ ▪ ▪ ▪ ▪ ▪ ▪ ▪ ▪ ▪ ▪ ▪ ▪ ▪ ▪ ▪ ▪ ▪ ▪ ▪ ▪ ▪
Mounting the Microphone
To mount the SCM-600, follow these steps:
1� Screw the included shock mount onto a 5/8″ threaded
microphone stand and make sure it is in a 90-degree
position� Then fully tighten the locking knob on the shock
mount�
2� Carefully place the bottom of the microphone into the shock
mount� Screw in the shock mount thread from below the
shock mount and tighten it until secure�

6
Positioning the Microphone
The SCM-600’s cardioid polar pattern picks up sound mostly from in front of the microphone�
The front of the microphone (the side with the Senal logo) should be facing the sound source, although
it is important to experiment with microphone placement and positioning to find the best solution for
your specific recording�
High-Pass Filter
The high-pass filter can be used to reduce the microphone’s sensitivity to low-frequency sounds, such
as vibrations from outside traffic, air conditioning, fans, or other background audio� When set to
ON ( ) the SCM-600 will filter sound from 110 Hz and below� The OFF setting ( ) will result in no
filtering�
Attenuation Pad
When switched to -10 dB, the SCM-600 attenuation pad lowers the output by 10 dB and prevents
distortion when recording loud sound sources like singers, percussion, or guitar amplifiers� When
set to 0, there is no attenuation�
▪ ▪ ▪ ▪ ▪ ▪ ▪ ▪ ▪ ▪ ▪ ▪ ▪ ▪ ▪ ▪ ▪ ▪ ▪ ▪ ▪ ▪ ▪ ▪ ▪ ▪ ▪ ▪ ▪ ▪ ▪ ▪ ▪ ▪ ▪ ▪ ▪ ▪ ▪ ▪ ▪ ▪ ▪ ▪ ▪ ▪ ▪ ▪ ▪ ▪ ▪ ▪ ▪ ▪ ▪ ▪
Positioning the Microphone/High-Pass Filter/Attenuation Pad

7
Connecting the Microphone
▪ ▪ ▪ ▪ ▪ ▪ ▪ ▪ ▪ ▪ ▪ ▪ ▪ ▪ ▪ ▪ ▪ ▪ ▪ ▪ ▪ ▪ ▪ ▪ ▪ ▪ ▪ ▪ ▪ ▪ ▪ ▪ ▪ ▪ ▪ ▪ ▪ ▪ ▪ ▪ ▪ ▪ ▪ ▪ ▪ ▪ ▪ ▪ ▪ ▪ ▪ ▪ ▪ ▪ ▪ ▪ ▪ ▪ ▪ ▪ ▪ ▪ ▪ ▪ ▪ ▪ ▪ ▪ ▪ ▪ ▪ ▪ ▪ ▪ ▪ ▪ ▪ ▪ ▪ ▪ ▪ ▪ ▪
Connecting the Microphone
Use an XLR cable (not included) to connect the microphone to your mixing console, microphone
preamp, or recording device� Make sure phantom power is turned on�
Note: Phantom power must be used with this microphone� Make sure your recording device has proper
+48 V phantom power�
Warning
Make sure all faders and volume knobs are turned down� After the microphone is connected, set the
volume to your preferred level for recording�
Before recording, make sure the high-pass filter is set to OFF ( ), and the attenuation pad is not
engaged� See High-Pass Filter on page 6 for more information�
If using this microphone for vocals, do not sing or blow directly into the diaphragm� Use a pop filter
(not included) to eliminate vocal plosives and shield against corrosive moisture that can damage the
diaphragm�

8
▪ ▪ ▪ ▪ ▪ ▪ ▪ ▪ ▪ ▪ ▪ ▪ ▪ ▪ ▪ ▪ ▪ ▪ ▪ ▪ ▪ ▪ ▪ ▪ ▪ ▪ ▪ ▪ ▪ ▪ ▪ ▪ ▪ ▪ ▪ ▪ ▪ ▪ ▪ ▪ ▪ ▪ ▪ ▪ ▪ ▪ ▪ ▪ ▪ ▪ ▪ ▪ ▪ ▪ ▪ ▪ ▪ ▪ ▪ ▪ ▪ ▪ ▪ ▪ ▪ ▪ ▪ ▪ ▪ ▪ ▪ ▪ ▪ ▪ ▪ ▪ ▪ ▪ ▪ ▪ ▪ ▪ ▪ ▪ ▪ ▪ ▪ ▪ ▪ ▪ ▪ ▪ ▪
Troubleshooting
Problem Solution
No sound is
being recorded�
Make sure your mixer or amplifier is turned on and phantom power is engaged�
The fader of the channel or master volume on your mixing console is turned all the
way down�
Your preamp gain is turned all the way down�
Make sure the microphone is properly connected and connections are secure�
Check your cable to make sure it’s reliable� Try switching it with another cable�
The sound is
distorted�
Turn on the microphone’s attenuation pad�
Move the microphone further away from the sound source�
Too much low-
frequency noise
or rumble is
being recorded�
Turn on the high-pass filter�
Turn off air conditioners, fans, heaters, or other devices that might be interfering
with your recording�
Troubleshooting

9
Specifications
▪ ▪ ▪ ▪ ▪ ▪ ▪ ▪ ▪ ▪ ▪ ▪ ▪ ▪ ▪ ▪ ▪ ▪ ▪ ▪ ▪ ▪ ▪ ▪ ▪ ▪ ▪ ▪ ▪ ▪ ▪ ▪ ▪ ▪ ▪ ▪ ▪ ▪ ▪ ▪ ▪ ▪ ▪ ▪ ▪ ▪ ▪ ▪ ▪ ▪ ▪ ▪ ▪ ▪ ▪ ▪ ▪ ▪ ▪ ▪ ▪ ▪ ▪ ▪ ▪ ▪ ▪ ▪ ▪ ▪ ▪ ▪ ▪ ▪ ▪ ▪ ▪ ▪ ▪ ▪ ▪ ▪ ▪ ▪ ▪ ▪ ▪ ▪ ▪ ▪ ▪ ▪ ▪ ▪ ▪
Element: True condenser transducer
Diaphragm: 1�3″ gold-plated diaphragm
Polar pattern: Cardioid
Frequency response: 20 Hz to 20 kHz
Sensitivity: -36 dB ±3 dB
Signal-to-noise ratio: 76 dB (1 kHz @ 1 Pa)
Maximum input SPL: ≥130/140 dB (0/-10 dB pad) (THD ≤1�0% @ 1 kHz)
Output impedance: 50 Ω @ 30%
Power requirements: 48 V DC phantom power
Output connector: 3-pin XLR
Pad: -10 dB
High-pass filter: -10 dB/octave @ 110 Hz
Dimensions (H × Ø): 6″ × 2″ (15�2 × 5�1 cm)
Weight (with case): 3�7 lb� (1�7 kg)
Specifications

10
▪ ▪ ▪ ▪ ▪ ▪ ▪ ▪ ▪ ▪ ▪ ▪ ▪ ▪ ▪ ▪ ▪ ▪ ▪ ▪ ▪ ▪ ▪ ▪ ▪ ▪ ▪ ▪ ▪ ▪ ▪ ▪ ▪ ▪ ▪ ▪ ▪ ▪ ▪ ▪ ▪ ▪ ▪ ▪ ▪ ▪ ▪ ▪ ▪ ▪ ▪ ▪ ▪ ▪ ▪ ▪ ▪ ▪ ▪ ▪ ▪ ▪ ▪ ▪ ▪ ▪ ▪ ▪ ▪ ▪ ▪ ▪ ▪ ▪ ▪ ▪ ▪ ▪ ▪ ▪ ▪ ▪ ▪ ▪ ▪ ▪ ▪ ▪ ▪ ▪ ▪ ▪ ▪ ▪ ▪
Specifications
Frequency Response Graph
Frequency in Hertz
-20
-30
-40
-50
-60
Frequency Response
Relative Response in dB
050 100 500 1K 5K 10K 20K
Polar Pattern
0° 30°
60°
90°
120°
150°
180°
210°
240°
270°
300°
330°

11
Warranty
▪ ▪ ▪ ▪ ▪ ▪ ▪ ▪ ▪ ▪ ▪ ▪ ▪ ▪ ▪ ▪ ▪ ▪ ▪ ▪ ▪ ▪ ▪ ▪ ▪ ▪ ▪ ▪ ▪ ▪ ▪ ▪ ▪ ▪ ▪ ▪ ▪ ▪ ▪ ▪ ▪ ▪ ▪ ▪ ▪ ▪ ▪ ▪ ▪ ▪ ▪ ▪ ▪ ▪ ▪ ▪ ▪ ▪ ▪ ▪ ▪ ▪ ▪ ▪ ▪ ▪ ▪ ▪ ▪ ▪ ▪ ▪ ▪ ▪ ▪ ▪ ▪ ▪ ▪ ▪ ▪ ▪ ▪ ▪ ▪ ▪ ▪ ▪ ▪ ▪ ▪ ▪ ▪ ▪ ▪ ▪ ▪ ▪ ▪ ▪
Two-Year Limited Warranty
This Senal product is warranted to the original purchaser to be free from defects in materials and workmanship
under normal consumer use for a period of two (2) years from the original purchase date or thirty (30) days after
replacement, whichever occurs later� The warranty provider’s responsibility with respect to this limited warranty
shall be limited solely to repair or replacement, at the provider’s discretion, of any product that fails during
normal use of this product in its intended manner and in its intended environment� Inoperability of the product or
part(s) shall be determined by the warranty provider� If the product has been discontinued, the warranty provider
reserves the right to replace it with a model of equivalent quality and function�
This warranty does not cover damage or defect caused by misuse, neglect, accident, alteration, abuse, improper
installation or maintenance� EXCEPT AS PROVIDED HEREIN, THE WARRANTY PROVIDER MAKES NEITHER ANY
EXPRESS WARRANTIES NOR ANY IMPLIED WARRANTIES, INCLUDING BUT NOT LIMITED TO ANY IMPLIED
WARRANTY OF MERCHANTABILITY OR FITNESS FOR A PARTICULAR PURPOSE� This warranty provides you
with specific legal rights, and you may also have additional rights that vary from state to state�
To obtain warranty coverage, contact the Senal Customer Service Department to obtain a return merchandise
authorization (“RMA”) number, and return the defective product to Senal along with the RMA number and proof
of purchase� Shipment of the defective product is at the purchaser’s own risk and expense�
For more information or to arrange service, visit www�senalsound�com or call Customer Service at 212-594-2353�
Product warranty provided by the Gradus Group�
www�gradusgroup�com
Senal is a registered trademark of the Gradus Group� © 2016 Gradus Group LLC� All Rights Reserved�

GG1
Table of contents
Other Senal Microphone manuals

Senal
Senal ub-440 User manual

Senal
Senal scm-660 User manual

Senal
Senal Professional MX Series User manual

Senal
Senal CL6 User manual

Senal
Senal ub-440 User manual

Senal
Senal MC5-MS User manual

Senal
Senal UC4-B User manual

Senal
Senal SC-550X User manual

Senal
Senal ENG-18R User manual

Senal
Senal MXGN Series User manual