Sensotec My Board Buddy User manual

my Board Buddy
manual
manuel
handleiding
Developed by | Développé par | Ontwikkeld door:

2
my Board Buddy
Copyright © 2019 – Sensotec NV
All rights reserved.
Other product or company names mentioned in this document are trademarks or registered marks of their
respective owners.
Version: 1.0.
Tous droits réservés.
Les autres noms de produits ou de sociétés mentionnés dans ce document sont des marques
commerciales ou des marques déposées de leurs propriétaires respectifs.
Version: 1.0.
Alle rechten voorbehouden.
Andere in dit document genoemde product- of bedrijfsnamen zijn handelsmerken of geregistreerde merken
van hun respectievelijke eigenaren.
Versie: 1.0.
Sensotec nv
www.sensotec.be
www.myboardbuddy.com
HQ:
Vlamingveld 8, B 8490 Jabbeke
Offices:
Antwerpse Steenweg 96, B-2940 Hoevenen-Stabroek
T +32 3 828 80 15
Rue de la Croix Rouge 39, B-5100 Namen
T +32 81 71 34 60
Board
Buddy
By Sensotec
my

3
Important note:
my Board Buddy has a micro USB
connection for the power adapter,
do not connect it until all connections
are made that follow.
Table of content
PG 4
1. Contents of the box
2. Maintenance and precautions
3. Guarantee
4. Technical Support
PG 5
5. Construction
6. Working with the connections
6.1 Power adapter
6.2 HDMI output
6.3 Ethernet connection
6.4 USB connection
7. Connecting
7.1 Standalone use
7.2 As an addon to a school
system
PG 6
8. Setting up the wireless network
PG 7-8
9. Software installation or
execution from USB stick
10. Working with my Board Buddy
10.1 As a student
10.2 As a teacher
PG 8
11. Troubleshooting
Remarque importante: my
Board Buddy dispose d’une con-
nexion micro USB pour l’adaptateur
secteur. Ne connectez-le jusqu’à
ce que toutes les connexions soient
établies.
Table des matières
PG 9
1. Contenu de la boîte
2. Maintenance et précautions
3. Garantie
4. Support technique
PG 10
5. Construction
6. Travailler avec les connexions
6.1 Adaptateur secteur
6.2 sortie HDMI
6.3 connexion Ethernet
6.4 connexion USB
7. Connecter
7.1 Utilisation autonome
7.2 En tant que complé
ment à un système d’école
PG 11
8. Mise en place du réseau sans fil
PG 12-13
9. Installation du logiciel ou
exécution à partir d’une clé USB
10. Travailler avec my Board Buddy
10.1 En tant qu’étudiant
10.2 En tant qu’enseignant
PG 13
11. Dépannage
Belangrijke opmerking:
my Board Buddy heeft een micro USB
aansluiting voor de stroomadapter,
sluit deze pas aan als alle connecties
gemaakt werden die hierop volgen !
Inhoudsopgave
PG 14
1. Inhoud van de doos
2. Onderhoud en voorzorgsmaatre-
gelen
3. Garantie
4. Technische ondersteuning
PG 15
5. Bouw
6. Werken met de verbindingen
6.1 Voedingsadapter
6.2 HDMI-uitgang
6.3 Ethernet-verbinding
6.4 USB-verbinding
7. Aansluiten
7.1 Standalone gebruik
7.2 Als aanvulling op een
schoolsysteem
PG 16
8. Het draadloze netwerk instellen
PG 17-18
9. Software-installatie of uitvoering
vanaf USB-stick
10. Werken met mijn Board Buddy
10.1 Als student
10.2 Als een leraar
PG 18
11. Problemen oplossen

4
Introduction to my Board
Buddy
Thank you for choosing my Board
Buddy as a solution for duplicating
a digital projection or smartboard.
The image is sent from a guest PC
via the network.
my Board Buddy is a stand-alone or
add-on solution for school setups
used by visually impaired children
and students.
my Board Buddy makes a vibration-
free, maximum magnifiable dupli-
cate of the smartboard or any other
projection while maintaining the
original image quality and offering
the possibility to manipulate the
colors.
Also very useful for visually impai-
red participants during meetings.
The Board Buddy is easy to operate
through a controller that requires no
knowledge of a PC, in other words it
can be operated by children from 6
years.
Boar
My Board
Buddy
My Board
Buddy
my Board Buddy manual
1. Content of the box
The box you received contains the
following items:
• my Board Buddy controller
• my Board Buddy processor
• Power adapter
• VESA mounting plate + 8 screws
• User manual
Always check in advance if all
components are present!
2. Maintenance and
precautions
Clean my Board Buddy with a damp,
well wrung cloth (NEVER use a wet
cloth). Never use corrosive products:
the housing will suffer irreparable
damage.
Keep the packaging in which the
Board Buddy was delivered. The
device must only be shipped in this
package.
Always give the Board Buddy
sufficient space (± 10 cm) so that air
can circulate through the openings.
Never cover the ventilation grille:
there is a risk that the appliance will
overheat.
Only use the supplied AC power
adapter.
Only use the supplied power adap-
ter. The use of an error type can
damage the device.
Never switch on the device if it has
been exposed to water.
Place all cables so that no one can
stumble or get stuck.
3. Warranty
Sensotec nv offers a warranty on
the Board Buddy up to two years after
purchase, in accordance with the
legal guarantee conditions.
Damage caused by improper or un-
tidy use is in no way covered by the
warranty conditions.
Maintenance and repairs are reser-
ved for technicians of or recognized
by Sensotec nv. The device must ne-
ver be opened by the user or third
parties. If this happens, your gua-
rantee will be void without any obli-
gation on our part.
4. Technical Support
Use this manual as a guide. Make
sure the IT department is sufficient-
ly aware of the operation so that the
Board is properly installed to the
network.
Finally, you can contact your local
supplier for technical support. If the
technical problem persists or you
do not find the answer in this manu-
al, please do not hesitate to contact
or by telephone at +32 50 40 47 47.
5
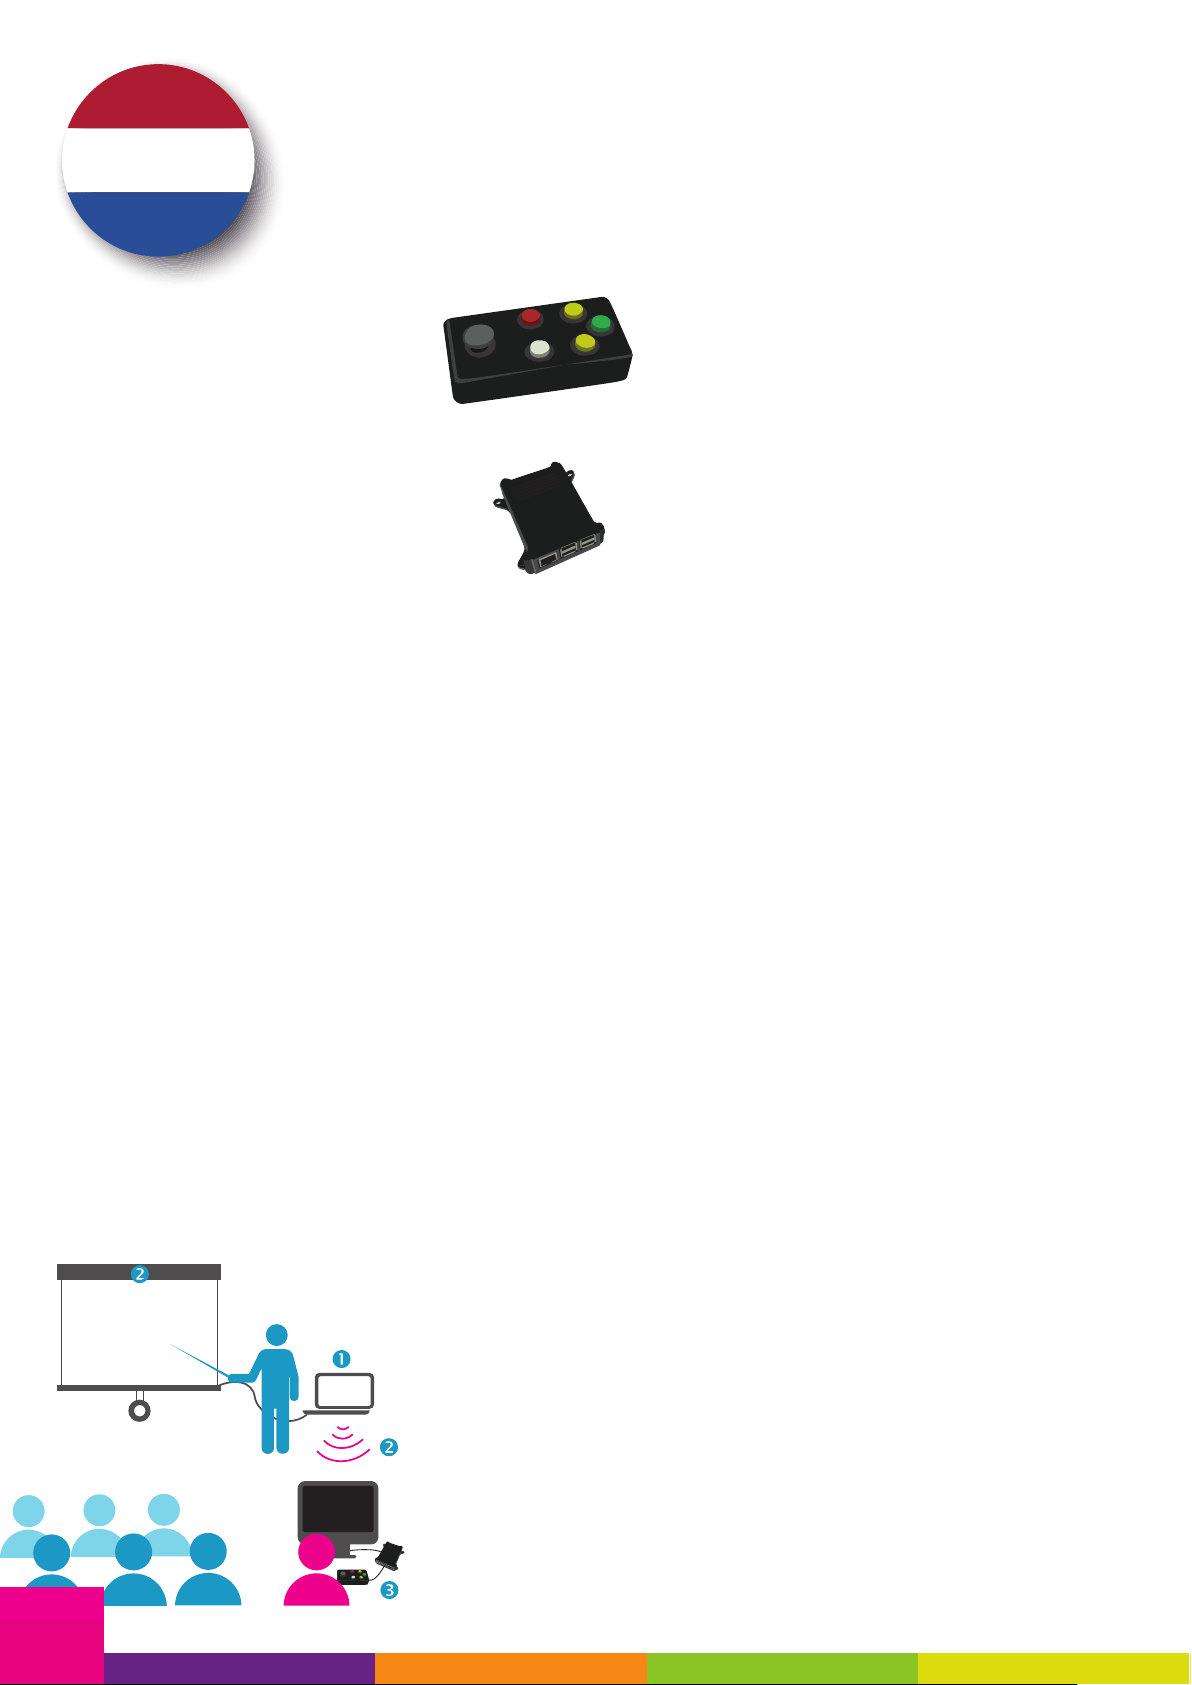
5. Construction of my
Board Buddy
Processor overview
• Micro USB connection for po-
wer adapter
• HDMI output
• Ethernet connection
• USB connection for controller
• Ventilation grille
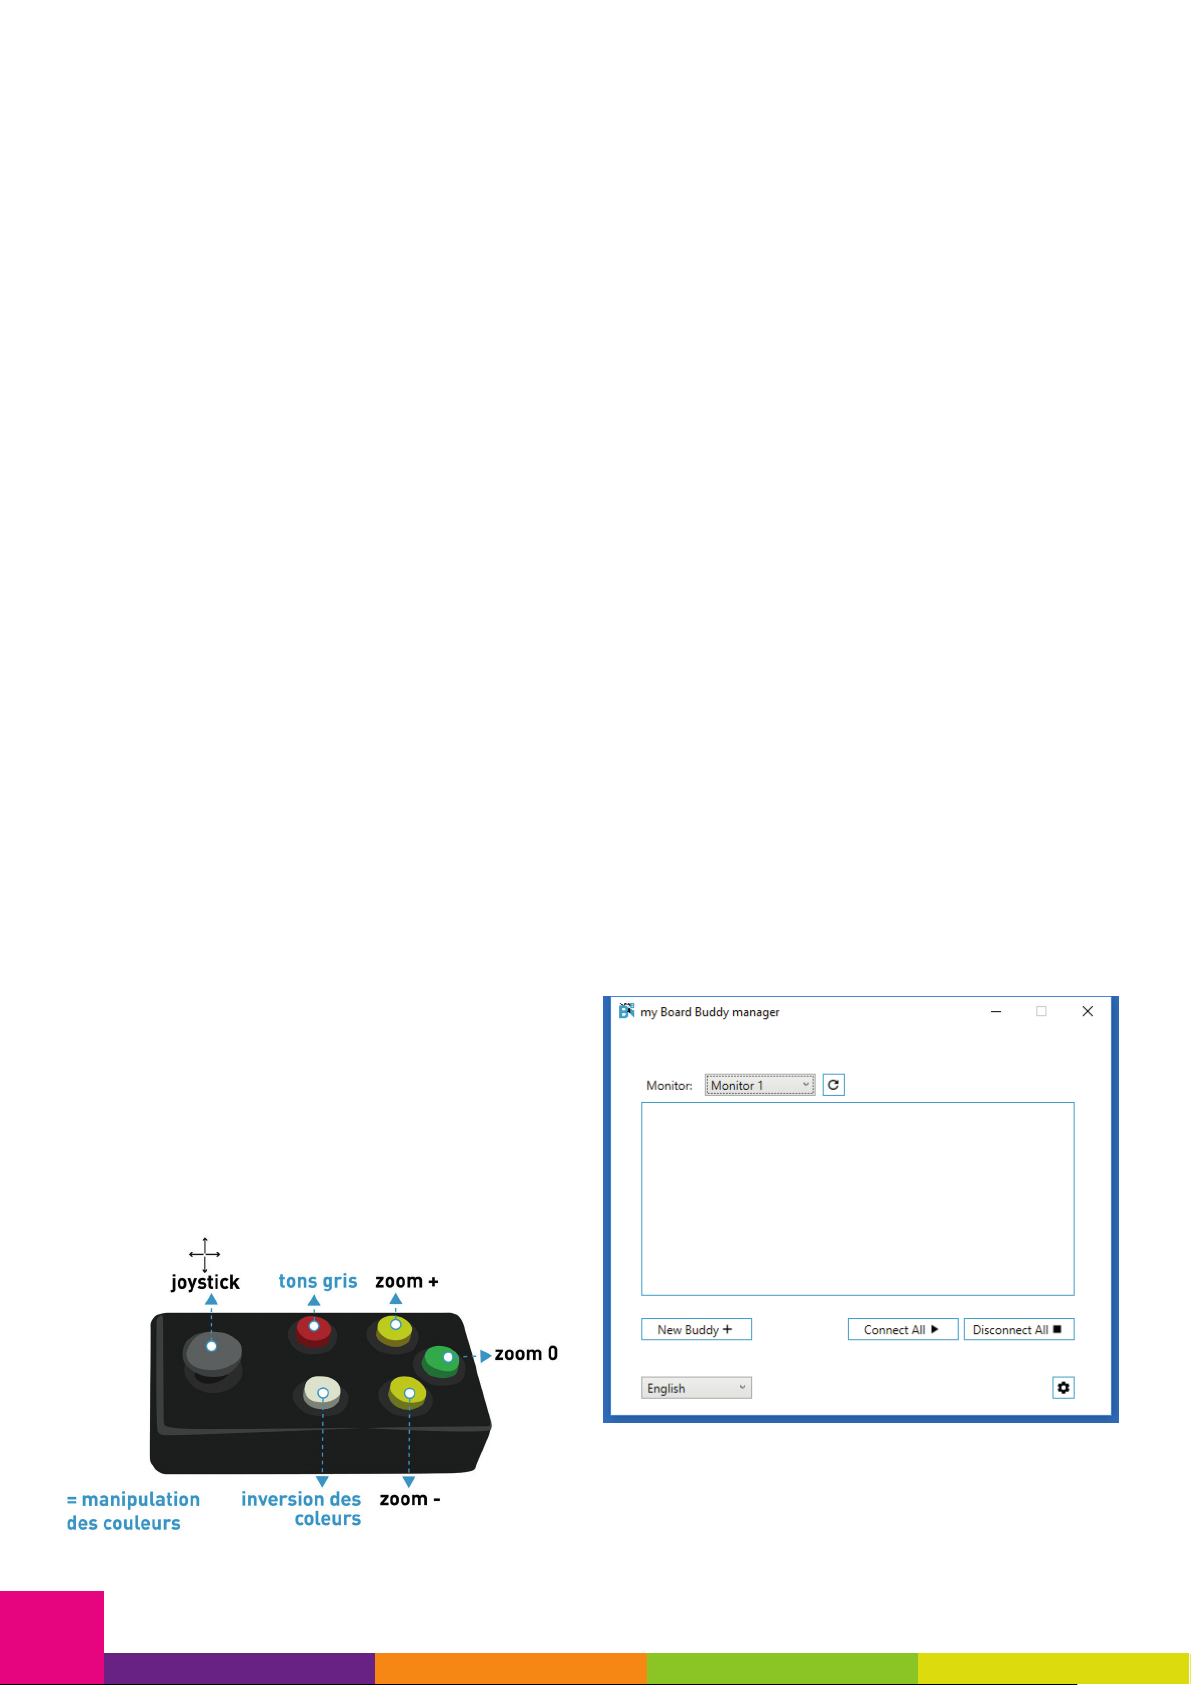
Controller overview
• Joystick (image moving)
• Button color inversion
• Button grayscale
• Button zoom in
• Button zoom out
• Button fit screen (1/1)
6. Working with the
connections
6.1 Power adapter
The Boardy Buddy has a micro USB
connection for the power adapter,
do not connect it until all connections
are made that follow.
6.2 HDMI output
The Board Buddy is equipped with
an HDMI output with full HD sup-
port (1080p, 1920x1080). It is also
possible to connect a DVI screen,
using an HDMI to DVI cable. VGA is
not supported!
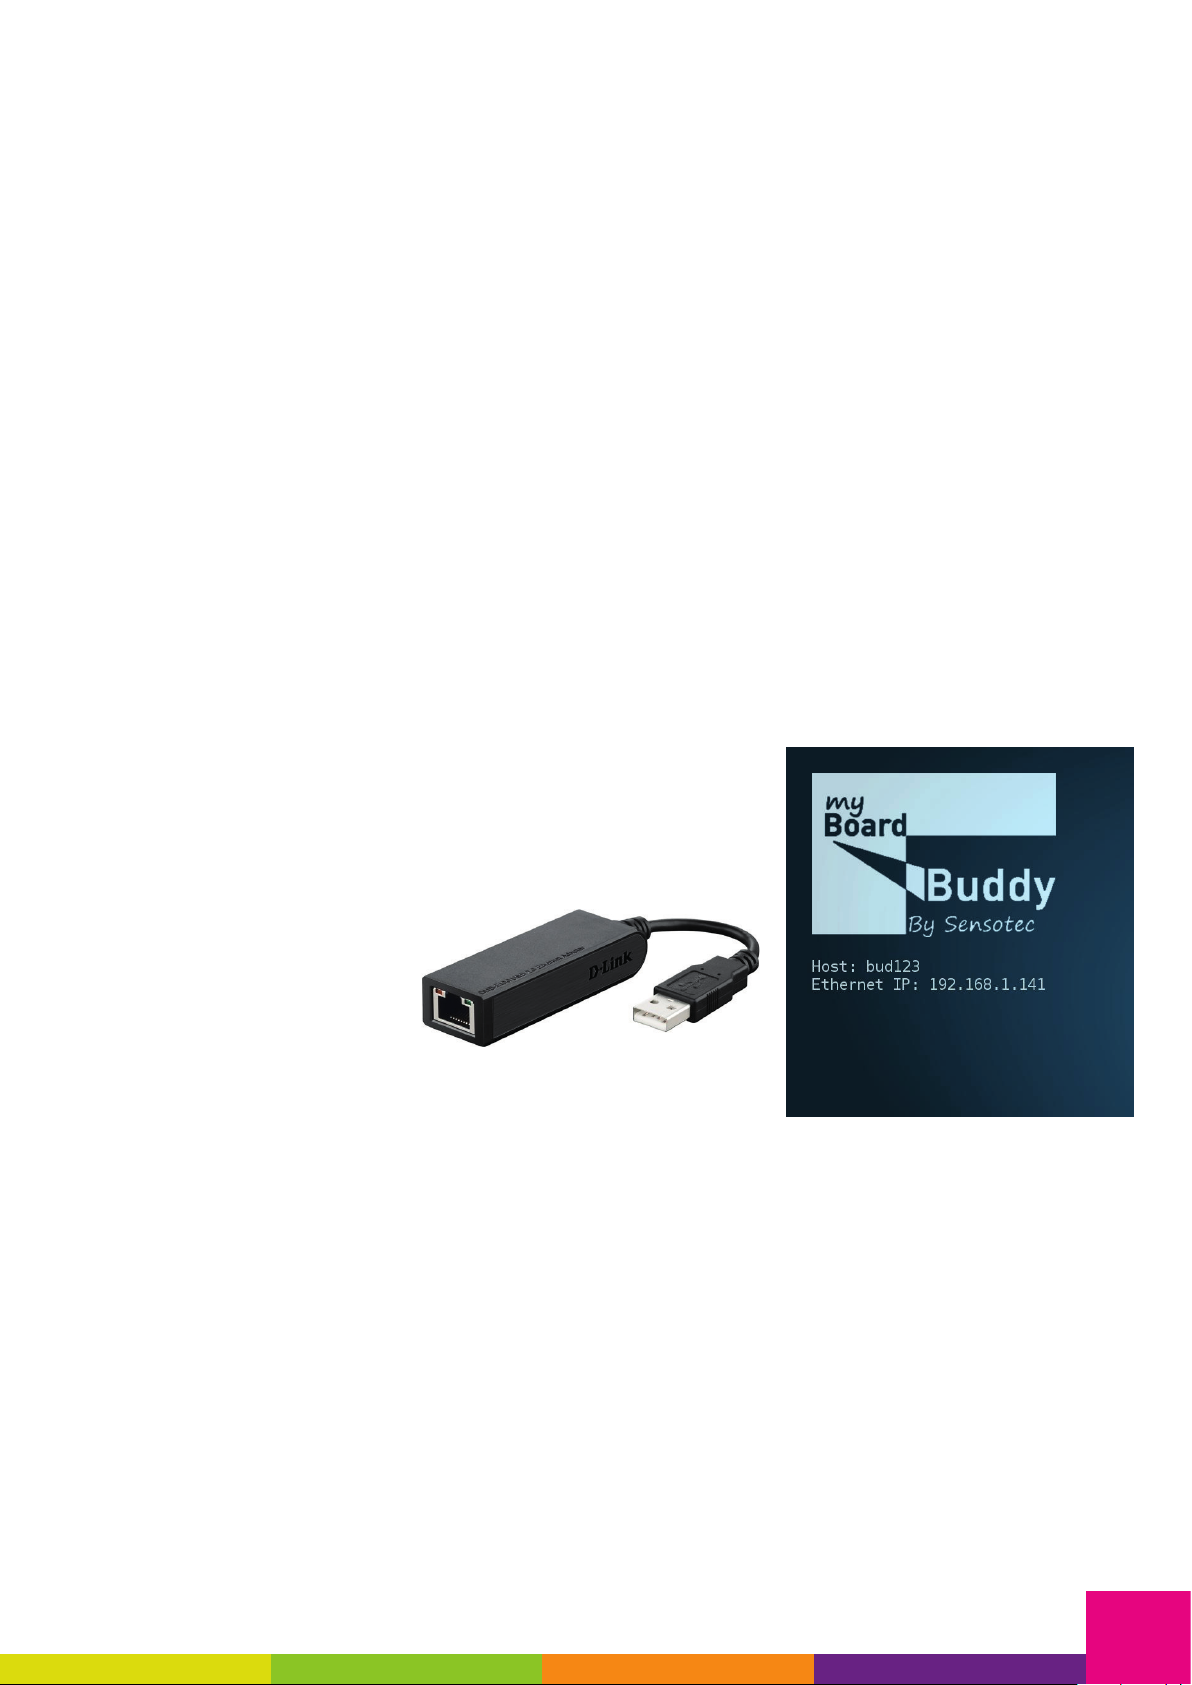
6.3 Ethernet connection
It is recommended to connect to the
network via a network cable. Make
sure that it is in good condition and
correctly connected. If a wired net-
work is not available, you can use a
wireless network.
6.4 USB connection
There are 4 USB connections on the
Board Buddy, we only use one for
permanent use by the controller. It
is possible to connect a keyboard
and mouse for setting the wireless
network or service purposes.
7. Connecting my Board
Buddy
You can use the Board Buddy in two
ways: as a stand alone solution or
as a supplement to a school set.
7.1 Standalone use
Optional: if you want to mount the
Board Buddy at the back of the
screen, use the VESA mounting pla-
te and supplied screws.
1. Connect the screen via an HDMI
-> HDMI or HDMI -> DVI cable
2. If you want to connect to a wired
network, connect the network
cable.
→ TIP, it is possible to connect
directly with a network cable
between the PC and my Board
Buddy! If no network connection is
available, you can use a USB.
3. Connect the controller to one of
the 4 USB ports.
4. Connect the power adapter to
the micro USB port and insert it
into the wall socket.
7.2 As an addon to a school
system
1. Connect the school set via an
HDMI cable. Use the PC input
of the CCTV if available. If this
is not available, contact your
supplier.
2. If you want to connect to a wired
network, connect the network
cable.
3. Connect the controller to one of
the 4 USB ports
4. Connect the power adapter to
the micro USB port and insert it
into the wall socket.
Next
If all goes well, you will see the
Sensotec startup screen, followed
by a blue screen with the Board
Buddy logo.
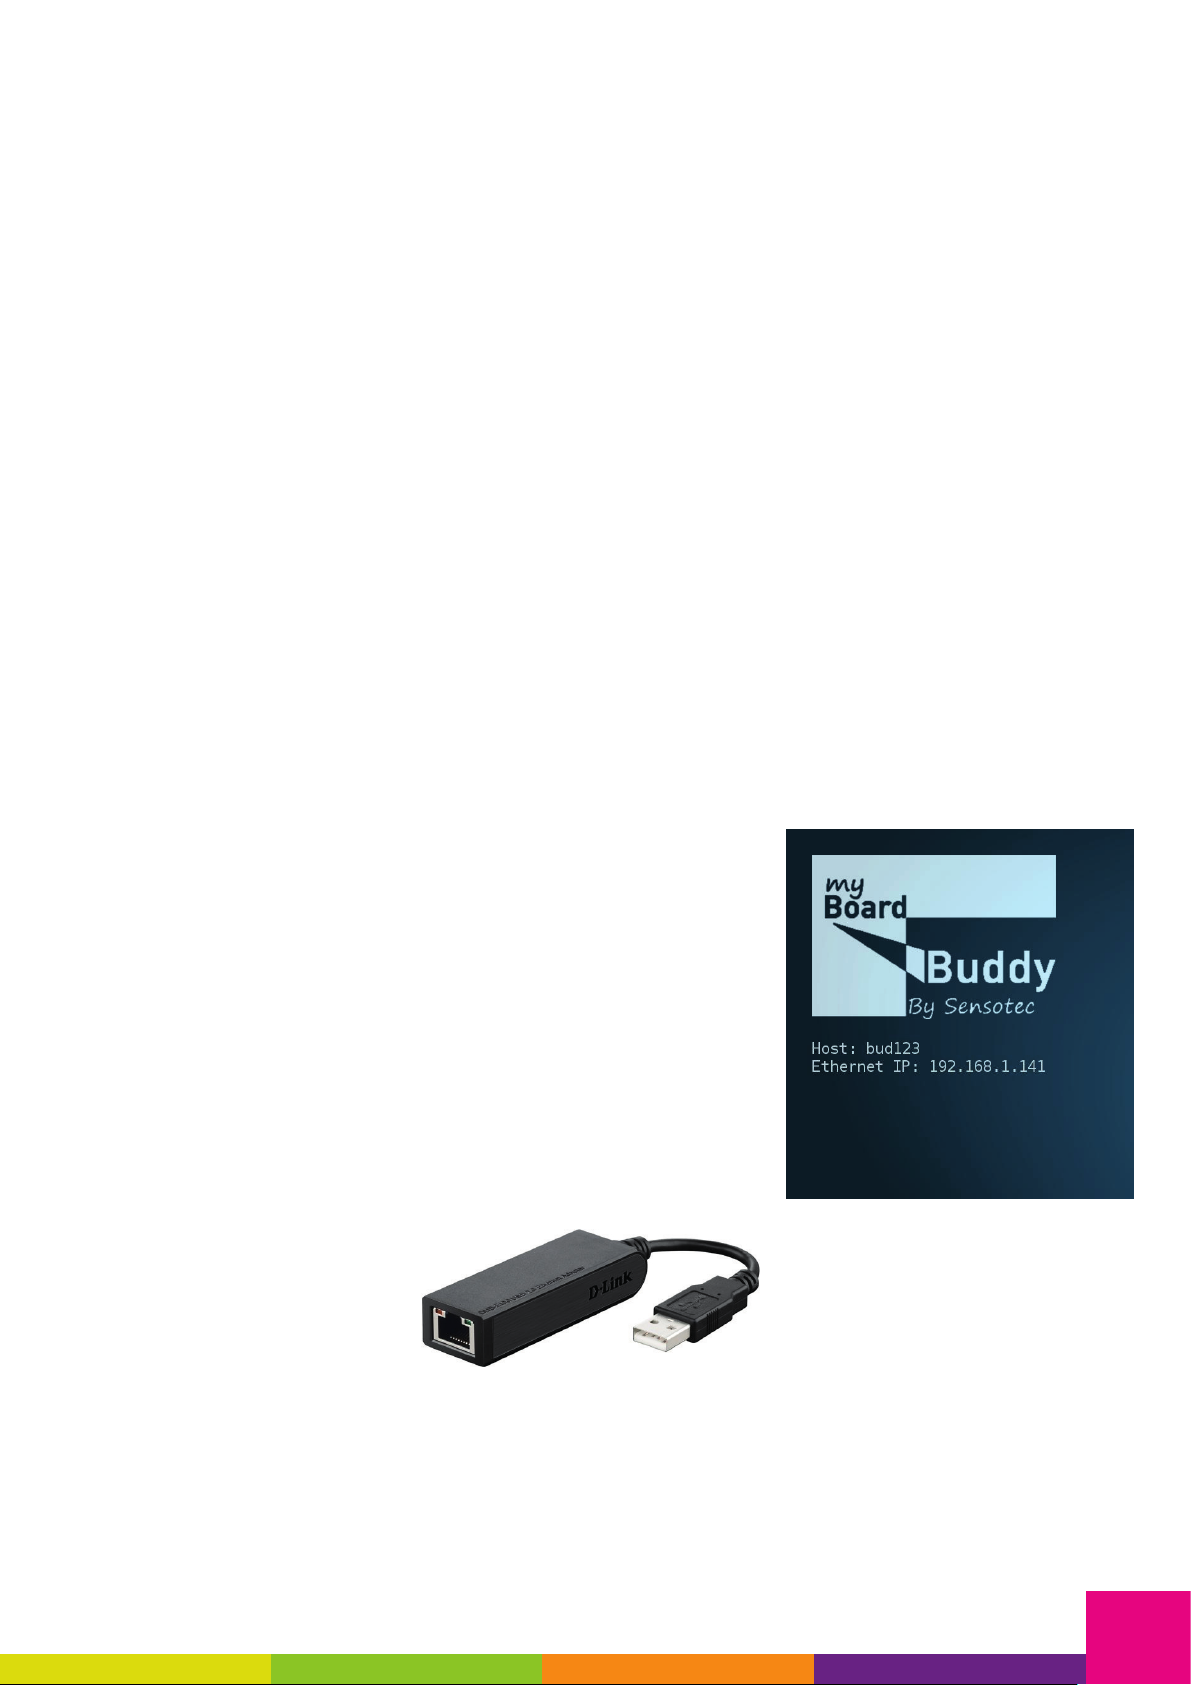
You will see the unique host name
and the IP address obtained under
the Board Buddy logo.

6
8. Setting up the wireless network
Connect a keyboard and mouse to the processor.
Click on the icon at the bottom right of the screen.
You will now see an overview of the available wireless
networks.
Select the correct network by checking the checkbox at
“Automatically connect to this network”. This will au-
tomatically connect to the wireless network with every
restart.
Now click connect to connect. If a security has been set
on the network, you will see a message that you have
to confirm.
Enter your password now in the space provided. By
clicking on the check mark in front of the input field you
make the entered password visible. Note, a password is
case-sensitive. The set input method is azerty.
Now click ok and then conntect to complete the con-
nection.

7
If all goes well, you will now see under the Board Buddy
logo the host name, the IP address obtained, the name
of the connected wireless network and signal strength.
If this does not work, verify the password and try again.
Tip: Correct the password by clicking on “Properties”.
Congratulations! The Board Buddy is ready for use.
Now we still have to set up the software on the guest
PC.
9. Software installation or execution from
USB stick
Connecting to a Board Buddy is very easy, requires little
effort and knowledge.
Install my Board Buddy manager from the included
stick. The installation speaks for itself.
It is possible to execute my Board Buddy manager from
stick without installation.
10. Working with the Board Buddy
10.1 As a student
Working with my Board Buddy is completely focused
on convenience, making it very easy for the user to get
used to the device and its operation. As soon as the
teacher shares the screen with the student, the latter
has the option to enlarge the image and
manipulate the colors.
On the controller you will see on the left a joystick re-
miniscent of a game console and on the right 5 color-
ful buttons.
• The yellow buttons are responsible for enlarging
the image, the top one making the image larger
and the lower one smaller.
• With the joystick you can move the image if an
enlargement has been set.
• The white button is responsible for the color inver-
sion.
• With the red button you can get a grayscale image
while retaining some colored information. This can
accentuate hard-to-read text for a better experien-
ce.
• The green button will rescale to full screen mode.
Since it’s the teacher that manages everything, the stu-
dent can focus on his lecture.
The Board Buddy goes to sleep after 20 minutes without
user input. By pressing a button on the controller or moving
the joystick you wake it up. It is not possible to completely
switch off the Board Buddy by means of a button, the low
consumption make this unnecessary.
10.2 As a teacher
Before establishing a connection with a Board Buddy,
make sure that the Board Buddy has been correctly in-
stalled and has an IP address within the same network
where your PC is located.
Start the program and choose the desired language at
the bottom left.
8
What screen to share?
At the top you see a field with the found monitors. This
corresponds to the number of desktops that are in use.
It is perfectly possible to share only one of the 2 screens
and thus maintain privacy on the other screen. Sharing
the contents of the smartboard without sharing your
own screen is a possibility.
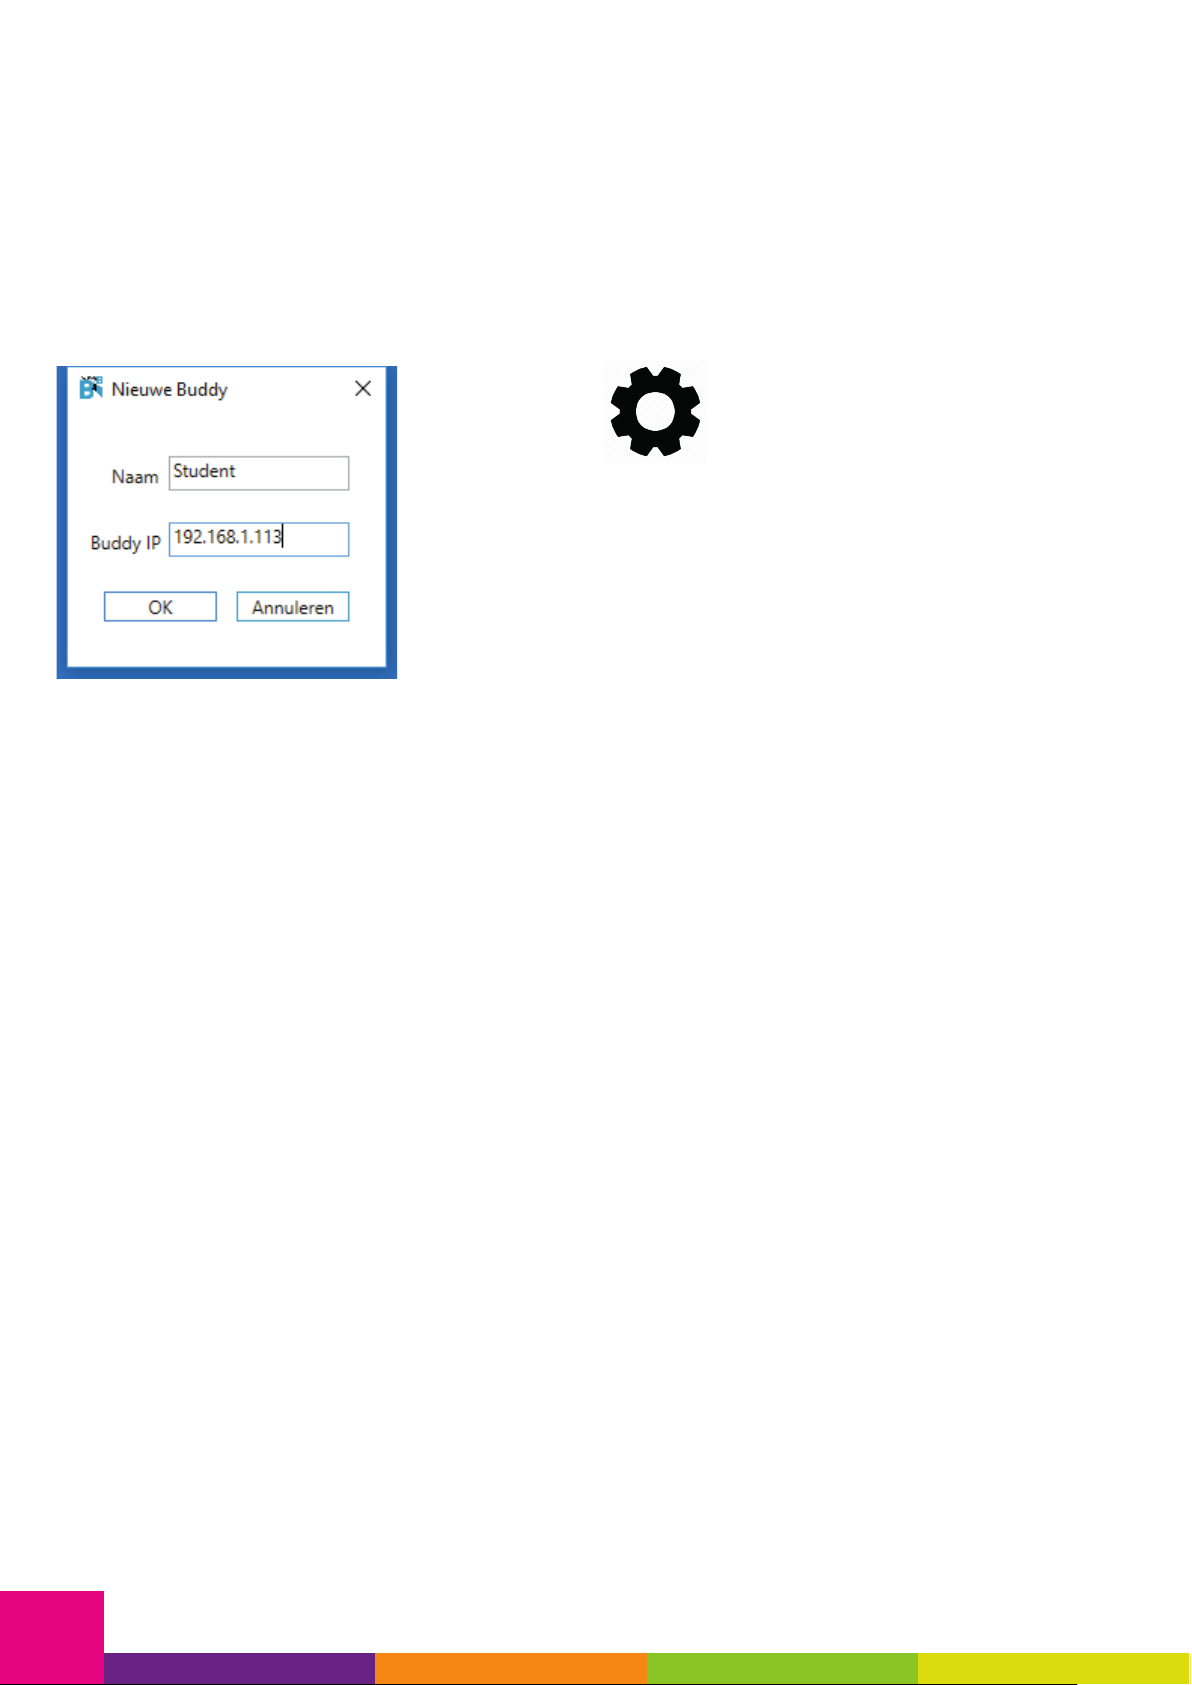
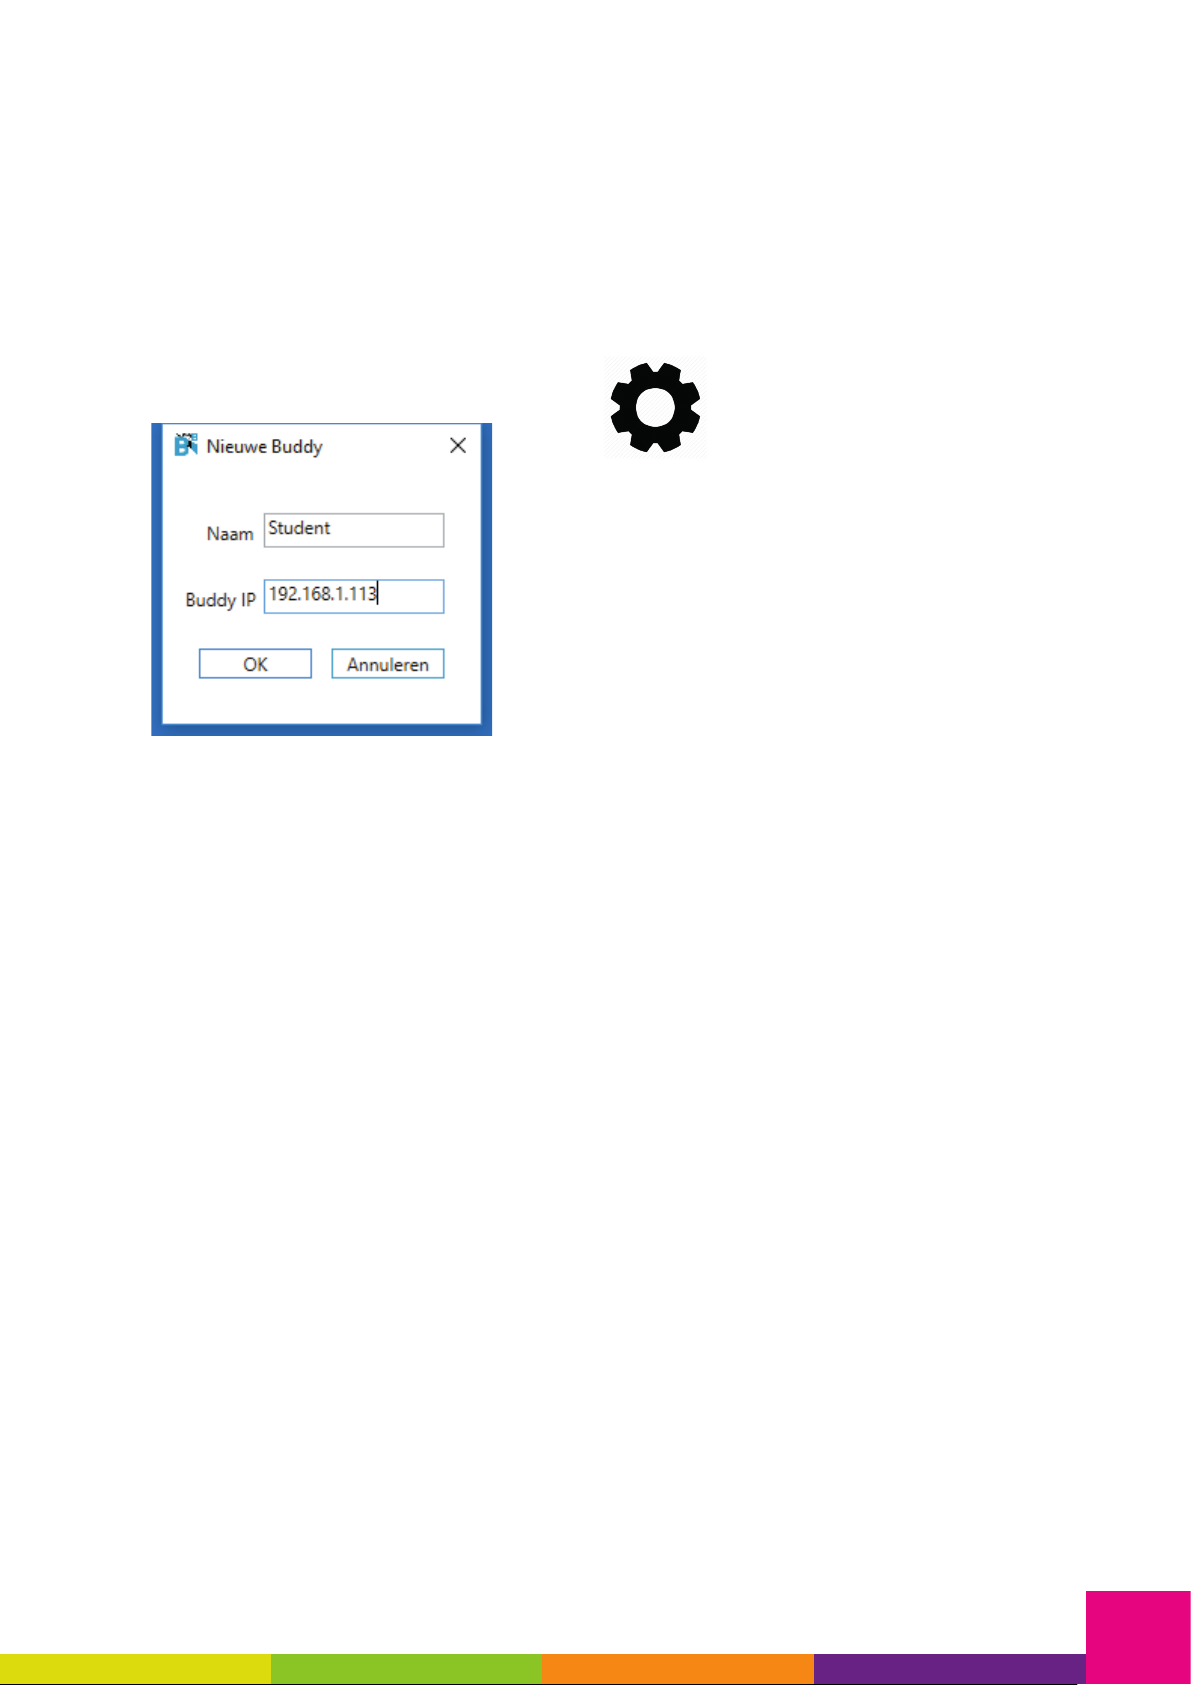
Add a new Board Buddy
Enter the name of the student and enter the correct
IP address of the Board Buddy. This IP address must
match what you can read on the screen of the my Board
Buddy.
Add as many Buddies as needed.
Start a session
Click on “Connect all” to connect all Buddies that are in
the list. All checked Buddies will be connected. When
you start the program automatically all Buddies will be
checked. If you teach as a teacher to multiple students
in different classes who use a my Board Buddy you can
exclude students who are not present at this time with
this feature.
All Buddies in the list that were successfully connected
are now also indicated in the screen.
Stop the session
Click on “Break all” to stop the session. All Buddies in
the list that were successfully connected are now also
indicated in the screen.
All connected Buddies now return to the home screen
and are ready for the next session.
If you close the program, all connections will be auto-
matically terminated.
Customize a Buddy
If you want to change the name or IP address of the
Buddy, click on the pencil next to the Buddy.
Delete a Buddy
If you want to remove a Buddy from the list, click on the
pencil and choose delete
Expert settings (advanced!)
By clicking on the icon at the bottom right it is possible
to change a number of advanced settings if the local IT
policy does not allow you to use my Board Buddy ma-
nager. Let the IT service assist you if necessary.
11. Troubleshooting
my Board Buddy has no IP address
Check if the cable has been connected correctly.
If a wireless network is used, check whether the SSID
and password have been set correctly.
→ A new device may be excluded on a school network.
Contact the IT service for this and get assistance with
the installation.
The shared image remains
The session may not have ended correctly. It is possible
to restore the Board Buddy by pressing the top of the
joystick until you feel a click and then pressing the red
button at the same time. My Board Buddy is now ready
for use again.
my Board Buddy has crashed
Remove the power adapter from the device and wait 30
seconds. Now reconnect the power adapter and wait
until the device has completely started up. If everything
went well, you will return to the home screen after a
maximum of 90 seconds.

9
Introduction
Merci d’avoir choisi my Board Buddy
comme solution permettant de dupli-
quer une projection numérique ou un
tableau intelligent. L’image est en-
voyée depuis un oridinator invité via
le réseau.
my Board Buddy est une solution
autonome ou complémentaire pour
les installations scolaires utilisée
par les enfants et les étudiants mal-
voyants.
my Board Buddy fait une duplication
du tableau digital interactif ou d’une
projection et ça sans vibration. La
duplication peut être agrandie de
façon optimale tout en préservant
sa qualité d’origine. Il offre aussi
la possibilité de modifier les couleurs.
L’appareil est également intéres-
sant lors de réunions pour des per-
sonnes malvoyants.
my Board Buddy est facile à utiliser
grâce à un contrôleur qui ne néces-
site as de connaissance en informa-
tique. C’est-à-dire qu’il peut être
utilisé par des enfants à partir de 6
ans.
Boar
My Board
Buddy
My Board
Buddy
my Board Buddy manuel
1. Contenu de la boîte
La boîte que vous avez reçue con-
tient les éléments suivants:
• my Board Buddy boîtier de
commandes
• my Board Buddy processeur
• Alimentation
• Plaque de fixation VESA + 8 vis
• Manuel d’instruction
Vérifiez toujours à l’avance si tous
les composants sont présents!
2. Maintenance et
précautions
Nettoyez le Board Buddy avec un
chiffon humide et bien essoré (NE
JAMAIS utiliser un chiffon mouillé).
Ne jamais utiliser de produits cor-
rosifs: le boîtier subira des domma-
ges irréparables.
Conservez l’emballage dans lequel
le Board Buddy a été livré. L’ap-
pareil ne peut être ré-expédié que
dans cet emballage.
Toujours laisser à Board Buddy un
espace suffisant (± 10 cm) pour per-
mettre à l’air de circuler à travers
les ouvertures. Ne couvrez jamais le
grilles d’aération: il y a un risque de
surchauffe de l’appareil.
Utilisez uniquement l’adaptateur
secteur fourni.
L’utilisation d’un autre adaptateur
peut endommager l’appareil.
Ne jamais allumer l’appareil s’il a
été exposé à l’eau.
Placez tous les câbles de sorte que
personne ne puisse trébucher ou se
coincer.
3. Garantie
Sensotec NV offre une garantie sur
my Board Buddy de deux ans après
l’achat, conformément aux conditi-
ons de garantie légales.
Les dommages causés par une uti-
lisation inappropriée ne sont en au-
cun cas couverts par les conditions
de la garantie.
La maintenance et les réparations
sont réservées aux techniciens de /
ou reconnus par Sensotec NV.
L’appareil ne doit jamais être ouvert
par l’utilisateur ou des tiers. Si cela
se produit, votre garantie deviendra
nulle sans aucun engagement de
notre part.
4. Support technique
Utilisez ce manuel comme guide
d’utilisation. Assurez-vous que le
service informatique est suffisam-
ment au courant du fonctionnement
pour que la carte soit correctement
enregistrée dans le réseau.
Enfin, vous pouvez contacter votre
fournisseur local afin d’obtenir une
assistance technique. Si le problème
technique persiste ou si vous ne
trouvez pas la réponse à votre
question dans ce manuel, n’hésitez
pas à nous contacter par e-mail
téléphone au +32 50 40 47 47.

10
5. Construction de my
Board Buddy
Vue d’ensemble du processeur
• Connexion micro USB pour
adaptateur secteur
• Sortie HDMI
• Connexion Ethernet
• Connexion USB pour le contrôleur
• Grille de ventilation
Vue d’ensemble du contrôleur
• Joystick (image en mouvement)
• Bouton inversion de couleur
• Bouton niveaux de gris
• Bouton zoom avant
• Bouton zoom arrière
• Bouton montage d’écran (1/1)
6. Travailler avec les con-
nexions
6.1 Adaptateur secteur
my Boardy Buddy est doté d’une
connexion micro USB pour l’adap-
tateur d’alimentation. Il ne faut
pas le brancher avant que toutes
les connexions suivantes aient été
établies.
6.2 Sortie HDMI
my Board Buddy est équipé d’une
sortie HDMI avec prise en charge
Full HD (1080p, 1920x1080). Il est
également possible de connecter
un écran en DVI à l’aide d’un câble
HDMI à DVI. VGA n’est pas supporté!
6.3 Connexion Ethernet
Il est recommandé de se connec-
ter au réseau via un câble réseau.
Assurez-vous qu’il est en bon état
et correctement connecté. Si un
réseau câblé n’est pas disponible,
vous pouvez utiliser un réseau sans
fil.
6.4 Connexion USB
l y a 4 connexions USB sur my Board
Buddy, nous n’en utilisons qu’une
pour une utilisation sûr. Il est pos-
sible de connecter un clavier et une
souris pour configurer le réseau
sans fil ou les services.
7. Connecter my Board
Buddy
Vous pouvez utiliser my Board Bud-
dy de deux manières: en solution
autonome ou en complément d’un
système scolaire.
7.1 Utilisation autonome
Facultatif; Si vous souhaitez monter
my Board Buddy à l’arrière de l’é-
cran, utilisez la plaque de montage
VESA et les vis fournies.
1. Connectez l’écran via un câ-
ble HDMI -> HDMI ou HDMI ->
câble DVI
2. Si vous souhaitez vous connec-
ter à un réseau câblé, connec-
tez le câble réseau.
→ CONSEIL, il est possible de se
connecter directement avec un câ-
ble réseau entre le PC et my Board
Buddy! Si aucune connexion réseau
n’est disponible, vous pouvez utili-
ser un périphérique USB.
3. Connectez le contrôleur à l’un
des 4 ports USB
4. Connectez l’adaptateur secteur
au port micro USB et insérez-le
dans la prise murale.
7.2 Comme complément à
un système scolaire
1. Connectez le système scolai-
re via un câble HDMI. Utilisez
l’entrée PC sur la loupe si elle
est présente. Si ce n’est pas
disponible, contactez votre
fournisseur.
2. ISi vous souhaitez vous connec-
ter à un réseau câblé, connec-
tez le câble réseau.
3. Connectez le contrôleur à l’un
des 4 ports USB
4. Connectez l’adaptateur secteur
au port micro USB et insérez-le
dans la prise murale.
Alors
Si tout se passe bien, vous verrez
l’écran de démarrage Sensotec,
suivi d’un écran bleu avec le logo
de my Board Buddy.
Vous verrez le nom d’hôte unique et
l’adresse IP obtenus sous le logo de
my Board Buddy.

11
8. Mise en place du réseau sans fil
Connectez un clavier et une souris au processeur.
Cliquez sur l’icône en bas à droite de l’écran.
Vous aurez alors un aperçu des réseaux sans fil dispo-
nibles.
Sélectionnez le bon réseau en cochant la case “Se con-
necter automatiquement à ce réseau”. Cela se con-
nectera automatiquement au réseau sans fil à chaque
redémarrage.
Maintenant, cliquez sur “Connecter” pour vous con-
necter. Si une sécurité a été définie sur le réseau, vous
verrez un message que vous devez confirmer.
Entrez votre mot de passe maintenant dans l’espace
prévu. En cliquant sur la case devant le champ de
saisie, vous rendez visible le mot de passe saisi. Re-
marque, un mot de passe est sensible à la casse. La
méthode de saisie définie est azerty.
Cliquez maintenant sur ok et puis sur “connect” pour
terminer la connexion.
12
Si tout se passe bien, vous verrez maintenant sous le
logo de my Board Buddy le nom de l’hôte, l’adresse IP
obtenue, le nom du réseau sans fil connecté et la force
du signal. Si cela ne fonctionne pas, vérifiez le mot de
passe et réessayez..
Astuce: Corrigez le mot de passe en cliquant sur “Propriétés”.
Félicitations! Votre my Board Buddy est prêt à être
utilisé. Il nous reste donc à configurer le logiciel sur
le PC invité.
9. Installation du logiciel ou exécution de-
puis une clé USB
Se connecter à un ami du conseil est très facile, néces-
site peu d’effort et de connaissances.
Installez le gestionnaire de mon ami conseil à partir du
bâton fourni. L’installation parle d’elle-même.
Il est possible d’exécuter mon gestionnaire my Board
Buddy de stick sans installation.
10. Travailler avec my Board Buddy
10.1 En tant qu’étudiant
Travailler avec my Board Buddy est entièrement axé
sur la commodité, ce qui permet à l’utilisateur de se fa-
miliariser facilement avec le périphérique et son fonc-
tionnement. Dès que l’enseignant partage l’écran avec
l’élève, celui-ci a la possibilité d’agrandir l’image et de
manipuler les couleurs.
Sur le contrôleur, vous verrez à gauche un joystick rap-
pelant une console de jeu et à droite 5 boutons colorés.
• Les boutons jaunes sont responsables de l’agran-
dissement de l’image, celle du haut agrandissant
et celle du bas à diminuer.
• Avec le joystick, vous pouvez déplacer l’image si
un agrandissement a été défini.
• Le bouton blanc est responsable de l’inversion de
couleur.
• Avec le bouton rouge, vous pouvez obtenir une
image en niveaux de gris tout en conservant cer-
taines informations de couleur. Cela peut accentu-
er un peu plus le texte difficile à lire.
• Le bouton vert va restaurer l’écran en plein écran.
Puisque la gestion est entièrement entre les mains de
l’enseignant, l’élève n’a rien d’autre à faire.
my Board Buddy se met en veille après 20 minutes
sans intervention de l’utilisateur. En appuyant sur un
bouton du contrôleur ou en déplaçant le joystick, vous
le réveillez. Il n’est pas possible d’éteindre complète-
ment my Board Buddy à l’aide d’un bouton, la faible
consommation rend cette opération inutile.
10.2 En tant qu’enseignant
Avant d’établir une connexion avec my Board Buddy,
assurez-vous que ce dernier a été correctement in-
stallé et qu’il possède une adresse IP dans le même
réseau que celui sur lequel se trouve également votre
ordinateur.
Lancez le programme et choisissez la langue souhai-
tée en bas à gauche.
13
Partager quel écran?
En haut, vous voyez un champ avec les moniteurs trou-
vés. Cela correspond au nombre de bureaux utilisés.
Il est parfaitement possible de ne partager qu’un seul
des 2 écrans et ainsi de préserver la confidentialité de
l’autre écran. Partager uniquement le contenu du ta-
bleau sans partager votre propre écran est une possi-
bilité.
Ajouter un my Board Buddy
Ajoutez ensuite un nouveau buddies à la liste.
Entrez le nom de l’étudiant et entrez l’adresse IP cor-
recte de Board Buddy. Cette adresse IP doit corres-
pondre à ce que vous pouvez lire sur l’écran de my Board
Buddy. Ajoutez autant de buddies que nécessaire.
Initier une session
Cliquez sur «Connecter tout» pour connecter tous les
“Buddies” figurant dans la liste. Tous les “Buddies”
cochés seront connectés. Lorsque vous démarrez le
programme, tous les contacts seront vérifiés. Si vous
enseignez en tant qu’enseignant à plusieurs élèves de
différentes classes qui utilisent un compagnon mon
conseil, vous pouvez exclure les élèves qui ne sont pas
présents pour le moment avec cette fonction. Tous les
“Buddies” de la liste qui ont été connectés avec succès
sont maintenant indiqués à l’écran.
Arrêter une session
Cliquez sur “Tout fasser” pour arrêter la session. Tous
les “Buddies” de la liste qui ont été connectés avec
succès sont maintenant indiqués à l’écran. Tous les
“Buddies” connectés retournent maintenant à l’écran
d’accueil et sont prêts pour la prochaine session.
Si vous fermez le programme, toutes les connexions
seront automatiquement terminées.
Personnaliser un my Board Buddy
Si vous voulez changer le nom ou l’adresse IP du con-
tact, cliquez sur le crayon à côté du contact.
Supprimer un my Board Buddy
ISi vous souhaitez supprimer un contact de la liste, cli-
quez sur le crayon et choisissez “Supprimer”.
Paramètres experts (avancé!)
En cliquant sur l’icône en bas à droite, il est possible de
modifier un certain nombre de paramètres avancés si la
stratégie informatique locale ne vous permet pas d’uti-
liser mon gestionnaire Board Buddy. Laissez le service
informatique vous assister si nécessaire.
11. Dépannage
Mon my Board Buddy n’a pas d’adresse IP
Vérifiez si le câble a été connecté correctement. Si un
réseau sans fil est utilisé, vérifiez si le SSID et le mot de
passe ont été définis correctement.
→ un nouvel appareil peut être exclu sur un réseau
scolaire. Contactez le service informatique pour cela et
obtenez de l’aide pour l’installation.
L’image partagée reste
La session peut ne pas s’être terminée correctement. Il
est possible de restaurer le my Board Buddy en appuyant
sur le haut du joystick jusqu’à ce que vous sentiez un
clic, puis en appuyant sur le bouton rouge en même
temps. my Buddy est maintenant prêt à être utilisé.
Mon my Board Buddy s’est fermé.
Mon my Board Buddy s’est écrasé
Retirez l’adaptateur secteur de l’appareil et attendez
30 secondes. Maintenant, reconnectez l’adaptateur
secteur et attendez que le périphérique ai complète-
ment démarré. Si tout se passe bien, vous revenez à
l’écran d’accueil au bout de 90 secondes maximum.
14
Introductie
Bedankt voor het vertrouwen om te
kiezen voor my Board Buddy als op-
lossing voor het dupliceren van een
digitale projectie of smartboard. Het
beeld wordt vanuit een gast PC ver-
zonden via het netwerk.
my Board Buddy is een stand-alone
of add-on oplossing voor school-
systemen die gebruikt worden door
slechtziende kinderen, studenten.
my Board Buddy maakt een trilvrij,
maximaal vergrootbaar duplicaat
van het digitale smartboard of een-
der welke andere projectie en dit
met behoud van beeldkwaliteit en
de mogelijkheid tot kleurmanipulatie.
Ook nuttig tijdens vergaderingen
voor deelnemers met een visuele
beperking.
my Board Buddy is eenvoudig te be-
dienen door middel van een controller
waarvoor geen kennis nodig is van
een PC, het is m.a.w. te bedienen
door kinderen vanaf 6 jaar.
Boar
My Board
Buddy
My Board
Buddy
my Board Buddy handleiding
1. Inhoud van de doos
De doos die u ontvangen hebt bevat
volgende zaken:
• my Board Buddy controller:
• my Board Buddy processor:
• Stroomadapter
• VESA montageplaat + 8 schroe-
ven
• Handleiding
Controleer altijd eerst op voorhand
of alle componenten aanwezig zijn!
2. Onderhoud en voorzorgs-
maatregelen
Maak my Board Buddy schoon met
een vochtige, goed uitgewrongen doek
(gebruik NOOIT een NATTE DOEK).
Gebruik nooit bijtende producten:
de behuizing loopt hierdoor onher-
stelbare schade op.
Bewaar de verpakking waarin de
Board Buddy werd geleverd. Het
toestel mag enkel in deze verpak-
king worden verstuurd.
Geef my Board Buddy steeds vol-
doende ruimte (± 10 cm) zodat er
lucht kan circuleren via de ope-
ningen. Dek het rooster nooit af: u
loopt het risico dat het toestel over-
verhit.
Gebruik enkel de meegeleverde stroom-
adapter. Het gebruik van een fout
type kan het toestel beschadigen.
Zet het toestel nooit aan als dit
blootgesteld werd aan water.
Plaats alle kabels zodat niemand
kan struikelen of deze gekneld zitten.
3. Garantie
Sensotec NV biedt tot twee jaar na
de aankoop garantie op my Board
Buddy, en dit volgens de wettelijke
garantiebepalingen.
Schade door ondeskundig of slordig
gebruik vallen onder geen beding
onder de garantievoorwaarden.
Onderhoud en reparaties zijn voor-
behouden aan technici van of er-
kend door Sensotec nv. Het toestel
mag nooit geopend worden door de
gebruiker of derden. Gebeurt dit
toch, dan vervalt uw garantie zonder
enige verplichting onzerzijds.
4. Technische support
Gebruik deze handleiding als gids
voor het gebruik. Zorg ervoor dat
de IT dienst voldoende op de hoogte is
van de werking zodat de my Board
Buddy goed opgenomen wordt in
het netwerk.
Tenslotte, kunt u voor technische
ondersteuning contact opnemen
met uw lokale leverancier. Wanneer
het technische probleem blijft
aanhouden of u het antwoord op
uw vraag niet in deze handleiding
terugvindt, aarzel dan niet om
contact met ons op te nemen via
telefonisch op het nummer:
+32 50 40 47 47.
15
5. Bouw van de my Board
Buddy
Overzicht processor
• Micro USB aansluiting voor
stroomadapter
• HDMI uitgang
• Ethernet aansluiting
• USB aansluiting voor controller
• Ventilatierooster
Overzicht controller
• Joystick (beeld verplaatsen)
• Knop kleurinversie
• Knop grijswaarden
• Knop inzoomen
• Knop uitzoomen
• Knop schermpassend (1/1)
6. Het werken met de aan-
sluitingen
6.1 Stroomadapter
my Boardy Buddy heeft een micro
USB aansluiting voor de stroomadapter,
sluit deze pas aan als alle connec-
ties gemaakt werden die hierop vol-
gen.
6.2 HDMI uitgang
my Board Buddy is voorzien van
een HDMI uitgang met full HD on-
dersteuning (1080p, 1920x1080) Het
is ook mogelijk om een DVI scherm
aan te sluiten, gebruik hiervoor een
HDMI naar DVI kabel. VGA wordt
niet ondersteund !
6.3 Ethernet aansluiting
Het is aanbevolen om connectie te
maken met het netwerk via een net-
werkkabel. Zorg ervoor dat deze in
goede staat is en correct aangeslo-
ten is. Indien een bedraad netwerk
niet voorhanden is kunt u gebruik
maken van een draadloos netwerk.
6.4 USB aansluiting
Er zijn 4 USB aansluitingen voorzien
op my Board Buddy, hiervan gebruiken
we er slechts één voor permanent
gebruik door de controller. Het is
mogelijk om een toetsenbord en
muis aan te sluiten voor het instellen
van het draadloos netwerk of service
doeleinden.
7. my Board Buddy aan-
sluiten
U kan de my Board Buddy op 2
manieren gebruiken: als stand
alone oplossing of als aanvulling op
een schoolset.
7.1 Standalone gebruik
Optioneel: indien u de my Board
Buddy wil monteren achteraan het
scherm, maak dan gebruik van de
VESA montageplaat en bijgeleverde
schroeven.
1. Connecteer het scherm via een
HDMI -> HDMI of HDMI -> DVI
kabel
2. Indien u verbinding wil maken
met een bedraad netwerk, sluit
dan de netwerkkabel aan.
→ TIP: het is mogelijk om direct te
verbinden met een netwerkkabel
tussen de PC en my Board Buddy.
Indien geen netwerkaansluiting be-
schikbaar is kan u gebruik maken
van een USB adapter. De my Board
Buddy en de PC zullen onderling
perfect in staat zijn om te commu-
niceren.
3. Sluit de controller aan op één
van de 4 USB poorten
4. Sluit de stroomadapter aan op
de micro USB poort en plaats
deze in het stopcontact.
7.2 Als aanvulling op een
schoolsysteem
1. Connecteer de schoolset via
een HDMI kabel. Maak gebruik
van de PC ingang op de loupe
indien deze aanwezig is. Indien
deze niet aanwezig is contac-
teer dan uw leverancier.
2. Indien u verbinding wil maken
met een bedraad netwerk, sluit
dan de netwerkkabel aan.
3. Sluit de controller aan op één
van de 4 USB poorten.
4. Sluit de stroomadapter aan op
de micro USB poort en plaats
deze in het stopcontact.
Vervolgens
Als alles goed is ziet u het Sensotec
opstartscherm, gevolgd door een
blauw scherm met het my Board
Buddy logo.
U ziet de unieke hostnaam en het
verkregen IP adres onder het my
Board Buddy logo.

16
8. Instellen van het draadloos netwerk
Sluit een toetsenbord en muis aan op de processor.
Klik op het icoon rechts onderaan het scherm.
U ziet nu een overzicht van de beschikbare draadloze
netwerken.
Kies het correcte netwerk door het vinkje aan te zetten
bij “Automatically connect to this network”. Hierdoor
zal bij elke herstart automatisch verbinding gemaakt
worden met het draadloze netwerk.
Klik nu op connect om verbinding te maken. Indien
een beveiliging werd ingesteld op het netwerk zal u
een boodschap te zien krijgen die u moet bevestigen.
Geef nu uw wachtwoord in in de voorziene ruimte.
Door het vinkje aan te klikken voor het invoerveld
maakt u het ingevoerde paswoord zichtbaar. Let op,
een paswoord is hoofdlettergevoelig. De ingestelde
invoermethode is azerty.
Klik nu op ok en vervolgens op connect om het verbin-
den te completeren.

17
Als alles goed is ziet u nu onder het my Board Buddy
logo de hostnaam, het verkregen IP adres, naam van
het verbonden draadloze netwerk en signaalsterkte.
Indien dit niet lukt verifieer dan het paswoord en pro-
beer opnieuw. Tip: het paswoord corrigeren kan via
“Properties”.
Proficiat ! my Board Buddy is klaar voor gebruik, rest
ons nu nog het instellen van de software op de gast PC.
9. Installatie van de software of uitvoeren
vanaf USB stick
Verbinding maken met een Board Buddy is zeer een-
voudig, vergt weinig moeite en kennis.
• Installeer my Board Buddy manager vanaf de mee-
geleverde stick. De installatie spreekt voor zich.
• Het is mogelijk om my Board Buddy manager uit te
voeren vanaf stick zonder installatie. Denk hierbij
aan situaties waarbij u geen machtigingen hebt om
een programma te installeren op de PC waarvan u
het scherm wil delen.
10. Werken met my Board Buddy
10.1 Als leerling
Het werken met my Board Buddy is volledig gefocust
op gemak waardoor men als gebruiker zeer snel ge-
woon is aan het apparaat en de bediening. Van zodra
de leerkracht het scherm deelt met de leerling heeft
deze de mogelijkheid om het beeld te vergroten en de
kleuren te manipuleren.
Op de controller ziet u aan de linkerkant een joystick
die aan een spelconsole doet denken en aan de rech-
terkant 5 kleurrijke knoppen.
→ insert photo controller
• De gele knoppen staan in voor de vergroting van
het beeld waarbij de bovenste het beeld zal groter
maken en de onderste kleiner.
• Met de joystick kan men het beeld verschuiven
indien een vergroting werd ingesteld.
• De witte knop staat in voor de kleurinversie.
• Met de rode knop kan men een beeld bekomen in
grijswaarden met behoud van een beetje kleurin-
formatie. Dit kan moeilijk leesbare tekst net dat
beetje meer accentueren.
• De groene knop zal het beeld volledig schermvul-
lend herstellen.
Gezien het beheer volledig in handen ligt van de leer-
kracht hoeft de leerling verder niets te doen.
my Board Buddy gaat in slaap na 20 minuten zonder
invoer van een gebruiker. Door op een knop van de con-
troller te drukken of de joystick te bewegen maakt u
deze wakker. Het is niet mogelijk om my Board Buddy
volledig uit te schakelen dmv een knop, het lage ver-
bruik maakt dit overbodig.
10.2 Als leerkracht
Vooraleer een verbinding tot stand te brengen met een
Board Buddy, vergewis u ervan dat my Board Buddy
correct werd geïnstalleerd en over een IP adres be-
schikt binnen hetzelfde netwerk waarin ook uw PC zich
bevindt.
Start het programma op en kies links onderaan voor de
gewenste taal.

18
Welk scherm delen?
Bovenaan ziet u een veld met de gevonden monitoren.
Dit stemt overeen met het aantal desktops die in ge-
bruik zijn. Het is perfect mogelijk om slechts één van
de 2 schermen te delen en zo privacy te behouden
op het andere scherm. Deel enkel de inhoud van het
smartboard zonder uw eigen scherm te delen is een
mogelijkheid.
Een Buddy toevoegen
Vul de naam van de leerling in en geef het correcte IP
adres in van de Board Buddy. Dit IP adres moet over-
eenstemmen met dat wat u kan aflezen op het scherm
van de my Board Buddy.
Voeg net zoveel Buddies toe als nodig.
Start een sessie
Klik op “Verbind alle” om alle Buddies te connecteren
die in de lijst staan. Alle aangevinkte Buddies zullen
verbonden worden. Wanneer u het programma start
zullen alle Buddies aangevinkt zijn. Indien u als leer-
kracht les geeft aan meerdere studenten in verschil-
lende klassen die een my Board Buddy gebruiken kan
u met deze feature leerlingen die op dat moment niet
aanwezig zijn uitsluiten.
Alle Buddies in de lijst die succesvol werden verbonden
zijn nu ook zo aangegeven in het scherm.
Stop een sessie
Klik op “Verbreek alle” om de sessie te stoppen. Alle
verbonden Buddies komen nu terug op het startscherm
terecht en zijn klaar voor een volgende sessie.
Als u het programma sluit zullen automatisch ook alle
verbindingen verbroken worden.
een Buddy aanpassen
Indien u de naam of het IP adres van de Buddy wil aan-
passen klik dan op het potlood naast de Buddy.
een Buddy verwijderen
Indien u een Buddy wil verwijderen uit de lijst klik dan
op het potlood en kies voor verwijderen.
Expert settings (geavanceerd!)
Door op het icoontje rechts onder te klikken is het mo-
gelijk om een aantal geavanceerde instellingen te wij-
zigen indien de lokale IT policy het niet toelaat om my
Board Buddy manager te gebruiken. Laat u assisteren
door de dienst IT indien nodig.
11. Troubleshooting
my Board Buddy heeft geen IP adres
Controleer of de kabel correct werd aangesloten.
Indien gebruik wordt gemaakt van een draadloos net-
werk, controleer dan of het SSID en paswoord correct
werden ingesteld.
→ mogelijk wordt een nieuw toestel uitgesloten op een
schoolnetwerk. Contacteer de dienst IT hiervoor en
laat u assisteren bij het installeren.
Het gedeelde beeld blijft hangen
Mogelijk werd de sessie niet correct afgesloten. Het is
mogelijk om de my Board Buddy te herstellen door te
drukken bovenaan op de joystick tot u een klik voelt en
dan tegelijk op de rode knop te drukken. my Board Bud-
dy is nu terug klaar voor gebruik.
my Board Buddy is vastgelopen
Verwijder de stroomadapter van het toestel en wacht
30 seconden. Sluit nu de stroomadapter terug aan en
wacht tot het toestel volledig is opgestart. Als alles
goed is komt u na maximaal 90 seconden terug op het
startscherm.


Sensotec HQ
Vlamingveld 8
B-8490 Jabbeke
T +32 50 39 49 49
Sensotec Jambes
Rue de la Croix Rouge 39
B-5100 Namur (Jambes)
T+32 81 71 34 60
Sensotec Antwerpen
Antwerpse Steenweg 96
B-2940 Hoevenen-Stabroek
T+32 3 828 80 15
visionary technology
Service & Support
T +32 50 40 47 47
Je kocht je my Board Buddy via Sensotec en hebt inhoudelijke of technische
vragen over dit product na het lezen van deze handleiding?
Dan staan onze Service & Support collega’s voor je klaar.
Vous avez acheté votre my Board Buddy chez Sensotec et vous avez des ques-
tions de fond ou techniques sur ce produit après avoir lu notre manuel? Alors
le service après-vente de Sensotec s.a. est là pour vous aider. Si vous avez
acheté votre appareil auprès d’un distributeur local, veuillez contacter vot-
re revendeur pour plus d’explications.
You bought your my Board Buddy via Sensotec and have questions about this
product after reading this manual? Then our after sales service is at your dis-
posal. If you bought your device via a local distributor, please contact your
disbtributor for more explanation.
Sensotec nv
www.sensotec.be
Table of contents
Languages:
Popular Office Equipment manuals by other brands

Plustek
Plustek SmartOffice PS186 quick start guide

SnapCab
SnapCab Pod S installation instructions

Classic Exhibits
Classic Exhibits Perfect 10 VK-1506 manual

Steelcase
Steelcase Elective Elements Freestanding Corner... manual

Formax
Formax CT-20 Assembly, operation and parts manual

ALLIED TIME
ALLIED TIME AT-3500 user manual


Ergotron
Ergotron Anthro-DNA Steve's Station Essential Assembly instructions

Kimball Office
Kimball Office Xsite Door Kit for Fold Down Tile Systems Assembly Instructions

Plus
Plus N-20J Service manual

GRAPHTEC
GRAPHTEC F-Mark Setup manual

Plus
Plus M-125 Service manual

Kimball
Kimball Xsede Assembly instructions