manuals.online logo
Brands
  1. Home
  2. •
  3. Brands
  4. •
  5. Sentinel
  6. •
  7. Marine Equipment
  8. •
  9. Sentinel Boat Monitor User manual

Sentinel Boat Monitor User manual

Popular Marine Equipment manuals by other brands

POWERWINCH 825 Operation manual

POWERWINCH

POWERWINCH 825 Operation manual

JRC JLN-628 brochure

JRC

JRC JLN-628 brochure

DIGITAL YACHT PilotLink2 Product handbook

DIGITAL YACHT

DIGITAL YACHT PilotLink2 Product handbook

Clarion CMS2 Owner's manual & installation manual

Clarion

Clarion CMS2 Owner's manual & installation manual

EBS M7000 installation manual

EBS

EBS M7000 installation manual

Kongsberg M3 Bathy installation manual

Kongsberg

Kongsberg M3 Bathy installation manual

NPK SCS-1002 operating manual

NPK

NPK SCS-1002 operating manual

Furuno FE-800 installation manual

Furuno

Furuno FE-800 installation manual

Harken 1561 instructions

Harken

Harken 1561 instructions

Simrad DD15 manual

Simrad

Simrad DD15 manual

Notifier FS-BSO Installation and maintenance instructions

Notifier

Notifier FS-BSO Installation and maintenance instructions

Raymarine ST40 Quick reference guide

Raymarine

Raymarine ST40 Quick reference guide

Raymarine Maxiview ST80 Owner's handbook

Raymarine

Raymarine Maxiview ST80 Owner's handbook

E2S E2XS112UL Instructions/service manual

E2S

E2S E2XS112UL Instructions/service manual

GUIDANCE MARINE 20- Series Installer's guide

GUIDANCE MARINE

GUIDANCE MARINE 20- Series Installer's guide

R2Sonic 2026 Operation manual

R2Sonic

R2Sonic 2026 Operation manual

COBHAM SAILOR 6000 installation manual

COBHAM

COBHAM SAILOR 6000 installation manual

Raymarine ST60 Tridata Owner's handbook

Raymarine

Raymarine ST60 Tridata Owner's handbook

manuals.online logo
manuals.online logoBrands
  • About & Mission
  • Contact us
  • Privacy Policy
  • Terms and Conditions

Copyright 2025 Manuals.Online. All Rights Reserved.

Sentinel Boat Monitor
Installation Guide • Installationsanleitung • Guide d'installation
Guida all’installazione • Guía de instalación
MONTAGETEILE - INKLUSIV
•
Sentinel Boat Monitor device
•
Benutzerhandbuch
•
Externe Antennen (Modell für externe
Antennen)
OPTIONALE TEILE (SKU: 010-11417-21)
• Magnetischer Schalter
• Verbindungskabel
(NMEA 2000)
• T-Verbinder
(NMEA 2000)
INCLUSE LE PARTI DI INSTALLAZIONE
•
Sentinel Boat Monitor device
•
Manuale utente
• Antenne esterne (modello per antenne
esterne)
PARTI OPZIONALI (SKU: 010-11417-21)
• Interruttore magnetico
• Cavo di discesa
(NMEA 2000)
• Connettore a T
(NMEA 2000)
PIEZAS DE INSTALACIÓN - INCLUIDAS
•
Sentinel Boat Monitor device
•
Manual de usuario
•
Antenas externas (modelo de
antenas externas)
PIEZAS OPCIONALES (SKU: 010-11417-21)
• Interruptor magnético
• Cable de derivación
(NMEA 2000)
• Conector T
(NMEA 2000)
INSTALLATION PARTS - INCLUDED
•
Sentinel Boat Monitor device
•
User manual
•
External antennas (external
antennas model)
OPTIONAL PARTS (SKU: 010-11417-21)
•
Magnetic switch
•
Drop cable (NMEA 2000)
•
T-connector (NMEA 2000)
DE
EN
IT
E
PIÈCES D'INSTALLATION - INCLUSES
•
Sentinel Boat Monitor device
•
Guide d’utilisation
•
Antennes externes (modèle d'antennes
externes)
FR
PIÈCES OPTIONNELLES
(SKU: 010-11417-21)
• Interrupteur magnétique
• Câble de branchement
(NMEA 2000)
• Connecteur T
(NMEA 2000)
1. Installing Sentinel App • Installieren der Sentinel-App •
Installation de l’application Sentinel • Installare la App di Sentinel •
Instalando Sentinel App
1.1 Using the Sentinel app • Verwendung der Sentinel-App •
Usando la aplicación Sentinel • Modalità d’uso della app Sentinel •
Utilisation de l'application Sentinel
To start using your Boat Monitor device you should install the
“Sentinel Marine solutions” app for your platform and create a
Sentinel account.
Tap “Register” if you do not yet have a Sentinel user account. Otherwise,
tap “Login” and enter your email and password.
Tippen Sie auf "Registrieren", wenn Sie noch kein Sentinel-Benutzerkonto
haben. Andernfalls tippen Sie auf "Login" und geben Sie Ihre
E-Mail-Adresse und Ihr Passwort ein.
Pulse "Registrarse" si aún no tiene una cuenta de usuario de Sentinel. De
lo contrario pulse "Iniciar sesión" e ingrese su correo electrónico y
contraseña.
Clicca su “Registra” se non hai ancora l’account di Sentinel. In caso
contrario clicca su “login” e inserisci la tua mail e la tua password.
Appuyez sur « Créer un compte » si vous n'avez pas encore de compte
utilisateur Sentinel. Sinon, appuyez sur « Connexion » et entrez votre
e-mail et votre mot de passe.
Um mit der Nutzung Ihres Boat Monitor
zu beginnen, sollten Sie die App
"Sentinel Marine solutions" für Ihre
Plattform installieren und einen
Sentinel-Account anlegen.
Pour commencer à utiliser votre dispositif
Boat Monitor, vous devez installer
l'application « Sentinel Marine solutions »
sur votre plate-forme et créer un compte
Sentinel.
Per incominciare ad usare il vostro
apparecchio di Boat Monitor dovete
prima installare la “Sentinel Marine
solutions app” per la vostra piattaforma
e creare un account personale.
Para comenzar a usar su dispositivo debe
instalar la aplicación "Sentinel Marine
solutions" para su plataforma y crear una
cuenta Sentinel.
DE
EN
DE
EN
E
E
IT
IT
FR
FR
2
Select the boat name for your Boat Monitor device.
Wählen Sie den Bootsnamen für Ihren Boat Monitor aus.
Seleccione el nombre de la embarcación para su dispositivo Boat Monitor.
Seleziona il nome del natante per il tuo apparecchio di Boat Monitor.
Sélectionnez le nom du bateau pour votre dispositif Boat Monitor.
Tap the + sign at the top of the screen.
Tippen Sie auf das +-Zeichen am oberen Bildschirmrand.
Pulse el signo + en la parte superior de la pantalla.
Clicca sul “+” in cima allo schermo
Appuyez sur le signe + en haut de l'écran.
Enter your email address and choose a password if you are registering a
new account.
Geben Sie Ihre E-Mail-Adresse ein und wählen Sie ein Passwort, wenn Sie
ein neues Konto eröffnen.
Si está registrando una cuenta nueva ingrese su dirección de correo
electrónico y elija una contraseña.
Oppure inserisci la tua mail e la tua password, se stai registrando un
nuovo account.
Entrez votre adresse e-mail et choisissez un mot de passe si vous créez
un nouveau compte.
Scan the QR code on the device
(included on the first page of this manual).
Scannen Sie den QR-Code auf dem Gerät
(auf der ersten Seite dieses Handbuchs).
Escanee el código QR en el dispositivo
(incluido en la primera página de este manual).
Osserva il codice QR sull’apparecchio
(lo trovi sulla prima pagina di questo manuale).
Scannez le QR code sur l'appareil
(fourni dans la première page de ce manuel).
DE
E
IT
FR
EN
DE
E
IT
FR
EN
DE
E
IT
FR
EN
DE
E
IT
FR
EN
3
Follow the instructions to activate the device and start using the
subscription.
Folgen Sie den Anweisungen, um das Gerät zu aktivieren und mit der
Nutzung des Abonnements zu beginnen.
Siga las instrucciones para activar el dispositivo y comience a usar la
suscripción.
Segui le istruzioni per attivare l’apparecchio e incomincia ad usare
l’abbonamento.
Suivez les instructions pour activer l'appareil et commencer à l’utiliser.
Enter the 6-digit activation code, which you received with the device
(included on the first page of this manual).
Geben Sie den 6-stelligen Aktivierungscode ein, den Sie mit dem Gerät
erhalten haben (auf der ersten Seite dieses Handbuchs).
Ingrese el código de activación de 6 dígitos que recibió con el dispositivo
(incluido en la primera página de este manual).
Inserisci il codice di attivazione a sei caratteri che ti è stato consegnato
assieme all’apparecchio (lo trovi sulla prima pagina di questo manuale).
Entrez le code d'activation à 6 chiffres que vous avez reçu avec l'appareil
(fourni dans la première page de ce manuel).
NOTE!
•
HINWEIS!
•
¡NOTA!
•
NOTE!
•
REMARQUE !
Please note that it might up to 2 hours for your device to start sending data to your smartphone
once the Subscription is activated.
Bitte beachten Sie, dass es bis zu 2 Stunden dauern kann, bis Ihr Abonnement aktiviert ist und Ihr
Gerät Daten an Ihr mobiles Gerät sendet.
Tenga en cuenta que su dispositivo puede tardar hasta 2 horas en comenzar a enviar datos a su
dispositivo móvil una vez activada la suscripción
Tieni presente che ci potrebbero volere più di due ore, perché il tuo apparecchio incominci a
mandare dati al tuo dispositivo mobile dopo che l'abbonamento è stato attivato.
Veuillez noter que votre appareil peut commencer à envoyer des données sur votre appareil mobile
2 heures après l'activation de votre compte.
DE
E
IT
FR
EN
DE
EN
E
IT
FR
DE
EN
E
IT
FR
4
Sentinel Boat Monitor ist
spritzwassergeschützt, es wird jedoch
empfohlen, das Gerät in Innenräumen zu
installieren. Das Gerät hat seitlich 2
Befestigungslöcher, die mit
Kunststoffklappen abgedeckt sind. Sie
kann mit Schrauben angezogen oder mit
Klebeband oder Kunststoffbändern
befestigt werden.
Sentinel Boat Monitor es a prueba de
salpicaduras pero se recomienda
instalarlo en interiores.
El dispositivo tiene 2 orificios de montaje
laterales cubiertos con escotillas de
plástico. Puede ser apretado con
tornillos o unido con cinta adhesiva o
correas de plástico.
Sentinel Boat Monitor è resistente
all’acqua, si raccomanda comunque di
installarlo al coperto.
L’apparecchio a due fori ai lati per il
montaggio, ricoperti da guarnizioni di
plastica. Può essere fissato con viti o
attaccata con nastro adesivo o cinghiette
di plastica.
Le système de surveillance pour bateaux
Boat Monitor de Sentinel, est résistant
aux éclaboussures, mais il est
recommandé de l’installer à l'intérieur.
L'appareil a 2 perforations de montage
sur le côté, recouverts de caches en
plastique. L’appareil peut être serré avec
des vis ou fixé avec du ruban adhésif ou
des sangles en plastique.
2. Installation Guide • Installationsanleitung •
Guía de instalación • Guida all’installazione • Guide d’installation
Sentinel Boat Monitor is splash proof, but it is recommended to be installed indoors.
The device has 2 mounting holes on the side, covered with plastic hatches. It can be
tightened with screws or attached with adhesive tape or plastic straps.
Mounting hole
•
Befestigungsloch
•
Orificio de
montaje
•
Foro di montaggio
•
Perforation de
montage
Mounting hole
•
Befestigungsloch
•
Orificio de
montaje
•
Foro di montaggio
•
Perforation de
montage
METAL FREE DIRECTION
•
Metallfreie Richtung
•
Dirección libre de metal
•
Direzione senza ostacoli
metallici
•
Direction sans métal
2.1. Model with internal antennas • Ausführung mit internen Antennen •
Modelo con antenas internas • Modello con antenne interne •
Modèle avec antennes internes
DE
EN
E
IT FR
5
Sentinel Boat Monitor has internal GPS and GSM antennas. The device is designed for wall
mounting. Supply cable should always face the ground as shown in figure. Any other orientation
will cause poor satellite reception, which can significantly lower the positioning precision.
The sky view should not be obstructed with any metal objects.
Sentinel Boat Monitor verfügt über interne GPS- und GSM-Antennen. Das Gerät ist für die
Wandmontage konzipiert. Das Versorgungskabel sollte immer zur Erde zeigen, wie in der
Abbildung gezeigt. Jede andere Ausrichtung führt zu einem schlechten Satellitenempfang, der die
Positioniergenauigkeit erheblich herabsetzen kann.
Der Blick in den Himmel darf nicht durch metallische Gegenstände versperrt werden.
Sentinel Boat Monitor tiene antenas GPS y GSM internas. El dispositivo está diseñado para
montarlo en la pared. El cable de suministro eléctrico siempre debe estar hacia abajo como se
muestra en la figura. Cualquier otra orientación causará una mala recepción del satélite lo que
puede reducir significativamente el posicionamiento preciso.
La vista hacia el cielo no debe estar obstruida con ningún objeto metálico.
Sentinel Boat Monitor è dotato di antenne interne di tipo GPS e GSM. L’apparecchio è progettato
per essere montato a parete. Il cavo di alimentazione dovrebbe essere sempre rivolto verso il
pavimento. Qualsiasi altro orientamento potrà causare una ricezione satellitare insufficiente che
può rendere più incerto il posizionamento.
La direzione verso il cielo non dovrà essere ostruita da nessun oggetto metallico.
Le dispositif Boat Monitor de Sentinel a des antennes GPS et GSM internes. L'appareil est conçu
pour un montage mural. Le câble d'alimentation doit toujours faire face au sol comme indiqué
sur la figure. Toute autre orientation entraînera une mauvaise réception du satellite, ce qui peut
réduire considérablement la précision du positionnement.
La vue du ciel ne doit pas être obstruée par des objets métalliques.
2.2 Model with external antennas • Ausführung mit externen Antennen •
Modelo con antenas externas • Modello con antenne esterne •
Modèle avec antennes externes
GSMGPS
2.2B2.2A
Sentinel Boat Monitor model with external antennas includes an external combo GSM+GPS
antenna with 3m of cable. Mount the antenna horizontally onto a designated place with a clear
sky view to ensure optimal satellite reception. Possible mounting holes are shown in fig. 2.2A.
Connect the antenna wires to the Boat Monitor as shown in fig. 2.2B: the cable with GPS label
should be on the left, GSM cable on the right. Tighten the antenna connectors firmly.
DE
E
IT
FR
EN
EN
6
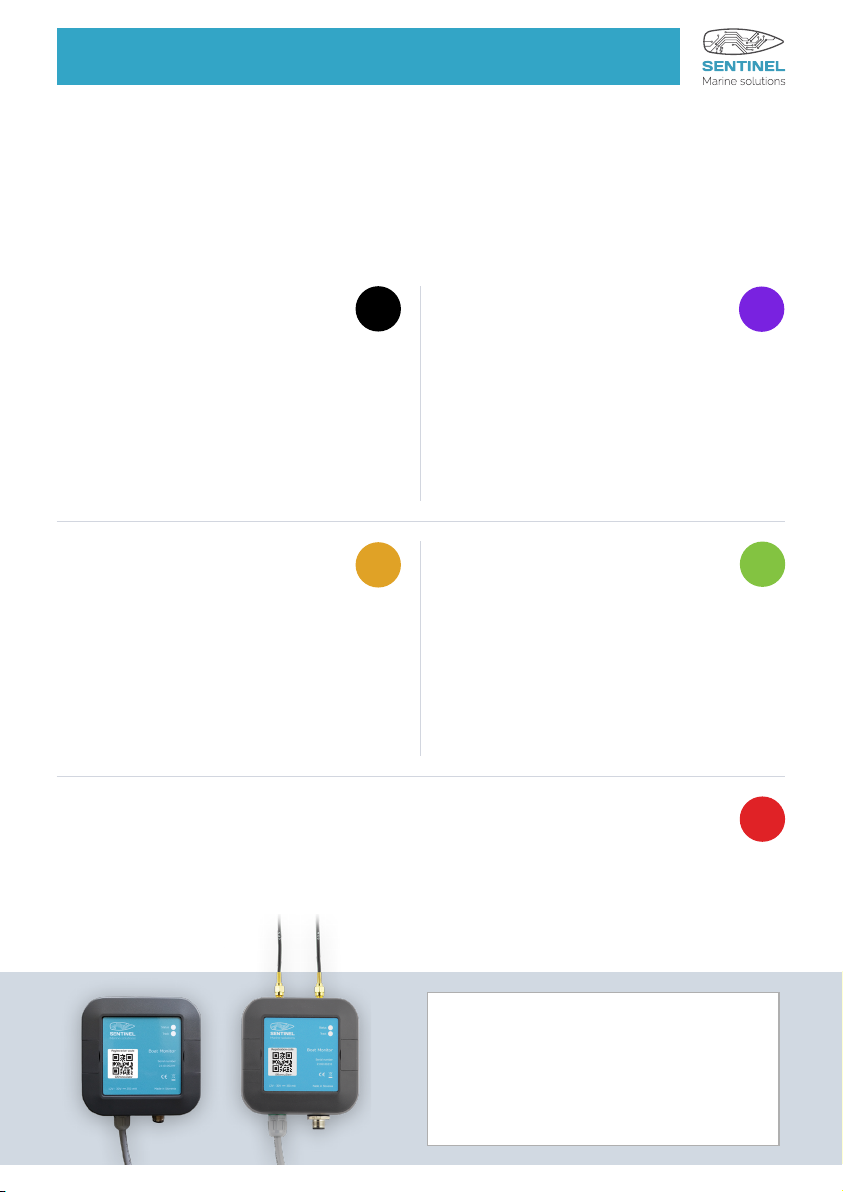
Das Modell des Sentinel Boat Monitor mit externen Antennen beinhaltet eine externe Kombi
GSM+GPS Antenne mit 3 m Kabel.
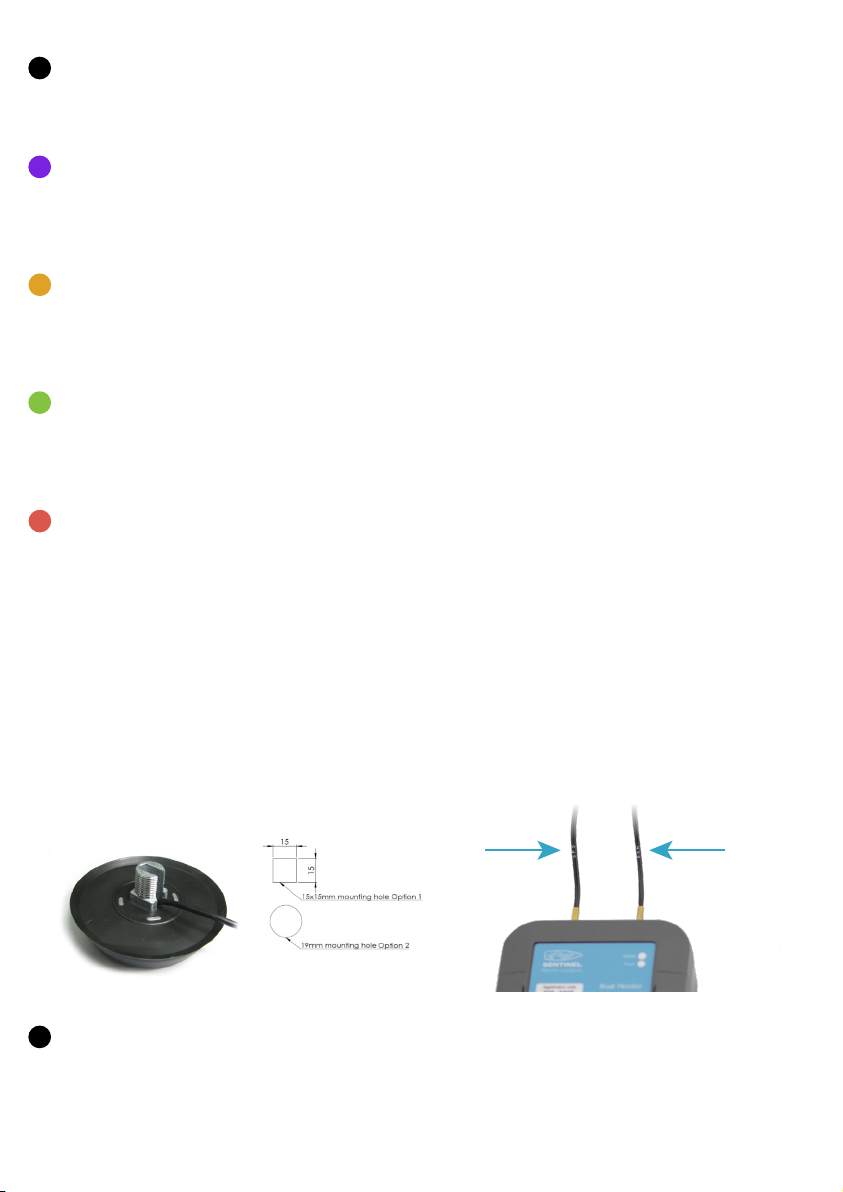
Montieren Sie die Antenne waagerecht an einem dafür vorgesehenen Ort mit freiem Himmel,
um einen optimalen Satellitenempfang zu gewährleisten. Mögliche Befestigungsbohrungen
sind in Abb. 2.2A dargestellt.
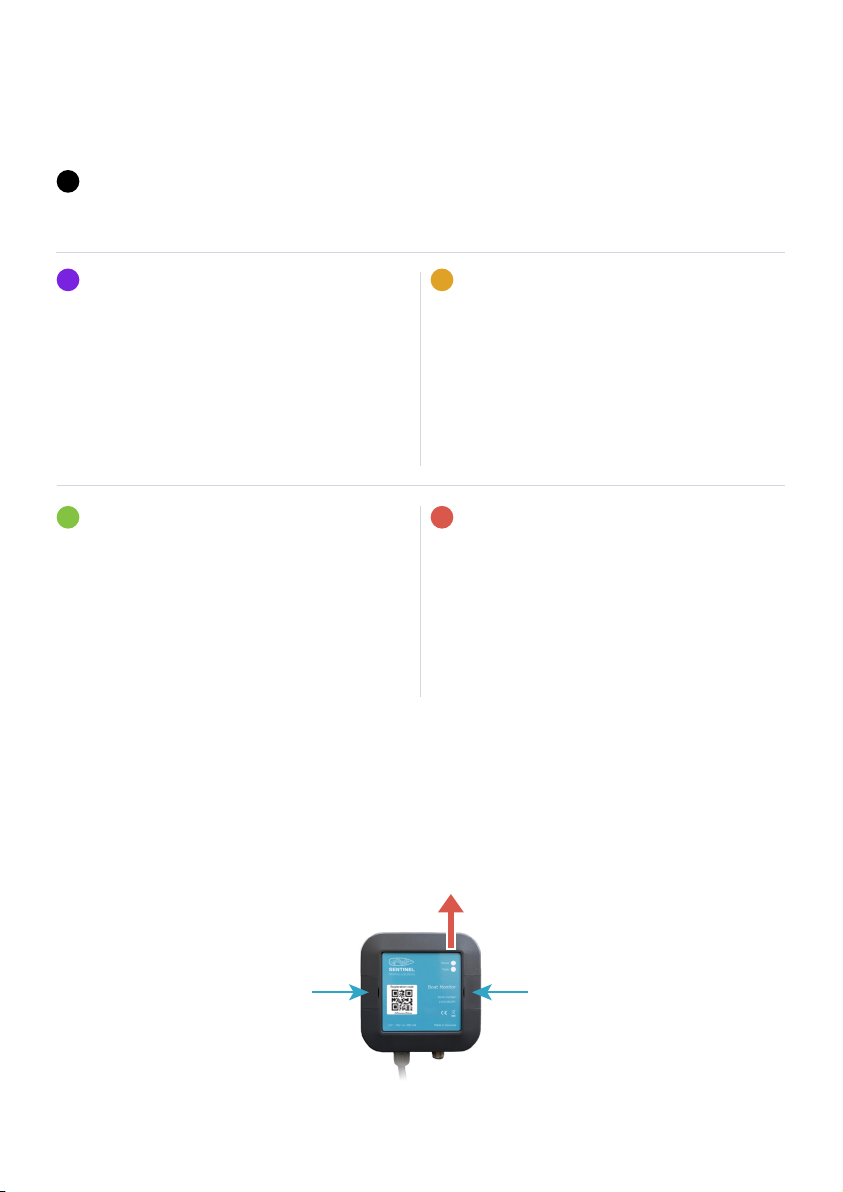
Schließen Sie die Antennenkabel an den Boat Monitor an, wie in Abb. 2.2B gezeigt: Das Kabel
mit GPS-Etikett sollte sich links, das GSM-Kabel rechts befinden. Ziehen Sie die
Antennenanschlüsse fest an.
El modelo Sentinel Boat Monitor con antenas externas incluye un combo externo de antenas
GSM + GPS con 3m de cable.
Monte la antena horizontalmente en un lugar designado con una vista clara del cielo para
asegurar una recepción óptima. Posibles orificios de montaje se muestran en la fig. 2.2A.
Conecte los cables de antena al Monitor como se muestra en la fig. 2.2B: el cable con la
etiqueta GPS debe estar a la izquierda y el cable GSM a la derecha. Apriete firmemente los
conectores.
Il modello con antenne esterne del Sentinel Boat Monitor include un’antenna combo esterna
GSM+GPS con cavo lungo 3 m.
Il montaggio dell’antenna deve avvenire nel punto designato in cui non ci siano ostacoli nella
direzione del cielo. Al fine di garantire una ricezione ottimale dell’onda satellitare. I fori di
montaggio sono visibili nella fig. 2.2A.
Connettere i cavi dell’antenna al Boat Monitor come mostrato in fig. 2.2B: il cavo con
l’etichetta GPS dovrà trovarsi alla sinistra mentre il cavo GSM alla destra. I connettori
dell’antenna vanno stretti efficacemente.
Le modèle Sentinel Boat Monitor avec antennes externes comprend un combo externe GSM
+ une antenne GPS avec 3m de câble.
Montez l'antenne horizontalement sur un endroit adapté avec une vue du ciel dégagée afin
d’assurer une réception satellite optimale. Les trous de montage sont indiqués sur la fig.
2.2A.
Branchez les fils d'antenne au système de surveillance du bateau comme indiqué sur la fig.
2.2B : le câble avec l'étiquette GPS doit être à gauche, le câble GSM à droite. Serrez
fermement les connecteurs d'antenne.
WARNING!
•
WARNUNG!
•
¡ADVERTENCIA!
•
ATTENZIONE!
•
ATTENTION !
The antenna mounting screw is directly connected to the Boat Monitor ground (black wire). If the
antenna is mounted onto a metal plane (hull) make sure that the metal plane is on the same
potential as the Boat Monitor ground (black wire)! Failing to do so, excessive current flowing through
the device may damage the device or other equipment.
Die Antennenbefestigungsschraube ist direkt mit der Boat Monitor-Masse (schwarzer Draht)
verbunden. Wenn die Antenne auf einer Metallplatte (Rumpf) montiert ist, stellen Sie sicher, dass
sich die Metallplatte auf dem gleichen Potential wie die Masse des Boat Monitor befindet (schwarzer
Draht)! Andernfalls kann ein zu hoher Strom, der durch das Gerät fließt, das Gerät oder andere
Geräte beschädigen.
El tornillo de montaje de la antena está conectado directamente a la conexión de tierra del monitor
(cable negro). Si la antena está montada en un plano de metal (casco) asegúrese de que el plano
tenga el mismo potencial al de conexión de tierra del Monitor (cable negro). De lo contrario la
corriente excesiva que fluye a través del dispositivo puede dañar el dispositivo o algún otro equipo.
DE
E
EN
DE
E
IT
FR
7
2.3 Electrical connection overview • Übersicht der elektrischen Anschlüsse •
Revisión general de la conexión eléctrica • Collegamento alla fonte elettrica:
riepilogo • Présentation de la connexion électrique
La vite per il montaggio dell’antenna è direttamente connessa alla terra (cavo nero) del Boat Monitor.
Se l’antenna è montata su un piano metallico (scafo), accertarsi che il piano metallico sia sullo stesso
potenziale della presa a terra del Monitor (cavo nero)! In caso di errore, un flusso eccessivo di
corrente, che attraverso l’apparecchio, può causare danni all’apparecchio e ad altri dispositivi.
La vis de montage de l'antenne est directement connectée à la base du Boat Monitor (fil noir). Si
l'antenne est montée sur un plan métallique (coque), assurez-vous que le plan métallique soit au
même niveau que la base du système de surveillance du bateau (fil noir) ! À défaut de le faire, un
courant excessif circulant dans l'appareil peut endommager l'appareil ou d'autres équipements.
IT
FR
Das Gerät sollte an eine
DAUERSTROMQUELLE angeschlossen
werden, um eine ständige Überwachung
zu ermöglichen. Der Geräteverbrauch
beträgt weniger als 1 Ah pro Tag bei
Bewegung und weniger als 50 mAh pro
Tag im Tiefschlaf-Modus.
El dispositivo debe estar conectado
a una FUENTE DE ALIMENTACIÓN
PERMANENTE para permitir el monitoreo
en todo momento. El consumo del
dispositivo al estar moviéndose es inferior
a 1 Ah por día y menos de 50 mAh por día
al estar en modo de suspensión.
L’apparecchio deve essere collegata
ad una FONTE DI ENERGIA ELETRICA
PERMANENTE per consentire il
funzionamento ininterrotto del
monitoraggio. Il consumo dell’apparecchio
è inferiore ad 1 Ah per giorno in
condizioni di movimento e 50mAh quindi
in modalità sleep.
L'appareil doit être connecté à une
SOURCE D'ALIMENTATION PERMANENTE
pour permettre une surveillance à tout
moment. La consommation de l'appareil
est inférieure à 1 Ah par jour en
déplacement et inférieure à 50 mAh par
jour en mode veille prolongée.
The device should be connected to a PERMANENT POWER SOURCE to allow monitoring at all
times. The device consumption is less than 1 Ah per day when moving and less than 50 mAh
per day when in deep sleep mode.
Power supply (+12 or +24 V DC)
Spannungsversorgung (+12 oder +24 V DC)
Fuente de alimentación (+12 or +24 V DC)
Alimentazione (+12 oppure +24 V DC)
Source de courant (+12 ou +24 V DC)
RED
•
ROT
•
ROJO
•
CAVO ROSSO
•
ROUGE
Ground
Masse
Tierra
Collegamento a terra
Sol
BLACK
•
SCHWARZ
•
NEGRO
•
CAVO NERO
•
NOIR
Wiring • Verkabelung • Cableado • Collegamenti • Câblage
DE
EN
E
IT FR
WARNING!
•
WARNUNG!
•
¡ADVERTENCIA!
•
ATTENZIONE!
•
ATTENTION !
8
Shunt - fourth voltage input (+48 V DC)
Nebenwiderstand - vierter Spannungseingang
(+48 V DC)
Derivación – cuarta entrada de tensión (+48 V DC)
Shunt - quarta entrata in tensione (+48 V DC)
Shunt - quatrième entrée de tension (+48 V DC)
Door sensor input
Eingang Türsensor
Entrada del sensor de puerta
Ingresso del sensore di porta
Entrée du capteur de porte
Second battery voltage measurement (+24 V DC)
Zweite Batteriespannungsmessung (+24 V DC)
Medición de voltaje de la segunda batería (+24 V DC)
Seconda misurazione del livello di tensione della
batteria (+24 V DC)
Deuxième mesure de tension de batterie (+24 V DC)
Shore power detection input
Eingang Landstromerkennung
Detección de fuente de alimentación de la orilla
Ingresso per il rilevamento della corrente da banchina
Entrée de détection de l’alimentation à quai
Third battery voltage measurement (+24 V DC)
Dritte Batteriespannungsmessung (+24 V DC)
Medición de voltaje de la tercera batería (+24 V DC)
Terza misurazione del livello di tensione della batteria
(+24 V DC)
Troisième mesure de tension de batterie (+24 V DC)
GREEN
•
GRÜN
•
VERDE
•
VERDE
•
VERT
Bilge sensor input
Bilgensensoreingang
Entrada del sensor sentina
Ingresso del sensore di sentina
Entrée de capteur de cale
PURPLE
•
VIOLETT
•
MORADO
•
PORPORA
•
VIOLET
BLUE
•
BLAU
•
AZUL
•
BLU
•
BLEU YELLOW
•
GELB
•
AMARILLO
•
GIALLO
•
JAUNE
PINK
•
ROSA
•
ROSADO
•
ROSA
•
ROSE BROWN
•
BRAUN
•
MARRÓN
•
MARRONE
•
MARRON
WHITE
•
WEIß
•
BLANCO
•
BIANCO
•
BLANC
When connecting any line (power supply or voltage input) directly to the battery, always
protect the battery and electrical circuit from potential damages with a fuse. Install a fuse
holder with 1 A fuse on the positive (+) power cable as close as possible to the battery
terminal.
Connect the red wire through a fuse (fuse should not be inserted until installation is
complete) to permanent power source (battery).
Connect the BLACK wire to system ground.
Wenn Sie eine beliebige Leitung (Stromversorgung oder Spannungseingang) direkt an die
Batterie anschließen, schützen Sie die Batterie und den Stromkreis immer mit einer
Sicherung vor möglichen Schäden. Installieren Sie einen Sicherungshalter mit einer 1 Ampere
Sicherung am Pluskabel (+) so nah wie möglich an der Batterieklemme.
Schließen Sie das rote Kabel durch eine Sicherung (Sicherung sollte erst nach Abschluss der
Installation eingesetzt werden) an eine Dauerstromquelle (Batterie) an.
Schließen Sie den SCHWARZEN Draht an die Systemmasse an.
2.4 Power supply connection • Anschluss der Stromversorgung •
Conexión de suministro de energía • Collegamento di alimentazione •
Connexion d'alimentation
DE
EN
9
Al conectar cualquier línea (fuente de alimentación o entrada de tensión) directamente a la
batería es necesario colocar un fusible para proteger la batería y el circuito eléctrico contra
posibles daños. Instale un porta fusibles con 1A fusible en el cable de alimentación positivo (+) lo
más cerca del terminal de la batería posible.
Conecte el cable rojo a través del fusible (el fusible no debe insertarse hasta que se complete la
instalación) a la fuente de alimentación permanente (batería).
Conecte el cable NEGRO a la tierra del sistema.
Quando si collega all’elettricità (sia essa rete o da banchina o batteria) è necessario proteggere
sempre la batteria e il circuito da danni potenziali con un fusibile. Installa una scatola portafusibili
con 1A sul lato positivo (+) del cavo elettrico il più vicino possibile al terminale della batteria.
Collegare il cavo rosso attraverso il fusibile (non inserire il fusibile fino a compimento
dell’impianto) alla rete elettrica (o batteria).
Collegare il cavo NERO alla terra del sistema.
Lorsque vous connectez une ligne (alimentation ou entrée de tension) directement à la batterie,
protégez toujours la batterie et le circuit électrique des dommages éventuels avec un fusible.
Installez un porte-fusible avec un fusible de 1 A sur le câble d'alimentation positif (+) le plus près
possible de la borne de la batterie.
Connectez le fil rouge à travers un fusible (le fusible ne doit pas être inséré le temps de
l'installation) à la source d'alimentation permanente (batterie).
Connectez le fil NOIR à la base du système.
Power supply / Voltage 1 • Stromversorgung/Spannung 1 • Fuente de alimentación/Voltaje 1 •
Corrente elettrica/tensione • Alimentation / tension 1
red
•
rot
•
rojo
•
rosso
•
rouge
Fuse
•
Sicherung
•
Fusible
•
Fusibile
• Fusible
Boat
Monitor
+
12/24V
black
•
schwarz
•
negro
•
nero
•
noir
2.5 Voltage and current measurements • Spannungs- und Strommessungen •
Mediciones de voltaje y corriente • Tensione e misurazione della corrente •
Mesures de tension et de courant
Current can be measured on HIGH-SIDE shunt resistor (not included). For low-side shunt wiring
please contact support. Shunt should be sized based on maximum current consumption
(e.g. 1 mΩ for up to 80 A). Connect shunt as shown in fig 2.5A.
Yellow and Pink wires should be used for measuring voltages up to 30 V (Voltage 2 and 3), brown
wire up to 60 V (Voltage 4) (fig. 2.5B). If current measurement in not required, connect white and
brown together to avoid false current readings (fig. 2.5C)
2.4
E
IT
FR
EN
10