Serato NOVATION DICER User manual

3RD PARTY CONTROLLER QUICKSTART GUIDE
• NOVATION DICER •
• PIONEER CDJ-2000 • PIONEER CDJ-350 •
• PIONEER CDJ-850 • PIONEER CDJ-900 •
• PIONEER CDJ-400 • PIONEER MEP-7000 •
• DENON DN-HC4500 • DENON DN-HC1000S •
• VESTAx VFx-1 •
SERATO SCRATCH LIVE 3RD PARTY CONTROLLER QUICKSTART 2.3

SERATO SCRATCH LIVE 3RD PARTY CONTROLLER QUICKSTART 2 .1 SERATO SCRATCH LIVE 3RD PARTY CONTROLLER QUICKSTART 2 .1
23
CONTENTS INTRODUCTION
Welcome to the Serato Scratch Live 3rd Party
Controller Quick Start Guide.
This guide outlines the available 3rd party
controllers that are natively supported or “plug
and play”.
This means that when you plug them into your
computer along side your Scratch Live setup,
they will work automatically with no extra MIDI
mapping or configuration required.
* Note that with all 3rd party controllers, you
much have your Rane Scratch Live hardware
connected to use Scratch Live.
Always ensure that you are running the latest
version of Scratch Live, available here:
http://www.serato.com/downloads/scratchlive
CONTENTS
INTRODUCTION 3
NOVATION DICER 4
Installation and Setup 4
Dicer Modes 4
Hot Cues 4
Loop Roll 4
Auto Loop 4
User Modes 1+2 4
PIONEER CDJ-2000 6
Installation and Setup 6
PIONEER CDJ-350 8
Installation and Setup 8
PIONEER CDJ-850 10
Installation and Setup 10
PIONEER CDJ-900 12
Installation and Setup 12
PIONEER CDJ-400 14
Installation and Setup 14
PIONEER MEP-7000 AND SEP-C1 16
Installation 16
Mac 16
Windows XP 16
Setup 16
Basic Operation 16
Playback 16
Using Cues 16
Using Loops 16
DENON DN-HC4500 18
Installation 18
Setup 18
Basic Operation 18
Setting Cue Points 18
Using Loops 18
DENON DN-HC1000S 20
Installation & Setup 20
Basic Operation 20
Using Cue Points 20
Looping 20
Manual Loop 20
Auto Loop 20
Loop Roll 20
Sample Player 20
Midi Channels 20
VESTAx VFx-1 23
Installation & Setup 23
SERATO SCRATCH LIVE 3RD PARTY CONTROLLER QUICKSTART 2 .1 SERATO SCRATCH LIVE 3RD PARTY CONTROLLER QUICKSTART 2 .1
45
NOVATION DICER
INSTALLATION AND SETUP
1. Connect your Novation Dicer to an available
USB port.
2. The Novation Dicer will be detected
automatically and will be ready to use.
3. Start Scratch Live.
4. You will now be able to control Scratch Live
with your Novation Dicer.
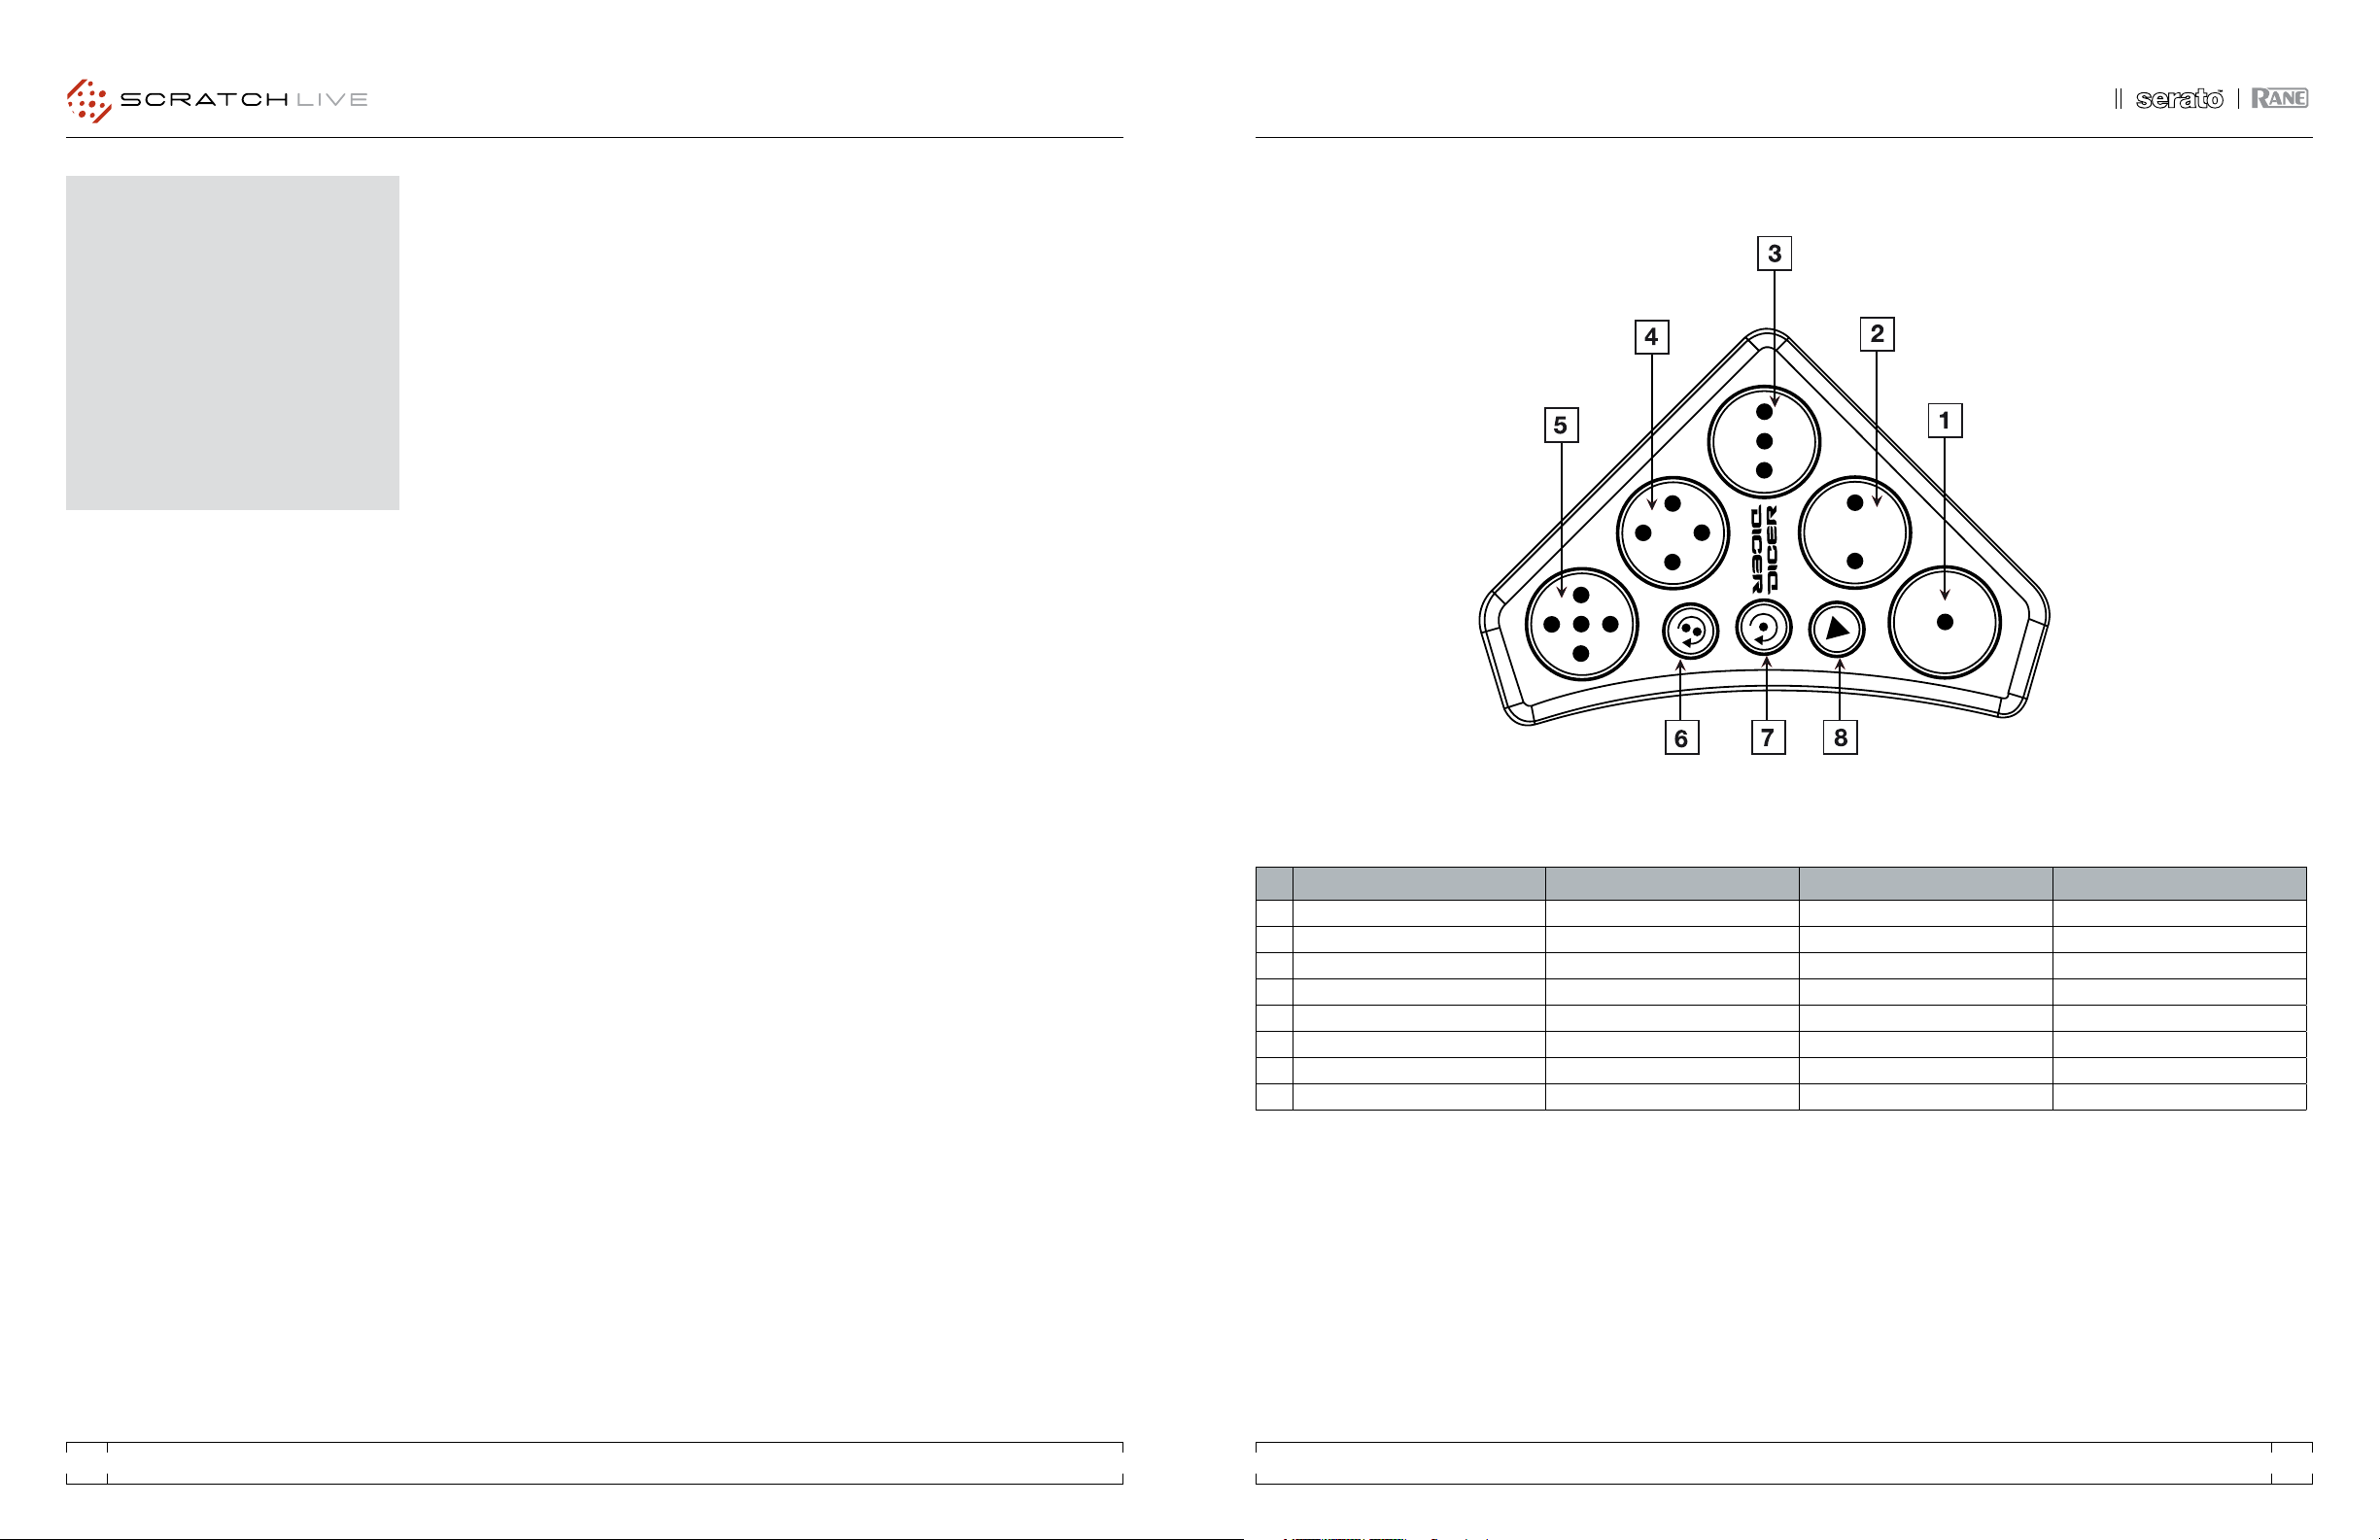
DICER MODES
The Dicer has 5 modes - the first three modes
are Hot Cues, Loop Roll and Auto Loop functions
and cannot be overwritten.
The last two modes are User Modes and can
be mapped to other functions in Scratch Live.
NOTE: To use the Cue Point and Looping
functions you will need to set your virtual decks
to Relative or Internal Modes.
HOT CUES
When in Cue Mode, press any of the 5 dice
buttons to trigger stored cue points in Scratch
Live.
If there is no cue point stored, and the dice
button is not illuminated, pressing the button will
store a cue point.
To delete a cue point hold down Cue Mode
and press the dice button for the unwanted cue
point.
LOOP ROLL
Press the 5 dice buttons to select the length of
loop roll you want - hold down the button for the
duration of time you wish to loop roll.
AUTO LOOP
Press one of the 5 dice buttons to trigger the
auto-loop at the desired loop length. The loop
can be exited by pressing the same dice button
or pressing another auto-loop button to change
loop length.
NOTE: Auto Loop and Loop Roll Modes
require the track to have a correct BPM value. If
none of the dice buttons are illuminated in either
Loop Roll or Auto Loop Mode then you will need
to analyze the track in Scratch Live or manually
tap in a BPM value in the software.
USER MODES 1+2
To map functions to User Modes 1 or 2 simply
click on the MIDI button in Scratch Live, click
on the parameter you wish to map to the Dicer
then press and hold the User Mode 1 or 2 button
(Loop Roll or Auto Loop) and the desired dice
button. Click on MIDI again to exit the editing
mode.
To activate the function hold down the User
Mode button and press the appropriate dice
button .
NOTE: You can save the Dicer layers 4 and 5
as a MIDI preset in Scratch Live. (See the MIDI
section of the Scratch Live manual for saving
presets.)
DICER CONTROLS HOT CUE MODE LOOP ROLL MODE AUTO LOOP MODE
1 Dice 1 Set/Trigger Cue Point 1 Trigger Loop Roll 1/16 Bar Trigger Auto Loop 1 Bar
2 Dice 2 Set/Trigger Cue Point 2 Trigger Loop Roll 1/8 Bar Trigger Auto Loop 2 Bar
3 Dice 3 Set/Trigger Cue Point 3 Trigger Loop Roll 1/4 Bar Trigger Auto Loop 4 Bar
4 Dice 4 Set/Trigger Cue Point 4 Trigger Loop Roll 1/2 Bar Trigger Auto Loop 8 Bar
5 Dice 5 Set/Trigger Cue Point 5 Trigger Loop Roll 1 Bar Trigger Auto Loop 16 Bar
6 Hot Cue Select Hot Cue Mode
7 Loop Roll Select Loop Roll Mode
8 Auto Loop Select Auto Loop Mode
SERATO SCRATCH LIVE 3RD PARTY CONTROLLER QUICKSTART 2 .1 SERATO SCRATCH LIVE 3RD PARTY CONTROLLER QUICKSTART 2 .1
67
PIONEER CDJ-2000
To use a pair of CDJ-2000s with Scratch Live,
you will need at least 3 available USB ports.
If you don’t have 3 ports available you may be
able to connect your CDJ-2000s to a powered
USB hub.
It is however, important to always connect
your Scratch Live hardware directly to your
computer.
Make sure you have the latest drivers and
firmware for the CDJ-2000 available here:
http://www.pioneer.eu/eur/products/44/106/
CDJ-2000/media.html
Make sure you are running the latest version
of Scratch Live available here:
http://serato.com/downloads/scratchlive
INSTALLATION AND SETUP
1. Connect your Scratch Live hardware as
per normal into an available USB port on your
computer.
2. Connect the CDJ-2000 to your computer via
USB cable.
3. Load Scratch Live
4. Press LINK on the CDJ-2000
5. Press the Scroll Knob to connect to the
computer
6. Use the Scroll Knob to choose which virtual
deck you wish the CDJ-2000 to control.
7. Set the virtual deck in Scratch Live to Internal
mode (INT).
CDJ-2000s can also be used to play regular
CDs. To do this just connect the CDJs Audio
outs (RCA) to your Scratch Live hardware as you
would your regular CD players.
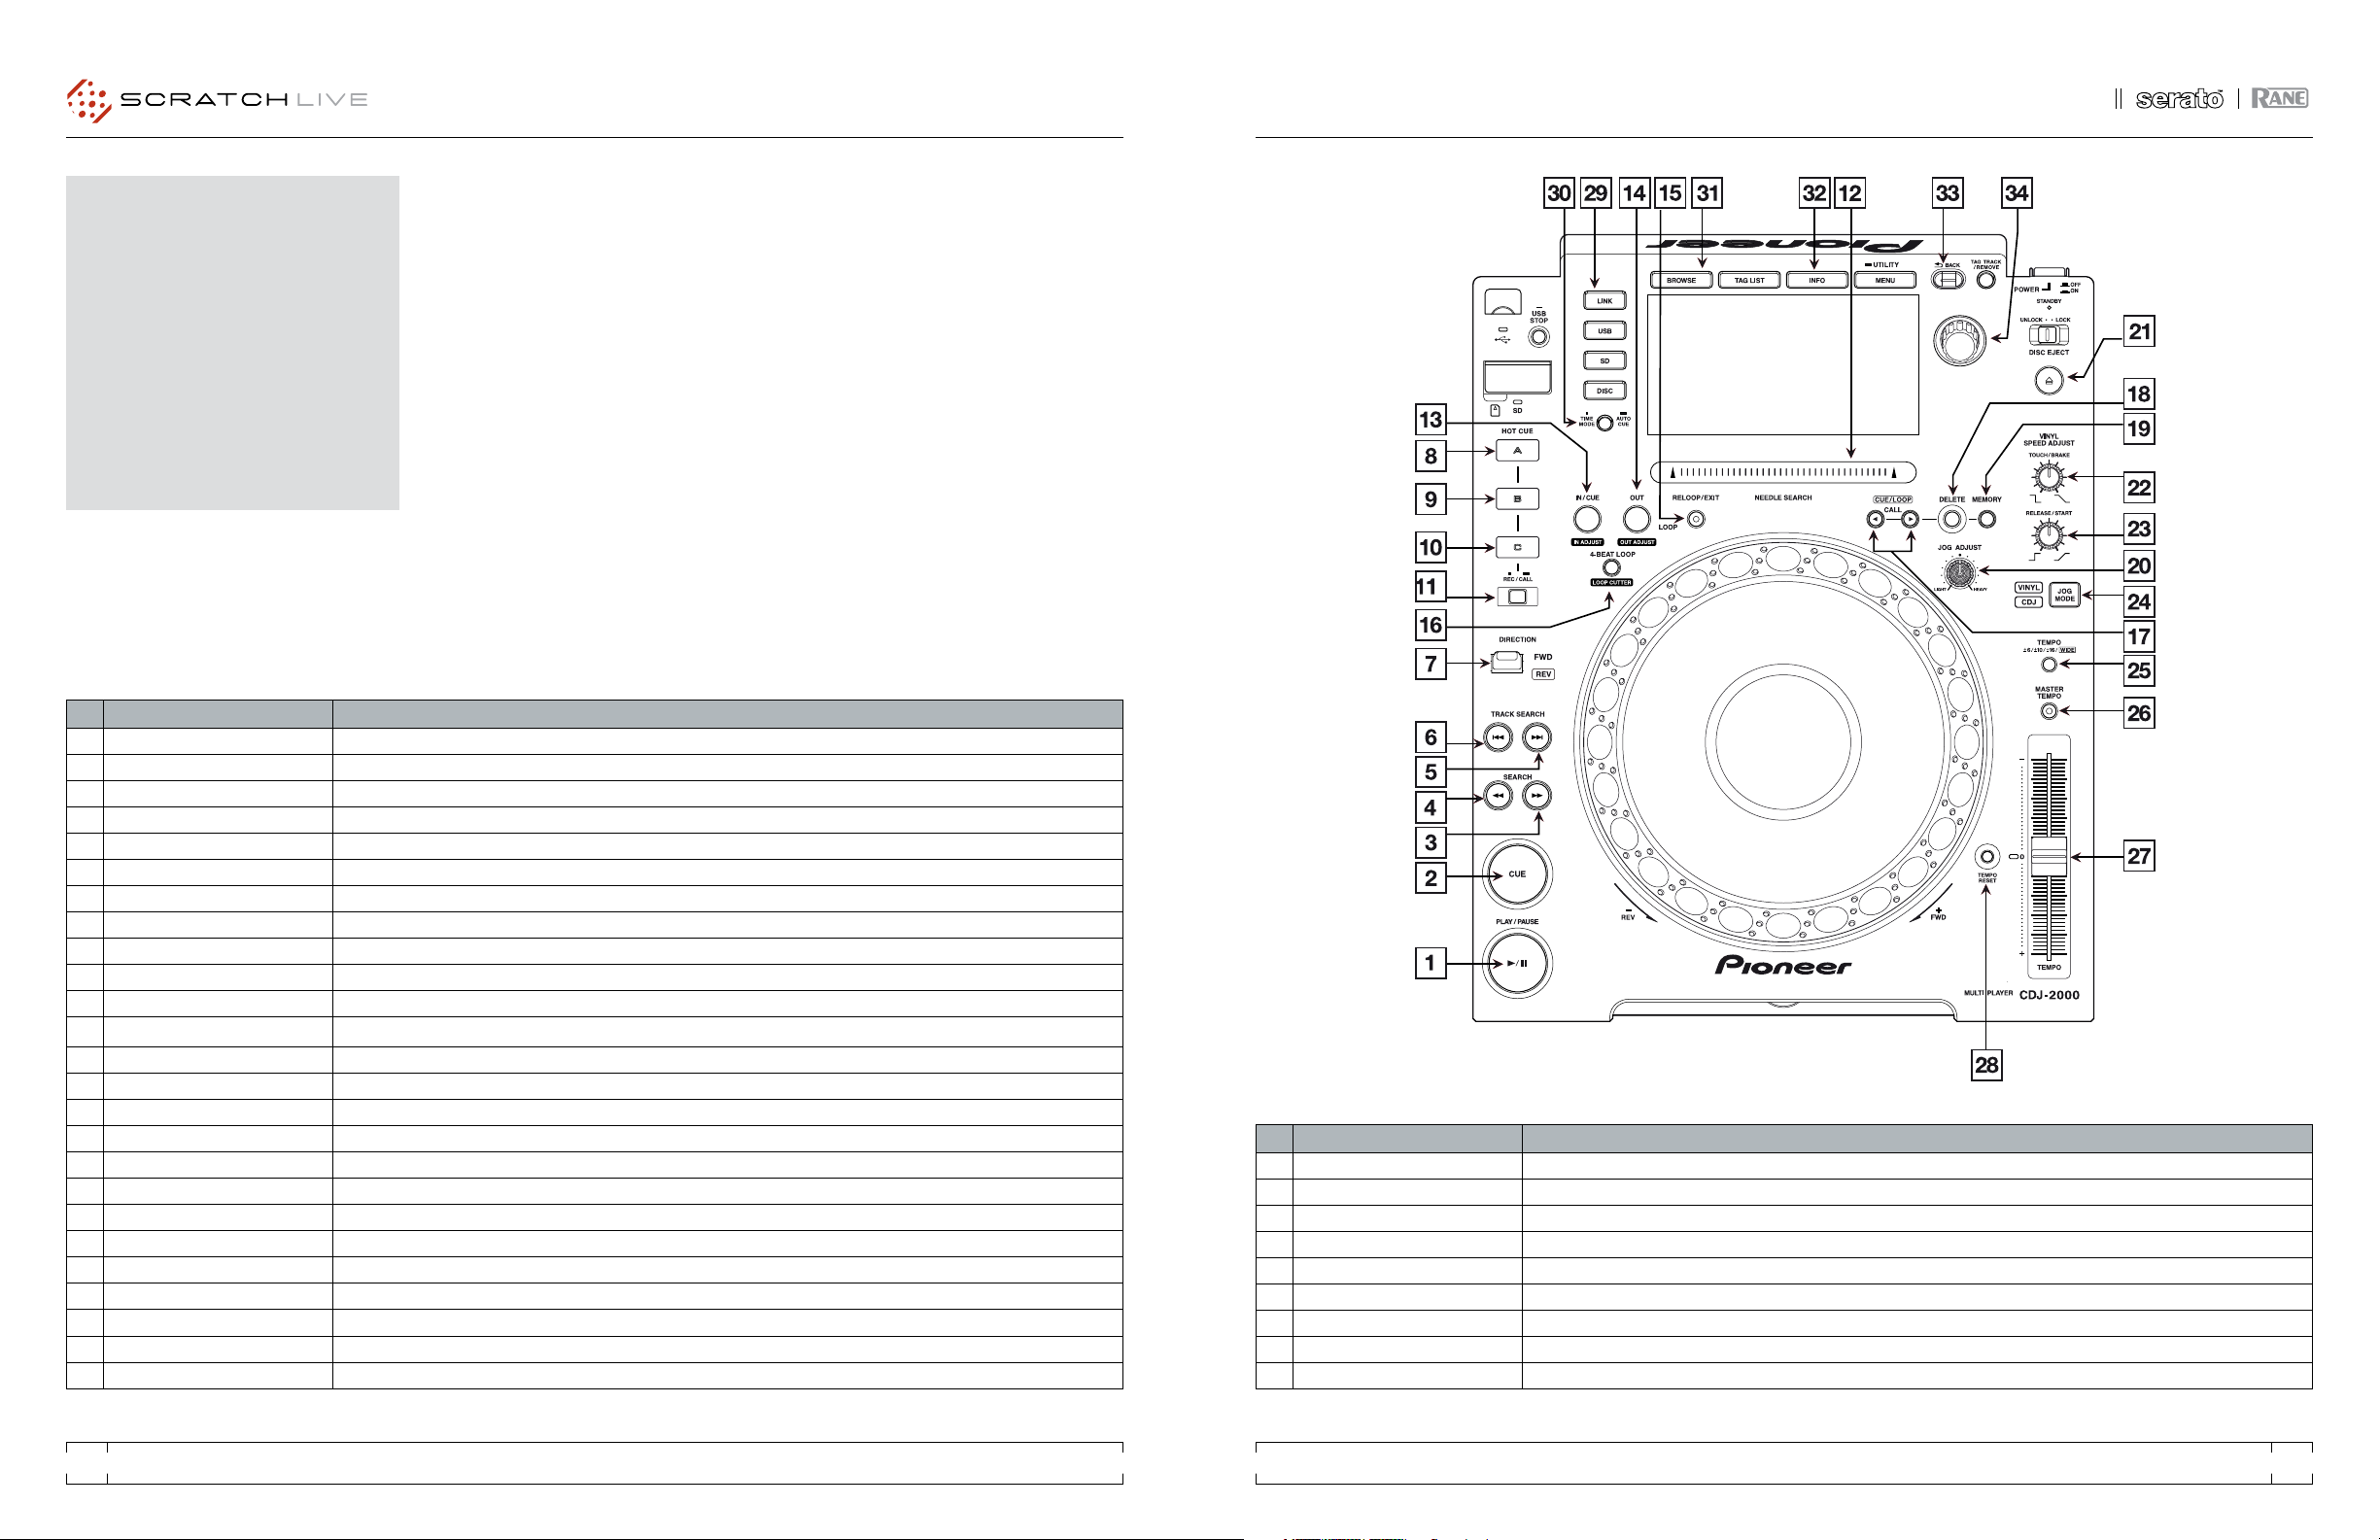
CDJ-2000 CONTROLS SCRATCH LIVE FUNCTIONALITY
1 Play/Pause Toggles playback on/off.
2 Cue Works as CDJ style cue button for setting and jumping to temporary cue.
3 Search » Fast Forward.
4 Search « Rewind.
5 Track Search » Loads next track.
6 Track Search « Loads previous track.
7 Direction Toggles playback forwards or reverse.
8 Hot Cue A Jumps to cue point 1. If in REC mode, press to set a cue point at the current play position.
9 Hot Cue B Jumps to cue point 2. If in REC mode, press to set a cue point at the current play position.
10 Hot Cue C Jumps to cue point 3. If in REC mode, press to set a cue point at the current play position.
11 Rec/Call Enters Hot Cue REC mode.
12 Needle Search While the track is paused or platter is held, run your finger along the needle search strip to scroll through the track.
13 In /Cue (In Adjust) Sets loop in point. (Press again to adjust the loop in point. Press again to exit loop in edit mode.)
14 Out (Out Adjust) Sets loop out point. (Press again to adjust the loop out point. Press again to exit loop out edit mode.)
15 Reloop/Exit Turns current loop on and off. Jumps to start of loop when turning it on.
16 4-Beat Loop/ Loop Cutter Creates a 4 beat loop. (Press again to halve the loop to 2 beats, and again to 1 beat and so on.)
17 Cue/Loop Call < > Jumps to next or previous loop slot.
18 Delete Deletes current loop slot.
19 Memory Saves the loop to the current loop slot.
20 Jog Adjust Adjusts platter sensitivity
21 Disk Eject Eject the current track. NOTE: This also ejects any CD in the player.
22 Touch/Break Adjusts the stop speed. (Mimicking a slowing down record.)
23 Release/Start Adjusts the start play speed.
24 Jog Mode Switches between jog and scratch mode for platter interaction.
25 Tempo Switches tempo range between +/- 6, 10, 16 and 100% (WIDE).
CDJ-2000 CONTROLS SCRATCH LIVE FUNCTIONALITY
26 Master Tempo Toggles Keylock on or off.
27 Tempo Slider Adjusts pitch slider.
28 Tempo Reset Resets pitch to zero.
29 Link Enters USB connection mode.
30 Time Mode. (Auto Cue) Switches display between elapsed & remaining time.
31 Browse Browse through library.
32 Info Displays song information.
33 Back Moves focus back to the crate selector.
34 Scroll Knob Scrolls through library (crates/songs/browse). Push the scroll knob to load select track or to tab cursor focus

SERATO SCRATCH LIVE 3RD PARTY CONTROLLER QUICKSTART 2 .1 SERATO SCRATCH LIVE 3RD PARTY CONTROLLER QUICKSTART 2 .1
89
PIONEER CDJ-350
To use a pair of CDJ350s with Scratch LIVE, you
will need at least 3 available USB ports.
If you don’t have 3 ports available you may
be able to connect your CDJ350s to a powered
USB hub.
It is however, important to always connect
your Scratch Live hardware directly to your
computer.
Make sure you have the latest drivers and
firmware for the CDJ-350 available here:
http://www.pioneer.eu/eur/products/44/106/
CDJ-350/media.html
Make sure you are running the latest version
of Scratch Live available here:
http://serato.com/downloads/scratchlive
INSTALLATION AND SETUP
1. Connect the CDJ350 to your computer via
USB cable.
2. Load Scratch Live.
3. Press the PC icon on the CD350.
4. Use the Scroll Knob to choose which virtual
deck you wish the CDJ350 to control and push
to select.
5. Set the virtual deck to Internal mode (INT) in
Scratch Live.
CDJ-350s can also be used to play regular
CDs. To do this just connect the CDJs Audio
outs (RCA) to your Scratch Live hardware as you
would your regular CD players.
CDJ-350 CONTROLS SCRATCH LIVE FUNCTIONALITY
1 Play/Pause Toggles playback on/off.
2 Cue Works as CDJ style cue button for setting and jumping to temporary cues.
3 Search « Rewind.
4 Search » Fast Forward.
5 Track Search « Loads previous track.
6 Track Search » Loads next track.
7 PC Enters USB connection mode with computer.
8 In /Cue (In Adjust) Sets loop in point. (Press again to adjust the loop in point. Press again to exit loop in edit mode.)
9 Out (Out Adjust) Sets loop out point. (Press again to adjust the loop out point. Press again to exit loop out edit mode.)
10 Reloop/Exit Turns current loop on and off. Jumps to start of loop when turning it on.
11 Beat Loop - Halves loop length when loop is active. Scrolls through stored loops when loop is not active.
12 Beat Loop + Doubles loop length when loop is active. Scrolls through stored loops when loop is not active.
13 Disk Eject Eject the current track. NOTE: This also ejects any CD in the player.
14 Vinyl Mode Switches between jog and ‘vinyl’ scratch mode for platter interaction.
15 Tempo Range Switches tempo range between +/- 6, 10, 16 and 100% (WIDE).
16 Master Tempo Toggles Keylock on or off.
17 Tempo Slider Adjusts pitch slider.
18 Back Moves focus back to the crate selector.
19 Scroll Knob Scrolls through library (crates/songs/browse). Push the scroll knob to load select track or to tab cursor focus
20 Playlist Adds currently highlighted track to Prepare Crate.
21 Time Mode Switches display between elapsed & remaining time.

SERATO SCRATCH LIVE 3RD PARTY CONTROLLER QUICKSTART 2 .1 SERATO SCRATCH LIVE 3RD PARTY CONTROLLER QUICKSTART 2 .1
10 11
PIONEER CDJ-850
To use a pair of CDJ-850s with Scratch Live, you
will need at least 3 available USB ports.
If you don’t have 3 ports available you may
be able to connect your CDJ-850s to a powered
USB hub.
It is however, important to always connect
your Scratch Live hardware directly to your
computer.
Make sure you have the latest drivers and
firmware for the CDJ-850 available here:
http://www.pioneer.eu/eur/products/44/106/
CDJ-850/media.html
Make sure you are running the latest version
of Scratch Live available here:
http://serato.com/downloads/scratchlive
INSTALLATION AND SETUP
1. Connect the CDJ-850 to your computer via
USB cable.
2. Load Scratch Live.
3. Press PC on the CDJ-850.
4. Use the Scroll Knob to choose which virtual
deck you wish the CDJ-850 to control.
5. Set the virtual deck in Scratch Live to Internal
mode (INT).
CDJ-850s can also be used to play regular
CDs. To do this just connect the CDJs Audio
outs (RCA) to your Scratch Live hardware as you
would your regular CD players.
CDJ-850 CONTROLS SCRATCH LIVE FUNCTIONALITY
1 Play/Pause Toggles playback on/off.
2 Cue Works as CDJ style cue button for setting and jumping to temporary cue.
3 Search « Rewind.
4 Search » Fast Forward.
5 Track Search « Loads previous track.
6 Track Search » Loads next track.
7 Direction Toggles playback forwards or reverse.
8 Beat Select Switches the auto loop beat division between the left and right columns and the button value.
9 1 Toggles auto loop on/off . (1 bar or 1/16 depending on Beat Select division.)
10 2 Toggles auto loop on/off . (2 bar or 1/8 depending on Beat Select division.)
11 4 Toggles auto loop on/off . (4 bar or 1/4 depending on Beat Select division.)
12 8 Toggles auto loop on/off . (8 bar or 1/2 depending on Beat Select division.)
13 In /Cue (In Adjust) Sets loop in point. (Press again to adjust the loop in point. Press again to exit loop in edit mode.)
14 Out (Out Adjust) Sets loop out point. (Press again to adjust the loop out point. Press again to exit loop out edit mode.)
15 Reloop/Exit Turns current loop on and off. Jumps to start of loop when turning it on.
16 Cue/Loop Call > Jumps to next loop slot.
17 Cue/Loop Call < Jumps to previous loop slot.
18 Delete Deletes current loop slot.
19 Memory Saves the loop to the current loop slot.
20 Disk Eject Eject the current track. NOTE: This also ejects any CD in the player.
21 Touch/Release Break Adjusts the stop and start speeds. (Mimicking a record.)
22 Jog Mode Switches between jog and scratch mode for platter interaction.
23 Tempo Switches tempo range between +/- 6, 10, 16 and 100% (WIDE).
24 Master Tempo Toggles Keylock on or off.
25 Tempo Slider Adjusts pitch slider.
CDJ-850 CONTROLS SCRATCH LIVE FUNCTIONALITY
26 Scroll Knob Scrolls through library (crates/songs/browse). Push the scroll knob to load select track or to tab cursor focus
27 Back Moves focus back to the crate selector.
28 Info Displays song information.
29 Browse Browse through library.
30 PC Enters USB connection mode with computer.
31 Time Mode Switches display between elapsed and remaining time.

SERATO SCRATCH LIVE 3RD PARTY CONTROLLER QUICKSTART 2 .1 SERATO SCRATCH LIVE 3RD PARTY CONTROLLER QUICKSTART 2 .1
12 13
PIONEER CDJ-900
To use a pair of CDJ-900s with Scratch Live, you
will need at least 3 available USB ports.
If you don’t have 3 ports available you may
be able to connect your CDJ-900s to a powered
USB hub.
It is however, important to always connect
your Scratch Live hardware directly to your
computer.
Make sure you have the latest drivers and
firmware for the CDJ-900 available here:
http://www.pioneer.eu/eur/products/44/106/
CDJ-900/media.html
Make sure you are running the latest version
of Scratch Live available here:
http://serato.com/downloads/scratchlive
INSTALLATION AND SETUP
1. Connect your Scratch Live hardware as
per normal into an available USB port on your
computer.
2. Connect the CDJ-900 to your computer via
USB cable.
3. Load Scratch Live
4. Press and hold MENU on the CDJ-900 until
the UTILITY menu appears.
5. Scroll to HID SETTING and press the Scroll
Knob. Using the Scroll Knob, change this setting
from STANDARD to ADVANCED and press Scroll
Knob again to set.
6. Use the Scroll Knob to choose which virtual
deck you wish the CDJ-900 to control.
7. In Scratch Live, set the virtual deck to Internal
mode (INT).
CDJ-900s can also be used to play regular
CDs. To do this just connect the CDJs Audio
outs (RCA) to your Scratch Live hardware as you
would your regular CD players.
CDJ-900 CONTROLS SCRATCH LIVE FUNCTIONALITY
1 Play/Pause Toggles playback on/off.
2 Cue Works as CDJ style cue button for setting and jumping to temporary cue.
3 Search » Fast Forward.
4 Search « Rewind.
5 Track Search » Loads next track.
6 Track Search « Loads previous track.
7 Direction Toggles playback forwards or reverse.
8 In /Cue (In Adjust) Sets loop in point. (Press again to adjust the loop in point. Press again to exit loop in edit mode.)
9 Out (Out Adjust) Sets loop out point. (Press again to adjust the loop out point. Press again to exit loop out edit mode.)
10 Reloop/Exit Turns current loop on and off. Jumps to start of loop when turning it on.
11 Beat Select Press Switches the auto loop beat division between (1, 2, 4, 8) and (1/16, 1/8,1/4, 1/2).
Beat Select Hold Press and hold Beat Division button to switch to (1/4, 1/3, 1/2, 3/4).
12 1 Toggles 1 bar auto loop on/off.
13 2 Toggles 2 bar auto loop on/off.
14 4 Toggles 4 bar auto loop on/off.
15 8 Toggles 8 bar auto loop on/off.
16 Call (Loop) > Jumps to next loop slot.
17 Call (Loop) < Jumps to previous loop slot.
18 Delete Deletes current loop slot.
19 Memory Saves the loop to the current loop slot.
20 Disk Eject Eject the current track. NOTE: This also ejects any CD in the player.
21 Touch/Release Break Adjusts the stop and start speeds. (Mimicking a record.)
22 Jog Mode Switches between jog and scratch mode for platter interaction.
CDJ-900 CONTROLS SCRATCH LIVE FUNCTIONALITY
23 Tempo Switches tempo range between +/- 6, 10, 16 and 100% (WIDE).
24 Master Tempo Toggles Keylock on or off.
25 Tempo Slider Adjusts pitch slider.
26 Link Enters USB connection mode
27 Time Mode Switches display between elapsed & remaining time.
28 Browse Browse through library.
29 Info Displays song information.
30 Back Moves focus back to the crate selector.
31 Scroll Knob Scrolls through library (crates/songs/browse). Push the Scroll Knob to load track or tab cursor focus.
SERATO SCRATCH LIVE 3RD PARTY CONTROLLER QUICKSTART 2 .1 SERATO SCRATCH LIVE 3RD PARTY CONTROLLER QUICKSTART 2 .1
14 15
PIONEER CDJ-400
To use a pair of CDJ-400s with Scratch Live, you
will need at least 3 available USB ports. If you
don’t have 3 ports available you may be able to
connect your CDJ-400s to a powered USB hub.
It is however, important to always connect
your Scratch Live hardware directly to your
computer.
Make sure you have the latest drivers and
firmware for the CDJ-400 available here:
http://www.pioneer.eu/eur/content/support/
support/upgrade/CDJ400.html
Make sure you are running the latest version
of Scratch Live available here:
http://serato.com/downloads/scratchlive
INSTALLATION AND SETUP
1. Connect your Scratch Live hardware as
per normal into an available USB port on your
computer.
2. Connect the CDJ-400 to your computer via
USB cable.
3. Load Scratch Live
4. Turn on both CDJ-400s, and switch them to
USB mode by pressing the button at the top left
corner marked USB.
5. Use the Scroll Knob to choose which virtual
deck you wish the CDJ-400 to control and push
to select.
6. Set the virtual deck to Internal mode (INT) in
Scratch Live.
You will now be able to control Scratch Live
with your CDJ-400s.
CDJ-400s can also be used to play regular
Cds. To do this just connect the CDJs Audio
outs (RCA) to your Scratch Live hardware as you
would your regular CD players.
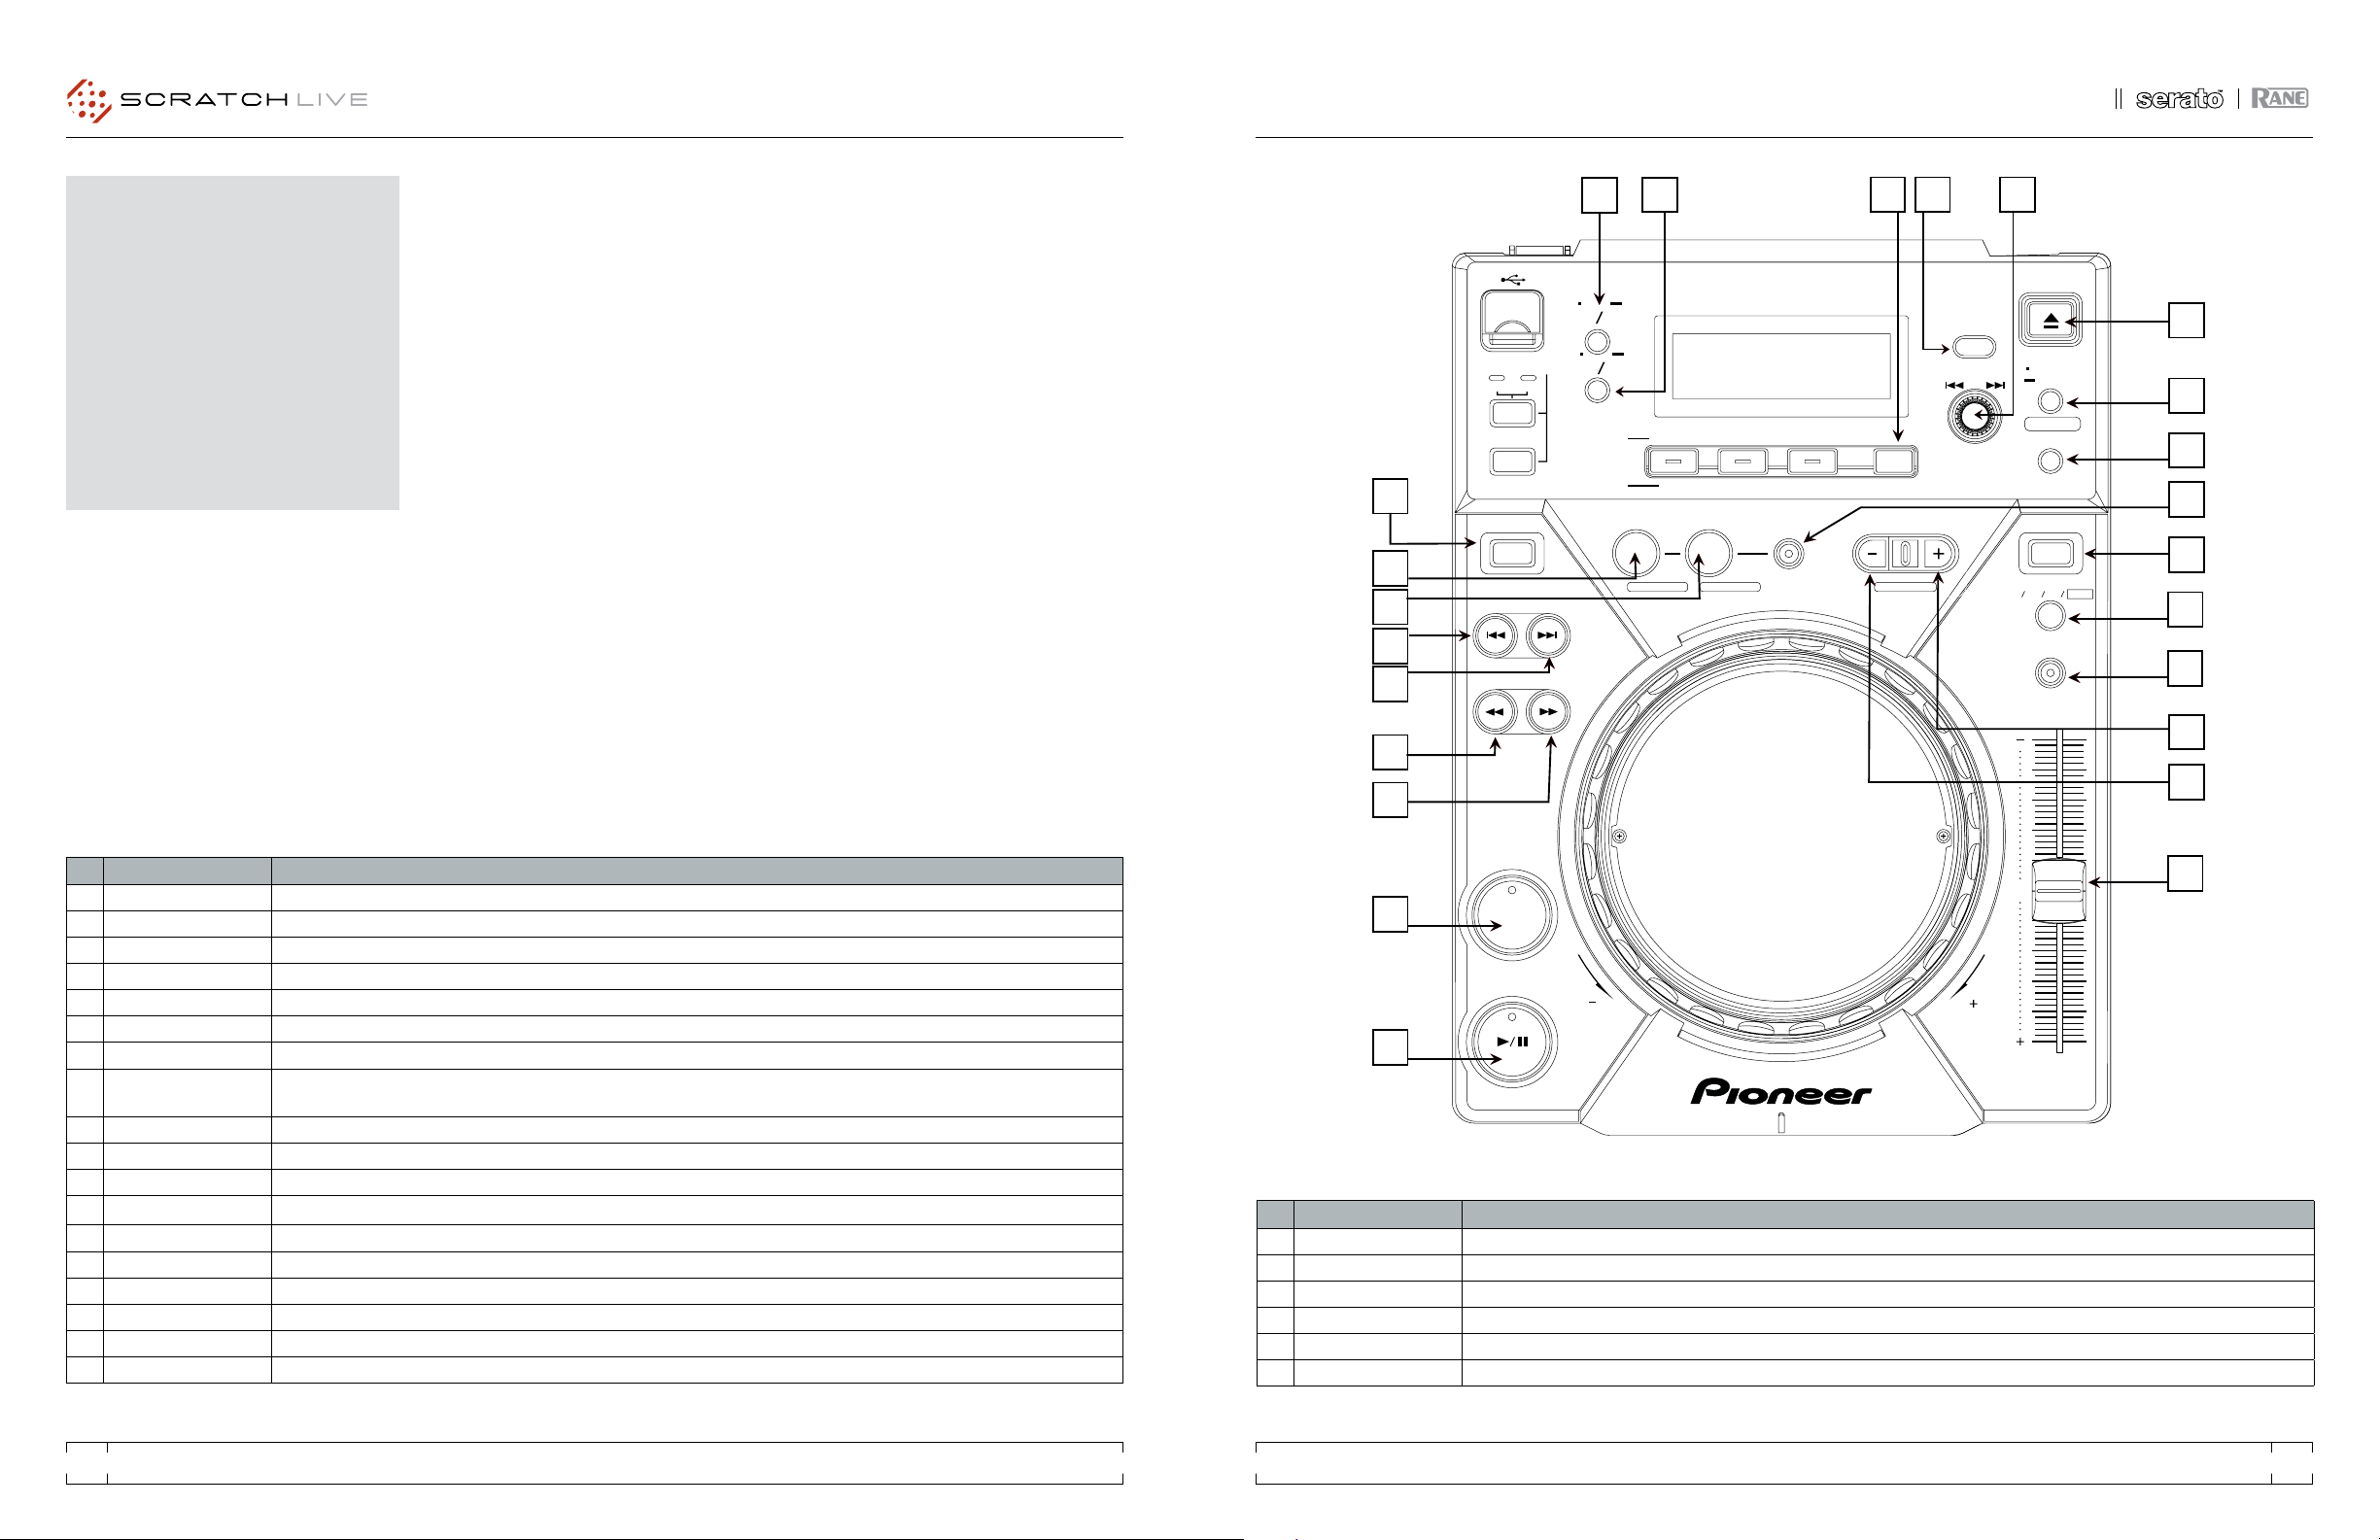
CDJ-400 CONTROLS SCRATCH LIVE FUNCTIONALITY
1 Eject Eject the current track.
2 Time Mode Switches display between elapsed & remaining time.
3 Text Mode Switches display between showing song title, artist name and album title. There is an icon for each.
4 Back Moves focus back to the crate selector.
5 Scrolling Knob Scrolls through library (crates/songs/browse). Clicking knob either tabs focus or loads song.
6 Cue/Loop Memory Sets 1st cue point at current playhead position.
7 Cue/Loop Call Jumps to 1st cue point.
8 Hold When holding hold, pressing the scroll knob will perform instant doubles to the opposite deck. Pressing direction will toggle playback
direction.
9 Loop In Sets loop in point.
10 Loop Out Sets loop out point.
11 Reloop Turns current loop on and off. Jumps to start of loop when turning it on.
12 Loop Divide - When loop is off: prev loop. When loop is on: halves loop.
13 Loop Divide + When loop is off: next loop. When loop is on: doubles loop.
14 Direction Censor.
15 Track Search « Loads previous track.
16 Track Search » Loads next track.
17 Search « Rewind.
18 Search » Fast Forward.
CDJ-400 CONTROLS SCRATCH LIVE FUNCTIONALITY
19 Jog Mode Switches between jog and scratch mode for platter interaction.
20 Tempo Switches tempo range between +/- 6,10 and 16%.
21 Master Tempo Toggles Keylock.
22 Tempo Slider Adjusts pitch slider.
23 Cue Works as cdj style cue button for setting and jumping to temporary cues.
24 Play/Pause Toggles playback on/off.
SOURCE SELECT
DIRECTION JOG MODE
TRACK SEARCH
SEARCH
PLAY/PAUSE
REV FWD
0
REV LOOP VINYL
CUE
USB
CD
SELECT PUSH MEMORY
DELETE
EJECT
CALL
CUE/LOOP
CDJ
-
400
TIME
MODE
MEMORY PC
AUTO
CUE
TEXT
MODE
UTILITY
MODE
SCRATCH
JOG EFFECT
BUBBLET RANS
BACK
HOLD
TEMPO
±
6
±
10
±
16 WIDE
MASTER TEMPO
TEMPO
JETR OLLW AH
WAH
DIGITAL
JOG BREAK
REALTIME CUE
IN OUTR ELOOP/EXITB EAT LOOP
LOOP DIVIDE
OUT ADJUSTHOT LOOP
MULTI PLAYER
1
20
19
21
22
6
7
8
12
13
11
54
23
14
23
24
15
17
16
18
9
10
SERATO SCRATCH LIVE 3RD PARTY CONTROLLER QUICKSTART 2 .1 SERATO SCRATCH LIVE 3RD PARTY CONTROLLER QUICKSTART 2 .1
16 17
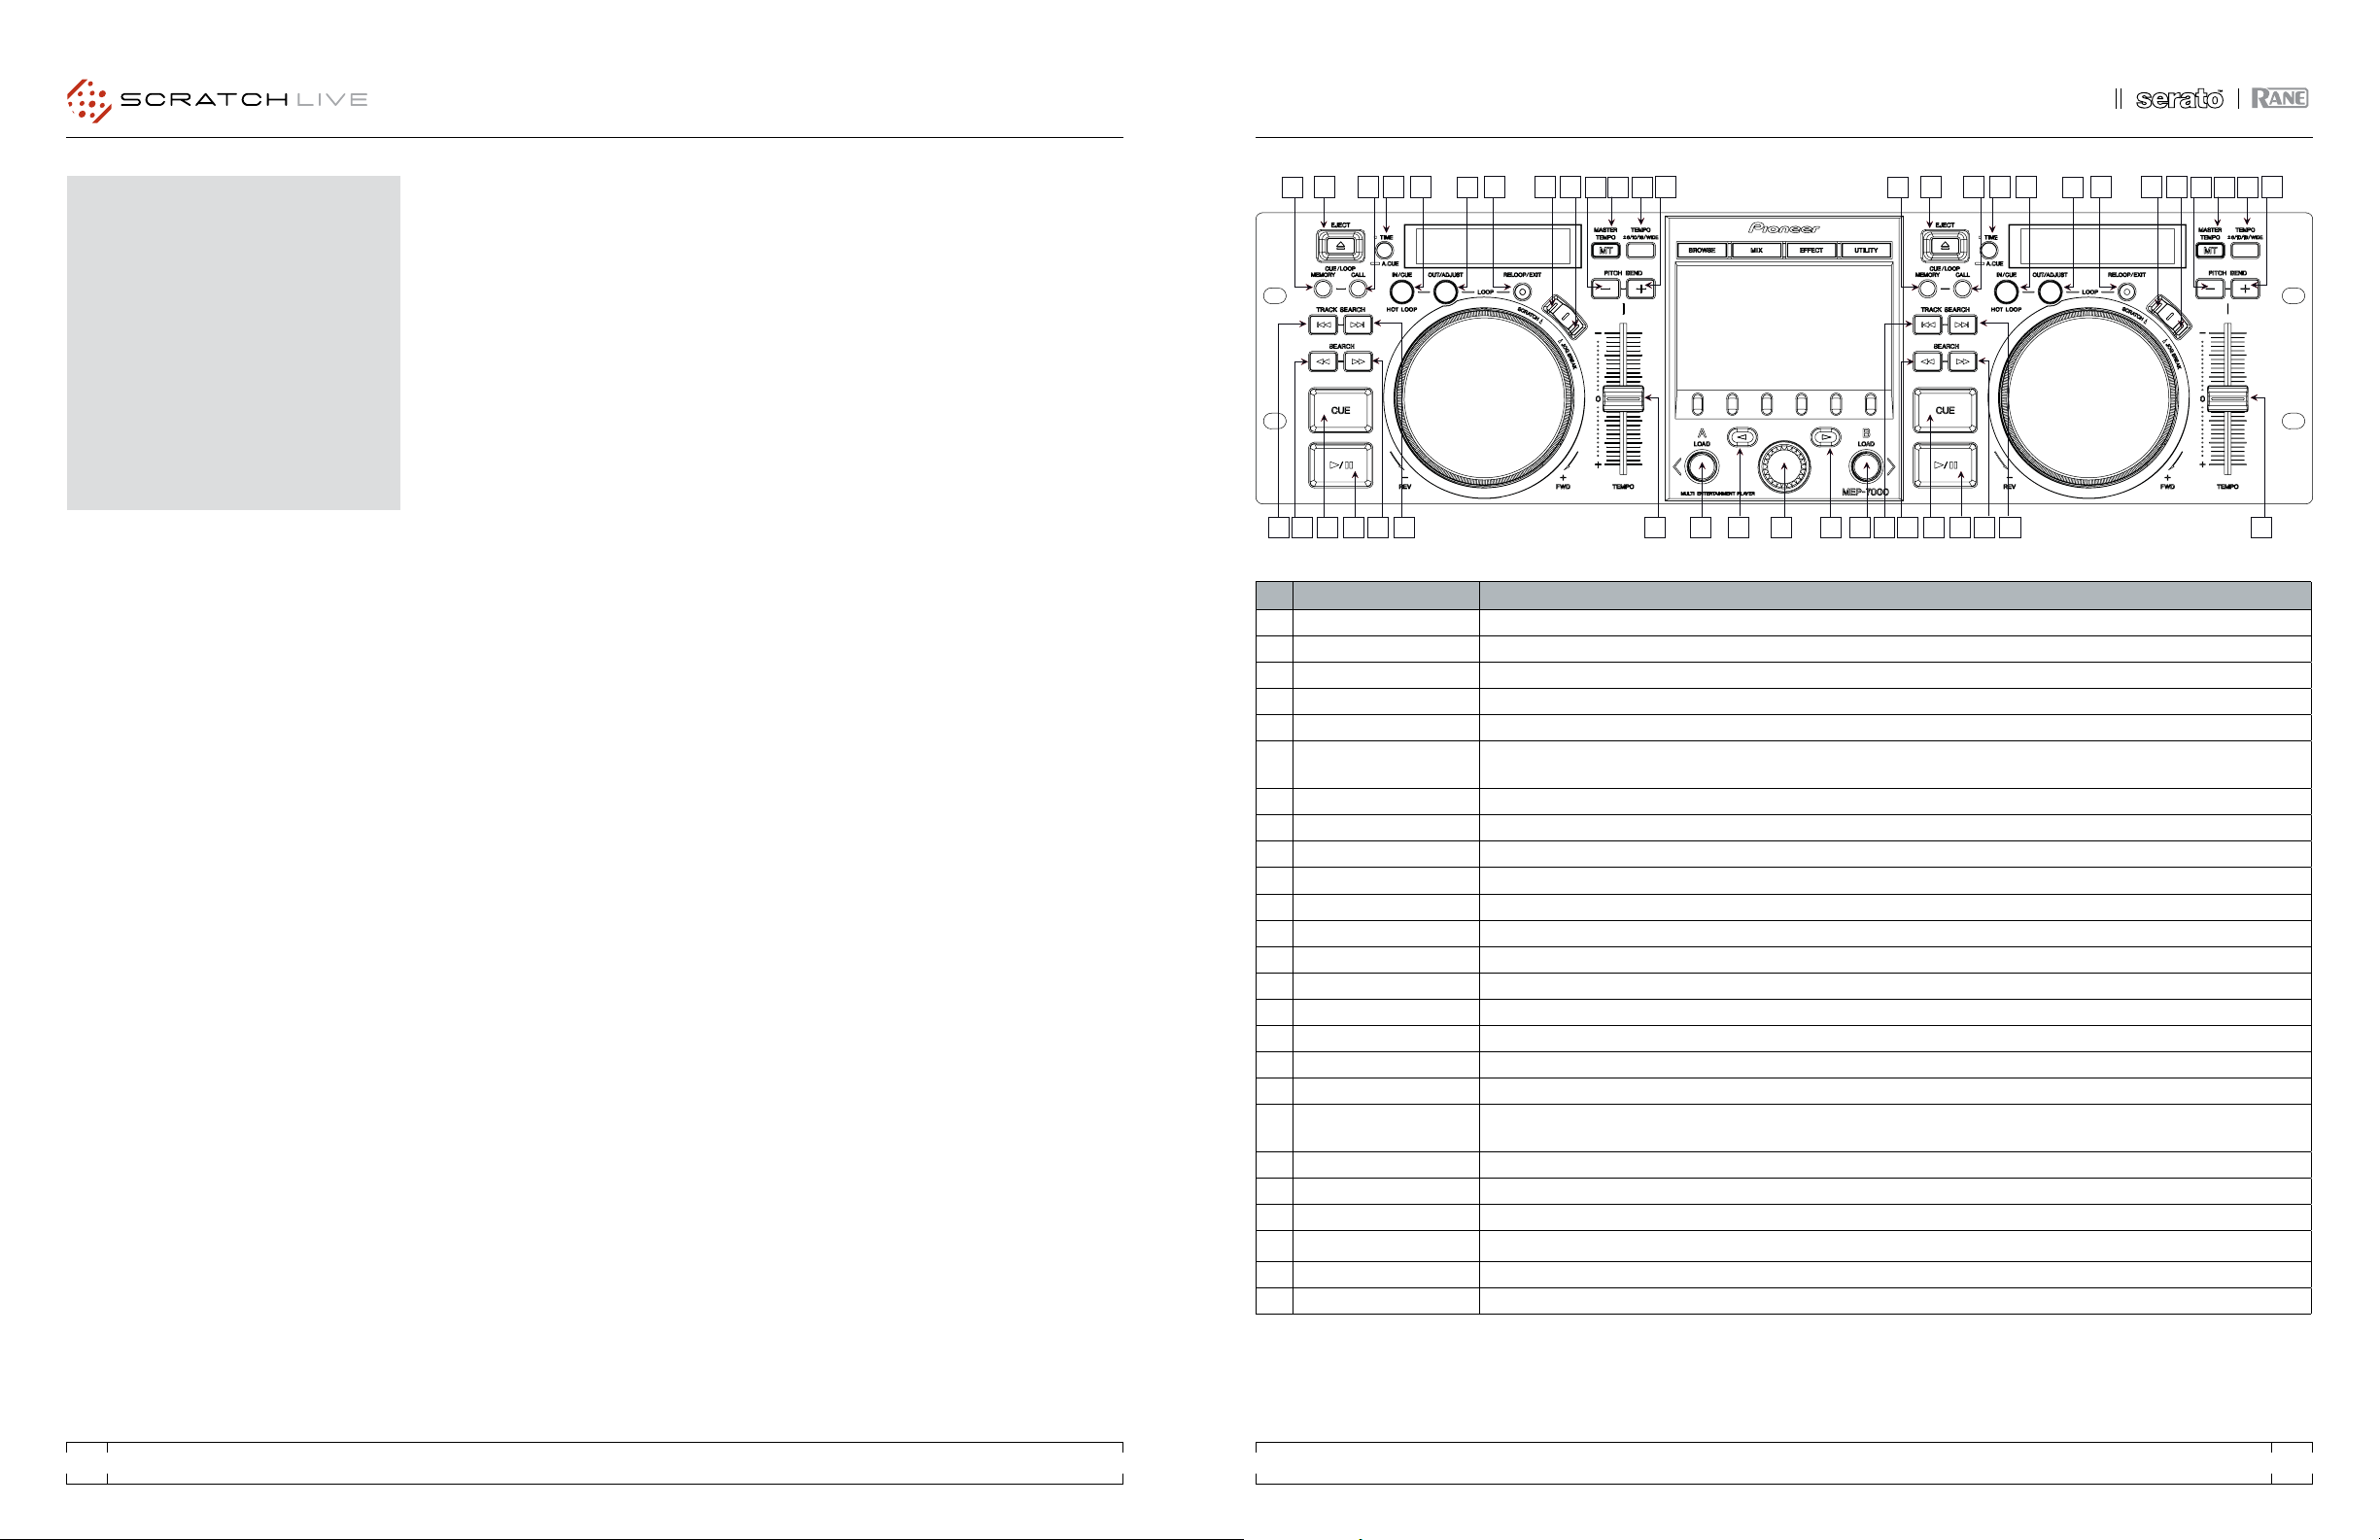
MEP-7000 CONTROLS SCRATCH LIVE FUNCTIONALITY
1 Eject Ejects track from virtual deck.
2 Memory Sets first cue point. Press and hold to delete cue point.
3 Call Trigger first cue point.
4 Time Time remaining toggle.
5 In/Cue Sets loop in-point if looping is off. If looping is on will jump to start of loop.
6 Out/Adjust Sets loop out-point if loop in-point is set and not yet looping. If looping is on this will allow you to adjust the loop out-point using the jog
wheel. Press again to then set new loop out-point.
7 Reloop/Exit If looping is off this turns looping on and jumps to the start of loop. If looping is on this turns looping off.
8 Scratch Enables Scratch mode.
9 Jog Break Enables Pitch Bend Mode.
10 Pitch Bend - Bend pitch down.
11 Pitch Bend + Bend pitch up.
12 Master Tempo Keylock toggle.
13 Tempo Toggle between 6, 10 and 16% pitch range.
14 Track search |<< Previous track.*
15 Track search >>| Next track.*
*If you hold down either track search button you can then use the jog wheel to scroll through the track library.
16 Search << Rewind.
17 Search >> Fast forward.
18 Cue If playback is paused this button will set the temporary cue point at the current position in the track. Holding down this button then plays
from the temporary cue point.
19 Play/Pause Play/Pause.
20 Tempo Slider Adjusts pitch slider.
21 Load Loads selected track to deck.
22 vJumps cursor to crate library.
23 Knob Scrolls through selected library. Pressing knob jumps cursor between crate and track libraries.
24 wJumps cursor to track library.
PIONEER MEP-7000
AND SEP-C1
INSTALLATION
MAC
1. Connect your MEP-7000 or SEP-C1 to an
available USB port.
2. Your MEP-7000 or SEP-C1 will be detected
automatically and will be ready to use.
WINDOWS xP
1. Connect your MEP-7000 or SEP-C1 to an
available USB port.
2. You will see the following prompt from
Windows: “Can Windows connect to Windows
update to search for software?”
3. Select: “No, not this time”, click “next”.
4. Select: “Install automatically”, click “next”.
5. Windows will then notify you that it has “Found
new Hardware PIONEER SDJ-C1 CONTROL”
followed by “USB composite device”.
6. You will be prompted to install 2 drivers. “USB
composite device” and “USB audio device”.
Follow the prompts as per the usual driver
installation method for Windows.
WINDOWS VISTA
1. Connect your MEP-7000 or SEP-C1 to an
available USB port.
2. You will see the following prompt from
Windows: “Windows needs to install driver
software for your PIONEER SDJ-C1 CONTROL”.
3. Select “Cancel”.
SETUP
1. Start Scratch Live and switch both decks to
internal mode.
2. You will now be able to control Scratch Live
with your MEP-7000 or SEP-C1.
BASIC OPERATION
To select and load tracks use the KNOB (23)
to scroll through your crates and tracks. By
pressing the KNOB you can jump between your
crate and track libraries. Use the LOAD button
(21) to load a track to the virtual deck.
PLAYBACK
Use the PLAY/PAUSE button (19) to play and
pause your tracks. You can control the speed
of the braking as normal in the setup menu of
Scratch Live.
USING CUES
You can set the first cue point using the
MEMORY button (2). You can then delete the
cue point by holding down the MEMORY button.
Press the CALL button (3) to trigger the first cue
point. You can set a temporary cue point at the
current position of the playhead by pressing
the CUE button (18) while playback is paused.
Holding the CUE button will then play from the
temporary cue point.
USING LOOPS
You can create loops by using the IN/CUE button
(5) to set the loop in-point and the OUT/ADJUST
button (6) to set the loop out-point. Once looping
you can press the OUT/ADJUST button again
which then allows you to use the JOG WHEEL
to adjust the loop out-point manually. Press the
OUT/ADJUST button again to set the new loop
out-point. Use the RELOOP/EXIT button (7) to
jump to the start of the loop and turn looping on
or to turn looping off if it is already looping.
3
1
27
68 9
19 1514 21 2217
5
4
18
16
11
12 1310
24
20 23 21
3
1
27
68 9
19 1514 17
5
4
18
16
11
12 1310
20

SERATO SCRATCH LIVE 3RD PARTY CONTROLLER QUICKSTART 2 .1 SERATO SCRATCH LIVE 3RD PARTY CONTROLLER QUICKSTART 2 .1
18 19
INSTALLATION
MAC
1. Connect your DN-HC4500 to an available
USB port.
2. The Denon DN-HC4500 will be detected
automatically and will be ready to use.
WINDOWS
1. Connect your DENON DN-HC4500 to an
available USB port.
2. You will see the following prompt from
Windows: “Can Windows connect to Windows
update to search for software?”
3. Select: “No, not this time” followed by “Install
automatically”
4. Windows will then notify you that it has found
the device: “Found new Hardware DN-HC4500,
followed by USB composite device” bubbles will
appear.
5. You will be prompted to install 2 drivers. “USB
composite device” and “USB audio device”.
Follow the prompts as per the usual driver
installation method for windows.
SETUP
1. Start Scratch Live and switch both decks to
internal mode.
2. Turn on the Denon DN-HC4500. It will
automatically be in PC link mode.
3. You will now be able to control Scratch Live
with your DENON DN-HC4500.
BASIC OPERATION
To select and load tracks, use the PARAMETERS
knob to scroll through your library and crates.
By pressing the PARAMETERS knob can
select a crate, sub-crate, and load your track
all without touching your computer. The BACK
button returns you to the previous location
selected.
SETTING CUE POINTS
1. Press the “MEMO” button.
2. You can then set your cue points 1-5 using the
“FUNCTION” keys along the top.
3. Once set, press the “MEMO” button again to
return to the main menu.
Your cues will now be mapped to the
“FUNCTION” keys. To delete or change your cue
points, simply repeat process 1 -3.
USING LOOPS
There are 2 loop cues you can use on the DN-
HC4500 - A1 and A2. To set the beginning (“In’)
point of the A1 loop, push the “A1” button.
To set the end (“Out”) point of the loop push
the “B” button. This button sets the end point
for both loop cues, depending on which loop
is currently playing. To clear all loop points
simultaneously, hold down the “FLIP” button for
3 seconds.
DENON DN-HC4500
DN-HC4500 CONTROLS SCRATCH LIVE FUNCTIONALITY
1 Play/Pause Play/Pause.
2 Cue CD player style cue.
3 Jog mode Toggles between scratch and bend modes.
4 Range / Key Keylock.
5 Pitch Slider Pitch Slider +/- 8%.
6Tap Tap Tempo have to tap at least 4 times, hold button down to cancel save.
7 Pitch bend +/- Pitch bend +\-.
8 Parameter knob Scroll crates / browse / track list.
9 Parameter press Enter crate / browse column / load track.
10 Eject / Playlist Eject.
11 Back Up a level of your browsing.
12 Function Key 1-5 Cue 1-5.
13 Memo Edit Cue Mode.
14 Time Toggle time remaining/elapsed for display.
15 Fast search « » RW / FF.
16 Cont/single Toggles auto mode.
17 Title Scrolls the song title if display can’t fit name.
18 A1 - A2 Sets the Loop In point.
19 B Sets the Loop Out point.
2 3 4611151617 175
79
12 810
12 3191811918 6111516 5
79 8 10
12

SERATO SCRATCH LIVE 3RD PARTY CONTROLLER QUICKSTART 2 .1 SERATO SCRATCH LIVE 3RD PARTY CONTROLLER QUICKSTART 2 .1
20 21
INSTALLATION & SETUP
1. Connect your DN-HC1000S to an available
USB port.
2. The Denon DN-HC1000S will be detected
automatically and will be ready to use.
BASIC OPERATION
Use the Back and Fwd buttons to move between
the crate and library view and use the File Select
knob to navigate through your selection. Use the
A Load and B Load buttons to load the selected
track to a deck.
USING CUE POINTS
Press the Cue 1-5 buttons for the left or right
deck to trigger your set cue points in Scratch
Live. If a cue point is not already set, pressing
these buttons will set the cue point. Press Shift
and Cue 1-5 to delete a cue point.
LOOPING
The DN-HC1000S allows control of manual
loops, auto loops and loop rolls.
MANUAL LOOP
Use the In button to set the loop in point and the
Out button to set the loop out point. Once the
out point is set the loop is saved to the track in
the next available loop slot. You can adjust the
loop in and out points by holding either In or Out
and turning the Loop Cut knob, or you can fine
adjust by holding Shift + In or Out and turning
the Loop Cut knob.
AUTO LOOP
Use the Loop Cut knob to select the length of
auto loop you want, then press Auto Loop to
turn the loop on and off.
LOOP ROLL
Use the Loop Cut knob to select the length of
loop roll you want then hold Loop Roll for the
duration of time you wish to loop roll.
NOTE: Auto Loop and Loop Roll require the
track to have a correct BPM value.
You can halve and double the length of any
loop type while it is playing by turning the Loop
Cut knob.
DENON DN-HC1000S
SAMPLE PLAYER
The Samp 1-3 and Samp 4-6 buttons allow you
to use the left and right Cue 3, 4 and 5 buttons to
trigger the Sample Player slots. Hold the Samp
1-3 button and press the left Cue 3, 4 and 5
buttons to trigger Sample Player slots 1, 2 and
3 respectively. Hold the Samp 4-6 button and
press the right Cue 3, 4 and 5 buttons to trigger
Sample Player slots 4, 5 and 6. You can load a
track to a Sample Player slot by pressing Shift +
Samp 1-3 + Cue 3, 4 or 5 for slots 1, 2 and 3 and
by pressing Shift + Samp 4-6 + Cue 3, 4 or 5 for
slots 4, 5 and 6.
MIDI CHANNELS
The DN-HC1000S has four MIDI channels.
Channel 1 is the default and is reserved for when
using the DN-HC1000S as a native controller,
leaving channels 2-4 free to be assigned to
other functions in Scratch Live. You can choose
the channel by pressing Shift + Files to select
channel 1, Shift + Browse for channel 2, Shift
+ History for channel 3 and Shift + Prepare for
channel 4.
NOTE: When you unplug the DN-HC1000S
it will remember the last MIDI channel used
and will default to that when re-connected.
When you connect the DN-HC1000S the Cue
1, 2, 3 or 4 buttons will flash to let you know
which MIDI channel is currently being used.
NOTE: When assigning the rotary knobs
on the DN-HC1000S to functions in Scratch
Live make sure the MIDI data type is set to
relative on/off [to do this click the desired
MIDI control, turn the rotary knob then press
the C key to select the MIDI data type]
DN-HC1000S CONTROLS SCRATCH LIVE FUNCTIONALITY (SHIFT FUNCTIONS IN GREY)
1 Loop Roll Engages Loop Roll while the button is held down.
2 Loop Cut Rotate the dial left to decrease loop length, rotate right to increase. Press to decrease the current loop by half.
Loop Sel Scrolls through saved loops in the current track.
3 Auto Loop Turns Auto Loop on and off.
4 In Sets loop in point. Hold In and turn the Loop Cut knob to adjust the loop in point.
Fine Adjust In Hold these and turn the Loop Cut knob to fine adjust the loop in point.
5 Out Sets loop out point. Hold Out and turn the Loop Cut knob to adjust the loop out point.
Fine Adjust Out Hold these and turn the Loop Cut knob to fine adjust the loop out point.
6 Loop Turns current loop on and off.
Reloop Jumps to selected loop and turns loop on.
7 Cue-1 (L) Triggers cue point one on the left deck. If cue point one is not already set this button will set it.
Clear Cue-1 (L) Clears cue point one on the left deck
8 Cue-2 (L) Triggers cue point two on the left deck. If cue point two is not already set this button will set it.
Clear Cue-2 (L) Clears cue point two on the left deck.
9 Cue-3 (L) Triggers cue point three on the left deck. If cue point three is not already set this button will set it.
Clear Cue-3 (L) Clears cue point three on the left deck.
10 Cue-4 (L) Triggers cue point four on the left deck. If cue point four is not already set this button will set it.
Clear Cue-4 (L) clears cue point four on the left deck.
11 Cue-5 (L) Triggers cue point five on the left deck. If cue point fivee is not already set this button will set it.
Clear Cue-5 (L) Clears cue point five on the left deck.
12 Samp 1-3 Hold this and press Cue-1 (L), Cue-2 (L) or Cue 3 (L) to trigger sample player slots 1, 2 or 3.
Load 1-3 Hold these and press Cue-1 (L), Cue-2 (L) or Cue 3 (L) to load selected track to sample player slots 1, 2 or 3.
13 Next Skip to the next track in your library/crate/playlist.
Fast Seek Forward Hold to move forward through the track at a very fast speed.
14 Prev Skip to the previous track in your library/crate/playlist.
Fast Seek Reverse Hold to move backward through the track at a very fast speed.
15 Tap Tap to manually calculate the BPM for a track. Once you have tapped the BPM, leave for 5 seconds to save the value to the track.
31 2 7 296830
919 31
17 16 15 14 13 12 11 10 21 24 25 28 26 27 22 32
5
4
18
33
2023
34

SERATO SCRATCH LIVE 3RD PARTY CONTROLLER QUICKSTART 2 .1 SERATO SCRATCH LIVE 3RD PARTY CONTROLLER QUICKSTART 2 .1
22 23
DN-HC1000S CONTROLS SCRATCH LIVE FUNCTIONALITY (SHIFT FUNCTIONS IN GREY)
16 + Pitch bend up.
Fast Foward Hold to move forward through the track at a fast speed.
17 - Pitch bend down.
Rewind Hold to move backward through the track at a fast speed.
18 Censor Press to reverse playback temporarily. When released, playback resumes from where the playhead would have been had Censor not
been pressed.
Keylock Turns keylock on and off.
19 Back Moves the cursor focus backwards through the open display panels.
Expand/Collapse Expand or collapse the selected crate and its subcrates.
20 Fwd Moves the cursor focus forwards through the open display panels.
21 A Load Loads selected track to the left deck (deck A).
A-Inst. Double Instant doubles the track loaded on the right deck (B) to the left deck (A).
22 B Load Loads selected track to the right deck (deck B).
B-Inst. Double Instant doubles the track loaded on the left deck (A) to the right deck (B).
23 File Select Scrolls through the tracks in your library/crate/playlist. Press to move between the Crates and Library views.
Rec Press to start and stop the record function.
24 Files Opens the Files panel.
MIDI Channel 1 Change to MIDI channel 1.
25 Browse Opens the Browse panel.
MIDI Channel 2 Change to MIDI channel 2.
26 History Opens the History panel.
MIDI Channel 3 Change to MIDI channel 3.
27 Prepare Opens the Prepare panel. Hold Prepare to add the selected track to the Prepare panel.
MIDI Channel 4 Change to MIDI channel 4.
28 Shift Press in conjunction with other buttons to access alternate functions.
29 Cue-1 (R) Triggers cue point one on the right deck. If cue point one is not already set this button will set it.
Clear Cue-1 (R) Clears cue point one on the right deck.
30 Cue-2 (R) Triggers cue point two on the right deck. If cue point two is not already set this button will set it.
Clear Cue-2 (R) Clears cue point two on the right deck.
31 Cue-3 (R) Triggers cue point three on the right deck. If cue point three is not already set this button will set it.
Clear Cue-3 (R) Clears cue point three on the right deck.
32 Cue-4 (R) Triggers cue point four on the right deck. If cue point four is not already set this button will set it.
Clear Cue-4 (R) Clears cue point four on the right deck.
33 Cue-5 (R) Triggers cue point five on the right deck. If cue point five is not already set this button will set it.
Clear Cue-5 (R) Clears cue point five on the right deck.
34 Samp 4-6 Hold this and press Cue-1 (R), Cue-2 (R) or Cue-3 (R) to trigger sample player slots 4, 5 or 6.
Load 4-6 Hold these and press Cue-1 (R), Cue-2 (R) or Cue-3 (R) to load selected track to sample player slots 4, 5 or 6.
To use the Vestax VFX-1 with Scratch Live you
will need at least 2 available USB ports.
If you don’t have enough ports available, you
may be able to connect your VFX-1 to a powered
USB hub.
It is however, important to always connect
your Scratch Live hardware directly to your
computer.
VESTAx VFx-1
INSTALLATION & SETUP
Connecting the VFX-1 to your computer with
Scratch Live open will automatically connect the
VFX-1 as a native Scratch Live controller.
VFx-1 CONTROLS SCRATCH LIVE FUNCTIONALITY
1 User Assignable User MIDI mappable control.
2 Deck 2 Applies effect to Deck 2.
3 Deck 1 Applies effect to Deck 1.
4 User Assignable User MIDI mappable control.
5 Beats Rotate to select effect tempo division.
6 FX Select Rotate to select a different effect.
7 User Assignable User MIDI mappable control.
8 User Assignable User MIDI mappable control.
9 FX Control Controls the effect knob in Scratch Live.
10 On / Off Turns effect on or off.
11 Latch Changes the ON/OFF button from momentary to permanent latch mode.
This manual suits for next models
9
Table of contents
Other Serato Recording Equipment manuals


