Setma Admiral Compact User manual

Comp
Compact
act
Montage und Betriebsanleitung
Installation and operating instructions
SETMA(Deutschland) GmbH
Siemensstrasse 3
D-85716 Unterschleissheim
Tel. +49 (0)89 / 317 13 19
Fax +49 (0)89 / 317 57 66

SETMA(Deutschland) GmbH
Siemensstrasse 3
D-85716 Unterschleissheim
Tel. +49 (0)89 / 317 13 19
Fax +49 (0)89 /317 5766
D
7d
7a
7b
Hauteur (m) / Vertical Height (m) /
Förderhöhe (m) /Altezza (m) /
Opvoercapaciteit (m) /Altura (m) /
Loftehojde (m) / Lyfthöjd (m)
Débit (l/min) / Flowrate (l/min) / Förderstrom (l/min)
/ Portata (l/min) /Afvoercapacitaet (l/min) / Caudal
(l/min) / Vandforing (l/min) / Vattenmängd (l/min)
6
4
2x 2x
2x
2x
2x2x
ABCD
JK
EFGH
5
7c
I

Allgemeines
ADMIRAL Compact ist ein einbaufertiges Komplett-WC mit
Spül-, Zerkleinerungs- und Pumpautomatik. Mit Hilfe des
ADMIRAL Compact wird Sanitärkomfort nun auch dort
möglich, wo vorher kein oder nur sehr schwierig ein WC ein-
gebaut werden konnte, wie zum Beispiel unter Kanalniveau
oder in Räumen ohneAbfluss.
Die Herstellung dieses Kompakt-WCs in unserem ISO zertifi-
zierten Werk unterliegt einer ständigen, strengen
Qualitätskontrolle.
Ihr ADMIRAL Compact bietet hohe Leistung, Sicherheit und
Zuverlässigkeit.Vorbehalt:bittebeachtenSiealle nachfolgen-
den Einbau- und Wartungshinweise.
Funktionsweise
ADMIRAL Compact wird elektronisch gesteuert und hat zwei
Funktionen:
· Zerkleinerung /Abfördern vonAbwasser als WC:
Die Einheit wird auf Knopfdruck eingeschaltet. Der
Spülvorgang beträgt 25 Sekunden.
· Entsorgung vonAbwasser eines Waschtischs:
Die Einheit schaltet sich automatisch ein. Die Dauer des
Spülvorgangs hängt von der Menge des zu entsorgenden
Abwassers ab.
Anwendungsbereich
Die Einheit ist zum Hausgebrauch bestimmt. Gewerblicher
Einsatz wird aus Zulassungsgründen nicht empfohlen. Die
integrierten Pumpe dient zum Entleeren des WC-Beckens
und hat die Möglichkeit das anfallende Abwasser eines
Waschtisches zu entsorgen.
Technische Daten
Max. Förderleistung vertikal 3m
Max. Förderleistung horizontal 30m
Ablaufdurchmesser 32mm
Motorleistung 800W
Fördermedientemperatur max. 35°C
Elektrische Einstufung I
Geräuschentwicklung 61dBA
Gewicht 26 Kg
Mitgeliefertes Zubehör (Abb. 4)
Masse (Abb. 5)
Leistungskurve (Abb. 6)
Installation
a) Bodenbefestigung (Abb. 7a)
Toilette provisorisch, ohne Bodenbefestigung am vorgesehenen Platz aufstellen.
Umfang des Sockels und genaue Position der Befestigungsbohrungen auf dem
Boden aufzeichnen. Anschließend die mitgelieferten Befestigungswinkel um 15mm
nach innen versetzt am Fußboden festschrauben.
Tipp:Bei der MontagedesADMIRALCompact empfiehltessich,das Gerät aufeine
leicht Silikonschicht zu montieren um Vibrationsgeräusche zu minimieren.
b) Vorbereiten derAbgangsleitung(Abb. 7b)
· Das Rückschlagventil H in den Förderstutzen einsetzen.
· Achten Sie darauf, dass sich die Klappe zur gleichen Seite hin öffnet wie die
Biegung desAblaufbogens I.
· Ablaufbogen I mit der Schelle C befestigen. 32er Rohr mit Schelle D befestigen.
Achtung: bei derAbgangsleitung handelt es sich um eine Druckleitung. Verwenden
Sie bitte ausschließlich zugelassenes Rohrmaterial (kein HT-Rohr verwenden!)
Achtung: Gummiförderstutzen weder knicken noch verdrehen (die Förderleistung
wird sonst stark verringert).
Achtung: Tiefpunkte in der Abgangsleitung vermeiden. Es bilden sich sonst
Ablagerungen, was die Förderleistung stark beeinträchtigt. Horizontale Leitungen mit
1%-Gefälle verlegen.
Achtung: Frostgefährdete Leitungen mit geeignetem Isoliermaterial schützen. Bei
längerer Abwesenheit Wasserzulaufhahn schließen. Bei eventuellem Frosteinbruch,
Frostschutzmittel in das WC-Becken gießen. Schließen Sie den Wasserzulauf und
betätigen Sie den Spülknopf. So gelangt das Frostschutzmittel in das Fördersystem.
Achtung: Planen Sie dieAbgangsleitung so unkompliziert wie möglich und verwen-
den Sie so wenig Winkel wie nur möglich, da jeder Winkel zu Lasten der
Förderleistung geht.
Tipp: Am tiefsten Punkt der Abgangsleitung ein Ablassventil vorsehen, so dass bei
eventuellen Wartungsarbeiten im Rohr stehendes Wasser abgelassen werden kann.
c) Waschtischanschluss (Abb.7c)
Falls Sie an die Einheit einen Waschtisch anschliessen möchten, so beachten Sie
bitte die Zeichnungen 1 bis 3
d) Wasserzuleitung (Abb. 7d)
Den flexiblen Druckschlauch an der Hinterseite des ADMIRAL Compact über das
Eckventil an die Wasserleitung anschließen.
Achtung: Die Qualität des Spülvorgangs ist vom Wasserdruck abhängig. Für einen
optimalen Spülvorgang sollte der Wasserdruck mindestens 1,7 bar betragen.
Tipp: In Gegenden mit stark kalkhaltigem Wasser, raten wir zum Einsatz eines
Filterelements zwischen Sperrventil und dem geräteseitigen Druckschlauch. So wird
das sensible Magnetventil, welches die Spülautomatik steuert, nicht beschädigt.
e) Elektroinstallation
Elektroinstallationen sind nach DIN/VDE Fachleuten vorbehalten. Die
Elektroinstallationdarferstnach abgeschlossenem EinbauIhresADMIRALCompact
erfolgen.
Die Steckdose ist vorschriftsmäßig anzubringen. Beachten Sie die Einhaltung der
Errichtungsnormen, wie z.B. DIN VDE 0100, Teil 701 (Feucht- und Nassräume,
Fehlerstromschutzschalter usw.) Unsere Geräte müssen über eine
Fehlerstromschutzeinrichtung (FI-Schutzschalter) mit einem Nennauslösestrom von
nicht mehr als 30mAversorgt werden.
D
SETMA(Deutschland) GmbH
Siemensstrasse 3
D-85716 Unterschleissheim
Tel. +49 (0)89 /317 1319
Fax +49 (0)89 /317 5766

Inbetriebnahme
Absperrhahn der Wasserzuleitung öffnen. Netzstecker in
die Steckdose stecken, Spülknopf betätigen. Vorgang
nach Ablauf des Spülvorgangs wiederholen. Jetzt den
Spülvorgang mit normalem Toilettenpapier einige Male
wiederholen.
Bei Waschtischanschluss: Lassen Sie Wasser in den
Waschtisch einlaufen. Das Gerät muss automatisch eins-
chalten.Spül-undAbwasseranschlüsseaufDichtheitprü-
fen.
Achtung: Alle Wasserzuläufe müssen absolut dicht sein.
Selbst geringe Tropfmengen haben ein ungewolltes
Anlaufen der Einheit zur Folge.
Benutzung
ADMIRAL Compact ist wie ein "normales" WC zu benut-
zen.
Achtung: wie ein normales WC ist auch der ADMIRAL
Compact nur zur Entsorgung von Fäkalien,
Toilettenpapier und Abwasser gedacht. Fremdstoffe wie
Watte, Tampons, Binden, Präservative, Öltücher,
Essensreste, Säuren, Lösungsmittel, Öle und ähnliche
Stoffe gehören in kein WC und ebenso nicht in den ADMI-
RAL Compact. Das Einleiten solcher Stoffe hat im
schlimmsten Falle einen Defekt der Einheit zur Folge.
Schäden und Folgeschäden die durch Fremdstoffe her-
vorgerufen werden, sind von der Garantie ausgeschlos-
sen.
Reinigungsmaßnahmen
Zum Reinigen des Gerätes handelsübliche WC-
Reinigungsmittel verwenden. Um Kalkablagerungen zu
vermeiden empfehlen wir regelmäßiges Entkalken wie
folgt: · Spülwasserzulauf schließen
· Spülknopf betätigen und Spülung ohne
Wasser durchführen
· Netzstecker ziehen
· 1l Entkalker oder Essig in das WC-Becken
gießen · 2 Stunden einwirken lassen
· Stromverbindung wiederherstellen
· Spülwasserzulauf öffnen
· 2-3 Spülungen zur Reinigung durchführen
Die Anzahl der Entkalkungen hängt von der Wasserhärte
ab. Wir empfehlen, bei normaler Wasserhärte, alle 6
Monate eine Entkalkung durchzuführen. Auf keinen Fall
Säure oder Chlorbleiche verwenden.
Tipps für ein langes Leben
· Regelmäßiges Reinigen
· nur normales Toilettenpapier benutzen, Feuchttoilettenpapiere lassen sich
durch die Ölbeschichtung nur sehr schlecht zerkleinern und können ein
Verstopfen derAnlage zur Folge haben
· Der Einsatz eines Kalkfilters ist sinnvoll.
· Bei längererAbwesenheit den Wasserzulauf unterbrechen
· Bei frostgefährdetem Einsatzort frostschützende Maßnahmen treffen
· Immer zuerst nach oben und dann seitwärts Fördern, da im anderen Falle
(z.B. diagonales Fördern) dieAnlage zu schwer arbeiten muss und der Motor
überhitzt.
Wenn's mal nicht so läuft wie's soll
In den meisten Fällen haben Funktionsstörungen nur geringe Ursachen die
Sie meist selbst beheben können. In der nachfolgenden Tabelle finden Sie
mögliche Fehlerursachen und Tipps zu deren Behebung. Für alle weitere
Probleme wenden Sie sich bitte unter der kostenlosen Rufnummer
(0800/317 13 19) an unseren Zentralkundendienst, der Ihnen kompetent wei-
terhelfen wird.
Achtung: Vor jedem Eingriff an dem Gerät den Netzstecker ziehen!!!!
Fehlfunktion Ursachen
Motor dreht,
Spülwasser gelangt
ins Gerät,
Wasserstand sinkt
nicht ab
Laute Geräusche
beim Betrieb
Gerät läuft aber kein
oder wenig
Wasserzulauf
·Die Siphonklappe (Teil
48) ist nicht mehr dicht
· Kanalisation ist vers-
topft
· Siebkorb (Teil 62) ist
verstopft
Fremdkörper im Gerät
· Magnetventil (Teil 28)
ist defekt
· Filter des Magnet-ven-
tils (Teil 28) ist verstopft
· Magnetventil austaus-
chen
· Filter vom Magnetventil
demontieren und reinigen
Abhilfe
· Reinigen oderAus-taus-
chen der Siphon-klappe
· Demontieren und
Reinigen
· Demontieren und
Reinigen
Demontieren,
Fremdkörper beseitigen
oder Zentralkundendienst
benachrichtigen
SETMA(Deutschland) GmbH
Siemensstrasse 3
D-85716 Unterschleissheim
Tel. +49 (0)89 / 317 13 19
Fax +49 (0)89 /317 5766
D
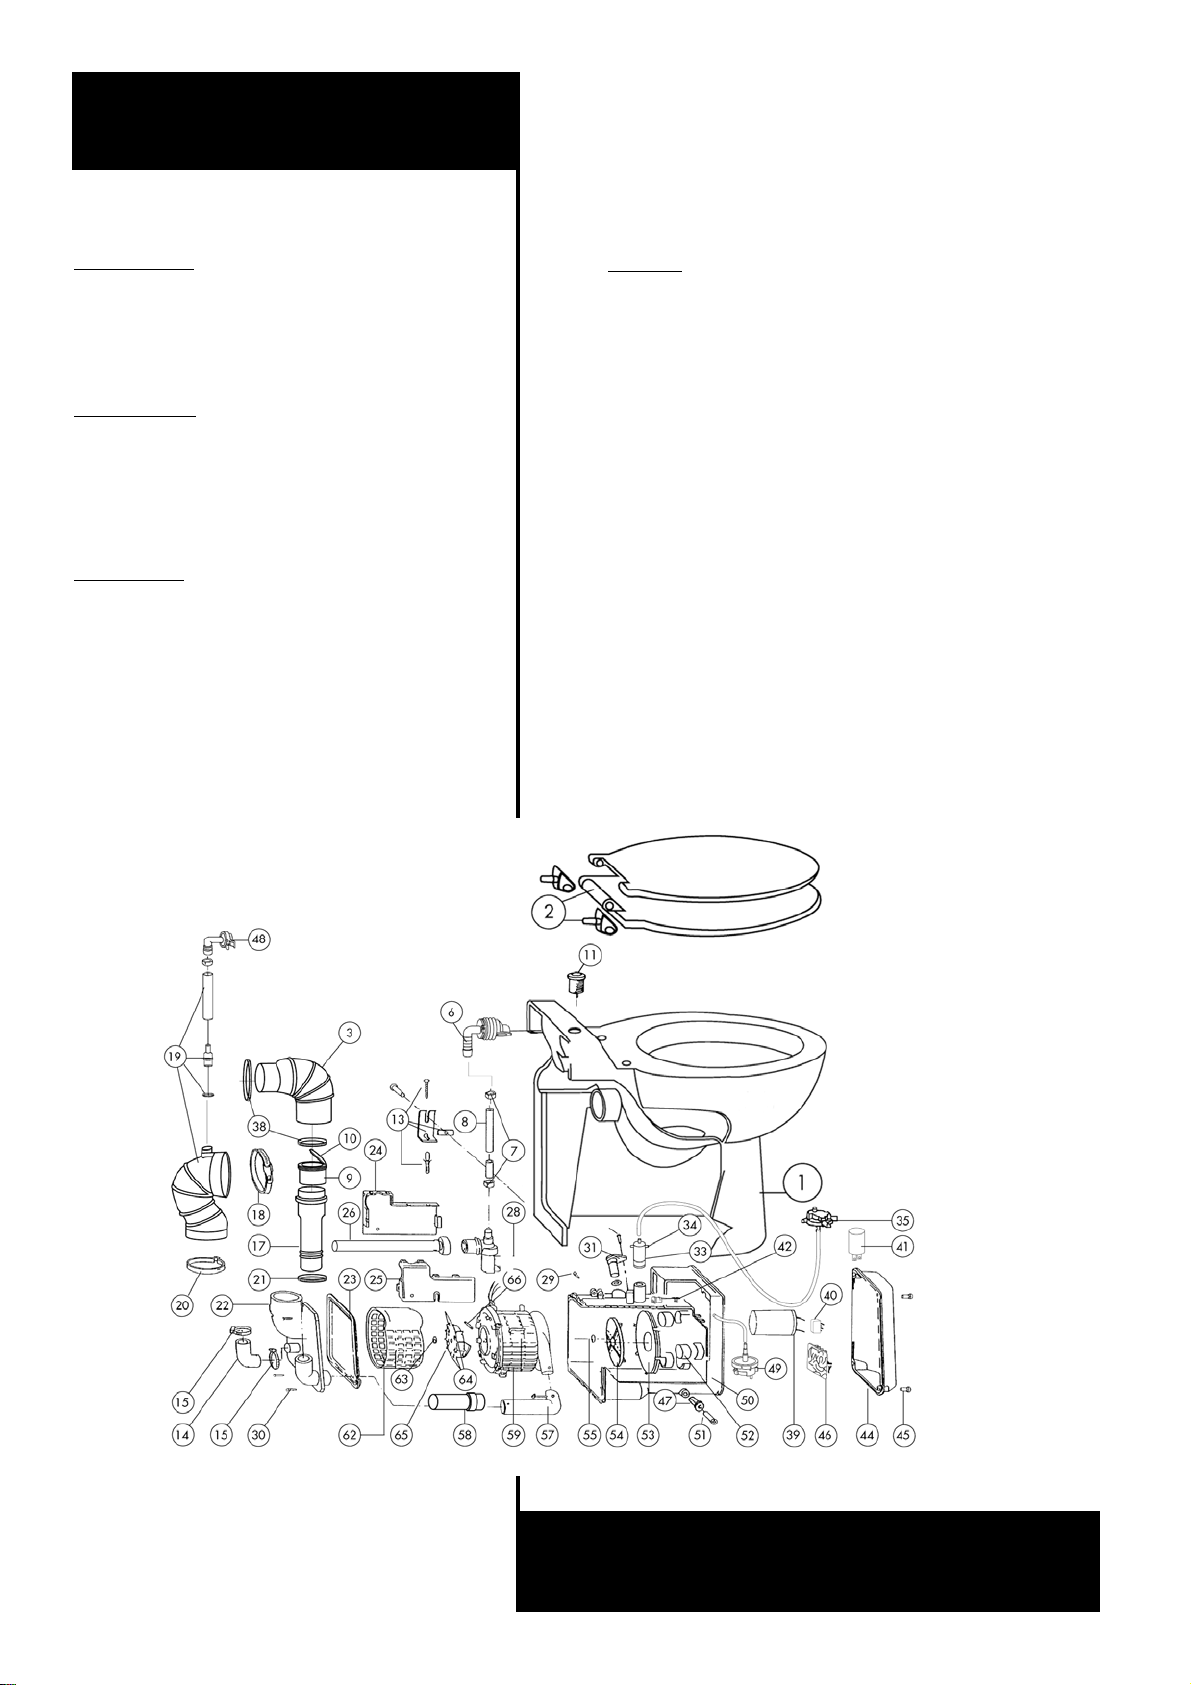
Ausbau des Gerätes
Keinerlei Reparaturen weder an der Netzzuleitung, Pressostat oder
Motor vornehmen. Bitte den Zentralkundendienst anrufen. Laut den
VDEVorschriftensind Reparaturen nur mit Spezialwerkzeug möglich.
Toilette demontieren:
· Netzstecker ziehen
· Sperrventil schließen und Wasserzulaufschlauch abschrauben
· seitliche Bodenbefestigungen lösen
· die 32mmAbflussleitung vomAbflussbogen I trennen
· Gerät nach vorne neigen und den Wasserrest ausgießen
Motor demontieren
· Motorgehäuseschrauben aufdrehen
· Verbindungsschlauch vom Spülknopf (Teil 11) trennen
· Spülwasserschlauch abziehen
· Schelle (Teil 20) am Verbindungsschlauch (Teil 19) zum
Geräteeinlauf (Teil 22) lösen.
· Motorblock aus der Keramik nehmen
Motor öffnen
· Deckelschrauben entfernen (Teil 30)
· Nachprüfen ob das Messerrad (Teil 64) frei dreht
Achtung: Verletzungsgefahr durch scharfe Messer
· Im Gehäuse befindliches Restwasser entleeren. Innenförderstutzen (Teil 57
und 58) reinigen.
· Deckeldichtung einfetten. Deckel aufsetzen und festschrauben.
· Gerät zusammenbauen.
Garantiebestimmungen
DerHersteller bietet eine zweijährige Garantie abKaufdatum.Ausschlaggebend
hierfür ist der Kaufbeleg.
Vorraussetzung für jeglichen Garantieanspruch sind fachmännischer Einbau,
produktgerechte, familiengemässe, nicht gewerbliche Nutzung derAnlage.
Die Garantie deckt weder Schadensersatzforderungen, Forderungen Dritter,
Schäden durch Selbstverschulden, Materialverschleiss, unsachgemässe
Wartung, noch Schäden durch höhere Gewalt oder Dritte. Schäden und
Folgeschäden die durch eine ständig einlaufende Sanitäreinheit (z.B. tropfender
Wasserhahn) verursacht werden, werden nicht von der Garantie abgedeckt. Die
Garantie erlischt automatisch, falls der Kunde ohne Zustimmung des Herstellers
Reparaturen oder Änderungen an der Einheit vornimmt oder vornehmen lässt.
SETMA(Deutschland) GmbH
Siemensstrasse 3
D-85716 Unterschleissheim
Tel. +49 (0)89 / 317 13 19
Fax +49 (0)89 /317 5766
D

Description
ADMIRAL Compact is a ready to install WC pan with an inte-
grated pump / macerator. The unit is for domestic use only.
Installed and used correctly, ADMIRAL Compact will give
consistent and reliable service.
Operation
ADMIRAL Compact is operated by an electronic programm.
It has 2 functions:
·ItwillmaceratetheWCwasteandpumpitawaytothedrain:
a push of the button will set in motion the 25 second cycle to
the above.
· It will pump away the waste water from a washbasin. In this
case, the motor will activate automatically when the water
enters.
Applications
The unit is for domestic use. Applications are discharge of a
WC and a washbasin. All other application and commercial
use are to proscribe.
Technical data
Max. vertical pumping 3m
Max. horizontal pumping 30m
Evacuation diameter 32mm
Normal power rating 800W
Medium water temperature 35°C
Electric class I
Noise level 61dBA
Net weight 26 Kg
Installation
a)Attaching the toilet to the floor (fig. 7a)
Find a suitable location, place the unit on the floor without attaching it. Mark the per-
imeterofthebowlonthefloorandmarkwherethebracket screws will be, (rear screw
holes). Remove the bowl. Measure 15mm inwards from the line and mount the L-
brackets on the floor.
Note: To reduce noise level when the toilet ist installed on a hard floor, you may want
to insert an insulating material between the floor and the bowl.
b) Connection of the discharge (fig. 7b)
· Push the plastic insert and rubber flap (H) down into the rubber discharge pipe until
it is flush with the lip.
· Point the non-return valve flap so that it opens in the direction of flow of the dis-
charge. Now place the discharge elbow over the flap assembly.
· Secure the base of the elbow (I) to the discharge pipe and non-return valve flap
assembly with the jubilee clip (C) provided.
Attention: Ensure that you do not twist the discharge pipework inside the unit.
Attention: The horizontal portion of the discharge pipe should be installed in a gra-
vity flow (at least 1%).Avoid any low parts in the discharge pipe.
Attention: Protect pipes against freezing with appropriate insulation. If the toilet is
installed in an unheated location during freezing periods protect it as follows:
- shut off the water supply
- activate one cycle without water
- pour antifreez in the bowl (2 liters)
-flush the toilet
Attention: Any bends in the discharge pipe run should be smooth radius bends. If
using plastic pipe, two 45 degree offsets can be used to form a smooth bend.
Note: We would recommend that a drain-off point is installed to allow the discharge
pipework to be drained down before any service work.
c) Connection of a washbasin (fig. 7c)
If you want to connect a washbasin to your ADMIRAL Compact unit, please refer on
fig. 1 to 3
d) Connection to the water supply (Abb. 7d)
Connect the water supply hose to a shut off valve.
Attention: For a correct rising, the water pressure should be at least 1.7 bar.
Note: In an area where the water is not pure, we advise you to add a filter between
the shut off valve and the toilet to prevent clogging of the solenoid valve.
e) Connection to the electrical supply
Electrical installations should be build by specialists. The electrical installation should
be installed after finishing the installation of your macerator unit.
The electrical installation must be in accordance with the current electrical code. The
product should be connected at all the times to the electrical supply.
GB
SETMA(Deutschland) GmbH
Siemensstrasse 3
D-85716 Unterschleissheim
Tel. +49 (0)89 /317 1319
Fax +49 (0)89 /317 5766
List of accessories included (fig. 4)
Dimensions (fig. 5)
Performance curve (fig. 6)

Commissioning of the unit
Connect the toilet to the electrical supply. Open the water
supply completely in order to have an efficient rising
stage. To activate the flushing cycle, push the button
mounted on the rear edge of the pan. Throw a few toilet
paper sheets in the bowl and start the cycle again.
Attention: The basin tap should be watertight. Any drip-
ping will cause the motor to activate in regular short
bursts.
Use
ADMIRAL Compact can be used like a "normal" WC and
does not require any special maintenance.
Warning: as a normal WC, ADMIRAL Compact should
only be used for the evacuating of normal human waste,
toilet paper and household WC cleansers. Damage may
occur to the machine if the following are disposed of via
the WC; cotton wool, tampons, sanitary towels, wet wipes,
kitchen towels, condoms as well as other fabric or hard
objects. Solvents, acids and other chemicals can also
cause damage to the unit, and will invalidate the warranty.
Warning: In case of a long electrical shut off (vacation,
strike, work being done on the electrical or water supply)
close the water supply.
Cleaning
To clean the bowl use regular bathroom cleaning products.
To avoid accumultions of scale inside the motor, we advise
you to clean it regularly.To do so:
· Shut off water supply
· Flush the toilet
· Pour one liter of bathroom cleaning product
or (vinegar) in the bowl.
· Leave sit for a few hours
· Open water supply and flush the toilet
several times.
The frequency of cleaning depends on the hardness of the
water in your area. We advise you to do it at least once a
year. Do not put acids, caustic sodas or solvents down
ADMIRAL Compact.
For a long life of your unit...
· Regular cleaning
· Please use only normal toilet paper. Humidified paper might block the mace-
rating unit.
· The use of a filter between shut off valve and the toilet is not useless.
· In case of longer absence (holidays) close the water supply
· First vertical and the horizontal discharge. Otherwise (or diagonal) evacua-
tion may damage the motor unit.
Fault finding / Remedies
For the most part any inconsistencies in the operation of the unit will be minor
and easily rectified. Please refer to the chart below.If the problem cannot be
easily remedied in this way, please call our service organisation.
Warning: Alwaysdisconnect the electricity supply before attempting any work
on the unit !!!
Symptom Possible Cause
The flushing cycle
activates normally, the
motor turns, but the
water leaves the pan
slowly or not at all
The motor activates
with a mechanical /
rattling sound
The cycle starts, but
water enters into the
pan too slowly or not
at all.
·The one way valve
(48) is not operating
normally
· The discharge pipe is
blocked
· The grille (62) is bloc-
ked
Aforeign object has
entered the blade / grille
area (65/62)
· water inlet filter on
electrovalve (28) bloc-
ked.
· The electrovalve is
defective.
· Remove and clean the
filter
· Replace the electrovalve
Remedy
· Clean or replace valve
· Remove and clean
· Remove and clean
Remove the motor block,
take out the foreign object
through the opening in
motor cover (22). If
unsuccessful, dismantle.
SETMA(Deutschland) GmbH
Siemensstrasse 3
D-85716 Unterschleissheim
Tel. +49 (0)89 / 317 13 19
Fax +49 (0)89 /317 5766
GB
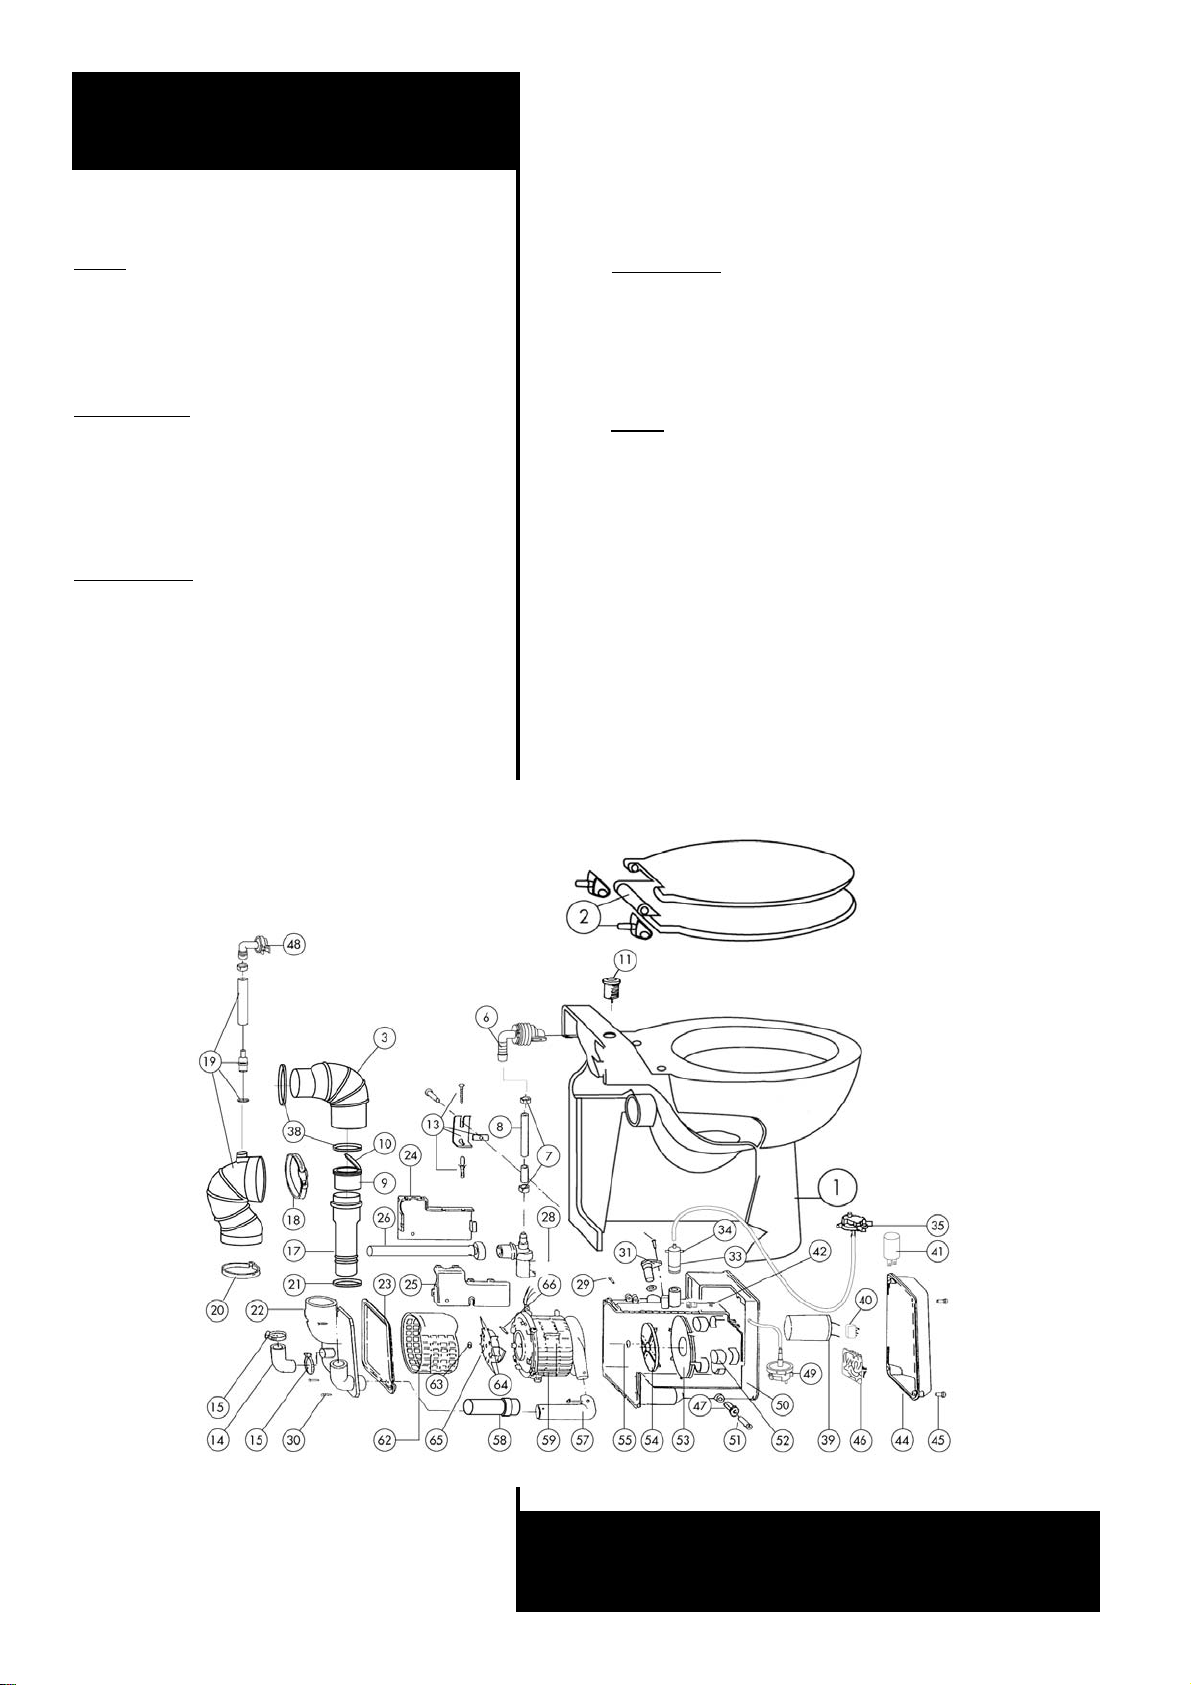
Removal
Any service work involving electrical components should only be car-
ried out by a recognised service engineer. In any case please call the
service hotline.
Removing the bowl:
· Shut off water supply and disconnect.
· Unscrew the bracket screws on the back of the toilet.
· Release the discharge pipe from discharge elbow (I)
· Incline the toilet frontwards and drain residual water into a bucket in
order to empty the toilet.
Removing the motor
· Remove the side screws which hold the motor case
· Remove the clear hose from the pneumatic push button (11)
· Remove the water supply hose (6)
·Unscrewthegear clamp (20)betweentheelbowandthe case ofthe
motor.
· Remove the motor from the bottom of the toilet.
Opening the motor
· Remove the screws to release the lid on the motor case (30)
· Check out that the shaft is rotating properly
Warning: the knives are very sharp
· Proceed with cleaning if needed
· Grease the cover gasket before reinstalling.
Warranty
Your ADMIRAL Compact has a two year warranty from its day of pur-
chase, subject to correct installation and usage.
SETMA(Deutschland) GmbH
Siemensstrasse 3
D-85716 Unterschleissheim
Tel. +49 (0)89 / 317 13 19
Fax +49 (0)89 /317 5766
GB
Table of contents
Languages:
Other Setma Toilet manuals


Popular Toilet manuals by other brands

Alpha Bidet
Alpha Bidet UX-T Pearl manual

Uspa
Uspa Everclean A7 Operating instructions manual

Kohler
Kohler K-3489 Series Installation and care guide

Schell
Schell EDITION ND 02 815 06 99 Assembly and installation instructions

fine fixtures
fine fixtures MOTB17 installation instructions

American Standard
American Standard FUNZIONALE Series Product Cut Sheet

DURAVIT
DURAVIT SensoWash Slim operating instructions

Schell
Schell 01 028 28 99 Assembly instructions

Kohler
Kohler STRUKTURA K-5888T installation instructions

Cinderella
Cinderella Motion user manual

Swiss Madison
Swiss Madison SM-WT442 installation instructions

MAX RANGER
MAX RANGER 11593 instruction manual


