manuals.online logo
Brands
  1. Home
  2. •
  3. Brands
  4. •
  5. FV
  6. •
  7. Toilet
  8. •
  9. FV E158-E User manual

FV E158-E User manual

FV se reserva el derecho de modificar,
cambiar, mejorar y/o anular materiales,
productos y/o diseños sin previo aviso.
MEDIDAS SUGERIDAS PARA LA INSTALACIÓN (en cm):
Código:
Asegúrese que la persona que vaya a instalar el
producto
sea un profesional en la materia, para
prevenir
errores que afecten las instalaciones o
el correcto funcionamiento del producto
.
Realice
los ajuste del sanitario UTILIZANDO
una
herramienta adecuada para que la
s
uperficie y el acabado del producto no se raye
o lastime.
Recuerde
que todos los productos tienen un
mecanismo
de control que debe ser revisado y
cambiado
de ser necesario, ya que este puede
deteriorarse debido a la frecuencia de uso.
To
prevent any error that may affect the facilities
or
the correct functioning of the product, make
sure
that the person who is going to install the
p
roduct is a professional. Install the product
u
sing suitable tools, so that it is not scratched.
Remember
that all products have a control
mechanism that must be reviewed and changed
if
necessary, since it can deteriorate due to the
frequency of use.
RECOMENDACIONES:
RECOMMENDA
TIONS:
MEDIDAS / MEASURES:
Dimensiones en milímetros / Dimensions in millimeters
Dimensiones en pulgadas / Dimensions in inches
680
26-3/4”
410
16-1/8”
400
15-3/4” 730
28-3/4”
150 5-1/2”
190 7-1/2”
5-9/16”
421
16-19/32”
354
13-15/16”
141
141
141
LEA LAS INSTRUCCIONES COMPLETAMENTE ANTES DE INSTALAR / READ ALL INSTRUCTIONS BEFORE EXECUTING ANY WORK
INSTALACIÓN CON ACOPLE: EMPAQUE HP.01.157 Y TUBO DE PVC
CAMPANA 369.01.30 / COUPLING INSTALLATION
INSTRUCCIONES DE INSTALACIÓN/ INSTALLATION INSTRUCTIONS:
E157.1-COLOR
E101.08-COLOR
E102.17
E113.2.2
E113.2.1
acometida de agua /
water connection
desagüe del inodoro /
toilet draining
agujeros para fijación /
fixation holes
perno de fijación /
fixation bolt screw
15 cm
15 cm
19 cm
piso terminado /
finished floor
pared terminada /
finished wall
15 cm
19 cm
acometida de agua /
water connection
desagüe del inodoro /
toilet drain
1. Realice la acometida de agua y el desagüe de acuerdo a las medidas sugeridas
en el gráco.
Build the water supply and drainage according to the measures suggested in
the graph.
3. Retire el inodoro para perforar. Coloque los tacos y pernos de jación EPEC-
DH-BL (no incluidos).
 RemovethetoilettodrillandttheEPER-DH-BLttingplugs(notincluded)in
ordertoattachthetoilettotheoor.
2. Verique la alineación del inodoro respecto de la pared y marque en el piso los
oricios para su jación
 Checkthealignmentofthetoilettothewall,andmarktheholesintheoorto
mount the product correctly.
• Blanco / White : BL
• Bone / Bone : BO
• Otros colores pueden estar disponibles para
otros mercados. / Other colors available
depending on the market.
Colores Disponibles/
Available Colors:
E158-E
Inodoro P- Trap Parma Plus / P-Trap Toilet Parma Plus
4. Coloque silicona alrededor del tubo campana
como indica el gráfico 1.
Put silicone around of the pipe bell as shown in
the graph 1.
Una el tubo campana con el empaque como
indica el gráfico 2.
Combine the pipe bell with the seal as shown in
the graph 2.
1
tubo campana
empaque
2
Coloque silicona al rededor de la salida del
desagüe (gráfico 3).
 Putsiliconearoundoftheexitofthetrap,(graph
3).
3
Fecha: 2020 - 08 - 06
FV - ÁREA ANDINA S.A. se reserva el derecho de modificar, cambiar, mejorar y/o anular materiales, productos y/o diseños sin previo aviso.
FV Responde
Centro de atención al usuario
ECUADOR
1-800 FV FV FV (1-800 38 38 38)
fvresponde@fvecuador.com
info.colombia@grupofv.comCOLOMBIA
info.peru@grupofv.com
PERÚ
info.cea@grupofv.com
CENTROAMÉRICA
Encuentre
Repuestos Legítimos FV y
la Garantía Total FV en:
www.fvandina.com
Encuentre
Repuestos Legítimos FV y
la Garantía Total FV en:
www.fvandina.com
NTE INEN 3123
Sello de Calidad
Instituto Ecuatoriano de Normalización
NTE INEN 3082
Sello de Calidad
Sanitarios
Instituto Ecuatoriano de Normalización
ref.: E266.02 DH CR
(no incluida) /
(not included)
7. Selle la unión entre el inodoro y el piso con un cordón de silicona.
 Sealtheconnectionbetweenthetoiletandoorwithaofsiliconecord.
9. Instale el herraje al tanque (ver
instrucciones en su embalaje).
Coloque el empaque espumoso
en la salida del herraje. Alinee el
tanque sobre el inodoro y fíjelo
con los pernos de sujeción.
 Install the tank ttings (see in-
structions in the packaging).
Place the foam packing in the
tting’send.Alignthe tankover
the toilet and secure with the
bolts.
10.Conecte la válvula de ingreso del tanque a la acometida de agua mediante una
llave angular FV con manguera exible, ref.: E266.02 DH CR (no incluida).Por
último, coloque el asiento en el inodoro.
 ConnectwatersupplytothetoiletvalveusingaF.V.anglebracketwithexible
hose ref. E266.02 DH CR, (notincluded).
IMPORTANTE:
Antes de conectar la válvula de entrada a la acometida de agua verique que la
tubería de alimentación esté limpia, libre de impurezas y residuos de construcción.
IMPORTANT:
Beforeconnectingthellvalvetothewatersupply,checkthateverypieceisclean,
impurity and construction debris.
nivel de agua
recomendado
(marca superior)
/
recommended
water level
(upper mark)
NIVEL DE AGUA
ESTANDAR
11.Coloque la manguera de la válvula
de entrada según se indica en el grá-
co. No la conecte al rebosadero.
 Placetherelltubeasshownonthe
graph,notinsideoftheoverowtube.
12. Cuando regule el herraje el
agua debe llegar hasta la
marca superior del interior
del tanque.
 After regulating the ttings,
water in the tank should
reach the level marked in
the tank.
Nota: el exceso de ajuste de la tuerca B
puede causar la ruptura de la válvula de
ingreso A.
Note: Over fitting tightening of the screw
B, can cause rupture of the inlet valve A.
A
B
Encuentre
Repuestos Legítimos FV y
la Garantía Total FV en:
www.fvandina.com
Encuentre
Repuestos Legítimos FV y
la Garantía Total FV en:
www.fvandina.com
NTE INEN 3123
Sello de Calidad
Instituto Ecuatoriano de Normalización
NTE INEN 3082
Sello de Calidad
Sanitarios
Instituto Ecuatoriano de Normalización
Encuentre
Repuestos Legítimos FV y
la Garantía Total FV en:
www.fvandina.com
Encuentre
Repuestos Legítimos FV y
la Garantía Total FV en:
www.fvandina.com
NTE INEN 3123
Sello de Calidad
Instituto Ecuatoriano de Normalización
NTE INEN 3082
Sello de Calidad
Sanitarios
Instituto Ecuatoriano de Normalización
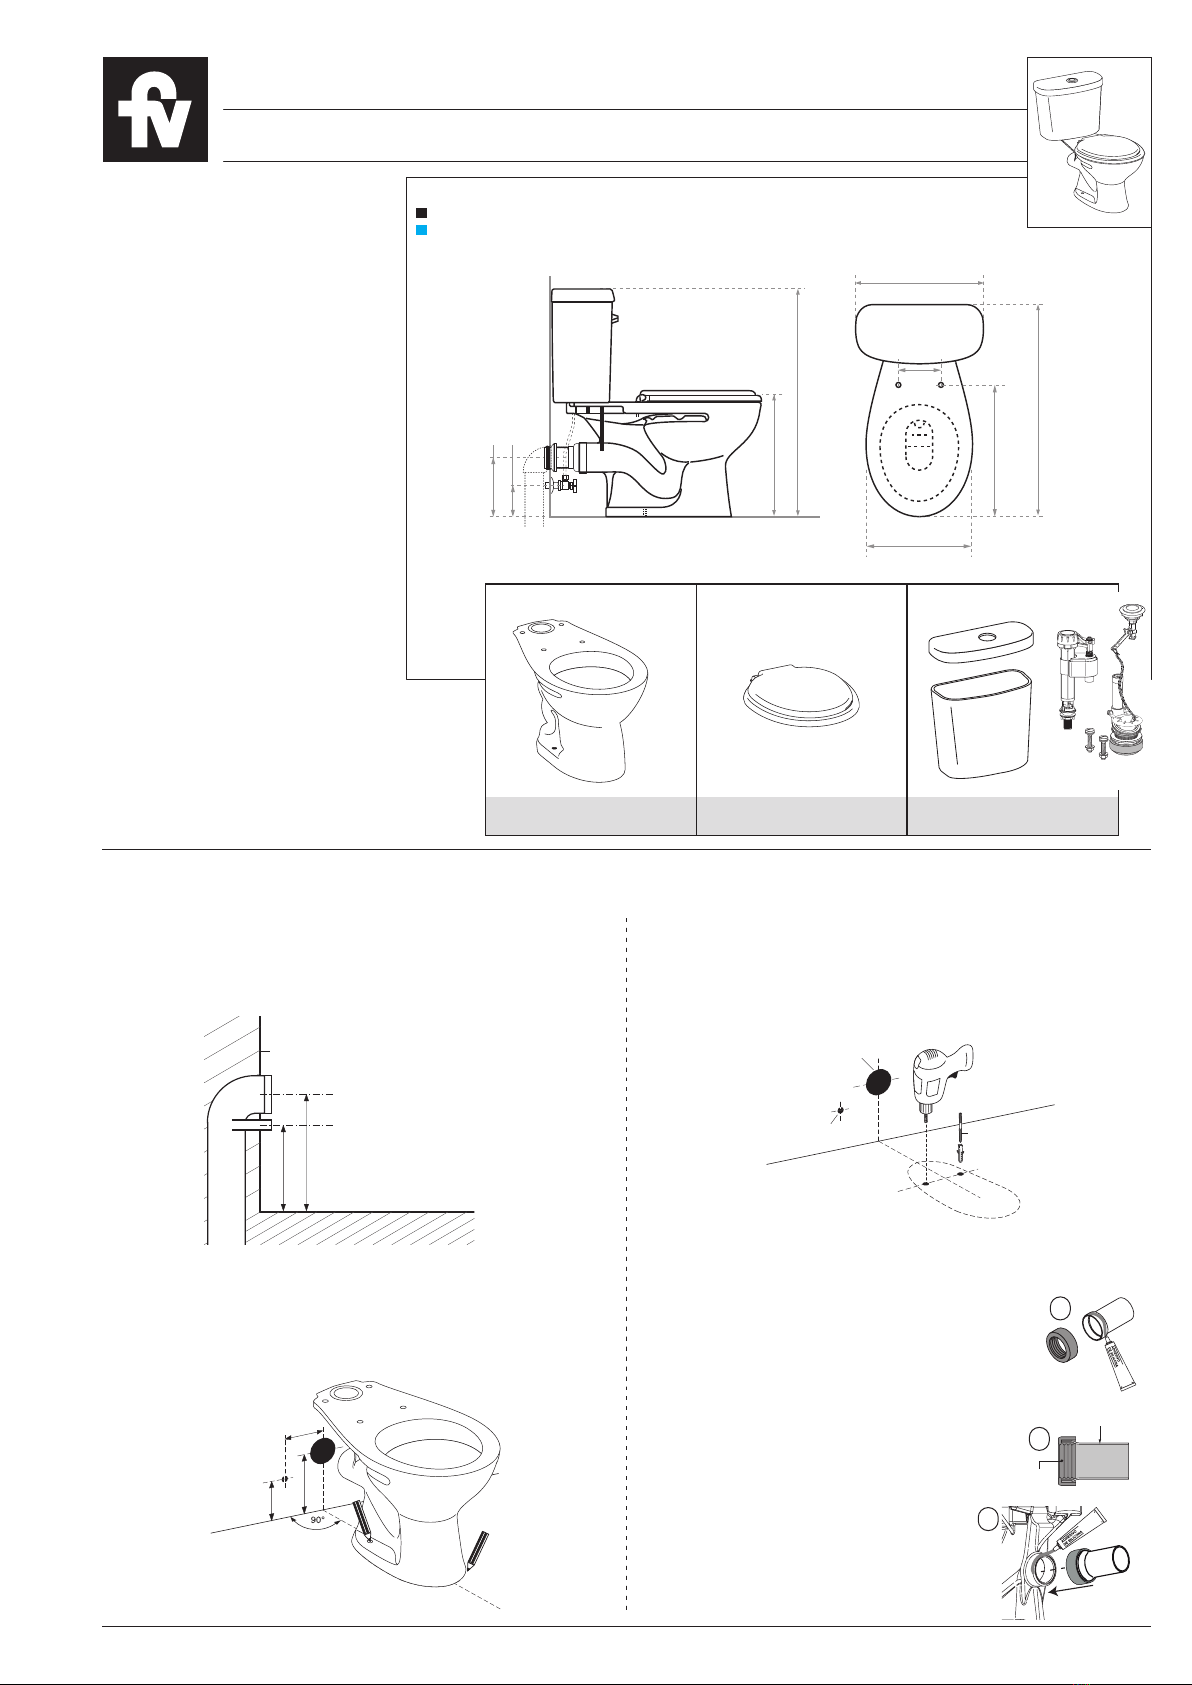
Nota: No es recomendable usar cemento mortero en la base del inodoro. La
Garantía FV no cubre inodoros instalados con mortero.
Antes de instalar el tanque verifique que la tubería de alimentación este limpia y libre
de impurezas y residuos de construcción.
Note: It is not advisable to use cement in the base of the toilet. The warranty doesn't
cover toilets installed with cement.
Before installing the tank, verify that the feeding pipe is clean and free of sludge and
construction residuals.
Acoplar los dos dispositivos (tubo campana +
empaque), hasta que ingrese completamente
(gráfico 4).
Toconnecttwodevices(pipebell+seal),until
itenterscompletely(graph 4).
4
tirafondos /
toilet screws
6. Instale el inodoro, use pega para PVC para unir el tubo campana con el de-
sagüe, nivélelo y fíjelo con los tirafondos.
Install the toilet, use PVC glue to attach the tube to the drain bell pipe, level and
secureittotheoorwithscrews.
5. Marque en el tubo campana al ras del inodoro (gráfico a).
Añada la distancia X obtenida en el paso 4 (gráfico b).
Corte el tubo si es necesario (gráfico c).
Mark the bell pipe as shown in graphic a. Add the distance you recorded in step
4(graphicb).Finallycutthepipeifnecessary(graphc).
x
x
x
x
x
x
a b c
suggested coupling type
(not included)
tipo de acople sugerido
(no incluido) /
cód.: E157.10
8. Conecte el inodoro al desagüe usando el conector para inodoro P-Trap cód.:
E157.10 (no incluido), coloque silicona entre el acople y el desagüe.
 Attachthetoilettothedrainvalveusingaexibleconnectorcode E157.10 (no
incluided),placesiliconebetweenthecouplingandthedrain.

Other FV Toilet manuals

FV E181 User manual

FV

FV E181 User manual

FV E149 User manual

FV

FV E149 User manual

FV E192 User manual

FV

FV E192 User manual

FV E149 User manual

FV

FV E149 User manual

FV Parma E157 User manual

FV

FV Parma E157 User manual

FV Ischia Plus User manual

FV

FV Ischia Plus User manual

FV Roma E113-E User manual

FV

FV Roma E113-E User manual

FV Ginebra E152 User manual

FV

FV Ginebra E152 User manual

FV E158-E User manual

FV

FV E158-E User manual

FV E193 User manual

FV

FV E193 User manual

FV A115-S User manual

FV

FV A115-S User manual

FV Ischia Elongado E187 User manual

FV

FV Ischia Elongado E187 User manual

FV E470 User manual

FV

FV E470 User manual

FV E183 User manual

FV

FV E183 User manual

FV E113 User manual

FV

FV E113 User manual

FV PARMA E157 User manual

FV

FV PARMA E157 User manual

FV New Greco 4.8 LPF User manual

FV

FV New Greco 4.8 LPF User manual

FV Ginebra E149 User manual

FV

FV Ginebra E149 User manual

FV Apolo E182 User manual

FV

FV Apolo E182 User manual

FV Ischia Plus E181 User manual

FV

FV Ischia Plus E181 User manual

FV Liber E168 User manual

FV

FV Liber E168 User manual

FV E165 User manual

FV

FV E165 User manual

FV Victoria E170 User manual

FV

FV Victoria E170 User manual

FV E122 User manual

FV

FV E122 User manual

Popular Toilet manuals by other brands

KELISS T162A Series instruction manual

KELISS

KELISS T162A Series instruction manual

WimTec MULTI 2 Assembly and operating instructions

WimTec

WimTec MULTI 2 Assembly and operating instructions

Wostman EcoFlush Troubleshooting

Wostman

Wostman EcoFlush Troubleshooting

Agua TABORA manual

Agua

Agua TABORA manual

SFA SaniCompact Star installation instructions

SFA

SFA SaniCompact Star installation instructions

Project Source MT-39201 manual

Project Source

Project Source MT-39201 manual

Scarabeo Moon 5522 manual

Scarabeo

Scarabeo Moon 5522 manual

TUSHY TUSHY SPA quick start guide

TUSHY

TUSHY TUSHY SPA quick start guide

Glacier bay N2428R Use and care guide

Glacier bay

Glacier bay N2428R Use and care guide

Toto CT447CFG01 installation manual

Toto

Toto CT447CFG01 installation manual

DURAVIT SensoWash 2129590000 Mounting instructions

DURAVIT

DURAVIT SensoWash 2129590000 Mounting instructions

Kohler K-3900X-2 Homeowner's guide

Kohler

Kohler K-3900X-2 Homeowner's guide

Dometic 310 Series instruction manual

Dometic

Dometic 310 Series instruction manual

Cinderella CLASSIC maintenance

Cinderella

Cinderella CLASSIC maintenance

Dometic CT 4110 operating manual

Dometic

Dometic CT 4110 operating manual

Thetford C260 Cassette Toilet user manual

Thetford

Thetford C260 Cassette Toilet user manual

Geberit AQUACLEAN MERA COMFORT user manual

Geberit

Geberit AQUACLEAN MERA COMFORT user manual

agape 750 ACER0750WRRS Assembly instructions

agape

agape 750 ACER0750WRRS Assembly instructions

manuals.online logo
manuals.online logoBrands
  • About & Mission
  • Contact us
  • Privacy Policy
  • Terms and Conditions

Copyright 2025 Manuals.Online. All Rights Reserved.