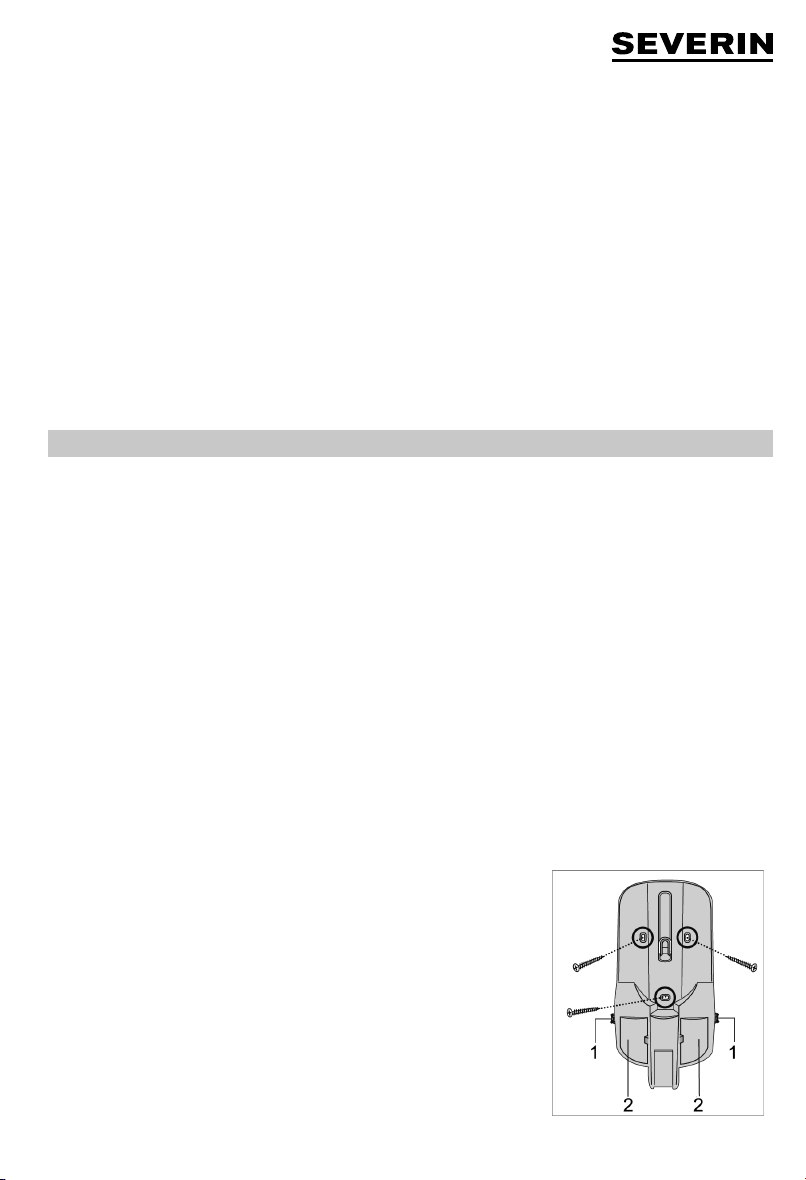
SEVERIN HV 7155 User manual

2in1-Handsauger 4
2in1 Hand-held/Upright Vacuum Cleaner 12
Aspirateur 2 en 1 : balai et main 20
2in1-handzuiger 28
Aspiradora de mango 2 en 1 36
Aspirapolvere a mano 2 in 1 44
2-i-1-håndstøvsuger 52
2 i 1-handdammsugare 60
2in1-varsi-imuri 68
Aspirador manual 2 em 1 76
Odkurzacz ręczny 2w1 84
Σκουπάκι χειρός 2 σε 1 92
142 x 208 mm
ART.-NO. HV 7155
DE Gebrauchsanleitung
GB Instructions for use
FR Mode d’emploi
NL Gebruiksaanwijzing
ES Instrucciones de uso
IT Manuale d’uso
DK Brugsanvisning
SE Bruksanvisning
FI Käyttöohje
PT Manual de instruções
PL Instrukcja obsługi
GR Oδηγίες χρήσεως

2
142 x 208 mm
6
5
4
7
8
9
3
2
1
10
13
11
12

3
142 x 208 mm
Technische Daten / Technical Data / Caractéristiques techniques / Technische gegevens /
Datos técnicos / Dati tecnici / Tekniske data / Tekniska data / Tekniset tiedot /
Dados técnicos / Dane techniczne / Τεχνικά χαρακτηριστικά
Art.Nr. / Item no. / Art. nº / Art.nr. / Nr. º Art. / Num. art. /
Artikelnr. / Art.nr. / Tuotenro / N.º Art.º / Nr art. / Αρ. πρ. HV 7155
Netzteil Input / Power supply Input / Entrée du bloc d’alimentation / Netvoeding ingang /
Entrada de fuente de alimentación / Ingresso alimentatore / Strømforsyning input / Nätdel Input /
Verkko-osan tulo / Entrada de alimentação / Zasilacz Input / Είσοδος τροφοδοτικού
100-240 V~
50-60 Hz
0.8 A
Netzteil Output / Power supply Output / Sortie du bloc d’alimentation / Netvoeding uitgang /
Salida de fuente de alimentación / Uscita alimentatore / Strømforsyning output / Nätdel Output /
Verkko-osan lähtö / Saída de alimentação / Zasilacz Output / Έξοδος τροφοδοτικού
25 V⎓/ 29 V⎓
500 mA
Gewicht / Weight / Poids / Gewicht / Peso / Peso / Vægt / Vikt / Paino / Peso / Waga / Βάρος 2,6 kg
Akku / Battery / Batterie / Accu / Acumulador / Batteria /
Batteri / Ackumulator / Akku / Bateria / Bateria / Μπαταρία
21,6 V⎓
2000 mAh
43,2 Wh
Nur verwenden mit Netzteil / Use only with the power supply unit /
N’utilisez l’appareil qu’avec le bloc d’alimentation /
Alleen gebruiken met netvoeding /
Utilícela únicamente con fuente de alimentación /
Da utilizzare solo con l’alimentatore / Må kun anvendes med strømforsyning /
Används bara med nätdel / Käytä vain verkko-osan kanssa /
Utilizar apenas com fonte de alimentação / Stosować wyłącznie z zasilaczem /
Να χρησιμοποιείται μόνο με το τροφοδοτικό
MC2805B-B
MC2805B-V

4
142 x 208 mm
2in1-Handsauger
Liebe Kundin, lieber Kunde,
die Gebrauchsanweisung sorgfältig vor der Benutzung des Gerätes durchlesen und für den weiteren Gebrauch
aufbewahren. Das Gerät darf nur von Personen benutzt werden, die mit den Sicherheitsanweisungen vertraut sind.
Sicherheitshinweise
Bestimmte Personengruppen
∙Dieses Gerät kann von Kindern ab 8 Jahren und von Personen mit verminderten
körperlichen, sensorischen oder geistigen Fähigkeiten oder Mangel an Erfahrung
und/oder Wissen bedient werden, wenn sie beaufsichtigt werden oder auf den
sicheren Gebrauch des Geräts hingewiesen wurden und die damit verbundenen
Gefahren kennen.
∙Kinder dürfen nicht mit dem Gerät spielen oder sich auf das Gerät stellen oder
setzen.
∙Reinigung und Benutzer-Wartung dürfen nicht durch Kinder ohne Beaufsichtigung
durchgeführt werden.
∙Kinder unter 8 Jahren müssen vom Gerät sowie vom Netzteil ferngehalten werden.
∙Verpackungsmaterial darf nicht zum Spielen verwendet werden. Es besteht
Erstickungsgefahr.
Gerät sicher anschließen
Das Gerät wird mit elektrischem Strom aufgeladen, dabei besteht grundsätzlich die
Gefahr eines elektrischen Schlags.
Deshalb:
∙Gerät und Netzteil vor dem Benutzen auf eventuelle Beschädigungen kontrollieren.
Niemals ein defektes Gerät oder ein Gerät mit defektem Netzteil betreiben.
∙Netzteil nur an Steckdosen anschließen, die den Angaben auf dem Typenschild
des Netzteils entsprechen.
∙Um Gefährdungen zu vermeiden und um Sicherheitsbestimmungen einzuhalten,
dürfen Reparaturen am Gerät und am Netzteil nur durch unseren Kundendienst
durchgeführt werden. Daher im Reparaturfall unseren Kundendienst telefonisch
oder per Mail kontaktieren (siehe Service-Adressen im separaten Garantieheft oder
auf www.severin.de).
∙Gerät oder Netzteil nicht in Wasser oder andere Flüssigkeiten tauchen oder mit
Flüssigkeiten behandeln. Gerät und Netzteil von Regen und Nässe fernhalten.
Gerät und Netzteil nicht im Freien oder in Räumen mit hoher Luftfeuchtigkeit
betreiben.
DE

5
142 x 208 mm
∙Gerät und Netzteil nicht mit nassen Händen anfassen. Beim Herausziehen des
Netzteils aus der Steckdose immer direkt am Netzteil ziehen.
∙Darauf achten, dass das Kabel des Netzteils nicht geknickt, eingeklemmt oder
überfahren wird oder mit Hitzequellen, Feuchtigkeit oder scharfen Kanten
in Berührung kommt. Darauf achten, dass das Kabel des Netzteils nicht zur
Stolperfalle wird.
∙Vor dem Reinigen oder Warten des Geräts sowie vor dem Zubehörwechsel Gerät
ausschalten und sicherstellen, dass das Netzteil nicht angeschlossen ist.
Sicherheit beim Umgang mit Akkus
∙Bei falschem Umgang mit Akkus besteht Verletzungs- und Explosionsgefahr.
∙Akku niemals durch andere Akkus oder Batterien ersetzen. Ausschließlich
baugleiche Akkus verwenden. Akkus niemals kurzschließen, d.h. nicht die Pole zur
gleichen Zeit berühren, insbesondere nicht mit elektrisch leitenden Gegenständen.
Akkus so lagern, dass sie auch bei der Lagerung nicht durch andere Akkus oder
Metallgegenstände kurzgeschlossen werden.
∙WARNUNG! Zum Auaden des Akkus ausschließlich das mitgelieferte Netzteil
verwenden (siehe Technische Daten). Den Akku keinesfalls mit einem anderen
Netzteil laden. Das mitgelieferte Netzteil wiederum ausschließlich zum Auaden
des Akkus verwenden.
∙Akku nach Gebrauchsende wie beschrieben ausbauen. Akku danach umgehend
an eine entsprechende Sammelstelle in Ihrer Nähe übergeben und so einer
sicheren und umweltgerechten Entsorgung zuführen. Akku niemals über den
Hausmüll entsorgen.
∙Vor dem Ausbauen des Akkus sicherstellen, dass das Netzteil aus der Steckdose
gezogen ist.
∙Wenn das Gerät für einen längeren Zeitraum ungenutzt gelagert wird, sollte der
Akku entfernt und separat gelagert werden.
∙Akku niemals auseinandernehmen, hohen Temperaturen aussetzen oder ins Feuer
werfen.
∙Bei unsachgemäßem Umgang kann Flüssigkeit aus dem Akku austreten. Akku
nicht länger verwenden, wenn er beschädigt ist oder gar Flüssigkeit austritt.
- Falls Flüssigkeit ausgetreten ist, Kontakt mit der Flüssigkeit vermeiden.
- Falls es zu Kontakt mit der Flüssigkeit gekommen ist, diese umgehend mit
reichlich Wasser abspülen. Bei Folgeerscheinungen (egal welcher Art) einen Arzt
aufsuchen.

6
142 x 208 mm
Rotierende Bürstwalze
∙Das Gerät besitzt in Boden- und Polsterdüse eine angetriebene Bürstwalze. Diese
kann Verletzungen hervorrufen. Daher Folgendes beachten:
∙Vor jeder Reinigung oder Wartung des Geräts sicherstellen, dass das Gerät
ausgeschaltet ist und nicht lädt.
∙WARNUNG! Darauf achten, dass zu keiner Zeit Körperteile unter die Bürstwalze
gelangen können.
∙Nicht in der Nähe von Kabeln, Leitungen und langen Fransen saugen. Zum einen
besteht die Gefahr, dass die Kabelisolierung beschädigt wird. Zum anderen
können sich diese Gegenstände in der Bürstwalze verfangen und so das Gerät
beschädigen.
LED-Beleuchtung
∙An der Bodendüse sind LEDs verbaut, die den Arbeitsbereich vor der Bodendüse
ausleuchten.
∙Während des Betriebs nicht in die LEDs blicken.
∙Ein Austausch der LEDs ist nicht möglich.
Bestimmungsgemäße Verwendung
∙Das Gerät darf nur im Haushalt eingesetzt werden.
∙Das Gerät darf ausschließlich für das Reinigen auf ebenen, normal verschmutz-
ten Oberächen, kurzorigen Teppichen oder Polstern eingesetzt werden, die den
Belastungen der rotierenden Bürste unbeschadet standhalten.
∙Das Gerät darf nur mit dem dazugehörigen Akku (siehe Technische Daten) und
Zubehör verwendet werden.
∙Jede weitere Verwendung gilt als nicht bestimmungsgemäß und ist untersagt.
Um Verletzungen, Bränden und Schäden vorzubeugen, darf das Gerät nicht
eingesetzt werden für das Saugen von:
∙Menschen, Tieren oder Panzen. Gerät stets von sämtlichen Körperteilen, Haaren
und Kleidungsstücken (z.B. Schnürsenkeln) fernhalten. Nicht in Kopfnähe saugen.
∙glühenden, brennenden oder glimmenden Partikeln (wie z. B. Asche, Kohle,
Holzkohle, Zigaretten, Streichhölzer).
∙explosiven oder leicht entzündlichen Stoffen oder Toner.
∙Wasser und anderen Flüssigkeiten, z. B. feuchten Teppichreinigern.
∙spitzen Gegenständen wie Glassplittern, Nägeln oder Bauschutt.
∙Feinstaub wie Gips, Zement, feinster Bohrstaub, Puder.

7
142 x 208 mm
Verboten ist außerdem:
∙Selbstständiges Umbauen oder Reparieren des Geräts oder des Netzteils.
∙Hineinstecken von Gegenständen in Öffnungen des Geräts. Hiervon ausge-
nommen ist das dafür vorgesehene Zubehör.
∙Gebrauch, Aufbewahrung oder Auaden im Freien.
∙Abdecken der Lüftungsschlitze am Gerät. Die Lüftungsschlitze freihalten von
Flusen, Haaren oder ähnlichem.
∙Benutzung des Gerätes ohne eingesetzte Filter.
CE-Kennzeichnung
Das Gerät entspricht den EU-Richtlinien, die für die CE-Kennzeichnung verbindlich
sind.
Geräteaufbau / Gerät montieren
Geräteaufbau und Lieferumfang
1. Abdeckung Ausblaslter
2. Display
3. Tasten Umstellung:
- Eco-/Power-Modus
- Drehgeschwindigkeit Bürstwalze
4. Ein-/Aus-Schalter
5. Anschlussbuchse Netzteil
6. Akku
7. Staubbehälter mit innenliegendem Motorvorlter
8. Teleskoprohr
9. Bodendüse mit Bürstwalze
10. LEDs
11. Turbo-Polsterdüse mit Bürstwalze
12. 2in1-Tool
13. Fugendüse
Ohne Abbildung:
14. Netzteil
15. Wandhalterung mit Befestigungsmaterial
16. Ersatz-Motorvorlter
Wandhalterung montieren
1. Wandhalterung senkrecht ausgerichtet an die Wand halten.
2. Löcher mit einem Bleistift anzeichnen.
3. Löcher bohren.
4. Mitgelieferte Dübel in Löcher stecken.
5. Wandhalterung mit mitgelieferten Schrauben befestigen.
6. Ladekabel durch die Kabelführung (1) an der rechten oder linken Seite der
Wandhalterung schieben.
7. Fugendüse und 2in1-Tool in Halterung einklemmen (2).
8. Gerät auf Wandhalterung aufstecken.

8
142 x 208 mm
Gerät montieren
Alle Verpackungsreste vom Gerät entfernen und die Einzelteile montieren:
1. Gegebenenfalls Staubbehälter montieren (siehe auch Kapitel „Staubbehälter reinigen“), Filter einsetzen und
Filterabdeckung montieren.
2. Saugrohr auf Gerät aufstecken.
3. Je nach Anwendung Bodendüse / Polsterdüse / 2in1-Tool / Fugendüse auf Saugrohr aufstecken.
Akku laden
Akku am besten vor jedem Gebrauch laden, insbesondere nach längerem Nichtgebrauch. Dies erhöht die Lebensdauer des
Akkus und sorgt für möglichst lange Reinigungszyklen.
1. Stecker des mitgelieferten Netzteils in die Anschlussbuchse des Geräts stecken.
2. Mitgeliefertes Netzteil an Steckdose anschließen.
- Die Punkte im Display am Handgriff beginnen zu blinken. Je mehr Punkte blinken, desto weiter ist der Ladevorgang
fortgeschritten.
- Sobald der Akku vollständig geladen ist, leuchten alle Punkte für einige Minuten und erlöschen dann. Der
Ladevorgang dauert bei leerem Akku ca. 5 Stunden.
3. Netzteil aus der Steckdose ziehen.
4. Stecker des Netzteils aus der Anschlussbuchse des Geräts ziehen.
Mit vollständig geladenem Akku beträgt die Betriebszeit ca. 18 Minuten (im Power-Modus) oder ca. 40 Minuten (im
Eco-Modus).
TIPP: Wenn das Gerät nur selten benutzt wird, sollte das Netzteil nicht dauerhaft angeschlossen bleiben.
Gerät bedienen
Bodendüse, Turbo-Polsterdüse, 2in1-Tool oder Fugendüse auswählen
Bodendüse : für Hartböden und Teppiche
Turbo-Polsterdüse : für Polstermöbel und Kissen
2in1-Tool : zum Absaugen von z.B. Möbeln.
Der Bürstaufsatz kann zurückgeschoben werden um, z.B. Krümel aufzusaugen. Dazu die
Arretiertaste an der Bürste drücken und sie vor oder zurück schieben.
Fugendüse : zum Saugen von schwer zugänglichen Ecken
∙Den gewünschten Aufsatz auswählen und auf das montierte Gerät aufstecken.
∙Das Teleskoprohr auf die gewünschte Länge einstellen.
∙Alle Aufsätze können auch ohne Saugrohr benutzt werden, um z. B. Möbel abzusaugen. Dabei darauf achten, dass der
Untergrund der Beanspruchung durch die Bürstwalze unbeschadet standhält.
Im Eco-Modus saugen
Im Eco-Modus wird mit normaler Leistung gesaugt. Der Handsauger verbraucht weniger Energie und die Betriebszeit des
Akkus verlängert sich. Die Bürstwalze rotiert.
1. Bodendüse am Saugrohr anbringen.
2. Schalter am Gerätegriff drücken, um das Gerät einzuschalten. Eco-Modus ist aktiviert.
3. Boden absaugen.
4. Schalter erneut drücken, um das Gerät auszuschalten.
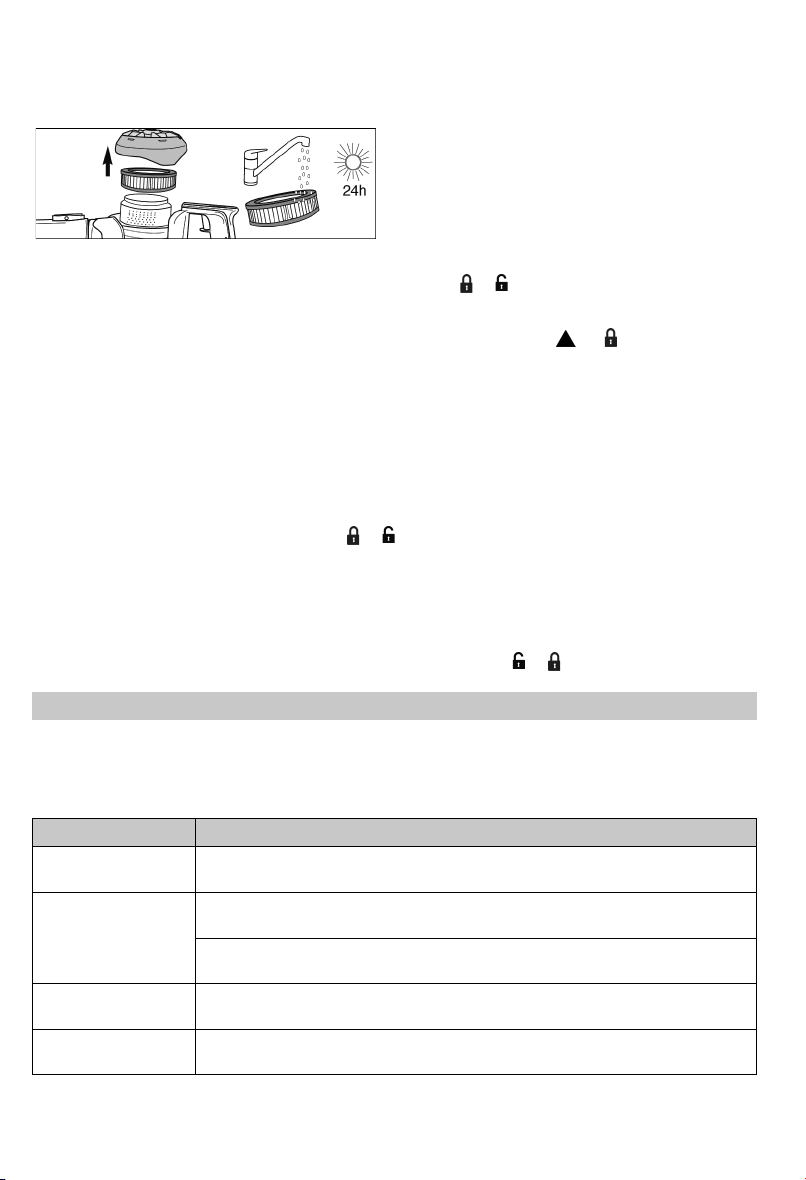
5. Staubbehälter leeren und reinigen (siehe Kapitel „Gerät warten“).
Im Power-Modus saugen
Im Power-Modus hat der Handsauger eine höhere Leistung. Die Bürstwalze rotiert.
1. Bodendüse am Saugrohr anbringen.
2. Schalter am Gerätegriff drücken, um das Gerät einzuschalten. Die hintere Taste an der Griff-Oberseite einmal drücken.
Power-Modus ist aktiviert, im Display leuchtet MAX.
3. Boden absaugen.
4. Schalter erneut drücken, um das Gerät auszuschalten.

9
142 x 208 mm
Bürstwalze umstellen für Teppich oder Hartboden
Wird die vordere Taste an der Griff-Oberseite gedrückt, kann die Drehgeschwindigkeit für die Bürstwalze umgestellt werden.
Wir empfehlen schnelles Drehen ( ) für Teppiche und Polster und langsames Drehen ( ) für Hartböden.
Gerät aufbewahren
Komfortable Verstaufunktion
Das Gerät kann wahlweise an der Wandhalterung oder stehend in einem Schrank oder einer geschützten Ecke aufbewahrt
werden. Dazu muss das Teleskoprohr komplett eingeschoben werden. Es darf mit Handteil nicht freistehend im Raum oder
ähnlich abgestellt werden, um ein Umfallen zu vermeiden. Ein umfallendes Gerät kann zu Verletzungen oder Schäden am
Gerät/Akku führen.
Gerät warten
Staubbehälter leeren
Der Staubbehälter kann nur begrenzte Schmutzmengen aufnehmen.
Den Staubbehälter daher am besten nach jedem Reinigungsvorgang und wenn die Saugleistung spürbar nachlässt leeren.
1. Sicherstellen, dass das Gerät ausgeschaltet ist und das Gerät nicht lädt.
2. Saugrohr abziehen.
3. Taste an der Seite des Staubbehälters drücken. Die Klappe öffnet sich und der Inhalt des Staubbehälters kann
ausgeleert werden.
4. Klappe schließen.
Staubbehälter und Motorvorlter reinigen
1. Sicherstellen, dass das Gerät ausgeschaltet ist und nicht lädt.
2. Den Staubbehälter leeren (siehe Kapitel ‚Staubbehälter leeren‘).
3. Das Handteil umdrehen, so dass der Staubbehälter nach oben zeigt.
4. Den Staubbehälterdeckel durch Drehung gegen den Uhrzeigersinn entriegeln und abnehmen.
5. Den Staubbehältereinsatz gegen den Uhrzeigersinn entriegeln ( → ) und entnehmen.
6. Den Motorvorlter aus dem Staubbehälter herausnehmen.
7. Die Schaumstoffhülle vom Filter abziehen und ausklopfen.
8. Filter gründlich ausklopfen und abbürsten. Dabei den Filterstoff nach außen stülpen.
9. Den Staubbehältereinsatz abbürsten.
Hinweis: Es dürfen alle Teile unter ießendem Wasser gereinigt werden. Hierbei unbedingt beachten, dass alle Teile
vor der nächsten Nutzung des Gerätes vollständig getrocknet sind. Die Trocknungszeit des Filters beträgt rund 24
Stunden.
10. Nach vollständiger Trocknung der Einzelteile den Filterstoff in den Filter schieben.
11. Die Schaumstoffhülle über den Filter ziehen und den Filter in den Staubbehälter setzen.
12. Den Staubbehältereinsatz darüberstülpen und durch Drehung verriegeln ( → ).
13. Den Staubbehälterdeckel auf das Handteil setzen und durch Drehung im Uhrzeigersinn verriegeln, bis sich und
gegenüberstehen.

10
142 x 208 mm
Ausblas-Filter reinigen
1. Sicherstellen, dass das Gerät ausgeschaltet ist und nicht lädt.
2. Abdeckung des Ausblas-Filters gegen den Uhrzeigersinn entriegeln ( → ) und abnehmen.
3. Ausblas-Filter abnehmen und unter ießendem Wasser reinigen. 24 h Stunden lang trocknen lassen.
4. Nach vollständiger Trocknung den Filter wieder aufsetzen.
5. Die Abdeckung des Ausblas-Filters aufsetzen und durch Drehung verriegeln, bis sich und gegenüberstehen.
Bürstwalze in Bodendüse und Polsterdüse reinigen
Durch Verschmutzung können sich die Bürstwalzen möglicherweise nicht mehr frei drehen. Die Bürstwalzen regelmäßig
reinigen.
1. Sicherstellen, dass das Gerät ausgeschaltet ist und das Gerät nicht lädt.
2. Düse vom Saugrohr abziehen.
3. Bodendüse:
Düse umdrehen. Arretierung der Bürstwalze an der linken Unterseite der Düse eindrücken und lösen. Bürstwalze
vorsichtig herausnehmen.
Polsterdüse:
Verriegelung an der Seite der Polsterdüse lösen ( → ). Bürstwalze vorsichtig zur Seite herausnehmen.
4. Bürste von Haaren und Schmutz befreien, ggf. vorsichtig eine Pinzette oder Schere benutzen.
5. Bürste wieder an der Düse montieren.
Bodendüse:
Die Bürstwalze rechts xieren und an der linken Seite herunterdrücken. Die Arretierung wieder in die Düse einsetzen
und festdrücken.
Polsterdüse:
Die Bürstwalze von der Seite in die Polsterdüse einsetzen und die verriegeln ( → ).
Probleme beheben
Probleme selbst beheben
Damit möglichst gar keine Probleme auftreten, ist es wichtig, den Staubbehälter rechtzeitig zu leeren sowie bei dieser
Gelegenheit den Motorvorlter zu kontrollieren und zu reinigen.
Problem mögliche Ursache / Lösung
Gerät lässt sich nicht
einschalten. Akku ist völlig leer. Gerät ausschalten und Akku laden, ►Kapitel „Akku laden“.
Gerät lässt sich nicht
laden (LEDs blinken
nicht).
Netzteil ist nicht korrekt eingesteckt. Prüfen, ob Netzteilstecker und Netzteiladapter korrekt in
ihren Buchsen sitzen, ►Kapitel „Akku laden“.
Akku ist nicht korrekt in das Gerät eingesetzt. Netzteil trennen. Überprüfen, ob der Akku
korrekt im Gerät sitzt. Netzteil erneut anschließen.
Gerät nimmt kaum
Schmutz auf. Staubbehälter muss geleert oder Motorschutzlter und Staubbehälter müssen gereinigt
werden, ►Kapitel „Gerät warten“.
Betriebsdauer ver- kürzt
sich zuneh- mend. Bürstwalze ist verschmutzt und muss gereinigt werden, ►Kapitel „Bürstwalze reinigen“.

11
142 x 208 mm
Bürstwalze dreht
sich langsam oder
unregelmäßig.
Bürstwalze ist verschmutzt und muss gereinigt werden, ►Kapitel „Bürstwalze reinigen“.
Bürstwalze und
LEDs schalten sich
selbstständig aus.
Es handelt sich hierbei um eine Sicherheitsfunktion, die einen Defekt an der Düse bei
verklemmter Bürstwalze verhindert.
Entweder ist die Bürstwalze verschmutzt und muss gereinigt werden, ►Kapitel „Bürstwalze
reinigen“ oder etwas hat sich in der Bürstwalze verklemmt, z.B. beim Absaugen eines
hochorigen Teppichs. Um die Abschaltung aufzuheben, schalten Sie den Staubsauger aus,
nehmen die Düse vom Saugrohr bzw. dem Handstaubsauger ab und entfernen eventuelle
Gegenstände, die die Bürstwalze blockieren. Nach erneutem Einschalten funktionieren
Bürstwalze und LEDs wieder wie gewohnt.
Servicehotline
Falls Sie das Problem anhand der Tabelle nicht beheben können, rufen Sie unsere Servicehotline an (siehe Kontaktdaten
im separaten Garantieheft).
Ersatzteile und Zubehör
Ersatzteile oder Zubehör können bequem im Internet auf unserer Website http://www.severin.de unter dem Unterpunkt
„Service Center / Ersatzteil-Shop“ bestellt werden.
Artikelnummer Beschreibung
2242-048 Motorvorlter
3962-048 Ausblaslter
4386-048 Bürstwalze für Bodendüse
6952-048 Bürstwalze für Polsterdüse
ZB 7227 Akku 21,6 V
Entsorgung und Garantie
Akku ausbauen und wechseln
Die Arretiertasten am Akku drücken und den Akku abziehen.
Akku einsetzen
Den Akku auf die Führungsschienen am Gerät setzen und andrücken, bis er einrastet.
Gerät und Akku separat entsorgen
Geräte und Akkus, die mit diesem Symbol gekennzeichnet sind, müssen getrennt vom Hausmüll entsorgt werden!
Geräte und Akkus enthalten wertvolle Rohstoffe, die wiederverwertet werden können. Eine ordnungsgemäße
Entsorgung schützt die Umwelt und die Gesundheit Ihrer Mitmenschen. Gerät und den ausgebauten Akku separat
zur Entsorgung an die entsprechenden Sammelstellen geben.

12
142 x 208 mm
2in1 Hand-held/Upright Vacuum Cleaner
Dear Customer,
Before using the appliance, read the following instructions carefully and keep this manual for future reference. The appliance
must only be used by those familiar with the instructions below.
Safety instructions
Certain groups of persons
∙This appliance may only be operated by children over the age of 8 and by persons
with reduced physical, sensory or mental capacities or a lack of experience and/or
knowledge if they are supervised or have been instructed about the safe use of the
appliance and are aware of the dangers associated with its use.
∙Children are not allowed to play with the appliance or stand or sit on it.
∙Cleaning and user maintenance may not be performed by children without
supervision.
∙Children under the age of 8 must be kept away from the appliance and the mains
adapter.
∙The packaging material must not be used for play purposes. There is a risk of
suffocation.
Connecting the appliance safely
The appliance is charged with electrical current. Thus, there is a risk of electric
shock.
Therefore:
∙Check the appliance and mains adapter for possible damage before use. Never
operate a defective appliance or an appliance with a defective mains adapter.
∙Only connect the mains adapter to sockets which match the specications on the
mains adapter type plate.
∙In order to avoid hazards and to comply with safety regulations, any repairs to the
appliance and the power supply unit must only be carried out by our customer
service. Therefore, in case of repair, contact our customer service by telephone or
email (see service addresses in the separate warranty booklet or at www.severin.
de).
∙Do not immerse the appliance or mains adapter in water or other liquids, or treat
with liquids. Keep the appliance and the mains adapter away from rain and wet
conditions. Do not operate the appliance and mains adapter outdoors or in rooms
with high humidity.
GB

13
142 x 208 mm
∙Do not handle the appliance or mains adapter with wet hands. When unplugging
the mains adapter from the socket, always pull directly on the plug.
∙Make sure that the cable of the mains adapter is not kinked, pinched or run over
and that it does not come in contact with sources of heat, humidity and sharp
edges. Make sure that the cable of the mains adapter does not become a trip
hazard.
∙Before cleaning or servicing the appliance and before changing accessories, switch
off the appliance and make sure that the mains adapter is not connected.
Safety when handling rechargeable batteries
∙If rechargeable batteries are handled improperly, there is a risk of injury and
explosion.
∙Never replace the rechargeable battery with other types of batteries. Only use
batteries of the same type. Never short-circuit batteries, i.e. do not touch the
poles at the same time, especially not with electrically conductive objects. Store
rechargeable batteries in such a way that they are not short-circuited by other
batteries or metal objects during storage.
∙WARNING! Use only the included power supply unit to charge the battery (see
Technical Data). Never use another power supply unit to charge the batteries. The
power supply unit provided must, in turn, only be used to charge the appliance
batteries provided.
∙At the end of its life span, remove the rechargeable battery as described. Then take
the rechargeable battery to an appropriate collection point nearby without delay,
thus ensuring safe and environmentally-appropriate disposal. Never dispose of the
rechargeable battery in household waste.
∙Before removing the rechargeable battery, make sure that the mains adapter is
unplugged from the socket.
∙If the appliance is to be stored unused for a long period of time, the battery should
be removed and stored separately.
∙Never take the rechargeable battery apart, expose it to high temperatures or throw
it onto res.
∙In case of improper handling, liquid can escape from the rechargeable battery. Do
not use the rechargeable battery if it is damaged or if it is leaking liquid.
- If liquid has escaped, avoid contact with the liquid.
- In case of contact with the liquid, rinse it off immediately with copious amounts of
water. In case of after effects (irrespective of type), consult a doctor.

14
142 x 208 mm
Rotating brush roller
∙The appliance has a powered brush roller in the oor and upholstery nozzle. This
can cause injuries. Therefore, note the following:
∙Before any cleaning or maintenance of the appliance, ensure that the appliance is
switched off and not charging.
∙WARNING! Ensure that parts of your body can never get under the brush roller.
∙Do not vacuum near cables, wires and long fringes. On the one hand, there is
a danger that the cable’s insulation will be damaged. On the other hand, these
objects can get caught in the brush roller and thereby damage the appliance.
LED lighting
∙LEDs are installed in the oor nozzle. These illuminate the work area in front of the
oor nozzle.
∙Do not look into the LEDs during operation.
∙It is not possible to exchange the LEDs.
Intended use
∙The appliance must only be used domestically.
∙The appliance may only be used for cleaning on level, normally-soiled surfaces,
short-pile carpets or upholstery that can withstand exposure to the rotating brush
without sustaining damage.
∙The appliance may only be used with the corresponding battery (see Technical
Data) and accessories.
∙Any other use is deemed improper and is forbidden.
In order to prevent injuries, res and damage, the appliance must not be used
to vacuum:
∙People, animals or plants. Always keep the device well away from all parts of the
body, and from hair and clothing (e.g. shoelaces). Do not use near to your head.
∙Glowing, burning or smouldering particles (such as ash, coal, charcoal, cigarettes,
matches).
∙Explosive or highly ammable substances or toners.
∙Water and other liquids, e.g. wet carpet cleaning agents.
∙Sharp objects, such as glass splinters, nails or construction waste.
∙Fine dust, such as plaster, cement, ne drilling dust, powder.

15
142 x 208 mm
The following is also forbidden:
∙Independent alteration or repair of the appliance or its mains adapter.
∙Inserting objects into the appliance’s openings. The specially provided accessories
are the exception to this rule.
∙Use, storage or charging outdoors.
∙Cover the ventilation slots on the unit. Keep the ventilation slots free of lint, hair or
similar.
∙Use of the appliance without lters in place.
CE Marking
This device is compliant with the mandatory EU directives for CE marking.
Device parts / Assembly
Device parts and items included
1. Exhaust lter cover
2. Display
3. Toggle keys:
- Eco/Power mode
- Rotation speed brush roller
4. On/Off switch
5. Power supply connection socket
6. Battery
7. Dust container with internal motor pre-lter
8. Telescopic tube
9. Floor tool with brush roller
10. LEDs
11. Turbo upholstery nozzle with brush roller
12. 2-in-1 tool
13. Crevice tool
Not illustrated:
14. Power supply
15. Wall mounting bracket with fastening components
16. Spare motor pre-lter
Installing the wall mount
1. Hold the wall mount to the wall, aligned in a vertical position.
2. Mark the holes with a pencil.
3. Drill the holes.
4. Insert the dowels included in the delivery into the holes.
5. Fasten the wall mount using the screws included in the delivery.
6. Push the charging cable through the cable guide (1) on the right or left side of the
wall bracket.
7. Clamp the crevice nozzle and 2in1 tool in the holder (2).
8. Push the device onto the wall mounting bracket.

16
142 x 208 mm
Assembling the appliance
Remove any remaining packaging from the device and assemble the component parts:
1. If necessary, mount the dust container (see also chapter “Cleaning the dust container”), insert the lter and mount the
lter cover.
2. Push the suction tube onto the device.
3. Depending on the application, attach the oor nozzle / upholstery nozzle / 2in1 tool / crevice nozzle to the suction tube.
Charging the rechargeable battery
It is best to charge the rechargeable battery before each use, especially after the appliance has not been used for a while.
This increases the service life of the rechargeable battery and ensures the longest possible cleaning cycles.
1. Insert the plug of the power supply unit supplied into the connection socket of the appliance.
2. Connect the mains adapter included in the delivery to a socket.
- The dots in the display on the handle start ashing. The more dots ash, the further the charging process has
progressed.
- As soon as the battery is fully charged, all dots light up for a few minutes and then go out. The charging process takes
approx. 5 hours when the battery is empty.
3. Disconnect the mains adapter from the socket.
4. Pull the plug of the power supply unit out of the connection socket of the appliance.
The operating time with a fully charged rechargeable battery is approximately 18 minutes (in Power mode) or 40
minutes (in Eco mode).
TIP: If the appliance is used infrequently, the power supply should not remain permanently connected.
Operating the appliance
Selecting oor nozzle, turbo upholstery nozzle, 2in1 tool or crevice nozzle
Floor nozzle : for hard oors and carpets
Turbo upholstery nozzle : for upholstered furniture and cushions
2-in-1 tool : for vacuuming e.g. furniture.
The brush attachment can be pushed back, e.g. to suck up crumbs. To do this, press the
locking button on the brush and push it forwards or backwards.
Crevice nozzle : for vacuuming hard-to-reach corners
∙Select the desired attachment and place it on the mounted appliance.
∙Adjust the telescopic tube to the desired length.
∙All attachments can also be used without the suction tube, e.g. to vacuum furniture. Make sure that the substrate can
withstand the stress of the brush roller without damage.
Vacuuming in Eco mode
In power mode, the hand vacuum has a higher output. The brush roller rotates.
1. Attach the oor nozzle to the suction tube.
2. Press the switch on the handle of the appliance to switch on the appliance. Eco mode is activated.
3. Vacuum the oor.
4. Press the switch again to switch off the appliance.
5. Empty and clean the dust container (see chapter “Maintaining the appliance”).
Vacuuming in Power mode
In Power mode the hand-held vacuum cleaner operates with higher power and the brush roller rotates.
1. Attach the oor nozzle to the suction tube.
2. Press the switch on the handle of the appliance to switch on the appliance. Press the rear button on the top of the
handle once. Power mode is activated, MAX lights up in the display.
3. Vacuum the oor.
4. Press the switch again to switch off the appliance.

17
142 x 208 mm
Switch brush roller for carpet or hard oor
If the front button on the top of the handle is pressed, the rotation speed for the brush roller can be changed. We recommend
fast turning ( ) for carpets and upholstery and slow turning ( ) for hard oors.
Storing the appliance
Convenient stowage function
The appliance can be stored either on the wall bracket or upright in a cupboard or protected corner. To do this, the telescopic
tube must be pushed in completely. Never leave the appliance with the handpiece in a free-standing position in a room or
similar place to prevent it from falling over. An appliance falling over may cause injury or damage to the appliance/battery.
Maintaining the appliance
Emptying the dust container
The dust container can only hold a limited quantity of dirt.
It is therefore best to empty the dust container after every cleaning procedure and if the suction power noticeably drops.
1. Make sure that the appliance is switched off and is not on charge.
2. Take the suction tube off.
3. Press the button button on the side of the dust container. The ap opens and the contents of the dust container can
be emptied.
4. Close the ap.
Cleaning the dust container and motor pre-lter
1. Make sure that the appliance is switched off and is not on charge.
2. Empty the dust container (see chapter ‘Emptying the dust container’).
3. Turn the handpiece over so that the dust container is facing upwards.
4. Unlock and remove the dust container lid by turning it anticlockwise.
5. Unlock the dust container insert anticlockwise ( → ) and remove it.
6. Remove the motor pre-lter from the dust container.
7. Pull the foam cover off the lter and tap it out.
8. Thoroughly tap out and brush off the lter. In doing so, turn the lter material inside out.
9. Brush the dust container insert.
Note: All parts may be cleaned under running water. Make sure that all parts are completely dry before using the
appliance again. The drying time of the lter is about 24 hours.
10.. After complete drying of the individual parts, push the lter cloth into the lter.
11. Pull the foam cover over the lter and place the lter in the dust container.
12. Put the dust container insert over it and lock it in place by turning it ( → ).
13. Place the dust container lid on the hand part and lock it by turning it clockwise until and are facing each other.

18
142 x 208 mm
Cleaning the blow-out lter
1. Ensure that the appliance is switched off and not charging.
2. Unlock the cover of the blow-out lter anticlockwise ( → ) and remove it.
3. Remove the blow-out lter and clean it under running water. Allow to dry for 24 hrs.
4. Reinsert the lter after it is completely dry.
5. Put on the cover of the outlet lter and lock it by turning until and are facing each other
Cleaning the brush roller in the oor tool and the upholstery tool
Dirt may prevent the brush rollers from rotating freely. Clean the brush rollers regularly.
1. Make sure that the appliance is switched off and is not on charge.
2. Remove the tool from the suction tube.
3. Floor nozzle:
Turn the nozzle upside down. Press in and release the locking device of the brush roller on the left underside of the
nozzle. Carefully remove the brush roller.
Upholstery nozzle:
Release thelock on the side of the upholstery nozzle ( → ). Carefully remove the brush roller to the side.
4. Remove any hair and dirt from the brush, using a pair of tweezers or scissors carefully, if necessary.
5. Fit the brush back onto the tool.
Floor nozzle:
Fix the brush roller on the right and press it down on the left side. Reinsert the lock into the nozzle and press it rmly.
Upholstery nozzle:
Insert the brush roller from the side into the upholstery nozzle and lock it ( → ).
Troubleshooting
Troubleshooting by yourself
To avoid problems, it is important to empty the dust container in good time and to take this opportunity to check and clean
the motor pre-lter.
Problem Possible cause / solution
Appliance cannotbe
switched on. The rechargeable battery is completely discharged. Switch off the appliance and charge the
rechargeable battery, ►chapter “Charging the rechargeable battery”.
The appliance cannot
be charged(LEDs do not
ash).
The mains adapter is not plugged in correctly. Check whether the mains
adapter’s connector and the mains adapter are connected rmly to their sockets, ►chapter
“Charging the rechargeable battery”.
The rechargeable battery has not been inserted correctly. Disconnect the
mains adapter. Check that the rechargeable battery is seated correctly inthe appliance.
Connect the mains adapter again.
Theappliancehardly
picks up any dust. The dust container needs to be emptied or the motor protection lter and the
dust container need to be cleaned, ►chapter “Maintaining the appliance”.
Operating durationis
becoming progressively
shorter.
The brush roller is soiled and needs to be cleaned, ►chapter “Cleaning the brush roller”.

19
142 x 208 mm
The brush rollerrotates
slowly or irregularly. The brush roller is soiled and needs to be cleaned, ►chapter “Cleaning the brush roller”.
The brush roller
and LEDs switchoff
automatically.
This is a safety function that prevents the nozzle becoming defective if thebrush roller gets
jammed.
The brush roller is either dirty and needs to be cleaned, ►chapter “Cleaning the brush roller”
or something has got jammed in the brush roller, e.g. when vacuuming ahigh pilecarpet.To
override the power-off, switchoff the vacuum cleaner, take the nozzle off of the suction tube or
the hand-held vacuum cleaner and remove any objects that may be blocking the brush roller.
The brush roller and LEDs will function again as normal when the
vacuum cleaner is next switched on.
Service hotline
If you cannot solve the problem using the table, call our Service Hotline (see contact details in a separate warranty booklet).
Item number Description
2242-048 Motor pre-lter
3962-048 Blow-out lter
4386-048 Brush roller for oor tool
6952-048 Brush roller for upholstery tool
ZB 7227 Battery 21.6V
Disposal and warranty
Removing and replacing the battery
Press the locking buttons on the battery and remove the battery.
Inserting the battery
Place the battery on the guide rails on the appliance and press until it clicks into place.
Disposing of the appliance and rechargeable battery separately
Devices and batteries marked with this symbol must be disposed of separately from household waste! Devices and
batteries contain valuable raw materials that can be recycled. Proper disposal of these items protects the
environment and public health. Return the device and the battery separately to the appropriate collection points for
disposal.

20
142 x 208 mm
Aspirateur 2 en 1 : balai et main
Chère cliente, Cher client,
Avant d’utiliser cet appareil, veuillez lire soigneusement les instructions suivantes et conserver ce manuel pour future
référence. L’appareil doit être utilisé uniquement par les personnes ayant pris connaissance des conditions d’utilisation
ci-dessous.
Consignes de sécurité
Groupes de personnes cibles
∙Les enfants âgés de 8 ans et plus ainsi que les personnes ayant des déciences
physiques, sensorielles ou mentales ou un manque d’expérience ou de
connaissances peuvent utiliser ce produit à condition d’être sous surveillance ou
d’avoir reçu des instructions concernant l’utilisation de l’appareil en toute sécurité
et de comprendre les dangers qui en résultent.
∙Il est interdit aux enfants de jouer avec l’appareil, ainsi que de monter ou de
s’asseoir dessus.
∙Le nettoyage et l’entretien de l’appareil ne doivent pas être exécutés par des
enfants sauf s’ils ont plus de 8 ans et sont sous surveillance.
∙Les enfants de moins de 8 ans ne doivent pas s’approcher de l’appareil, ni du bloc
d’alimentation.
∙Ne pas jouer avec le matériel d’emballage. Il existe un risque d’asphyxie.
Branchement de l’appareil en toute sécurité
L’appareil est chargé par du courant électrique, il existe donc un risque
d’électrocution.
Par conséquent :
∙Vériez avant usage que l’appareil et le cordon électrique sont exempts de défauts.
Ne mettez jamais en marche un appareil défectueux ou dont le bloc d’alimentation
est défectueux.
∙Branchez le bloc d’alimentation uniquement sur des prises de courant dont les
caractéristiques correspondent aux indications de la plaque signalétique du bloc
d’alimentation.
∙An d’éviter tout danger et de respecter les règles de sécurité, les réparations de
l’appareil et du bloc d’alimentation ne doivent être effectuées que par notre service
clientèle. Par conséquent, pour toute réparation, contactez notre service clientèle
par téléphone ou par e-mail (voir les coordonnées du service dans le carnet de
garantie séparé ou sur le site web www.severin.de).
∙N’immergez jamais l’appareil ou le bloc d’alimentation dans l’eau ou dans d’autres
liquides, et n’effectuez jamais un traitement avec des liquides. Gardez l’appareil et
FR
Table of contents
Languages:
Other SEVERIN Vacuum Cleaner manuals

SEVERIN
SEVERIN 7050 User manual

SEVERIN
SEVERIN AH-7912 User manual

SEVERIN
SEVERIN CY 7088 User manual

SEVERIN
SEVERIN BC 7048 User manual

SEVERIN
SEVERIN CY7087 User manual

SEVERIN
SEVERIN 7046 User manual

SEVERIN
SEVERIN 7047000 User manual

SEVERIN
SEVERIN 7115 User manual

SEVERIN
SEVERIN 7144 User manual

SEVERIN
SEVERIN CY 7106 User manual

SEVERIN
SEVERIN HV 7154 User manual

SEVERIN
SEVERIN 7085 User manual

SEVERIN
SEVERIN BR 7926 User manual

SEVERIN
SEVERIN 7025 User manual

SEVERIN
SEVERIN 7158 User manual

SEVERIN
SEVERIN RB7028 User manual

SEVERIN
SEVERIN BODENSTAUBSAUGER BR 7951 User manual

SEVERIN
SEVERIN HV 7144 User manual

SEVERIN
SEVERIN 7030 User manual

SEVERIN
SEVERIN MY 7114 User manual