Severtson SE43 Series User manual
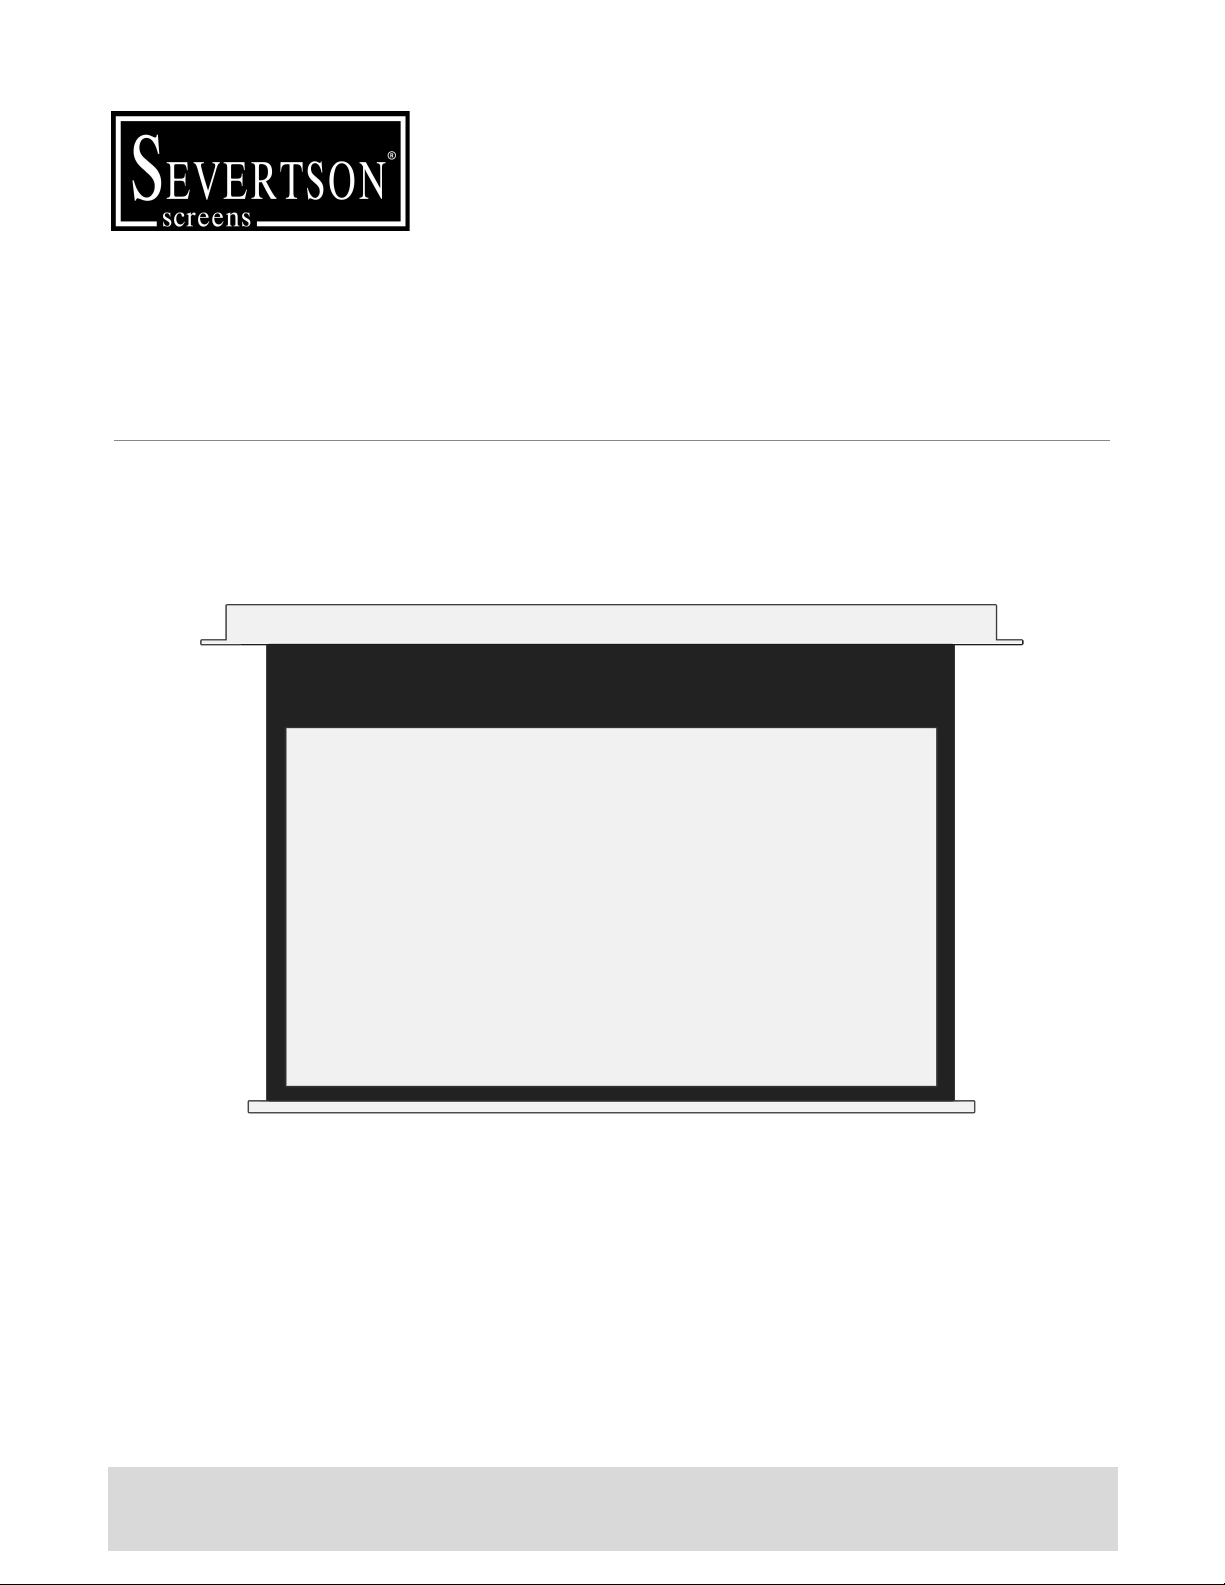
Instruction Manual for
Spirit & Spirit Tab-Tension Series In-Ceiling Electric
MODELS: SE43***, SE169***, SE1610***, ST43***, ST169***, ST1610***
Thank you for purchasing a Severtson projection screen. Before use, please read the instructions
carefully. After installation, store the instructions for future reference.
Rev 191205
Instruction Manual for Spirit & Spirit Tab-Tension Series In-Ceiling Electric
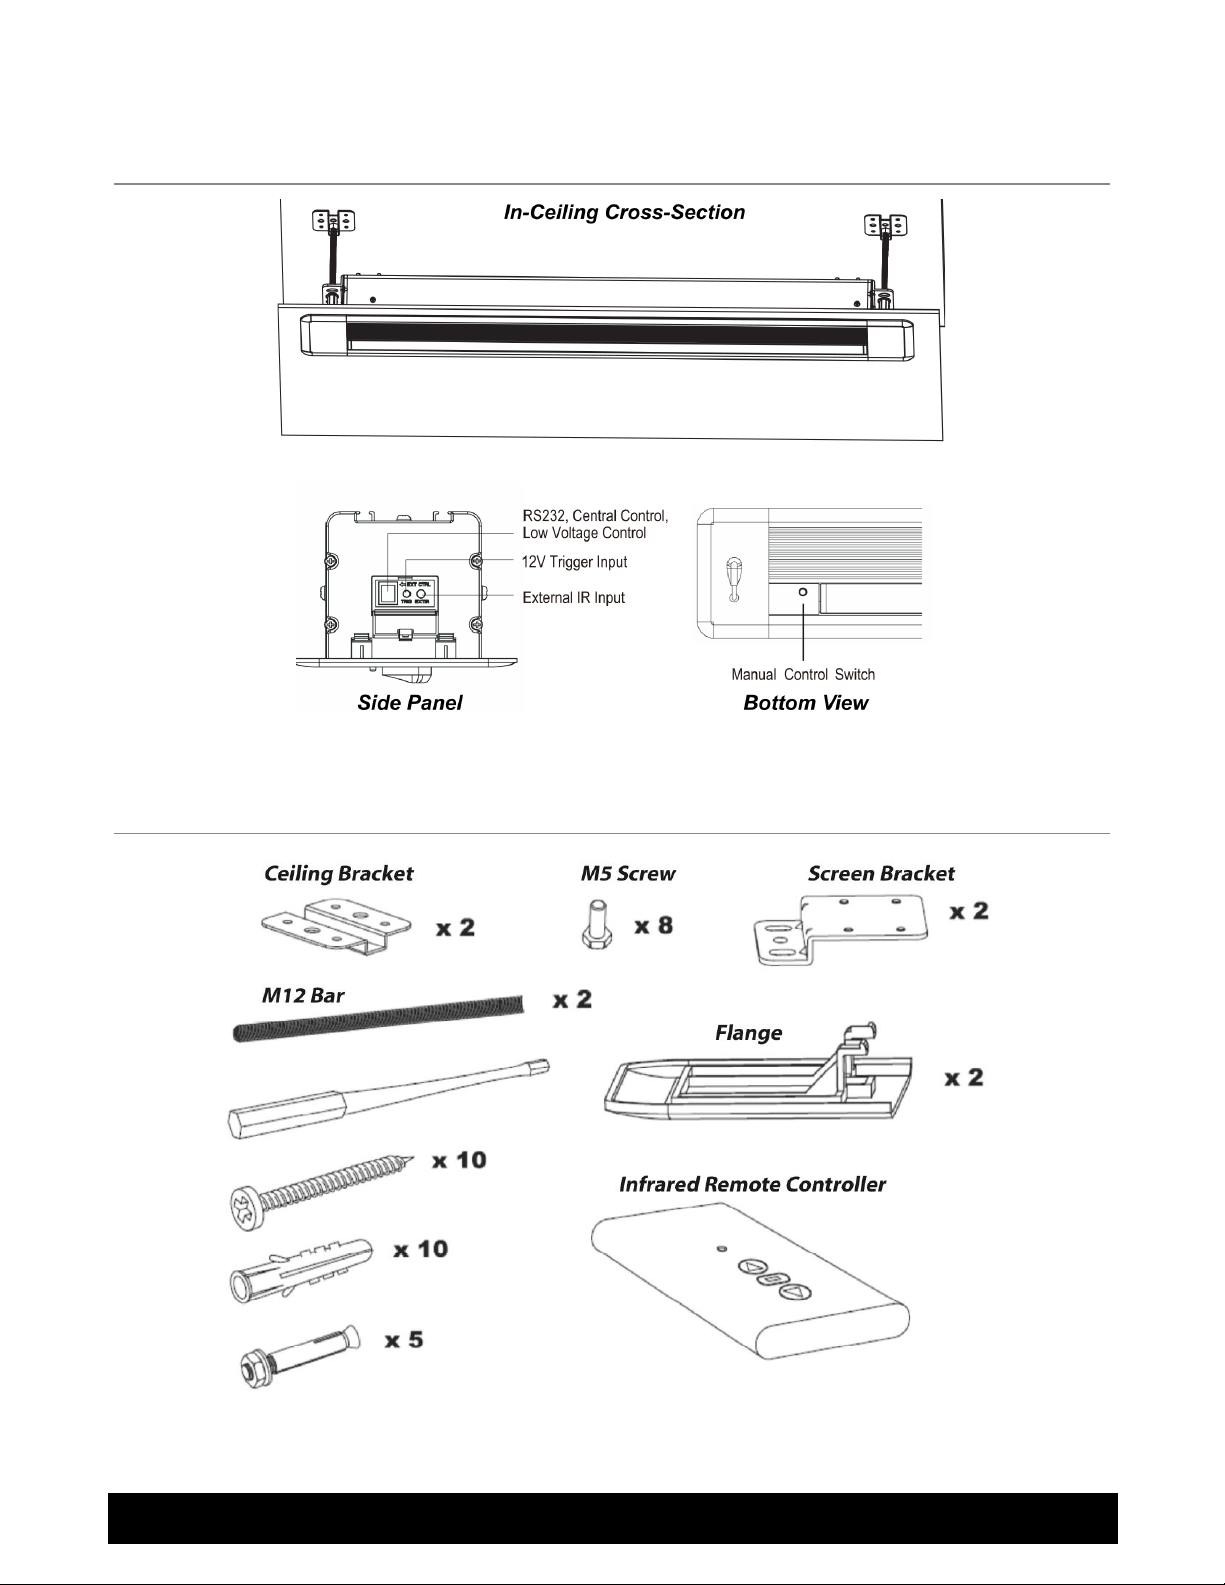
Overview
Parts Included
1

Instruction Manual for Spirit & Spirit Tab-Tension Series In-Ceiling Electric
Preparation Instructions
Take out all the parts from the packaging and verify that all the parts have been included, then
follow the steps below to install the screen.
Note 1.1: When installing the projection screen it is important to choose the correct fasteners
for the ceiling type. Choosing the wrong fasteners can lead to severe injuries or screen damage.
1. Choose a proper location on the ceiling to install the projection screen. Be sure that no load-bearing
supports will be cut or compromised during the installation.
2. Measure the total length of the case w/ flanges attached (A) as shown (Fig. 1). Subtract 20mm (3/4”)
from that value (A) to get the hole cut-out length. The cut-out width is 140mm (5 1/2”).
3. After determining the location of the screen and the cut-out dimensions (Fig. 2), proceed to cut the
hole in the ceiling. This step cannot be undone, so be sure the measurements are correct before
making any cuts.
4. The distance between the center of each bracket is A (the measurement from Fig. 1 above) minus
116mm (4 1/2”). Mark the location of each mounting hole for both brackets (Fig. 3).
2

Instruction Manual for Spirit & Spirit Tab-Tension Series In-Ceiling Electric
Installation Instructions
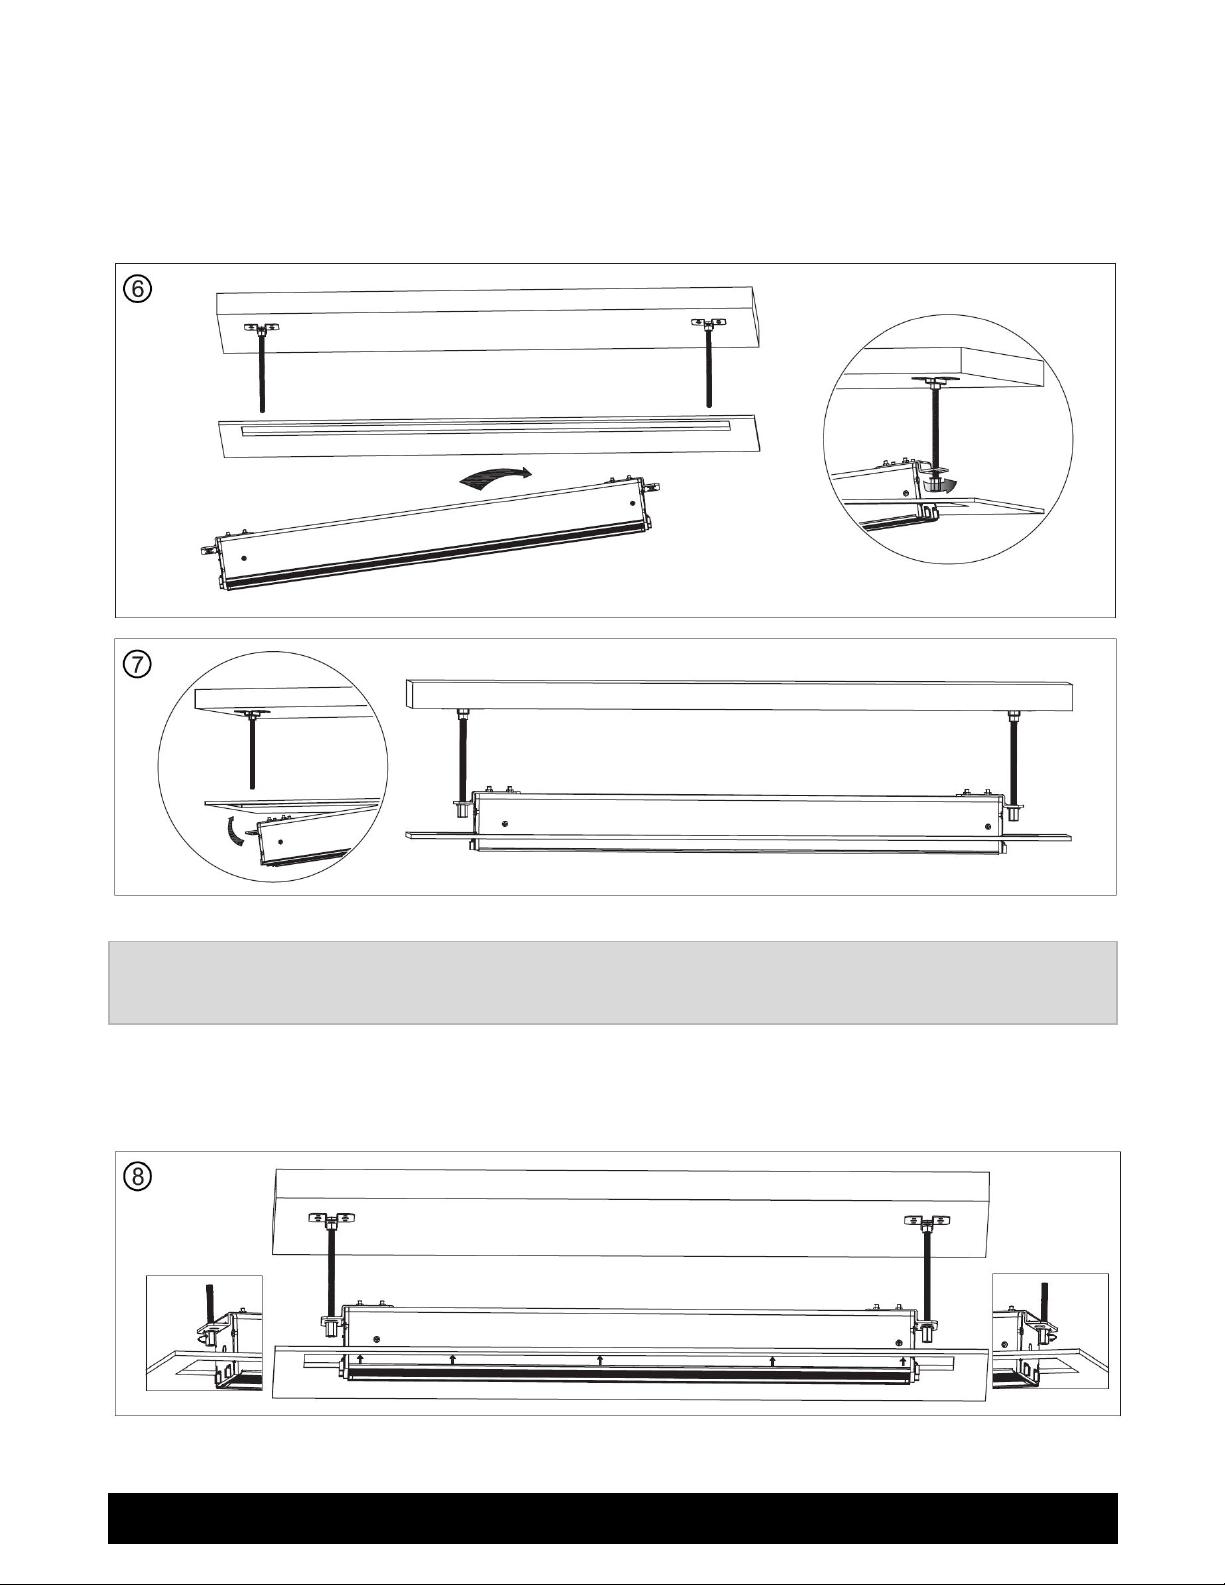
1. Slide four M5 screws (two along each track) onto the screen case (Fig. 1). Place the first
screen bracket on the screen case aligned with the four screws (Fig. 2). Slide the bracket so
that there is no gap between the bracket and the end of the screen case. Secure the
bracket with a nut on each screw (Fig. 3). Repeat this step for the second bracket on the
other end.
2. Slide the threaded installation rods through the holes in the each ceiling-mount bracket
and secure each rod on both sides with nuts until the ceiling-mount brackets are secure
(Fig. 4). Install the ceiling brackets (Fig. 5) at the previously marked locations (see Preparation
Instructions).
Note 2.1: The included threaded installation rods are M10 x 1.5mm pitch, 3.3 ft. (1.0 m) long.
The rods can be carefully cut to length if they are too long for the installation.
3
Instruction Manual for Spirit & Spirit Tab-Tension Series In-Ceiling Electric
3. Be sure that the screen case is facing the correct direction. The screen controls should be
on the left side of the case when looking at the viewing side of the screen. Lift the screen
up so that the threaded hanging rods slide into the holes in the case mounting brackets
(Fig. 6). Secure the screen in place with nuts threaded onto the hanging rods (Fig. 6, Fig. 7).
Note 3.1: At this step you may want to attach external wiring, power, etc. to test the screen’s
operation before fully installing it into the ceiling.
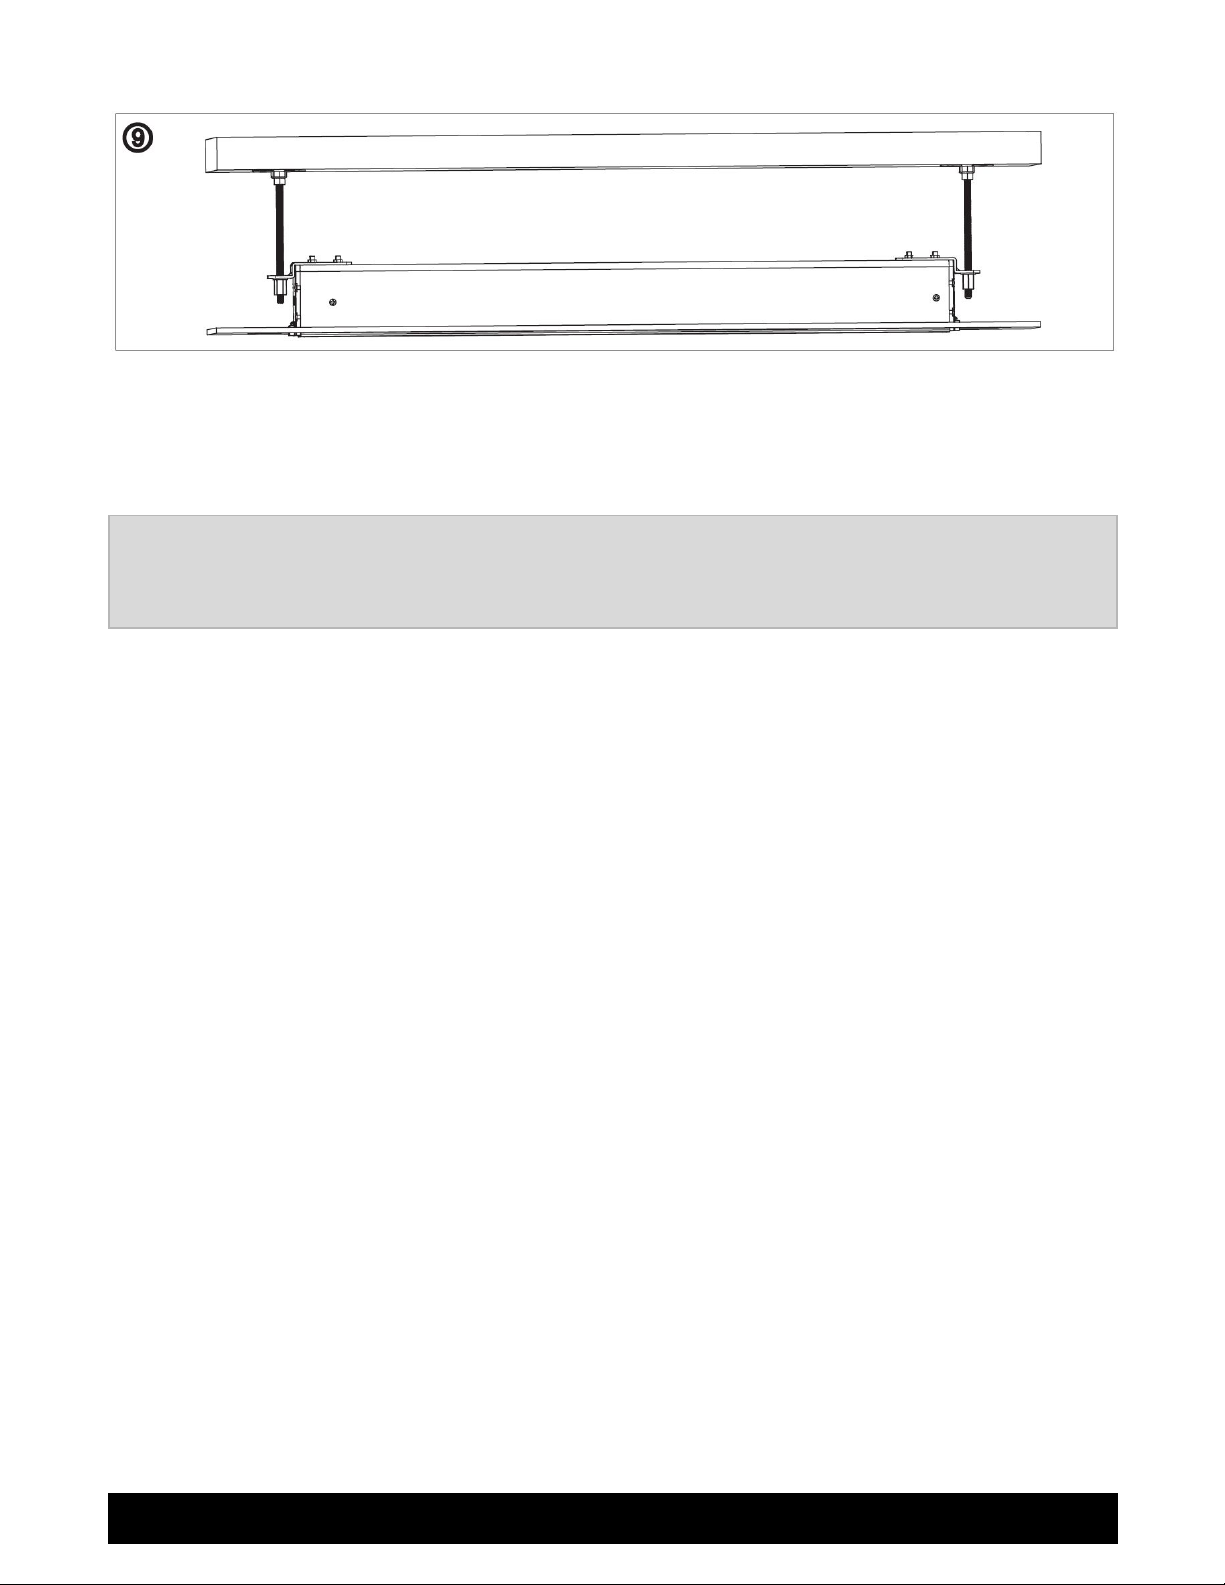
4. To secure the screen into its final location, tighten the nuts below each case mounting
bracket (Fig. 8) until the screen trim is flush with the ceiling (Fig. 9).
4
Instruction Manual for Spirit & Spirit Tab-Tension Series In-Ceiling Electric
5. Install the screen trim flanges. Each trim flange snaps into small groves near the bottom of
the left and right sides of the screen case. The screen should now be fully installed and the
cut-out hole should not be visible since it is covered by the trim flanges.
Note 5.1: For adjusting the automatic stop limits of your screen please see Appendix A: Adjusting
the Screen Limits in this guide for steps to set the stop locations for both upper and lower screen
retraction and extension.
5

Instruction Manual for Spirit & Spirit Tab-Tension Series In-Ceiling Electric
Controlling the Screen
There are many different options included to control the projection screen. Only connect the
screen to the options that will be used.
Note 1.1: When the screen is set to manual control, only manual control of the screen will work.
For any other type of control set the screen to remote control.
1. Manual Control. The push-button located on the left end of the screen face near where the
projection screen extends. Pushing the button will cause the motor to switch between
several different modes. The state change pattern can be seen in the diagram below:
2. Trigger Connection. The trigger jack recognizes outputs of DC 5V-12V. When power is
sensed the screen will automatically lower. When power is off the screen will rise back into
the case.
6
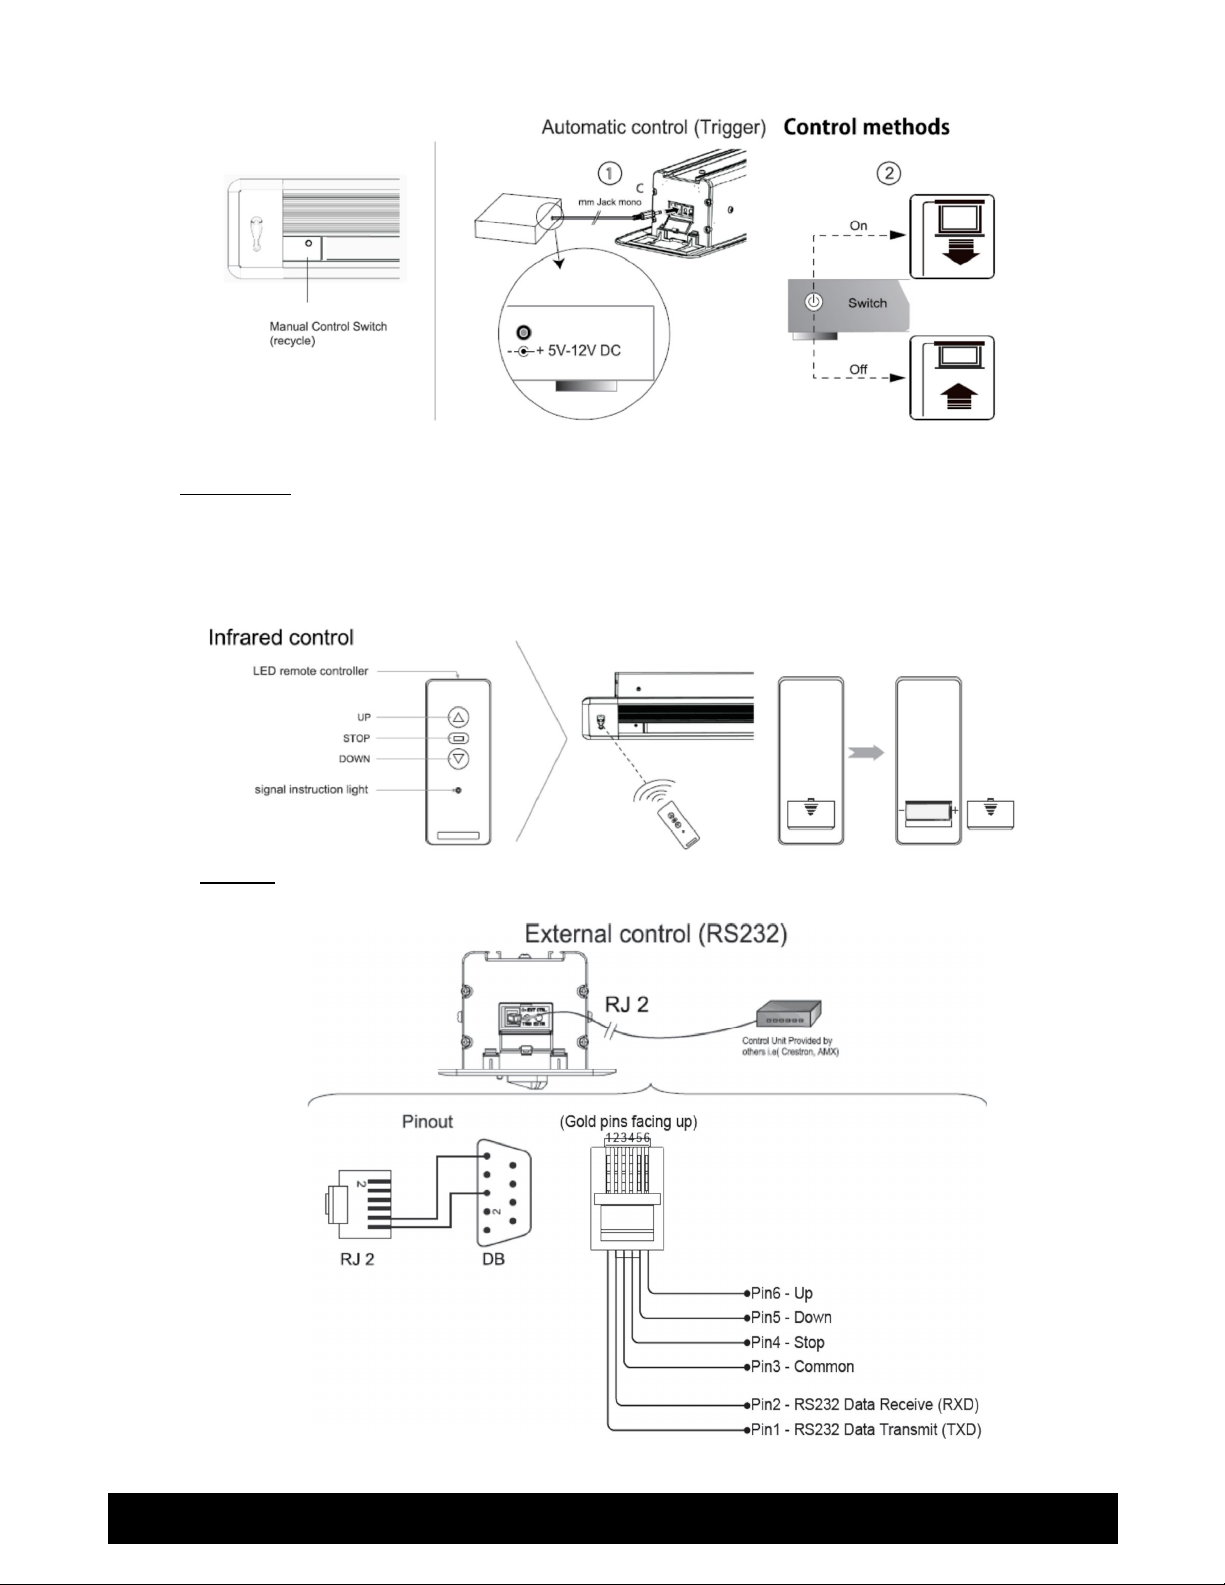
Instruction Manual for Spirit & Spirit Tab-Tension Series In-Ceiling Electric
3. IR Remote. The remote control will work up to 25’ from the IR eye and an angle of up to 30°.
The remote will not work if the signal or receiver is covered. Keep the remote away from
high temperatures and humidity. Change the battery when the signal is low; be sure to use
the same type of battery as the original.
4. RS-232. Home automation systems that are compatible with RS-232 communication can
remotely operate the screen via the RJ-45 connector on the left-side control panel.
7

Instruction Manual for Spirit & Spirit Tab-Tension Series In-Ceiling Electric
8

Instruction Manual for Spirit & Spirit Tab-Tension Series In-Ceiling Electric
Appendix A: Adjusting the Screen Limits
We only recommend that experience AV installers adjust the motor limits of the projection screen.
The upper limit should never be adjusted - it controls the point at which the screen stops
retracting into the case and is factory-set to flush. Improperly adjusting the limits of the motor will
cause damage to the screen and motor and will void all warranty.
1. Remove the small rubber stopper on the underside of the screen case near the left-side, and extend
the screen enough to be able to locate the limit controls inside the screen case.
2. Identify the upper (retraction) and lower (drop) limit switches and then adjust the appropriate limit
according to the respective steps below.
3. To adjust the upper limit (this should usually not be adjusted since it is factory-set):
a. Bring the screen to the down position.
b. Press “up” on the remote control.
c. If the screen does not fully ascend into the case use the accessory tool to adjust the up limit.
Turn the Up limit towards the “+” symbol until the screen is at the desired position. Always
make small adjustments, and test often to avoid damage to the screen.
d. If the screen ascends too far then simply turn the same positioning screw towards the “-“.
4. To adjust the lower limit:
a. Bring the screen to the up position.
b. Press “down” on the remote control.
c. If the screen does not fully drop to your desired position from the case use the accessory
tool to adjust the down limit. Turn the Down limit towards the “+” symbol until the screen is
at the desired position. Always make small adjustments, and test often to avoid damage to
the screen.
d. If the screen drops too far then simply turn the same positioning screw towards the “-“.
9

Instruction Manual for Spirit & Spirit Tab-Tension Series In-Ceiling Electric
Appendix B: Adjusting the Screen Tension
This section is only for applicable models (tab-tensioned models beginning with “ST”). The tension of
the screen may need to be adjusted occasionally if the screen begins to appear wavy.
1. Use a flat head screwdriver to lightly push the adjustment screw in on the weight bar. Turn
to loosen or tighten.
10

Instruction Manual for Spirit & Spirit Tab-Tension Series In-Ceiling Electric
Appendix C: Troubleshooting the Screen
The Spirit Series screens are designed for many years of use. Problems are usually simple to
resolve and caused by small issues or improper end use. If problems persist, please contact us.
General Troubleshooting:
Screen does not retract.
Power cable is not connected or outlet does not have power.
Check the connection of the power cable.
Screen goes too low or does not
go down enough.
Adjust the lower limit as described in Appendix A: Adjusting the Screen
Limits.
Screen goes too far into case or
does not ascend to the correct
position.
Adjust the upper limit as described in Appendix A: Adjusting the Screen
Limits.
IR control does not work.
Check the batteries in the IR remote.
Check to make sure you are in the IR range.
Close windows or shut off lights that may be diffusing the IR signal.
11

Instruction Manual for Spirit & Spirit Tab-Tension Series In-Ceiling Electric
Warnings
1. Do not attempt to take apart or modify the screen. If any problems occur please contact
your local dealer.
2. The screen is designed to be transported, stored, and operated in the horizontal position.
Do not stand the screen up on its end vertically for any extended period of time.
3. Do not clean the screen case with water - only dust the screen to avoid electric shock.
4. Make sure the brackets used are firmly secured to the wall or ceiling to avoid any damage.
5. Make sure fixing screws are tight to avoid any damage.
6. When installing electric motors use a professional or contact your local dealer. Incorrect
connection of wires may result in shorts or fires.
7. Fluorescent lights may cause interference with infrared signal.
8. Be careful not to scratch or damage the screen surface while handling it.
9. Do not write or draw on screen surface. Do not poke, fold, or tear screen material.
10. Do not use detergents or harsh chemicals to clean screen material. A soft cloth and mild
soap can clean dust and dirt off the screen material. A cotton cloth can be used to gently
wipe dust off of the screen.
11. For coated screens, simply dust the screen with a clean, dry, lint-free cloth. You may also
blow dust off of the screen with a leaf blower. If the screen gets something on it that
cannot be dusted or blown off, clean it using a damp cloth in a dabbing motion. DO NOT
WIPE A COATED SCREEN WITH WATER.
12. Retract the screen after each use.
13. To prevent unnecessary damage, the assembly and maintenance of the screen should be
done by adults.
12
This manual suits for next models
20
Table of contents
Other Severtson Projector Accessories manuals

Popular Projector Accessories manuals by other brands

Elitech
Elitech EW2 Assembly instructions

Kindermann
Kindermann Compact 120 installation manual

Extron electronics
Extron electronics Pole Mount Kit PMK 450 Specifications

Mustang
Mustang MPJS-K216 instruction manual

WolfVision
WolfVision Cynap Core PRO quick start guide

eSmart
eSmart TATENSO instruction manual


Christie
Christie CoreIII Series Installation and setup guide

Grandview
Grandview GPAD58 Series instruction manual

Navitar
Navitar 633MCZ087 installation instructions

Kingpin
Kingpin BIG SIZE SCREEN A Operation guide
 user manual")
Black Box
Black Box Wireless HDMI Presentation System (WHPS) user manual

New Star
New Star NeoMounts BEAMER-C300 instruction manual