Sewosy EF300CTC-R User manual

Sous réserve de modifications techniques - Technical changes reserved! - Änderungen vorbehalten!
13b rue Saint-Exupéry ZA Aérodrome CS20152 F-67503 HAGUENAU CEDEX www.sewosy.eu 33 (0)3 90 59 02 20
33 (0)3 90 59 02 19
INSTRUCTIONS GENERALES AVANT LE MONTAGE GENERAL INSTALLATION INSTRUCTIONS
ALLGEMEINE ANWEISUNGEN VOR DER MONTAGE
FR
- Utiliser ce matériel uniquement pour une application adaptée.
- Le fabricant n’est pas responsable des dommages éventuels causés par une utilisation contraire aux dispositions de sécurité.
- Le montage, la maintenance et les réparations doivent être réalisés par un personnel spécialisé et autorisé.
DE
- Dieses Material nur für vorgesehene Anwendungen einsetzen.
- Der Hersteller leistet keine Gewähr für Schäden die durch fehlerhafte Montage oder nicht einhalten von Sicherheitsvorschriften entstehen.
- Die Montage, die Wartung und Reparaturen dürfen nur durch sachkundiges Personal durchgeführt werden.
EN
- Use this equipment only for an adapted application.
- The manufacturer cannot be held responsible for possible damage caused when usual security requirements are not fullled.
- Mounting, maintenance and repair must be carried on by a skilled and authorized staff.
EF300CTC-R
MODE D’EMPLOI
INSTALLATION INSTRUCTIONS
BEDIENUNGSANLEITUNG
VENTOUSE ELECTROMAGNETIQUE EN APPLIQUE
SURFACE ELECTROMAGNETIC LOCK
aP -FLÄCHENHAFTMAGNET
ST_EF300CTC-R_A_170105
(*) Forces de retenue maximales pour des mises en œuvre respectant les conditions de pose optimales
(*) Maximal theoretical holding forces for implementations fullling optimal installation conditions
(*) Maximale theoretische Haftkräfte unter optimalen Montagebedingungen
1/4
1 x
1 x
1 x
1 x
8 x
2 x
1 x
1 x
NOMENCLATURE
BILL OF MATERIAL
LIEFERUMFANG
a
b
c
d
e
f
g
h
EF300CTC-R 1,8 kg
12V DC
ou-or
oder
24V DC
-15 /+20 %
520 mA
ou-or
oder
270 mA
6,24 W
ou-or
oder
6,48 W
300 daN
(*)
HALL
24V DC / 2 A
(FRANCE : T.B.T.S.)
- 10° C
+ 55° C
42
REED
24V DC / 0,5 A

Attention - Caution - Achtung
!
Contacts secs
Dry contacts
Potentialfreie Kontakte
- Make sure to observe correct polarity.
- Use correct input voltage as specied.
- Check jumper setting before connecting the lock to its power supply.
Incorrect polarity, wrong input voltage or wrong jumper position may damage the
product. These failures are not covered by the product warranty.
- Check for perfect alignement between armature plate and magnet.
- Anschlußpolarität beachten.
- Höhe der Betriebsspannung beachten.
- Richtige Einstellung des Jumpers vor dem Anschluß des Magneten an die
Stromversorgung prüfen.
Bei falschem Anschluß, Betriebsspannung oder Jumper Einstellung entfällt die
Garantieleistung!
Es kann am Magneten nicht reparierbarer Schaden entstehen.
- Überprüfen Sie ob Magnet und Gegenplatte genau ausgerichtet sind.
- Veiller à respecter la polarité indiquée.
- Utiliser une tension conforme à celle indiquée
- Vérier la position du cavalier avant de brancher la ventouse à
sa source d’alimentation.
Le non-respect de la polarité, l’emploi d’une tension inappropriée ou une mauvaise
position du cavalier ne sont pas couverts par la garantie et peuvent causer des
dommages irréversibles au produit.
- S’assurer d’un alignement parfait entre contreplaque et ventouse.
12V DC
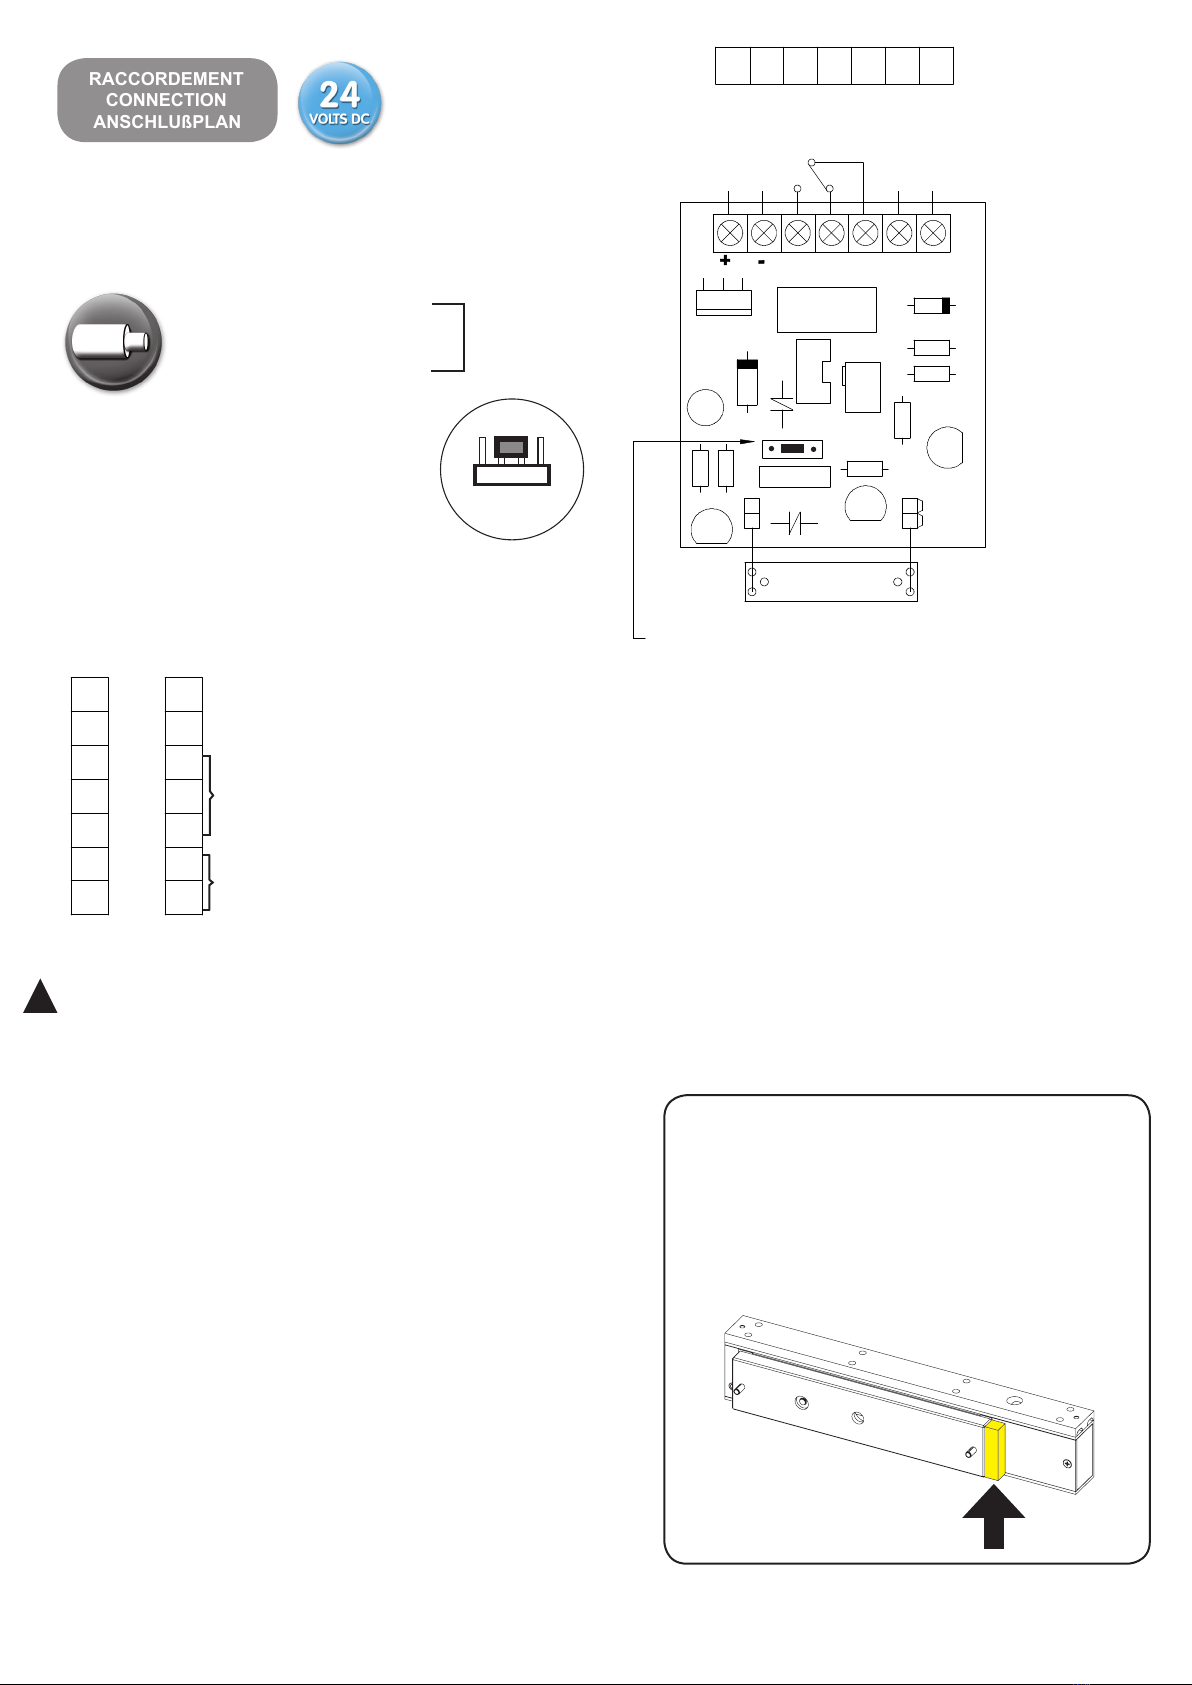
RACCORDEMENT
CONNECTION
ANSCHLUßPLAN
NO NC C COM DS
ATTENTION à la position du cavalier (12V DC)
PAY ATTENTION to jumper’s position (12V DC)
BITTE BEACHTEN: Positionierung des Jumpers (12V DC)
1
2
3
4
5
6
7
+
-
C
NC
NO
C
NO
1 3 62 54 7
12V DC
max. 1 mm²
Section des conducteurs
Conductor’s cross-section
Leitungsquerschnitt
0V DC
Contact d’état
verrouillé / déverrouillé
Door status contact
door locked / door unlocked
Contact de signalisation
porte ouverte / fermée
L’aimant doit se trouver en face de l’électro-
nique
The magnet must be positioned in front of
the electronic
Der Magnet muss genau gegenüber der
Elektronik positioniert sein
Door position sensor
door open / door closed
Türzustandsanzeige
Tür offen / Tür zu
Türriegelzustandsanzeige
Tür verriegelt / Tür entriegelt
12V DC
2/4
Attention - Caution - Achtung
!
Contacts secs
Dry contacts
Potentialfreie Kontakte
- Make sure to observe correct polarity.
- Use correct input voltage as specied.
- Check jumper setting before connecting the lock to its power supply.
Incorrect polarity, wrong input voltage or wrong jumper position may damage the
product. These failures are not covered by the product warranty.
- Check for perfect alignement between armature plate and magnet.
- Anschlußpolarität beachten.
- Höhe der Betriebsspannung beachten.
- Richtige Einstellung des Jumpers vor dem Anschluß des Magneten an die
Stromversorgung prüfen.
Bei falschem Anschluß, Betriebsspannung oder Jumper Einstellung entfällt die
Garantieleistung!
Es kann am Magneten nicht reparierbarer Schaden entstehen.
- Überprüfen Sie ob Magnet und Gegenplatte genau ausgerichtet sind.
- Veiller à respecter la polarité indiquée.
- Utiliser une tension conforme à celle indiquée
- Vérier la position du cavalier avant de brancher la ventouse à
sa source d’alimentation.
Le non-respect de la polarité, l’emploi d’une tension inappropriée ou une mauvaise
position du cavalier ne sont pas couverts par la garantie et peuvent causer des
dommages irréversibles au produit.
- S’assurer d’un alignement parfait entre contreplaque et ventouse.
24V DC
RACCORDEMENT
CONNECTION
ANSCHLUßPLAN
ATTENTION à la position du cavalier (24V DC)
PAY ATTENTION to jumper’s position (24V DC)
BITTE BEACHTEN: Positionierung des Jumpers (24V DC)
1
2
3
4
5
6
7
+
-
C
NC
NO
C
NO
1 3 62 54 7
24V DC
max. 1 mm²
Section des conducteurs
Conductor’s cross-section
Leitungsquerschnitt
0V DC
Contact d’état
verrouillé / déverrouillé
Door status contact
door locked / door unlocked
Contact de signalisation
porte ouverte / fermée
L’aimant doit se trouver en face de l’électro-
nique
The magnet must be positioned in front of
the electronic
Der Magnet muss genau gegenüber der
Elektronik positioniert sein
Door position sensor
door open / door closed
Türzustandsanzeige
Tür offen / Tür zu
Türriegelzustandsanzeige
Tür verriegelt / Tür entriegelt
NO NC C COM DS
24V DC
3/4

4/4
MONTAGE SOUS CADRE DE PORTE POUSSANTE
MOUNTING UNDER PUSH DOOR FRAME
MONTAGE UNTER QUERSTÜCK (AUSWÄRTS ÖFFNENDE TÜR)
CONFIGURATIONS DE POSE
INSTALLATION DIAGRAMS
MONTAGEZEICHNUNGEN
AUTRES TYPES DE MONTAGE : Se référer aux notices techniques des accessoires correspondants.
OTHER MOUNTING TYPES : Please refer to the corresponding accessories technical leaets.
WEITERE MONTAGEARTEN: Bitte entnehmen Sie die nötigen Informationen den entsprechenden technischen Anleitungen.
EF300CTC-R
+ EF300L
+ EF300C
EF300CTC-R
+ EF300_550UL
+ EF300_550UZAP
+ EF300L
+ EF300/550Z
+ EF300C
EF300CTC-R
+ EF300L
+ EF300/550Z
+ EF300C
Insert the rubber washer (h)
between the steel washers (g) and
do not screw too tighltly to keep the
armature plate slightly loose.
Insérer la rondelle caoutchouc (h)
entre les rondelles métalliques (g)
en évitant de serrer l’ensemble
trop fortement an de conserver la
mobilité de la contreplaque.
Beiliegende Gummischeibe (h)
zwischen beide Metallscheiben
einsetzen (g).
Vermeiden Sie diese zu fest anzu-
ziehen, damit die Gegenplatte leicht
beweglich bleibt.
Other Sewosy Door Lock manuals


