Sharp TU-R160HA User manual

Operation Manual
Model: TU-R160HA
Digital TV Recorder
Important : This product can only receive Digital Terrestrial TV signals, subject to
coverage and an aerial upgrade may be required.
1. Please check coverage by phoning 08708 80 99 80 or use your mobile to SMS text
0845 880 0421
REC MENU OK
TU-R160HA

1
INDEX
POWERCORD(MAINSLEAD)........................................................................................................................................................2
SUPPLIED ACCESSORIES..............................................................................................................................................................5
GENERALPROPERTIES..................................................................................................................................................................6
REMOTE CONTROL.........................................................................................................................................................................6
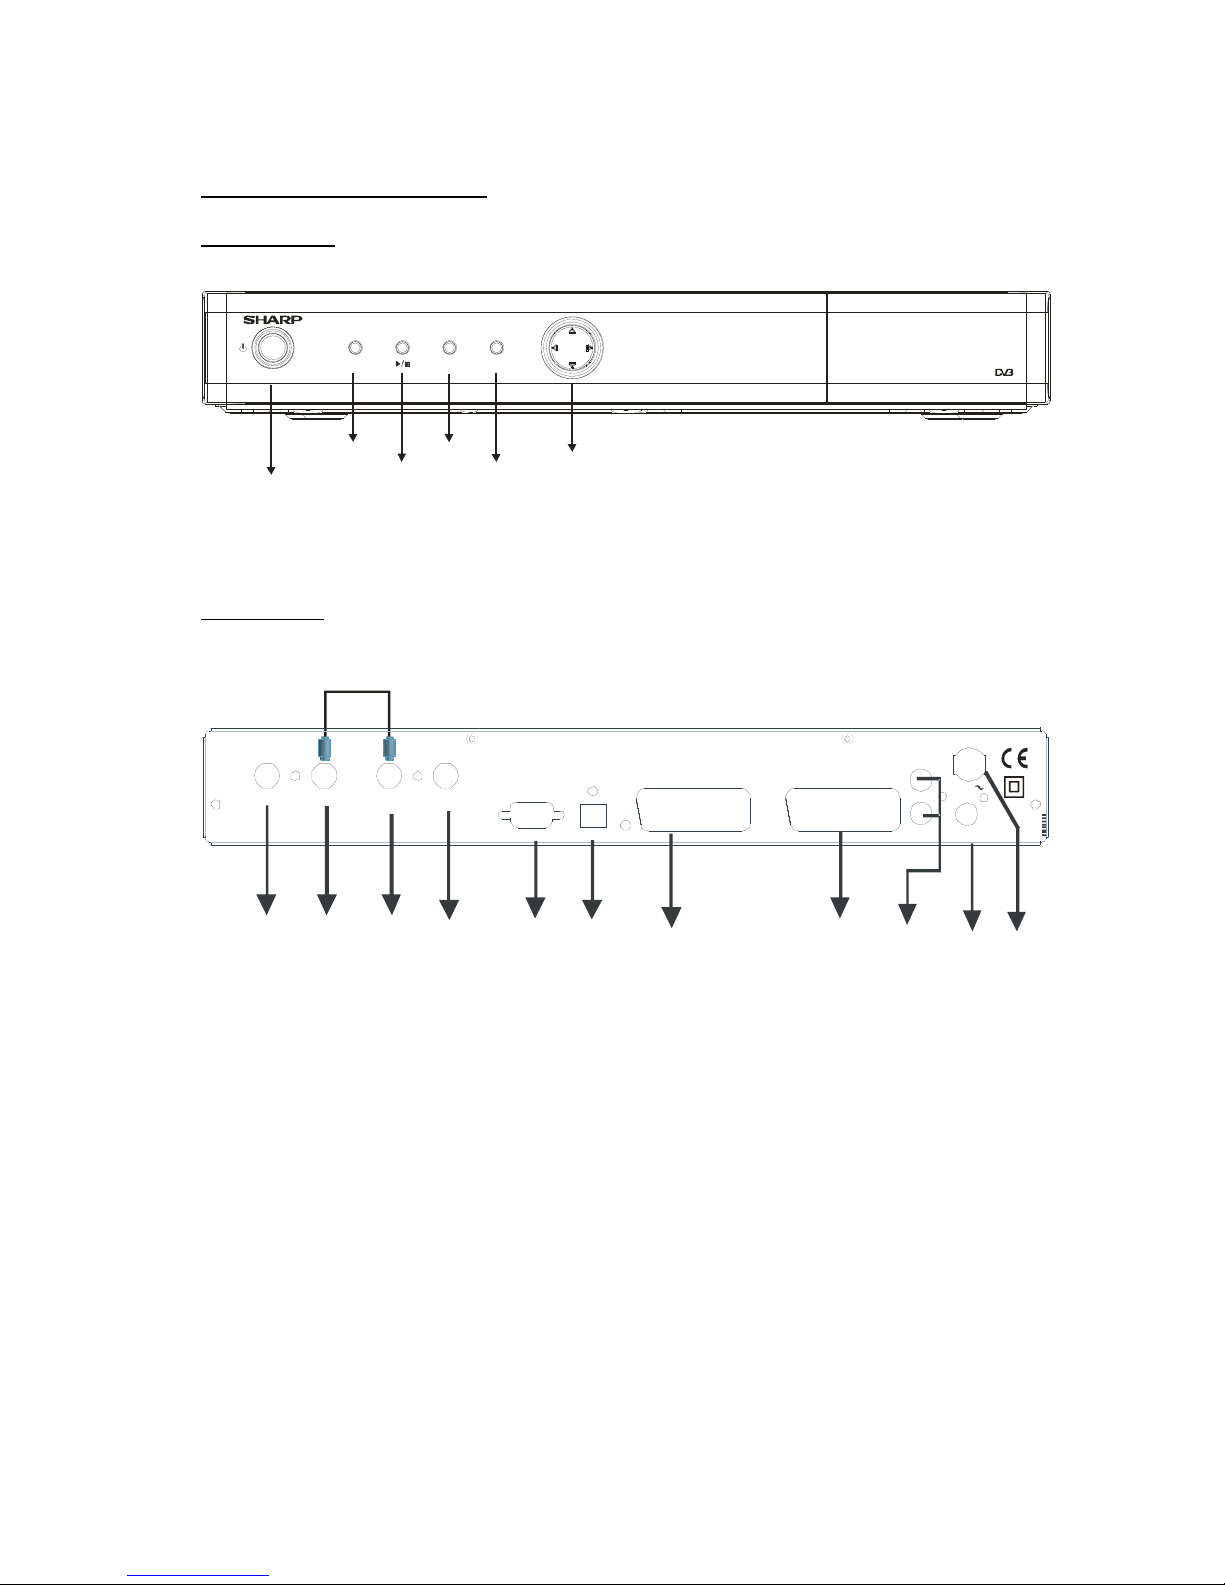
FRONTAND BACKPANEL..............................................................................................................................................................7
GETTINGSTARTED.........................................................................................................................................................................8
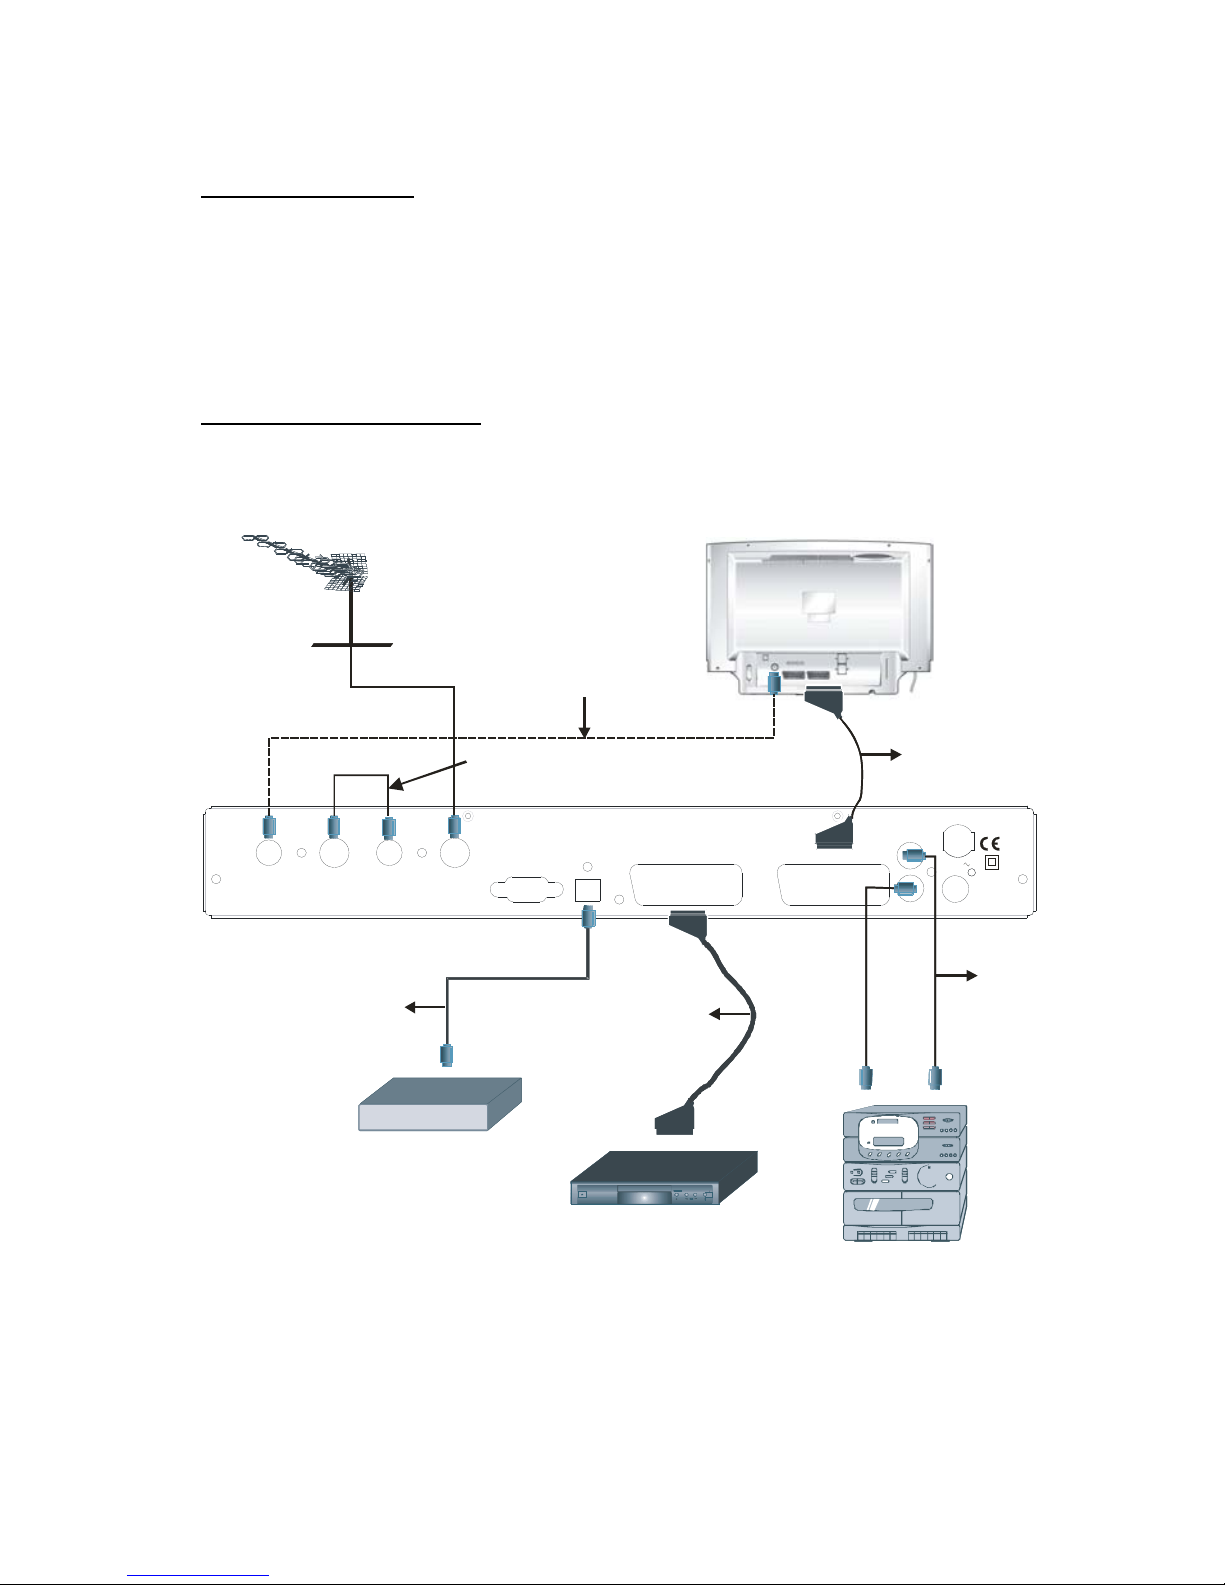
CONNECTIONDIAGRAMS...............................................................................................................................................................8
REMOTE CONTROL&FUNCTIONS...............................................................................................................................................9
MENU INTERFACE.........................................................................................................................................................................11
FIRST TIME INSTALLATION..........................................................................................................................................................11
MAIN MENU.....................................................................................................................................................................................11
1. CHANNEL LIST...........................................................................................................................................................................11
1.1. NAVIGATINGCHANNELLIST.................................................................................................................................................12
1.2. DELETINGCHANNEL.............................................................................................................................................................12
1.3.EDITINGCHANNELNAMES...................................................................................................................................................12
1.4.ADDINGLOCKSTO CHANNELS............................................................................................................................................12
1.5.SETTINGFAVOURITE LIST....................................................................................................................................................12
2.PROGRAMMEGUIDE (8DAYS)................................................................................................................................................13
3. TIMERS........................................................................................................................................................................................13
4. RECORDINGS LIBRARY............................................................................................................................................................14
4.1.PLAY OPTIONS........................................................................................................................................................................15
4.1.1.PLAY FROMSTART.............................................................................................................................................................15
4.1.2.RESUME................................................................................................................................................................................15
4.1.3.PLAY FROMOFFSET...........................................................................................................................................................15
4.1.4MANAGE CHAPTERS............................................................................................................................................................15
4.1.5.CREATE ARCHIVE(ARCHIVE MANAGEMENT).................................................................................................................15
EDITRECORDINGS.......................................................................................................................................................................15
MAINTITLE.....................................................................................................................................................................................16
RECORDINGTITLE........................................................................................................................................................................16
4.2. CHAPTEROPTIONS................................................................................................................................................................17
4.2.1.CREATE NEWCHAPTER MARK.........................................................................................................................................17
4.2.2.FORWARDSTO NEXT CHAPTER.......................................................................................................................................17
4.2.3.BACKTOSTARTOF CHAPTER..........................................................................................................................................17
4.2.4.BACKTOPREVIOUSCHAPTER.........................................................................................................................................17
5.SETUP.........................................................................................................................................................................................18
5.1. RECORDINGS..........................................................................................................................................................................18
5.1.1.MAX TIMESHIFT...................................................................................................................................................................18
5.1.2.AUTO DISCARD....................................................................................................................................................................18
5.1.3.FORMATDISK......................................................................................................................................................................19
5.1.4.HARD DISK INFO..................................................................................................................................................................19
RecordingFormat............................................................................................................................................................................20
UnrecordableMaterial......................................................................................................................................................................20
Hard DiskOperation (Recording /Playback / Time ShiftRecording)..............................................................................................20
5.2. CONFIGURATION....................................................................................................................................................................21
5.2.1.TV TYPE................................................................................................................................................................................21
5.2.2.TV OUT..................................................................................................................................................................................21
5.2.3.VCR OUT...............................................................................................................................................................................21
5.2.4.FAVOURITE MODE...............................................................................................................................................................21
5.2.5.CHANNEL LIST.....................................................................................................................................................................21
5.2.6.SCAN ENCRYPTEDCHANNELS.........................................................................................................................................21
5.2.7.RECEIVERUPGRADE-OAD...............................................................................................................................................22
5.2.8.PARENTALLOCKING...........................................................................................................................................................22
5.2.8.i. MENU LOCK........................................................................................................................................................................22
5.2.8.ii. SETPIN..............................................................................................................................................................................22
5.3. LANGUAGE..............................................................................................................................................................................23
5.4.INSTALLATION........................................................................................................................................................................23
5.4.1.AUTOMATICCHANNELSCAN............................................................................................................................................23
5.4.2.MANUALCHANNEL SCAN...................................................................................................................................................23
5.4.3.FIRST TIME INSTALLATION................................................................................................................................................24
6.MESSAGES.................................................................................................................................................................................24
7.SPECIFICFUNCTIONSOF REMOTECONTROL.....................................................................................................................24
TIMESHIFTING(PAUSELIVE RECORDING)...............................................................................................................................26
8.SOFTWAREUPGRADETHROUGHRS232.............................................................................................................................27
9. NOTES.........................................................................................................................................................................................28
10. TROUBLESHOOTINGGUIDE.................................................................................................................................................29
11. TECHNICALSPECIFICATIONS...............................................................................................................................................30
12. IMPORTANTNOTICE:..............................................................................................................................................................32
DIGITALSWITCHOVERAND YOURTV EQUIPMENT.................................................................................................................32
13. INFORMATIONABOUTPRODUCTDISPOSAL......................................................................................................................33

2
POWER CORD (MAINS LEAD)
Donot placethe productwhereapieceoffurnitureor otherheavyobjectcouldtrapthe powercord
(mainslead). Handlethepowercord bytheplug.Do not pull out the plug bytuggingthe cord and
never touchthe power cord whenyourhands arewet as thiscould causeashort circuitor electric
shock.Never makeaknot in the cord or tieit withothercords.The powercordsshould berouted in
suchawaythat theyare not likelyto bestepped on. A damaged powercord can cause fire or giveyou
anelectrical shock.Check the power cord periodicallyto see if it isdamaged.Ifit isdamaged, please
ask an approved service agent toreplaceit.
For your ownsafetyread following instructions carefullybefore attempting to connect this device to the
mains.
Thisunit is designed tooperateona220V-240V AC -50Hz supplyonly.Connectingit to other power
sourcesmaydamageit.Ensure thatthesupplycorrespondstotheinformationontheratinglabelon
the bottomof theunit. Thiscomponent systemmaybe fitted withanon-rewireableplug. If itis
necessaryto change the fusein anon-rewireable plug, thefusecover mustbe refitted. Ifthe fuse
cover becomeslostor damaged,the plugmostnot be useduntil areplacement, available fromthe
manufacturer, isobtained. It isimportant that the colourofthe replacement fusecover corresponds
withthecolour marking on thebaseoftheplug.Iftheplugneedsto be changedbecause it isnot
suitable foryour socket, or it becomesdamaged,it should be cut off andthe fuseremoved
immediately.Pleasedisposeof the plug safelyandoutof reach fromchildren. Under nocircumstance
should the cut-off plug beinsertedintoamainssocket outletdueto highriskof electricshock.
Thenfit an appropriateplug carefullyfollowing the wiringinstructions shownbelow.
IMPORTANT
The wiresin themainsplugshouldbe connected
asshown in the diagram.
The coloursof thewiresin the mains leadof the unit
maynotcorrespond with thecolouredmarkings
identifyingtheterminalsin yourplug. Connectthem
asfollows:
The wirewhich iscolouredblue must be connected
to theterminalwhich ismarked with theletter‘N’ or
colouredblack.
The wire which iscolouredbrownmust be connected
to the terminalwhichismarked withthe letter‘L’ or
colouredred.
Thereshould benoconnection toearthterminal of
yourplug.If youuse a13 Amp (BS1363)plug,you will
need a 5 Amp fuse.
Howto replacethefuse
Openthe fusecompartmentwith a bladescrewdriverand replacethe fuse. Whenreplacingthefusein
the plug,useASTAorBSI approved 5AMPfuseandbesure to re-fit thefuse cover. If theplug
suppliedwith thisequipmenthas adetachable fusecover, be sureattachthefusecoverafter you
change thefuse.Never use the plugwithoutthe fuse cover.
If you should lose thefuse cover, please contact an electricalgoodsretailer.
If indoubt,consult acompetent electrician howtoreplace the fuse
Thissymbol meansthatthisunit is doubleinsulated.An earthconnection isnotrequired.
CAUTION
To prevent electricshock, disconnectfromthemainsbefore removing cover.Nouser servicable parts
inside.Referservicing toqualifiedservice personnel. Disconnectfromthemainssupplybefore
cleaning.
BLUE
(NEUTRAL)
BROWN
(LIVE)
FUSE
CORDGRIP
OUTER
SLEEVE

3
CAUTION: Pleaseread all of these instructions beforeyou operatethis product and savethese
instructions for later use.
Electricalenergycan performmanyuseful functions.Thisproducthasbeenengineered and
manufactured to assureyour personal safety.BUTIMPROPER USECAN RESULTIN POTENTIAL
ELECTRICAL SHOCKOR FIRE HAZARDS.In order not todefeatthe safeguardsincorporatedinthis
product, observe the following basicrulesfor itsinstallation, use and servicing.
1. ReadInstructions
Allthe safetyandoperating instructions shouldbe read beforethe productis operated.
2. Retain Instructions
The safetyand operating instructionsshould be retainedforfuturereference.
3. Heed Warnings
All warningson the product andin theoperatinginstructionsshouldbeadhered to.
4. FollowInstructions
Alloperating anduse instructionsshould befollowed.
5. Cleaning
Unplug thisproduct fromthewalloutletbeforecleaning.Do notuse liquidcleanersor aerosol
cleaners.Use a damp cloth forcleaning.
6. Attachments
Donot use attachmentsnotrecommendedbytheproduct manufacturer astheymaycause hazards.
7. Water and Moisture
Donot use thisproductnear water–for example,nearabathtub,washbowl,kitchensink,orlaundry
tub; ina wet basement; orneara swimmingpool; andthe like.
The mainsplugor theappliancecouplerisusedas thedisconnect device,the disconnectdeviceshall
remain readilyoperable.
Apparatusshallnotbe exposedto drippingorsplashing and noobjectsfilledwithliquids,suchasvases,
shallbe placed on theapparatus.
Nonaked flamesources,suchas lighted candles, should be placed onthe apparatus.
8. Accessories
Donot place thisproducton anunstable cart, stand,tripod,bracket,or table. Theproductmayfall,
causingseriousinjurytoachildor adult, andseriousdamagetothe product.Useonlywithacart,
stand, tripod, bracket, ortable recommendedbythemanufacturer, or sold withtheproduct. Any
mounting oftheproductshouldfollowthemanufacturer’sinstructions,and shoulduseamounting
accessoryrecommended bythe manufacturer.
9. Transportation
Aproductandcartcombinationshouldbe moved withcare. Quickstops,excessiveforceand uneven
surfacesmaycausetheproduct andcart combinationto overturn.
10. Ventilation
Slotsandopeningsinthe cabinet areprovidedfor ventilation to ensure reliable operationof the
productandto protectitfromoverheating,andtheseopeningsmustnotbeblocked or covered. The
openingsshouldneverbe blockedbyplacingtheproducton abed, sofa,rug,orothersimilar surface.
Thisproductshould not beplacedinabuilt-in installationsuchasabookcaseorrackunless proper
ventilationis provided or the manufacturer’sinstructionshave beenadheredto.

4
11. PowerSources
Thisproductshould beoperated onlyfromthe type ofpowersource indicated on the markinglabel. If
you are not sure of thetypeofpowersupplyto your home, consult yourproductdealerorlocalpower
company. For productsintended to operatefrombatterypower,or othersources, refer to the operating
instructions.
12. Groundingor Polarization
Thisproductisprovidedwithoneofthe following types of plugs.If theplug should failtofitinto the
poweroutlet, please contactyour electrician. Do notdefeat the safetypurpose of theplug.
a. Two-wire type (mains)plug.
b. Three-wiregroundingtype (mains)plug withagroundingterminal. Thisplug will onlyfitintoa
groundingtype poweroutlet.
13. Power-Cord Protection
Power-supplycordsshould berouted sothat theyarenot likelytobewalkedonorpinched byitems
placed uponor againstthem,payingparticularattention to cords at plugs,conveniencereceptacles,
and thepoint wheretheyexit fromthe product.
14. Lightning
Foradded protectionfor thisproductduring alightning storm,orwhen itisleft unattended andunused
for longperiodsof time,unplug it fromthewalloutletanddisconnectthecable system.This will
prevent damage tothe productdue to lightning and power-line surges.
15. Overloading
Donot overload walloutlets,extensioncords,or integral convenience receptacles asthiscanresult in
a riskoffire or electricshock.
16. Objectand LiquidEntry
Neverpushobjectsofanykindintothisproductthroughopeningsastheymaytouchdangerous
voltage pointsorshort-out partsthatcouldresultinafire orelectricshock.Neverspill liquidofany
kind on the product.
17. Servicing
Donot attemptto servicethisproductyourself asopeningorremovingcoversmayexposeyou to
dangerous voltageorotherhazards.Refer all servicing to qualified service personnel.

5
18. Damage Requiring Service
Unplug this productfromthewall outlet and refer servicing to qualified servicepersonnel underthe
following conditions:
a. Whenthe power-supplycord or plug isdamaged.
b. Ifliquid hasbeen spilt,orobjectshave fallen intothe product.
c. If the producthas been exposedto rain orwater.
d. If theproductdoes not operate normallybyfollowingthe operatinginstructions.Adjustonlythose
controlsthat arecoveredbytheoperatinginstructions,asanimproper adjustment of other controls
mayresult in damage andwilloftenrequireextensiveworkbyaqualified technicianto restore the
product tonormaloperation.
e. Iftheproduct hasbeendropped or damaged in anyway.
f. Whentheproduct exhibitsa distinctchangeinperformance, thisindicatesa need for service.
19. ReplacementParts
When replacement partsarerequired,ensure the servicetechnician hasusedreplacement parts
specifiedbythemanufactureror havethe samecharacteristicsasthe originalpart. Unauthorized
substitutionsmayresult in fire,electricshock,or other hazards.
20. SafetyCheck
Upon completion ofanyservice orrepairs to thisproduct,ask the servicetechnicianto performsafety
checksto determinethattheproductisinproper operatingcondition.
21. WallorCeilingMounting
Thisproduct should be mountedto awall orceilingonlyas recommended bythe manufacturer.
22. Heat
Thisproductshouldbesituated awayfromheat sourcessuchasradiators,heat registers,stoves,or
other products(includingamplifiers) that produce heat.
23. Copyright
Audio-visualmaterial mayconsistofcopyrightworkswhichmustnot berecorded withoutthe authority
of the owner ofthe copyright. Please refer torelevant lawsin your country.
WARNING
SUPPLIED ACCESSORIES
•Operationmanual
•QSG (Quick Start Guide)
•Remotecontrol &2xAAA batteries
•1 Scart lead

6
GENERAL PROPERTIES
1. Menu Language: English
2. Channellock,Menulock
3. Channellist sorted byD-booklogical channel numbers.
4. Channellist nameeditingoption.
5. BBC UKCompliantOver AirDownload.
6. PIP(Pictureinpicture)
7. Timeshift–pause live TV.
8. Onebutton record(Instantrecording of channels).
9. Dual recordingsatthe sametime.
10. Once, daily,weeklyprogrammedeventrecordings.
11. Abilitytorecord one channelwhilewatchinganotherchannel.
12. Abilitytorecord two channels whilstwatching arecording.
13. X1/4, X1/2, X1,X2,X4, X8, X16, X32 forwardand backward playoptions.
14. Playlist showsavailablerecordings(Eventname,Start time, Duration,delete/playback
permission)
15. Timerslist showsscheduled recordings(Event name, Start time, Duration,once/daily/weekly
repeat,change/delete/playback permission)
16. Recordtimervia 8dayEPG
17. RecordsDVB subtitles(If anyare broadcasted bythe broadcaster).
18. Automatic/Manualchannel search.
19. Guided firsttimeinstallation.
20. 200channelsstorage.
21. Favourite channel lists.
22. Automaticdaylight saving time updating.
23. MHEG-5 Engine
REMOTE CONTROL
1. Press the ^markon thecover and slide it inthe direction of the arrow.
2. Insert the batteriesmaking sure thepolaritiescorrectlymatch the + and -marksinside the battery
compartment.
3. Attach the coverand slideituntilit clicksintoplace.
Please followtheprecautionsbelow.
• Dangerof explosion if batteryis incorrectlyreplaced.
Replace onlywiththe same or equivalent type.
• Insert the batteriesmakingsure thepolaritiescorrectlymatch the+ and-marks insidethe battery
compartment.
• Batteriesof different typeshave differentproperties, thereforedo notmixbatteriesofdifferenttypes.
• Donotmixnewandoldbatteries.
Thismayshortenthelifeofnewbatteries or maycause old batteriesto leak.
• Remove the batteries fromtheremote control once theyhave run out, asleaving themin can cause
themtoleak.
Batteryfluid fromleaked batteriesisharmfultoskin,therefore ensurethat you wipethemfirst and then
remove themusingacloth.
• Remove the batteries fromtheremote control if you will notbe using theremotecontrol foralong
time.
• Complywith the rules (ordinance)of each local governmentwhen disposing ofworn-out batteries.
• Dispose ofbatteries carefully, safelyandaccordingtolocalregulations. Do notincineratethem.
Replacementbatteriesforthisunitare1.5Volt (R03/AAA).

7
FRONT AND BACK PANEL
FRONT PANEL
ON/OFF
KEY
MENU
KEY
PLAY/PAUSE
KEY
RECORD
KEY OK
KEY
MENU
UP/DOWN
LEFT/RIGHT
RECMENUOK
TU-R160HA
BACK PANEL
TVSCARTVCRSCART
ANTENNA1 OUTANTENNA1IN
RS 232 CVBS
LEFT
RIGHT
OPTICALOUT
ANTENNA2OUTANTENNA2IN ACIN
134
2567 8
9
DONOTREMOVE
10
11
1.AERIAL 2OUT: To watch analoguechannelsonthe TV
2.AERIAL 2IN :Loopthrough
3.AERIAL 1OUT:Loopthrough
4.AERIAL 1IN :Aerial input
5.RS232 : Software Upgrade
6. OPTICALSPDIF :OpticalDigitalAudioOutput
7. VCR SCART:Outputforother equipment such asDVD,VCR...etc.
8. TV SCART:TVScart connection/ loopthrough
9.ANALOGUE AUDIO LEFT/RIGHT : AnalogueAudiooutput
10. CVBS :Video Output
11. POWER SUPPLY : 220-240V AC, 50Hz

8
GETTINGSTARTED
Beforeconnecting, ensurethat the power cord ofthe unit isunpluggedfromthe AC outlet andturn off
thedevicestobeconnected. Aftermakingall connections(Diagramson page8), turn onthe unitfirst
and thenthe other devices.
"NOTE" - Whentheunitisfirst poweredup, pleasewait forashort whileas the unit'ssoftwareneeds
to be initialised and the harddisk ischecked.
The unit isequipped withoutput terminalsthat supportRGB, S-videoand CVBS videosignals.The
image qualityishighest intheorderof the RGB signal,theS-videosignal andtheCVBS video signal
CONNECTION DIAGRAMS
TVSCARTVCR SCART
ANTENNA1
OUT ANTENNA1
IN
RS232
CVBS
LEFT
RIGHT
OPTICALOUT
ANTENNA2
OUT ANTENNA2
IN
ACIN
35020157
TVAerial
LOOPTHROUGH
AC3DIGITAL
AMPLIFIER
VCR
VCR SCART
VCR
VCR SCART
TVAerial
DONOTREMOVE
Aux
HI-FI
Aux
HI-FI
“Optional RF leadif you
stillwishtowatchanalogue
channels on theTV”
SCARTCABLE
SUPPLIED
OPTIONAL
CABLE
OPTIONAL
CABLE
OPTIONAL
CABLE
NOTE: This settopboxsupportsFree To Viewonly.There isnoprovision for a CAMor PayToView
card.

9
REMOTE CONTROL & FUNCTIONS
1
2
3
4
6
7
8
9
10
11
12
13
14
15
16
17
18
19
20
21
22
23
27
25
26
24
28
29
30
31
32
5
USING THE CONTROLSON THE FRONT PANEL
You can enterthemain menu bypressing the menubutton onthefront of theunit. Thennavigate
throughthemenu'swith the fourarrowbuttons onthefront oftheunit.andmake aselectionwiththe
OK button.

10
KEY FUNCTION
1.STAND BY StandbyON/OFF
2. 8Fast Forward
3. LIB.Libraryof recordings
4. TIMERS Schedulerecording information
5. Record key
6. INFODisplaysInfowindow
7. Arrow keys/OKMenu Navigation
8. BACKExitfrom menu(Withoutsaving) / Pageback
9. PR+/-Next/Previouschannel
10. YELLOWTeletextFunction key
11. BLUE TeletextFunction key
12. 0,1,2,3.....9Numeric keys
13. P3P Previouschannel
14. WIDETV Mode (Screenformat)
15. SUBT.EnablesSubtitles
16. SWAP Normalscreen and PIP window change theirplaces
17. PIP + Next channelin PIP window
18. MUTEMute
19. 4Playtherecording
20. 7Fast reverse
21. <Stoptherecording
22. ;Pause
23. GUIDE ElectronicProgram Guide
24. TEXTTeletextkey
25. V+/ V -Volume UP/DOWN
26. GREEN TeletextFunction key/Interactive Service
27. REDTeletextFunction key
28. AUX AUXInput
29. MENUEnter menu/ Exit menu (Withsaving)
30. FAV Favourite list
31. PIP OpensPIP window
32. PIP- PreviousChannelinPIPwindow

11
MENU INTERFACE
FIRST TIME INSTALLATION
When theunit isoperated for the firsttimeorifthereis nochannel storedinthe database,“FirstTime
Installation”Menu windowisdisplayedonthescreen. In thiswindow,setthe TVtypewith “3/4” keys
and pressOK tocontinue.
The automaticchannel scan windowappears.
To confirmautomaticchannel scan, use the “3/4” keys and press OK tocontinue.
The unit will start searchingforchannels.When the automaticchannelscaniscompleted, the unitwill
switchto PR 1.
CAUTION -Donotpressanybuttons on theremotecontrol or frontpaneldisplayduring automatic
channel search.
MAIN MENU
The mainmenuisaccessed bypressing the “MENU” keyonthe remote
control.
You can navigate the menuusing the “5/6”keysontheremote control. To
activate themenuselection, pressthe OK keyontheremotecontrol. Press
“BACK” on theremote control to exitthe selected menu. In all menus thereis
anInfobanner locatedat thebottomofthescreen.These are functionsthat
can be appliedin thatmenuoption.
1. CHANNELLIST
Channellististhe placewherethe
channelsaremanaged. Thefollowing
operations canbe performed inthismenu:
1. Navigatingchannel list
2. Deletingchannels
3. Renaming channels
4. Adding locksto channels
5. Setting favourite list

12
1.1. NAVIGATINGCHANNEL LIST
In the“channeltable” “5/6”keyscan beused to movetheselectiontothepreviousor next.Toexit
menuandwatch aspecificchannel, highlight it using,“5/6”then pressOKkey whilethe"SELECT"
optionatthebottomofthescreen ishighlighted.If theselectedchannel ispasswordprotected thena
popupmenuisdisplayed.Ifthecorrectcodeisentered, the selectedchannel can be watched. You
cannowselectanother channel in thelist.Thescroll bar in the middle ofthescreenshowsrelative
positionof thecurrentlyvisiblechannels withrespect to the wholelist.
1.2. DELETINGCHANNEL
Todeleteachannelhighlightitusing “5/6”, thenhighlightthe“Delete” keyusing“3/4” andpress
“OK”. A message is displayed to confirmyour decision, ifyoustill wantto delete select“YES”,with the
“3/4”keysor theoperation will be cancelled ifyou select “NO”.
1.3. EDITINGCHANNELNAMES
Torenameaspecificchannel, highlight"Edit Name"keyafter the channelisselectedand press “OK”.
A boxappearson the screen. “3/4” moves tothe previous/next character. “5/6”togglesthecurrent
character, i.e., ‘b’ character becomes‘a’ on“6”and ‘c’ on “5”. Pressing the numeric keys‘0...9’
replacesthe highlighted character with the charactersprintedabove thekeyone byoneasthe keyis
pressed. Pressing“BACK” cancelsthe editing and“OK” savesthe newname.
1.4. ADDINGLOCKSTOCHANNELS
“ChannelLocking”providespassword-protectedaccess to channelsselectedbyparents.In orderto
lockachannel youshouldknowtheparentalLock password (set to 0000 in thefactoryandcan only
bechanged fromthe“Configuration Menu”), fromthechannellistmenuhighlight the channeltobe
locked andselectthe“Lock”keywith the “3/4” keys,whenOK ispressed apassword boxis
displayed.Enter theparentalLock code, press “OK”andtheLockiconwillbedisplayed infrontofthe
selected channel.Repeat the sameoperation to cancelthe Lock.Write the PIN downatthelastpage
and keepit safe.
1.5. SETTINGFAVOURITE LIST
Favorite lists”providean easywayto
group programsin acustomizable way.
Five favouritelistsare availableon this
productnamed asList1, List2, List3, List4
and List5.
ØFromthechannellistusethe
“3/4”keysto highlight
“Favourites”and press“OK”to
enterthe“Favourite Lists” menu.
ØPress the“3/4” keysto select
yourpreferred favourite list
(List1/List2/List3/List4 or List5).
ØPress “OK”to addthehighlightedprogrammeto your listandcontinue to add theprogrammes
you wanttoinclude inyourfavourites byhighlighting the channel and pressing“OK”.
ØRepeat the abovesteps to removethe channels fromthe list. Once complete press“MENU” to
saveyoursettings.
ØYou can stepthrough your favouritelistswiththe “FAV”keyon theremote.Eachpresswill
advancetothe nextlist. The “PR+”and“PR-“ keyswill cycle throughthechannelsyou putin
thecurrentlyselected favouriteslist.

13
2. PROGRAMME GUIDE(8DAYS)
Press the “Guide” buttontoaccess EPG
menu.“ElectronicProgramGuide”appears
on the screen. It is able to getInformation of
the channel-programs weeklybymeansof
8-DAY–EPG.All programsof channelsare
displayed.Thecurrent programis
highlightedandthereisbrief information
about the programs ofthe channel, suchas:
name,short/extendedevent description,
start&endtime.Bypressing “3/4”keys
continuouslythe timescale can be
changed.If thereisanyevent information
dataavailableonlyprogramnames and
dates aredisplayed.Across the bottomof
the screen there isaninfo barshowingall
the available commandswhichare listed
below.
RED BUTTON (SHRINK): make theinfoboxessmaller
GREEN BUTTON(EXPAND): make theinfoboxeslarger
YELLOW BUTTON(PREV DAY): displays theprograms of previousday
BLUE BUTTON (NEXT DAY) : displays theprograms of next day.
INFO (DETAILS):displays theshort extended programsin detail.
(RECORD) : theunit will recordtheselected progamme.
NUMERIC BUTTONS (JUMP) :go topreferred channel directlyvianumericbuttons.
OK (VIEW / REMINDER):showsthe highlighted channel /setsthereminder for future
programs
TEXT (SEARCH) :activates“Search”window.
7(PAGELEFT):movesthe pageto left.
8(PAGERIGHT): movesthe pageto right.
4(NOW): showsthe current programme
3. TIMERS
TodisplayTimer windowpress either
“TIMERS”keyor activate itfrommain
menu.Toadd aTimerpress“YELLOW”
button on the remoteandthe,“Add Timer“
windowsappears.
Channel: “3/4” keyswill navigate theuser
throughtheTVor Radio list.
Date: Byusingeither “3/4”or“0,1,2…,9”
keysstart dateisentered.
Start: Byusingeither “3/4”or “0,1,2…,9”
keysstart time isentered.
End: Byusing either “3/4” or“0,1,2…,9” keysend time is entered.
Duration: Displaysthe durationof therecording.
Thisisautomaticallyworkedout afterthe start and endtimeshavebeen entered.
Repeat: Byusing “3”/“4” keys, repeatmode isset to“Once”,“Daily” or “ Weekly”.
Playback: Permit or blockplayback for other users."use parental settings" is default.

14
Change /Delete: Permitorprohibit anymodifications forother users.
When atimer Starttimeisreached,thereceiverstartsto recordthedesiredprogram,thenwhenthe
endtimeis reached, the record stops.Save the adjustmentsbymeansof “GREEN” keyorcancel with
“RED” button. Edit the list via “GREEN” keyanddelete with the “RED” button.
4. RECORDINGSLIBRARY
Alltherecordingsarekept inalist.Toshowthe listofrecordingspress either“LIB”buttononthe
remoteor access it fromthemainmenu.
RED BUTTON (DELETE):erase the recordings
GREEN BUTTON(EDIT ): make changestothe recordings
YELLOW BUTTON (TAG): marks the recordingsforarchiving
BLUE BUTTON (SORT) : changethe order of the recordings
INFO (DETAILS):displays theshort extended programsin detail
OK BUTTON : opensthe playoptions menu
4(RESUME): recommence the recordings
Redbar: indicates the used space of therecordingsonthe hard disk.
Yellowbar: displaysthe approximate capacityrequired for the timerscurrentlyset.
Greenbar: showsthe free space ontheharddisk.

15
4.1. PLAYOPTIONS
4.1.1. PLAYFROM START
Playsthe recording fromthebeginning.
4.1.2. RESUME
Beginswithplayingfromthelast stoppedposition.
4.1.3. PLAYFROM OFFSET
Beginswithplaying, fromthe timewhich isentered.
4.1.4 MANAGE CHAPTERS
It willdisplayanymarked chapters(To set chaptermarks, pressthe Menubuttonduringplayback and
enter the“Chapter Options” menu)andbegin with playback fromthe selected chapter.
4.1.5. CREATE ARCHIVE (ARCHIVE MANAGEMENT)
Using thisoption, you will beabletoarchiveyourrecordingsto anexternaldevice likea“Recorder or
VCR”. Pressthe “LIB.”button andcometothe“RecordingsLibrary”.Inthislibrary,the saved
recordingsarelisted.Toselectarecording which should bearchived,highlightoneofthemusing the
“5/6”buttonsandselectthe TAG option,bypressing the“YELLOW”button. Afterthen, press the
“OK” buttontoopenthe“PlayOptions”menu. In this menu, using the“5/6”buttons,selectthe
“Create Archive” option and enteritbypressing the“OK” button. You will see themenu below:
EDIT RECORDINGS
Whilethe “Editrecordings” option ishighlighted,using the3/4” buttonsmove to thelistof recordings
ontheright of thismenu. Select one of them,which shouldbearchived and press the “OK” button.
You will cometothe following menu:

16
Here, onlythe“Startrecordingat” and“Stoprecordingat” optionsare active. Ifyou havealready
separatedrecording, you can selectanychaptertobegin withthe archiving and stopit.Ifit isnot
separatedin chapters,thebeginning and endingtimeof therecordingwill beautomaticallythe
beginning and ending timeofthe archiving.
MAIN TITLE
If you want to displaya maintitle,select“Include” (To dothis, use the “3/4” buttons).Ifnot,select
“Skip”. Byselecting“Skip”, the optionsbelowwill bedisabled.
TEXT: Afteryou select the “Include” optionin the “MainTitle” menu,you can edit the main titleby
pressing theOK button.
DURATION: Set the duration ofthe appearance ofthe maintitle on the screen.
RECORDINGTITLE
If you want to displaya recording title,select “Include” (To dothis,use the“3/4” buttons). If not,
select “Skip”. Byselecting “Skip”, theoptions belowwill bedisabled. Whilearchiving, you candecide
to showthenamesof the savedrecordingsonthescren.
DISPLAY: In thisoption, you can decide, which ofthefollowing itemsshould be displayed inthe
recording title:“Name”, “Start date/time” and “Length”.
DURATION: Set the duration of theappeareanceof the“Recording title”menumain title on the
screen.Ifyou presstheMenubutton duringplayback,you willenter the “Chapter optionsand inthis
menu,youcanset anypointas achapter. So,you canskip frameswhichshould not bearchived. You
canalso start and stop the playback fromanychapter you want.
To stop archiving, press the “STOP”button.During archiving, noother buttonwillbe functioned.

17
4.2. CHAPTER OPTIONS
During playbackofa recording, if you press the“MENU” button, youwill gettothe“ChapterOptions”
menu.Thechapteroptionsmenu includesfollowing options:
4.2.1. CREATE NEWCHAPTERMARK
Using the “5/6”buttonsselectthisoption and press the “OK” button, tocreatea chapter mark.You
canset achaptermarkanywhereyou want.
4.2.2. FORWARDS TONEXT CHAPTER
Using the “5/6”buttonsselectthisoption and press the “OK” button, togoto thenextchapter.
Available, if there is more than one chapter.
4.2.3. BACK TOSTART OF CHAPTER
Using the “5/6”buttonsselectthisoption and press the “OK” button, togotothebeginning of the
current chapter.Thisisthe last played chapter.
4.2.4. BACK TOPREVIOUS CHAPTER
Using the “5/6”buttonsselectthis option and press the “OK” button, togotoback totheprevious
chapter. Availale,if there ismorethan onechapter.

18
5. SETUP
Allthe settingsfor the unit areadjustedin the “SETUP” window.The adjustmentsinthismenuare:
5.1. RECORDINGS
The internalhard drive canstoreupto 80 hoursof digital TVbroadcast(dependingonthe data rate of
therecordedprogramme, which is set automaticallybythe broadcaster).
BecausethePVR hasaTwinTuner it ispossible torecord twoeventsand watch twoprogrammes at
thesametime.Itisalso possible toplayback a recordingpreviouslymadeduring anactive recording.
The PVR record and playbackfunctionsare verysimilar tothoseofaVCR. The buttonsusedfor
playback and recording are shown below.
Toconfigure the playback/recording
options selectthe"Recordings..." option
fromtheconfigurationmenu.The following
optionareavailable foradjustment:
5.1.1. MAX TIMESHIFT
Selectthemaximumtime allowedfor
timeshifting.See belowformore
informationontimeshifting
5.1.2. AUTODISCARD
Discard: When theHDD isfull and atimer
isset torecord, theunitwillautomaticallydiscard previous recordingsbased onthissetting.The
options areasfollows:
None: Theunit will not discard anyrecordings and the timer will notrecord the requestedprogramme.
Oldest: Starting withthe oldest,recordingswillbe deletedtomake space forthe requestedtimer.
Longest: Starting withthelongest,recordings willbedeleted tomake space for therequested timer.
PLAY
STOP
PAUSE
FASTFORWARD
REWIND
RECORD

19
Shortest: Starting with the shortest, recordings will be deletedtomake spacefor the requested timer.
Unplayed: Ifthisoptionisset to "EXCLUDED"anyunplayedrecordingswill NOTbedeleted. Ifthis
optionisset to"INCLUDED", unplayed recordings WILL be deleted.
5.1.3. FORMAT DISK
On rareoccasions theHard Disk maymalfunction,in mostcasesformatting theHard Disk willrestore
normal operationhoweverALLthe datastored on the HardDiskwill belost. PressOK withthe
“Format Disk”option ishighlighted. Amenu appears,in which youwillbe asked forapin number. If
you havenotchanged thepin number, thefactorydefault is0000.After youenterit,apop-up menu
appearson thescreentoensurethat theharddisk should beformated,select"YES"andpress OK to
formattheHard Disk.Select"NO" andpressOKto cancel. Ensure you dub important recordingsonto
Video orDVD beforeyou formattheHDD.
5.1.4. HARD DISK INFO
Toviewthe detailsabouttheHarddisk,
highlight"Hard Disk Info"using
"(up)/(down)" keysandpress OK. The
following informationwill be shown:
Total Space: The totalsizeof the Hard
Drive
Reserved fortimeshift: Thisisthespace
thatisreservedforusebythetimeshift
functionand isdependanton thesetting
in "Maxtimeshift" (see page21 for
details)
Space used byrecordings: The space used bythe recordings thatare ontheHard Drive
Free Space: Available space for futurerecordings
Estimated spacefor times set: Theestimatedspaceon theharddrivethat will be usedfor theany
timersthat are currentlyset
Estimated RecordingTimeafter: Thisistheestimated remaining timeleft available for recordingsThe
settings of therecordingsareconfiguredin thismenu, pressOK todisplaythemenu.
ThisRecorder hasabuilt in harddisk(abbreviated asHDD )forrecording and playback.Bewareof
thefollowingpointswhen settingupandusingthe Recorder.Failure toobserveprecautions may
cause damage totheHDD itselfor itscontent, failure of thedisk tooperate, orrecordingof noise.
•Do notsubject theRecorder toanyvibration or impact.
•Do not placethe Recorder in acrampedlocationwhichmightblocktheventilationporton the
back of theRecorder.
•Do notplace the Recorder in alocation with severe temperature variation.
ØIf the Recorder isset up ina locationwith severetemperature variation,dewmayform
onandinside theRecorder. IftheRecorder isused withinternaldewformation
present, thismaycauseHDDdamage ormalfunction. We recommend keeping
variationinroomtemperature within 10 C per hour.
•Do notplace the Recorder in alocation with highhumidity.
•Place the Recorder horizontally,never at an incline.
•Do notplace amagneticdevice (magnet etc.) close tothe recorder.
•Whenthe powerison,donotunplugthe powercordfromthe AC outlet,turnoff thebreaker
for thearea wherethe Recorder isset up, or move the Recorder.
When moving theRecorder,first turn offthe powerand thenunplug the power cord fromthe AC outlet.
Table of contents
Other Sharp DVR manuals