Sharp AR-FX10 User manual

FACSIMILE EXPANSION KIT
OPERATION MANUAL
MODEL
AR-FX10
(for AR-C262M)
•BEFORE USING
THE FAX FEATURE
•BASIC OPERATIONS
•USING CONVENIENT
FUNCTIONS 1
•USING CONVENIENT
FUNCTIONS 2
•USING CONVENIENT
FUNCTIONS 3
•PROGRAMMING
•TROUBLESHOOTING
•KEY OPERATOR
PROGRAMS
•APPENDIX
1-1
2-1
3-1
4-1
5-1
6-1
7-1
8-1
9-1
Page
Be sure to become thoroughly familiar with this manual to gain
the maximum benefit from the product.
Before installing this product, be sure to read the installation
requirements and cautions sections of the "Operation manual
(for general information and copier operation)".
Be sure to keep all operation manuals handy for reference
including this manual, the "Operation manual (for general
information and copier operation)" and operation manuals for
any optional equipment which has been installed.
NA
KS1
CZZ
WhaleII_fax_ex.book 1 ページ 2004年9月21日 火曜日 午後1時9分

■
■■
■FAX interface cable and Line cable:
These special accessories must be used with the device.
■
■■
■Notice for Users in Europe
This equipment works on the British analogue public switched telephone network.
This equipment has been tested according to the pan-European TBR 21 regulation.
It will operate on all analogue telephone networks which comply with the TBR 21.
Please contact your dealer or network operator, if you are not sure whether your network operates according to TBR 21.
■
■■
■Important Notice for New Zealand Users
General
"The grant of a Telepermit for any item of terminal equipment indicates only that Telecom has accepted that the
item complies with minimum conditions for connection to its network. It indicates no endorsement of the
product by Telecom, nor does it provide any sort of warranty. Above all, it provides no assurance that any item
will work correctly in all respects with another item of Telepermitted equipment of a different make or model,
nor does it imply that any product is compatible with all of Telecom's network services. In particular the higher
speeds which this modem is capable of, can only be achieved in ideal conditions."
"This equipment shall not be used in any manner which could constitute a nuisance to other Telecom
customers."
This equipment shall not be set up to make automatic calls to the Telecom '111' Emergency Service.
To avoid telephone charges for local calls, be sure to store numbers "without" area code in your rapid or speed
dial locations.
This equipment may not provide for the effective hand-over of a call to another device connected to the same line.
WARNING:
This is a Class A product. In a domestic environment this product may cause radio interference in which case
the user may be required to take adequate measures.
This equipment complies with the requirements of Directive 1999/5/EC.
Dieses Gerät entspricht den Anforderungen der EU-Richtlinie 1999/5/EG.
Cet appareil est conforme aux exigences de la directive 1999/5/CE.
Este aparato satisface las exigencias de las Directiva 1999/5/CE.
Quest'apparecchio è conforme ai requisiti delle direttiva 1999/5/CE.
Dit apparaat voldoet aan de eisen van de richtlijn 1999/5/EG.
Este equipamento obedece às exigências da directiva 1999/5/CE.
Denna utrustning uppfyller kraven enligt direktiv 1999/5/EC.
Dette udstyr overholder kravene i direktiv 1999/5/EF.
Dette produktet oppfyller kravene i direktiv 1999/5/EC.
Tämä laite täyttää direktiivi 1999/5/EY.
cover1-2.fm 2 ページ 2004年10月15日 金曜日 午前9時32分

0-1
INTRODUCTION
Thank you for purchasing this product. This manual only explains the facsimile functions of the product. For safety
precautions and general information on using the machine such as loading paper, clearing misfeeds, and handling
peripheral units, see the "Operation manual (for general information and copier operation)". For other functions, see
the following manuals as appropriate:
Copier function: See "Operation manual (for general information and copier operation)".
General and copier-related key operator programs: See the key operator's guide.
Printer function: See "Operation manual (for printer)".
Network scanner function: See "Operation manual (for network scanner)". (if the network scanner option is
installed)
The explanations in this manual assume that certain peripheral units are installed.
The display screens, messages, and key names shown in the manual may differ from those on the actual machine
due to product improvements and modifications.
WhaleII_fax_ex.book 1 ページ 2004年9月21日 火曜日 午後1時9分

0-2
CONTENTS
Page
INTRODUCTION ........................................................ 0-1
TO USE THIS PRODUCT CORRECTLY AS A
FACSIMILE................................................................. 0-4
●IMPORTANT SAFETY INFORMATION................ 0-5
●NOTICE FOR USERS IN AUSTRALIA AND NEW
ZEALAND.............................................................. 0-5
CHAPTER 1
BEFORE USING THE FAX FEATURE
POINTS TO CHECK AND PROGRAM AFTER
INSTALLATION .......................................................... 1-2
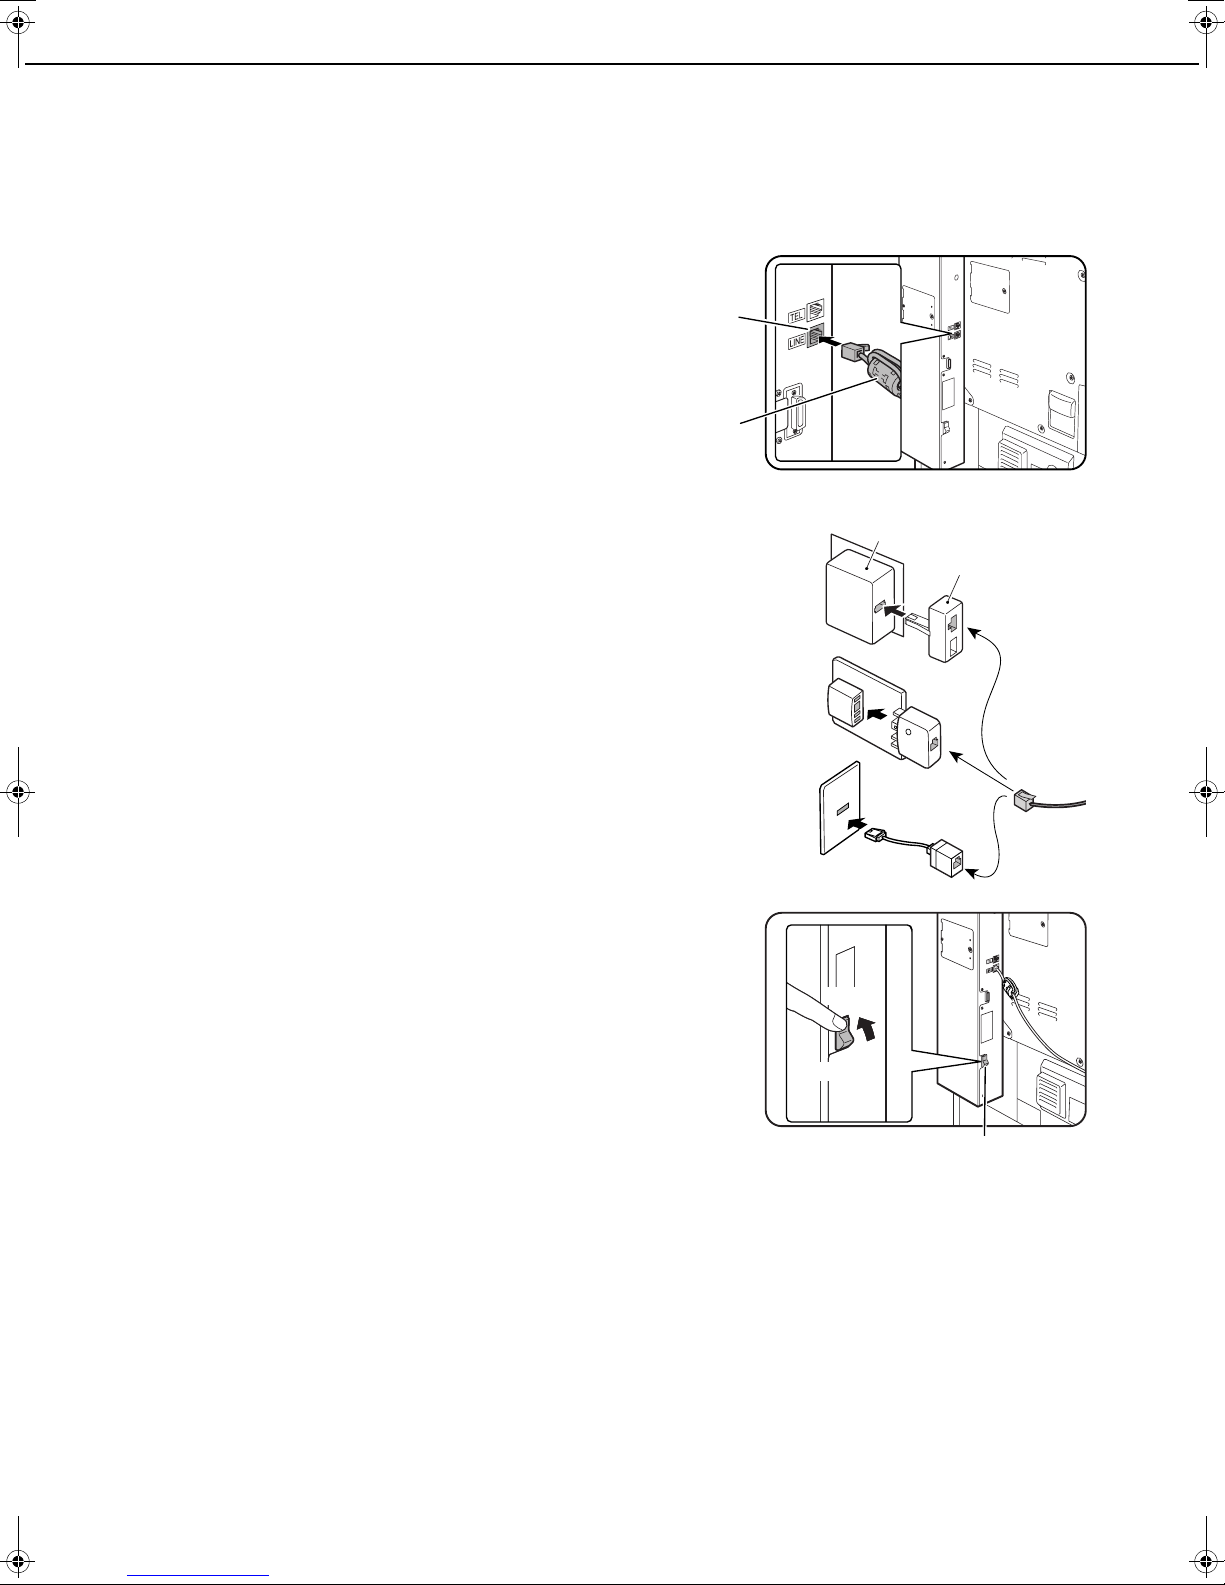
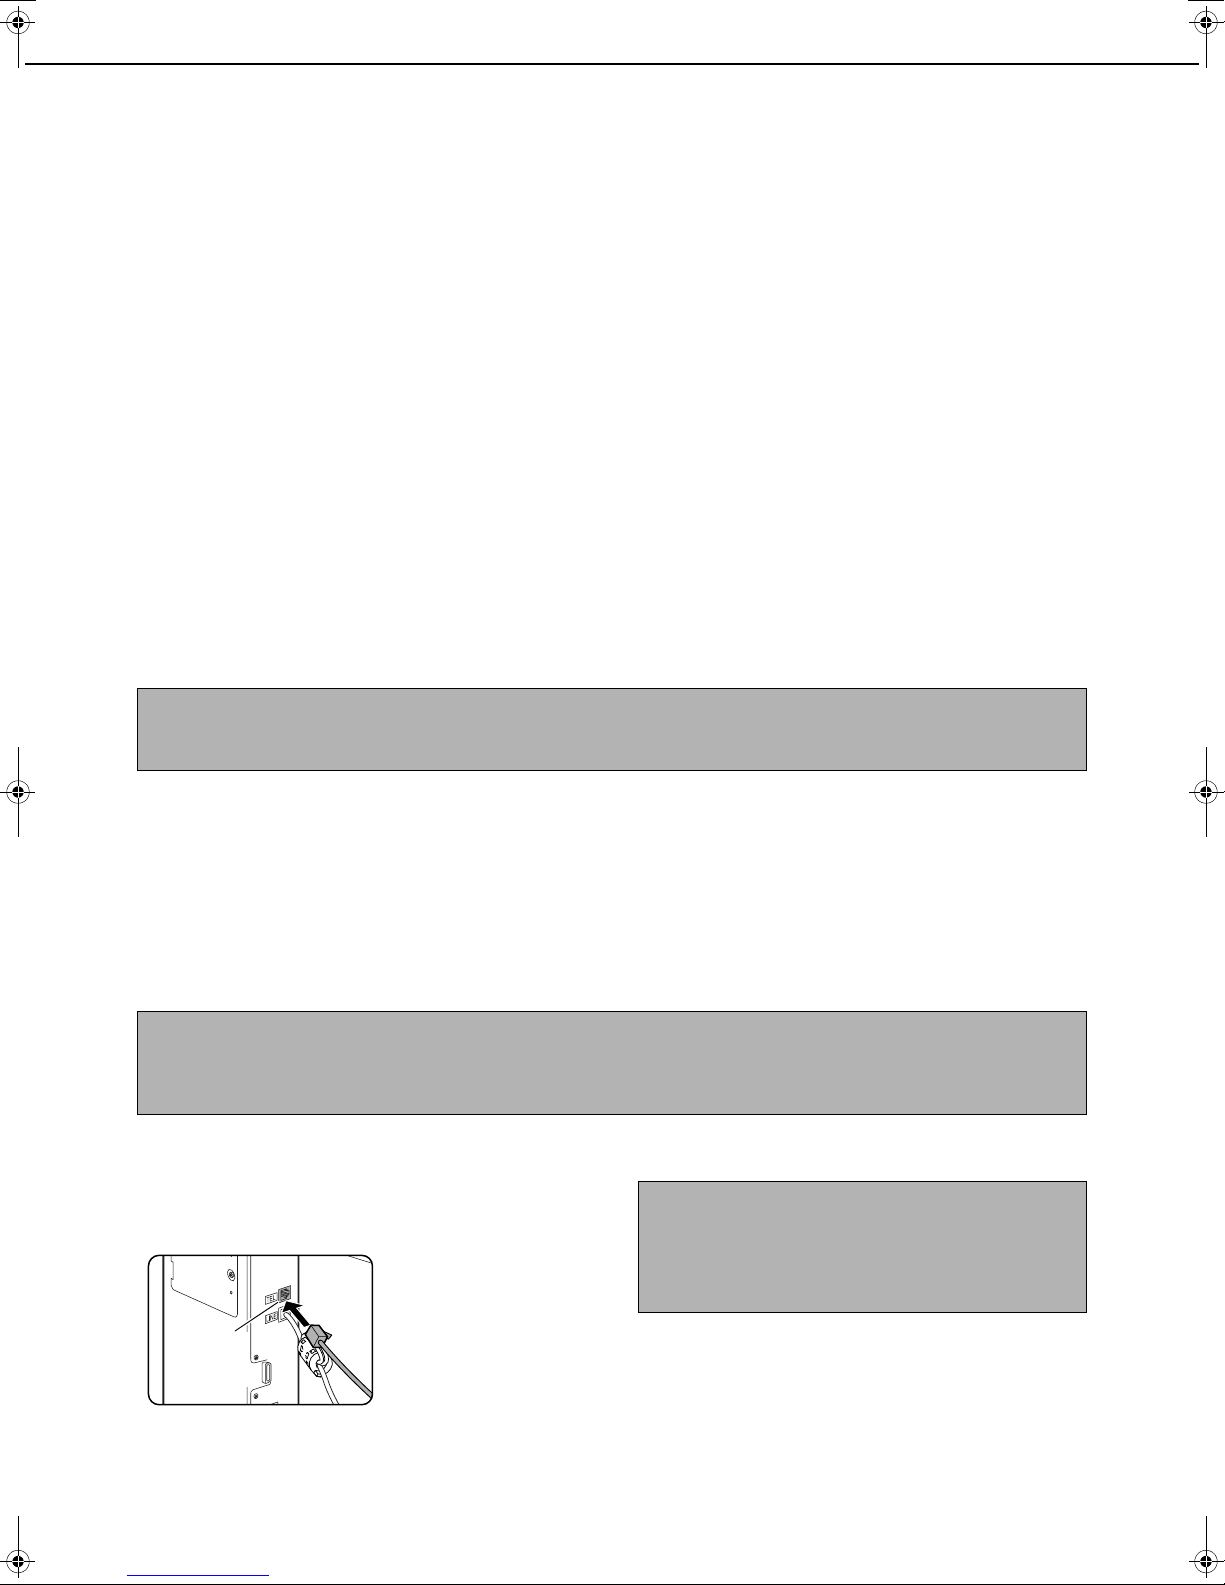
CONNECTING AN EXTENSION PHONE .................. 1-2
●CONNECTING AN EXTENSION PHONE............. 1-2
A LOOK AT THE OPERATION PANEL...................... 1-3
●
FAX MODE (CONDITION SETTINGS SCREEN)
..... 1-4
ORIGINALS ................................................................ 1-6
●ORIGINALS THAT CAN BE FAXED..................... 1-6
LOADING A DOCUMENT........................................... 1-7
●USING THE REVERSING AUTOMATIC
DOCUMENT FEEDER.......................................... 1-7
●USING THE DOCUMENT GLASS........................ 1-7
CHECKING THE SIZE OF A LOADED ORIGINAL .... 1-8
●MANUALLY SETTING THE SCANNING SIZE ..... 1-8
SELECTING RESOLUTION AND EXPOSURE SETTINGS
..... 1-9
●SELECTING THE RESOLUTION ......................... 1-9
●SELECTING THE EXPOSURE............................. 1-10
CONVENIENT DIALING METHODS.......................... 1-11
CHAPTER 2
BASIC OPERATIONS
SENDING A FAX ........................................................ 2-2
●BASIC PROCEDURE FOR SENDING FAXES..... 2-2
●TRANSMISSION BY AUTO-DIALING (ONE-
TOUCH DIALING AND GROUP DIALING)........... 2-3
●FAXING A TWO-SIDED ORIGINAL...................... 2-4
PRIORITY TRANSMISSION OF A STORED JOB ..... 2-6
CANCELLING A FAX TRANSMISSION ..................... 2-6
●CANCELLING ON-HOOK DIALING...................... 2-6
RECEIVING FAXES ................................................... 2-7
●RECEIVING A FAX ............................................... 2-7
CHAPTER 3
USING CONVENIENT FUNCTIONS 1
ADVANCED TRANSMISSION METHODS
Page
SENDING THE SAME DOCUMENT TO MULTIPLE
DESTINATIONS IN A SINGLE OPERATION
(BROADCAST TRANSMISSION) ............................... 3-2
●USING BROADCAST TRANSMISSION ............... 3-3
AUTOMATIC TRANSMISSION AT A SPECIFIED
TIME (TIMER TRANSMISSION)................................. 3-4
●SETTING UP A TIMER TRANSMISSION ............. 3-4
TRANSMISSION AND RECEPTION USING THE
POLLING FUNCTION ................................................. 3-5
●USING THE POLLING FUNCTION....................... 3-6
●USING POLLING MEMORY ................................. 3-7
OWN NUMBER SENDING.......................................... 3-9
FAXING A DIVIDED ORIGINAL (DUAL PAGE SCAN)
........
3-10
PROGRAMMING FREQUENTLY USED OPERATIONS
.....
3-11
●USING A PROGRAM ............................................ 3-11
TRANSFERRING RECEIVED FAXES TO ANOTHER
MACHINE WHEN PRINTING IS NOT POSSIBLE
(FORWARDING FUNCTION) ..................................... 3-12
●USING THE TRANSFER FUNCTION................... 3-12
CHAPTER 4
USING CONVENIENT FUNCTIONS 2
TRANSMISSION USING F-CODES
TRANSMISSION BETWEEN MACHINES
SUPPORTING F-CODES ........................................... 4-2
●
MEMORY BOXES AND SUB-ADDRESSES/PASSCODES
REQUIRED FOR F-CODE TRANSMISSION
................... 4-2
●ENTERING (DIALING) A FAX NUMBER WITH A
SUB-ADDRESS AND PASSCODE ....................... 4-3
●CREATING A MEMORY BOX FOR F-CODE
TRANSMISSION ................................................... 4-3
F-CODE POLLING MEMORY..................................... 4-4
●USING F-CODE POLLING MEMORY................... 4-4
●PROCEDURE FOR F-CODE POLLING................ 4-5
F-CODE CONFIDENTIAL TRANSMISSION............... 4-6
●F-CODE CONFIDENTIAL TRANSMISSION ......... 4-6
●PRINTING A DOCUMENT RECEIVED TO AN F-
CODE CONFIDENTIAL MEMORY BOX............... 4-7
F-CODE RELAY BROADCAST TRANSMISSION...... 4-8
●USING THE F-CODE RELAY BROADCAST
FUNCTION (your machine is the relay machine) .. 4-9
●
USING THE F-CODE RELAY REQUEST FUNCTION
(your machine requests a relay broadcast)
................
4-9
WhaleII_fax_ex.book 2 ページ 2004年9月21日 火曜日 午後1時9分

CONTENTS
0-3
CHAPTER 5
USING CONVENIENT FUNCTIONS 3
CONVENIENT METHODS OF USE
Page
USING AN EXTENSION PHONE............................... 5-2
●SENDING A FAX AFTER TALKING (MANUAL
TRANSMISSION)
........................................................
5-2
●
USING AN EXTENSION PHONE TO RECEIVE A FAX
.... 5-3
●RECEIVING A FAX AFTER TALKING (MANUAL
RECEPTION) ........................................................ 5-4
CHAPTER 6
PROGRAMMING
PROGRAMMING........................................................ 6-2
STORING, EDITING, AND DELETING AUTO DIAL
KEYS AND PROGRAMS............................................ 6-2
●STORING ONE-TOUCH KEYS............................. 6-3
●EDITING AND DELETING ONE-TOUCH KEYS... 6-5
●STORING A GROUP KEY .................................... 6-6
●EDITING AND DELETING GROUP KEYS ........... 6-7
●STORING A PROGRAM....................................... 6-8
●EDITING AND DELETING PROGRAMS .............. 6-8
STORING A GROUP INDEX...................................... 6-9
PROGRAMMING, EDITING, AND DELETING F-
CODE MEMORY BOXES........................................... 6-10
●PROGRAMMING AN F-CODE MEMORY BOX.... 6-10
●SETTING FOR F-CODE POLLING MEMORY
BOXES (POLLING TIMES)................................... 6-11
●
SETTING FOR F-CODE CONFIDENTIAL
TRANSMISSION MEMORY BOXES (PRINT PIN)....
6-12
●SETTING FOR F-CODE RELAY BROADCAST
MEMORY BOXES (RECIPIENT) .......................... 6-13
●EDITING AND DELETING A MEMORY BOX....... 6-14
PRINTING PROGRAMMED INFORMATION............. 6-14
ENTERING CHARACTERS........................................ 6-15
CHAPTER 7
TROUBLESHOOTING
WHEN A TRANSACTION REPORT IS PRINTED...... 7-2
VIEWING THE COMMUNICATION ACTIVITY REPORT.....
7-3
WHEN AN ALARM SOUNDS AND A WARNING
MESSAGE IS DISPLAYED......................................... 7-3
PROBLEMS AND SOLUTIONS.................................. 7-4
CHAPTER 8
KEY OPERATOR PROGRAMS
Page
KEY OPERATOR PROGRAMS.................................. 8-2
●KEY OPERATOR PROGRAM LIST ...................... 8-2
●USING THE KEY OPERATOR PROGRAMS........ 8-3
●EXPLANATION OF SETTING PROGRAMS......... 8-4
●FAX SETTINGS..................................................... 8-4
●PRINTING OUT SETTINGS.................................. 8-12
CHAPTER 9
APPENDIX
SPECIFICATIONS ...................................................... 9-2
INDEX ......................................................................... 9-3
WhaleII_fax_ex.book 3 ページ 2004年9月21日 火曜日 午後1時9分

0-4
TO USE THIS PRODUCT CORRECTLY AS
A FACSIMILE
Several points must be kept in mind when using this product as a facsimile.
Please note the following:
■
■■
■Line connection
Use the telephone cable supplied to connect the
machine to a telephone line. Insert the end of the line
cord with the core into the LINE socket on the
machine as shown. Insert the other end into the
telephone line socket.
In some countries, an adapter is required to connect the
telephone line cable to the wall telephone socket, as
shown in the illustration.
■
■■
■Fax power switch
When using the machine, be sure to keep the fax power switch turned
on at all times. The fax power switch must be turned on to receive
faxes at night or send timer transmission faxes at night.
■
■■
■Settings and programming
Information about settings and programming that are required before the fax functionality can be used is located
in "POINTS TO CHECK AND PROGRAM AFTER INSTALLATION" on page 1-2 of this manual. Please read this
section and perform the required settings and programming.
■
■■
■Lithium battery
A lithium battery inside the machine keeps key operator program settings for the fax function in memory.
●When the battery dies, settings and programmed information will be lost. Be sure to keep a written record of
the settings and programmed information. (Refer to page 6-14.)
●The life of the lithium battery is approximately 5 years if the main switch and fax power switch are kept
continually off.
■
■■
■Other information
●If a thunderstorm occurs, we recommend that you unplug the power cord from the power outlet. Information
will be retained in memory even if the power cord is unplugged.
Core
Line socket
Adapter
Wall socket
For Australia
For New Zealand
For United
Kingdom
OFF
Fax power switch
ON
WhaleII_fax_ex.book 4 ページ 2004年9月21日 火曜日 午後1時9分

TO USE THIS PRODUCT CORRECTLY AS A FACSIMILE
0-5
IMPORTANT SAFETY INFORMATION
●If any of your telephone equipment is not operating properly, you should immediately remove it from your telephone
line, as it may cause harm to the telephone network.
●The AC power outlet shall be installed near the equipment and shall be easily accessible.
●Never install telephone wiring during a lightning storm.
●Never install telephone jacks in wet locations unless the jack is specifically designed for wet locations.
●Never touch uninsulated telephone wires or terminals unless the telephone line has been disconnected at the
network interface.
●Use caution when installing or modifying telephone lines.
●Avoid using a telephone (other than a cordless type) during an electrical storm. There may be a remote risk of
electric shock from lightning.
●Do not use a telephone to report a gas leak in the vicinity of the leak.
●Do not install or use the machine near water, or when you are wet. Take care not to spill any liquids on the machine.
NOTICE FOR USERS IN AUSTRALIA AND NEW ZEALAND
Your fax machine and the telephone system
WARNING NOTICE:
NO calls can be made to or from this fax during a mains power failure.
●This is a Class A product. In a domestic environment this product may cause radio interference in which case the
user may be required to take adequate measures.
WARNING
Australian Communications Authority (ACA) regulations state that no unauthorised changes or modifications to this
equipment are permitted.
Note: Complies with the following standards,
ACA TS001-1997, AS/NZS 60950:2000
AS/ACIF S002:2001, NZ TELECOM and AS/NZS CISPR 22:2002
These limits are designed to provide reasonable protection against interference in an installation. This equipment
generates, uses and can radiate radio frequency energy and, if not installed and used in accordance with the
instructions, may cause interference. However, there is no guarantee that interference will not occur in a particular
installation.
If this equipment does cause interference to radio or television reception, which can be determined by turning the
equipment off and on, the user is encouraged to try to correct the interference by one or more of the following
measures:
●Reorient or relocate the receiving antenna.
●Increase the separation between the equipment and the receiver.
●Connect the equipment to an outlet on a different circuit to that which the receiver is connected.
●Consult the dealer or an experienced radio/TV technician for help.
The Ringer Equivalence Number (REN) for this equipment is written on the A-Tick label.
Important safety information
In Australia, installing or modifying telephone lines should only be done by an ACA licensed serviceman. In New
Zealand, installing or modifying telephone lines should be done in accordance with Telecom wiring practices.
Whale_00.fm 5 ページ 2004年10月15日 金曜日 午前9時38分

WhaleII_fax_ex.book 6 ページ 2004年9月21日 火曜日 午後1時9分

1-1
CHAPTER 1
BEFORE USING THE FAX
FEATURE
This chapter contains basic information about using the fax features of
this product. Please read this chapter before using the fax features.
Page
POINTS TO CHECK AND PROGRAM AFTER INSTALLATION..............1-2
CONNECTING AN EXTENSION PHONE ................................................1-2
●CONNECTING AN EXTENSION PHONE ......................................
1-2
A LOOK AT THE OPERATION PANEL....................................................1-3
●FAX MODE (CONDITION SETTINGS SCREEN)...........................
1-4
ORIGINALS ..............................................................................................1-6
●ORIGINALS THAT CAN BE FAXED...............................................
1-6
LOADING A DOCUMENT.........................................................................1-7
●
USING THE REVERSING AUTOMATIC DOCUMENT FEEDER
......
1-7
●USING THE DOCUMENT GLASS..................................................
1-7
CHECKING THE SIZE OF A LOADED ORIGINAL...................................1-8
●MANUALLY SETTING THE SCANNING SIZE...............................
1-8
SELECTING RESOLUTION AND EXPOSURE SETTINGS.....................1-9
●SELECTING THE RESOLUTION ...................................................
1-9
●SELECTING THE EXPOSURE.......................................................
1-10
CONVENIENT DIALING METHODS ........................................................1-11
WhaleII_fax_ex.book 1 ページ 2004年9月21日 火曜日 午後1時9分

1-2
POINTS TO CHECK AND PROGRAM
AFTER INSTALLATION
After installing the unit and before using it as a fax machine, check the following points and program the required
information.
■
■■
■Make sure the fax power switch is turned on
In addition to the main switch (see page 1-4 of the "Operation manual (for general information and copier
operation)"), the machine also has a fax power switch (see "Fax power switch" on page 0-4). When using the
machine, be sure to keep the fax power switch turned on at all times.
■
■■
■Make sure the correct date and time have been set
Make sure the correct date and time have been programmed in the unit (refer to page 2-13 of "Operation manual
(for general information and copier operation)"). If the date and time are wrong, please correct them.
It is important to set the correct date and time because they are used for such features as Timer Transmission
(page 3-4).
■
■■
■Program the sender's name and sender's number
The name and fax number of the user of the machine is programmed in "Own number and name set" (page
8-5) in the key operator programs.
The programmed name and number are printed at the top of each transmitted fax page. The sender's number
is also used as an identification number when you use the Polling function to request transmission from another
fax machine (See "USING THE POLLING FUNCTION" on page 3-6).
CONNECTING AN EXTENSION PHONE
You can connect a telephone to the machine and use it as an extension phone to place and receive calls like any normal
phone. When the other party has made the call, the extension phone can be used to activate fax reception. (remote
operation)
CONNECTING AN EXTENSION PHONE
1Insert the end of the extension phone cord
into the extension phone socket on the
rear of the machine.
Make sure you hear a
"click" sound indicating
that the cord is securely
connected.
NOTES
You can check your programmed name and number by printing out the Sender List. (Refer to "PRINTING OUT
SETTINGS" page 8-12.)
NOTES
●If you connect a combination telephone/answering machine to the machine, you will not be able to use the
answering machine function.
●You can place calls from the phone even during a power failure.
Extension
phone
socket
NOTE
In New Zealand, not all standard telephones and
answering machines will respond to incoming
ringing when connected to the extension socket of
the equipment.
WhaleII_fax_ex.book 2 ページ 2004年9月21日 火曜日 午後1時9分

1-3
1
A LOOK AT THE OPERATION PANEL
The operation panel used for the fax function is described below.
Touch panel (following page)
• Messages and keys appear on the touch panel.
Key input is accomplished by touching the keys.
• When a key in the touch panel is touched, a beep
sounds and the key is highlighted.
• Keys that cannot be selected in a screen are
greyed out. If touched, a double-beep will sound
to alert you that the key cannot be selected.
Mode select keys (page 2-2)
Use these keys to change modes.
[IMAGE SEND] key
Press to switch to fax mode. The initial screen of
fax mode will appear.
When the network scanner option is installed,
touch this key to return to the initial screen of fax
mode or scanner mode, whichever mode was
selected last. (Pressing the [IMAGE SEND] key in
a copy screen or printer screen returns you to the
initial screen of fax mode.) To switch to the initial
screen of fax mode from the initial screen of
scanner mode, touch the [SCANNER/FAX] key
(see on page 1-4).
Numeric keys
Use to enter fax numbers, sub-addresses,
passcodes, and numerical settings. (See
"MEMORY BOXES AND
SUB-ADDRESSES/PASSCODES REQUIRED
FOR F-CODE TRANSMISSION" on page 4-2.)
On the model for Singapore, alphabets are
described on each numeric key.
[C] key (clear key)
Use to clear a mistake when entering fax numbers,
sub-addresses, passcodes, and numerical
settings. One digit is cleared each time you press
the key.
When an original is being scanned, this key can
also be used to cancel scanning.
[CA] key (clear all key)
Use to cancel a transmission or programming
operation. When this key is pressed, the operation
is cancelled and you return to the initial screen
described on the following page.
This key is also used to cancel a resolution, paper
size, or special function setting that was selected
when sending a fax.
[ ] key (page 5-4)
This is used to produce tone signals when you are
on a pulse dial line.
[BLACK COPY START] key (page 2-3)
Press to begin scanning an original for fax
transmission.
[COLOUR COPY START] key
Not used when using the machine as a fax
machine. (For information on this key, see page
1-8 of the "Operation manual (for general
information and copier operation)".)
12 3 4 5 6 9
7 8
1
2
3
8
4
5
6
7
8
9
NOTE
For the names and functions of the parts of the machine, see page 1-4 of the "Operation manual (for general
information and copier operation)".
Whale_01.fm 3 ページ 2004年10月15日 金曜日 午前9時41分

A LOOK AT THE OPERATION PANEL
1-4
FAX MODE (CONDITION SETTINGS SCREEN)
The condition settings screen of fax mode is displayed by pressing the [IMAGE SEND] key while the print mode, copy
mode, or job status screen appears in the touch panel. In the explanations that follow, it is assumed that the initial
screen that appears after pressing the [IMAGE SEND] key is the condition settings screen (shown below). If you have
set the display to show the address directory screen (next page) when the [IMAGE SEND] key is pressed, touch the
[CONDITION SETTINGS] key in the address directory screen to display the condition settings screen.
"Default display settings" (page 8-4) in the key operator programs can be used to select whether the condition
settings screen (below) appears or the address directory screen (next page) appears as the initial screen when the
[IMAGE SEND] key is pressed.
* When the network scanner option is installed, you will return to the initial screen of fax mode or scanner mode,
whichever mode was selected last. (Pressing the [IMAGE SEND] key in a copy screen or printer screen returns
you to the initial screen of fax mode.)
■
■■
■Condition settings screen
The display is initially set (factory setting) to show the following condition settings screen as the initial screen.
Message display
Messages appear here to indicate the current
status of the machine. The icon at left ( )
indicates fax mode.
Memory and reception mode display
This shows the amount of fax memory that is free
and the currently selected reception mode.
[SPEAKER] key (page 1-11)
Touch the [SPEAKER] key to dial and transmit a
fax manually.
During dialing it changes into the [PAUSE] key, and
after touching the [SUB ADDRESS] key it changes
into the [SPACE] key.
[REDIAL] key (page 1-11)
Touch this key to redial the number most recently
dialed with the numeric keys or a one-touch key.
After dialing, this key changes into the [NEXT
ADDRESS] key.
[ADDRESS DIRECTORY] key (page 2-3)
Touch this key to display the address directory
screen (next page). Touch this key when you want
to use an auto-dial number (one-touch dialing or
group dialing).
[SUB ADDRESS] key (page 4-3)
Touch this key to enter a sub-address and
passcode when using F-code transmission.
[ADDRESS REVIEW] key (page 3-3)
When performing a broadcast transmission, touch
this key to check your selected destinations. The
selected destinations will appear and any
unneeded destinations can be deleted.
[SCANNER/FAX] key
This key appears when the network scanner option
is installed. Touch the key to switch between the
scanner screen and the fax screen. When the fax
screen appears, "FAX" is highlighted. When the
scanner screen appears, "SCANNER" is
highlighted.
[SPECIAL MODES] key
Touch this key to set one of the following special
functions:
•Timer transmission (page 3-4)
•Polling (page 3-6)
•Dual page scan (page 3-10)
•Program (page 3-11)
•Memory box (page 3-7)
Two-sided original icon display (page 2-4)
Icons appear here when you touch the [ORIGINAL]
key and select two-sided scanning. The icons can
be touched to open function selection screens.
ADDRESS
DIRECTORY
AUTO
READY TO SEND.
ORIGINAL
STANDARD
RESOLUTION
AUTO
EXPOSURE
SUB ADDRESS
ADDRESS REVIEW
SPECIAL MODES
REDIAL
SPEAKER
FAX MEMORY:100%
AUTO RECEPTION
SCANNER FAX
12 3 4
5
6
7
8
9
10
11
12
13
14
1
2
3
4
5
6
7
8
9
10
WhaleII_fax_ex.book 4 ページ 2004年9月21日 火曜日 午後1時9分

A LOOK AT THE OPERATION PANEL
1-5
1
[ORIGINAL] key (page 1-8)
Touch this key when you wish to manually set the
size of the original to be scanned or scan both
sides of the original.
[RESOLUTION] key (page 1-9)
Touch this key to change the resolution setting for
the original to be scanned. The selected resolution
setting will be highlighted above the key. The initial
factory setting is [STANDARD].
[EXPOSURE] key (page 1-10)
Touch this key to change the exposure setting for
the original to be scanned. The selected exposure
setting will be highlighted above the key. The initial
factory setting is [AUTO].
Special function icon display (page 6-2 of
"Operation manual (for general information
and copier operation)")
When a special function such as polling or dual
page scan is selected, a special function icon
appears here.
■
■■
■Address directory screen (alphabetically ordered)
The screen below appears initially when the address directory is set as the initial screen using "Default display
settings" (page 8-4) in the key operator programs.
One-touch key display
This shows the one-touch keys that have been
stored on the selected "index card". The key type is
indicated by the icon at the right. One-touch keys in
which a fax number is stored are indicated by a
" " icon. The display is initially set to show 8 keys.
This can be changed to 6 or 12 using the key
operator program. (See "The number of direct
address keys displayed setting" on page 8-4.)
Display switching keys
In cases where the one-touch keys cannot all be
displayed on one screen, this shows how many
screens are left. Touch the keys to move
through the screens.
[CONDITION SETTINGS] key
This displays the condition settings screen (previous
page), which is used to set various conditions.
[ABC GROUP] key (page 6-9)
Touch this key to switch between the alphabetical
index and the group index.
Index keys (page 6-9)
One-touch key destinations are stored on each of
these index cards (alphabetical index or group
index). Touch this key to switch between the
indexes.
Group indexes make it possible to store one-touch
keys by group with an assigned name for easy
reference. This is done with the custom settings
(refer to pages 6-3 and 6-9). Frequently used
one-touch key destinations can be stored on the
[FREQUENT USE] card for convenient access.
11
12
13
14
A
FREQUENT USE ABCD EFGHI JKLMN OPQRST UVWXYZ ABC GROUP
B
C D
E F
G H
CONDITION
SETTINGS
READY TO SEND.
SUB ADDRESS
ADDRESS REVIEW
REDIALSPEAKER
1
2
3
45
1
2
3
4
5
NOTE
The screen shown above is the alphabetical address directory. If desired, the initial screen can be set to the group
address directory (refer to "Default display settings" on page 8-4).
WhaleII_fax_ex.book 5 ページ 2004年9月21日 火曜日 午後1時9分

1-6
ORIGINALS
ORIGINALS THAT CAN BE FAXED
■
■■
■Original sizes
■
■■
■Scanning area of original
Note that the edges of an original cannot be scanned.
Area that cannot be scanned: 2mm±2mm at edges of original
■
■■
■Automatic reduction of faxed document
If the size (width) of the faxed document is greater than the receiving machine's paper size, the size will be
automatically reduced.
A document can also be faxed without reducing its size. In this case, the left and right edges will not be
transmitted. (See "Auto reduction sending setting" on page 8-7.)
Minimum original size Maximum original size
Using the reversing
automatic document
feeder
A5: 210 mm (width) x 148 mm (length)
(8-1/2" (width) x 5-1/2" (length))
A5R: 148 mm (width) x 210 mm (length)
(5-1/2" (width) x 8-1/2" (length))
297 mm (width) x 431.8 mm* (length)
(11" (width) x 17"* (length))
* Long documents can not be loaded
Using the document glass
NOTE
Originals that are not a standard size (A5, B5, B5R, A4, A4R, B4, A3, 5-1/2"x8-1/2", 8-1/2"x11", 8-1/2"x11"R,
8-1/2"x14", 11"x17") can also be faxed.
Faxed document width
Receiving machine's paper
width Reduced size Ratio (Area ratio)
A3 (11"x17") B4 (8-1/2"x14") B4 (8-1/2"x14") 1 : 0.78 (1 : 0.64)
A3 (11"x17") A4 (8-1/2"x11") A4R (8-1/2"x11"R) 1 : 0.5 (1 : 0.5)
WhaleII_fax_ex.book 6 ページ 2004年9月21日 火曜日 午後1時9分

1-7
1
LOADING A DOCUMENT
A document can be loaded in the reversing automatic document feeder or on the document glass. Use the reversing
automatic document feeder when faxing a large number of sheet originals. Use the document glass to fax originals
that cannot be scanned using the reversing automatic document feeder such as thick or thin sheet originals or bound
originals such as books.
USING THE REVERSING AUTOMATIC DOCUMENT FEEDER
1Lift the document glass cover and make
sure a document is not placed on the
document glass. Gently close the cover.
2Adjust the document guides on the
document feeder tray to the width of the
document.
3Align the edges of the document pages
and then insert the stack in the document
feeder tray so that the first page is face up.
Insert the stack into the
document feeder tray until
it stops.
USING THE DOCUMENT GLASS
1Open the document glass cover, and place
the document face down on the document
glass. Gently close the cover.
Regardless of the size of the original, place the
original on the left side of the document glass. (Align
the original with the document glass scale and
centring mark.)
Place the original in the appropriate position for its
size as shown below.
NOTE
Do not place any objects under the original size
detector plate. Closing the document glass cover
with an object underneath may damage the original
size detector plate and prevent correct detection of
the document size.
Original size detector
A5 R
A4 R
A4
A5
A3
B4
B5
B5 R
Document glass scale
mark
Document glass scale
mark
WhaleII_fax_ex.book 7 ページ 2004年9月21日 火曜日 午後1時9分

1-8
CHECKING THE SIZE OF A LOADED ORIGINAL
When a standard-size* original is placed, the original size is automatically detected
(automatic original detection function) and displayed in the top half of the
[ORIGINAL] key. Check the key to make sure that the original size has been
correctly detected.
: [AUTO] appears when the automatic original detection function is operating.
: Displays the original size.
If a non-standard size original is placed or if you wish to change the scanning
size, follow the steps below to manually set the original scanning size.
MANUALLY SETTING THE SCANNING SIZE
If you load an original that is not a standard size (such as an INCH size), or if the size is not detected correctly, you
must touch the [ORIGINAL] key and set the original size manually. Perform the following steps after loading the
document in the document feeder tray or on the document glass (see the previous page).
1Touch the [ORIGINAL] key.
If the address directory
screen appears, touch the
[CONDITION SETTINGS]
key to display the
condition settings screen
(page 1-5).
2Touch the [MANUAL] key.
The sizes that can be
selected are displayed.
3Touch the desired original size key.
[AUTO] is no longer
highlighted. [MANUAL]
and the original size key
you touched are
highlighted.
To select an inch size,
touch the [INCH] tab.
Touch the appropriate
inch original size key.
The selected key is
highlighted. To return to
the AB original size
palette, touch the [AB]
tab.
4Touch the outer [OK] key.
You will return to the
initial screen. (Touching
the inner [OK] key in the
step above returns you
to step 2.)
5The selected size appears in the top half of
the [ORIGINAL] key.
NOTE
* Standard sizes that can be detected are as follows:
A5, B5, B5R, A4, A4R, B4, A3, 5-1/2"x8-1/2", 8-1/2"x11", 8-1/2"x11"R, 8-1/2"x14", 11"x17". If a non-standard
size original is loaded (including special sizes), the closest standard size may be displayed, or the original size
may not appear at all.
AUTO A4
ORIGINAL
STANDARD
RESOLUTION
1
2
AUTO A4
ORIGINAL
STANDARD
RESOLUTION
MANUAL
ORIGINAL SIZE
O
2-SIDED
BOOKLET
IDED
OK
OK
ORIGINAL SIZE
SPEAKER REDIAL
MANUAL
AUTO
B4
A4
A5 A5R
A4R
B5
A3
B5R
INCH
AB
OK
OK
ORIGINAL SIZE
SPEAKER REDIAL
MANUAL
AUTO
B4
A4
A5 A5R
A4R
B5
A3
B5R
INCH
AB
SPEAKER REDIAL
OK
OK
ORIGINAL SIZE
MANUALAUTO
INCH
AB
8 X11
1
/
2 8 X11R
1
/
2
5 X8 R
1
/
2 1
/
2
5 X8
1
/
2 1
/
2
8 X14
1
/
2 11X17
8 X11R
1
/
2
OK
OK
UAL
8 X11
1
/
2
ORIGINAL
STANDARD
RESOLUTION
8 X11
1
/
2
WhaleII_fax_ex.book 8 ページ 2004年9月21日 火曜日 午後1時9分

1-9
1
SELECTING RESOLUTION AND EXPOSURE SETTINGS
After loading an original, you can adjust the resolution and exposure settings to match the condition of the original
--for example, if it has small or faint characters, or if it is a photo. After loading the original in fax mode, adjust the
settings as explained below.
SELECTING THE RESOLUTION
The initial resolution setting is STANDARD. To change the setting, follow these steps:
■
■■
■Change the resolution.
1Touch the [RESOLUTION] key.
2Touch the [STANDARD] key, [FINE] key,
[SUPER FINE] key, or [ULTRA FINE] key.
The selected key is
highlighted.
If you touched the [FINE]
key, [SUPER FINE] key,
or [ULTRA FINE] key,
you can also select
halftone by touching the
[HALF TONE] key.
3Touch the [OK] key.
You will return to the
initial screen.
■
■■
■Resolution settings
NOTES
●
The factory default setting for the initial resolution is
[STANDARD]. The initial resolution can be changed
to a different setting in the key operator programs
(see "Initial resolution setting" on page 8-5).
●When using the reversing automatic document
feeder, the resolution setting cannot be changed
once scanning has begun.
●When a fax is sent at [ULTRA FINE], [SUPER
FINE], or [FINE] resolution, a lower resolution will
be used if the receiving machine does not have
that resolution.
AUTO A4
ORIGINAL
STANDARD
RESOLUTION
STANDARD
FINE
SUPER FINE HALF TONE
ULTRA FINE
DARD
NE
FINE HALF TONE
OK
FINE
Standard
Touch this key if your original consists
of normal-sized characters (like those
in this manual).
Fine
Touch this key if your original has small
characters or diagrams. The original
will be scanned at twice the resolution
of the
[STANDARD]
setting.
Super fine
Touch this key if your original has
intricate pictures or diagrams. A
higher-quality image will be produced
than with the [FINE] setting.
Ultra fine
Touch this key if your original has
intricate pictures or diagrams. This
setting gives the best image quality.
However, transmission will take longer
than with the other settings.
Half tone
Touch this key if your original is a
photograph or has gradations of colour
(such as a colour original). This setting
will produce a clearer image than
[FINE], [SUPER FINE], or [ULTRA
FINE] used alone. Half tone cannot be
selected if [STANDARD] has been
selected.
WhaleII_fax_ex.book 9 ページ 2004年9月21日 火曜日 午後1時9分

SELECTING RESOLUTION AND EXPOSURE SETTINGS
1-10
SELECTING THE EXPOSURE
The initial exposure setting is AUTO. To change the setting, follow these steps:
■
■■
■Change the exposure.
1Touch the [EXPOSURE] key.
2Touch the [MANUAL] key.
3Touch the desired exposure key.
To darken the exposure,
touch the key. To
lighten the exposure,
touch the key. To
return to auto exposure,
touch [AUTO].
4Touch the [OK] key.
You will return to the
initial screen.
■
■■
■Exposure settings
AUTO
EXPOSURE
STANDARD
RESOLUTION
AUTO
ORIGINAL
AUTO
MANUAL
MANUAL
AUTO
MANUAL
AUTO
OK
NOTE
When using the document glass to scan pages, the
exposure setting can be changed each time you
change pages. When using the reversing automatic
document feeder, the exposure setting cannot be
changed once scanning has begun.
1 to 2
Select this setting if your original consists
mostly of dark characters.
Auto
This setting automatically adjusts the
exposure for light and dark parts of the
original.
4 to 5
Select this setting if your original consists
mostly of faint characters.
WhaleII_fax_ex.book 10 ページ 2004年9月21日 火曜日 午後1時9分

1-11
1
CONVENIENT DIALING METHODS
The fax function includes a convenient auto dial feature (one-touch dialing and group dialing). By programming
frequently dialed numbers, you can call and send documents to these locations by means of a simple dialing
operation (refer to page 2-3). There are two types of auto-dialing: one-touch dialing and group dialing. To program
auto-dial numbers, refer to pages 6-3, 6-6.
●One-touch dialing
Simply press a one-touch key and then press the [BLACK
COPY START] key to dial the programmed location. A
name of up to 36 characters can be programmed for the
location (a maximum of 18 characters are displayed).
When using F-code transmission, a sub-address and
passcode can also be programmed (refer to page 4-2).
Touch the [ADDRESS DIRECTORY] key in
the initial screen to display the above screen.
●Group dialing
Multiple one-touch dial locations can be programmed into
a single one-touch key. This is convenient for successively
sending a document to multiple locations.
•Full fax numbers entered with the numeric keys cannot
be stored in a group key. First program the number in a
one-touch key and then store it in a group key.
Touch the [ADDRESS DIRECTORY] key in
the initial screen to display the above screen.
●Redialing
The machine keeps the last fax number dialed with the
numeric keys in memory. You can redial the last number
dialed by simply touching the [REDIAL] key.
●On-hook dialing
Touch the [SPEAKER] key, listen for the dial tone through
the speaker, and then dial.
•Faxes must be sent manually when using on-hook
dialing. (Refer to page 5-2.)
•On-hook dialing is not possible using a one-touch key
that includes a sub-address and passcode, or a group
key.
NOTES
●A total of 500 one-touch dial and group keys can be programmed. (Refer to page 6-2.)
●Programmed one-touch keys and group keys are stored on "index cards". A one-touch key or group key can be
easily accessed by touching the index key. (Refer to on page 1-5.)
●To prevent calling or sending a fax to a wrong number, look carefully at the touch panel and make sure you
program the correct number when programming an auto-dial number. After storing a number, you can also print
out the stored number (refer to page 6-14) to make sure it was stored correctly.
FREQUENT USE ABCD EFGHI JKLMN OPQRS
CORPO.TPS
SHARP GROUP
SHARP CORPORATION
No.001:SHARP CORPORATION
0666211221
SHARP CORPORATION
FREQUENT USE ABCD EFGHI JKLMN OPQRST
CORPO.TPS
SHARP GROUP
No.005:SHARP GROUP
GROUP:025
ADDRESS
DIRECTORY
SUB ADDRESS
REDIALAKER
Y:100%
EPTION
FAX MEMORY:100%
AUTO RECEPTION ADDR
DIRE
SUB
RESPEAKER
5
WhaleII_fax_ex.book 11 ページ 2004年9月21日 火曜日 午後1時9分

WhaleII_fax_ex.book 12 ページ 2004年9月21日 火曜日 午後1時9分
Table of contents
Other Sharp Fax Machine manuals

Sharp
Sharp UX-68 User manual

Sharp
Sharp UX-465L User manual

Sharp
Sharp UX-A260 User manual

Sharp
Sharp FO-5700 User manual

Sharp
Sharp FO-5900 User manual

Sharp
Sharp FO-A650 User manual

Sharp
Sharp UX-P400 User manual

Sharp
Sharp UX-4000M - UX 4000 B/W Laser Printer User manual

Sharp
Sharp FO-4ML User manual

Sharp
Sharp FO-3150 User manual

Sharp
Sharp UX-B800 User manual

Sharp
Sharp FO-1460 User manual

Sharp
Sharp UX-340L User manual

Sharp
Sharp FO-175 User manual

Sharp
Sharp UX-P115 User manual

Sharp
Sharp UX-41 Parts list manual

Sharp
Sharp UX-B30 User manual

Sharp
Sharp UX-2200CM User manual

Sharp
Sharp FO-CC500 User manual

Sharp
Sharp FO-1850 User manual