Sharp Tokyo User manual

User manual
DR-P420 | Tokyo Portable Digital Radio
Product images are for illustration purposes only. Actual product may vary.
EN
IT
DE
NL
ES FR
PL RU

2
1 2 3 4

10 125 11
6 7 8 9

4
Important safety
instructions
Please follow all safety instructions
and heed all warnings. Keep this
manual for future reference.
CAUTION
RISK OF ELECTRIC SHOCK
DO NOT OPEN
This symbol instructs the user to consult the
user manual for further safety, operation, and
maintenance related information.
DC voltage
Precautions
Child safety
• Always follow basic safety precautions when using
this product, especially when children are present.
Children should be supervised to ensure that they
do not play with the product.
Location
• The product should be installed in a stable location
and ensure the product and its parts are not
overhanging.
Ventilation
• Slots and openings in the cabinet are provided
for ventilation to ensure reliable operation of the
product and to protect it from overheating; these
openings must not be blocked or covered. Ensure
a minimum distance of 5 cm around the product
for sucient ventilation. Never let anyone push
anything into holes, slots or any other openings
in the product’s casing as this could result in an
electric shock.
Heat and operating temperature
• Do not install near any heat sources such as
radiators, heat registers, stoves, or other apparatus
(including ampliers) that produce heat. Avoid
exposure to direct sunlight.
Naked ames
• To prevent the risk of re, keep candles or open
ames away from this product.
This symbol instructs the user to consult the user manual for further safety, operation, and
maintenance related information.
This symbol means that the product should be disposed of in an environmentally friendly manner
and not with general household waste.
CAUTION
RISK OF ELECTRIC SHOCK
DO NOT OPEN

EN
Water, moisture, and liquid entry
• To prevent the risk of re or electric shock, do not
expose this product to rain, water, or moisture. Do
not place objects lled with liquids on or near this
product.
Storms and lightning
• Storms are dangerous for all electric products. If
the mains or aerial wiring is struck by lightning the
product might get damaged, even if it is turned o.
You should disconnect all cables and connectors
from the product before a storm.
USB cable
• Do not damage the USB charging cable, stretch,
bend or place heavy objects on it.
Damage
• Please inspect the unit for damage after unpacking.
If it is damaged in any way do not operate the unit
and consult your dealer.
Maintenance
• Unplug the power cable from the power source
before cleaning the product. Use a soft and clean
cloth to clean the outside of the unit. Never clean it
with chemicals or detergent.
Service and repair
• This product does not contain any parts that are
serviceable by the user. Exposing the internal parts
inside the device may endanger your life. In case
of a fault, contact the manufacturer or authorised
service department. The manufacturers guarantee
does not extend to faults caused by repairs carried
out by unauthorised third parties.
Batteries
Installation
• Do not use any batteries other than those specied.
Observe the correct polarity when inserting the
batteries. Never use dierent types of batteries
together or mix new and old ones.
Use and maintenance
• Do not expose batteries to high temperatures, e.g.
near re or in direct sunshine. When the product is
not to be used for a long time (more than a month),

6
remove the batteries from the product to prevent
them from leaking. If the batteries leak, wipe away
the leakage inside the battery compartment and
replace the batteries with new ones.
Children safety
• Always ensure battery compartment is closed and
secured.
• Batteries are easily swallowed by young children
and can cause severe internal burns and lead to
death. Keep batteries away from children. Seek
immediate medical advice if you believe a battery
has been swallowed.
Environmental condition
• Keep batteries away from low air pressure or high
temperatures as this may result in an explosion or
the leakage of a ammable liquid or gas.
Disposal
• Please dispose of batteries correctly by following
the guidance in this manual (see section “Disposal
of this equipment and batteries”). Do not throw
them into re, do not disassemble them and do not
try to recharge non-rechargeable batteries. They
could leak or explode.
Disposal of this equipment
and batteries
Information for users on collection and disposal of old
equipment and used batteries.
This symbol means that the product
contains batteries covered by European
Directive 2013/56/EU which cannot be
disposed of with normal household
waste. Cd, Hg and Pb underneath the wheelie
bin symbol shows whether the battery contains,
cadmium (Cd), mercury (Hg) or lead (Pb).
This symbol on a product means that the
product is covered by European Directive
2012/19/EU and must not be disposed of
or dumped with your other household
waste.

EN
This symbol means that the product is
designed and manufactured so that it
can be recycled and reused.
• These symbols on the products, packaging, and/
or accompanying documents mean that used
electrical and electronic products and batteries
should not be mixed with general household
waste. Household users should contact either the
retailer where they purchased this product, or their
local government oce, for details of where and
how they can take these items for environmentally
safe recycling.
CE and UKCA statement:
• Hereby, Sharp Consumer Electronics Poland sp. z
o.o. declares that this audio device is in compliance
with the essential requirements and other relevant
provisions of RED Directive 2014/53/EU and UK
Radio Equipment Regulations 2017.
• The full CE text and UKCA declaration of conformity
are available at sharpconsumer.eu and then
entering download section of your model and
choosing“CE Statements”.

8
Controls
1. Telescopic aerial
2. Battery compartment
3. Micro USB port
4. Headphone jack
5. Backlit display
6. Power/Mode
• When switched o, short press: power on
• When switched on, short press: change mode
• When powered via USB, long press: standby
• When powered via battery, long press: power
o
7. Pre-set/Play/Pause (20 DAB/20 FM)
• Short press: Preset recall
• Long press: Preset store
• In Bluetooth mode:
- Short press to Play/Pause
- Long press to disconnect current device and
scan for new devices
8.
• In DAB mode:
- Short press to move up the DAB Station list
• In FM mode:
- Short press: Move down the frequency band
by 0.05MHz.
- Long press: Scan down the frequency band.
• In Bluetooth mode: Previous track
• In Menu: Move through the menu options
9.
• In DAB mode:
- Short press to move down the DAB Station list
• In FM mode:
- Short press: Move up the frequency band by
0.05MHz.
- Long press: Scan up the frequency band,
• In Bluetooth mode: Next track
• In the Menu: Move through the menu options
10. Info/Menu
• Short press: Station information
• Long press: Enter the menu options
• When in standby mode: short press to enter the

EN
Alarm 1 and 2 On/O settings
11. Memory presets 1, 2 and 3
• Short press: Recall preset 1 (2 or 3)
• Long press: Store preset 1 (2 or 3)
12. Volume control:
• Rotate: adjust the volume
• Rotate in Menu or Presets: Scroll through the
available menu options or preset locations
• Short press: Select a displayed radio station/
frequency, menu or preset option
• When in standby mode, short press: activates a
10-minute snooze.
Box contents
1 x DR-P420 Tokyo Portable Digital Radio
1 x USB to Micro USB power cable
User documentation
Using your portable DAB+/
FM radio
Telescopic aerial
Fully extend the telescopic aerial (preferably
vertically) before you attempt to tune to a DAB / FM
station. This will ensure that the maximum signal
strength is available when the radio begins to scan.
Extending the aerial also ensures the best possible
sound quality.
Connection
Connect the USB cable supplied into the Micro
USB port on the back of the radio. Plug the USB-A
(standard) end of the cable into a USB device or
adapter to power the radio. The radio will power on
and display <SHARP sharpconsumer.eu>. It will
then go into standby mode.
Inserting batteries (optional)
Before installing the batteries (not included), please

10
ensure the radio is switched o using and
has been unplugged from the USB cable. At the
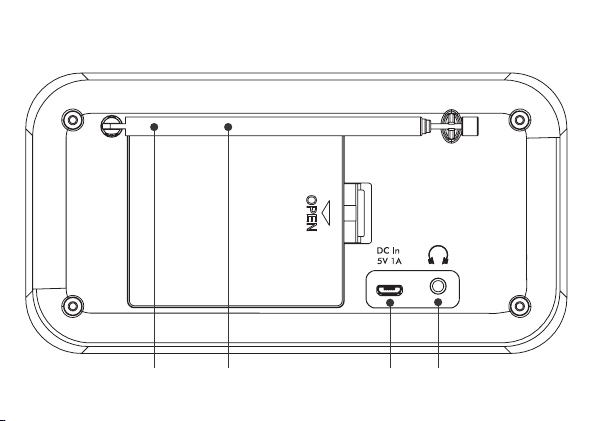
back of the radio, press in the tab on the battery
compartment cover to remove it.
Insert 4 x 1.5V AA-size (also known as LR-6) batteries,
making sure to note the‘+’and‘-‘ markings and
position the batteries correctly. Replace the battery
cover, making sure that it‘clicks’ securely shut.
Initial set-up
Short press to switch on the radio. It will begin
an automatic scan for DAB stations. A progress bar
will show the progress of the scan and the number of
stations found. When the scan is complete, your radio
will select the rst available station and begin to play.
By default, stations are listed numerically and then
alphabetically.
Note: The DAB radio station list is stored in the
memory; the next time the radio is switched on, the
station search does not take place.
Short press or to scroll through the available
stations. To select the station displayed, short press
. There will be a short delay whilst your radio tunes
to your selected station.
Adjusting the volume
Turn clockwise to increase the volume, and
anti-clockwise to decrease the volume.
Time and date
Time and date will be synchronised automatically to
that broadcast by the DAB service in 24-hour format.
To set the time and date manually, turn on the radio.
Long press to enter the menu options.
Use to select <System> / <Time> / <Set
Time/Date>. <Set time> is displayed and the
hour digits will ash; use to set hours and
minutes. <Set date> is displayed and the day will
ash; use to set day, month and year. <Time
Saved> is shown once the year is conrmed and you
will return to the <Set Time/Date> menu.
Use to change the clock/date format and
auto update settings. Short press to exit the menu.

EN
Change the mode
Short press to change between DAB, FM, and
Bluetooth modes. The display screen will conrm
the mode.
DAB radio mode
Select DAB radio mode
Short press until the screen displays <DAB+>.
The rst time you use the radio or if the station list
is empty, your radio will automatically begin to scan
for DAB radio stations. A progress bar will show the
progress of the scan and the number of stations
found during the scan will also be displayed. If you
were listening to a DAB station when you switched
the radio o, this station will automatically be
selected when you switch the radio back on.
Change DAB stations
Use and to scroll through the available
stations. Press to select when the station you want
to listen to is displayed. There will be a short delay
whilst your radio tunes to your selected station.
Scanning for DAB stations
With DAB radio, additional stations and services
regularly become available. Carry out a manual scan
periodically to make sure that you have the most
up-to-date station listing stored within the memory
of your radio. If you have moved your radio to a new
location, for e.g., if you go abroad on holiday, then it’s
also a good idea to carry out a manual scan.
In DAB mode:
Long press . Use to scroll and
select <Full Scan>. The display will change to
<Scanning…>. A progress bar will show the progress
of the scan and the number of stations found.
Prune DAB stations
You can remove the DAB stations in the station list
that cannot be received in your area. These are listed
with a <?> prex.

12
In DAB mode:
Long press . Use to scroll and select
<Prune>. <Prune? <No> Yes> is displayed. Use
to scroll and select <Yes>. Stations with a
<?> prex will now no longer be displayed.
Storing a DAB station preset
Your radio can store up to 20 DAB radio stations as a
preset for instant access to your favourite stations.
Note: Storing DAB radio station presets do not
overwrite FM station presets.
Tune the radio to the DAB radio station that you wish
to preset. Long press until <Preset Store
<1:(Empty)>> is displayed. Use to move to the
preset location that you would like to store the radio
station to (1-20). Press to select. The display will
conrm <Preset X stored>, where ‘X’is the number
of the preset (1-20)
Note: If there is already an existing DAB station stored
under a preset, it will be overwritten when you store
the new station.
Tune to a DAB preset station
In DAB mode:
To quickly access the radio stations stored under
preset locations 1, 2, or 3, short press 1, 2, or 3as
appropriate, on the front of your radio. Alternatively,
short press . <Preset Recall <1:>> is
displayed together with the name or frequency of
the station stored there, or <(Empty)> if no previous
station has been stored. Use to move to and
select the preset station that you would like to listen
to (1-20).
DAB display information
When listening to a DAB station, you can change the
information that will appear on the display. There are
several dierent types of information that are sent by
the broadcaster. Repeatedly short press to cycle
through the dierent information options:
• Dynamic label segment (DLS) - This is scrolling text
information as supplied by the broadcaster. This
could include artist names, song titles, contact
details for the radio station, etc.

EN
• Signal strength - An empty will appear on the
display to indicate the minimum signal strength
for acceptable listening. The row of solid rectangles
indicates the actual signal strength that you are
receiving.
• Program type (PTY) – e.g.,‘Rock’, ‘Pop’,‘Talk’or ‘News’
• Multiplex name - Displays the broadcasting area
and collection of radio stations on this frequency
e.g., BBC National DAB, Digital 1 Network
• Channel and frequency – e.g. 12B 225.648 MHz
(Channel=12B, Frequency=225.648 MHz)
• Signal error - This is displayed as a number between
0-99. To satisfactorily listen to a radio station, the
signal error must be below 30. Adjust the aerial or
relocate your radio to improve reception.
• Signal information - The data rate at which the
signal is being transmitted.
• Power indicator – displays <USB Power> when
powered by USB; displays <Battery XX> where XX
is the battery charge available.
• Time
• Date
Dynamic range control (DRC)
DRC data is not transmitted by all broadcasters. DRC
is used for controlling dierence between the loudest
and quietest sounds. e.g., in a noisy environment,
setting the DRC to maximum makes quiet sounds
comparatively louder, and loud sounds quieter.
There are 3 levels of compression:
• DRC o - no compression. This is the default
setting.
• DRC low - medium compression
• DRC high - maximum compression
In DAB mode, long press . Use to scroll
and select <DRC> and then select your preference.
Note: The current DRC setting will have an asterisk (*)
in the display.
FM radio mode
To change to FM mode, short press until the
radio displays <FM>. If you were listening to an FM
station when you switched the radio o, this station

14
will automatically be selected when you power the
radio back on.
Tune to an FM station
Long press or button to scan up or down the
frequency band. The radio will search for and stop at
the next available station.
Short press or to ne-tune each frequency in
0.05MHz steps.
Note: If the reception is poor, adjust the aerial or
move the radio to another location.
Change the scan setting
In FM mode:
Long press , <Scan setting> will be displayed.
Press .
There are two dierent options to choose from:
• <Strong stations> The scan will only stop when a
strong signal strength is received, resulting in bet-
ter audio quality. It is possible that the station you
are scanning for may be missed using this option.
• <All stations> The scan will stop at every station it
receives, even if the signal strength is poor.
Use to choose and select from the options
available.
Note: The current scan setting will have an asterisk (*)
in the display.
Storing an FM station preset
Your radio can store up to 20 FM stations in its preset
memories for instant access to your favourite stations.
Note: Storing FM radio station presets do not
overwrite your DAB station presets.
Tune the radio to the FM radio station that you wish
to preset. Long press until <Preset Store
<1:(Empty)>> is displayed. Use to move
to and select the preset location that you would like
to store the radio station to (1-20). The display will
conrm <Preset X stored>, where ‘X’is the number
of the preset (1-20).
Note: If there is already an existing FM station stored
under a preset, it will be overwritten when you store

EN
the new station.
Auto memory store (AMS)
Alternatively, you can use the Auto Memory Store
(AMS) feature to store your FM radio station presets.
In FM mode, long press . Use to scroll
to and select <AMS>. Your radio will now scan the
FM frequency band and the stations found will be
automatically stored to the preset locations.
Note: You can manually overwrite your AMS stored
presets by following the steps in ‘Storing an FM
station preset’ above.
Tune to an FM preset station
In FM mode:
To quickly access the radio stations stored under
preset locations 1, 2 or 3, short press 1, 2or 3, as
appropriate. Alternatively, short press .
<Preset Recall <1:>> is displayed together with the
name or frequency of the station stored there, or
<(Empty)> if no previous station has been stored.
Use to move to and select the preset station
that you would like to listen to (1-20).
FM display information
When listening to an FM station you can change the
information that appears on the second line of the
display. Repeatedly short press to cycle through
the dierent information options:
• Radiotext (RT) - This is scrolling text information
as supplied by the broadcaster. This could include
artist names, song titles, contact details for the
radio station, etc.
• Program Type (PTY) – e.g., ‘Rock’, ‘Pop‘, ‘Talk’, or
‘News’
• Station name or frequency – e.g., BBC R4, 93.30MHz
• Power indicator – displays <USB Power> when
powered by USB; displays <Battery XX> where XX
is the battery charge available.
• Time
• Date

16
Bluetooth mode
Ensure your radio is in Bluetooth mode by
short pressing until the radio displays
<Bluetooth>. Your radio will begin to search for
Bluetooth devices. Ensure the Bluetooth-enabled
device you are connecting to is discoverable.
Note: If necessary, refer to the instructions for your
device to add or set up Bluetooth.
When found, your radio will be displayed as ‘SHARP
DR-P420’on your device. Select this to begin pairing.
Once done, <BT connected> will be displayed on
your radio.
Paired devices will connect to the radio when they are
within range (within 10 metres in line of sight). Your
device will remain paired with the radio unless you
decide to disconnect it.
To disconnect from Bluetooth, long press for
3 seconds to unpair your current device and search
for new devices.
Wirelessly stream music via Bluetooth
In Bluetooth mode, you can wirelessly stream audio
through the product’s speaker. Use the controls on
your paired Bluetooth device as well as those on your
radio. Controls available:
• Play/ Pause: Short press
• Previous track: Short press
• Next track: Short press
Volume can also be adjusted – either using your radio
and/or your connected device.
Note: If the radio is inactive for 20 minutes, or
no audio signal is being received, the radio will
automatically go into standby (or power o if the
radio is running on batteries).

EN
Alarm functionality
Note: The alarm function will only function when the
radio is powered through via USB; it won’t function
when powered through batteries (to preserve the
battery life).
Set an alarm
Note: Check that the radio is displaying the correct
time and date before you set an alarm.

18
DAB+
Full Scan
ManualTune System
DRC Sleep Alarm
Prune Alarm Alarm 1 Setup
System Time Alarm 2 Setup
Backlight
FM
Scan setting Language
AMS Factory reset
System Software Version
BT System
Alarm 1 or 2 settings
Time Hour
Min
Duration 1, 5, 15, 30, or 60 minutes
Source Buzzer, DAB, or FM
Frequency Daily, once, weekdays or weekends
Volume level 25%-100%
Alarm On or O

EN
Note: If the time is not set or has failed to update
from the radio signal, <Time is not set> will be
displayed when you try to set the alarm. The radio will
then prompt you to set the time. An alarm can only
be set after the time has been set.
If you try to set alarm when the unit is powered by
batteries, <Alarm inactive> will be displayed. Alarm
functions are only available with mains power (USB).
Stop, snooze, or switching the alarm
o
To stop the alarm, short press ,<Alarm o>
will be displayed. The alarm symbol will remain in the
display and will sound again at the same time the
next day unless it was set for <Once>.
To snooze the alarm, press . <Snooze> will be
displayed, followed by a 10-minute countdown. Once
the countdown ends, the alarm will sound again. You
can terminate snooze by pressing . <Alarm o>
will be displayed.
To switch o the alarm, follow the steps for‘Set an
alarm’and select <O>.
Sleep timer
You can set your radio to switch to standby mode
automatically using the sleep timer. You can choose
from <Sleep o>, <15>, <30>, <45>, <60> and
<90> minutes. To do this, long press . Use
to scroll and select <System> / <Sleep>.
Use to scroll and select your preference.
<Sleep> will be displayed. In the top right of the
radio display, the number of minutes until your radio
will switch to standby mode will be displayed e.g.,
S90.
Display backlight timeout
To adjust the display backlight timeout, long press
. Use to scroll to and select <System>
/ <Backlight> / <Timeout>. Scroll through the
available backlight timeout options. The current
setting will have an asterisk (*) in the display. Press
to select.
Similarly, use to change the settings for
the backlight brightness for the <Dim level> and
<On level>. There are 3 options available: <High>,

20
<Medium>, and <Low>.
Display language
To change the display language, long press
. Use to scroll and select <System> /
<Language>. Use to scroll and select your
preferred language.There are 7 options available:
English, French, German, Italian, Spanish, Polish, and
Netherlands. An asterisk (*) will be displayed next to
the current language setting.
Other information
Software version
To check the software version of your radio, long
press . Use to scroll and select
<System> / <SW Version>. The software version will
be displayed.
Factory reset
You can reset your radio to restore it to the original
factory settings.
Note: If you reset your radio, your stored presets will
be deleted and any connected Bluetooth device will
be unpaired.
Long press . Use to scroll and select
<System> / <Factory reset>. <Factory Reset? <No>
Yes> will be displayed. Use to scroll and
select <Yes >. <Restarting…> will be displayed. After
a few seconds, the display will change to <SHARP
sharpconsumer.eu> and will then go to standby
mode.
Troubleshooting
If there is no sound or power:
• Adjust the volume.
• Check that the USB cable is connected and that the
radio is not in standby mode.
• If the product is powered using batteries, check if
they need to be replaced. Please use good quality
AA batteries.
This manual suits for next models
5
Table of contents
Languages:
Other Sharp Radio manuals

Sharp
Sharp DR-450(GR) User manual

Sharp
Sharp DR-430 User manual

Sharp
Sharp QT-15XW User manual

Sharp
Sharp FV-310GB User manual

Sharp
Sharp FV-1800 User manual

Sharp
Sharp QT-CD131H User manual

Sharp
Sharp FV-1710 User manual

Sharp
Sharp GF-5454H User manual

Sharp
Sharp GF-9191H User manual

Sharp
Sharp DR-P320 User manual