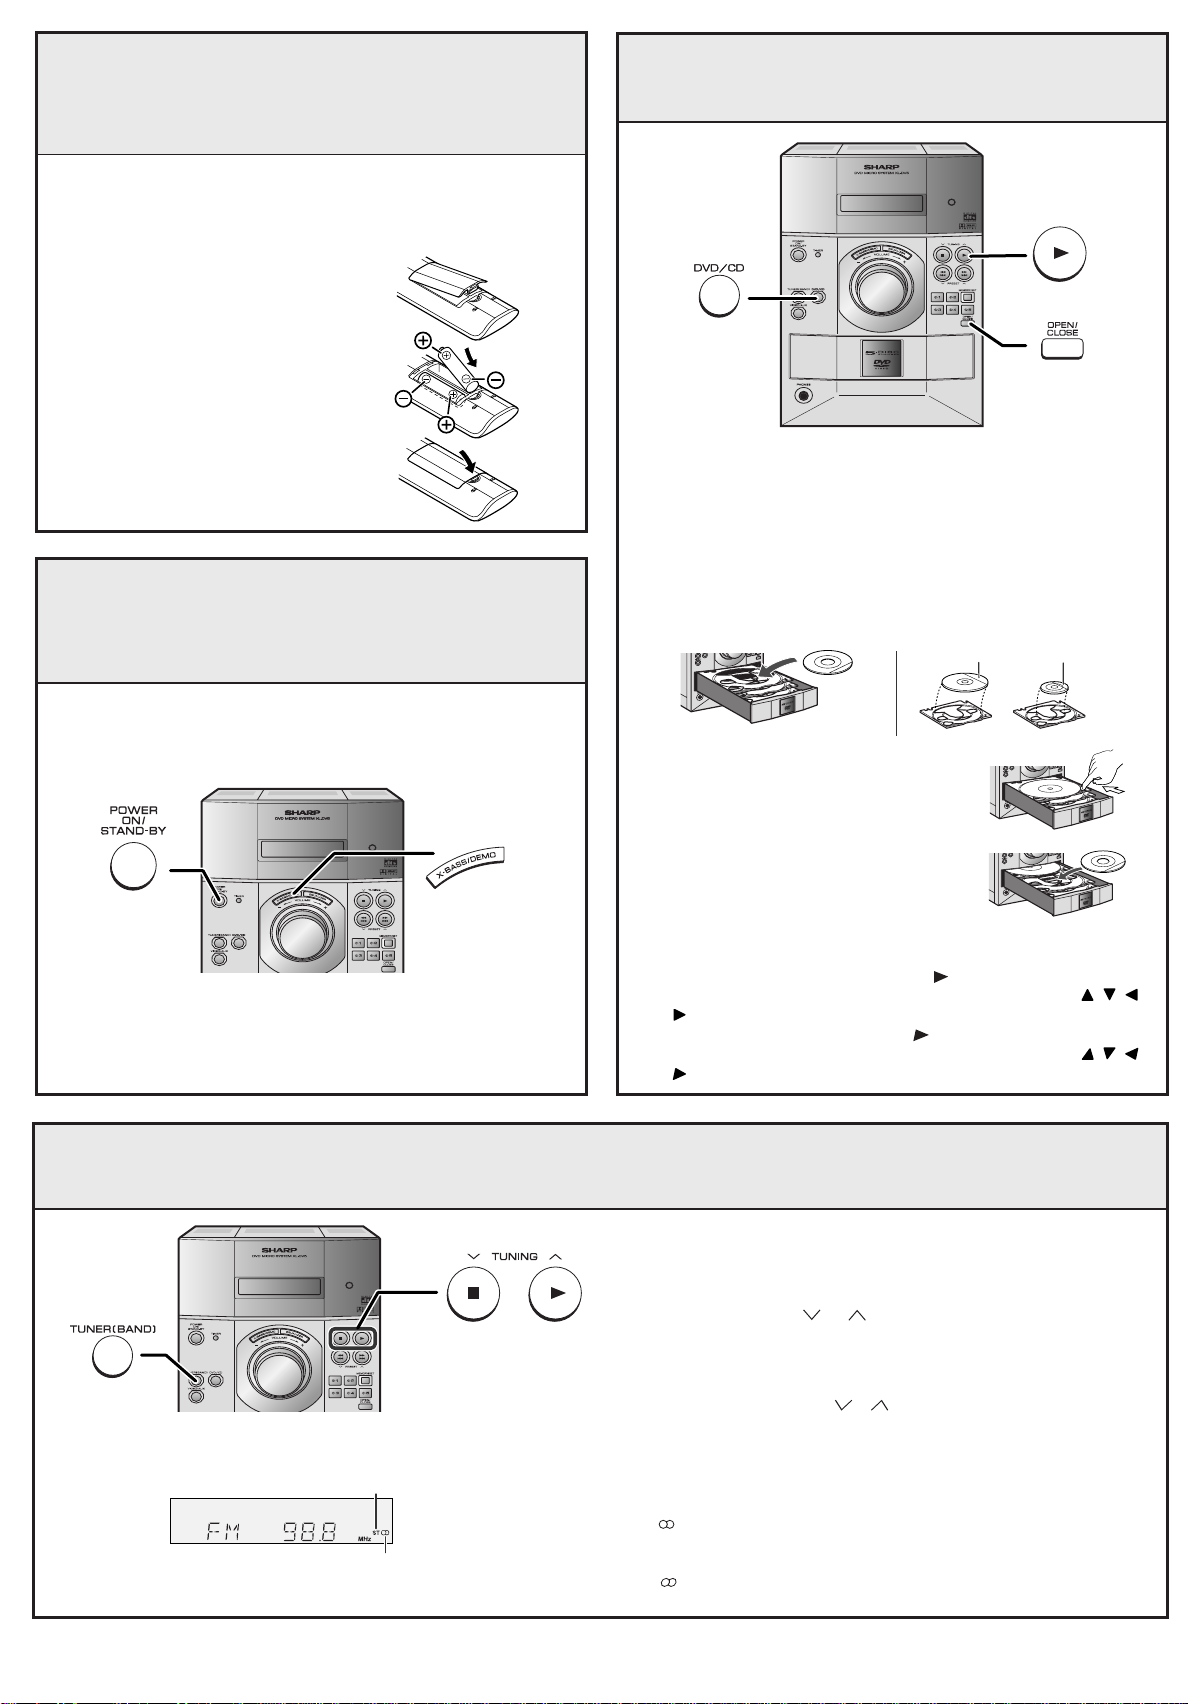
manuals.online logo
Brands
  1. Home
  2. •
  3. Brands
  4. •
  5. Sharp
  6. •
  7. Stereo System
  8. •
  9. Sharp XLDV50 User manual

Sharp XLDV50 User manual

Other Sharp Stereo System manuals

Sharp XL-MP50H User manual

Sharp

Sharp XL-MP50H User manual

Sharp XL-S10 User manual

Sharp

Sharp XL-S10 User manual

Sharp MD-X60 User manual

Sharp

Sharp MD-X60 User manual

Sharp SD-EX100H User manual

Sharp

Sharp SD-EX100H User manual

Sharp GX-CD1200WBK User manual

Sharp

Sharp GX-CD1200WBK User manual

Sharp XL-HF200P User manual

Sharp

Sharp XL-HF200P User manual

Sharp XL-DV50H User manual

Sharp

Sharp XL-DV50H User manual

Sharp QT-CD250 User manual

Sharp

Sharp QT-CD250 User manual

Sharp SD-CX1H User manual

Sharp

Sharp SD-CX1H User manual

Sharp CD-G10000P User manual

Sharp

Sharp CD-G10000P User manual

Sharp DK-KP80PH User manual

Sharp

Sharp DK-KP80PH User manual

Sharp XL-MP100H User manual

Sharp

Sharp XL-MP100H User manual

Sharp XL-UH4H User manual

Sharp

Sharp XL-UH4H User manual

Sharp CD-BA2010H User manual

Sharp

Sharp CD-BA2010H User manual

Sharp XL-MP110H User manual

Sharp

Sharp XL-MP110H User manual

Sharp XL-3000V User manual

Sharp

Sharp XL-3000V User manual

Sharp XL-HP700 User manual

Sharp

Sharp XL-HP700 User manual

Sharp XL-DK257NH User manual

Sharp

Sharp XL-DK257NH User manual

Sharp XL-MP45H User manual

Sharp

Sharp XL-MP45H User manual

Sharp CD-ES770 User manual

Sharp

Sharp CD-ES770 User manual

Sharp XL-MP100H User manual

Sharp

Sharp XL-MP100H User manual

Sharp CD-BA300 User manual

Sharp

Sharp CD-BA300 User manual

Sharp XL-UR14H User manual

Sharp

Sharp XL-UR14H User manual

Sharp CD-BA1700H User manual

Sharp

Sharp CD-BA1700H User manual

Popular Stereo System manuals by other brands

LG CM3330B owner's manual

LG

LG CM3330B owner's manual

Sony SS-CEP50 Service manual

Sony

Sony SS-CEP50 Service manual

Cetacea Sound CVS-II user guide

Cetacea Sound

Cetacea Sound CVS-II user guide

Denon UCD-250 Service manual

Denon

Denon UCD-250 Service manual

Sanyo DC-MX41i instruction manual

Sanyo

Sanyo DC-MX41i instruction manual

Exibel BDX600-UK user manual

Exibel

Exibel BDX600-UK user manual

Sanyo DC-F320 Service manual

Sanyo

Sanyo DC-F320 Service manual

Philips FWM583X Specifications

Philips

Philips FWM583X Specifications

Onkyo CBX 300 - CD / MP3 Clock Radio instruction manual

Onkyo

Onkyo CBX 300 - CD / MP3 Clock Radio instruction manual

Aiwa XR-EM70 Service manual

Aiwa

Aiwa XR-EM70 Service manual

Cyrus Lyric user guide

Cyrus

Cyrus Lyric user guide

Philips MCM159/98 quick start guide

Philips

Philips MCM159/98 quick start guide

Philips/Magnavox Magnavox FW 62C owner's manual

Philips/Magnavox

Philips/Magnavox Magnavox FW 62C owner's manual

RCA RS3965SB user manual

RCA

RCA RS3965SB user manual

Philips FW 690 Instructions for use

Philips

Philips FW 690 Instructions for use

LG FB165DAB Service manual

LG

LG FB165DAB Service manual

Sanyo DC-UB1475M/XE/UK Service manual

Sanyo

Sanyo DC-UB1475M/XE/UK Service manual

LG LAS750M manual

LG

LG LAS750M manual

manuals.online logo
manuals.online logoBrands
  • About & Mission
  • Contact us
  • Privacy Policy
  • Terms and Conditions

Copyright 2025 Manuals.Online. All Rights Reserved.

1
Accessories
Accesorios
Remote control × 1
Controlador remoto
×
1
TINSEA017SJZZ
04A N HK 1
3
System connections
FM/AM loop antenna × 1
Antena de cuadro de FM/AM
×
1
AC power cord × 1
Cable de alimentación de CA
×
1
Plug in with the rising side
facing to the right.
Insértela con el lado de eleva-
ción encarado a la derecho.
AC outlet
(AC 120 V, 60 Hz)
Toma de corriente de CA
(120 V de CA, 60 Hz)
Front speaker (left)
Altavoz delantero (izquierdo)
FM antenna
Antena de FM
AM loop antenna
Antena de cuadro de AM
Front speaker (right)
Altavoz delantero (derecho)
Black
Negro
Red
Rojo
Printed in China
Impreso en China
Subwoofer
Altavoz de subgraves
Video cable × 1
Cable de vídeo
×
1
2
TV conection
Conexión a un televisor
To video input
jack
A la toma de
entrada de vídeo
TV
Televisor
To S-video input jack
A la toma de entrada de
S-vídeo
To component video input jacks
A las tomas de entrada de vídeo de
componentes
Component video cable
(commercially available)
Cable de vídeo de componente
(de venta en las tiendas del ramo)
Video cable
(supplied)
Cable de vídeo
(suministrado)
S-video cable
(commercially available)
Cable de S-vídeo
(de venta en las tiendas del ramo)
*XL-DV5_DV55(U)_QG.pm 04.1.30, 10:43 AM1
5
Turn on your system
Conexión de la alimentación de su
sistema
The first time the unit is plugged in, the unit will enter the dem-
onstration mode. You will see words scroll.
Cuando se enchufe por primera vez el aparato, se establecerá en
el modo de demostración. Verá un desplazamiento de palabras.
1Press the X-BASS/DEMO button to cancel the demonstration mode.
Pulse el botón X-BASS/DEMO para cancelar el modo de
demostración.
2Press the ON/STAND-BY button to turn the power on.
Pulse el botón ON/STAND-BY para conectar la alimentación.
Listening to the radio
Audición de la radio
1Press the TUNER (BAND) button repeatedly to select the desired
frequency band (FM or AM).
Pulserepetidamenteelbotón TUNER(BAND) paraseleccionar labanda
de frecuencias deseada (FM o AM).
2Press the TUNING ( or ) button to tune in to the desired sta-
tion.
When the TUNING button is pressed for more than 0.5 seconds, scan-
ning will start automatically and the tuner will stop at the first re-
ceivable broadcast station.
Pulse el botón TUNING ( o ) para sintonizar la emisora deseada.
Cuando se pulse el botón
TUNING durante más de 0,5 segundos, la
exploración se iniciará automáticamente y el sintonizador se parará en
la primera emisora difusora que pueda recibirse.
To receive an FM stereo transmission:
Press the TUNER (BAND) button to display the “ST” indicator.
●“” will appear when an FM broadcast is in stereo.
Para recibir una transmisión de FM en estéreo:
Pulse el botón TUNER (BAND) para que se visualice el indicador “ST”.
●
“ ” aparecerá cuando una difusión de FM sea en estéreo.
FM stereo mode indicator
Indicador del modo de FM
en estéreo
FM stereo receiving indicator
Indicador de recepción de FM
en estéreo
Playing a disc
Reproducción de un disco
TINSEA017SJZZ
4
Remote control battery installation
Instalacióndelaspilasdelcontrolador
remoto
1Remove the battery cover.
Extraiga la cubierta de las pilas.
2Insert the batteries as shown.
Inserte las pilas como se muestra.
3Replace the cover.
Vuelva a colocar la cubierta.
Use 2 “AA” size batteries (UM/SUM-3, R6, HP-7 or similar).
Batteries are not included.
Use dos pilas del tamaño “AA” (UM/SUM-3, R6, HP-7 o
equivalentes).
Las pilas no están incluidas.
1Press the DVD/CD button.
Pulse el botón DVD/CD.
2Press the OPEN/CLOSE button to open the disc compartment.
●All trays open in tiers.
Pulse el botón OPEN/CLOSE para abrir el compartimiento del disco.
●
Todas las bandejas se abren en fila.
3Place the disc on the disc tray 1, label side up.
Coloque el disco en la bandeja de discos 1, con el lado de la etiqueta
hacia arriba.
4To place discs in the trays 2 - 5
Para poner discos en las bandejas 2 - 5
1.Slidein thetraywith adisc toward theunit.
Introduzca la bandeja con un disco
deslizándola hacia el aparato.
2.Place a disc in an empty tray.
Ponga un disco en una bandeja vacía.
5Press the OPEN/CLOSE button to close the disc compartment.
Pulse el botón OPEN/CLOSE para cerrar el compartimiento del disco.
6If playback does not start, press the button.
●When the menu screen appears, select an item using the , , or
button and then press the ENTER button.
If playback does not start, press the button.
●
When the menu screen appears, select an item using the
, ,
or
button and then press the ENTER button.
5” (12 cm)
12 cm
3” (8 cm)
8 cm
*XL-DV5_DV55(U)_QG.pm 04.1.30, 10:43 AM2