Shift Power Full Race Unit User manual

Reading time: 10min
Full Race Unit installation manual part № “C-YF6”
Please read carefully before attempting any use of this product!
To install the Full Race Unit you will have to:
1. Gain access to the fuel injectors (for best results refer to your motorcycle service
manual). Plug in the female connectors to the fuel injectors and the male connectors to the
bike's harness. You must connect each male and female connector pair to the same
corresponding cylinder no matter left to right or right to left!
IMPORTANT NOTE: Make sure when plugging the connectors that you press them well enough
to lock, as this will provide sealed and reliable electrical connection, vital for the function of
the Full Race Unit. Find appropriate place for the Full Race Unit control box and route the
cables, they are high quality, automotive class, heat resistant cables but there is some care you
should take: Avoid moving parts as they might damage them, the best way is to follow other
cables from the bike's harnes, use the cable ties provided to fasten them. Make sure the place
for the Full Race Unit control box is away from heavy vibrations, heat and it is not constantly
exposed to rain and water.
Connect the single Yellow wire with the provided Posi-Tap terminal to the tachometer signal.
This is very important because the entire system will relay on this signal and if not provided
properly it will not function at all. Please look at the following pictures:
(Step_ 1) (Step_ 2) Locate the correct ECU connector!

(Step_2) Connect the Posi-Tap terminal to the Yellow with Black stripe wire, terminal №4.
Posi-Tap connector installation guide:
1. Do not strip run wire.
2. Unscrew the big end cap counter-clockwise
3. Insert the run wire in the big end cap slot.
4. Screw the big end cap to pierce and provide signal.
Connect the Full Race male and female 3-way white connectors to the speed sensor. It
is usually located to the upper crankcase under the fuel pump and the OEM sensor connector
may be black or white depending on model.

The pictures are for illustrative purposes and from YZF-R1(2007-2008) model.
The Full Race Unit will require negative (ground) connection to power up, connect the
single black wire to the battery NEGATIVE (-) lead!
Remove your original shift rod and install SP-Shift Sensor with the fitting rod(s) provided
to its place. Route the wire to the Full Race Unit control box and plug it in. When installing the
sensor, make sure all counter nuts are locked and the sensor wire is not under tension when

pressing the gear lever all the way up and down. The rod and sensor provided are made with
DUAL THREADS (left and right hand at the same time) which makes fitting universal.
NOTE: The gearbox pivot arm must extend to 90 degrees with the shift rod in order to receive
equal force in both directions, if not set corectly, the gearbox may not react accordingly and
miss gears when using the quickshifter!
After this is done, turn the ignition key ON, make sure the engine kill switch is in RUN position
and the gearbox is in neutral, at this time the Full Race control box must power up and enter
normal operation - display SP flashing.
BEFORE USING THE QUICKSHIFTER YOU MUST ENSURE THE CORRECT SENSOR MOTION FOR
YOUR SHIFT SETUP IS SELECTED, PLEASE REFER TO THE FOLLOWING TABLE - OPTION SS
The following is a Menu table for adjusting the control box parameters.
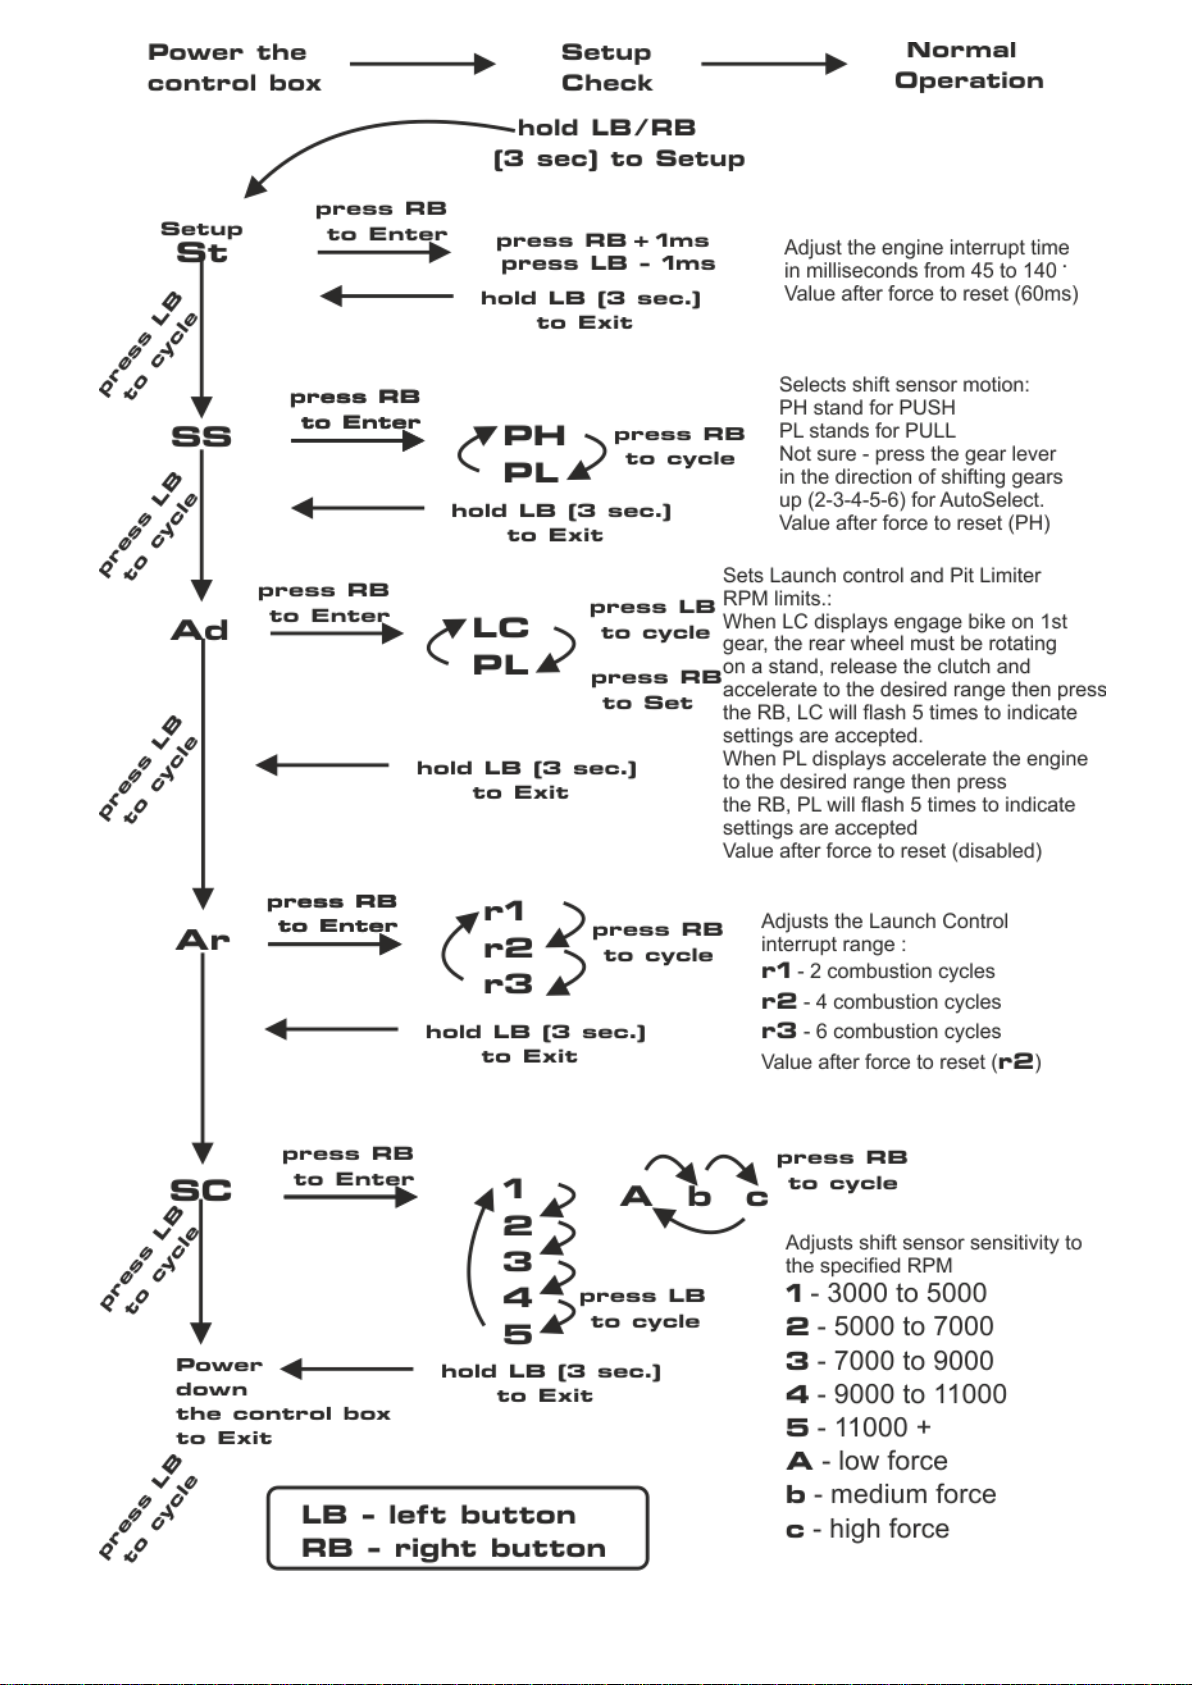
Table of contents
Other Shift Power Motorcycle Accessories manuals


