Shinerich 11875013 User manual
Questions, problems, missing parts? Before returning this product to your
Item NO.: SRFP41304
Model NO.: 11875013
1
retailer, call our customer service department at 1-866-814-0585, 8 a.m. - 8 p.m.,

Table of Contents
Warnings............................................................................................ 3
Schematic Drawing / Tools Required ................................................ 4
Parts List ............................................................................................5
Hardware............................................................................................ 6
Assembly Instructions......................................................................... 7
Operating & Maintenance Instructions............................................. 14
Warranty Information........................................................................ 15
2

Warnings
WARNINGS AND CAUTIONS
WARNING: TO AVOID INJURY
Ɣ)25287'22586(21/<
Ɣ'RQRWXVHWKHILUHSLWLQGRRUV%HFDXVHRIKD]DUGRXVFDUERQPRQR[LGHIXPHVDODFNRI
YHQWLODWLRQFDQFDXVHGHDWK
Ɣ'RQRWXVHJDVROLQHRUNHURVHQHWRVWDUWILUHVLQWKHILUHSLW.HHSDOOIODPPDEOHOLTXLGVDZD\
IURPWKHILUHSLW
Ɣ7KLVXQLWLVGHVLJQHGWREXUQFKDUFRDODQGXQWUHDWHGZRRGRQO\
Ɣ'RQRWXVHXQGHURURQFRPEXVWLEOHVWUXFWXUHVVXUIDFHVLQFOXGLQJZRRGHQGHFNV
Ɣ8VHSURWHFWLYHJORYHVDQGORQJKDQGOHGWRROVZLWKWKLVILUHSLW
Ɣ'LVSRVHRISDFNDJLQJPDWHULDOVSURSHUO\
Ɣ.HHSFKLOGUHQDZD\IURPKRWILUHSLW
Ɣ)LUHSLWUHPDLQVYHU\KRWIRUDSHULRGRIWLPHDIWHUXVLQJ
Ɣ%HVXUHILUHSLWLVFRROEHIRUHDWWHPSWLQJWRPRYHLW
Ɣ7KHILUHSLWVKRXOGEHSODFHGQRFORVHUWKDQFPIURPZDOOVGXULQJXVH
3
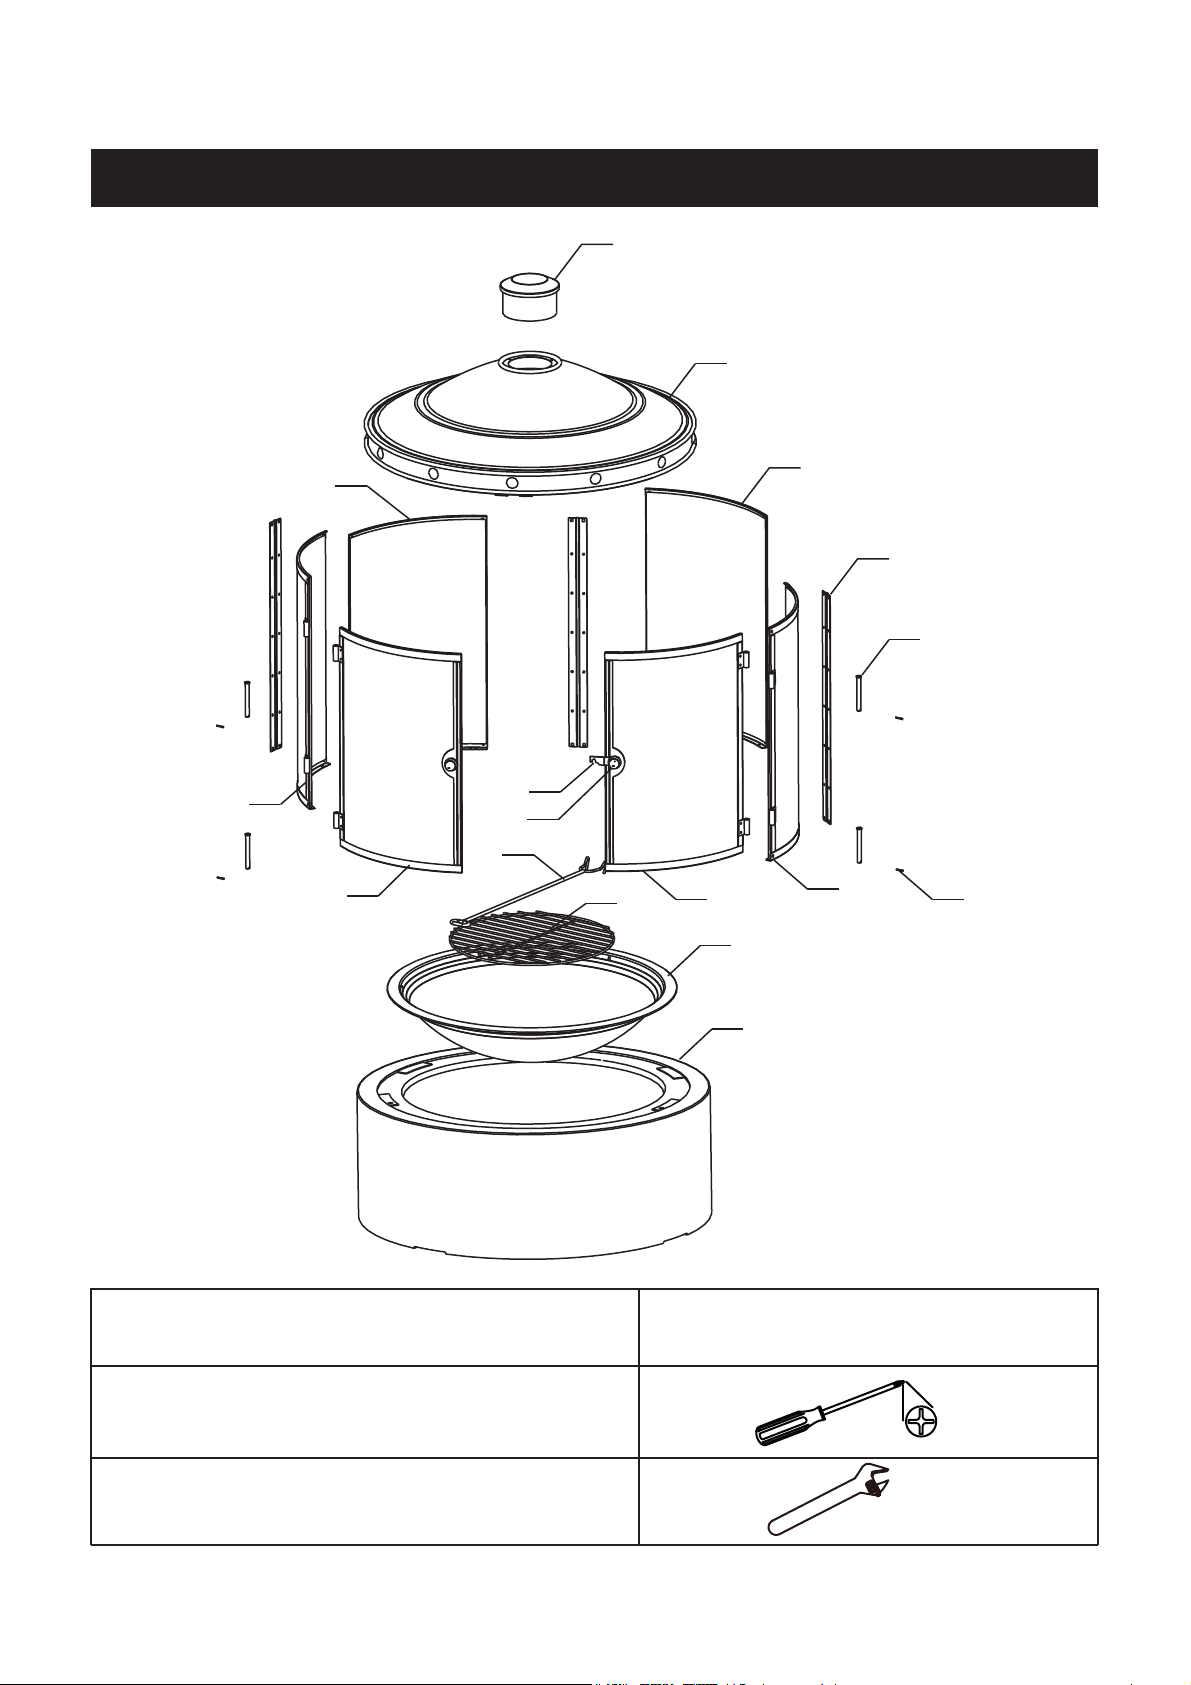
Schematic Drawing / Tools Required
PictureDescription (Not included)
Phillips Head Screwdriver
Adjustable open end wrench
A
B
C
D
E
F
G
H
IJ
K
L
M
N
O
P
Q
4

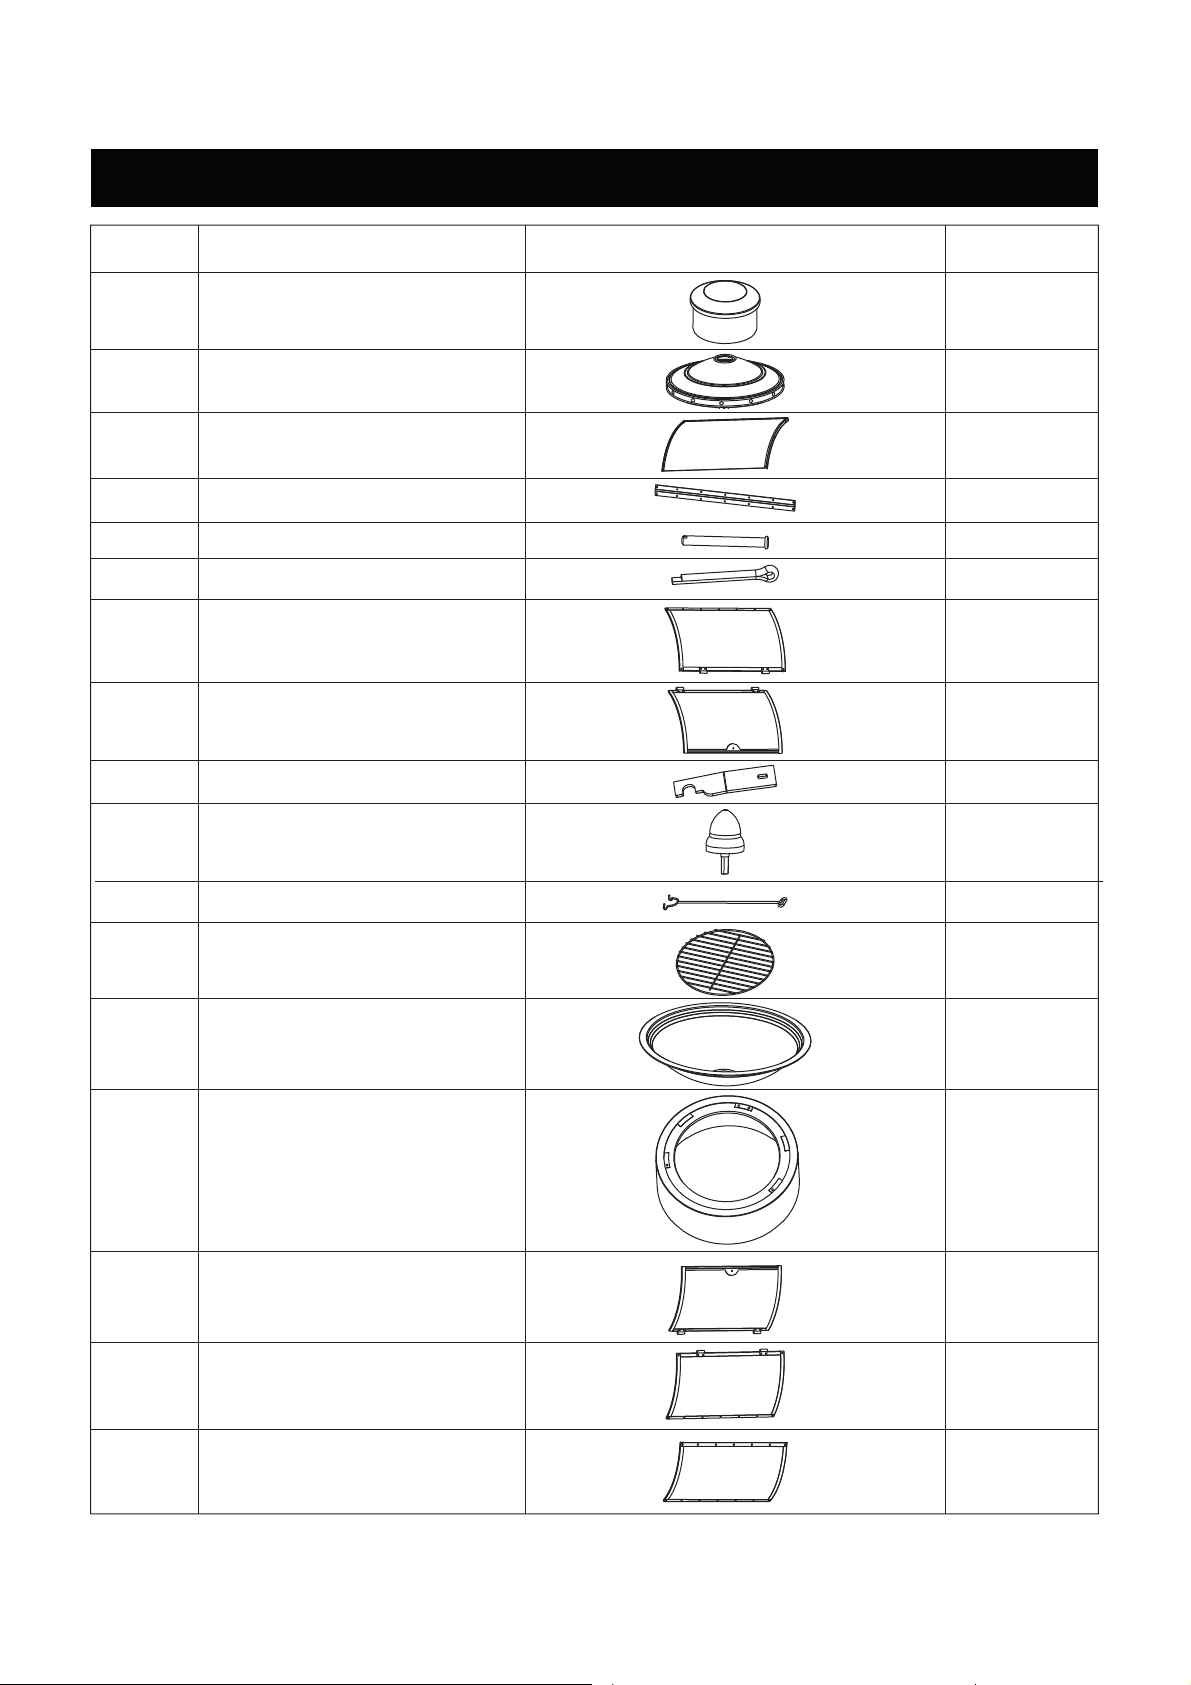
Parts List
Part # Quantity
1A
1B
1C
D3
E
1
4
4
F
G
H
I
J
K
L
M
N
O
P
Q
1
1
Description Picture
Chimney cap
Roof
Panel 1
Connecting pole
Door spindle
Pin
Panel 2
Right door
Door latch
2
1
1
1
1
1
1
1
Door knob
Hook
Charcoal grid
Fire bowl
Base
Left door
Panel 3
Panel 4
5
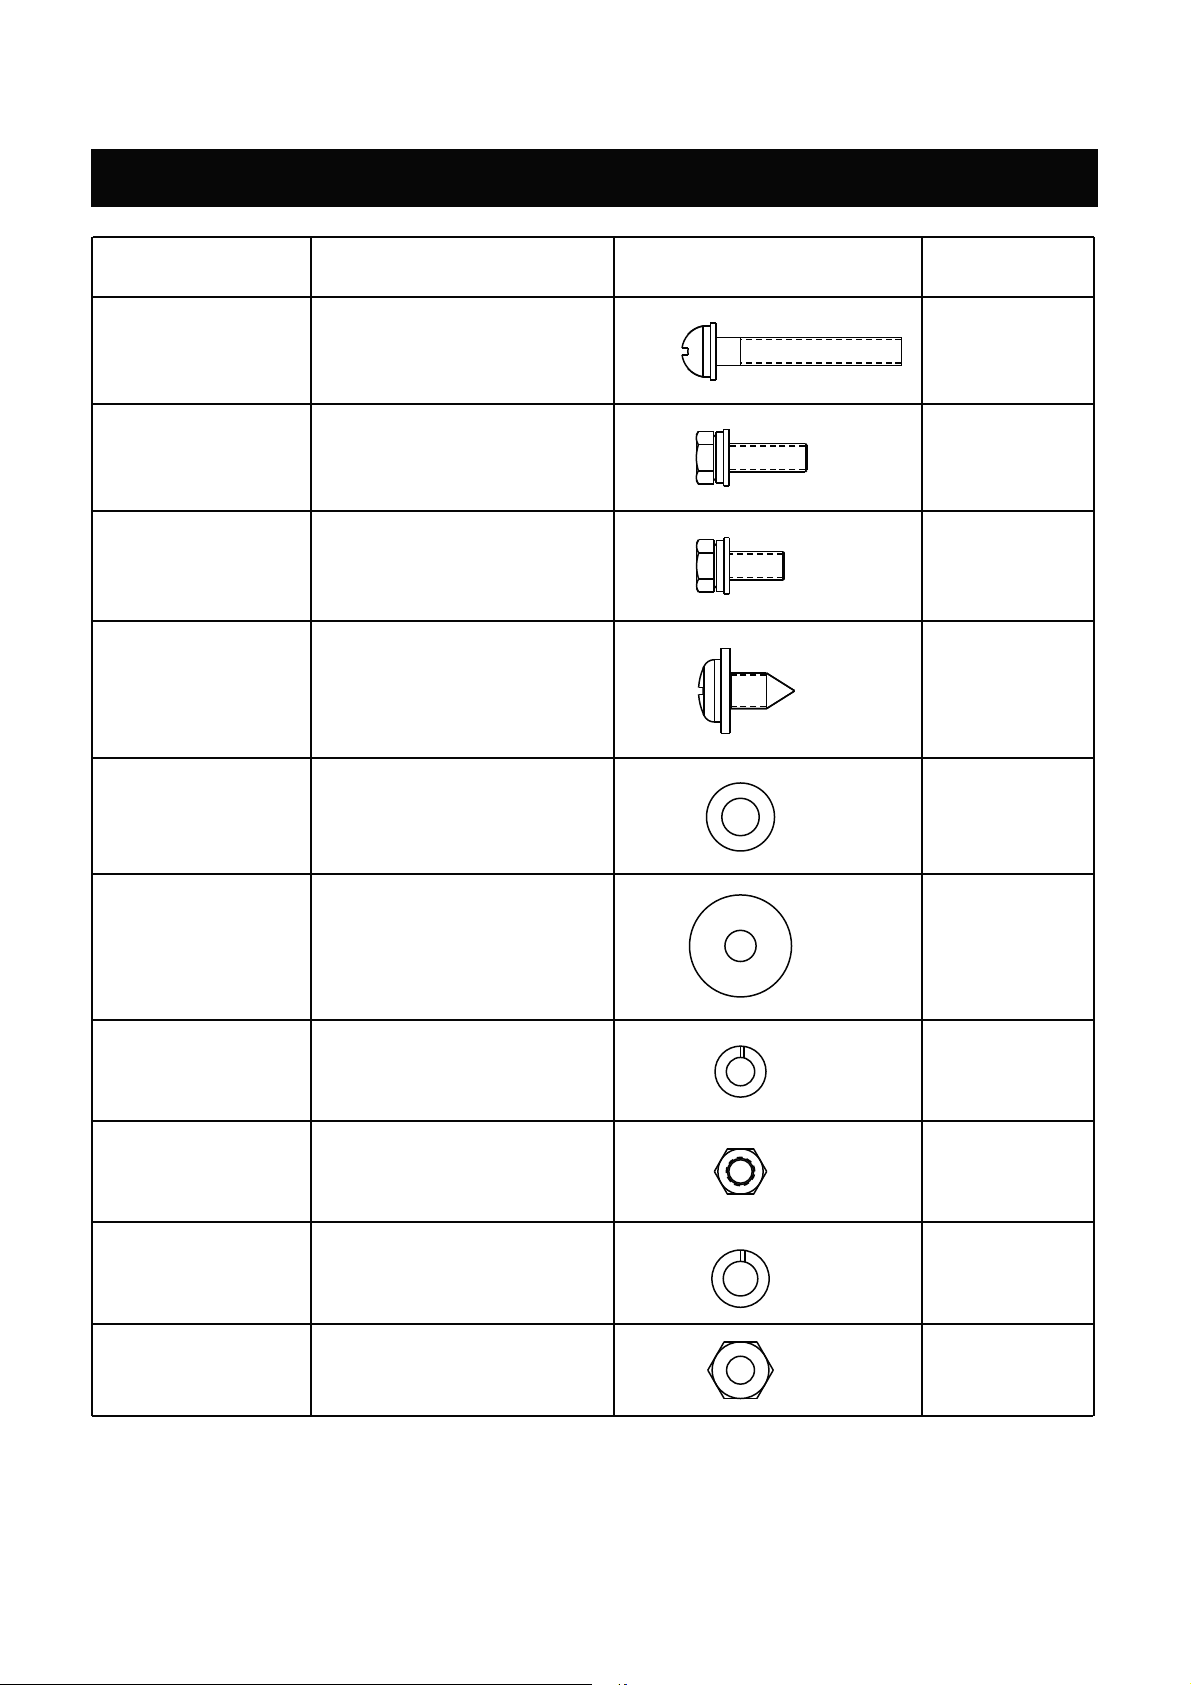
Hardware
Picture Quantity
4
8
8
33
AA
BB
CC
DD
DescriptionHardware #
M5 x 35mm Bolt
M5 x 16mm Bolt
M5 x 12mm Bolt
ST5.5 x 13mm Bolt
1EE D6 Washer
4FF D5 Washer
12GG D5 Spring Washer
12HH M5 Nut
3II D6 Spring Washer
2JJ M6 Nut
Before beginning assembly, installation or operation of product, make sure all parts are present.
Compare parts with package contents list and diagram above. If any part is missing or damaged,
do not attempt to assemble the product. Contact customer service for replacement parts.
6

Assembly Instructions
NOTE: Assemble the fireplace on a non-abrasive level surface.If any parts are missing or
damaged, do not attempt to assemble this product, contact customer service.
Step 1
Step 2
1
2
Attach Door knob (J) and Door
latch (I) to Right door (H) with
(2) D6 washer (EE), (2) D6 spring
washers (II), and M6 nut (JJ).
See Figure 2
Attach Door knob (J) to Left door (O)
with D6 spring washer (II) and M6
nut (JJ).
See Figure 1
Hardware Used
II D6 Spring Washer x 1
JJ M6 Nut x 1
JJ
JJ EE
II
II
O
J
J
H
I
Hardware Used
II D6 Spring Washer x 2
x 1
JJ M6 Nut
EE D6 Washer
x 1
7

Assembly Instructions
Hardware Used
M5 x 12 Bolt x 3
ST5.5 x 13 Bolt x 10
D5 Spring Washer x 3
M5 Nut x 3
Step 3 3
Attach Panel 1 (C) and Panel 2 (G) to
Connecting pole (D) with
(10) ST5.5 x 13mm bolts (DD).
(3) M5 x 12mm bolts (CC), (3) D5 spring
washers (GG) and (3) M5 nuts (HH).
See Figure 3
CC
DD
GG
HH
D
G
C
DD
CC
DD
HH GG
8

Assembly Instructions
Step 4 4
Attach Panel 4 (Q) and Panel1 (C) to
Connecting pole (D) with
(10) ST5.5 x 13mm bolts (DD).
(2) M5 x 12mm bolts (CC), (2) D5 spring
washers (GG) and (2) M5 nuts (HH).
See Figure 4
Hardware Used
M5 x 12 Bolt x 2
ST5.5 x 13 Bolt x 10
D5 Spring Washer x 2
M5 Nut x 2
CC
DD
GG
HH
D
C
Q
DD
GG
HH
9
Assembly Instructions
Step 5
Attach Panel 4 (Q) and Panel 3 (P) to
Connecting pole (D) with
(10) ST5.5 x 13mm bolts (DD), (3) M5 x 12mm
bolts (CC), (3) D5 spring washers (GG) and
(3) M5 nuts (HH).
See Figure 5
5Q
D
P
Hardware Used
M5 x 12 Bolt x 3
ST5.5 x 13 Bolt x 10
D5 Spring Washer x 3
M5 Nut x 3
CC
DD
GG
HH
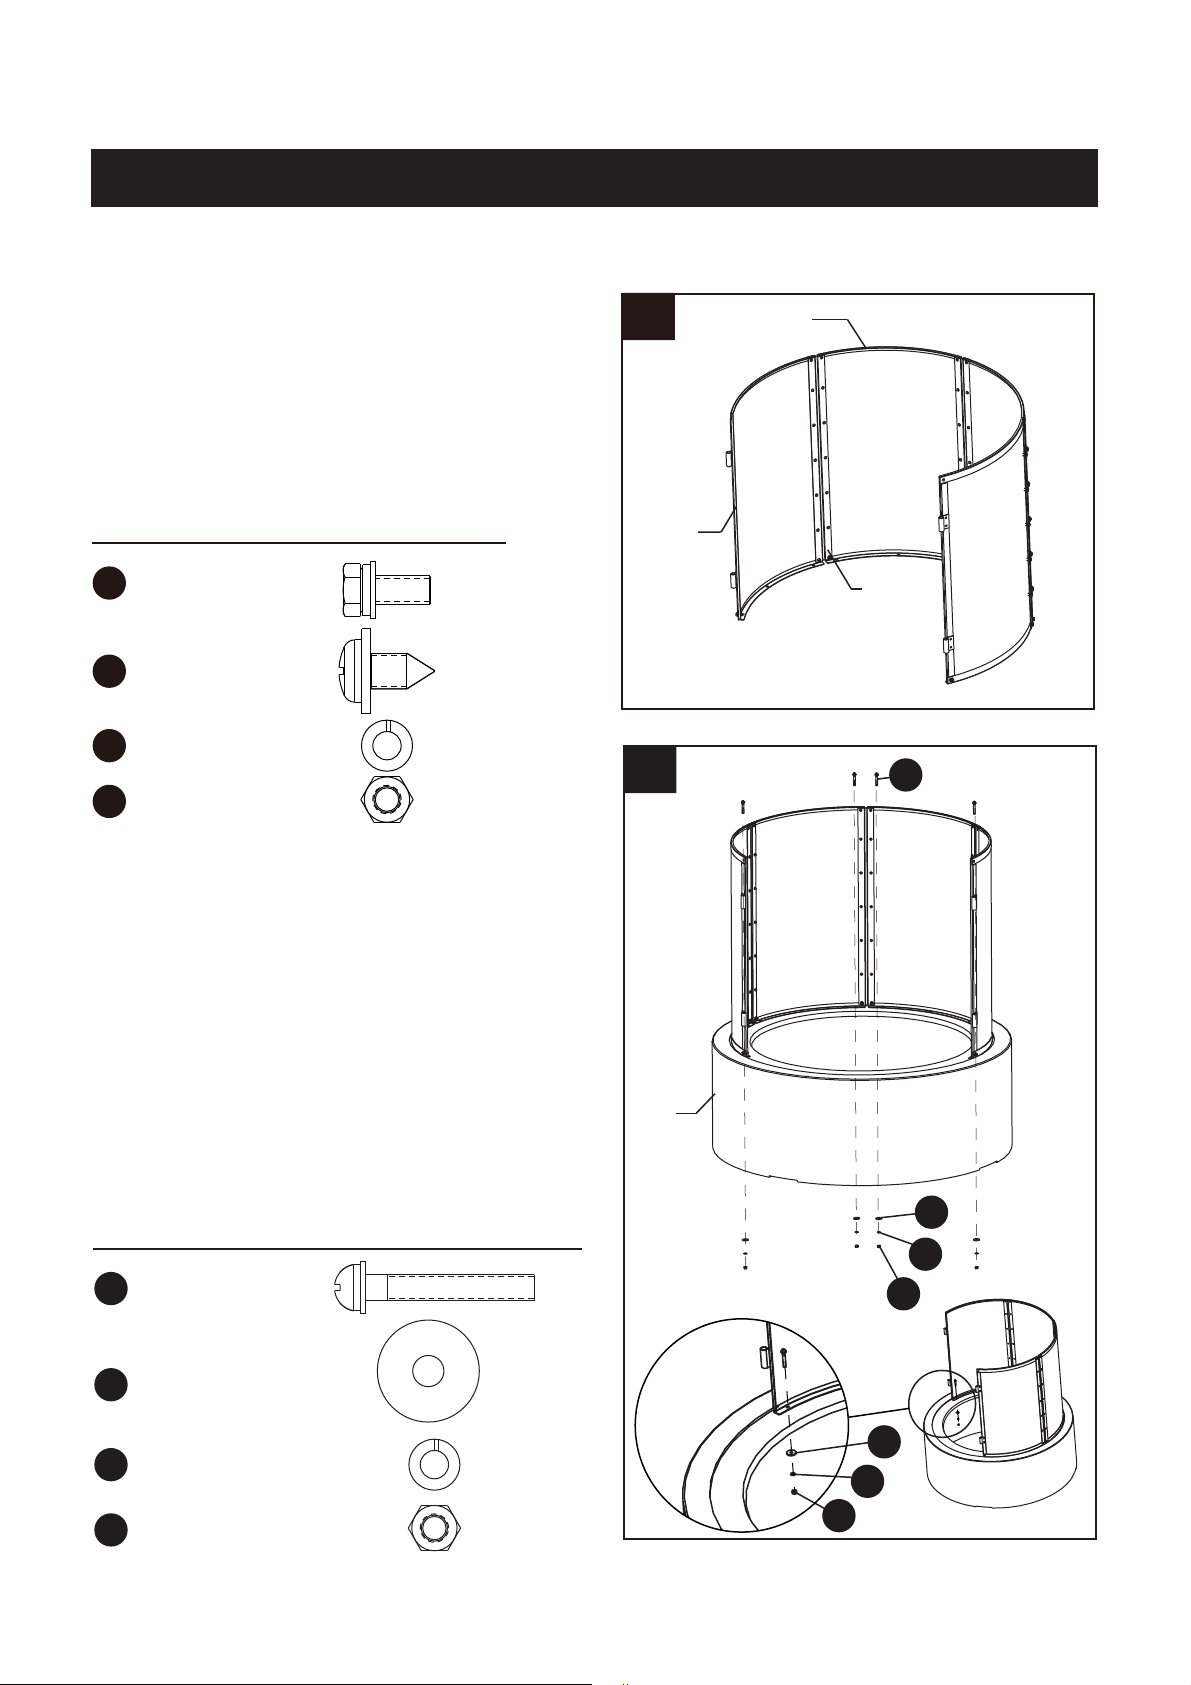
Step 6
Attach panel assembly to Base (N)
With help from at least one person, lift Base
(N) and place in desired location.
with (4) M5 x 35mm bolts (AA), (4) D5
washers (FF), (4) D5 spring washers (GG)
and (4) M5 nuts (HH).
NOTE: Please line up the holes on panel
assembly and the base (N).
See Figure 6
6
Hardware Used
M5 x 35mm Bolt x 4
D5 Washer x 4
D5 Spring Washer x 4
M5 Nut x 4
AA
FF
GG
HH
AA
FF
FF
GG
GG
HH
HH
N
10
Assembly Instructions
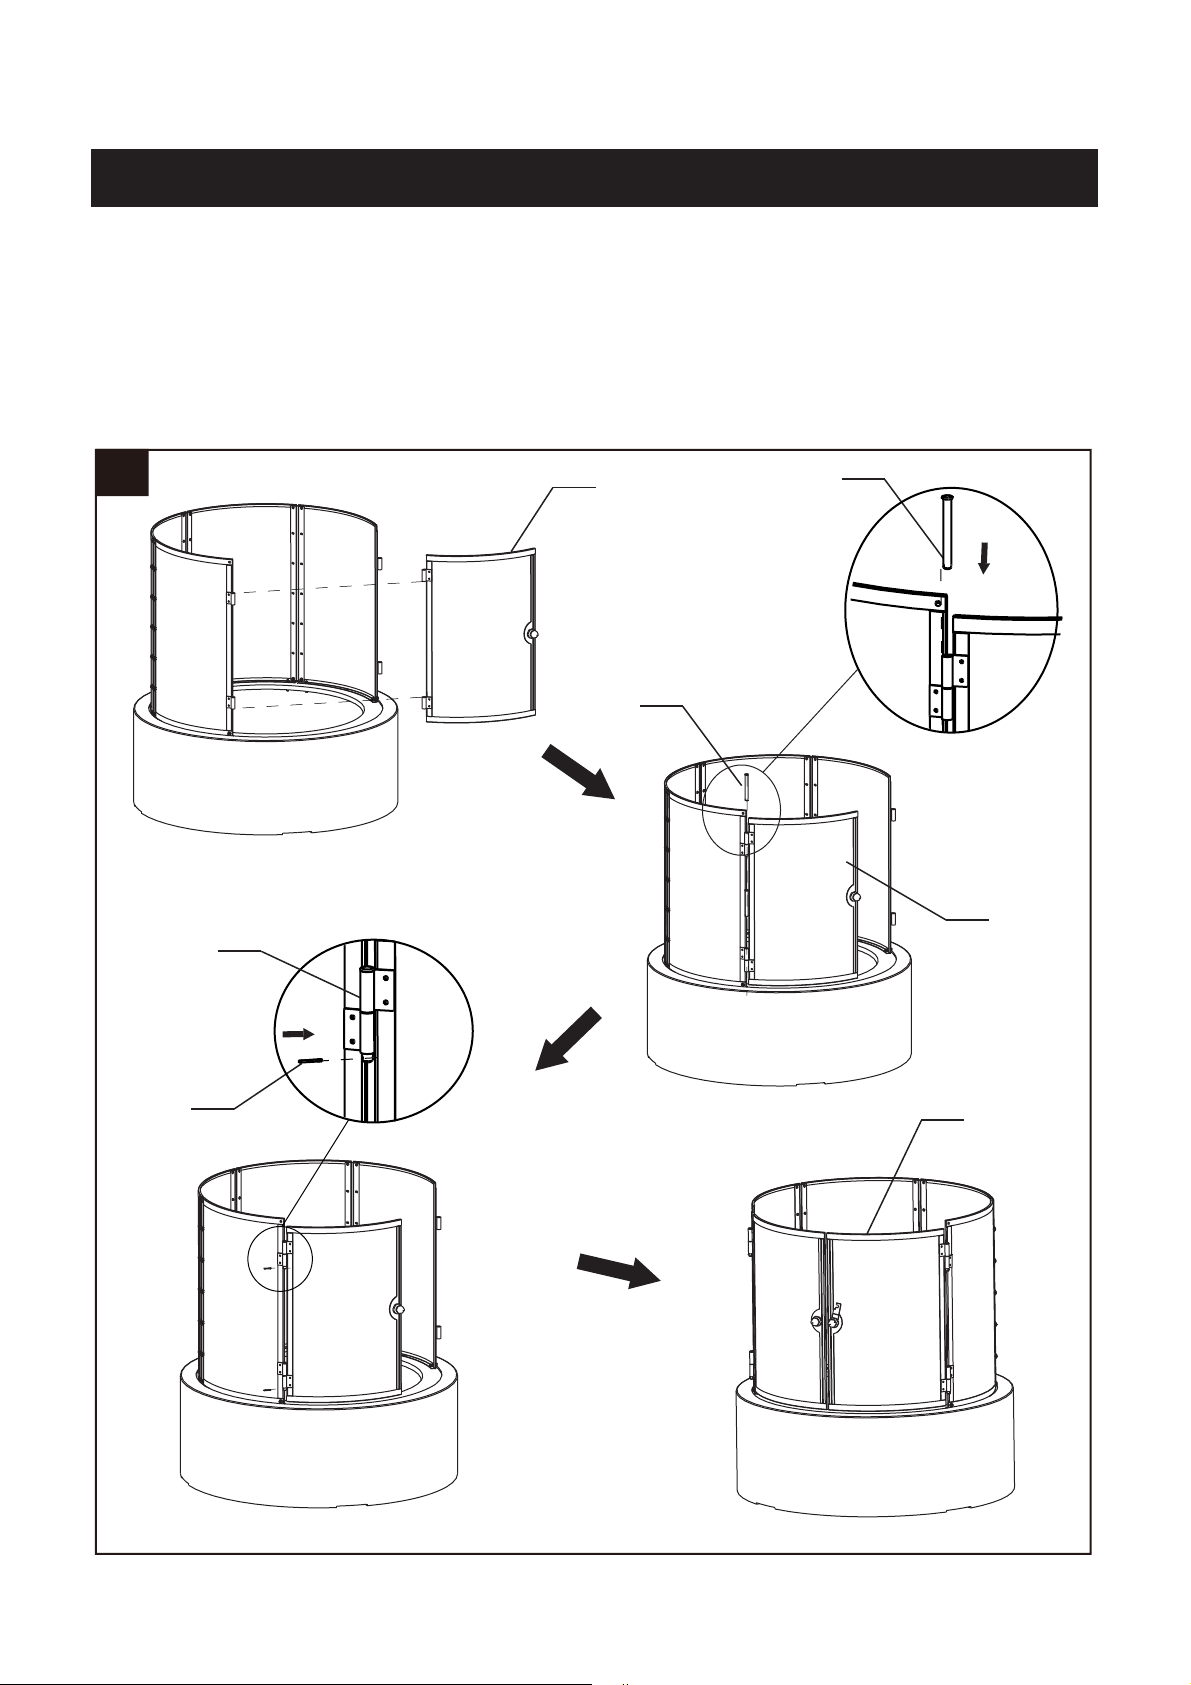
Step 7
7
Line up the hole found on panel assembly and on Left door (O) in place fix them with (2) door
spindles (E).
Insert the (2) pins (F) into the hole on the door spindles (E).
Repeat the same procedure to install the Right door (H).
See Figure 7
OE
E
E
F
O
H
11

Assembly Instructions
Step 8 8
Connect decorative Chimney cap (A) to
Roof (B) with (3) ST5.5 x 13mm Bolts (DD).
See Figure 8
Hardware Used
DD
DD
BB
ST5.5 x 13 Bolt x 3
A
B
B
Step 9 9
Connect Roof (B) and panel assembly
with (8) M5 x 16mm bolts (BB).
See Figure 9
Hardware Used
BB M5 x 16 Bolt x 8
Panel assembly
12

Assembly Instructions
Step 10
10
Place Charcoal grid (L) on top of Fire bowl (M) followed by Hook (K) and close front
doors
,
then close door latch.
See Figure 10
13

Operating & Maintenance Instructions
, and fireplace
is cool to the touch.
Lighting
1. Make sure there is only a small amount of ash in the bottom of the bowl.
2. Place a layer of dry kindling or a natural fire-starter onto the center of the grate.
3. Over kindling, place a layer of dry seasoned hardwood that covers no more than 3/4 the diameter of
the bowl.
4. Use a match to light kindling or fire-starter.
5. Using the hook provided and heat resistant gloves, replace spark guard screen once the
kindling or fire-starter is lit.
Tending the Fire
You may need to shift and/or add to make sure the fire burns well.
DO NOT place a hot spark guard screen or hot firep s,sargsahcussecafruselbitsubmocotnoslootecal
wooden decks or furniture.
1. Using the hook that is provided and heat resistant gloves, carefully remove spark guard screen.
2. Using a long handled fireplace tool, shift coals and logs to allow additional airflow.
3. DO NOT add gasoline, kerosene, diesel fuel, lighter fluid or alcohol to relight or enhance an existing
fire.
4. Wait until glowing coals have developed before adding any additional wood. If additional wood is
required, place wood on top coals, be careful not to shift ashes.
Extinguishing
1. Allow fire to burn itself out.
2. DO NOT use water to extinguish as this is dangerous and can cause damage to this outdoor fire pit.
Inspecting
Cleaning
Storage
safety and longer
the finish.
If damage to any component is detected, do not operate until repairs are made.
14
dispose of ashes.
pets when it is not being used.

Warranty Information
This warranty is valid for the original consumer purchaser only and excludes
industrial, commercial or business use of the product, product damage due
to shipment or failure which results from alteration, product abuse, or product
misuse, whether performed by a contractor, service company, or consumer.
We will not be responsible for labor charges and / or damage incurred in
installation, repair or replacement, nor for incidental or consequential damage.
The appliance has been manufactured under the highest standards of quality
and workmanship. We warrant to the original consumer purchaser that all
aspects of this product will be free of defects in material and workmanship for
one year (1) from the date of purchase. A replacement for any defective part will
be supplied free of charge for installation by the consumer. Defects or damage
caused by the use of other than genuine parts are not covered by this warranty.
This warranty shall be effective from the date of purchase as shown in the
purchaser’s receipt.
Need help?
call our toll free number at:
1-866-814-0585or
e-mail us at:
customerservice@shinerichgroup.com
15

Des questions, des problèmes, des pièces manquantes? Avant de
retourner l’article au détaillant, appelez notre service à la clientèle
au 1-866-814-0585, entre 8 h et 20 h (HNE), du lundi au vendredi.
Courriel: [email protected]
Item NO.: SRFP41304
Model NO.: 11875013
16

Table des matières
Avertissements..................................................................................18
Schéma / Outils requis ......................................................................19
Liste des pièces.................................................................................20
Quincaillerie..............................................................................................21
Instructions d’assemblage.................................................................22
Instructions d'utilisation et d'entretien. ...............................................29
Renseignements sur la garantie........................................................30
17

Avertissements
AVERTISSEMENTS ET MISES EN GARDE
AVERTISSEMENT:POUR ÉVITER LES BLESSURES
Ɣ32858186$*(¬/¶(;7e5,(856(8/(0(17
Ɣ1¶XWLOLVH]SDVOHIR\HUjO¶LQWpULHXU/HVYDSHXUVGHPRQR[\GHGHFDUERQHSHXYHQWFDXVHUOD
PRUWVLODYHQWLODWLRQHVWLQDGpTXDWH
Ɣ1¶HPSOR\H]SDVG¶HVVHQFHRXGHNpURVqQHSRXUDOOXPHUOHIR\HU7HQH]WRXWOLTXLGH
LQIODPPDEOHORLQGXIR\HU
Ɣ&HWDUWLFOHHVWXQLTXHPHQWFRQoXSRXUEUOHUGXFKDUERQHWGXERLVQRQWUDLWp
Ɣ1¶XWLOLVH]SDVFHIR\HUVXURXVRXVXQHVXUIDFHRXXQHVWUXFWXUHLQIODPPDEOHSDUH[HPSOH
XQHWHUUDVVHHQERLV
Ɣ8WLOLVH]GHVJDQWVGHSURWHFWLRQHWGHVRXWLOVjORQJXHSRLJQpHORUVTXHYRXVPDQLSXOH]FH
IR\HU
Ɣ-HWH]OHVPDWpULDX[G¶HPEDOODJHGHIDoRQDSSURSULpH
Ɣ7HQH]OHVHQIDQWVORLQGXIR\HUORUVTX¶LOHVWFKDXG
Ɣ/HIR\HUGHPHXUHWUqVFKDXGSHQGDQWXQFHUWDLQWHPSVDSUqVVRQXWLOLVDWLRQ
Ɣ$VVXUH]YRXVTXHOHIR\HUV¶HVWUHIURLGLDYDQWGHOHGpSODFHU
Ɣ/HIR\HUGRLWrWUHSODFpjDXPRLQVSRFPFPGHWRXWPXUSHQGDQWVRQXWLOLVDWLRQ
18

Schéma / Outils requis
ImageDescription (non incluse)
Tournevis à tête Phillips
Clé à molette ajustable
A
B
C
D
E
F
G
H
IJ
K
L
M
N
O
P
Q
19
Liste des pièces
Pièce n° Description Image Quantité
1A
1B
1C
D3
E
1
4
4
F
G
H
I
J
K
L
M
N
O
P
Q
1
1
Capuchon de cheminée
Toit
Panneau 1
Poteau de raccordement
Axe de porte
Goupille
Panneau 2
Porte de droite
Loquet de porte
2
1
1
1
1
1
1
1
Bouton de porte
Crochet
Grille pour charbon
Foyer
Base
Porte de gauche
Panneau 3
Panneau 4
20
This manual suits for next models
1
Table of contents
Languages:


