manuals.online logo
Brands
  1. Home
  2. •
  3. Brands
  4. •
  5. SHORE TEL
  6. •
  7. Switch
  8. •
  9. SHORE TEL ShoreGear 90BRI User manual

SHORE TEL ShoreGear 90BRI User manual

Introduction
About the ShoreGear 90BRI
The SG-90BRI Voice Switch connects enterprise telephone extensions through an
internal IP network, or to any central office (CO) ISDN BRI trunk line. The switch
provides connectivity through:
• Two RJ-45 local area network (LAN) connectors
• Four RJ-45 ISDN BRI ports for connecting the switch to telephone company ISDN
BRI lines
• One RJ-21X port (male) for connecting the switch to a telephone company punch-
down block, patch panel, or 12-port harmonica connector
• One DB-9 (female), RS-232C maintenance port (19200 bps, 8 bits, no parity, 1 stop
bit, no handshake) for serial communications
• One audio input port (3.5 mm stereo) for connecting to a music-on-hold source
• One audio output port (3.5 mm stereo) for connecting to a corporate paging system
or night bell
The ShoreGear 90BRI Voice Switch package contains:
• ShoreGear 90BRI Voice Switch
• Power cord
• Stick-on feet for surface installation
• Mounting Ears – attachable installation brackets
• Cable retainer for the Telco cable (metal bracket with a Velcro strap)
Installation Connections and Servicing
Mounting the ShoreGear Voice Switch on a Flat Surface
If you plan to mount the switch on a flat surface, first attach the provided rubber feet
to the bottom corners of the device. (You can stack up to three switches in a surface
installation.)
Installing the ShoreGear 90BRI in a 19-inch Rack
The SG-90BRI is placed in a 19-inch rack only by mounting a ShoreGear Dual Tray
into the rack, then installing the SG-90BRI into the Tray.
Refer to the Quick Install Guide for the ShoreGear Dual Tray for Tray installation
instructions and information on using the Tray.
Connecting Trunk and Telephone Lines
Optional Connections
After connecting the voice switch to the LAN, you can make optional connections,
Powering on the ShoreGear Voice Switch
After connecting the switch to the network, power on the device by connecting it to
an AC power source.
1. Plug an AC surge protector (not provided) into a grounded AC power source.
2. Plug one end of the provided power cord into the receptacle on the back of the
switch, then plug the other end into the AC surge protector.
The power LED flashes momentarily, and remains lit.
• If the LED is not lit, make sure the power cord is plugged into the switch and the
power source.
• If the LED continues flashing, there is an internal error. Unplug the switch to power
it off, then power it back on. Refer to the “Configuring Switches” chapter in the
ShoreTel Administration Guide for information on flash patterns, or contact the
ShoreTel Support Services at http://www.shoretel.com.
The LAN ports auto-sense the network transport rate. When the network connection
is established, the network LED indicates a transport rate of 10 Mbps or 100 Mbps,
and whether the switch is receiving and transmitting data.
Once the ShoreGear 90BRI Voice Switch is secured to a rack or surface-
mounted, you can connect it to the data network. Use an RJ-45 Ethernet
cable to connect one or both of the LAN ports to the network subnet.
While both ports can detect and respond to link status, the switch uses only
one LAN port at a time.
German: Einen Erdungsleiter anschließen
Um den elektrischen Sicherheitsanforderungen für eine korrekte Erdung
nachzukommen, müssen Sie einen permanenten Erdungsschutz zwischen dem
ShoreGear-Gerät und der Erde des Kabelsystems installieren.
1. Schließen Sie ein Erdungskabel (Nr. 14 AWG oder größer) an die Schraube an der
Rückseite des Geräts an, die sich rechts neben dem Produktetikett befindet.
2. Schließen Sie das andere Ende des Erdungskabels an die Erde des Kabelsystems an.
VORSICHT: Schließen Sie immer zuerst den permanenten Erdungsschutz an, bevor Sie ver-
suchen, das Gerät an ein LAN-Segment und Telekommunikationsleitungen anzuschließen.
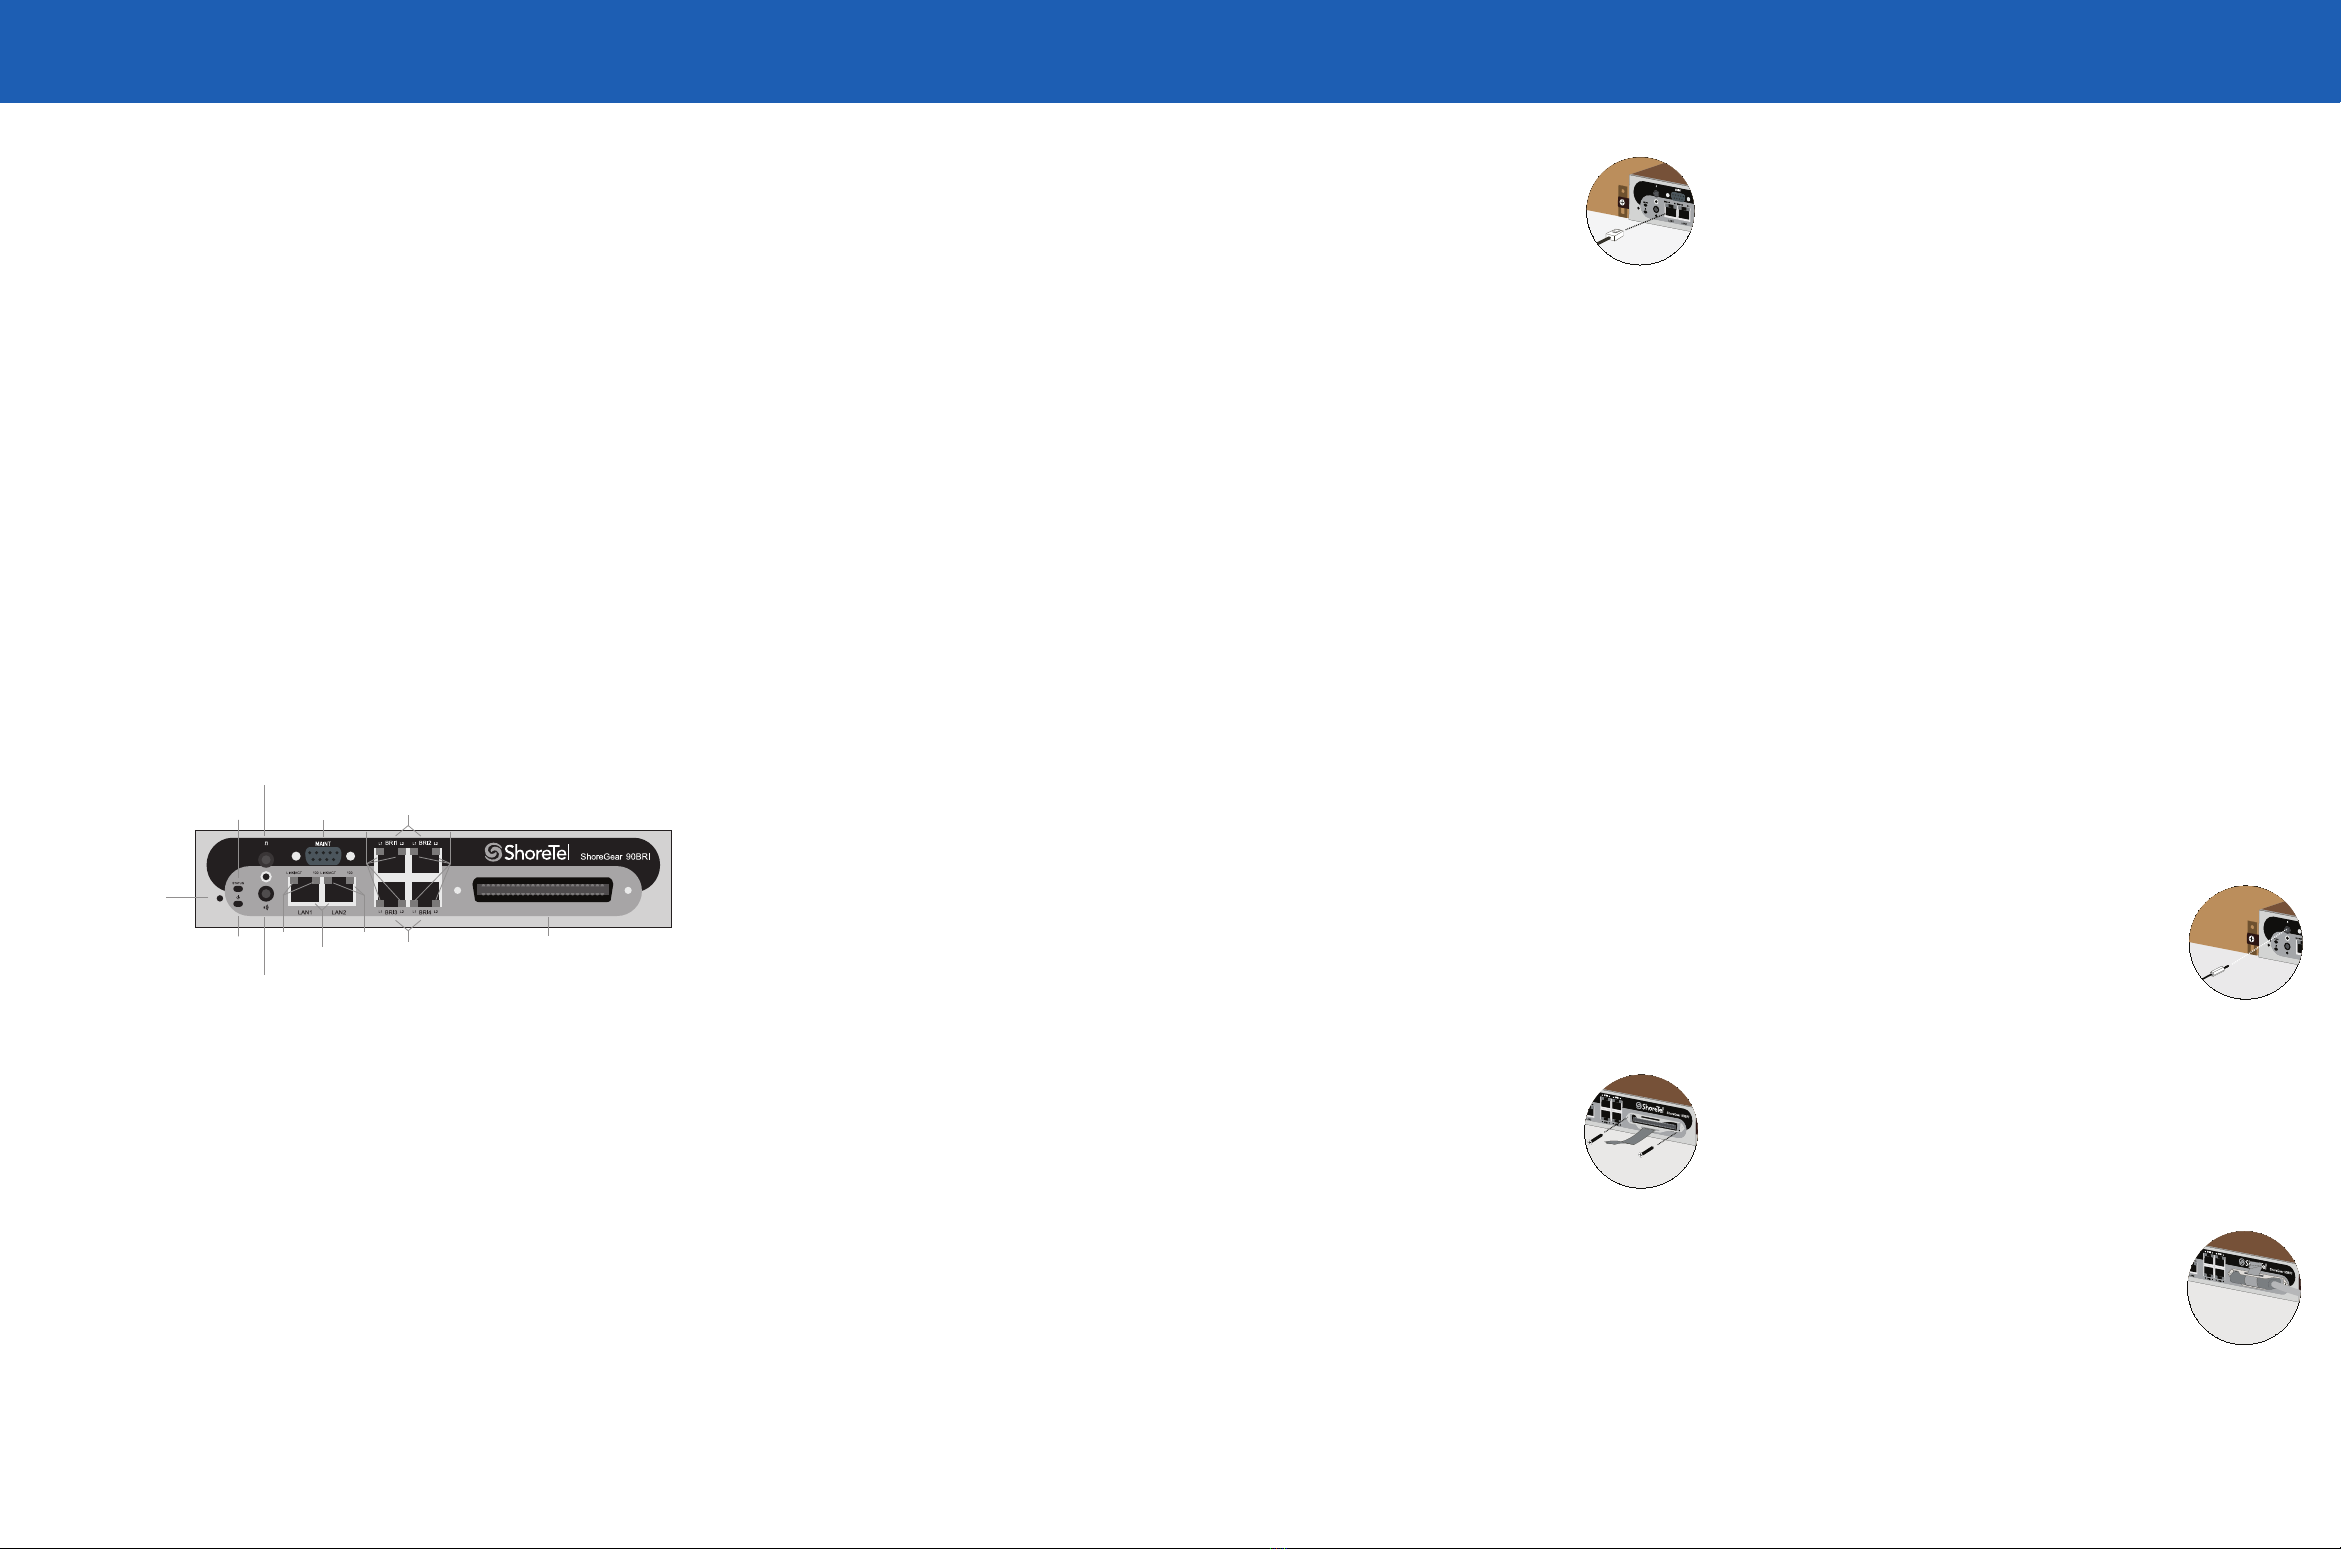
Connecting the ShoreGear Voice Switch to the Network
Default
Switch
Audio Output Port
(night bell)
Power
LED
Network
LEDs
RS-232C
Maintentance
Port
RJ-21X
Telco Port
Status
LED
Audio Input Port
(music on hold)
Network
LEDs LAN
Connectors
BRI
LEDs
BRI
LEDs
BRI
Ports
BRI
Ports
Installation Equipment
To install the switch, you need the following equipment:
• AC surge protector for the power connection
• RJ-45 cables for connecting the switch to the local area network and telco lines
• Music-on-hold source with a standard mini-headphone Y-adapter (optional)
• Permanent earthing connector for grounding the device
• RJ-21 telephone cable (female on end connected to ShoreGear voice switch) for
analog port connections
• RJ-21 to RJ-11 patch panel for connecting telephones and trunk lines
• #1 Phillips screwdriver
Use the provided cable retainer to connect the voice switch to the
telephone company’s punch-down block or patch panel.
1. Use a #1 Phillips screwdriver to remove the two screws on either side
of the RJ-21X port, then place the retainer on the port and re-attach
the screws.
2. Plug the Telco cable into the port, then pull the Velcro strap tightly
around the cable connector and fasten it.
3. Connect the other end of the Telco cable to the punch-down block
or patch panel.
4. Use RJ-45 cables to connect your ISDN BRI lines to the telco ports.
CAUTION: To reduce risk of re, use only No. 26 AWG or larger (e.g., 24 AWG) UL Listed
or CSA Certied Telecommunication Line Cord
VORSICHT: Um das Brandrisiko zu verringern, verwenden Sie nur Telekommunikationslei-
tungen Nr. 26 AWG oder größer (z.B. 24 AWG) mit UL- oder CSA-Zulassung
For detailed information on switch port and trunk conguration, see the “Conguring
Switches” and “Conguring Trunks” sections in the ShoreTel Administration Guide.
including input from a music-on-hold source or output to an internal
paging system.
1. Connect a music-on-hold source (CD player or other audio source)
to the audio input port.
2. Connect your site’s paging system to the audio output port.
German: Das ShoreGear Voice-Schaltgerät auf einer ebenen
Oberäche montieren
Wenn Sie planen, das Gerät auf einer ebenen Oberfläche zu montieren, befestigen Sie
zunächst die mitgelieferten Gummifüße an den unteren Ecken des Geräts. (Bei einer
Oberflächeninstallation können Sie bis zu drei Schaltgeräte übereinander stapeln.)
Attaching an Earthing Connector
To meet electrical safety requirements for proper grounding, you must connect a
permanent earthing protector between the ShoreGear voice switch and the wiring
system ground.
1. Connect a ground wire (#14 AWG wire or larger) to the screw on the back of the
unit and to the right of the product label.
2. Connect the other end of the ground wire to the wiring system ground.
CAUTION: Always connect the permanent earthing connector before attempting to connect
the switch to a LAN segment and telecommunication lines.
Servicing Procedures
WARNING: The SG-90BRI contains no internal field serviceable parts. Return the
equipment to ShoreTel for any required service procedures.
CAUTION: Internal fuses should be serviced only by qualified ShoreTel personnel. If
internal fuses are blown and require replacement, return the SG-90BRI to ShoreTel for
service.
WARTUNGSVERFAHREN
ACHTUNG: Der SG-90BRI enthält keine internen Teile, die vor Ort gewartet werden
können. Senden Sie das Gerät an ShoreTel, falls Wartungsarbeiten erforderlich sein
sollten.
VORSICHT: Interne Sicherungen dürfen nur von qualifizierten ShoreTel-Mitarbeitern
gewartet werden. Wenn interne Sicherungen ausgetauscht werden müssen, senden Sie
den SG-90BRI zur Wartung an ShoreTel.
Installation Location Requirements
To ensure optimum operating conditions for the SG-90BRI voice switch, verify the
operating environment is adequately ventilated, free of gas or airborne particles, and
isolated from electrical noise.
Conguration & Specications Switch Status
Quick Install Guide
ShoreGear 90BRI Voice Switch
Copyright © 1998-2012 by ShoreTel Inc., Sunnyvale, California, USA. All rights reserved. Printed in the United States of America. Contents of this publication may not be reproduced or transmitted in any form or by any means,
electronic or mechanical, for any purpose, without prior written authorization of ShoreTel, Inc. ShoreTel, Inc. reserves the right to make changes without notice to the specications and materials contained herein and shall not be
responsible for any damage (including consequential) caused by reliance on the materials presented, including, but not limited to typographical, arithmetic or listing errors. ShoreTel, ShoreTel (and logo), ControlPoint, Brilliantly Simple,
Brilliantly Simple Communication, ShoreCare, ShoreGear, ShorePhone, and ShoreWare are registered trademarks of ShoreTel, Inc. in the United States and/or other countries. The ShoreTel logo is a trademark of ShoreTel, Inc. in the
United States and/or other countries. All other copyrights and trademarks herein are the property of their respective owners.
PN 850-1118-02
960 Stewart Drive Sunnyvale, California 94085
Phone: +1.408.331.3300 OR +1.800.425.9385 Fax: +1.408.331.3333 www.shoretel.com
Power LED
The power LED indicates the operating status of the switch.
Light Description
Steady The switch is powered on, and the internal software is running.
Flashing Two ashes indicates a failed internal self-test (i.e. hardware failure). Refer to
“Conguring Switches” in the ShoreTel Administration Guide for details on other
ash patterns.
Off The switch is not powered on, or the software is not running.
Status LED
The status LED provides voice switch activity information.
Color Activity Description
Off No ports are assigned
Green Steady No ports are handling active calls
Green Flashing-Fast At least one port is handling an active call.
Yellow Steady No ports are handling active calls and at least one port is out of service.
Yellow Flashing-Slow The switch is not connected (or has lost connection) to a ShoreTel server.
Yellow Flashing-Fast At least one port is handling an active call and at least one port is out of
service.
Network LEDs
Each LAN connector provides two LEDs (Link/Act and 100) that indicate the activity
and communication speed of the connected network
LED Color/State Description
Link/Act Off This switch cannot detect an Ethernet network.
Link/Act Green-Steady This switch is connected to an Ethernet network.
Link/Act Green-Flashing This switch detects network data trafc.
100 Off Network interface is operating at 10 Mbps.
100 Green Network interface is operating at 100 Mbps.
BRI LEDs
Each BRI connector provides two LEDs that indicate port activity.
LED L1 LED L2 Description
Off Off Port not congured in ShoreWare Director
Yellow Off Port inactive or not connected
Green Off Layer 1 active. Layer 2 not established
Green Green Layer 1 active. Layer 2 active
Green Flashing Green Layer 1 active. Layer 2 active. Call in progress (Layer 3 active).
ShoreGear 90BRI Voice Switch RJ-21X Port Pinout
An RJ-21 telephone cable, wired straight through, allows the ShoreGear 90BRI Voice
Switch to connect to a standard 12-port patch panel or 12-port harmonica block.
When connecting to a 24-port patch panel, the voice switch’s four analog extension
ports map to alternating ports from port 17 through 23 on the patch panel.
Pin No. 12345678910 11 12 13 14 15 16 17 18 19 20 21 22 23 24 25
Port No. 910 11 12
X
Port Type EEEE
X
Pin No. 26 27 28 29 30 31 32 33 34 35 36 37 38 39 40 41 42 43 44 45 46 47 48 49 50
Pin pairs Assignment
17,42 19,44 21,46 23,48 Four congurable ports (E) for telephones.
Network Conguration
Once the ShoreGear voice switch is installed and powered on, it must be configured
for network operations. A voice switch gets a network configuration by assignment
from a DHCP or BOOTP server, or directly from an administrator console (see
procedure below).
For more information on setting up a switch for automatic conguration by a DHCP or
BOOTP server, see the ShoreTel Planning and Installation Guide.
Conguring the Voice Switch from a Console
1. Use a straight-through serial cable, DB9 male to DB9 female, to connect the switch
to a console PC.
2. On the PC or laptop, start a terminal emulation program and connect to the voice
switch using these serial communication settings: 19200 bps, 8 data bits, no parity,
one stop bit, no handshake.
3. At the login prompt, enter:
Login: anonymous
Password: ShoreTel
4. Choose Menu Options and follow the onscreen instructions for setting network
parameters, including IP address, subnet mask, and gateway.
Specications
Feature Specication
Dimensions 1.69 x 8.39 x 14.88 inches (43 x 213 x 378 mm)
Weight 5.3 lb (2.4 kg)
Input voltage 100-240 VAC, 50-60 Hz
Power consumption 1A max.
Humidity 0-90% relative humidity (non-condensing)
Operating temperature 0-50˚ C

Other SHORE TEL Switch manuals

SHORE TEL ShoreGear 220T1A User manual

SHORE TEL

SHORE TEL ShoreGear 220T1A User manual

SHORE TEL ST1D User manual

SHORE TEL

SHORE TEL ST1D User manual

SHORE TEL ST100DA User manual

SHORE TEL

SHORE TEL ST100DA User manual

SHORE TEL ShoreGear-60/12 User manual

SHORE TEL

SHORE TEL ShoreGear-60/12 User manual

SHORE TEL ST50A User manual

SHORE TEL

SHORE TEL ST50A User manual

SHORE TEL 200 User manual

SHORE TEL

SHORE TEL 200 User manual

SHORE TEL ShoreGear 90BRI User manual

SHORE TEL

SHORE TEL ShoreGear 90BRI User manual

SHORE TEL SG-220T1 User manual

SHORE TEL

SHORE TEL SG-220T1 User manual

SHORE TEL ShoreGear 90BRIV User manual

SHORE TEL

SHORE TEL ShoreGear 90BRIV User manual

SHORE TEL ShoreGear 30 User manual

SHORE TEL

SHORE TEL ShoreGear 30 User manual

SHORE TEL ShoreGear-T1 User manual

SHORE TEL

SHORE TEL ShoreGear-T1 User manual

SHORE TEL SG-120 User manual

SHORE TEL

SHORE TEL SG-120 User manual

SHORE TEL Extreme Summit x440 Series User manual

SHORE TEL

SHORE TEL Extreme Summit x440 Series User manual

Popular Switch manuals by other brands

Weidmüller IE-SW-EL24-24TX Hardware installation guide

Weidmüller

Weidmüller IE-SW-EL24-24TX Hardware installation guide

SICK i150RP operating instructions

SICK

SICK i150RP operating instructions

Siemens SCALANCE XM-400 Configuration manual

Siemens

Siemens SCALANCE XM-400 Configuration manual

Belkin OmniView user manual

Belkin

Belkin OmniView user manual

pro bel Freeway manual

pro bel

pro bel Freeway manual

FSR DV-HSW4K-41 user manual

FSR

FSR DV-HSW4K-41 user manual

SEAL Innovation SwimSafe SH002 user manual

SEAL Innovation

SEAL Innovation SwimSafe SH002 user manual

Extron electronics MLS 608 D Series user guide

Extron electronics

Extron electronics MLS 608 D Series user guide

System Sensor Zonecheck Keyswitch ZCK-1 Installation and maintenance instructions

System Sensor

System Sensor Zonecheck Keyswitch ZCK-1 Installation and maintenance instructions

Hubbell C5027 Replacement parts

Hubbell

Hubbell C5027 Replacement parts

ATEN MasterView CS-1732A user manual

ATEN

ATEN MasterView CS-1732A user manual

Cisco CATALYST 6500 WS-X6066-SLB-S-K9 Installation note

Cisco

Cisco CATALYST 6500 WS-X6066-SLB-S-K9 Installation note

Philips SDW5058/17 Specifications

Philips

Philips SDW5058/17 Specifications

Extron electronics MTP SW6 user manual

Extron electronics

Extron electronics MTP SW6 user manual

FineTek SIS Operation manual

FineTek

FineTek SIS Operation manual

Belkin OMNIVIEW F1DN102D Quick installation guide

Belkin

Belkin OMNIVIEW F1DN102D Quick installation guide

Bticino K4413CM2 quick start guide

Bticino

Bticino K4413CM2 quick start guide

MikroTik RB2011iL-IN manual

MikroTik

MikroTik RB2011iL-IN manual

manuals.online logo
manuals.online logoBrands
  • About & Mission
  • Contact us
  • Privacy Policy
  • Terms and Conditions

Copyright 2025 Manuals.Online. All Rights Reserved.