SICCO V 1811-07 User manual

EINE MARKE VON BOHLENDER
Bedienungsanleitung
Operating Instructions
Mode d’emploi
»Mini-Exsikkatoren Premium
»Mini-Desiccators Premium
»Desiccators Mini Premium

SICCO Mini–Exsikkatoren Premium, Artikelnummer: V 1811-07, V 1940-06, V 1942-06,
V 1943-06, V 1947-06, V 1948-06, V 1949-06, V 1950-01, V 1950-02 und V 1950-03.
BEDIENUNGSANLEITUNG
1. LIEFERUMFANG 2
2. SICHERHEITSHINWEISE 2
3. INBETRIEBNAHME 3
4. FUNKTIONSHINWEISE 5
5. SERVICE / PFLEGE 6
6. STÖRUNGSHINWEISE / REPARATUREN 6
7. ENTSORGUNGSHINWEISE 7
8. SPEZIFIKATIONEN 7
9. ERSATZ- / SONDERZUBEHÖR 7
1
SICCO Mini-Exsikkatoren
Premium - 1 Kammer
Artikelnummer: V 1950-01
Sicco Mini-Exsikkatoren Premium
SICCO Mini-Exsikkatoren
Premium - 2 Kammern
Artikelnummer: V 1950-02
SICCO Mini-Exsikkatoren
Premium - 3 Kammern
Artikelnummer: V 1950-03
Mini-Exsikkatoren
Protect Premium
Artikelnummer: V 1942-06
Mini-Exsikkatoren
Black Premium
Artikelnummer: V 1940-06
SICCO Mini-Exsikkatoren
Inertgas Premium
Artikelnummer: V 1949-06
SICCO Mini-Exsikkatoren
Secure Box Premium
Artikelnummer: V 1947-06
SICCO Mini-Exsikkatoren
Antistatik Premium
Artikelnummer: V 1943-06
SICCO Mini-Exsikkatoren
Mobil Premium
Artikelnummer: V 1948-06
SICCO Mini-Exsikkatoren
Vitrum
Artikelnummer: V 1811-07

1. Lieferumfang
1 Mini-Exsikkator Premium
1 Dose Silicagel
2 Dosen Silicagel (nur bei Mini-Exsikkator 2 Kammern)
3 Dosen Silicagel (nur bei Mini-Exsikkator 3 Kammern)
1 Elektronischen Thermo-Hygrometer je Kammer montiert. Bei Mini-Exsikkator Black Premium beigelegt.
2 Anschlüsse für die Begasung mit 5 m Druckluftschlauch (nur bei Mini-Exsikkator Inertgas Premium)
2 Schlüssel (nur bei Mini-Exsikkator Secure Box Premium)
2 Zwischenböden je Kammer
1 Bedienungsanleitung
2
2. Sicherheitshinweise
»Bitte nehmen Sie ein schadhaftes Gerät nicht in Betrieb.
»Bitte keine Lösungsmittel oder Säuren im Exsikkator lagern.
»Stellen Sie keine explosive oder brennbare Materialien in den Exsikkator.
»Erzeugen Sie keinen Über- oder Unterdruck im Exsikkator.
»Sorgen Sie für einen sicheren Stand des Exsikkators.
»Benutzen Sie den Exsikkator nur auf einer für Sie gut erreichbaren Arbeitshöhe.
»Benutzen Sie den Exsikkator nur bei einer Umgebungstemperatur von – 35 °C bis + 70 °C.
»Schützen Sie den Exsikkator vor direkter Sonneneinstrahlung.
»Die Dose, in welcher das Silicagel aufbewahrt wird, ist nicht zum Regenerieren des Silicagels geeignet.
Bitte lesen Sie alle im Folgenden aufgeführten Informationen aufmerksam durch. Wir bitten dringend, die Hinweise
für die Sicherheit, den Gebrauch und die Wartung zu beachten.
SICCO Mini-Exsikkatoren bestehen aus hochwertigem Kunststoff. Sie eignen sich zur feuchtigkeitsabwehrenden
Aufbewahrung oder Trocknung mittels Silicagel.
In Ihrem SICCO Exsikkator können Sie Ihre feuchtigkeitsempfindlichen Produkte wie mikroelektronische Bauteile,
Referenzmaterialien, Rückstellmuster und DNA-Proben geschützt aufbewahren.
Sicco Mini-Exsikkatoren Premium
Bei SICCO Mini-Exsikkator Inertgas Basic beachten Sie bitte zusätzlich die nachfolgenden
Sicherheitshinweise:
»Benutzen Sie die Möglichkeit der Begasung nur in ausreichend belüfteten Räumen.
»Schließen Sie bei der Begasung immer beide Anschlüsse an.
»Schließen Sie immer zuerst den Abluftschlauch an, bevor Sie den Zuluftschlauch anschließen. Beim Entfernen der
Begasungsanschlüsse ist die Reihenfolge umgekehrt.
»Vermeiden Sie ungewollte Reaktionen beim Öffnen der Tür oder beim Einstellen neuer Bauteile durch Gasreste.
»Die Gasleitungen dürfen nicht unter Zug- oder Druckspannung stehen.
Bei SICCO Mini-Exsikkator Antistatik Basic beachten Sie bitte zusätzlich die nachfolgenden
Sicherheitshinweise:
»Schließen Sie Ihr Erdungskabel an der Rückseite des Exsikkators an.
»Der Mini-Exsikkator Antistatik Basic ist statisch ableitfähig und hat einen Widerstand von 105Ohm.

3
3. Inbetriebnahme
»Entfernen Sie sämtliche Transportverpackungen.
Sicco Mini-Exsikkatoren Premium
»Zum Öffnen der Drehtüre drücken Sie den Riegel (1) gegen die
Federkraft in den Griff (2) hinein.
»Zum Schließen drücken Sie die Türe zu, bis der Riegel (1) hörbar in
die Türverriegelung (3) einrastet.
»Achtung: Quetschgefahr zwischen Riegel (1) und Griff (2)!
»Öffnen Sie das Batteriefach auf der Rückseite des Hygrometers,
indem Sie den Deckel nach unten aufschieben.
»Entfernen Sie den Batterieunterbrechungsstreifen und setzen die
Batterie ohne diesen wieder ein. Schließen Sie das Batteriefach.
»Info: Bei Mini-Exsikkatoren Black Premium ist der Hygrometer
nicht montiert.
Info: Beträgt die tatsächliche relative Luftfeuchtigkeit in Ihrem Exsikkator zwischen 25 % und 75 %, so wird Ihnen diese
vom Hygrometer mit einer maximalen Abweichung von ± 5 % angezeigt.
Die Temperatur muss dabei zwischen 0 °C und + 50 °C liegen.
Beträgt die tatsächliche relative Luftfeuchtigkeit weniger als 25 % oder mehr als 75 %, so kann die Anzeige mehr als
± 5 % vom tatsächlichen Wert abweichen. Liegt die Temperatur nicht zwischen 0 °C und + 50 °C, müssen Sie ebenfalls
mit einer größeren Abweichung der Anzeige rechnen.Benötigen Sie eine höhere Präzision, empfehlen wie Ihnen den
SICCO Stand-Hygrometer Artikelnummer V 1859-08. Siehe auch unter Zubehör Punkt 1.9.
»Bei Bedarf schieben Sie die im Lieferumfang enthaltenen
Zwischenböden diagonal durch die Türe und legen diese auf die
Führungsschienen auf.
2
1
3
3
1
23
»Öffnen Sie die Dose mit dem Silicagel und stellen Sie diese neben Ihre Bauteile in den Exsikkator.
4
Die folgenden Funktionen sind nur bei SICCO Mini-Exsikkator Inertgas Premium Artikelnummer V 1949-06
möglich.
Die Begasung
Sie können Ihre eingestellten Bauteile oder Substanzen mit Gasen überlagern. Die entsprechenden Bohrungen zum
Einleiten sind werksseitig in der Rückwand bereits vorhanden. Aus verpackungs- und transporttechnischen Gründen
liegen der Schlauch und die Anschlussstücke dem Exsikkator bei und müssen erst montiert werden.
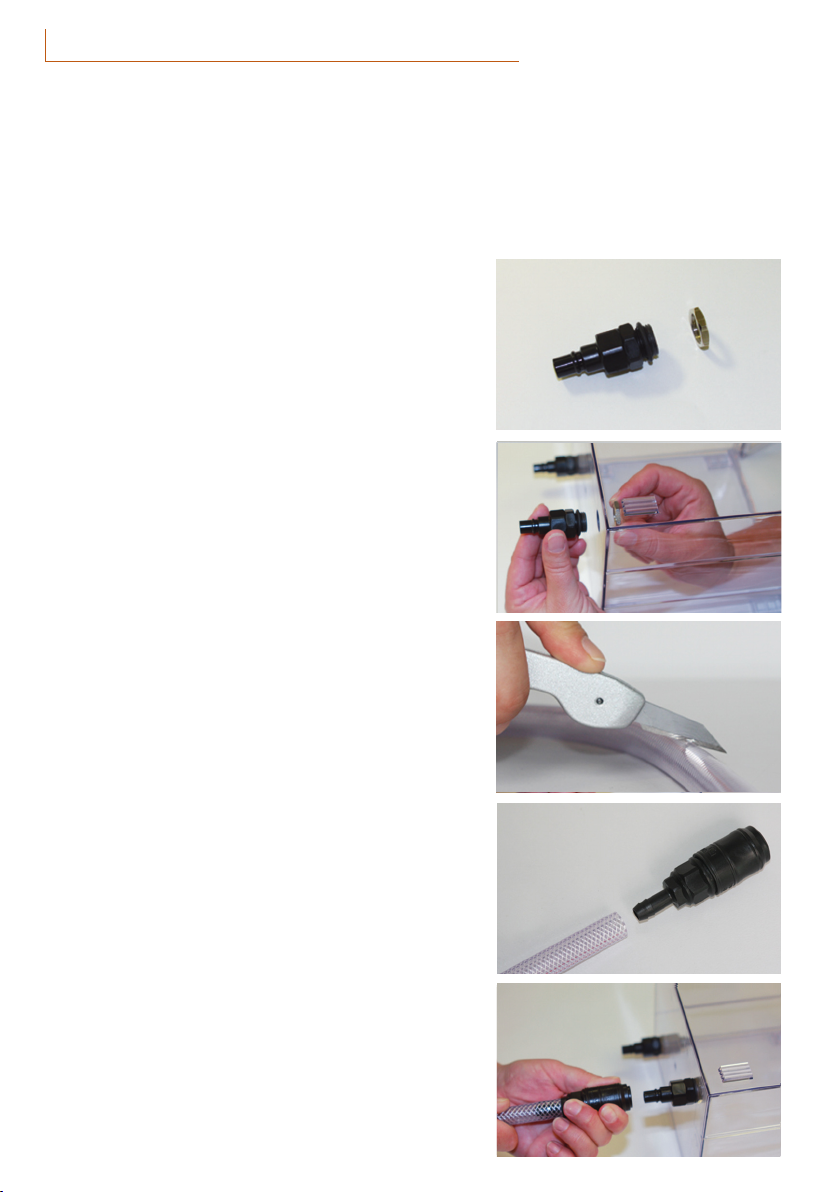
»Schrauben Sie die Mutter (1) durch Drehen gegen den
Uhrzeigersinn von beiden Anschlussstücken (2) ab. Der O-Ring (3)
bleibt auf dem Gewinde.
Sicco Mini-Exsikkatoren Premium
2
4
5
»In der Rückwand befinden sich zwei Bohrungen. In diese Bohrungen
stecken Sie die Anschlussstücke (2) mit O-Ring (3) durch.
Schrauben Sie die Mutter (1) von innen mit zwei Fingern im
Uhrzeigersinn fest.
Benutzen Sie für diese Montage kein Werkzeug!
»Schneiden Sie sich mit einem Messer auf einer schnittfesten
Unterlage den Zu- und Abluftschlauch auf die gewünschte Länge
zu. Im Lieferumfang sind 5 m enthalten.
2
4
5
»Schieben Sie den Druckluftschlauch auf das Kupplungsstück.
Tipp: Mit angefeuchteter Schlaucholive geht es leichter.
»Ziehen Sie den Schiebeverschluss (4) am Kupplungsstück (5)
Richtung Schlauch und stecken dieses auf das montierte
Anschlussstück (2) am Exsikkator.
Tipp: Mit einigen Tropfen Silikonöl auf der Kontaktfläche geht es
leichter. 2
4
5
1
23
231

5
Sicco Mini-Exsikkatoren Premium
4. Funktionshinweise
»Die Regulierung der Luftfeuchtigkeit im Innenraum erfolgt durch vermehrte oder verminderte Zugabe von Silicagel.
Das Silicagel ist mit einem Farbindikator versetzt. In trockenem Zustand ist das Silicagel orange. Mit zunehmender
Sättigung verfärbt sich das Silicagel über dunkelbraun nach schwarz. Regenerieren können Sie das Silicagel, indem
Sie es in einem offenen, temperaturbeständigen Gefäß über 60 Minuten in einem Ofen bei 90 - 110 °C erwärmen.
Verwenden Sie nicht die mitgelieferte Dose! Ein Mikrowellenofen eignet sich hierfür nicht.
»Um zu verhindern, dass beim Bestücken oder beim Herausnehmen von Bauteilen Luftfeuchtigkeit aus dem
Umgebungsraum ins Innere des Exsikkators gelangt, sollte die Öffnungszeit der Türe so kurz wie möglich gehalten
werden.
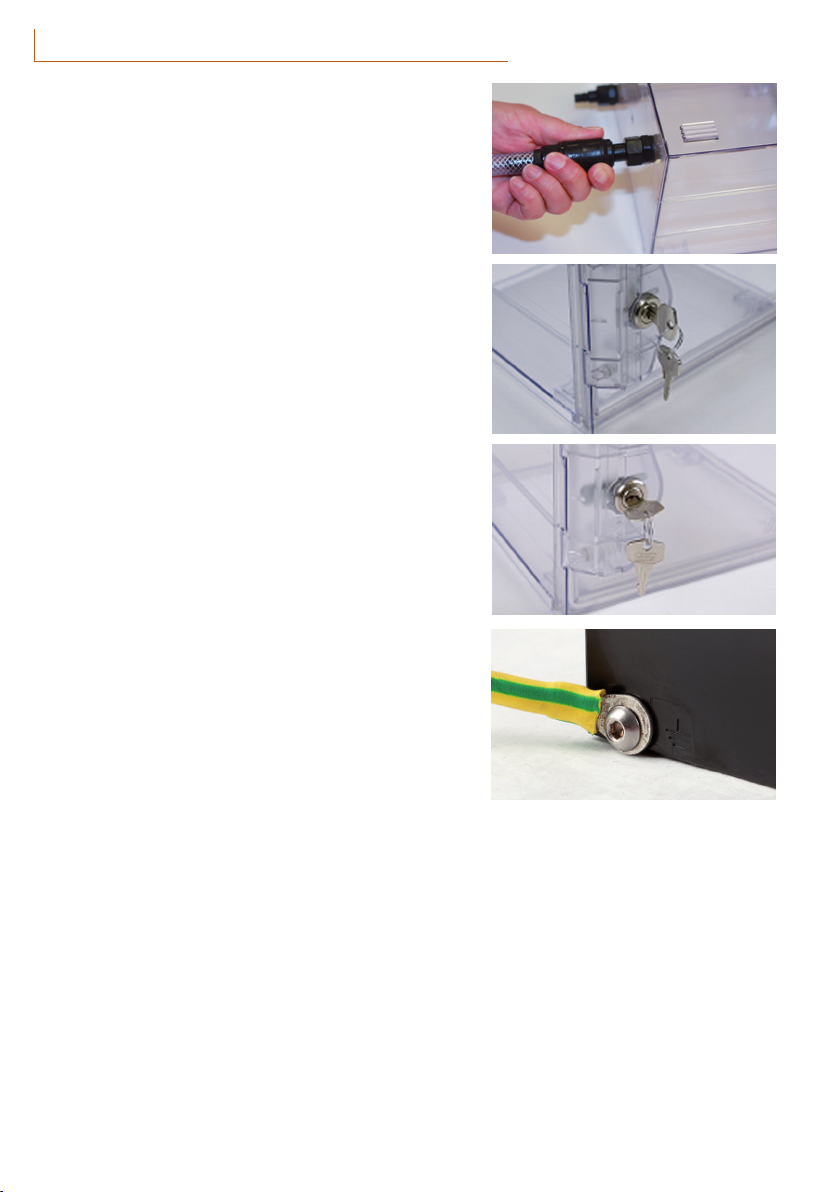
»Lösen können Sie die Verbindung, indem Sie das Kupplungsstück
(5) festhalten und den Schiebeverschluss (4) Richtung
Kupplungsstück (5) ziehen.
Achtung: Der Durchgang am Anschlussstück (2) und am
Kupplungsstück (5) wird erst durch die Verbindung miteinander
freigegeben. Im getrennten Zustand sind beide Durchgänge durch
ein integriertes Rückschlagventil geschlossen.
24
5
Die folgenden Funktionen sind nur bei SICCO Mini-Exsikkator
Secure Box Basic Artikelnummer V 1847-06 möglich.
»Die Tür ist aufgeschlossen, wenn der Schlüssel (6) senkrecht
steht. Der Schlüssel (6) kann bei aufgeschlossener Tür nicht
abgezogen werden.
»Wenn Sie den Schlüssel (6) eine viertel Umdrehung gegen den
Uhrzeigersinn drehen, ist die Tür abgeschlossen.
Der Schlüssel (6) kann abgezogen werden.
6
6
Die folgenden Funktionen sind nur bei SICCO Mini-Exsikkator
Antistatik BasicArtikelnummer V 1843-06 möglich.
»Schließen Sie an der Rückseite des Exsikkators Ihr
Erdungskabel an. Wir empfehlen eine Schraube mit einem
Durchmesser von 4 mm mit einer Mutter und einer Scheibe.

6
6. Störungshinweise / Reperaturen
Die im Folgenden aufgezeigten Hinweise zur Beseitigung von möglichen Störungen sollen Ihnen helfen, mögliche
Ursachen für die Störungen selbst zu erkennen und evtl. zu beseitigen. Sollte ein Schaden vom Anwender nicht zu
beheben sein, bitten wir um telefonische Rücksprache. Wir werden dann gerne versuchen, Ihnen auf diesem Wege
zu helfen. Sollte dies dann endgültig zu keinem positiven Ergebnis führen, bitten wir den Exsikkator im gereinigten
Zustand zurückzusenden. Wir werden dann prüfen, inwieweit eine kostengünstige Reparatur möglich ist.
Sicco Mini-Exsikkatoren Premium
5. Service / Pflege
»Benutzen Sie nur weiche Tücher und verwenden Sie keine lösungsmittelhaltigen oder scheuernden Reinigungsmittel.
»Verwenden Sie den Exsikkator nur in sauberer und staubfreier Umgebung.
»Setzen Sie ihn nie direkter Sonnenbestrahlung oder anderen Wärmequellen aus.
Funktionen des digitalen Thermometer / Hygrometer:
Messbereich: »Temperatur – 10 °C bis + 60 °C
»Luftfeuchtigkeit 20 % bis 90 % relative Feuchte.
Max. Messfehler: »+/- 1°C bei –10 °C bis + 50 °C
»+/- 5 % relative Feuchte bei 25 % bis 75 % relative Feuchte und 0 °C bis + 50 °C
»Achtung: Wenn in Ihrem Exsikkator eine relative Luftfeuchtigkeit herrscht,
welche kleiner als 25 % oder größer als 75 % ist, so können diese Werte von dem eingebauten
Thermometer/Hygrometer nicht mehr richtig angezeigt werden. Verwenden Sie bitte hierfür ein
höherwertiges Thermometer/ Hygrometer.
Batterie: »Bitte verwenden Sie bitte eine Knopfzelle LR44 oder AG13.
Die Funktionen
der Tasten:
Abruf der Höchst-/Tiefstwerte:
»Durch Drücken der MAX/MIN-Taste erscheint der seit der letzten Rückstellung erreicht
Höchstwert.
»Durch nochmaliges Drücken der MAX/MIN-Taste erhalten Sie den seit der letzten Rückstellung
erreichten Tiefstwert.
»Um wieder die aktuelle Anzeige zu erhalten, betätigen Sie nochmals die MAX/MIN-Taste.
Rückstellen des MAX/MIN- Speichers auf die aktuellen Werte:
»Drücken Sie die CLEAR-Taste, um den MAX/MIN-Speicher auf die momentanen Anzeigewerte
zurückzusetzen.
Batterieanzeige
»Bei schwacher Batterie erscheint im Display links unten eine Anzeige (Batterie mit
Querbalken). Bitte wechseln Sie die Batterie, um die optimale Funktionsweise des
Instrumentes zu gewährleisten.
7
Sicco Mini-Exsikkatoren Premium
Beanstandung Ursache und Abhilfe
Die Luftfeuchtig-
keit im Innenraum
sinkt nicht.
»Die Tür ist nicht dicht geschlossen. Schließen Sie die Tür, bis der Riegel hörbar in die
Türverriegelung einrastet.
»Das Trocknungsmittel ist gesättigt. Regenerieren Sie das Silicagel wie unter Punkt 1.4 beschrieben.
»Eventuell haben Sie für Ihren Anwendungsfall zu wenig Silicagel im Einsatz. Erhöhen Sie die
Silicagelmenge.
»Durch eingelegte Zwischenböden wird die Zirkulation der Luft behindert. Stellen Sie das
Silicagel neben Ihre Bauteile.
7. Entsorgungshinweise
Der Exsikkator sowie die Verpackungen bestehen aus recyclingfähigen Materialien und können deshalb den ortsüblichen
Entsorgungsstellen zugeführt werden.
Nähere Angaben zu den verwendeten Materialien entnehmen Sie bitte den nachfolgenden Spezifikationen.
8. Spezifikationen
»Die maximale Bodenlast bei flächiger Belastung beträgt bei allen Mini-Exsikkatoren Premium 3 kg.
»Die maximale Bodenlast bei flächiger Belastung beträgt beim Mini-Exssikkator Vitrum 2 kg.
»Bei Mini-Exsikkator Inertgas Premium sind 5 m Schlauch für die Begasung enthalten. Der Durchgang an den
Schnellkupplungen beträgt 6 mm.
»Der Mini-Exsikkator Antistatik Premium ist statisch ableitfähig und hat einen Widerstand von 105Ohm.
Artikel-
Nummer
Temperatur-
beständigkeit
Material Nutzbarer
Innenraum
B x H x T in mm
Nutzvolumen
in Liter ca.
Gewicht
in kg ca.
Außenmaße
B x H x T in mm
V 1811-07 - 70 °C bis
+ 120 °C
Borosilikat-
glas 3.3
200 x 170 x 214
pro Kammer
6 pro Kammer 2,0 220 x 183 x 214
V 1940-06 - 35 °C bis
+ 70 °C
Poly-
carbonat
212 x 162 x 180
pro Kammer
6,2 pro
Kammer
0,9 221 x 183 x 214
V 1942-06
V 1947-06 0,9 221 x 183 x 214
V 1948-06 1,0 221 x 183 x 214
oben zus. 35 für Griff
V 1949-06 0,9 221 x 183 x 214
hinten zus. 110 für
Kupplung
V 1950-01 0,9 221 x 183 x 214
V 1950-02 1,8 221 x 362 x 214
V 1950-03 2,7 221 x 540 x 214
V 1943-06 Poly-
Carbonat,
ableitfähig
0,9 221 x 183 x 214
9. Ersatz / Sonderzubehör
»siehe Seite 22

8
Sicco Mini-Desiccators Premium
SICCO Mini-Desiccators Premium, Cat.-No.: V 1811-07, V 1940-06, V 1942-06,
V 1947-06, V 1948-06, V 1949-06, V 1950-01, V 1950-02 and V 1950-03.
OPERATING INSTRUCTIONS
1. Supplied with 9
2. Security instructions 9
3. Taking into operation 10
4. Mode of function 12
5. Service / Maintenance 13
6. Disturbances / Repairs 13
7. Waste disposal 14
8. Specifications 14
9. Spare parts / accessories 14
SICCO Mini-Desiccator
Premium 1 compartment
Cat.-No.: V 1950-01
SICCO Mini-Desiccator
Premium 2 compartments
Cat.-No.: V 1950-02
SICCO Mini-Desiccator
Premium 3 compartments
Cat.-No.: V 1950-03
Mini-Desiccator
Protect Premium
Cat.-No.: V 1942-06
Mini-Desiccator
Black Premium
Cat.-No.: V 1940-06
SICCO Mini-Desiccator
For Gas Filling Premium
Cat.-No.: V 1949-06
SICCO Mini-Desiccator
Secure Box Premium
Cat.-No.: V 1947-06
SICCO Mini-Desiccator
Antistatic Premium
Cat.-No.: V 1943-06
SICCO Mini-Desiccator
Mobile Premium
Cat.-No.: V 1948-06
SICCO Mini-Desiccator
Vitrum
Cat.-No.: V 1811-07

9
Sicco Mini-Desiccators Premium
1. Supplied with
1 Mini-Desiccator Premium
1 Jar with Silica gel (23 g)
2 Jars with Silica gel (only Mini-Desiccator Premium with 2 compartments)
3 Jars of Silica gel (only Mini-Desiccator Premium with 3 compartments)
2 Connections for gas filling with quick couplings and hose (5 m) (Mini Desiccator Premium for Gas Filling only)
2 Keys (Mini Desiccator Secure Box Premium only)
1 Operating Instructions
2. Security instructions
»Do not take a damaged desiccator into operation.
»Do not store any solvents or acids in the desiccator.
»Do not put any explosive or inflammable products into the desiccator.
»SICCO Desiccators are not suitable for overpressure or vacuum.
»Provide a safe stand for the desiccator.
»Place the desiccator in a reachable working height.
»The ambient temperature range of -35 °C to + 70 °C shall not be exceeded.
»Do not expose the desiccator to direct sunlight.
»The jar in which the Silica gel is delivered cannot be used to regenerate the gel.
Please read the information listed below thoroughly. We urgently ask you to observe the instructions about security,
use and maintenance.
SICCO Mini-Desiccators are made of high-quality plastic material. They are made for safe and secure storage of
humidity-sensitive products as well as of optical and microelectronic parts in a dust-free atmosphere.
This happens by adding Silica gel which considerably reduces the air humidity by its absorbing effect.
Further security advice for SICCO Mini Desiccator Premium for Gas Filling
»SICCO Mini Desiccators Premium for Gas Filling shall be taken into operation only in rooms with sufficient ventilation.
»For gas filling a connection has to be made to both connectors.
»Connect the outlet tube at first, then the inlet tube. Disconnection has to be made in reverse order.
»Avoid unanticipated reactions which might be caused by gas residues upon opening the door when storing further
components in the desiccator.
»Do not put the filling tubes under tensile or compressive stress.
Further security advice for SICCO Mini Desiccator Antistatic Premium:
»Connect your ground cable to the bore on the backside of the desiccator.
»SICCO Mini Desiccators Antistatic Premium can discharge electrostatic charges by means of grounding cable. The
surface resistance is 105Ohm.

10
Sicco Mini-Desiccators Premium
3. Taking into operation
»The desiccator can be used immediately after having unpacked it.
»Opening of the hinge door: Push the locking bar (1) into the
handle (2).
»Closing: Push the door onto the frame. You will hear when the
locking bar (1) snaps into the frame (3).
»Attention: Risk of crushing to fingers between locking bar
and handle!
»Open the battery case on the back of the hygrometer by pushing
the cover downwards.
»Remove the battery safety strip and reinsert the battery. Close the
battery case.
»Please note: The hygrometer of Mini Desiccators Black Premium
is not fixed on the door.
Please note: Provided the actual relative humidity in your desiccator is between 25 % and 75 % and temperature is
between 0 °C and +50°C, the value displayed on the hygrometer will have a deviation of ± 5 % relative humidity.
If the actual relative humidity is less than 25 % or more than 75 %, the displayed value can derivate more than ± 5 %
from the actual value. Also if the temperature is below 0 °C or higher than +50 °C, a derivation of the displayed value is
possible.
»If necessary, place the shelves inside the desiccator by pushing
them diagonally through the door. Then put them on the rails on
the left and on the right side.
2
1
3
3
1
23
»Open the jar with silica gel and place it inside the desiccator.

11
Sicco Mini-Desiccators Premium
The following functions are only available with SICCO Mini Desiccators Premium for Gas Filling
Cat.-No. V 1949-06:
Swapping with Gas
The substances and components which are stored in the desiccator can be swapped with gas. The corresponding bores
to lead in the gas are located on the side walls and factory-made. For technical reasons (packing and transport), the
tubing and the connecting pieces are enclosed in delivery but not yet mounted. The assembly is quite easy:
»Remove the nut (1) from the connecting piece (2) by turning it
counter clockwise. The o-ring (3) remains on the thread.
2
4
5
»Two bores are located on the back side. Put the thread of the
connecting piece (2) with the o-ring from the outside through the
bore. Fix the connecting piece from the inside by screwing
manually the nut (1) on it.
Do not use any tooling for the assembly!
»Cut the inlet and outlet tubing with a knife to the requested
length. 5 m are included in delivery.
2
4
5
»Press the tubing on the coupling.
Tip: Wet the hose connector with some water.
»Pull the slide closure (4) of the coupling (5) in the direction of the
tubing and put it on the already mounted connecting piece (2).
Tip: Put some drops of silicone oil onto the sealing surface.
2
4
1
23
231

12
Sicco Mini-Desiccators Premium
4. Mode of function
»The regulation of the air humidity inside the desiccator is made by adding different quantities of silica gel.The silica
gel contains a colour indicator. Dry silica gel is orange-coloured, being saturated the silica gel changes its colour to
dark brown or black. For regeneration, the silica gel has to be put into an open, heat-resistant vessel. On this vessel,
the silica gel can be regenerated in an oven at approx. 90 to 110 °C for around 60 minutes.
Do not regenerate the silica gel in the supplied jar!
»To prevent a rise of air humidity when putting in or taking out parts, the door should be opened only for a very short
period of time.
»For disconnection just hold the coupling (5) and move the slide
closure (4) in direction of the coupling.
Attention: The passage on the connecting piece (2) will only be
opened after the connection with the coupling (5) has been closed
tight. During disconnection, both passages are blocked by an
integrated non-return valve.
24
5
The following functions are only available with SICCO Mini
Desiccators Secure Box PremiumCat.-No. V 1947-06:
»Key (6) in vertical position: The door can be opened.
Please note that the key (6) cannot be removed in this position.
»To close the lock, turn the key (6) a quarter turn to the left.
The key (6) can now be removed from the lock. 6
6
DThe following functions are only available with SICCO Mini
Desiccators Antistatic Premium Cat.-No. V 1943-06:
»Connect your grounding cable to the back of the desiccator.
We recommend using a screw with a diameter of 4 mm with nut
and plate.

13
Sicco Mini-Desiccators Premium
6. Disturbances / Repairs
The following information shall help you to recognize and, if possible, to eliminate possible reasons for
disturbances by yourself. If you are not able to handle the disturbance, please give us a call. We will then try to help
you this way. If then a solution to your problem cannot be found, we will ask you to return the cleaned desiccator in
the original packing to us. Then we will check whether a cost-effective repair is possible.
5. Service / Maintenance
»Only use soft clothes and no detergents which contain solvents or which scrub.
»Only use the desiccator in clean and dust-free conditions.
»Never expose it to direct insulation or other sources of heat.
Functions of the digital thermometer/hygrometer:
Measuring range: »Temperature -10 °C to +60 °C
»Air humidity 20 % to 90 % relative humidity
Max. error in
measurement:
»+/- 1°C between –10 °C and + 50 °C
»+/- 5 % relative humidity at 25 % to 75 % relative humidity and 0 °C to +50 °C
Battery: »button cell LR44 or AG13.
Functionality of
the keys:
Indication of maximum / minimum values:
»By pressing the MAX/MIN-key, the maximum value since the last reset will be displayed.
»By pressing the MAX/MIN-key again, the minimum value since the last reset will be displayed.
»The current values will be displayed after pressing MAX/MIN a third time.
Reset of the MAX/MIN-memory:
»Press CLEAR and the MAX/MIN-memory will be deleted. The current values will be stored
instead.
Battery sign in the display
»If the battery is low, a battery flag is shown on the left bottom of the display. Exchange the
battery to ensure best possible operation of the device.
Objection Reason and help
Humidity inside
the desiccator
does not fall.
»The door is not closed tightly. Close the door.
»The silica gel is saturated. Regenerate the silica gel as described under point 2.4.
»You possibly have not added enough silica gel. Add further silica gel.
»Air circulation is constrained by mounted shelves. Place the desiccant right next to your
components.
14
Sicco Mini-Desiccators Premium
7. Waste disposal
The desiccators as well as their packing are made of recyclable materials. Please take further information about the
materials used from the following specifications.
8. Specifications
»The maximum all-over load is 3 kg for all Mini Desiccators Premium.
»The maximum all-over load is 2 kg for the Mini Desiccator Vitrum.
»A hose with a length of 5 meter is included in the delivery of SICCO Mini Desiccators Premium for Gas Filling. The
passage of the quick couplings has a bore with 6 mm.
»SICCO Mini Desiccator Antistatic Premium is conductive and its surface has a resistance of 105Ohm.
Cat.-No. Temperature
resistance
Material Usable
interior space
B x H x T in mm
Usable
volume
in Liter approx.
Weight
in kg
approx.
Outer dimensions
B x H x T in mm
V 1811-07 - 70 °C to
+ 120 °C
Borosilicat-
glas 3.3
200 x 170 x 214
per
compartment
6 per
compartment
2,0 220 x 183 x 214
V 1940-06 - 35 °C to
+ 70 °C
Poly-
carbonate
212 x 162 x 180
per
compartment
6,2 per
compartment
0,9 221 x 183 x 214
V 1942-06
V 1947-06 0,9 221 x 183 x 214
V 1948-06 1,0 221 x 183 x 214
additional height for
handle: 35
V 1949-06 0,9 221 x 183 x 214
additionally 110 on
the backside for
coupling
V 1950-01 0,9 221 x 183 x 214
V 1950-02 1,8 221 x 362 x 214
V 1950-03 2,7 221 x 540 x 214
V 1943-06 Conductive
Poly-
carbonate
0,9 221 x 183 x 214
9. Spare parts / accessories
»see page 22

15
SICCO Dessiccateurs Mini Premium, Réf.: V 1811-07, V 1940-06, V 1942-06,
V 1943-06, V 1947-06, V 1948-06, V 1949-06, V 1950-01, V 1950-02 et V 1950-03.
MODE D’EMPLOI
1. Volume de livraison 16
2. Instructions de sécurité 16
3. Mise en service 17
4. Mode de fonction 19
5. Service / Maintenance 20
6. Perturbations / Réparations 20
7. Enlèvement du déchet 21
8. Spécifications 21
9. Zubehör / Accessories / Accessoirs 22
SICCO Dessiccateur Mini
Premium 1 chambre
Réf.: V 1950-01
Sicco Dessiccateurs Mini Premium
SICCO Dessiccateur Mini
Premium2 chambres
Réf.: V 1950-02
SICCO Dessiccateur Mini
Premium 3 chambres
Réf.: V 1950-03
SICCO Dessiccateur Mini
Protect Premium
Réf.: V 1942-06
SICCO Dessiccateur Mini
Noir Premium
Réf.: V 1940-06
SICCO Dessiccateur Mini Pour
Recouvrement Avec Gaz Premium
Réf.: V 1949-06
SICCO Dessiccateurs Mini
Secure Box Premium
Réf.: V 1947-06
SICCO Dessiccateurs Mini
Antistatique Premium
Réf.: V 1943-06
SICCO Dessiccateurs Mini
Portable Premium
Réf.: V 1948-06
SICCO Dessiccateurs Mini
Vitrum
Réf.: V 1811-07

16
1. Volume de livraison
1 Dessiccateur Mini Premium
1 Bouteille de gel de silice
2 Bouteilles de gel de silice (Dessiccateurs Mini Premium avec 2 chambres)
3 Bouteilles de gel de silice (Dessiccateurs Mini Premium avec 3 chambres)
2 Dispositifs pour l’addiction du gaz et tube de raccordement (5 m) (Dessiccateurs Mini Premium pour
Recouvrement avec Gaz)
2 Clés (Dessiccateurs Mini Secure Box Premium)
1 Mode d’emploi
2. Instructions de sécurité
»Ne mettez pas de dessiccateur défectueux en service.
»Ne stockez pas de solvants ou d’acides dans le dessiccateur.
»Ne stockez pas de produits explosibles ou inflammables dans le dessiccateur.
»Ne gênerez pas de vide ou de la pression dans le dessiccateur.
»Posez le dessiccateur seulement sur une surface plane et une hauteur d’opération convenable.
»Respectez des températures ambiantes de -20 °C à +70 °C.
»Protégez le dessiccateur de la pénétration du soleil directe.
»La bouteille de gel de silice ne peut pas être utilisée pour la régénération du gel de silice.
Veuillez lire précisément toutes les informations suivantes. Nous vous prions d’observer les indications sur sécurité,
usage et maintenance.
Les dessiccateurs SICCO sont fabriqués en matière plastique de première qualité. Leur tâche est de «sécher» des
produits sensibles à humidité et des parties microélectroniques de manière sûre et en conditions sans poussière. Cela
se fait par ajouter gel de silice qui baisse la humidité de l’air dans le dessiccateur par sa fonction absorbante.
Sicco Dessiccateurs Mini Premium
Instructions de sécurité pour les SICCO Dessiccateurs Mini Premium pour Recouvrement avec Gaz:
»N’utilisez l’option de l’addiction du gaz que dans des salles suffisamment ventilées.
»Raccordez chaque fois tous les deux connecteurs.
»Raccordez le tuyaux sortant en premier, d’après le tuyaux d’alimentation. Le démontage est fait dans l’ordre inverse.
»Evitez des réactions involontaire qui peuvent être causé par des restes du gaz en ouvrant la porte.
»Evitez de la pression de traction ou de compression sur le tuyau.
Instructions de sécurité pour les SICCO Dessiccateurs Mini Antistatique Premium:
»Connectez votre câble de terre sur l´arrière du desiccateur.
»Le Desiccateur Mini Antistatique Premium est antistatique et a une résistance de 105Ohm.

17
3. Mise en service
»Le dessiccateur peut être utilisé immédiatement après avoir enlevé l’emballage. Remplissez la bouteille de gel de
silice et mettez la bouteille auprès des pièces dans le dessiccateur
»Ouvrez la porte en pressant le verrou (1) contre la poignée de la
porte (2).
»Fermez la porte en l’appuyant. L’enclenchement du verrou (1) doit
être audible
»Attention: Risque de contusion entre verrou (1) et poignée (2)!
»Ouvrez le compartiment à piles en arrière de l’hygromètre en
poussant le couvercle vers le bas.
»Enlevez la bande d’interruption de la pile et remettez la pile.
Fermez le compartiment à piles.
»Notez: L’hygromètre du dessiccateur Mini Black Premium n’est
pas montée à la porte.
Attention: Si l’humidité relative d’air effective est entre 25 % et 75 % est la température est entre 0 °C et +50 °C, la
déviation du valeur indiqué sur l’hygromètre est ± 5 %.
Si l’humidité relative d’air effective est moins de 25 % ou plus de 75 %, la déviation du valeur indiqué sur l’hygromètre
est plus de ± 5 % . Températures de moins de 0 °C ou de plus de +50 °C amènent une deviation de plus de ± 5 % .
»Mettez les étagères sur les guides s’il vous faut d’espace
additionnel.
2
1
3
3
1
23
»Remplissez la bouteille de gel de silice et mettez la bouteille auprès des pièces dans le dessiccateur.
Sicco Dessiccateurs Mini Premium

18
Les fonctions suivantes ne sont disponibles qu’avec le SICCO Dessiccateur Mini pour Recouvrement avec
Gaz réf. V 1849-06:
Recouvrement avec gaz
Avec les dessiccateurs Mini pour Recouvrement avec Gaz vous avez la possibilité de recouvrir
les produits dans le dessiccateur avec gaz. Les perçages correspondants sont déjà mis dans les plaques.
Le tube et les raccords sont inclus dans la livraison. L’assemblage est simple.
»Devissez l’écrou (1) par le tourner en sens antihoraire.
Le joint torique (3) reste sur le raccord (2).
2
4
5
»Deux perçages se trouvent à l’arrière du dessiccateur. Introduisez le
raccord (2) avec le joint torique dans le perçage. Fixez le raccord
par visser l’écrou (1) par la main.
N’utilisez pas d’outils pour l’assemblage!
»Coupez le tuyau sortant et le tuyau d’alimentation aux longueurs
désirées avec un couteau. Un tuyau de 5 m est inclus dans la
livraison.
2
4
5
»Poussez le tuyau sur le coupleur (nous recommandons de mettre
quelques gouttes d’eau sur l’embout).
Une fixation additionnel du tube n’est pas nécessaire.
»Tirez le bouchon à coulisse (4) sur le coupleur (5) en vers du tuyau.
Joignez le coupler avec le raccord (2) dans le dessiccateur.
Conseil: C’est plus facile avec quelques gouttes de l’huile à
silicone sur la surface d’étanchéité. 2
4
5
1
23
231
Sicco Dessiccateurs Mini Premium
19
4. Mode de fonction
»La régulation de la humidité de l’air se fait par ajouter des quantités différentes de gel de silice dans le dessiccateur.
Le gel de silice contient un indicateur de couleur. En état sec, le gel de silice est orange, en état saturé, le gel de
silice devient brun et noir. Il est possible de réactiver le gel dans un four à environ 90-110°C.
N‘utilisez pas la bouteille livrée, mais un récipient ouvert et résistant à la chaleur!
Un four à micro-ondes n’est pas approprié!
»Pour éviter que de la humidité de l’air vient dans le dessiccateur, la porte doit être ouverte seulement pendant très
peu de temps.
»Démontez le raccordement par tenir le coupleur (5) et tirer le
bouchon à coulisse (4) en vers du coupleur.
Attention: Le passage sera débloqué aussitôt que vous
avez bien joint le raccord ainsi que le coupleur.
Aussitôt que la jonction est coupé, le passage est bloqué par une
soupape de retenue intégrée.
24
5
Les fonctions suivantes ne sont disponibles qu’avec le SICCO
Dessiccateur Secure Box Premium réf. V 1947-06:
»Clé (6) en position verticale: La porte peut être ouverte mais
la clé (6) ne peut pas être retirée de la serrure.
»Tournez la clé (6) un quart d’un tour pour fermer la serrure. Après,
la clé (6) peut être retirée de la serrure
6
6
Les fonctions suivantes ne sont disponibles qu’avec le SICCO
Dessiccateur Mini Antistatique Premiumréf. V 1843-06:
»Connectez votre câble de terre sur l´arrière du desiccateur. Nous
recommandons une vis avec un diamètre de 4 mm avec une écrou
et une rondelle.
Sicco Dessiccateurs Mini Premium
This manual suits for next models
8
Table of contents
Languages:
Other SICCO Laboratory Equipment manuals


