Spectradyne nCS1 User manual


© Spectradyne LLC, All rights reserved 2Version 2.5.0 Revision 3, July 2020
Contents
The nCS1 Instrument: Overview & Specifications...............................................................................................5
Specifications ...............................................................................................................................................................5
Instrument Setup and Sample Prep.........................................................................................................................6
Setting up the nCS1...................................................................................................................................................6
Cleaning Cartridge.....................................................................................................................................................6
Calibration Sample and First Run.........................................................................................................................6
Loading the Cartridge...............................................................................................................................................7
Load the Analyte into the Cartridge ...............................................................................................................7
Load the Cartridge into the nCS1....................................................................................................................7
nCS1 Control and Data Acquisition Software.......................................................................................................9
Software Startup.....................................................................................................................................................9
Enter Run Details....................................................................................................................................................9
Initializing the Cartridge ....................................................................................................................................... 10
Single-click to Acquisition ............................................................................................................................... 10
Fill Monitors .......................................................................................................................................................... 10
Acquisition Control................................................................................................................................................. 11
Continuous-mode and Single-mode Data Acquisition........................................................................ 11
Balance Monitor .................................................................................................................................................. 12
Assessing Data Quality...................................................................................................................................... 12
Utilities......................................................................................................................................................................... 13
Instrument Prime................................................................................................................................................. 13
Clear Constriction ............................................................................................................................................... 13
Instrument Shutdown........................................................................................................................................ 14
Less/More .............................................................................................................................................................. 14
Diagnostic Panel ...................................................................................................................................................... 14
Manual Pressure Control.................................................................................................................................. 15

© Spectradyne LLC, All rights reserved 3Version 2.5.0 Revision 3, July 2020
Bias Setting............................................................................................................................................................ 16
Sensors.................................................................................................................................................................... 16
Manual Utilities.................................................................................................................................................... 16
Finish Priming Manually ................................................................................................................................... 17
Run Cleaning Cartridge Only.......................................................................................................................... 17
Drain Bottle Lines................................................................................................................................................ 17
Check Supply Pressure...................................................................................................................................... 17
Restarting the Auto-analysis Engine............................................................................................................ 17
About this instrument….................................................................................................................................... 17
The Auto-analysis Engine..................................................................................................................................... 18
Automatic Processing of Raw Data.............................................................................................................. 18
Live CSD –Quantitative Real-time Data Analysis ................................................................................... 19
After Data Acquisition............................................................................................................................................ 20
End Measurement Run ..................................................................................................................................... 20
Prepare the Next Cartridge for Analysis (if continuing with measurements)............................... 20
Remove the Used Cartridge............................................................................................................................ 20
Insert the Next Analysis Cartridge (if continuing with measurements).......................................... 20
nCS1 Shutdown Procedure.................................................................................................................................. 20
Run Instrument Shutdown Routine.............................................................................................................. 20
Turn Off Power to the Instrument ................................................................................................................ 20
Buffer Maintenance ................................................................................................................................................ 21
Guidelines for Sample Preparation................................................................................................................... 21
Data Analysis and Viewer Software....................................................................................................................... 22
Workflow Overview................................................................................................................................................. 22
Data Viewer Software User Interface ............................................................................................................... 23
1. Select & Process Raw Data......................................................................................................................... 24
Viewing and Selecting Raw Data for Analysis.......................................................................................... 24
Processing Raw Data ......................................................................................................................................... 25

© Spectradyne LLC, All rights reserved 4Version 2.5.0 Revision 3, July 2020
Viewing the Results of Raw Data Processing ........................................................................................... 26
2. Refine & Filter.................................................................................................................................................. 28
2.1 Refine the Diameter and Concentration Scaling of the CSD................................................ 29
2.2 Filter the Set of Detected Particles to Exclude False Positives............................................. 31
3. Combine and Compare................................................................................................................................ 34
3.1 Combine multiple Stats files into a single Combined file...................................................... 34
3.2 Compare Multiple Analyses .............................................................................................................. 34
Data Export ................................................................................................................................................................ 36
Cartridge Size and Concentration Coverage..................................................................................................... 38
More Information and Technical Support .......................................................................................................... 38

© Spectradyne LLC, All rights reserved 5Version 2.5.0 Revision 3, July 2020
The nCS1 Instrument: Overview & Specifications
The nCS1 is a powerful tool for obtaining detailed size and concentration information about
particle distributions in liquids. The core technology utilized in the nCS1 is called Resistive Pulse
Sensing (RPS), also referred to as the Coulter Principle, and is a truly orthogonal method to both
light scattering methods such as dynamic light scattering (DLS) or nanoparticle tracking analysis
(NTA) as well as to resonant mass measurement (RMM) techniques. A clean disposable cartridge
targets a specific size range of particles for each analysis, eliminating concerns of contamination
between samples.
Specifications
•Dimensions: 12” x 12” x 15” (30.5cm x 30.5cm x 38.1cm)
•Weight: 30 lbs (13.6 kg)
•Power: North America: 110V, 5A, 60 Hz;
Europe: 230V, 16 A, 50 Hz
•Nitrogen or CDA: 15 to 30 psi regulated supply
•Min. analyte volume: 3 µl
•Min. ionic strength of analyte: 1-10 mM
•Size Range: 50 nm –10 µm (Refer to cartridge coverage on page 38)
•Concentration range: 1x10⁴ –5x10¹¹ particles per ml, cartridge dependent
•Running buffer: PBS buffer + 1% polysorbate 20 filtered to 0.2 µm
A computer is required to interface with the nCS1 through a standard USB link.
Figure 1. The nCS1 instrument and analysis cartridges.

© Spectradyne LLC, All rights reserved 6Version 2.5.0 Revision 3, July 2020
Instrument Setup and Sample Prep
Setting up the nCS1
Unpack: Remove all packaging from the instrument and position it on the benchtop.
Power supply: Use the power cable provided with the instrument to connect the nCS1 to a source
of electrical power (North America: 110V, 5A, 60 Hz; Europe: 230V, 16 A, 50 Hz). The power input
connection is located on the back panel. The fuse drawer also provides a means to set the
instrument to run on 110V power (North America) or 230V (Europe). Align the arrows for the
desired AC voltage on the fuse drawer and the power entry module.
Pressure supply: Connect the instrument to a source of clean inert gas (e.g., filtered nitrogen or
air). The acceptable range of input pressures is 15-30 PSI. The pressure input is located on the
back panel.
Load running buffer: Running buffer is used to fill auxiliary portions of the analysis cartridges
during operation—it does not contact the sample to be analyzed until after measurement.
Recommended running buffer is PBS + 1% polysorbate 20 filtered at 0.2 µm. Add approximately
50 mL to each of the two bottles labeled “Buffer” on the right side of the instrument.
USB connection: Use the USB cable provided with the instrument to connect the nCS1 to a
computer with Spectradyne software installed. The USB port is located on the back panel.
Power on: Turn on the instrument with the switch located on the rear panel before running the
nCS1 software installed on the attached computer.
Software: Run the Spectradyne nCS1 software on the computer. Note that if the instrument is
powered off, the software will need to be restarted before next use. Make sure the cartridge
calibration file is up-to-date, please contact support@spectradynellc.com for the latest version.
Cleaning Cartridge
A reusable cleaning cartridge is supplied with the nCS1 for instrument prime and shutdown. A
cleaning cartridge routine should also be performed after setting up the nCS1 for the first time,
or after any significant period of inactivity, i.e. more than 2 weeks. Refer to pages 13 and 17 of
this guide for instructions.
Calibration Sample and First Run
A calibration sample should be the first sample run after unpacking the instrument, and can be
used at any time by users wishing to familiarize themselves with instrument operation. The
calibration sample should be a polystyrene particle size standard in filtered PBS + 1% Tween 20.
Guidelines for preparing your own sample for measurement can be found in the Guidelines for
Sample Preparation section on page 21 of this guide.

Loading the Cartridge
A video demonstrating cartridge loading is available on Spectradyne’s website:
https://www.nanoparticleanalyzer.com/nanoparticle-analyzer-products-ncs1video.php.
Load the Analyte into the Cartridge
➢Pipette 3-5 microliters of the sample to be measured into the analyte reservoir on the
analysis cartridge (Figure 3).
➢IMPORTANT:
❖Ensure that any air bubbles in the sample are acceptably positioned in the reservoir
(see Figure 2).
❖Gently tap the cartridge on a flat surface to shift/remove any bubbles if necessary.
Figure 2. Any air bubbles in the analyte must not occlude the bottom of the reservoir.
Figure 3. Left: The sample pipetted into the analysis cartridge. Right: The front panel of the
Spectradyne nCS1: On the left side is the cartridge insertion socket (Hardware Version 1),
and on the right are the cartridge engage button and indicator lights.

© Spectradyne LLC, All rights reserved 8Version 2.5.0 Revision 3, July 2020
Load the Cartridge into the nCS1
➢Ensure the nCS1 control software is running on the attached computer.
➢Load the cartridge into the socket in the front of the nCS1.
➢To determine your hardware version, see About this instrument…on page 17.
Hardware Version 1 or higher:
➢IMPORTANT:
❖The cartridge must sit flat on the bottom of
the holder. Refer to Figure 4.
Hardware Version 0:
➢IMPORTANT:
❖The outer glass edge of the cartridge
MUST be flush with the edge of the shelf
on which it sits.
All Hardware Versions:
➢Refer to Figure 3 for button and indicator light locations.
➢The middle indicator light (blue), and the button ring light (blue) on the front panel of
the instrument must be illuminated before proceeding.
➢Press the cartridge engage button on the front of the nCS1 to raise the cartridge into the
instrument. The top indicator light (white) will illuminate to indicate that the stage has
reached the top of its range of motion and that the cartridge is ready for priming.
➢IMPORTANT (Hardware Version 0):
❖If the white light does not illuminate when the stage is raised to the top of its travel,
immediately depress the cartridge engage button to lower the stage.
❖Call your customer service contact before continuing, or email
support@spectradynellc.com for assistance.
➢After this point, the nCS1 and data acquisition process are controlled entirely through the
Spectradyne Acquisition software on the computer.
Figure 4. Guidelines for cartridge insertion
(Hardware version 1 or higher).

© Spectradyne LLC, All rights reserved 9Version 2.5.0 Revision 3, July 2020
nCS1 Control and Data Acquisition Software
Software Startup
Starting up the software after the instrument is powered on. The ‘nCS1 Status’ bar displays
important messages and running processes during a measurement run.
Enter Run Details
Description of fields (see Figure 5):
➢Cartridge Mold ID: Enter the cartridge mold ID (e.g., P15.2.3, or E16.1.2.).
➢Box Number: First six-digit date code printed on the cartridge box (e.g., 190915-NN).
➢Save Location: Use the folder icon to specify a location for saving data.
➢Data File Prefix: Specify a prefix for all data files to be saved (optional).
➢Sample Description: Enter a sample description, this will be stored with the data file.
➢Calibration: Size (nm): Enter the diameter (in nm) of calibration particles mixed in with
the sample. If no calibration particles are used, the entry may be left blank.
➢Conc. (1/mL): Enter the concentration of calibration particles in particles/mL (e.g., ‘2E9’).
This entry may be left blank.
Figure 5. Run Details frame.

© Spectradyne LLC, All rights reserved 10 Version 2.5.0 Revision 3, July 2020
Initializing the Cartridge
Single-click to Acquisition
Prime and acquire data with a single click of the “GO!”button.
➢Press “GO!” to prime the cartridge and start data acquisition automatically (see Figure
6).
Fill Monitors
➢The fill monitors are vertical sliders in the Cartridge Initialization frame that indicate the fill
status in various parts of the cartridge (see Figure 6).
➢The priming routine typically requires 1-2 minutes to complete. During the process, it is
normal for fill monitors to vary between all levels and show different colors.
➢After normal priming, the fill monitors should have approximately the pattern shown in
Figure 6.
➢When the routine is complete, data acquisition will begin automatically.
Figure 6. Run Control frame and fill monitors status.
Troubleshooting Tip:
➢If the priming routine encounters an issue, one or more of the fill monitors
will remain in a red color and the priming routine will not complete.
➢If Fill Monitor 1 or 3 is red:
❖An issue with the running buffer is likely.
❖Check that sufficient running buffer remains in the reservoirs
❖Stop the priming by clicking “Cancel” and then “End Run” to eject
the cartridge.
❖Replace the running buffer and use the cleaning cartridge to flush
the system with the new running buffer.
➢If Fill Monitor 2 or 4 is red:
❖There may be an issue with the sample:
▪Is there insufficient conductivity and/or surfactant in the
sample?
▪Is the sample too highly concentrated?
❖There may be an issue with the cartridge:
▪Try measuring the sample in a new cartridge.
© Spectradyne LLC, All rights reserved 11 Version 2.5.0 Revision 3, July 2020
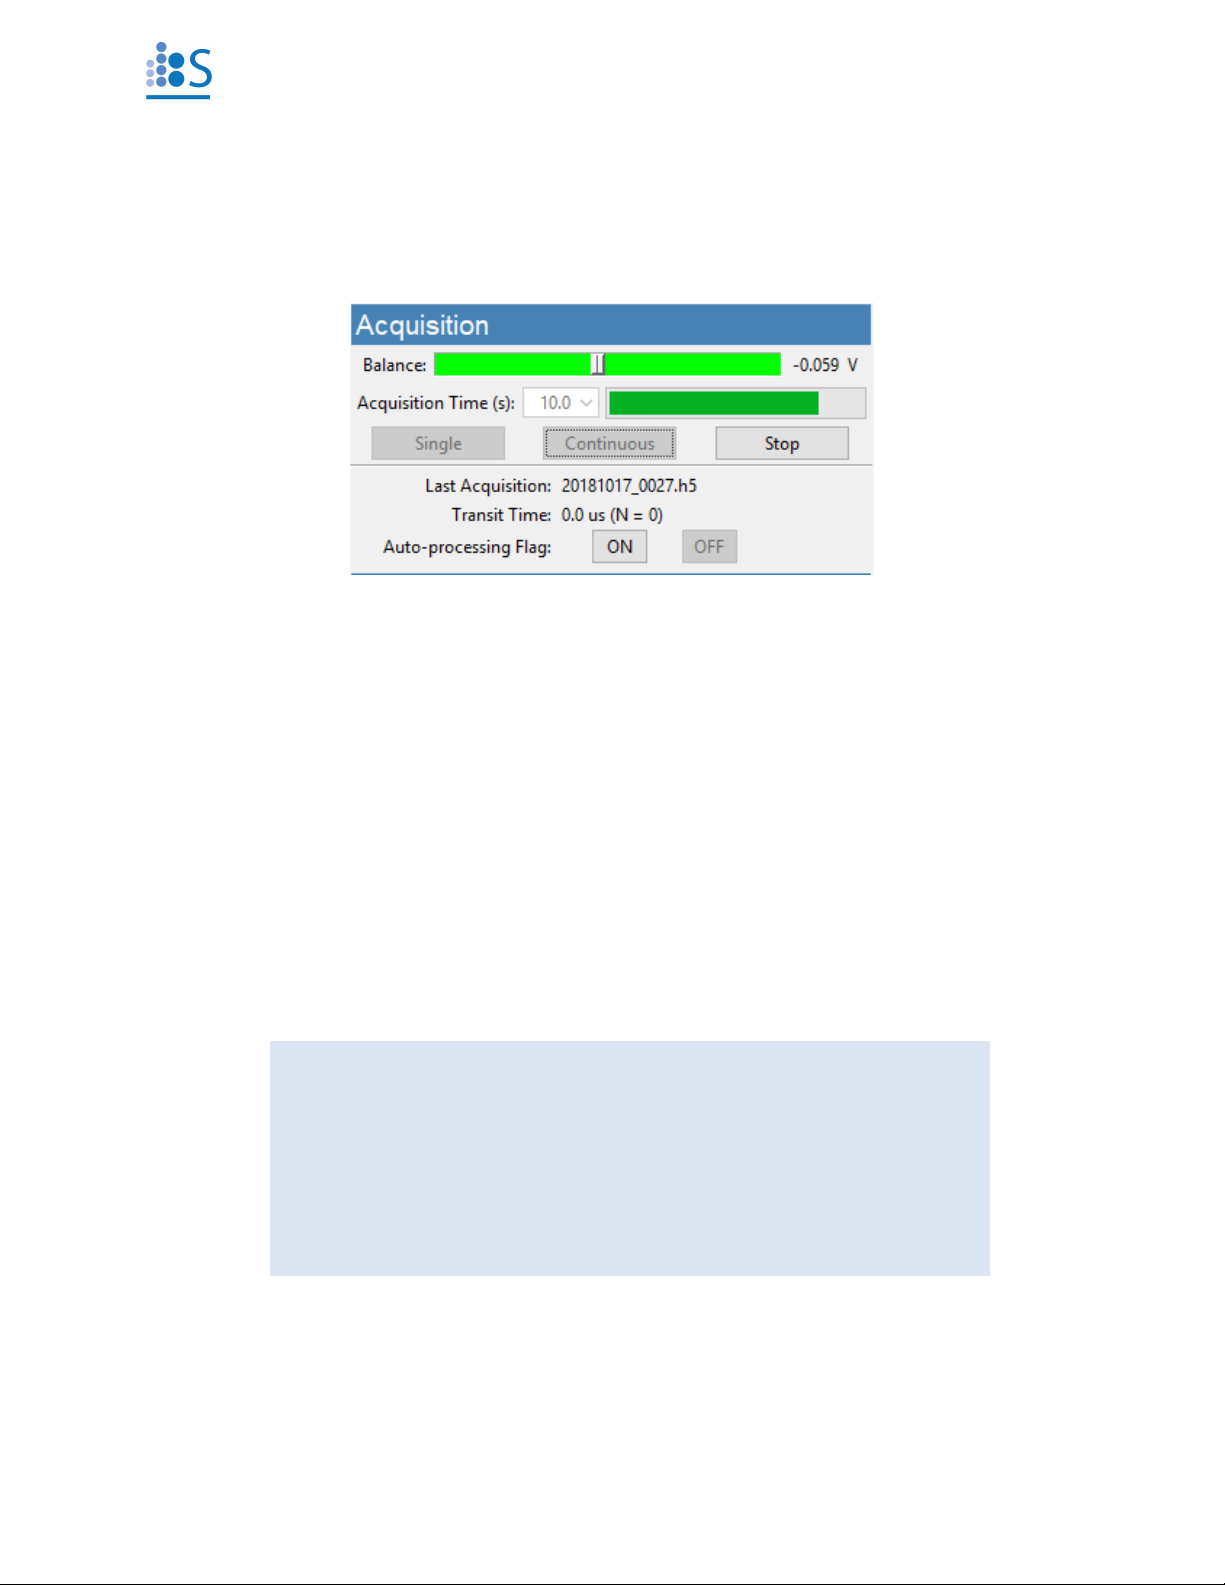
Acquisition Control
After priming of the cartridge is complete, continuous data acquisition will begin automatically
using bias values that are optimized for the cartridge type.
Continuous-mode and Single-mode Data Acquisition
➢The length of each acquisition is specified using the “Acquisition Time” dropdown (10s
default).
➢Continuous-mode acquisition may be manually started by pressing the “Continuous”
button (Figure 7). Repeat acquisitions are collected until the user presses the “Stop” button
or until user-defined “Set Acquisition Stop Point” value is reached, see page 18.
➢In continuous mode, each acquisition is automatically flagged for processing unless a
significant number of defects are detected in the data (see page 18).
➢A single acquisition can be obtained by pressing the “Single” button.
➢In single acquisition mode, the user may manually flag the most recent acquisition for
automatic processing by pressing the “ON” button in the Acquisition frame.
➢Interrupt the current acquisition with the “Stop” button. Partial acquisitions are not saved.
Figure 7. Acquisition frame.
Data Saving Tips:
➢Raw data files are saved to the folder specified by the user in the Run
Details frame.
➢Raw data file names have the following format:
❖<prefix>_YYYYMMDD_NNNN.h5
➢Record significant acquisition numbers in your notes for future
reference.

© Spectradyne LLC, All rights reserved 12 Version 2.5.0 Revision 3, July 2020
Balance Monitor
➢When the bias is ON, the Balance monitor indicates the electrical balance of the system.
➢The balance should remain approximately centered on the scale, within the range of -0.800
V to +0.800 V, and the color of the balance indicator should be green.
➢If the scale moves outside the normal range, run the “Clear Constriction” routine (page
13).
Assessing Data Quality
➢Raw data should have the form shown in Figure 8—it has a smooth baseline with particle
detection events appearing as downward spikes from the baseline.
➢Drifting of the baseline is acceptable.
➢In some situations, there may be occasional steps in the baseline. These steps may be
acceptable, depending on their severity.
➢If the raw data shows too many steps, too many red “x”’s or poor display of calibration
particles, click on the “Clear Constriction” button (page 13), wait for completion, then
reattempt acquisition.
➢In single acquisition mode, the user may manually flag the most recent acquisition for
automatic processing by pressing the “ON” button in the Acquisition frame.
➢Flagged acquisitions are highlighted blue in the Viewer software for rapid identification
(refer to the Data Analysis and Viewer Software section on page 22 of this guide).
Figure 8. Exemplary raw data: Smooth baseline with particle detection events appearing as
downward spikes.
© Spectradyne LLC, All rights reserved 13 Version 2.5.0 Revision 3, July 2020
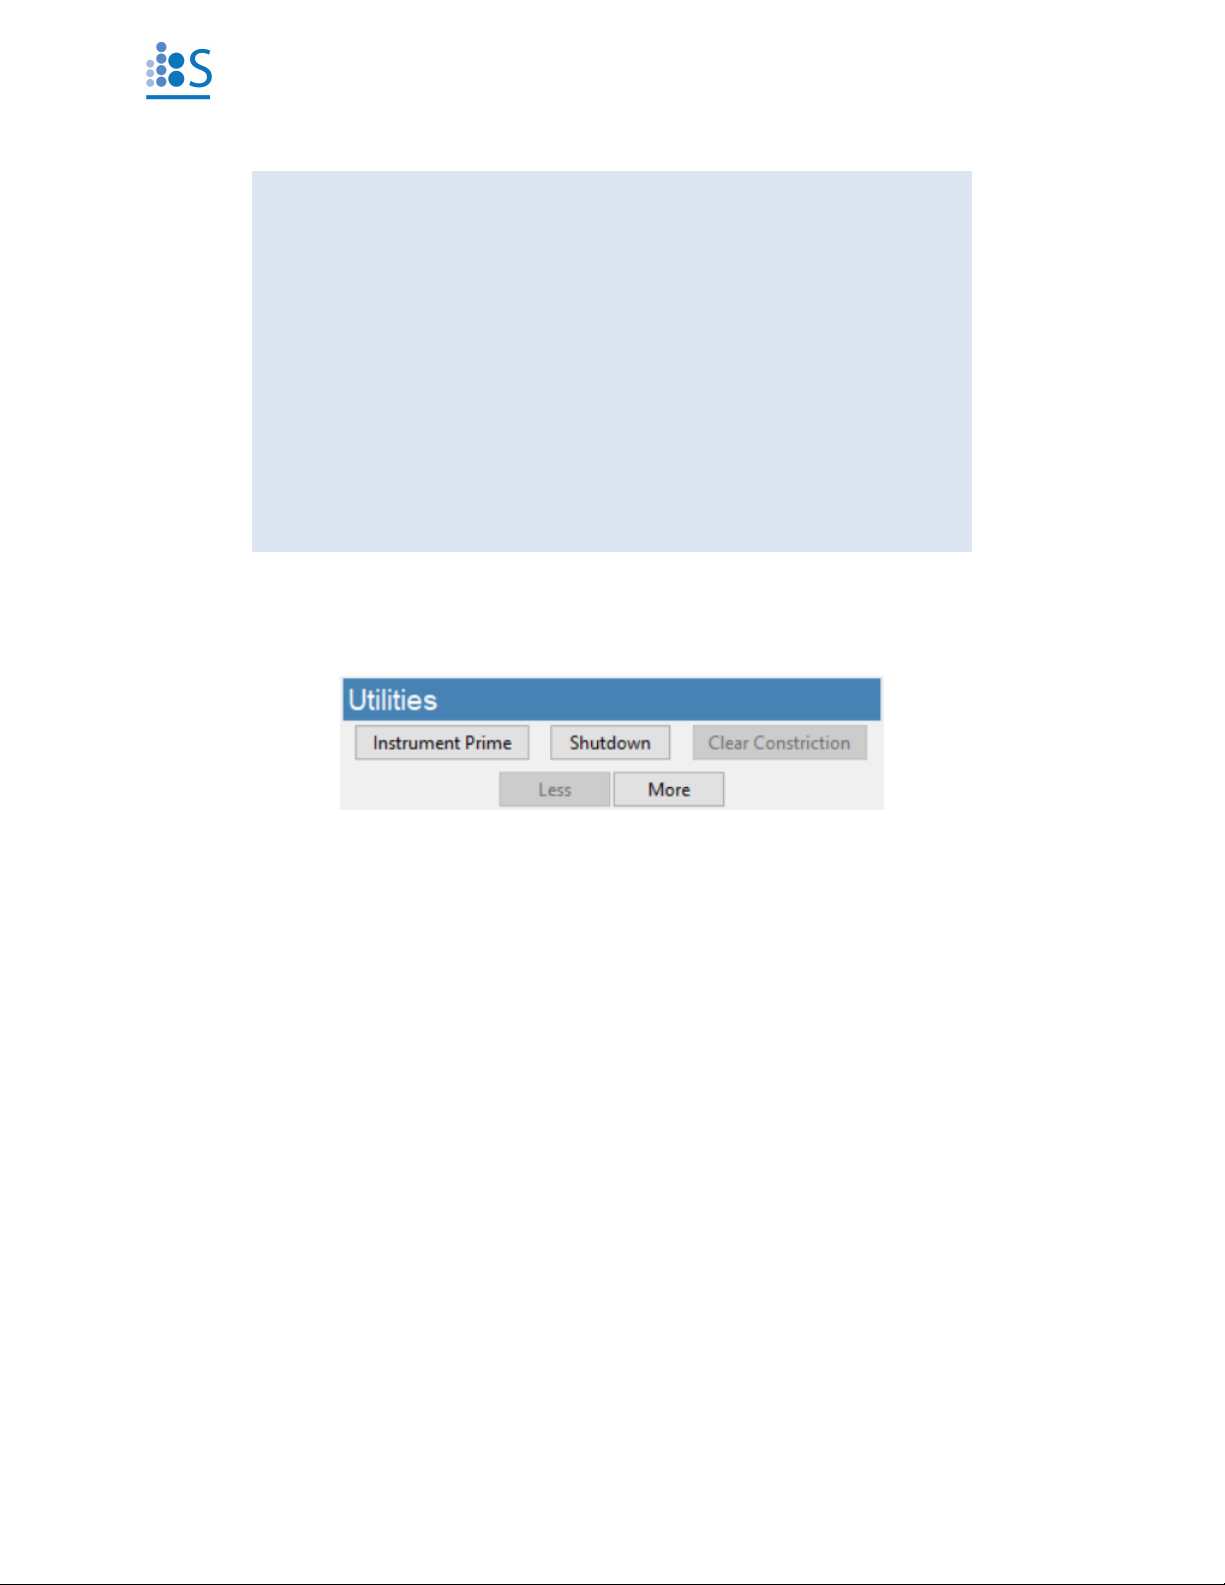
Utilities
Instrument Prime
Run this sequence to prepare the instrument for running the first cartridge on startup. Follow the
prompts from the software:
➢Load a reusable cleaning cartridge
➢Allow the routine to complete:
oFill Monitor 1 and 3 sliders should reach the top.
➢Lower the stage
➢Remove the reusable cleaning cartridge and store it in a safe place
➢Load the sample cartridge and run as usual
Clear Constriction
This automatic sequence is used during a measurement run to clear the sensing constriction of
the cartridge in the event of a blockage.
➢Press the “Clear Constriction” button (Figure 9) and wait for the routine to complete.
➢Continue acquisitions as normal (press “Continuous” on Acquisition panel).
How much data is enough?
➢The 1-σ error reported for a concentration measurement in a given
size range is derived from statistical error in counting particle
detection events.
➢Particle detection events are Poisson-distributed in time; therefore,
the error scales as 1/N1/2 (with small corrections for N < 5).
➢Example: N = 100 particles must be counted in a given size range to
obtain a concentration measurement on that range having standard
error of 10 %.
➢The particle concentration (with error) measured over any user-
defined size range can be obtained in real time using the Live CSD
feature of the Auto-analysis engine.
Figure 9. Utilities frame.

© Spectradyne LLC, All rights reserved 14 Version 2.5.0 Revision 3, July 2020
Instrument Shutdown
This automatic sequence flushes the internal fluid lines of the nCS1 and subsequently prepares
the instrument for shutdown. It requires a reusable cleaning cartridge and deionized water.
➢Press the “Instrument Shutdown” button (Figure 9) to begin the automated process.
➢Follow the prompts:
oLoad a reusable cleaning cartridge
oClick OK to prepare for shutdown
➢Wait for first stage of process to complete. Follow the prompt to replace running buffer
with DI water (bottles 1 and 3):
oDisconnect the running buffer bottles from the fluid lines using the quick-connect
tube fittings. Refrigerate running buffer if intended for future use.
oAdd 25-50 mL of deionized water to running buffer bottles or separate DI water
bottles and replace in the instrument.
Note: Use only fresh deionized water
oClick OK to continue the shutdown routine
➢Follow the next prompt to remove the cleaning cartridge and store it in a safe place for
re-use.
oClick OK to complete the routine.
➢IMPORTANT:
oRefrigerate buffer bottles and DI water bottles after use
Less/More
The “More” button opens an extra panel on the right for diagnostic/troubleshooting purposes.
➢To hide the Diagnostic panel, press the “Less” button
Diagnostic Panel
➢This panel is used for diagnostic purpose and troubleshooting measurement issues. It can
be revealed by clicking the “More” button under the “Utilities” frame, Figure 9. Please
contact Spectradyne at support@spectradynellc.com for troubleshooting tips.

© Spectradyne LLC, All rights reserved 15 Version 2.5.0 Revision 3, July 2020
Figure 10.Manual Pressure Control frame.
Manual Pressure Control
The Manual Pressure Control Frame allows individual pressure setting at each port on the
cartridge.
➢IMPORTANT:
❖These controls should only be used after consultation with a Spectradyne
technician
❖P1 IN port must always have the higher pressure setting than the rest of the
ports
➢To set the pressure at a specific port, enter a PSI value (max 10 psi) into the
corresponding entry box and press the “SET”button
➢Closing air or fluid lines can be achieved using the Close All option for “Fluid Lines”and
“Air Lines”
➢Pressing the “Zero All Pressures”button will depressurize all lines
➢“Set Measurement Pressures”button resets all port pressures to default pressure settings
for routine measurement.

© Spectradyne LLC, All rights reserved 16 Version 2.5.0 Revision 3, July 2020
Figure 11. Bias and Sensors frames.
Bias Setting
➢IMPORTANT:
❖These controls should only be used after consultation with a Spectradyne
technician
➢Negative and positive voltage bias can be changed by entering values (-6.0 V to +6.0 V)
in their corresponding boxes (see Figure 11). Click “ON/SET” to apply the setting. Check
the bias slider to ensure balance.
➢Press the “OFF” button to turn off the voltage and turn on the fill monitor sensors
Sensors
➢IMPORTANT:
❖These controls should only be used after consultation with a Spectradyne
technician
➢“ON” and ”OFF” buttons control the Fill Monitors and the Balance Sensor as labeled.
➢Note: Fill monitors are automatically turned off once priming is successful and
acquisition has started.
Manual Utilities
Figure 12. Manual Utilities frame.

© Spectradyne LLC, All rights reserved 17 Version 2.5.0 Revision 3, July 2020
Finish Priming Manually
This automatic sequence interrupts the automated cartridge priming routine and allows the user
to finish priming the cartridge using non-standard pressures.
➢Use only when the cartridge is not priming normally because of low surfactant content in
the sample, or very high viscosity
➢This is an advanced user feature and special training is required—please contact
Spectradyne’s support team for more details (support@spectradynellc.com)
Run Cleaning Cartridge Only
This automatic sequence flushes the internal fluid lines of the nCS1 and requires a reusable
cleaning cartridge.
➢Click the “Run Cleaning Cartridge” button and follow the prompts.
➢Wait for the routine to complete.
➢Remove the reusable cleaning cartridge and store it in a safe place for future use.
Drain Bottle Lines
This automatic sequence drains any remaining liquid in the lines back into the bottles
➢Click the “Drain Bottle Lines” button and follow the prompts.
➢Wait for the routine to complete.
Check Supply Pressure
This automatic sequence is used to ensure sufficient pressure is supplied to the instrument.
➢DO NOT USE WHEN MEASUREMENTS ARE BEING PERFORMED
➢Click “Check Supply Pressure” and wait for the dialog window to appear
➢The measured pressure should be > 10 PSI
Restarting the Auto-analysis Engine
In the rare event where the Auto-analysis engine freezes or fails to process the incoming data and
the Live CSD stops updating during acquisition, click the “Restart Auto-analysis Engine” button to
reboot the engine.
About this instrument…
Use this button to obtain information about the connected instrument. A dialog window will be
displayed with Hardware Version Number and Serial Number. If the Hardware Version Number is
0, then Serial Number defaults to 0.
© Spectradyne LLC, All rights reserved 18 Version 2.5.0 Revision 3, July 2020
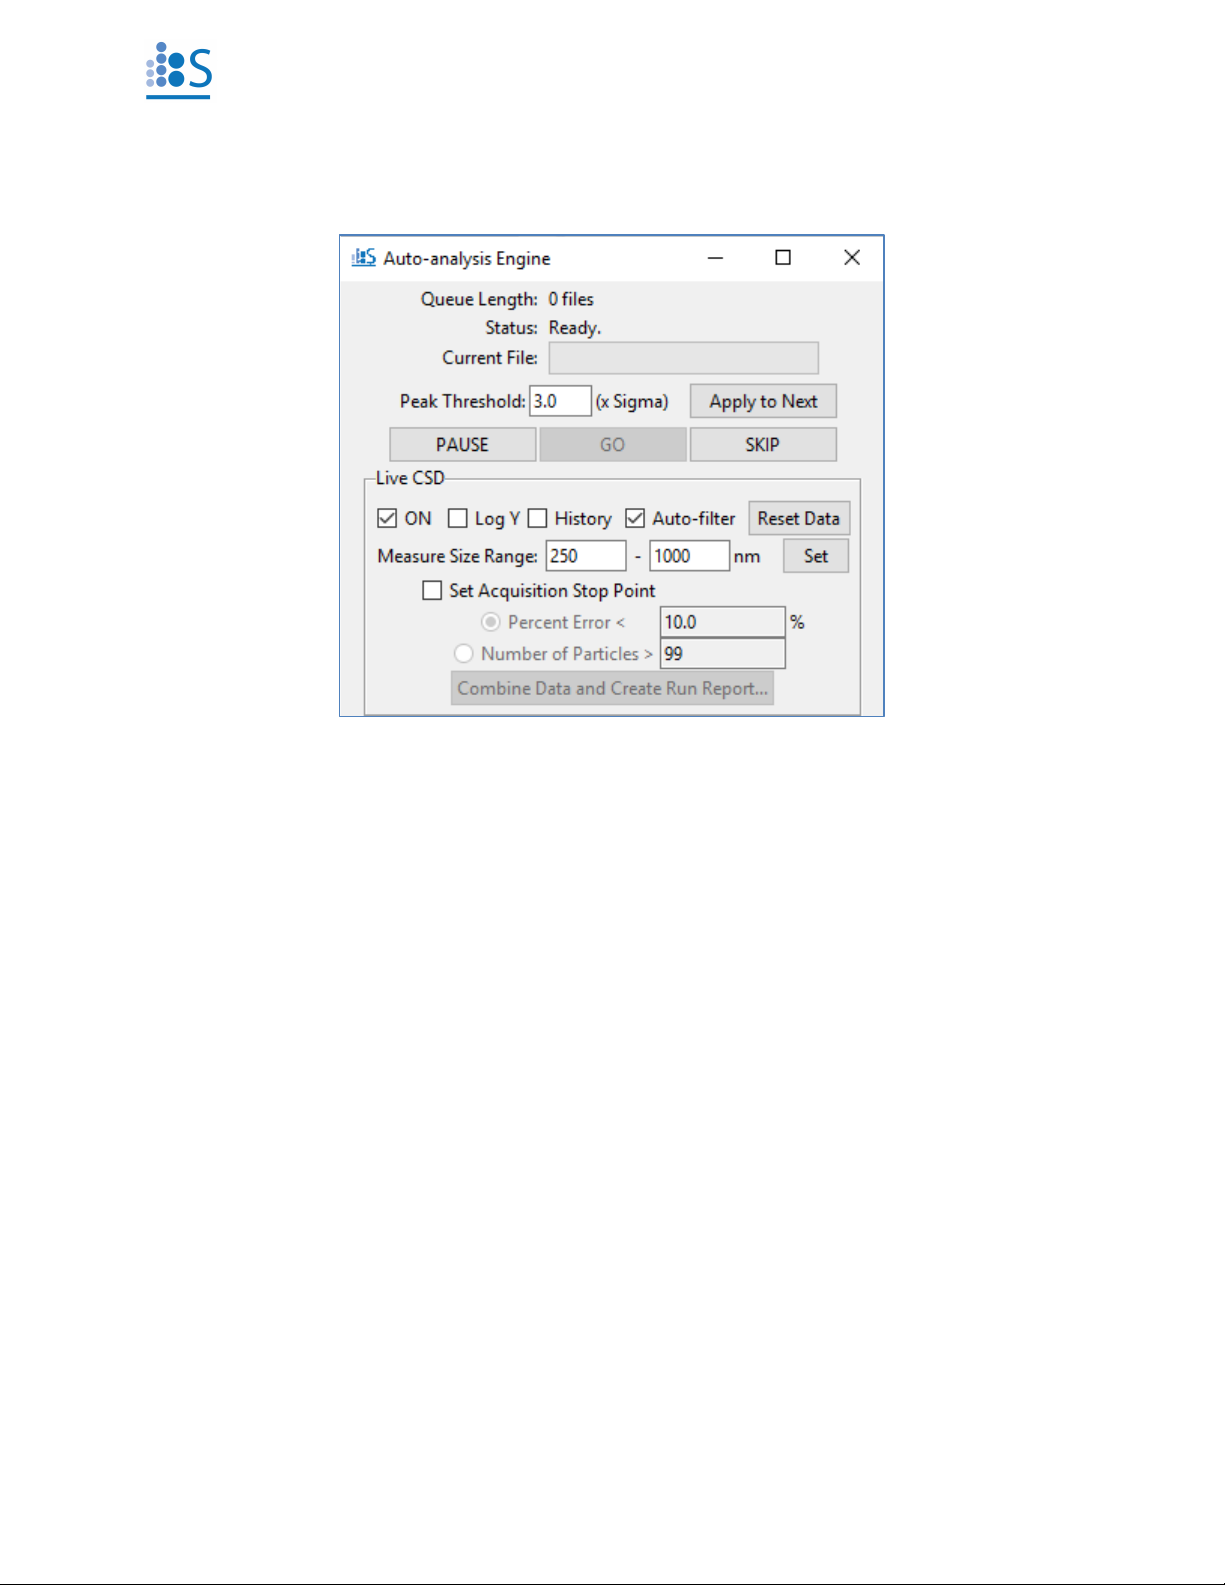
The Auto-analysis Engine
Automatic Processing of Raw Data
➢Flagged acquisitions (of raw data, see Figure 8) are placed in the Auto-analysis Engine
queue for automatic processing into Spectradyne Stats files.
➢Raw data is processed using standard parameters (refer to page 25 for details):
oPeak Detection Threshold: 3.0 x the standard deviation of the baseline noise.
▪NOTE: The peak threshold value should not be changed unless directed to
by Spectradyne.
➢Control the auto-processing engine using the “Pause”, “Go” and “Skip” buttons.
Figure 13. Auto-analysis Engine Interface.

© Spectradyne LLC, All rights reserved 19 Version 2.5.0 Revision 3, July 2020
Live CSD –Quantitative Real-time Data Analysis
A live CSD plot enables quantitative evaluation of the current run in real-time.
➢The Live CSD feature displays a combined size distribution from the current cartridge run.
➢The Live CSD is updated each time a new stats file is generated by the auto-analysis engine.
➢Display Options (see Figure 13. Auto-analysis Engine Interface.):
o“ON” – Control display of the Live CSD.
o“Log Y” – Plot the y-axis in log scale to view concentrations over multiple orders
of magnitude in a single sample.
o“Show History” – Display all acquisitions that are included in the combined
distribution.
o“Auto-filter” – Apply default peak filters to stats files at the time of processing. It is
recommended to always leave this on. The original data is still available for regular
post-processing in Viewer if desired. NOTE: When a combined file is created
from the engine (see below), the default filters will be applied and saved with
the file if the checkbox is marked at the time of saving.
o“Reset Data” – Clear the history of acquisitions displayed in the Live CSD.
➢Concentration Measurements on the Live CSD:
oSpecify an integration range using the “Measure Size Range” box entries provided
and click “Set”.
oThe measured concentration for a specific size range (with statistical error) is
displayed.
➢Automatically Stop Data Acquisition by Particle Count or Concentration Error Limit:
oSpecify a size range using the “Measure Size Range” entries and click “Set”
oCheck the “Set Acquisition Stop Point” box to activate the “Percent Error” and
“Number of Particles” entries
oSpecify a stop point by the statistical error on the integrated concentration or by
the number of particles
oData acquisition will stop once the specified limit has been reached
oNOTE: The End Run routine must be performed to prepare the cartridge for
removal
➢Create a Combined File and 1-page Run Report:
o“Combine Data and Create Run Report” – Create a combined file and generate a
Run Report (see page 36) for the acquisitions displayed in the Live CSD for the
current measurement run. NOTE: Default filters will be saved with the resulting
file if the “Auto-filter” checkbox is on.
➢Which data is included in the Live CSD?
oAll data from the current cartridge run and since the ‘Reset Data’ button was last
pressed.
oNo peak filtering is applied if the ‘Auto-filter’ box is not checked—false positive
detection events may be included. For more in-depth data analysis use the Data
Viewer (page 22).

© Spectradyne LLC, All rights reserved 20 Version 2.5.0 Revision 3, July 2020
After Data Acquisition
End Measurement Run
➢IMPORTANT (Hardware Version 0 only):
❖Before ending the run, ensure the stage control button on the front panel of the
instrument is latched in the IN position (not released to the OUT position).
➢After acquiring sufficient data, press “End Run” (Run Control frame, see Figure 6).
➢Follow all prompts and wait for the process to complete.
➢Follow the instructions in the prompts at the end of the routine.
Prepare the Next Cartridge for Analysis (if continuing with measurements)
➢Prepare the sample as necessary.
➢Load the new sample into a new analysis cartridge.
Remove the Used Cartridge
➢After completion of the End Run routine, lower the stage by pressing the button on the
front panel of the instrument and remove the cartridge.
➢The nCS1 is now ready for the next measurement run—load a new cartridge for analysis.
Insert the Next Analysis Cartridge (if continuing with measurements)
➢Return to the section entitled, ‘Loading the cartridge’ on page 7.
nCS1 Shutdown Procedure
Run Instrument Shutdown Routine
➢Refer to Instrument Shutdown, page 14, for detailed instructions.
➢Follow all prompts and wait for the procedure to complete.
➢Reminders:
oStore the reusable cleaning cartridge in a safe place for next use.
oRefrigerate the running buffer.
Turn Off Power to the Instrument
➢Power off the instrument during long periods of inactivity (e.g., overnight).
➢Use the power switch at the back of the instrument to power down.
➢The power indicator light (green) on the front of the instrument may take a few seconds
to turn off.
Other manuals for nCS1
2
Table of contents
Other Spectradyne Laboratory Equipment manuals


