SIGE 350 User manual
ATTENZIONE!
CAUTION!
A
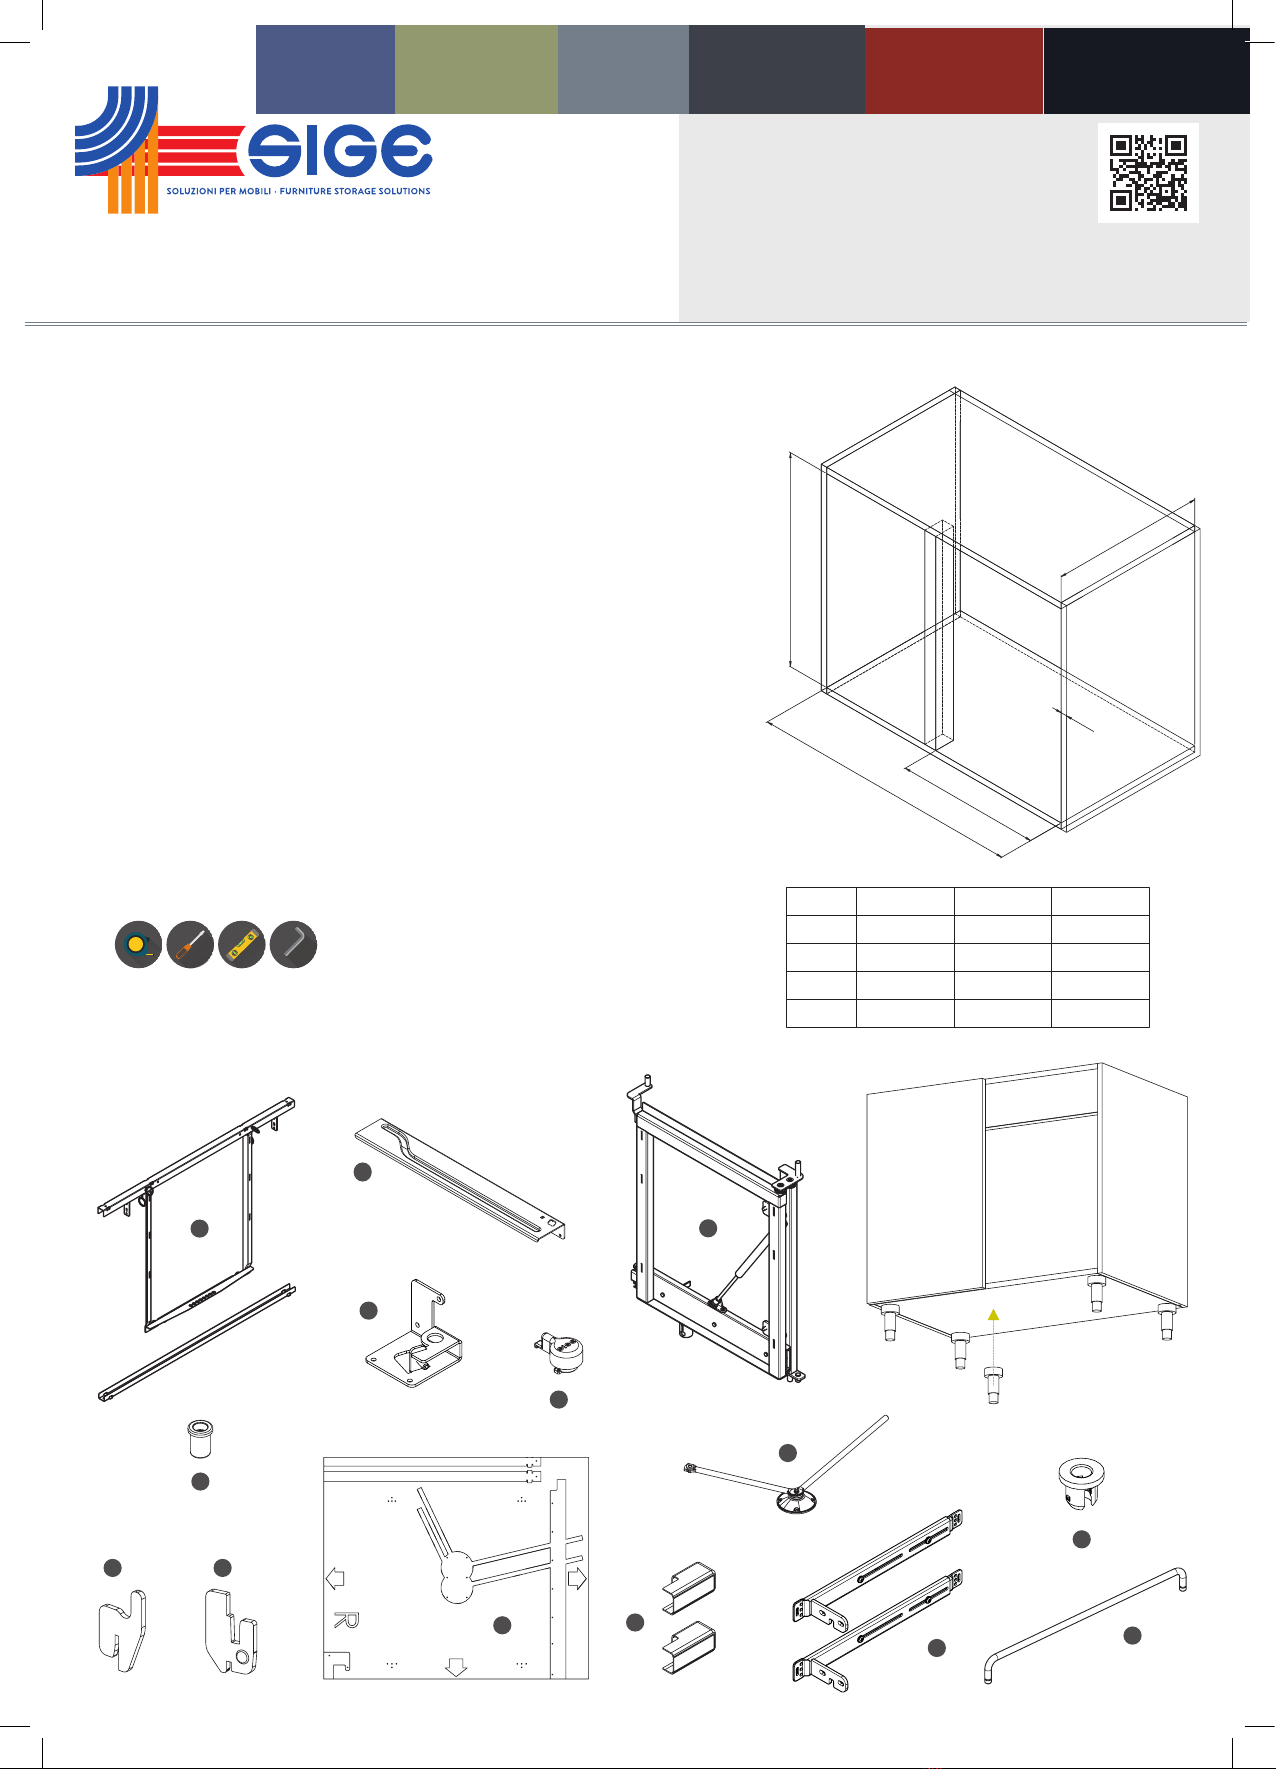
CARATTERISTICHE • FEATURES • CARACTÉRISTIQUES • CARACTERÍSTICAS
Meccanismo estraibile per angolo base, con 4 cesti, completo di soft. Versione sx o dx.
Pull-out mechanism for corner base unit, with 4 baskets, complete of soft. Left or right side version.
Mécanisme extractible pour angle de base, avec 4 paniers,complet de soft. Version gauche ou droite.
Mecanismo extraíble para esquinero con 4 cestos, y soft. Disponible izquierdo y derecho.
MINUTERIA INTERNA • FITTINGS • FERRURE • FERRETERIA
N° 27 4x16 Viti autofilettante / Self-tapping screws / Vis auto-taraudeuses / Tornillos autorroscantes
COMPONENTI • PARTS • COMPOSANTS • COMPONENTES
A. N°1 Struttura posteriore / Back structure / Structure postérieur / Estructura posterior
B. N°1 Struttura laterale / Lateral structure / Structure laterale / Estructura lateralr
C. N°1 Struttura anteriore / Front structure / Structure antérieur / Estructura anterior
D. N°1 Boccola inferiore / Lower bushing / Douille inférieur / Boquilla inferior
E. N°1 Boccola superiore / Upper bushing / Douille supérieur / Boquilla superior
F. N°1 Fine corsa / Stop / Fin de course / Terminal
G. N°1 Soft / Soft / Soft / Soft
H. N°2 Staa fissaggio antina / Bracket / Patte fixation pour la porte / Estribo de fijación para puerta
I. N°1 Snodo / Joint / Rotule / Juntura
L. N°2 Reggi braccetto / Post-connectors / Douille / Sostén para brazo
M. N°1 Braccetto / Linking arm / Crochet / Brazo
N. N°2 Cover / Cover / Cover / Cover
O. N°1 Dima di foratura / Mounting template / Modèle approprié / Molde para agujeros
P. N°8 Ganci (dentro la scatola dei cesti) / Hooks (inside basket box)
Crochets (à l’intérieur de la boîte du panier) / Ganchos (dento de la caja del cesto)
UTENSILERIA • TOOLS • OUTILS • INSTRUMENTOS
MANUTENZIONE/ MAINTENANCE/ ENTRETIEN/ MANTENIMIENTO
Pulire con un panno morbido ed asciutto. Evitare l’uso di solventi e/o abrasivi.
Clean with a soft, dry cloth. Avoid using solvents or abrasive.
Nettoyez avec un chion sec et doux. N’utilisez pas aucun solvant ou produit abrasif.
Limpiar con paño suave y seco. Evitar el uso de solventes y/o abrasivos.
REV 00.2019
F0IST000012
ART 350
MONTAGGIO VERSIONE DX . ASSEMBLY RIGHT VERSION
MONTAGE VERSION DROITE . MONTAJE VERSIÓN DERECHE
PRODOTTO ED ASSEMBLATO IN ITALIA / MADE AND ASSEMBLED IN ITALY / FABRIQUÉ ET ASSEMBLÉ EN ITALIE / HECHO Y MONTADO EN ITALIA
SIGE non Sarà rESponSabIlE dI EvEntualI dannI occorSI pEr utIlIzzo dEl prodotto dIfformE da quEllo pEr Il qualE èStato concEpIto. SIGE wIll not bE rESponSIblE for any EvEntual damaGE duE to adIffErEnt uSE from thE onE It haS bEEn madE.
SIGE nE SEra paS rESponSablE pour touS lES dommaGES àcauSE d’un dIfférEnt utIlIzatIon du produIt pour lEquEl Il aété fabrIqué. SIGE no SEra rESponSablE para cualquIEr daño dEbIdo al uSo dIfErEntE dE lo por El cual un producto ha SIdo rEalIzado.
A
Min. 580
C
B
16-20
DOOR
A
B
C
400
Min. 360 Min. 760
470/505
450
Min. 410 Min. 860
470/505
500
Min. 460 Min. 860
470/505
600
Min. 560 Min. 1050
470/505
B
C
SIGE S.P.A.
60020 POLVERIGI AN ITALY
TEL +39 071 90 90 000 R.A. FAX +39 071 90 90 804
WWW.SIGESPA.IT INFO@SIGESPA.IT
INFINITY LINE INFINITY PLUSMATERIA MATERIA EVOGREEN LINEPRO LINE
D
E
F
H
I
L
M
N
500
450
O
P01 P02
5
1
2
3
4
10
79
138
202
266
330
394
513
53,50
26
52,50
12,50
317
273
D
32
443
730
E
E
C
F
G
H
57
4,50
49,50
470 505
F=183 X
G=227.5 X X
H=272 X
C D E
470 454 456
505 489 491
92
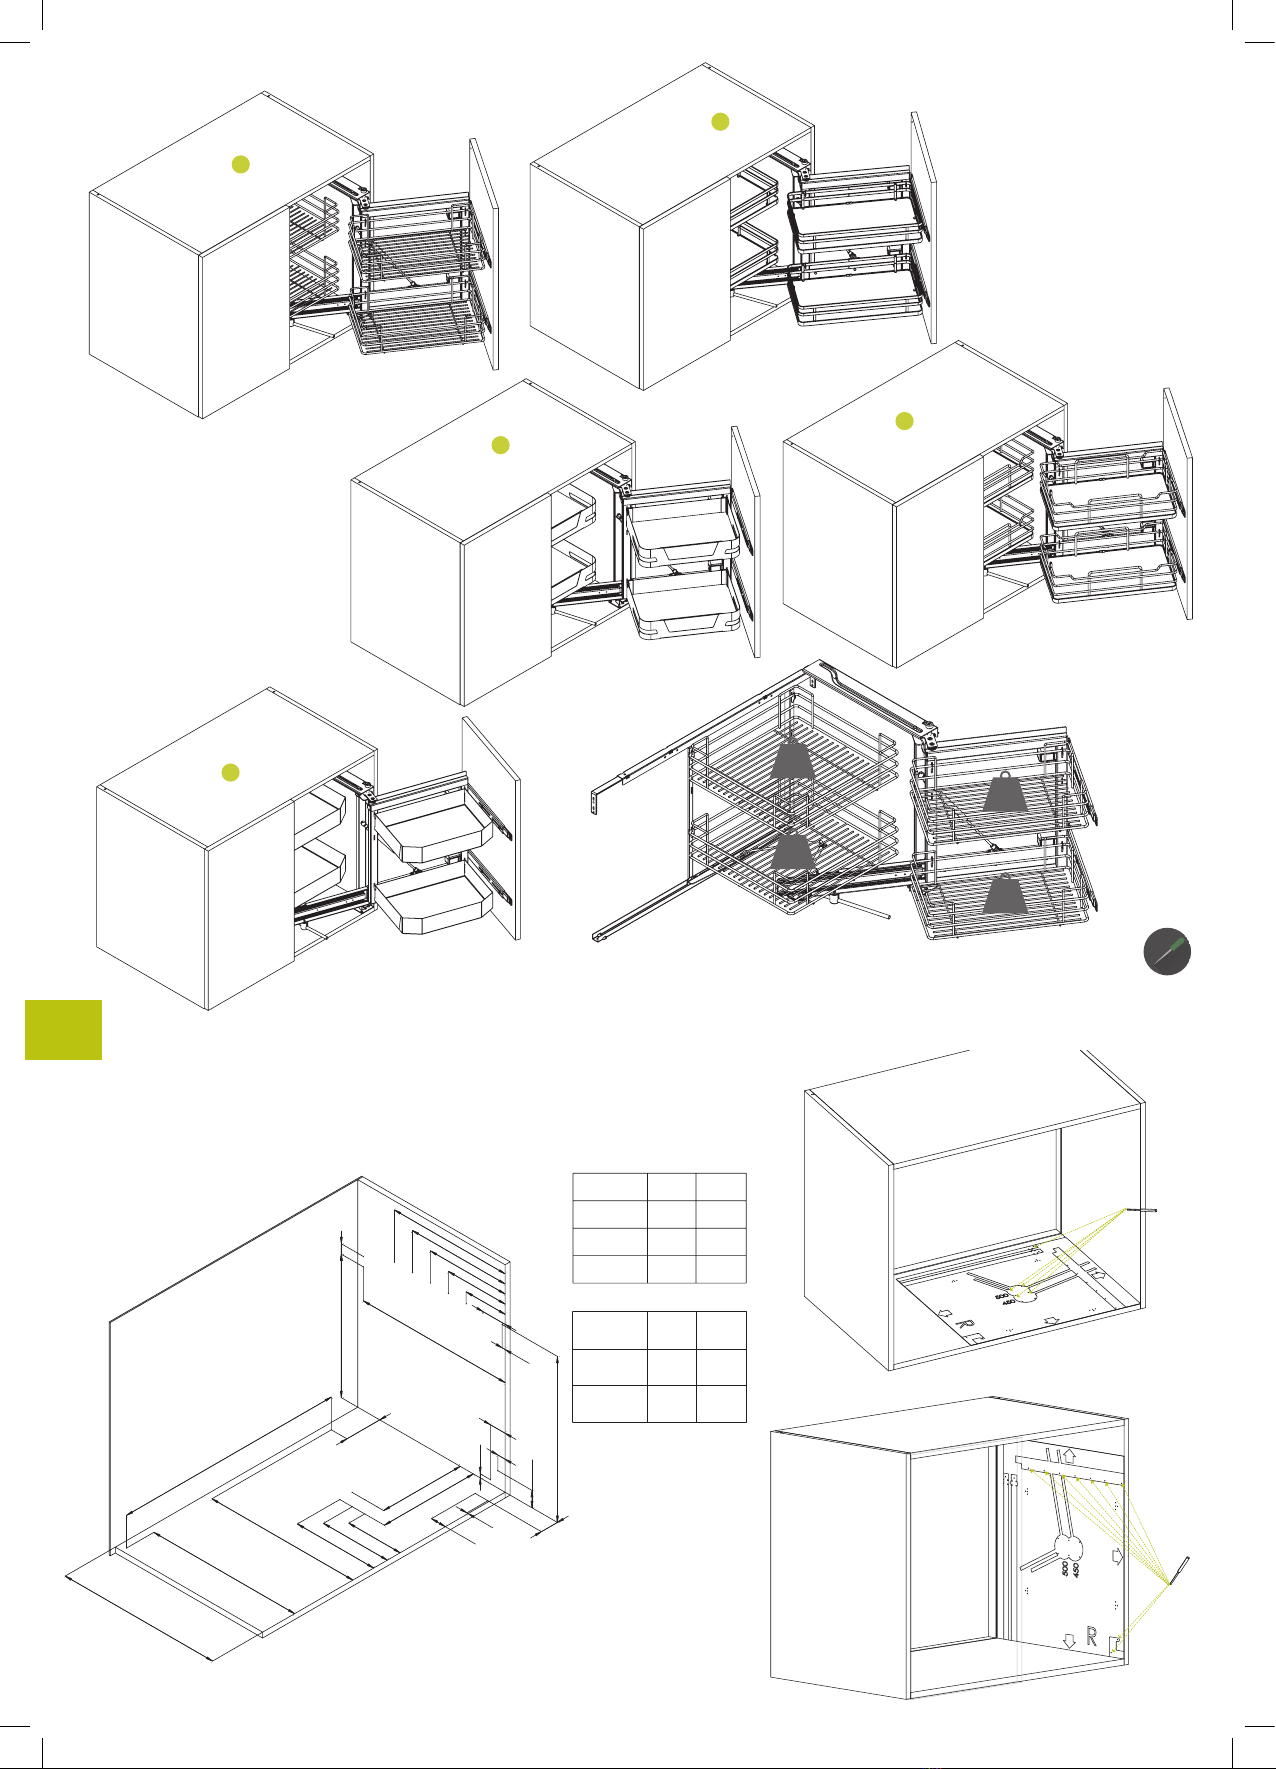
Eseguire preforature sul mobile.
Pre-drilling cabinet.
Effectuer le pré-forage sur l’armoire.
Efectuar la pre-perforación en el mueble.
1
7,5
KG
7,5
KG
10
KG
10
KG

Fissare il telaio posteriore A con l’apposita dima e serrare i grani.
Attach the rear frame A with the appropriate mounting template and lock the screw.
Fixez le cadre arrière A utilisant le modèle approprié et bloquer les vis.
Fije el bastidor posterior A con el molde y ajuste los tornillos.
N°6 4x16
2
Posizionare il particolare B e F con l’apposita dima O.
Place the particular B and F with the appropriate mounting template O.
Positionner le particulier B et F utilisant le modèle O approprié.
Posicione los particulares B y F con el molde O.
N°9 4x16
3
53,50
26
52,50
12,50
513
10
79
138
266
394
202
330
FIG. 2
FIG. 4 FIG. 5
FIG. 3FIG. 1

Disporre la boccola inferiore D nell’apposito alloggio.
Put the lower bushing D in the hole.
Préparez la douille inférieure D dans son espace.
Disponga la boquilla inferior D en su agujero.
4
5
Inserire la boccola superiore E e ruotare in senso orario fino all’aggancio (click).
Fit the upper bushing E and turn clockwise until the hooking (click).
Inserez la douille supérieure E et tournez la dans le sens des aiguilles d’une mon-
tre jusque l’accrochage (click).
Inserte la boquilla superior E y gire en sentido horario hasta que se enganche (click).
6
Montare la struttura anteriore C nella struttura B e fine corsa F e accertarsi che
il cuscinetto sia posizionato nell’apposito binario.
Put the front structure C in the frame B e F. Check if the bearing is in the track.
Montez la structure antérieur C dans le châssis B e F; contrôlez que le roulement
soit dans sa voie.
Monte la estructura anterior C en la estructura B y el terminal F, asegúrese de
que la almohadilla este posicionada en su riel.
FIG. 1
FIG. 2 FIG. 3

Avvitare rispettando l’apposita dima.
Screw according the mounting template.
Visser observant le modèle spécial.
Atornille respetando el molde.
Assemblare i reggi-braccetti L e il braccetto M nelle posizioni corrette.
Put together the post-connectors L and the linking arm M.
Assemblez les douilles L et le crochet M.
Monte los sóstenes del brazo L y el brazo M en su posición.
7
C
295
F,G / G,H
1 2 3 4 5
C
DEPTH
FORI/HOLES/TROUS/AGUJEROS
470
F,G
2/3
505
G,H
4/5
Montare le staffe di fissaggio H sull’anta rispettando le quote e l’apposita dima,
poi collocare sulla struttura anteriore aperta.
Fix the front-brackets H on according to the door measures or mounting tem-
plate and put it on the pulled out front structure.
Montez les pattes de fixation H pour la porte sur la porte et modèle spécial, selon
les mesures de la porte, et placez sur la structure antérieur ouverte.
Montar los estribos de fijación H a la puerta respetando las medidas y el molde,
luego colóquelo en la estructura anterior.
N°8 4x16
9
Y
Y
18
135 291
DOOR
Y
400 340
450 375
500 422
600 527
8
Montare l’antina sulle staffe attacco antina E, quindi serrare le sei euroviti 6.2x3.5
Mount the door on the door brackets E, then tighten the six 6.2x3.5 eurovite.
Montez la porte sur les équerre de façade E, puis serrez les six 6.2x3.5 eurovite.
Monte la puerta en las escuadras para ajuste puerta E, luego apriete los seis
6.2x3.5 eurovite.
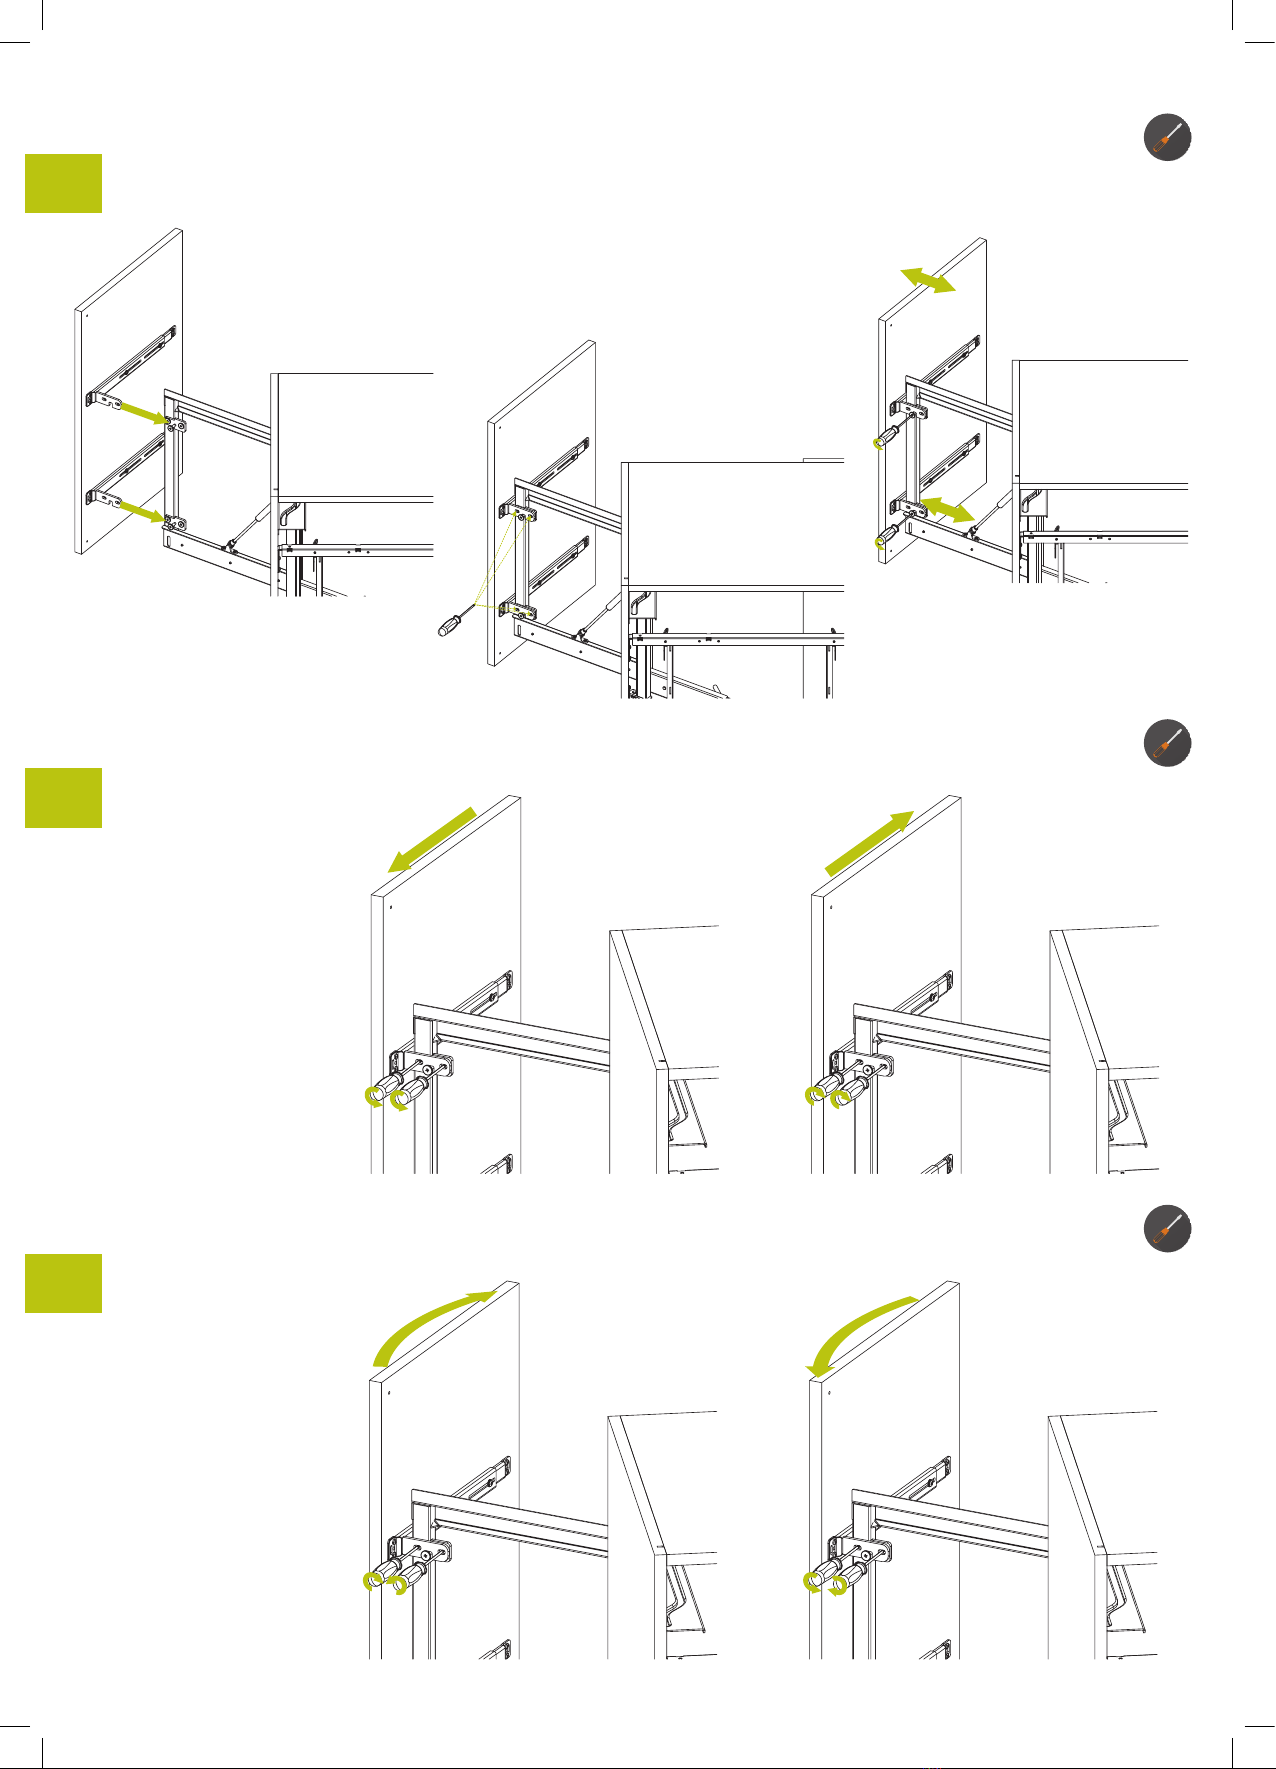
Effettuare le regolazioni.
Make adjustments.
Effectuez les réglages.
Efectuar las regulaciones.
Effettuare le regolazioni.
Make adjustments.
Effectuez les réglages.
Efectuar las regulaciones.
10
11
12

Eseguire la regolazione di apertura di fine corsa tramite vite.
Perform the adjustment of opening limit using screw.
Effectuez le réglage de l’ouverture de fin de course utilisant le vis.
Efectuar las regulaciones de abertura limite usando los tornillos.
Infilare il cover N.
Put the cover N.
Mettre la couverture N.
Insertar la cover N.
13
14
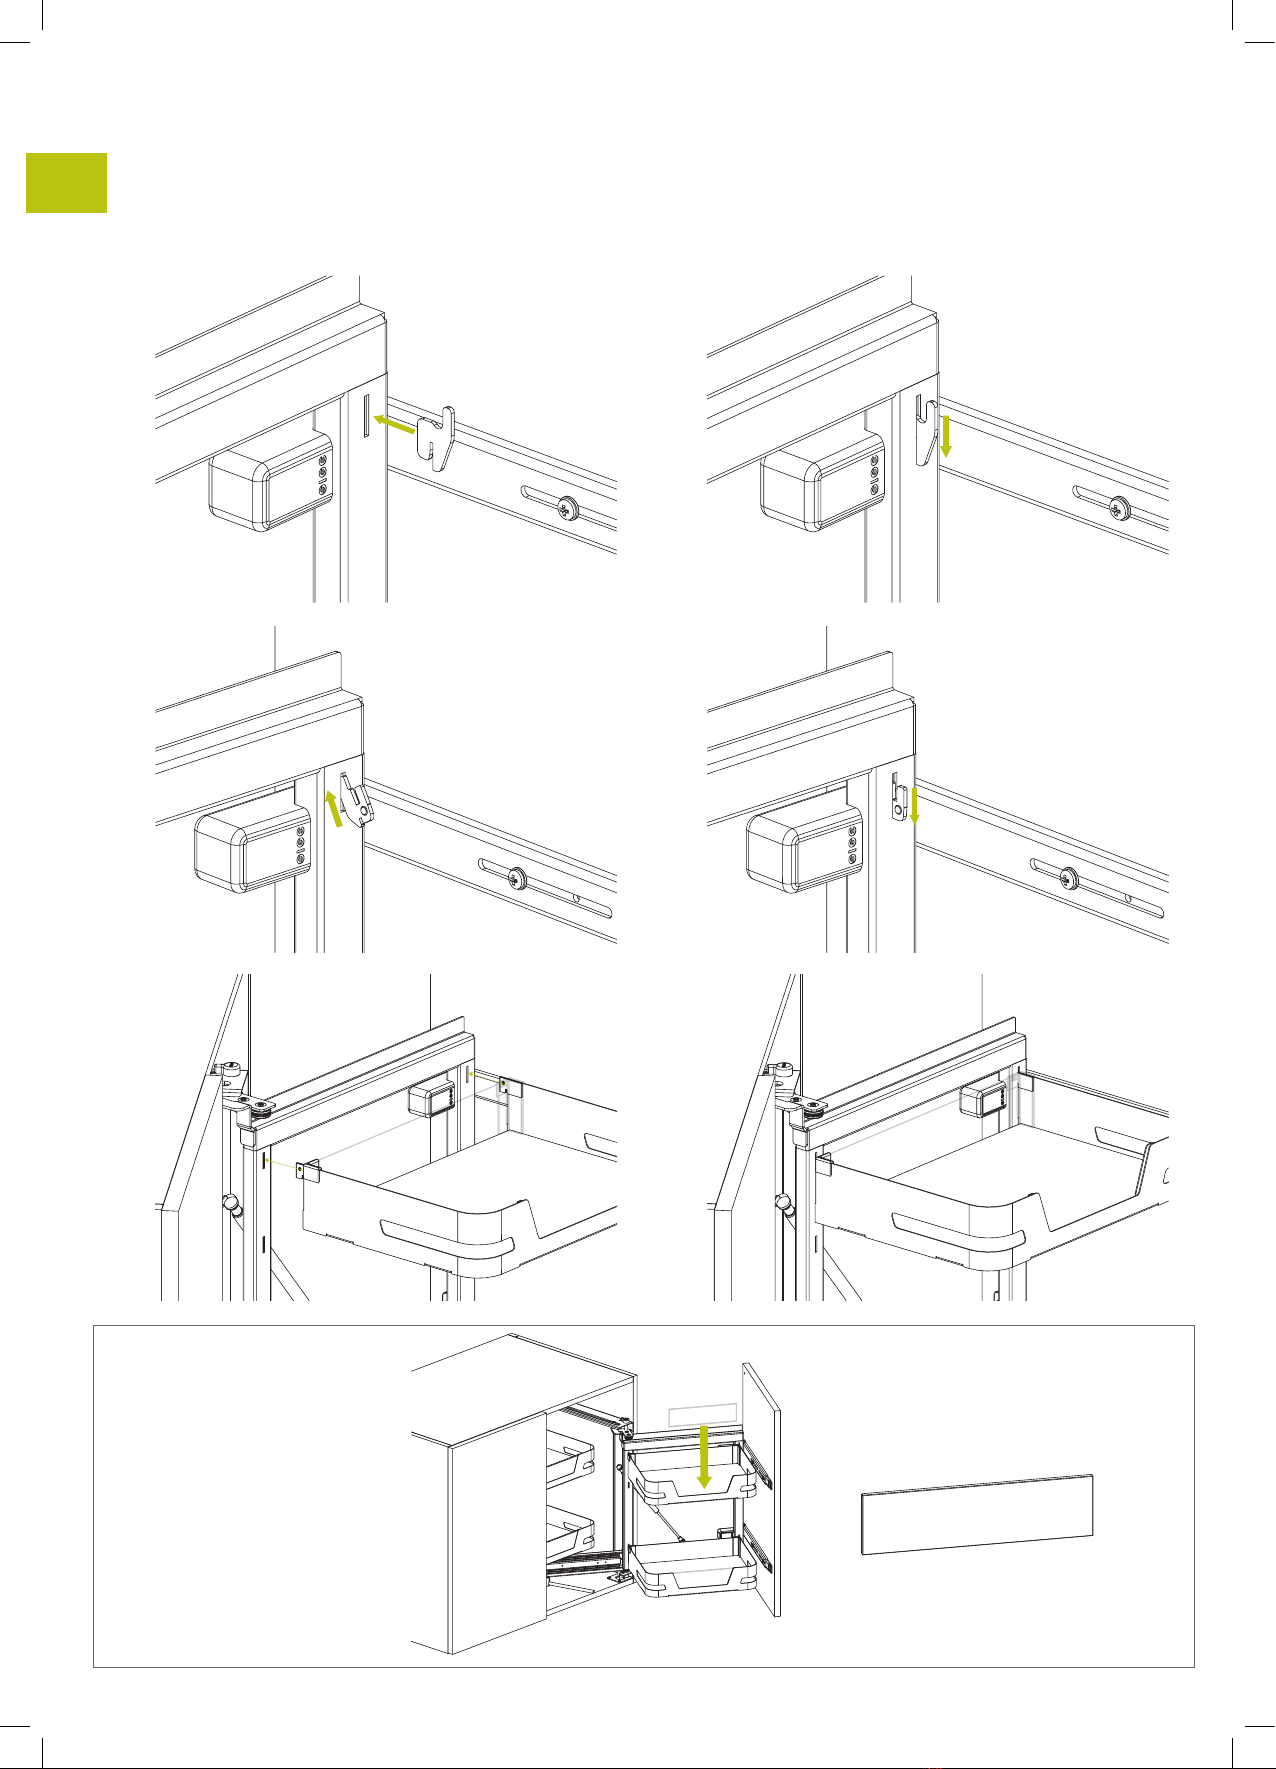
Inserire gli appositi ganci per il montaggio dei cesti.
Insert the hooks for mounting baskets.
Insérez les crochets de montage pour les paniers.
Insertar los ganchos para el montaje de los cestos.
15
LA SIGE SPA SI RISERVA IL DIRITTO DI APPORTARE VARIAZIONI SENZA PREAVVISO SIGE SPA HAS THE RIGHT TO MAKE CHANGES ON IT WITHOUT NOTICE
SIGE SPA A LE DROIT D’APPORTER DES VARIATIONS SANS PRÉAVIS SIGE SPA SE RESERVA EL DERECHO DE REALIZAR CAMBIOS SIN PREVIO AVISO.
OPTIONAL
350/350i
350+
350M
350ME
350PRO
350ME
Other SIGE Kitchen Utensil manuals


