Silhouette CAMEO5 User manual

Silhouette Cutting Machine
User's Manual
MANUAL NO. CAMEO5-UM-151

2
Preface
Thank you for choosing Silhouette CAMEO5/CAMEO5PLUS.
Silhouette CAMEO5is an electronic cutting machine suitable for cutting the following sizes (width): 5in., A4,
Letter, 9in., 8.5-in. mat, A3, 12 in., and 12-in. mat.
Silhouette CAMEO5PLUS is an electronic cutting machine suitable for cutting the following sizes (width): 5in.,
A4, Letter, 9in., 8.5-in. mat, A3, 12 in., 12-in. mat, 15 in., and 15-in. mat.
In addition to cutting films, craft papers, and iron-print sheets, the machine can easily cut various materials.
To ensure safe and correct use, be sure to read this User's Manual thoroughly prior to use.
After reading, please keep this manual in a safe place where you can find it at any time.
Notes on this Manual
(1) No part of this publication may be reproduced, stored in a retrieval system, or transmitted, in any form or by
any means, without the prior written permission of Silhouette Japan Corporation.
(2) The product specifications and other information in this manual are subject to change without notice.
(3) While every effort has been made to provide complete and accurate information, please contact us through
the company website if you find any unclear or erroneous information or wish to make other comments or
suggestions.
(4) Notwithstanding the stipulations in the preceding paragraph, Silhouette Japan Corporation assumes no
liability for damages resulting from the use of the information contained herein or the use of the product.
Registered Trademarks
All names of companies, brands, logotypes, and products appearing in this manual are the trademarks or
registered trademarks of their respective companies.
Copyright
This User's Manual is copyrighted by Silhouette Japan Corporation.
About the display screen
• The Silhouette Studio screens use the display screens that appear when Silhouette CAMEO5/CAMEO5PLUS
is connected to a Windows 10 environment. The displayed content varies depending on the connected PC
environment. In addition, some of the display screens may be subject to change with a software upgrade.

3
Before using this machine, please read this manual.
Handling Precautions
To use the product correctly, as well as to obtain better cutting results, be sure to read the following points
thoroughly before use.
Note
•To avoid bodily injury, handle blades with care.
•Physical damage to a new machine caused by customers will not be covered by the warranty, so
unfortunately, we cannot offer you a product replacement.
Always make a test cut before cutting
If cutting conditions, such as blade depth, force, and speed, are not appropriate, the blade tip may break, or the
machine may be damaged. Furthermore, the expected cutting results may not be obtained, and the media may
be wasted.
Optimal cutting conditions vary depending on the thickness and quality of the media used and the degree of
wear of the blade.
Make a test cut every time you change the media.
Guideline for blade depth
Appropriate blade depth
= Film thickness + α
Release paper thickness
Film thickness
Does not cut through the film
The most important setting in cutting is to adjust the blade depth.
Adjust the blade depth so that the blade protrudes slightly more than
the thickness of the media to be cut.
When cutting the cutting film, extend the cutter blade more than the
film, but not so much that it penetrates the release paper.
Use the cutting mat for the following circumstances
Be sure to use the cutting mat when cutting the following media.
Failure to use the cutting mat may damage the machine.
• When cutting media that do not have release papers
• When cutting out media (die cut)
Cut through to the release paper

4
Intelligent Path Technology
The Intelligent Path Technology function offers specialized cutting options, such as controlling the cutting order
automatically.
This allows users to prevent the media from shifting while cutting.
There is tension in the material when cutting media (mainly paper) using the blade.
If the media to be cut are not fixed firmly, depending on the cutting order, this tension may cause the media to
shift or rip thin papers.
* This can be used to select the Silhouette Studio check box.
More
Intelligent Path
Technology
Since paper shift is less likely to occur, users can stack and cut multiple sheets of paper or cut thin papers more
beautifully than normally.
For example, this function is effective for cutting multiple sheets for the following design.
Note
The Intelligent Path Technology function is not guaranteed in all cases.
Additional information
In addition, this function is effective when cutting the following data.
•When cutting complicated designs
•When cutting sharp angles
•When the adhesive comes off easily, such as sealing materials

5
Optional items
This section describes the optional items that can be used with this product.
Silhouette Auto Sheet Feeder (ASF)
Set the ASF connecting plate and attach the ASF on top of it. There are two sizes available: letter and A3plus.
For details, refer to "https://www.silhouetteamerica.com/shop/auto-sheet-feeders".
CAMEO Electrostatic Mat
A CAMEO electrostatic mat can be attached. There are three colors available to match the color of the machine:
white, black, and pink. For details, refer to the "Electrostatic Mat" supplies manual.
* To use the CAMEO Electrostatic Mat, a separately sold Electrostatic Protection Sheet - 12 in. x 12 in. is needed. Please
purchase it together with the product.
Heat Pen Set
This tool is used to transfer foil to the media. For details, refer to the "Heat Pen" supplies manual.
Pen Holder (for Tool Holder 2)
This adapter can be attached to Tool Holder 2. The Pen Adapter allows cutting and writing with the pen at the
same time. It can be used when using a parallel pen or other similar tools (such as a thick pen).
Embossing Tool (for Tool Holder 2)
Embossing can be done on the media. For details, refer to the "Embossing Tool (Type C)" supplies manual.
* To use the Embossing Tool (Type C), a separately sold Embossing Mat - 12 in. x 12 in. is needed.

6
For the latest information on this product, supplies, and consumables, please refer to our website.
Please use it together with this manual.
https://www.silhouetteamerica.com

7
Contents
Preface...............................................................................2
Notes on this Manual ..........................................................2
Registered Trademarks .........................................................2
Copyright .....................................................................2
About the display screen...............................................................2
Before using this machine, please read this manual. ......................................3
Handling Precautions...........................................................3
Always make a test cut before cutting .........................................3
Guideline for blade depth ..................................................3
Use the cutting mat for the following circumstances ............................3
Intelligent Path Technology.............................................................4
Optional items ........................................................................5
Silhouette Auto Sheet Feeder (ASF) .............................................5
CAMEO Electrostatic Mat ......................................................5
Heat Pen Set ..................................................................5
Pen Holder (for Tool Holder 2)..................................................5
Embossing Tool (for Tool Holder 2)..............................................5
01 About Silhouette CAMEO5/CAMEO5PLUS ......10
1-1Checking the contents of the package .............................................10
1-2Removing packaging materials from the machine ....................................
11
1-3Name and functions of each component...........................................13
Silhouette CAMEO5..........................................................13
Operations ...................................................................14
1-4Setting up the machine ..........................................................15
Create your Silhouette account.................................................15
Register the Machine..........................................................17
Install the software (Silhouette Studio) ..........................................21
Supported OS ..............................................................21
For Windows ..............................................................21
For Mac ...................................................................22
Check the connection with Silhouette CAMEO5.................................23

8
Connect with Bluetooth .....................................................23
Connect with the USB cable .................................................24
Obtain free contents ..........................................................26
Check the free contents .....................................................26
Use trial subscription in Silhouette Design Store ...............................27
Confirm activation..........................................................31
1-5Available functions ..............................................................32
Size of the media that can be loaded ............................................32
Cut images ...................................................................33
02 Easy Operation Guide .........................34
2-1Cutting with an Auto Blade .......................................................34
Changing the Pinch Roller Unit position .........................................34
Loading roll paper.............................................................36
Load Media-1................................................................
40
Load Media-2. . . . . . . . . . . . . . . . . . . . . . . . . . . . . . . . . . . . . . . . . . . . . . . . . . . . . . . . . . . . . . . . .44
Setting the Auto Blade.........................................................
46
2-2Workflow from simple designing to cutting ........................................
48
Step 1. Creating cutting data using figures and texts ..............................
48
Step 2. Cutting created data....................................................49
2-3Basic workflow of printing and cutting .............................................
50
Pattern 1. Using the Drawing Tool to create cut lines ..............................
50
Pattern 2. Using the auto-trace function .........................................51
Pattern 3. Loading and tracing an image file .....................................52
03 About the Silhouette Studio Screen .............54
3-1Starting the software (Silhouette Studio)...........................................
54
For Windows .................................................................
54
For Mac......................................................................
54
3-2Name and functions of each component...........................................
54
3-3About the STORE tab (Silhouette Design Store) ....................................56
3-4Configuring the cutting conditions ................................................58
Descriptions of each setting item ...............................................58
Guideline for blade depth and media materials...................................
60
Auto Blade indicator scale...................................................
60

9
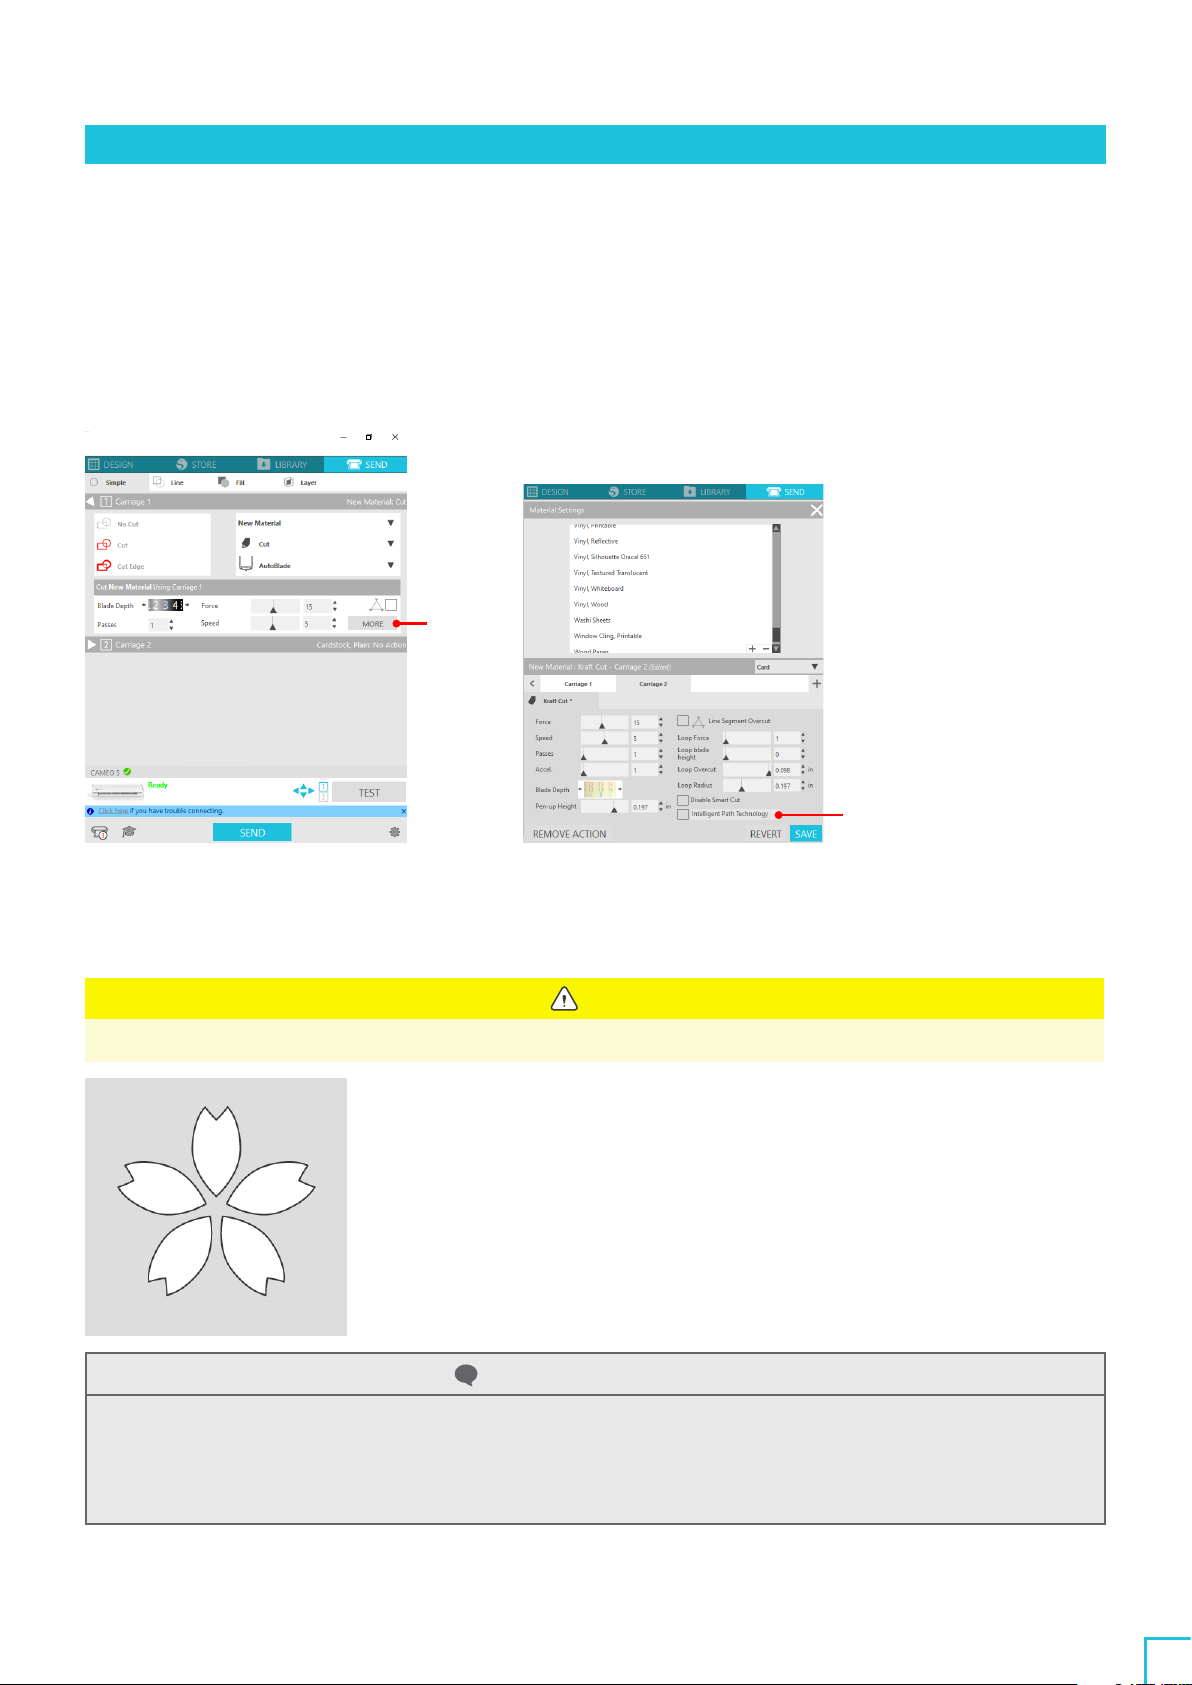
About the Intelligent Path Technology ..........................................
60
Auto cross-cutting ............................................................61
04 Troubleshooting ..............................63
4-1Unable to load the media properly ................................................63
The media does not enter properly, and they bend and warp ......................63
If you are using rolled media, does the leading end tend to curl itself?............63
4-2Unable to feed the media properly ................................................
64
The media move obliquely in the machine during cutting. . . . . . . . . . . . . . . . . . . . . . . . . .64
Are the media or the left side of the cutting mat aligned with the Guiding Line?...
64
Is the Pinch Roller Unit aligned with the media and set to the appropriate printing
position?. . . . . . . . . . . . . . . . . . . . . . . . . . . . . . . . . . . . . . . . . . . . . . . . . . . . . . . . . . . . . . . . . . .64
Are the leading end of the media cut at a right angle? ..........................
64
The media slip out of the Pinch Roller ...........................................65
Is the leading end of the media butted against the Pinch Rollers on both sides and
loaded straight? ............................................................65
4-3Unable to cut properly ...........................................................
66
The film peels off during cutting ................................................
66
Are the tools set correctly? ..................................................
66
Is the blade tip cap of the Auto Blade loose?...................................67
Is the blade worn, or is the cutting tip broken? .................................67
Is the blade depth too small, or is the force set too low? ........................67
Is the cutter blade sticking out too much, or is the force too high? Is the speed
(cutting speed) too fast? ....................................................
68
Is the width of characters or figures to be cut too thin or too small? .............
68
The start and end of the cutting operation are misaligned.........................
68
Is the inside of the Auto Blade dirty?..........................................
68
Are the set media warping or bent? ..........................................69
Are you selecting a pen even though you are using an Auto Blade, or vice versa? .69
Is the cutter blade sticking out too much, or is the force too high? ...............69
When media are stuck ........................................................69
Are you loading the media in Silhouette CAMEO5using the cutting mat?......69
Are the media you are using too thick? .......................................70
The media are cut too much ...................................................70
Is the cutter blade sticking out too much, or is the force too high? ...............70
4-4Firmware update ................................................................71
When in trouble .....................................................................72

01 About Silhouette CAMEO5/CAMEO5PLUS
10
01 About Silhouette CAMEO5/CAMEO5PLUS
1-1Checking the contents of the package
The Silhouette CAMEO5and CAMEO5PLUS come with accessories shown in the following list.
Make sure all the accessories are included when unpacking.
If any item is missing, promptly contact the distributor where you purchased it or Silhouette America Customer
Center.
Silhouette CAMEO5/CAMEO5PLUS AC adapter and power cable set
Cutting mat Auto Blade
• CAMEO5:
Cutting mat (12 x 12 inches)
• CAMEO5PLUS:
Cutting mat (15 x 15 inches)
Hand-held blade adjuster Roll Feeder
* In addition, various documents may be attached.

01 About Silhouette CAMEO5/CAMEO5PLUS
11
1-2Removing packaging materials from the machine
There are strips of tape and cushions to hold the moving parts of Silhouette CAMEO5/CAMEO5PLUS in place
during shipment and prevent any damage to the machine.
Remove all of the packaging materials (strips of tape and cushions).
1Remove the machine from the box.
Note
Silhouette CAMEO5alone weighs approximately 5kg, and Silhouette CAMEO5PLUS alone weighs
approximately 5.5kg.
Open the package on a sturdy surface.
Attempting to work on unstable ground can cause the machine to fall and cause serious injury to
personnel.
2Remove the strips of (blue) tape and cushions (2pieces) that hold the parts for the machine in place.
Cushion
Pull out to the top
3Open the cover and remove the strips of (blue) tape, protective sheets (2pieces), and cushions (5
pieces) that hold the parts in place.
Protective
sheet Cushion
Cushion
Pull out to the front
Protective sheet
Cushion
Cushion
Pull out from the back

01 About Silhouette CAMEO5/CAMEO5PLUS
12
4Remove the strips of (blue) tape and cushions (2pieces) that hold the Tool Carriage in place.
After removing cushion (1), move the Tool Carriage slightly to the left, and remove the remaining
cushion (2).
Cushion (1)Cushion (2)
Tool Carriage
Note
When manually moving the Tool Carriage, do not hold the
Tool Holder with your hand.
Turn off the power, hold the part shown on the right, and
move it slowly.
Moving it too fast may cause a malfunction.
Tool Carriage
Tool Holder

01 About Silhouette CAMEO5/CAMEO5PLUS
13
1-3Name and functions of each component
Silhouette CAMEO5
(5) Tool Holder
(4) Tool Carriage
(9) Guiding Line
(7) Pinch Roller Unit
(6) Pinch Roller:
(7) Pinch Roller Unit
(8) Auxiliary Roller
(3) Power Connector
(2) USB Interface
(1) Power Button
(1) Power Button : Switches the power on or off.
Emergency Stop Button : When the Power Button is pressed during the cutting operation, the operation
stops immediately.
(2)USB Interface : Used to connect the machine to the computer with a USB Interface cable.
(3)Power Connector : Connects the AC adapter.
(4)Tool Carriage : Part to drive the tool to the left and right.
(5)Tool Holder : A holder to place tools, such as the Auto Blade or specialty tools.
Place the Auto Blade in Tool holder 1and specialty tools in Tool holder 2.
(6)Pinch Roller : Roller to feed the media.
(7)Pinch Roller Unit : Roller unit to feed the media. The pinch roller unit on the right side
determines the position based on the media size, lowers the lever, and
secures it.
(8)Auxiliary Roller : Holds the media down to prevent it from warping. The auxiliary roller can be
adjusted freely depending on the media size. We recommend positioning the
auxiliary rollers so that their left-right spacing are almost even taking account
into the width of the loaded media.

01 About Silhouette CAMEO5/CAMEO5PLUS
14
(9)Guiding Line : Guiding line to align the left side of the media or cutting mat.
Guiding Line
Operations
(1) Repeat Job Button
(2) Bluetooth Button
(3) Position Key
(6) Pause Button
(4) Media Load Button
(5) Media Removal Button
(1) Repeat Job Button : Repeatedly cuts the data sent from Silhouette Studio using Silhouette CAMEO5.
(2)Bluetooth Button : Switches the Bluetooth on or off.
The lamp indicates the connection status.
(3)Position Key : Used to move the Tool Carriage and media position.
Press and hold down the key to move the Tool Carriage faster.
(4)Media Load Button : Used to load the media or cancel the media loading preparation state.
(5)Media Removal Button : Removes the media.
(6)Pause Button : Used to pause/resume cutting operation.
If you want to cancel the paused cutting operation, press and hold the Pause Button.
Roll Feeder : Assemble this with the machine if you load roll paper or use the cutting paper or
cutting mat.
For details on attaching the Roll Feeder, refer to "Loading roll paper" in "2-1Cutting
with an Auto Blade".
Roll Feeder

01 About Silhouette CAMEO5/CAMEO5PLUS
15
1-4Setting up the machine
Create your Silhouette account
You can create your Silhouette account for free.
A Silhouette account allows you to register the Silhouette machine, and you can use the same account on
SilhouetteAmerica.com, SilhouetteDesignStore.com, and as a shared account for the Silhouette Studio library.
1Access the Silhouette America.com website from a browser.
https://www.silhouetteamerica.com/
2Click "Machine Setup" at the bottom of the page.
3Please select your language.
4Click "CREATE ACCOUNT".

01 About Silhouette CAMEO5/CAMEO5PLUS
16
5Enter your account information.
Enter your name, email address, email address (retype), password, password (retype), language,
currency, and timezone.
If you do not want to receive newsletters (English) from Silhouette, unselect the check box of "Send me
newsletters..."
Select the check boxes of "I agree to the privacy policy", "I agree to the Terms & Conditions", and "I am
over the age of 13".
Note
The following criteria must be met when entering your password.
If you see a red x mark when entering your password, please change or reset the password.
•The password must be at least 10 characters in length.
•You must include at least one number in your password.
Name
Email address
Confirm email address
Password
Confirm password
Language
Currency
Timezone
I agree to the Privacy Policy.
I agree to the Terms & Conditions.
I am over the age of 13.
I'm not a robot.
Send me newsletters about Silhouette
products and information.

01 About Silhouette CAMEO5/CAMEO5PLUS
17
Check
If there is a problem with your password, you will see a red x mark on the right.
In such a case, review and re-enter your password.
If there is no problem with the password, a green check mark will appear in the password field.
6Select the check box "I'm not a robot" and click the "CREATE ACCOUNT" button.
7A registration confirmation email will be sent to the registered email address.
Click on the link on the email to complete the machine registration.
Note
You will need to click the link on this email in order to verify and activate your account.
If you do not activate your account, you will not be able to register the machine or access the
Silhouette Design Store.
Register the Machine
The Silhouette account can be used to register your Silhouette CAMEO5machine.
If your machine is registered, the following services are available.
• You can download 100 designs included with the Silhouette Library for free.
• A one-month trial subscription is available to download contents from the Silhouette Design Store free of
charge.
* Please note that the upper limit for the download may change under the trial subscription.
1Access the Silhouette America.com website from a browser.
https://www.silhouetteamerica.com/
2Click "Machine Setup" at the bottom of the page.

01 About Silhouette CAMEO5/CAMEO5PLUS
18
3Please select your language.
4Click "Sign In".
5Enter the registered email address and password for your Silhouette account and then sign in.

01 About Silhouette CAMEO5/CAMEO5PLUS
19
6Select the country where you live from the country pull-down list, and enter your address information
before clicking the "CONTINUE" button.
7Enter the required information and click the "CONTINUE" button.
The serial number is marked on a sticker on the back of the machine as an 11-digit number starting with
an alphabet.
* Depending on the web browser, you may be required to click " " to confirm after selecting.

01 About Silhouette CAMEO5/CAMEO5PLUS
20
8Check the model to be registered and click "REGISTER MY MACHINE".
9Once you register the machine, confirm the warranty information.
Additional information
•After completing the machine registration, do not click "CONTINUE TO NEXT STEP". Instead, follow
the instructions below to install the software (Silhouette Studio).
•After the machine registration, you will receive an email with details on the one-month free trial
subscription. For details, refer to "Use trial subscription in Silhouette Design Store".
10 Exit the screen.
This manual suits for next models
2
Table of contents
Other Silhouette Cutter manuals

Silhouette
Silhouette Portrait User manual

Silhouette
Silhouette CAMEO User manual

Silhouette
Silhouette Portrait User manual

Silhouette
Silhouette CAMEO 4 User manual

Silhouette
Silhouette CAMEO 4 PRO User manual

Silhouette
Silhouette Cameo Pro User manual

Silhouette
Silhouette CAMEO User manual

Silhouette
Silhouette portait4 User manual