Silvercrest SDG 800 A1 User manual

KOMPERNASS GMBH
BURGSTRASSE 21 · D-44867 BOCHUM
www.kompernass.com
ID-Nr.: SDG800A1-09/10-V1
KITCHEN TOOLS
Steamer SDG 800 A1
7
Steamer
Operating instructions
Dampfgarer
Bedienungsanleitung
Parni lonac
Upute za upotrebu
Уред за готвене на пара
Ръководство за експлоатация
ΑΑττμμοομμάάγγεειιρρααςς
Οδηγίες χρήσης
CV_58820_SDG800A1_LB7.qxd 27.09.2010 13:45 Uhr Seite 1

SDG 800 A1
1
2
3
4
5
6
7
8
9
10
11
12
15
14
13
16
17
18
19
A
B
20 21
22
CV_58820_SDG800A1_LB7.qxd 27.09.2010 13:45 Uhr Seite 4

5GB/CY
Table of contents
Introduction
Intended Use ................................................................................................................... Page 6
Technical Data ................................................................................................................ Page 6
Scope of Supply.............................................................................................................. Page 6
Description of Components............................................................................................ Page 7
Safety............................................................................................................................. Page 7
Use Original Accessories ............................................................................................... Page 8
Prior to Initial Use................................................................................................ Page 8
Initial Operation.................................................................................................... Page 8
Setting the clock.............................................................................................................. Page 9
Using Immediate-Start Function...................................................................................... Page 9
Using Delay-Start Function ............................................................................................. Page 10
Keep-Warm Mode.......................................................................................................... Page 10
Using Several Steam Trays............................................................................................. Page 11
Useful tips ........................................................................................................................ Page 11
Steaming chart ................................................................................................................ Page 11
Storing the Steamer in a Space-Saving Way................................................................ Page 14
Descaling the Base of the Appliance/Water Tank...................................................... Page 15
Cleaning and maintenance.......................................................................... Page 15
Service........................................................................................................................... Page 15
Warranty..................................................................................................................... Page 15
Disposal........................................................................................................................ Page 16
Declaration of Conformity/ Manufacturer.....................................Page 16
58820_Dampfgarer_Content_LB7.indd 5 11.10.10 16:09

6 GB/CY
Introduction
Steamer
Q
Introduction
We are pleased that you have chosen
this product. Fold out the page with the
pictures and familiarise yourself with the
functions of the appliance before the initial operation.
For this, read the following instruction manual and
the safety advices carefully. Only use the appliance
as described and for the stated ranges of use. Keep
this instruction manual safely. Hand out all documents
to third persons when passing on the appliance.
Q
Intended Use
The appliance is designed for steaming food. The
steamer may only be used in dry and confined
spaces. Other uses or modifications of the appliance
are not intended and harbour considerable risks.
For damage arising from not intended use, the man-
ufacturer does not assume liability. The appliance is
not designed for commercial use.
Q
Technical Data
Nominal voltage: 220-240V ~50 Hz
Nominal power: 800W
Volume steam trays: 3l
Volume rice bowl: 1l
Dimensions: 31,3x23,1x 39,8cm
(WxDx H)
Weight: 2.05 kg
Q
Scope of Supply
Check the scope of supply for completeness
as well as the intactness of the product and all
components immediately after unpacking.
1x Base of the appliance
1x Turbo ring
1x Condensate collection basin
3x Steam trays
1x Rice bowl (1l)
1x Cover
1x Instruction manual
The following icons/symbols are used in this instruction manual:
Read instruction manual! Warning - Hot surfaces!
Observe caution and safety notes! Keep children away from electrical
devices!
Risk of explosion! WWatts (Effective power)
Caution–electric shock!
Danger to life! V~Volt (AC)
Food-safe! Check that the device, mains lead
and plug are in good condition!
Proper procedure and handling. Risk of fire!
Dispose packaging and appliance in
an environmentally-friendly way!
58820_Dampfgarer_Content_LB7.indd 6 11.10.10 16:09

7GB/CY
Introduction/Safety
Q
Description of Components
1Cover
2Rice bowl
3Upper steam tray (3)
4Middle steam tray (2)
5Egg cups (recesses)
6Lower steam tray (1)
7Condensate collection basin
8Turbo ring
9MIN mark
10 Base of the appliance/water tank
11 Heating element
12 Water level indicator
13 LCD-display
14 ON/OFF button
15 Pilot lamp
16 PLUS/MINUS button
17 PROG button (“programming”)
18 Power cord with mains plug
19 MAX mark
20 Time indicator
21 PROG symbol (“programming”)
22 Keep-warm symbol
Q
Safety
WARNING!Read all safety advices and
instructions. Non-observance of the safety advices
and instructions may cause electric shock, fire and/
or bad injuries.
KEEP ALL SAFETY ADVICES AND
INSTRUCTIONS FOR THE FUTURE!
Avoid injuries and damage of
the electrical appliance:
J DANGER OF LIFE AND ACCI-
DENT FOR BABIES AND
CHILDREN! Never leave children
unsupervised with the packing material and
the product. There is the hazard of choking by
packing material and the hazard of life by burns.
Children often underrate the risks. Always keep
children away from the product.
J Do not operate the appliance in
explosive environments, where
inflammable liquids or gases are
located.
J Children and persons, not having the knowledge
or experience in operating the appliance or
having handicaps of physical, sensorial or
mental nature must not operate the appliance
without supervision or instruction by a person,
responsible for their safety. Children must be
supervised in order to ensure that they do not
play with the appliance.
J ATTENTION! Never leave the steamer
unattended during operation.
J ATTENTION! HAZARD OF
BURNS! The appliance will become
very hot during use. Beware of get-
ting in contact with the ascending steam or the
hot food.
J Always lift the cover 1slowly, turning away
from you and let the steam exhaust backwards.
Do not bend over the appliance during steam
generation. Use oven cloths when touching the
cover 1and the steam trays 3, 4, 6. Use
a long fork or tongs when checking if the food
is done.
J Pull the mains plug after each use. Never let
the cord 18 hang down over the edge of the
work surface so that the appliance can not be
pulled down accidentally.
J Let the appliances completely cool down,
before you remove the remaining water from
the base of the appliance/water tank 10.
J ATTENTION! HAZARD OF
FIRE! Do not operate the steamer in
the proximity of or below curtains,
wall cupboards or other inflammable materials.
J Place the appliance on a heat resistant surface
(no varnished tables, no table cloths). Do not
operate it in the vicinity of other sources of
heat (oven, gas flame). Otherwise, the appli-
ance and/or pieces of furniture may be dam-
aged.
J Place the appliance on an even, stable surface
at a safe distance to walls and cupboards in
order to avoid any damage caused by steam
rising.
58820_Dampfgarer_Content_LB7.indd 7 11.10.10 16:09

8 GB/CY
Safety/Prior to Initial Use/Initial Operation
J Always fill the base of the appliance/water
tank 10 with sufficient water for the period of
steaming. Do not cover the base of the appli-
ance/water tank 10 with aluminium foil or
any other material. If not observed, this can
lead to an overheating of the appliance.
Damage of the appliance is the consequence.
J Never immerse the appliance in water and
always pull the mains plug before cleaning or
transporting it.
J FOOD-SAFE! The taste and smell
of your food are not detrimentally
affected by this product.
Avoid the hazard of
life by electric shock:
J Make sure that the details on the rating label
are in conformity with your mains voltage.
Only connect the unit to alternating current.
J Do not at all operate this unit with an external
timer or a separate telecontrol system.
J Check the power cord 18 regularly
for damage or deterioration.
J Do not operate the appliance when the power
cord 18 or the mains plug is damaged.
ATTENTION! A damaged power cord 18
presents a hazard of life by electric shock.
Have appliances, which do not work faultlessly
or which are damaged, immediately and only
checked and repaired by the after-sales service.
J Do not use the power cord 18 for unplugging
the appliance. Keep the power cord 18 away
from hot surfaces, sharp edges and mechanical
forces. Damaged or entangled cords 18 in-
crease the risk of an electric shock.
J Do not operate the appliance outside. Never
let the power cord 18 become wet or damp
during operation.
J Unplug the power cord 18 when you are not
operating the appliance.
Q
Use Original Accessories
J Only use accessories and additional equipment
stated in the instruction manual. The use of other
products or accessories than recommended
in the instruction manual may present a risk of
injuries for you.
Q
Prior to Initial Use
J Clean all detachable parts prior to the initial use
with warm soapy water and dry them carefully.
Wipe the interior of the base of the appliance/
water tank 10 with a damp cloth.
Q
Initial Operation
Observe the mains voltage. The mains voltage of
the power source must be in conformity with the
details on the rating label of the appliance. Appli-
ances declared with 230V can also be operated
with 220V.
j Place the base of the appliance 10 on a sta-
ble, even surface.
j Then place the black turbo ring 8onto the
heating element 11 mounted in the centre.
Make sure that the larger side faces down-
wards.
j Now fill the base of the appliance/water tank
10 with cold water up to the MAX mark 19.
Note: Consider that the base of the appliance/
water tank 10 has to be filled with water at
least up to the MIN mark 9.
ATTENTION! HAZARD OF BURNS!
Make sure that the water does not exceed the
MAX mark 19. Otherwise, hot water may spurt
out of the appliance during operation.
ATTENTION! Do not add anything like sea-
sonings etc. to the water. This may affect the
steam flow and/or damage the surface of the
base of the appliance/water tank 10 and the
heating element 11.
j Now place the black condensate collection
basin 7onto the base of the appliance 10.
Make sure that the semi-circular elevation
58820_Dampfgarer_Content_LB7.indd 8 11.10.10 16:09

9GB/CY
Initial Operation
points to the front towards the keypad and is
level. Thus, the turbo ring 8will be kept in
position.
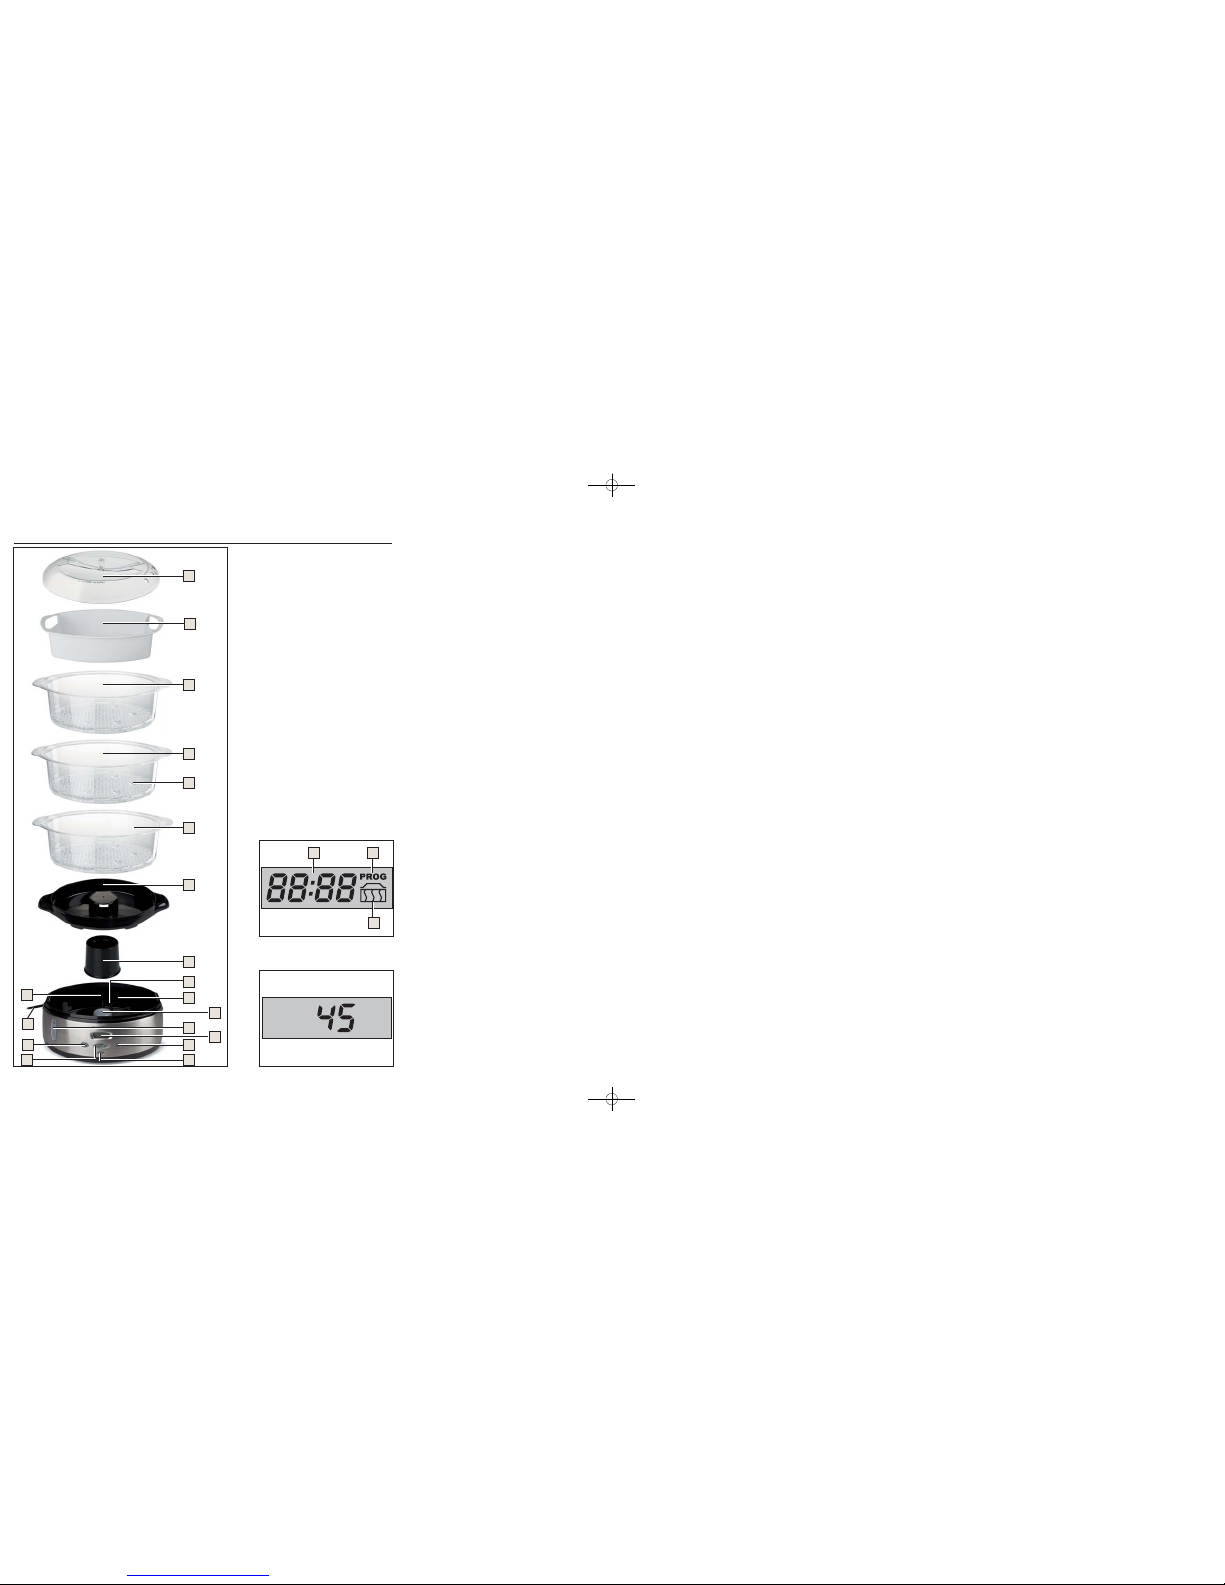
j Place the food in the steam trays 3, 4, 6.
j Ensure that all parts are positioned correctly
before switching on the appliance.
ATTENTION! Never use bowls or other parts,
not especially produced for this appliance.
Otherwise, there may be the risk of injuries
and/or damage of the appliance.
j Now place the steam trays 3, 4, 6in
1-2- 3 succession (please see the markings on
the handles) on top of the condensate collection
basin 7.
j Place the cover 1centrically so that the upper
steam tray 3is completely closed and no
steam can exhaust.
j Connect the mains plug 18 to a suitable socket.
j The LC display 13 shows “45” (see Fig. B).
Now your steamer is ready for use.
Q
Setting the clock
Proceed as follows:
j Simultaneously press the PROG 17 and ON /
OFF 14 buttons for 2-3 seconds. A signal tone
will be heard on releasing the buttons.
j Press the PLUS button 16 to increase the time
indicator 20 by 10 minutes each time. Press the
MINUS button 16 to reduce the time indicator
20 by 1 minute each time.
j Press the PROG button 17 to confirm your setting.
j The LCD-display 13 will now show the current
clock time (clock time mode).
Q
Using Immediate-Start Function
Note: Consider that the base of the appliance/
water tank 10 has to be filled with water at least
up to the MIN mark 9. Ensure that the turbo ring 8
in addition to the condensate collection basin 7
has been correctly positioned.
j Press the ON/OFF button 14. The LCD dis-
play 13 will show the factory-set steaming time
of 45 minutes (see fig. B).
j Press the PLUS/MINUS button 16 to increase
the steaming time in 5-minute steps or decrease
it in 1-minute steps.
Note: The maximum steaming time is 90 minutes.
Note: Be aware that you might have to replen-
ish water when the steaming time is longer.
Use the openings on the sides of the conden-
sate collection basin 7for refilling. If the base
of the appliance/water tank 10 is filled up to
the MAX mark 19, it will be sufficient for approx.
1 hour of steaming.
ATTENTION! HAZARD OF BURNS!
Make sure that the water does not exceed the
MAX mark 19. Otherwise, hot water may spurt
out of the steamer during operation.
j Press the ON/OFF button 14. The device sounds
a beep. The red indicator light 15 comes on
and the device starts the steaming process.
j The LCD-display 13 will indicate the remaining
steaming time.
ATTENTION! HAZARD OF BURNS! The
appliance will become hot during use. Beware
of getting in contact with the ascending steam
or any components.
j If the set steaming time is elapsed, the appli-
ance will automatically switch back to the
keep-warm mode (see “keep-warm mode”).
Note: You can increase the steaming time at
any time in 5-minute steps or decrease it in
1-minute steps by pressing the PLUS/ MINUS
button 16. As soon as the steaming time is set
manually to “0”, the device switches automati-
cally into the warm mode (see “Warm mode”).
ATTENTION! HAZARD OF BURNS!
Always lift the cover 1slowly, turning away
from you and let the steam exhaust backwards.
Do not bend over the appliance during steam
generation. Use oven cloths when touching the
cover 1and the steam trays 3, 4, 6. Use
a long fork or tongs when checking if the food
is done.
j Press the ON/OFF button 14 to terminate the
steaming process prematurely or to switch off
58820_Dampfgarer_Content_LB7.indd 9 11.10.10 16:09

10 GB/CY
Initial Operation
the appliance. The indicator on the LCD-display
13 switches back to the time indicator 20
again (see fig. A).
Note: If the supply of water is used up during
use, a signal tone will sound. The steaming pro-
cess gets stopped. The indicator on the LCD-
display 13 switches back to the time indicator
20 again (see fig. A). Therefore, regularly
check the water level on the water level indica-
tor 12 and replenish sufficient water in good
time!
ATTENTION! HAZARD OF BURNS!
Make sure that the water does not exceed the
MAX mark 19. Otherwise, hot water may spurt
out of the steamer during operation.
Q
Using Delay-Start Function
Note: Consider that the base of the appliance/
water tank 10 has to be filled with water at least
up to the MIN mark 9. Ensure that the turbo ring
8as well as the condensate collection basin 7
are positioned correctly.
j Press the PROG button 17. In the LCD-display
13, the time indicator 20 as well as the PROG
symbol 21 (see fig. A) will appear.
j Press the PLUS/MINUS button 16, to increase
the delay time in 10-minute steps or decrease it
in 1-minute steps to achieve the desired delay.
Note: The set delay time refers to the current
clock time. That means if you set a delay time
of 30 minutes at 13:00, the steaming process
will start at 13:30. The maximum delay time is
24 hours.
j Press the PROG button 17 again.
j Press the PLUS/MINUS button 16 to increase
the steaming time in 5-minute steps or decrease
it in 1-minute steps.
Note: The maximum steaming time is 90 minutes.
Note: Be aware that you might have to replen-
ish water when the steaming time is longer. Use
the openings on the sides of the condensate
collection basin 7for refilling. If the base of
the appliance/water tank 10 is filled up to
the MAX mark 19, it will be sufficient for approx.
1 hour of steaming.
j Press the PROG button 17 again. In the LCD-
display 13 the time indicator 20 as well as the
PROG symbol 21 will appear. The delay-start
is now activated.
j If the set delay time is elapsed, a signal tone
will sound, the pilot lamp 15 will glow red and
the appliance will start the steaming process
automatically.
ATTENTION! HAZARD OF BURNS!
The appliance will become hot during use.
Beware of getting in contact with the ascending
steam or any components.
Note: The device starts to beep as soon as
the water in the reservoir is exhausted. The
steaming process is interrupted. Check the
water level in the reservoir regularly by referring
to the water level indicator 12 and add more
water in good time.
ATTENTION! HAZARD OF BURNS!
Make sure that the water does not exceed the
MAX mark 19. Otherwise, hot water may spurt
out of the steamer during operation.
j Press the PROG button 17 to terminate the
delay start. The PROG symbol 21 in the LCD-
display 13 will go out.
Q
Keep-Warm Mode
If the steaming time is elapsed, the appliance will
automatically switch over to keep-warm mode.
- In the LCD-display 13 the time indicator 20 as
well as the keep-warm symbol 22 will appear.
- The pilot lamp 15 will glow green.
- The water is heated repeatedly in cycles in
the warm mode to keep the food warm at a
temperature of approx. 60 - 70°C.
ATTENTION! HAZARD OF BURNS! The
appliance will become hot during use. Beware
of getting in contact with the ascending steam
or any components.
- The keep-warm mode will remain active until
the supply of water is used up or you press a
button.
j Press the ON/OFF button 14 to terminate the
keep-warm mode.
58820_Dampfgarer_Content_LB7.indd 10 11.10.10 16:09

11GB/CY
Initial Operation
Q
Using Several Steam Trays
j Place the largest food or this with the longest
steaming time (e.g. also rice) in the lower
steam tray 6.
j Please note that the steaming times in the up-
per 3and middle steam tray 4increase by
5–10 minutes. Consider this when setting the
steaming time.
j Taste of foods can spread through condensed
water. Therefore, generally place meat and fish
in the lower steam tray 6. Let the lower steam
tray 6empty if you want to prepare food with
longer steaming time first. Place then fish or meat
in the lower steam tray 6at the desired time.
ATTENTION! HAZARD OF BURNS!
Always lift the cover 1slowly, turning away
from you and let the steam exhaust backwards.
Do not bend over the appliance during steam
generation. Use oven cloths when touching the
cover 1and the steam trays 3, 4, 6. Use
a long fork or tongs when checking if the food
is done.
j Place the food with the longer steaming time in
the lower steam tray 6, if you want to prepare
food with different steaming times. Carefully
remove the cover 1and place the next steam
tray 3, 4on top of the lower when the steam-
ing time is that of the food to be steamed.
Place the cover 1carefully on top again.
Useful tips
The steaming times shown in the chart are only
approximate. Times can vary according to the size
of food, quantities in the steaming trays 3, 4, 6,
the freshness of food and personal tastes. When
you are more familiar with the steamer, you can
adjust the steaming times.
j Please note that one layer of food will steam
more quickly than several layers. Therefore, the
steaming time increases with the quantity of
food, e.g. 1000g of cauliflower florets require
longer than 500g.
j Make sure that all pieces are of a similar size.
So you achieve an optimal result. If pieces are
of different sizes and have to be layered, place
the smaller pieces on top.
j Do not cram food into the steam trays 3, 4,
6. Leave enough room between the pieces to
ensure a good supply of steam circulation.
j When steaming larger amounts, stir the food
with a long-handled spoon after half of the
steaming time.
j Never steam frozen meat, poultry or seafood.
Always thaw everything completely first.
j All of the times shown in the steaming chart
apply to their use with cold water. To slightly
reduce steaming times, use warm (not boiling)
water.
j The rice bowl 2is an ideal container for
steaming other food such as fruit, vegetables,
puddings etc.
Q
Steaming chart
The steaming times shown in the chart are only ap-
proximate. Times can vary according to the size of
food, quantities in the steaming trays 3, 4, 6,
the freshness of foods and personal tastes. There-
fore, we recommend checking the condition with a
long utensil (fork or skewer) towards the end of the
set steaming time. The steaming times apply to the
quantities shown in the chart. If not specified other-
wise, all steaming times refer to the use of the lower
steam tray 6. Food in the upper 3and middle
steam trays 4requires 5-10 minutes longer.
All times shown in the chart apply to their use with
cold water.
58820_Dampfgarer_Content_LB7.indd 11 11.10.10 16:09

12 GB/CY
Initial Operation
Vegetables Type Quantity Steaming time Recommen-
dations
Artichokes fresh 2-3, medium size 50-55 minutes
Asparagus fresh 400 g 15-20 minutes lay flat in steam tray
3, 4, 6
frozen 400g 15- 20 minutes criss-cross 2nd
layer to allow
steam flow
Beans, green fresh 400g 25-30 minutes stir halfway through
steaming time
frozen 400g 35- 40 minutes
Broccoli fresh 400 g 15-20 minutes stir halfway through
steaming time
frozen 400g 20- 25 minutes
Brussels sprouts fresh 400g 20-25 minutes stir halfway through
steaming time
Cabbage fresh, chopped 400g 35-40 minutes stir halfway through
steaming time
Carrots fresh, sliced 400g 20-25 minutes stir halfway through
steaming time
Corn on the cob fresh, whole approx.
15 minutes
turn 180° halfway
through steaming
time
Cauliflower fresh, florets 400g 15-20 minutes stir halfway through
steaming time
frozen 400g 20- 25 minutes
Green squashes fresh, in slices 400g 15 -20 minutes stir halfway through
steaming time
Mushrooms fresh 200 g 15-20 minutes stir halfway through
steaming time
Peas frozen 400g 15- 20 minutes stir halfway through
steaming time
Potatoes peeled and
chopped
900g 25-30 minutes stir halfway through
steaming time
New potatoes fresh, whole 400g 30-35 minutes
Spinach fresh 250g 10- 15 minutes
frozen 400g 15- 20 minutes
Tips:
- Cut off thick stems from cauliflower, broccoli
and cabbage.
- Steam leafy, green vegetables for the shortest
possible time as they loose colour easily.
- Salt and season vegetables after steaming for
best results.
- Frozen vegetables need not be thawed before
steaming.
58820_Dampfgarer_Content_LB7.indd 12 11.10.10 16:09

13GB/CY
Initial Operation
Fish and
Seafood Type Quantity Steaming time Recommen-
dations
Lobster, tails fresh 2 queues 20-25 minutes meat will be opa-
que; cook longer if
necessary
Fish, fillets frozen 250g 10-15 minutes
fresh 250g 10-15 minutes
Fish, thick steaks salmon, cod 250/400g 10-15 minutes
tuna 400g 15-20 minutes
Mussels fresh 400g 10-15 minutes steaming is done
when shells are
completely open
Oysters fresh 6 pieces 15-20 minutes steaming is done
when shells are
completely open
Prawns fresh 400 g 10-15 minutes stir halfway through
steaming time
Tips:
- Fish is done as its colour turns opaque.
- Frozen fish may be steamed without defrosting
if separated before steaming and the cooking
time is extended.
- Add lemon wedges and herbs while steaming
to improve flavour.
Poultry Type Quantity Steaming time Recommen-
dations
Chicken boneless breast 400g 15-20 minutes remove skin before
cooking
drumsticks 400g 20-30 minutes after steaming,
brown skin under
grill if desired
Meat and
Type sausages Type Quantity Steaming time Recommen-
dations
Beef in slices,
fillet steak or
roast beef
250g 10-15 minutes trim all fat;
steamed beef has
a firm texture
Lamb chops with or
without bones
4 chops 15- 20 minutes trim all fat
Pork fillet, loin steaks or
loin chops
400 g or 4 chops 10-15 minutes trim all fat
58820_Dampfgarer_Content_LB7.indd 13 11.10.10 16:09

14 GB/CY
Initial Operation
Meat and
Type sausages Type Quantity Steaming time Recommen-
dations
Sausages
(pre-cooked)
beef or pork
sausages
(e.g. “frankfurter”)
400g 10 -15 minutes pierce skins before
steaming
Tips:
- Steaming has the advantage of allowing all
the fat to drip away during cooking. Due to the
gentle heat only choose tender, lean cuts of
meat and trim all fat. Meat suitable for grilling
is ideal for steaming.
- Serve steamed meat and poultry with flavour-
some sauces or marinade before steaming.
- Thoroughly cook all food before serving.
Pierce with a long object (knife or skewer) to
check if done.
- Sausages must be completely cooked before
steaming.
- Use fresh herbs while steaming to add flavour.
Rice Type Quantity Amount of
water
Steaming
time
Recommen-
dations
Rice white 200g 300ml 25 minutes Serves 2
300g 600ml 35 minutes Serves 4
brown 300g 600ml 40 minutes Serves 4-6
Rice pudding pudding rice 100g rice +
30g caster
sugar
warm milk 75-80 minutes
Tips:
- Use the rice bowl 2and add the required
amount of water together with the rice.
- For menu cooking always place the rice bowl 2
in the topmost steam tray as the flavours of the
other foods may spread through the condensed
water.
Eggs Quantity Amount of
water
Steaming
time
Recommen-
dations
soft-boiled max. 6 400ml 8 minutes sit eggs in the egg
cups 5(recesses
in the steam trays)
hard-boiled 15 minutes
For cooking soft-boiled eggs, set 10 minutes
steaming time and take out the eggs timely.
Q
Storing the Steamer in a
Space-Saving Way
j Place the rice dish 2in the lower steaming
basket 6.
j Place the lower steaming basket 6with the
rice dish 2into the middle steaming basket 4.
j Place both the steaming baskets 6, 4and the
rice dish 2into the upper steaming basket 3.
j Place the steaming baskets 3, 4, 6and
the rice dish 2on the condensate collection
dish 7and place the lid 1on top.
58820_Dampfgarer_Content_LB7.indd 14 11.10.10 16:09

15GB/CY
Initial Operation/Cleaning and maintenance/Service/Warranty
Q
Descaling the Base of the
Appliance/Water Tank
ATTENTION! RISK OF INJURY! Always switch
the appliance off and pull the mains plug 18 prior
to all occupations with the electrical appliance.
ATTENTION! HAZARD OF BURNS! Let the
steamer completely cool down before descaling it.
j Descale the base of the appliance/water tank
10 regularly in order to maintain the steam gen-
eration and to extend the lifespan of the appli-
ance. The amount of limescale deposit caused
will depend on the water hardness type. Descale
the tank 10 after every seventh to tenth use.
Slight and persistent scale:
j For slight scale, use a cloth moistened with
vinegar.
j Wipe the scaled areas with it.
j Use correspondingly more vinegar for persistent
scale.
j Then rinse and dry the appliance thoroughly.
Descale the base of the appliance/
water tank:
j Place the turbo ring 8with the upside down
on the heating element 11 (larger side faces
upwards).
j Fill the base of the appliance/water tank 10
with cold water up to the MAX mark 19.
j Fill the inside of the turbo ring 8with usual
decalcifier.
j Do not heat the appliance.
j Leave the appliance to descale overnight.
j Pour the decalcifier out and rinse the appliance
thoroughly.
j Then wipe and dry the appliance thoroughly.
Q
Cleaning and maintenance
ATTENTION! HAZARD OF INJURY
Always switch the appliance off and pull the mains
plug 18 prior to all occupations with the appliance.
ATTENTION! HAZARD OF BURNS!
Let the steamer completely cool down before
cleaning it.
j Clean the steamer regularly, best after every use.
j Do not at all immerse the appliance in water.
j Wipe out the base of the appliance 10 with a
damp cloth.
j Clean all the demountable parts in hot water
with a little detergent using a washing-up brush.
Then rinse all the parts thoroughly and dry
them carefully.
j Do not use any abrasive cleaners such as
scouring powder, scouring sponges, steel wool,
washing soda or bleach.
Q Service
WARNING!
Have your device
repaired at the service centre or by
qualified specialist personnel using
original manufacturer parts only. This
will ensure that your device remains safe to use.
WARNING!
If the plug or lead needs
to be replaced, always have the
replacement carried out by the manu-
facturer or its service centre. This will
ensure that your device remains safe to use.
QWarranty
The warranty for this appliance is for 3
years from the date of purchase. The ap-
pliance has been manufactured with care
and meticulously examined before deliv-
ery. Please retain your receipt as proof
of purchase. In the event of a warranty
claim, please make contact by telephone
with our Service Department. Only in this
way can a post-free despatch for your
goods be assured.
The warranty covers only claims for material and
maufacturing defects, but not for transport damage,
for wearing parts or for damage to fragile compo-
nents, e.g. buttons or batteries. This product is for
private use only and is not intended for commercial
use.
58820_Dampfgarer_Content_LB7.indd 15 11.10.10 16:09

16 GB/CY
Warranty/Disposal/Declaration of Conformity/ Manufacturer
The warranty is void in the case of abusive and im-
proper handling, use of force and internal tamper-
ing not carried out by our authorized service branch.
Your statutory rights are not restricted in any way
by this warranty.
The warranty period will not be extended by repairs
made unter warranty. This applies also to replaced
and repaired parts. Any damage and defects extant
on purchase must be reported immediately after
unpacking the appliance, at the latest, two days after
the purchase date. Repairs made after the expiration
of the warranty period are subject to payment.
GB
DES UK LTD
Tel.: 0871 5000 700 (£ 0.10 / minute)
e-mail: [email protected]
CY
Kompernass Service Cyprus
Tel.: 800 94401
e-mail: [email protected]
QDisposal
The packaging is wholly composed of
environmentally-friendly materials that can
be disposed of at a local recycling centre.
Do not dispose of electrical
equipment in the household
waste!
In accordance with European Directive 2002/96/EC
(covering waste electrical and electronic equipment)
and its transposition into national legislation, worn out
electrical power tools must be collected separately
and taken for environmentally compatible recycling.
Contact your local refuse disposal authority for more
details of how to dispose of your worn out electrical
devices.
Q Declaration of Conformity/
Manufacturer
We, Kompernaß GmbH, Burgstr. 21, D-44867 Bochum,
Germany, hereby declare that this product complies
with the following standards, normative documents
and EU directives:
EU Low Voltage Directive
(2006/95/EC)
Electromagnetic Compatibility
(2004/108/EC)
Type/Device description:
Steamer
Serial number: IAN 58820
Bochum, 30.09.2010
Hans Kompernaß
- Managing Director -
We reserve the right to make technical modifica-
tions in the course of further development.
58820_Dampfgarer_Content_LB7.indd 16 11.10.10 16:09

17HR
Popis sadržaja
Uvod
Namjenska uporaba................................................................................................. Stranica 18
Tehnički podatci ........................................................................................................Stranica 18
Opseg isporuke.........................................................................................................Stranica 18
Opis dijelova.............................................................................................................Stranica 19
Sigurnost................................................................................................................ Stranica 19
Rabite originalni pribor............................................................................................. Stranica 20
Prije prvog stavljanja u pogon...........................................................Stranica 20
Stavljanje u pogon........................................................................................ Stranica 20
Namještanje vremena...............................................................................................Stranica 21
Uporaba funkcije Smjesta-Pokretanje......................................................................Stranica 21
Uporaba usporavanja pokretanja...........................................................................Stranica 22
Modus održavanja topline.......................................................................................Stranica 22
Korištenje više posuda za kuhanje...........................................................................Stranica 23
Upute .........................................................................................................................Stranica 23
Tabela za vrijeme parenja .......................................................................................Stranica 23
Prostorno štedljivo skladištenje parnog kuhala....................................................... Stranica 27
Otklanjanje kamenca iz osnovnog uređaja/spremnika za vodu.........................Stranica 27
Čišćenje i njega.................................................................................................Stranica 28
Servis........................................................................................................................Stranica 28
Jamstveni list......................................................................................................Stranica 28
Zbrinjavanje.......................................................................................................Stranica 29
Objašnjenje konformnosti/Proizvođač....................................... Stranica 29
58820_Dampfgarer_Content_LB7.indd 17 11.10.10 16:09

18 HR
Uvod
Parni lonac
Q
Uvod
Radujemo se, da ste se odlučili za ovaj
proizvod. Prije prvog stavljanja u pogon,
rasklopite prikaze i upoznajte se sa funk-
cijama uređaja. Za to pomno pročitajte slijedeće
upute za uporabu i uputstva za sigurnost. Rabite
uređaj isključivo sukladno opisu i za navedena
područja primjene. Dobro sačuvajte ove upute za
uporabu. U slučaju prosljeđivanja uređaja, proslije-
dite također svu pripadajuću dokumentaciju.
Q
Namjenska uporaba
Uređaj je namjenjen za kuhanje živežnih namirnica
na pari. Parno kuhalo smije se isključivo stavljati u
pogon u suhim i zatvorenim prostorijama. Druga
uporaba ili promjene uređaja smatrat će se nena-
mjenskim i mogu prouzročiti nezgode. Proizvođač
ne jamči za štete nastale od nenamjenske uporabe.
Uređaj nije namjenjen za komercijalne svhe.
Q
Tehnički podatci
Nazivni napon: 220-240V ~
50Hz
Nazivni prijem: 800W
Volumen posude za kuhanje: 3l
Volumen zdjelice za rižu: 1l
Mjere: 31,3x23,1x
39,8cm ( š x d x v)
Težina: 2,05kg
QOpseg isporuke
Odmah nakon otvaranja paketa provjerite dali su
svi dijelovi unutra, te dali su proizvod i svi pojedini
dijelovi ispravni.
1x osnovni uređaj
1x turbo prsten
1x zdjelica za primanje kondenzata
3x posuda za kuhanje
1x zdjelica za rižu (1l)
1x poklopac
1x upute za uporabu
U ovim uputama za uporabu/na uređaju rabi se slijedeće prikaze:
Čitati upute za rukovanje! Upozorenje od vrućih površina!
Obratiti pažnju na upozoravajuće
i sigurnosne upute! Držite djecu podalje od
električnog uređaja!
Opasnost od eksplozije! WW (Efektivna snaga)
Čuvajte se strujnog udara!
Opasnost po život! V~Volt (Imjenični napon)
Bez utjecaja na živežne namirnice! Vodite računa o tome, da se ne ošteti
uređaj, mrežni kabel i mrežni utikač!
Savjet! Ovako se ponašate ispravno. Opasnost od požara!
Materijal ambalaže i uređaj zbrinite
na način neškodljiv za okoliš!
58820_Dampfgarer_Content_LB7.indd 18 11.10.10 16:09

19HR
Uvod/Sigurnost
Q
Opis dijelova
1poklopac
2zdjelica za rižu
3gornja posuda za kuhanje (3)
4srednja posuda za kuhanje (2)
5posuda za jaje (udubljenja)
6donja posuda za kuhanje (1)
7zdjelica za primanje kondenzata
8turbo prsten
9minimalna oznaka
10 osnovni uređaj/spremnik za vodu
11 grijaći element
12 pokazivanje vodostaja
13 LC pokazivač
14 tipka za UKLJUČIVANJE/ISKLJUČIVANJE
15 kontrolna svjetiljka
16 tipka Plus-/ Minus
17 tipka PROG („programiranje“)
18 mrežni vod s mrežnim utikačem
19 oznaka MAX
20 pokazivanje vremena
21 znak PROG („programiranje“)
22 znak za održavanje topline
Q
Sigurnost
UPOZORENJE! Pročitajte sva uputstva za
sigurnost i upute. Ne pridržavanje sigurnosnih i
ostalih uputa može prouzročiti strujni udar, požar
i/ili teške ozljede.
SAčUVAjTE SVE SIgURNOSNE NAPOmENE I
UPUTE zA bUDUćNOST!
Izbjegavajte ozljede i oštećenje
električnog uređaja:
J UPOZORENJE! OPA-
SNOST PO ŽIVOT I OD NEZ-
GODA ZA DJECU! Ne ostavljajte
djecu nikad bez nadzora zajedno sa omotnim
materijalom. Inače prijeti opasnost od gušenja
omotnim materijalom. Djeca često podcjenjuju
opasnost. Držite djecu uvijek podalje od ure-
đaja.
JNe stavljajte uređaj u pogon u
okoli-
ni u kojoj prijeti opasnost od eksplozije
,
u kojoj se nalaze zapaljive tekućine
ili plinovi.
J Djeca ili osobe koje imaju manjka znanja ili
iskustva u ophođenju s uređajem ili koji su svojim
tjelesnim, osjetilnim ili duševnim sposobnostima
ograničeni ne smiju koristiti uređaj bez nadzora
ili vodstva od strane osobe koja je odgovorna
za njihovu sigurnost. Djeca se moraju nadzirati
da se ne bi igrala uređajem.
JOPREZ! Ne ostavljajte parno kuhalo nikad
bez nadzora, ako nije u pogonu.
JOPREZ! OPASNOST OD OPE-
KLINA! Uređaj se tijekom uporabe
veoma zagrije. Vodite računa, da
ne dođete u dodir s parom koja se podiže ili
vrućim živežnim namirnicama.
JUvijek sporo podižite poklopac 1, te ga okre-
nite od sebe kako bi para mogla odlaziti unazad.
Ne pregibajte se preko uređaja, dok stvara paru.
Rabite kuhinjske rukavice, dok dodirujete po-
klopac 1i posudu za kuhanje 3, 4, 6.
Ako želite provjeriti da li su živežne namirnice
zgotovljene, rabite dugu vilicu s držkom ili ku-
harska kliješta.
JNakon svake uporabe izvucite utikač. Vodite
računa o tome, da mrežni vod 18 ne vjesi preko
ruba radne površine, kako se nebi slučajno
poteglo uređaj na tlo.
JOstavite uređaj da se potpuno ohladi, prije
nego što otklonite preostalu vodu iz osnovnog
uređaja/spremnika za vodu 10.
JOPREZ! OPASNOST OD PO-
ŽARA! Ne stavljajte parno kuhalo
u pogon u blizini zavjesa, visećih
ormara ili drugih zapaljivih materijala.
JPostavite uređaj na podlogu koja je otporna na
vrućinu. (ne na lakirane stolove, ne na stolnjake).
Ne stavljajte ga u pogon u blizini drugih izvora
topline (štednjak, plinski plamena). Inače prijeti
oštećenje uređaja i/ili drugog pokućstva.
JPostavite uređaj na ravnu, stabilnu podlogu.
Vodite računa o dostatnom razmaku između
zidova i ormara. Na taj način izbjegavate štete
od pare koja se podiže.
JVodite računa, da su osnovni uređaj/ spremnik
za vodu 10 tijekom kuhanja napunjeni s dostatno
58820_Dampfgarer_Content_LB7.indd 19 11.10.10 16:09

20 HR
Sigurnost/Prije prvog stavljanja u pogon/Stavljanje u pogon
vode. Ne polažite alu foliju i.sl. u osnovni ure-
đaj/spremnik za vodu 10. U slučaju nepridr-
žavanja uređaj bi se mogao pregrijati, a to bi
moglo prouzročiti oštećenje uređaja.
JNe uranjajte uređaj nikad u vodu i prije čišćenja
ili transportiranja uvijek izvucite mrežni utikač.
J NEŠKODLJIVO ZA HRANU!
Ovaj proizvod ne ugrožava okuse i
mirise hrane.
Izbjegavajte opasnost po život
od strujnog udarca:
JVodite računa, da je mrežni napon identičan s
podatcima na tipskoj ploči. Priključujte uređaj
uvijek na izmjeničnu struju.
JNe stavljajte uređaj ni u kojem slučaju u pogon
preko vanjskog satnog sklopnog mehanizma ili
odvojenog sustava daljinskog djelovanja.
JRedovito provjeravajte mrežni vod
18 na oštećenja i zastarjelost.
JNe stavljajte uređaj u pogon s oštećenim mrež-
nim vodom 18 ili oštećenim mrežnim utikačem.
OPREZ! Oštećeni mrežni vodovi 18 mogu
prouzročiti opasnost po život kroz strujni udar.
Uređaji, koji ne funkcioniraju besprijekorno ili
koji su oštećeni, smjesta i isključivo predajte
servisnoj službi na provjeru ili popravak.
JNe zlorabite mrežni vod 18, kako bi izvukli
uređaj iz utičnice. Držite mrežni vod 18 podalje
od vrućih površina, oštrih rubova i mehaničkog
opterećenja. Oštećeni ili zamršeni mrežni vodovi
18 povećavaju rizik od strujnog udarca.
JNe stavljajte uređaj u pogon u prirodi. Vodite
računa o tome, da se mrežni vod 18 tijekom
pogona nikad ne smoči ili skvasi.
JUkoliko ne rabite uređaj, izvucite mrežni vod 18
iz utičnice.
Q
Rabite originalni pribor
JRabite isključivo pribor i dodatne uređaje, koji
su navedeni u uputstvu za uporabu. Uporaba
drugih osim u uputama za uporabu navedenih
proizvoda ili drugog pribora može prouzročiti
opasnost od ozljeda.
Q
Prije prvog stavljanja u pogon
JPrije prve uporabe, čistite sve dijelove koje se
može skinuti s toplom vodom te ih brižljivo osu-
šite. Obrišite unutarnje strane osnovnog uređa-
ja/spremnika za vodu 10 vlažnom krpom.
Q
Stavljanje u pogon
Vodite računa o nazivnom naponu. Mrežni napon
izvora struje treba odgovarati podatcima na tipskoj
ploči uređaja. Uređaji koji su oznašeni s 230V,
mogu također raditi sa 220V.
j Postavite osnovni uređaj/spremnik za vodu 10
na stabilnu, ravnu podlogu.
j Umetnite crni turbo prsten 8na grijaći element
11 koji je postavljen na sredini. Vodite računa
o tome, da veća strana leži dolje.
j Napunite sad osnovni uređaj/spremnik za
vodu 10 hladnom vodom sve do oznake MAX
19.
Uputa: Vodite računa o tome da osnovni ure-
đaj/spremnik za vodu 10 treba biti napunjen
vodom najmanje do oznake Minimal 9.
OPREZ! OPASNOST OD OPEKLINA!
Vodite računa o tome da voda ne prekorači
oznaku MAX 19. Inače bi tijekom kuhanja
mogla prskati vruća voda iz parnog kuhala.
OPREZ! Ne dodajite nikakve začine i.sl. u
vodu. Isti bi mogli ometati cirkulaciju pare i/ili
oštetiti površinu osnovnog uređaja/spremnika
za vodu 10 grijaćeg elementa 11.
j Položite sad crnu zdjelicu za prijem kondenzata
7osnovni uređaj/spremnik za vodu 10. Vo-
dite računa o tome, da polukružno povišenje
pokazuje naprijed u smjeru poslužnih tipki te da
usko priliježe. Na taj način održava se turbo
prsten 8u svojoj poziciji.
j Dodajte sad živežne namirnice u posude za
kuhanje 3, 4, 6.
j Osigurajte, da su svi dijelovi ispravno postav-
ljeni, prije nego što stavite uređaj u pogon.
58820_Dampfgarer_Content_LB7.indd 20 11.10.10 16:09

21HR
Stavljanje u pogon
OPREZ! Ne rabite nikad posude i druge dije-
love, koji nisu specijalno proizvedeni za ovaj
uređaj. Inače prijeti opasnost od ozljeda i/ili
oštećenja uređaja.
j Postavite posude za kuhanje 3, 4, 6u
redoslijedu 1-2-3 (vidite oznaku na držkama)
na zdjelicu za primanje kondenzata 7.
j Polegnite poklopac 1u sredini, tako da je
posuda za kuhanje 3potpuno zatvorena i da
nemože istjecati para.
j Utaknite mrežni utikač 18 u odgovarajuću utič-
nicu.
j Na LC pokazivaču 13 pojavi se „45“ (vidite
prik. B).
Vaše parno kuhalo je sad spremno za pogon.
Q
Namještanje vremena
Postupite na slijedeći način:
j Držite tipke PROG 17 i UKLJUČIVANJE/IS-
KLJUČIVANJE 14 istovremeno 2-3 sekunde.
Nakon što otpustite tipke, zazvučati će signalni
zvuk.
j Pritisnite sad tipku Plus 16, kako bi pokazivanje
vremena 20 povećali po 10 minuta. Pritisnite
tipku Minus 16, kako bi pokazivanje vremena
20 smanjili po 1 minutu.
j Pritisnite tipku PROG 17, kako bi potvrdili Vaš
unos.
j LC pokazivač 13 pokazuje sad trenutno vrijeme
(modus vremena).
Q
Uporaba funkcije Smjesta-
Pokretanje
Uputa: Vodite računa o tome, da osnovni uređaj/
spremnik za vodu 10 treba biti napunjen vodom
najmanje do oznake Minimal 9. Uvjerite se u to,
da su turbo prsten 8i zdjelica za primanje kon-
denzata 7ispravno postavljeni.
j Pritisnite tipku za UKLJUČIVANJE/ISKLJUČI-
VANJE 14. Na LC pokazivaču 13 sad žmiga
prethodno programirano vrijeme parenja od
45 minuta (vidite prik. B).
j Pritisnite tipku Plus-/Minus 16, kako bi povećali
vrijeme parenja u koracima od 5 minuta tj.
smanjili u koracima od 1 minute.
Uputa: Maksimalno vrijeme parenja iznosi
90 minuta.
Uputa: Vodite računa o tome, da kod duljeg
vremena parenja evtl. nadopunite vode. Za
nadopunjivanje rabite bočne otvore na zdjelici
za primanje kondenzata 7. Osnovni uređaj/
spremnik za vodu 10 koji je napunjen do
oznake MAX 19 dostatno je napunjen za
vrijeme parenja od cca. 1 sata.
OPREZ! OPASNOST OD OPEKLINA!
Vodite računa o tome, da voda ne prekorači
oznaku MAX 19. Inače bi moglo tijekom kuha-
nja prskati vruća voda iz parnog kuhala.
j Pritisnite tipku za UKLJUČIVANJE/ISKLJUČIVA-
NJE 14. Zazvučati će signalni zvuk. Kontrolna
svjetiljka 15 svijetli crveno i uređaj automatski
prebaci na parenje.
j LC pokazivač 13 pokazuje preostalo vrijeme
parenja.
OPREZ! OPASNOST OD OPEKLINA!
Uređaj se tijekom uporabe veoma zagrije.
Vodite računa o tome, da ne dođete u dodir s
parom koja se podiže ili dijelovima uređaja.
j Čim je isteklo namješteno vrijeme parenja,
uređaj automatski prebaci u modus održavanja
topline (vidite „Modus održavanja topline“).
Uputa: Tijekom parenja možete vrijeme parenja
u svako doba povečati u koracima od 5 minuta
pritiskanjem tipke PLUS/MINUS 16 tj. smanjiti
u koracima od 1 minute. Čim ručno namjestite
vrijeme parenja na „0“, uređaj automatski
prebaci u modus održavanja topline (vidite
„Modus održavanja topline“).
OPREZ! OPASNOST OD OPEKLINA!
Uvijek sporo podižite poklopac 1, te ga
okrenite od sebe kako bi para mogla odlaziti
unazad. Ne pregibajte se preko uređaja, dok
stvara paru. Rabite kuhinjske rukavice, dok do-
dirujete poklopac 1i posudu za kuhanje 3,
4, 6. Ako želite provjeriti da li su živežne
namirnice zgotovljene, rabite dugu vilicu s
držkom ili kuharska kliješta.
j Pritisnite tipku za UKLJUČIVANJE/ISKLJUČI-
VANJE 14, kako bi prije vremena prekinuli
parenje ili isključili uređaj. Pokazivanje na LC
58820_Dampfgarer_Content_LB7.indd 21 11.10.10 16:09

22 HR
Stavljanje u pogon
pokazivaču 13 ponovno prebaci na pokaziva-
nje vremena 20 (vidite prik. A).
Uputa: Čim se tijekom pogona potroši rezerva
vode, zazvuče signalni zvukovi. Parenje se pre-
kine. Pokazivanje na LC pokazivaču 13 ponovno
prebaci na pokazivanje vremena 20 (vidite
prik. A). Stoga redovito provjeravajte vodostaj
pomoću pokazivanja vodostaja 12 i pravovre-
meno nadopunite dostatno vode.
OPREZ! OPASNOST OD OPEKLINA!
Vodite računa o tome da voda ne prekorači
oznaku MAX 19. Inače bi tijekom kuhanja
mogla prskati vruća voda iz parnog kuhala.
Q
Uporaba usporavanja
pokretanja
Uputa: Vodite računa o tome, da osnovni uređaj/
spremnik za vodu 10 treba biti napunjen vodom
najmanje do oznake Minimal 9. Uvjerite se u to,
da su turbo prsten 8i zdjelica za primanje kon-
denzata 7ispravno postavljeni.
j Pritisnite tipku PROG 17. Na LC pokazivaču
13 pojavit će se pokazivanje vremena 20 kao
i znak PROG 21 (vidite prik. A).
j Pritisnite tipku Plus-/Minus 16, kako bi željeno
vrijeme usporavanja povećali u koracima po
10 minuta tj. smanjili u koracima po 1 minutu.
Uputa: Namješteno vrijeme usporavanja
odnosi se na trenutno vrijeme. To znači, ako u
13:00 sati namjestite vrijeme usporavanja od
30 minuta, postupak parenja počinje u 13:30 sati.
Maksimalno vrijeme usporavanja iznosi 24 sata.
j Ponovno pritisnite tipku PROG 17.
j Pritisnite tipku Plus-/Minus 16, kako bi povećali
vrijeme kuhanja u koracima od 5 minuta tj.
smanjili u koracima od 1.
Uputa: Maksimalno vrijeme parenja iznosi
90 minuta.
Uputa: Vodite računa o tome, da u slučaju
duljeg vremena parenja evtl. nadopunite vode.
Za nadopunjivanje rabite bočne otvore na zdjelici
za prijem kondenzata 7. Osnovni uređaj/
spremnik za vodu 10 koji je napunjen do oznake
MAX 19 dostatno je napunjen za vrijeme
parenja od cca. 1 sata.
j Ponovno pritisnite tipku PROG 17. Na LC
pokazivaču 13 pojavit će se sad pokazivanje
vremena 20 kao i znak PROG 21. Usporavanje
pokretanja je sad uključeno.
j Čim je isteklo namješteno vrijeme, zazvuči
signalni zvuk, kontrolna svjetiljka 15 svjetli
crveno i uređaj automatski pokrene postupak
parenja.
OPREZ! OPASNOST OD OPEKLINA!
Uređaj se tijekom uporabe veoma zagrije.
Vodite računa o tome, da ne dođete u dodir s
parom koja se podiže ili dijelovima uređaja.
Uputa: Čim se rezerva vode tijekom pogona
potroši, zazvuče signalni zvukovi. Postupak pa-
renja se prekine. Stoga redovito provjeravajte
vodostaj pomoću pokazivanja vodostaja 12 i
pravovremeno nadopunite dostatno vode.
OPREZ! OPASNOST OD OPEKLINA!
Vodite računa o tome, da voda ne prekorači
oznaku MAX 19. Inače može tijekom kuhanja
vruća voda prskati iz parnog kuhala.
j Pritisnite tipku PROG 17, kako bi prekinuli
usporavanje pokretanja. Znak PROG 21 se
izgasi na LC pokazivaču 13.
Q
Modus održavanja topline
Nakon isteka namještenog vremena parenja, uređaj
automatski prebaci u modus održavanja topline.
- Na LC pokazivaču 13 pojavi se pokazivanje
vremena 20 kao i znak za održavanje topline
22.
- Kontrolna svjetiljka 15 svjetli zeleno.
- U modusu održavanja topline voda se ciklično
ponovno zagrijava. Na taj način se održava
jela toplima na temperaturi od cca. 60 - 70°C.
OPREZ! OPASNOST OD OPEKLINA!
Uređaj se tijekom uporabe veoma zagrije.
Vodite računa o tome, da ne dođete u dodir s
parom koja se podiže ili dijelovima uređaja.
- Modus održavanja topline ostaje toliko dugo
uključen, sve dok se potroši rezerva vode ili
dok Vi pritisnete jednu tipku.
j Pritisnite tipku za UKLJUČIVANJE/ISKLJUČI-
VANJE 14, kako bi isključili modus održavanja
topline.
58820_Dampfgarer_Content_LB7.indd 22 11.10.10 16:09
Other manuals for SDG 800 A1
3
Table of contents
Languages:
Other Silvercrest Electric Steamer manuals

Silvercrest
Silvercrest KH 1560 User manual

Silvercrest
Silvercrest SDG 950 C3 User manual

Silvercrest
Silvercrest DGS 800 User manual

Silvercrest
Silvercrest SDG 800 B2 User manual

Silvercrest
Silvercrest SDG 800 B2 User manual

Silvercrest
Silvercrest SDG 800 A1 User manual

Silvercrest
Silvercrest SDG 950 C3 User manual