• Die Laserlibelle so drehen, dass sie sich über einem der
Einstellräder befindet
• Das Rad einstellen, bis die Phiolen anzeigen, dass sie horizontal ist
• Die Libelle 90° rotieren und mit Hilfe der Einstellräder horizontal
einstellen
• Diesen Prozess durch 360° fortsetzen, bis die Libelle ganz horizontal
ist
VERWENDUNG
• Zum Einschalten des Lasers das Ende des roten Knopfs drehen
• Die Libelle rotieren und die Positionen an den gewünschten Stellen
markieren
INSTANDHALTUNG
• Nach jedem Gebrauch die Libelle mit einem trocken Tuch oder einer
Bürste von Schmutz befreien
• Wenn die Libelle für längere Zeit aufbewahrt und nicht verwendet
wird, wird empfohlen, dass die Batterien herausgenommen werden
HINWEIS: Dieses Libelle oder die Batterien nicht im normalen
Haushaltsmüll entsorgen.
LASERSICHERHEIT ACHTUNG
Nicht direkt in den Laserstrahl blicken. Eine Gefahr kann bestehen,
wenn Sie absichtlich in den Strahl blicken. Beobachten Sie bitte alle
Sicherheitsrichtlinien.
In Verbindung mit unserer fortlaufenden Produktentwicklung können
sich die Spezifikationen für Silverline-Produkte ohne vorherige
Ankündigung ändern.
VOR DEM GEBRAUCH
Zusammenbau
• Den Deckel des Batteriefachs (2) auf der Rückseite durch
Abschrauben abnehmen
• Die Batterien wie auf der Libelle angezeigt in diese einlegen
• Den Deckel durch Wiederanschrauben wieder anbringen
• Den Drehuntersatz an das Stativ schrauben
• Die Libelle in die Halterung geben und in Position klemmen
HINWEIS: Die horizontale Phiole sollte zentral im Drehuntersatz sitzen.
EINSTELLUNG
• Die Laserliebelle auf einen festen Boden in Reichweite der zu
markierenden Wand stellen
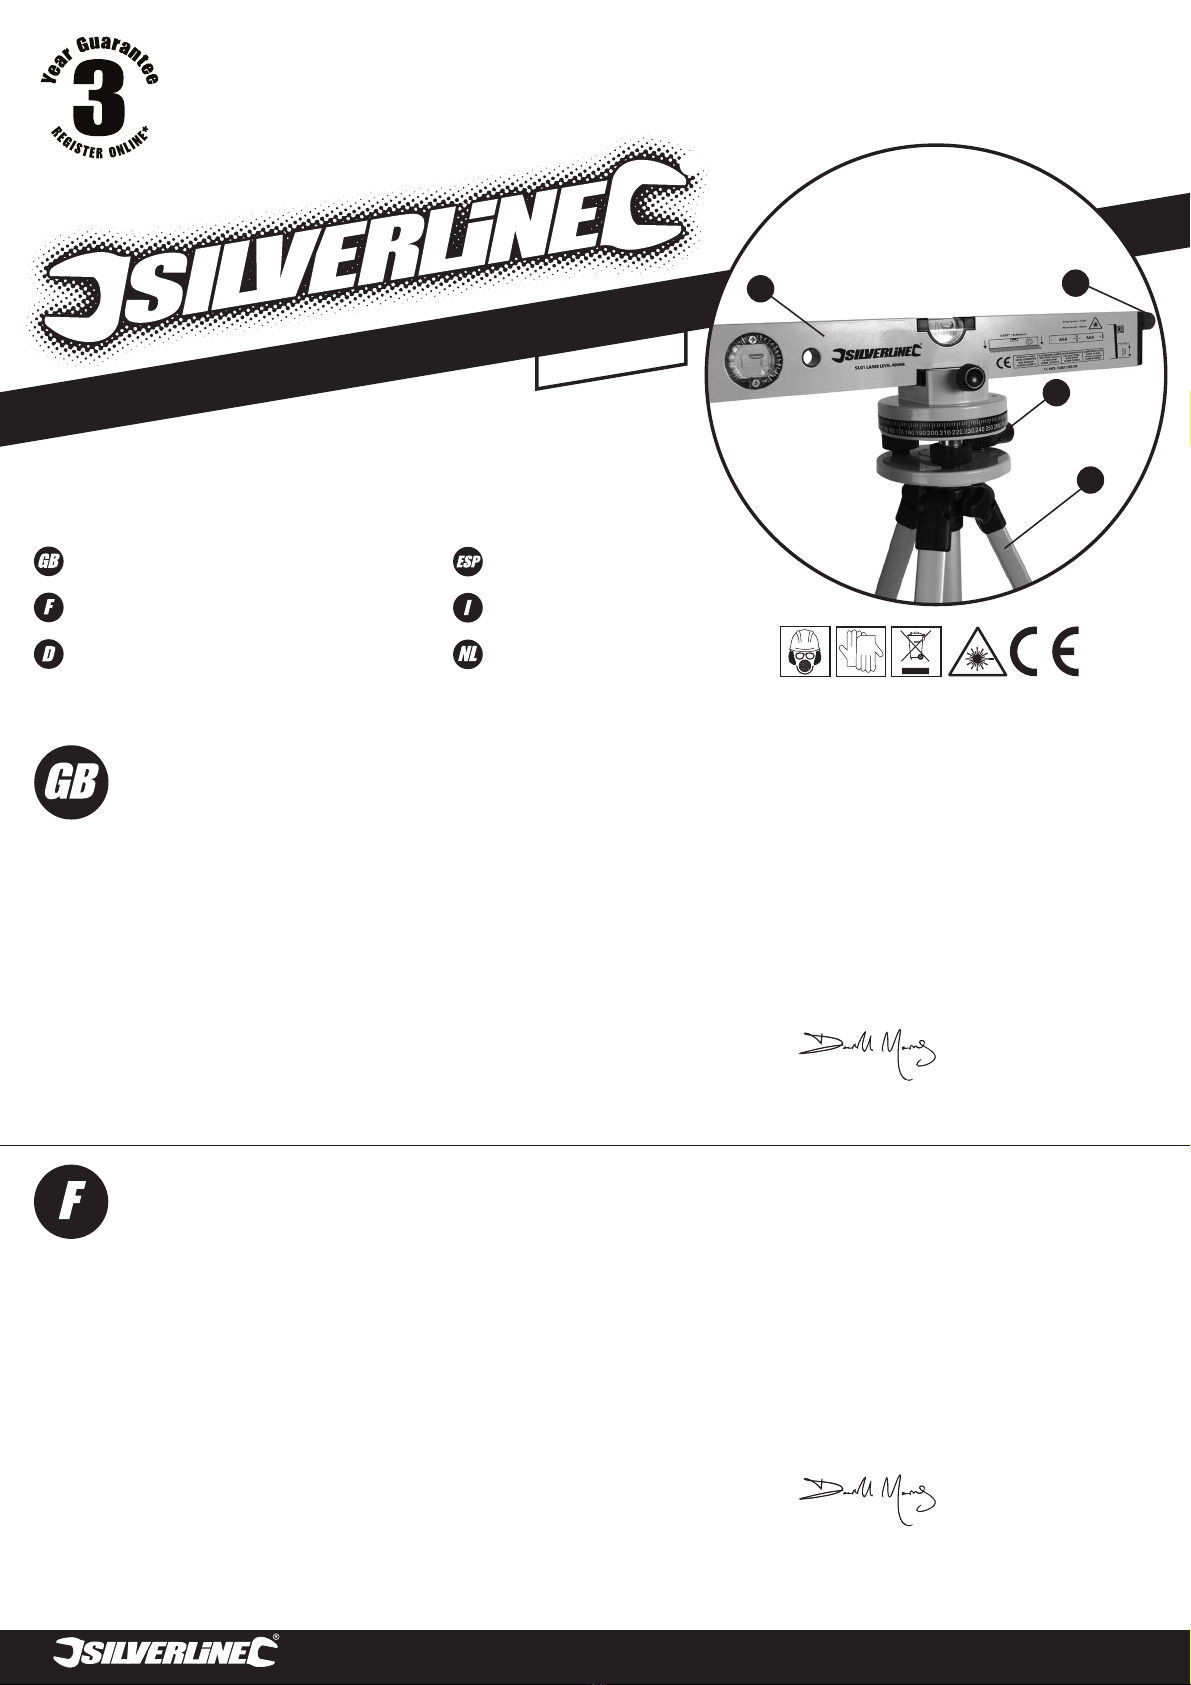
1) Laserlibelle
2) Batteriefach
3) Drehuntersatz
4) Stativ
3V DC
30m
0.5mm/m
<1Mw
=650nm
III
II
Normal
SPEZIFIKATION
Spannung:
Arbeitsbereich:
Genauigkeit:
Laserleistung:
Sichtbares Rotlich:
Schutzklasse:
Laser:
Schutzgrad:
PREPARACIÓN
• Posicione el nivel láser sobre un suelo firme dentro del alcance de la
pared a marcar
• Ajuste el nivel láser hasta que esté sobre uno de las ruedas de
ajuste
• Ajuste el nivel hasta que el tubo indique que es correcto
• Gire el nivel 90° y use las ruedas de ajuste para hacer que esté
nivelado
• Continúe ese proceso a través de 360° hasta que esté
completamente nivelado
UTILIZACIÓN
• Para activar el láser, tome el mando rojo y gire su extremo
• Gire el nivel y marque los puntos en los lugares deseados
MANTENIMIENTO
• Después de cada utilización, limpie el nivel de todos los residuos
utilizando un paño o cepillo seco
• Si el nivel se almacena por un periodo de tiempo considerable, en el
que no se utilizará, se aconseja retirar las pilas
NOTA: No deseche este nivel o las pilas como residuos sin clasificar.
LÁSER ADVERTENCIA
No mire directamente al rayo láser. Puede haber peligro si deliberada-
mente mira al rayo. Observe por favor todas las reglas de la seguridad.
Como parte de nuestro desarrollo continuo de productos, las
especificaciones de productos Silverline pueden alterarse sin
notificación previa.
ANTES DE UTILIZARLO
Montaje
• Retire la tapa del compartimiento de pilas (2) situada en la parte
trasera destornillándola
• Coloque las pilas en el nivel de la forma indicada en éste.
• Vuelva colocar la tapa atornillándola.
• Atornille la base giratoria en el trípode
• Coloque el nivel en su soporte y sujételo en posición con la
abrazadera
NOTA: El tubo horizontal debe colocarse centralmente sobre la base
giratoria
1) Laserlibelle
2) Batteriefach
3) Drehuntersatz
4) Stativ
3V DC
30m
0,5mm/m
<1Mw
=650nm
III
II
Ordinario
ESPECIFICACIONES
Voltaje:
Radio de Acción:
Exactitud:
Potencia de salida
del láser:
Luz roja visible:
Clase de protección:
Láser:
Grado de protección:
IMPOSTAZIONE
• Posizionare il livello laser su una superficie piana sicura alla portata
del muro da marcare
• Ruotare il livello laser in modo tale che si trovi su una delle rotelle di
regolazione
• Regolare la rotella fino a quando l’indicatore indica che è a livello
• Ruotare il livello di 90° e usare la rotella di regolazione per portarlo a
livello
• Continuare questo processo per 360° fino a quando è
completamente a livello
USO
• Per accendere il laser, afferrare il pomello rosso e girare l’estremità
per accenderlo
• Ruotare il livello e marcare i punti nelle posizioni desiderate
MANUTENZIONE
• Dopo l’uso pulire sempre il livello dallo sporco o dalla polvere usando un
panno asciutto o una spazzola
• Se si deve conservare il livello per un periodo di tempo prolungato, è
consigliabile rimuovere le batterie
NOTA: Non gettare il livello o la batteria nei rifiuti indifferenziati.
LASER AVVERTENZA
Non rivolgere lo sguardo direttamente al fascio laser. Fissare
deliberatamente un fascio laser rappresenta un rischio per la salute.
Osservi prego tutte le regole di sicurezza.
Silverline è costantemente impegnata nello sviluppo dei suoi prodotti
e pertanto le caratteristiche tecniche dell’utensile potrebbero variare
senza preavviso.
PRIMA DELL’USO
Montaggio
• Svitare il coperchio del vano batteria (2) sulla parte posteriore per
rimuoverlo
• Inserire le batterie nel livello seguendo le istruzioni sul dispositivo
• Chiudere il vano batteria riavvitando il coperchio
• Avvitare la base rotante al cavalletto
• Porre il livello nella staffa e fissarlo in posizione
NOTA: L’indicatore orizzontale dovrà essere posto centralmente sulla
base rotante
1) Livello laser
2) Vano batteria
3) Base rotante
4) Cavalletto
3V DC
30m
0,5mm/m
<1mw
=650nm
III
II
Normale
CARATTERISTICHE TECNICHE
Tensione d’esercizio:
Portata utile:
Precisione:
Potenza d’uscita laser:
Luce rossa
visibile:
Classe di protezione:
Laser:
Grado di protezione:
OPSTELLING
• Zet de laserwaterpas op een stevige ondergrond, binnen bereik van
de muur die moet worden gemarkeerd.
• Draai de laserwaterpas zodanig dat hij boven een van de stelwieltjes
zit
• Stel het wieltje zo bij dat de flacon aangeeft dat hij waterpas staat.
• Draai de waterpas 90° en gebruik de stelwieltjes om hem waterpas
te zetten.
• Herhaal dit voor de hele 360° totdat hij helemaal waterpas staat.
GEBRUIK
• Pak de rode knop en draai aan het eind daarvan om hem aan te
zetten.
• Draai de waterpas en markeer de punten op de gewenste plaatsen.
ONDERHOUD
• Maak de waterpas na elk gebruik met een droge doek of borstel schoon.
• Als de waterpas langere tijd niet wordt gebruikt, wordt aangeraden om de
batterijen te verwijderen.
N.B. De waterpas en de batterijen mogen niet bij het normale huisvuil
worden weggedaan.
LASERS WAARSCHUWING
Kijk niet rechtstreeks in de laserstraal. Het kan gevaarlijk zijn als u
opzettelijk in de straal kijkt. Gelieve te leven alle veiligheidsregels na.
Omdat Silverline producten deel uitmaken van onze voortdurende
productontwikkeling kunnen de specificaties zonder aankondiging
wijzigen.
VÓÓR GEBRUIK
Samenstelling
• Verwijder de kap op het batterijvakje (2) aan de achterkant door de
schroeven los te maken
• Stop de batterijen in de waterpas, volgens de instructies op de
waterpas
• Zet de kap weer met de schroeven vast
• Draai de roterende basis op de driepoot
• Plaats de waterpas in de houder en klem hem in positie
N.B. De horizontale flacon moet centraal op de roterende basis
worden geplaatst.
1) Laserwaterpas
2) Batterijvakje
3) Roterende basis
4) Driepoot
3V DC
30m
0,5mm/m
<1mW
=650Nm
III
II
Gewoon
SPECIFICATIE
Spanning:
Werkbereik:
Nauwkeurigheid:
Laservermogen:
Zichtbaar rood licht:
Beschermingsklasse:
Laser:
Mate van bescherming:
EU-Konformitätserklärung
Name des Unterzeichners: Mr. Darrell Morris
Bevollmächtigt durch: Silverline Tools
Erklärt hiermit, dass das Produkt:
Ident.-Nr.: SL01
Produktbeschreibung: Laserwasserwaagen-Satz
Den folgenden Richtlinien entspricht:
• Niederspannungsrichtlinie 2006/95/EG
• Elektromagnetische Verträglichkeitsrichtlinie 2004/108/EG
• RoHS-Richtlinie 2011/65/EG
• EN 61326-1:2006
• EN 61010-1:2010
• EN 60825-1:2007
Benannte Stelle: TUV Rheinland, Shanghai, China
Techn. Unterlagen bei: Silverline Tools
Datum: 07.11.2013
Unterzeichnet von:
Geschäftsführender Direktor
Name und Anschrift des Herstellers oder seines niedergelassenen
Bevollmächtigten:
Powerbox International Ltd., Boundary Way, Lufton Trading Estate, Yeovil,
Somerset, BA22 8HZ, Großbritannien
Declaración de conformidad CE
El abajo firmante: Mr Darrell Morris
Autorizado por: Silverline Tools
Declara que el producto:
Código de identificación: SL01
Descripción: Juego de nivel láser
Está en conformidad con las directivas:
• Directiva de baja tensión 2006/95/CE
• Compatibilidad electromagnética 2004/108/EC
• Directiva ROHS 2011/65/CE
• EN 61326-1:2006
• EN 61010-1:2010
• EN 60825-1:2007
Organismo notificado: TUV Rheinland, Shanghai, China
La documentación técnica se conserva en:
Silverline Tools
Fecha: 07/11/13
Firma:
Director General
Nombre y dirección del fabricante o representante autorizado:
Powerbox International Ltd., Boundary Way, Lufton Trading Estate, Yeovil,
Somerset, BA22 8HZ, Reino Unido.
Dichiarazione di conformità CE
Il sottoscritto: Sig. Darrell Morris
come autorizzato di: Silverline Tools
Dichiara che il prodotto:
Codice di identificazione: SL01
Descrizione: Kit livella laser
Si conforma alle seguenti direttive
• Direttiva sulla bassa tensione 2006/95/CE
• Direttiva sulla compatibilità elettromagnetica 2004/108/CE
• Direttiva ROHS 2011/65/CE
• EN 61326-1:2006
• EN 61010-1:2010
• EN 60825-1:2007
Organismo informato: TUV Rheinland, Shanghai, Cina
La documentazione tecnica è mantenuta da: Silverline Tools
Data: 07/11/13
Firma:
Direttore
Nome e indirizzo del fabbricante oppure persona autorizzata:
Powerbox International Ltd., Boundary Way, Lufton Trading Estate, Yeovil,
Somerset, BA22 8HZ, Regno Unito
EG-verklaring van overeenstemming
De ondergetekende: Mr. Darrell Morris
Gemachtigd door: Silverline Tools
Verklaart dat
Identificatienummer: SL01
Beschrijving: Laser kit
Voldoet aan de volgende richtlijnen:
• Richtlijn laagspanning 2006/95/EG
• Elektromagnetische verenigbaarheid 2004/108/EG
• Richtlijn ROHS 2011/65/EG
• EN 61326-1:2006
• EN 61010-1:2010
• EN 60825-1:2007
Keuringsinstantie: TUV Rheinland, Shanghai, China
De technische documentatie wordt bijgehouden door: Silverline Tools
Datum: 07-11-2013
Handtekening:
Directeur
Naam en adres van fabrikant of gemachtigde:
Powerbox International Ltd., Boundary Way, Lufton Trading Estate, Yeovil,
Somerset, BA22 8HZ, Verenigd Koninkrijk
www.silverlinetools.com
SL01_Z1MANPRO1 B&W.indd 2 04/03/2014 11:30