SimPure Y7P-W User manual

Who
we
are
«
SimPure®
is
a
purification
brand
based
in
the
United
States,
focusing
on
engineering
filtration
and
advanced
purification
technology.
«
SimPure®
promotes
the
philosophy
of
a
minimalist
lifestyle,
returning
to
nature
with
clean
water
and
fresh
air.
«
SimPure®
designs
products
to
be
both
smart,
easy
to
operate,
and
practical
in
appearance
and
functionality.
Contact
Us
If
you
require
technical
assistance,
please
contact
our
friendly
professional
support
engineers,
who
will
be
pleased
to
assist
you.
4530
BSTREET
NW
#A,
AUBURN
WA
98001,
USA
Customer
Service:
Toll-Free:
1-866-528-4572
Website:
www.simpurelife.com
®
4530
BSTREET
NW
#A,
.
AUBURN
WA
98001,
USA
=
staysimple.
stay
pure—
Y7P-W
Water
Filtration
System
Model:
Y7P-W(Y7P
Series)
[
——stay
simple.
stay
pure—
Retain
owner's
manual
for
future
reference
Warning
&
Caution
SimPure®
products
are
designed
with
safety
in
mind.
However,
personnel
using these
units
must
be
familiar
with
any
potential
dangers.
All
safety
information
detailed
in
this
handbook
should
be
reviewed
before
installing
and
operating
this
water
purification
system.
This
product
is
not
a
toy;
please
keep
children
away from
the
water
purifier
or
use
under
adult
supervision.
Please
keep
packing
materials
out
of
children's
reach.
The
system
has
been
designed
for
indoor
use
only.
Install
the
system
out
of
direct
sunlight
on
a
flat,
level,
dry, and
secure
surface
in
ambient
room
temperature.
Do
not
move
the
system
without
first
isolating
the
power
supply and
draining
the
feed
water
tank.
This
unit
is
for
use
with
cold
municipal
tap
water
or
potable
well
water
that
has
been
tested
safe
by
a
certified
laboratory.
Never
use
hot
water
or
unknown/unsafe
sources
of
water.
The
installation
of
the
system
must
comply
with
your
local
and
state
regulations.
Please
check
before
commencing
installation.
In
case
of
malfunction,
isolate
the
water
supply
to
the
system.
If
any
part
of
the
system
is
damaged
or
missing,
replace
the
item
before
use.
Warnings
and
Cautions
are
provided;
Failing
to
observe
the
instructions
could
result
in
damage
to
the
equipment,
associated
parts,
surroundings,
or
personal
injury.
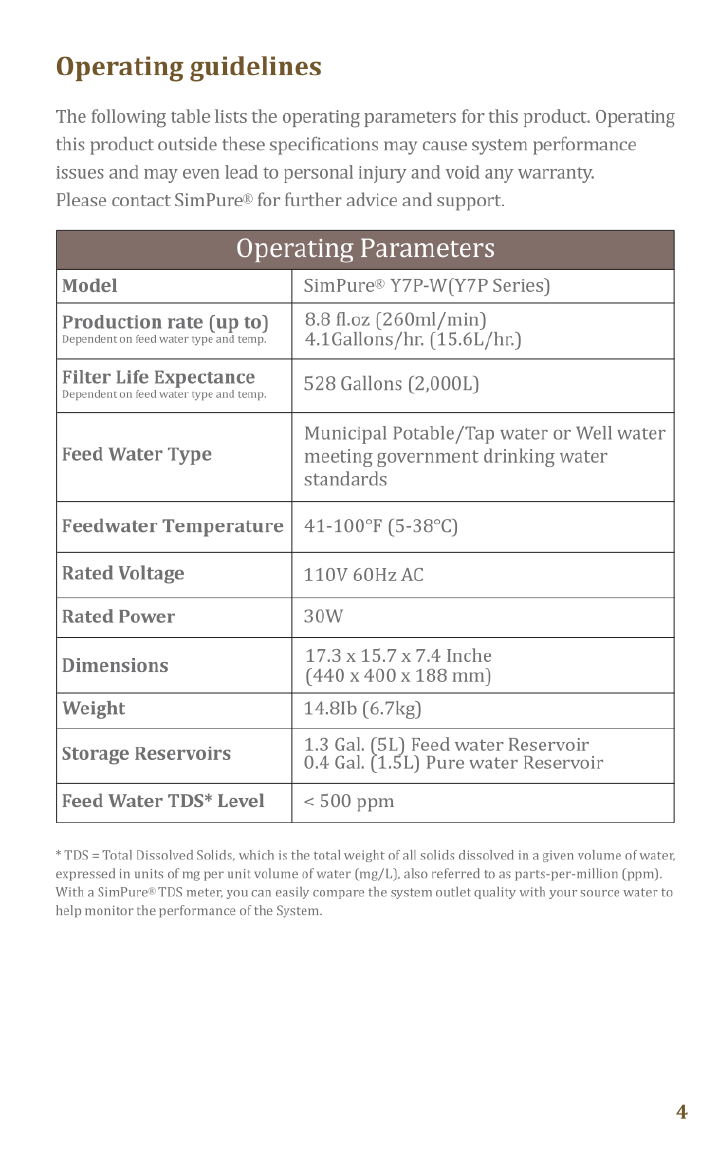
Operating
guidelines
The
following
table
lists
the
operating
parameters
for
this
product.
Operating
this
product
outside
these
specifications
may
cause
system
performance
issues
and
may
even
lead
to
personal
injury
and
void
any
warranty.
Please
contact
SimPure®
for
further
advice
and
support.
Operating
Paramet
Model
SimPure®
Y7P-W(Y7P
Series)
Production
rate
(up
to)
Dependent
on
feed
water
type
and
temp,
8.8
fl.oz
(260ml/min)
4.1Gallons/hr.
(15.6L/hr.)
Filter
Life
Expectance
Dependent
on
feed
water
type
and
temp,
528 Gallons
(2,000L)
Feed
Water
Type
Municipal
Potable/Tap
water
or
Well
water
meeting
government
drinking water
standards
Feedwater
Temperature
41-100°F
(5-38°C)
Rated
Voltage
110V
60Hz
AC
Rated
Power
30w
Dimensions
17.3x15.7
x
7.4
Inche
(440
x
400
x
188
mm)
Weight
14.81b
(6.7kg)
Storage
Reservoirs
1.3
Gal.
(5L)
Feed
water
Reservoir
0.4
Gal.
(1.5L)
Pure
water
Reservoir
Feed
Water
TDS*
Level
<500
ppm
*TDS
=
Total
Dissolved
Solids,
which
is
the
total
weight
of
all
solids
dissolved
in
a
given
volume
of
water,
expressed
in
units
of
mg
per
unit
volume
of
water (mg/L),
also
referred
to
as
parts-per-million
(ppm)
With
a
SimPure®
TDS
meter,
you
can easily
compare
the
system
outlet
quality
with
your
source
water
to
help
monitor
the
performance
of
the
System
Warning
&
Caution
SimPure®
products
are
designed
with
safety
in
mind.
However,
personnel
using these
units
must
be
familiar
with
any
potential
dangers.
All
safety
information
detailed
in
this
handbook
should
be
reviewed
before
installing
and
operating
this
water
purification
system.
This
product
is
not
a
toy;
please
keep
children
away from
the
water
purifier
or
use
under
adult
supervision.
Please
keep
packing
materials
out
of
children's
reach.
The
system
has
been
designed
for
indoor
use
only.
Install
the
system
out
of
direct
sunlight
on
a
flat,
level,
dry, and
secure
surface
in
ambient
room
temperature.
Do
not
move
the
system
without
first
isolating
the
power
supply and
draining
the
feed
water
tank.
This
unit
is
for
use
with
cold
municipal
tap
water
or
potable
well
water
that
has
been
tested
safe
by
a
certified
laboratory.
Never
use
hot
water
or
unknown/unsafe
sources
of
water.
The
installation
of
the
system
must
comply
with
your
local
and
state
regulations.
Please
check
before
commencing
installation.
In
case
of
malfunction,
isolate
the
water
supply
to
the
system.
If
any
part
of
the
system
is
damaged
or
missing,
replace
the
item
before
use.
Warnings
and
Cautions
are
provided;
Failing
to
observe
the
instructions
could
result
in
damage
to
the
equipment,
associated
parts,
surroundings,
or
personal
injury.
Operating
guidelines
The
following
table
lists
the
operating
parameters
for
this
product.
Operating
this
product
outside
these
specifications
may
cause
system
performance
issues
and
may
even
lead
to
personal
injury
and
void
any
warranty.
Please
contact
SimPure®
for
further
advice
and
support.
Operating
Paramet
Model
SimPure®
Y7P-W(Y7P
Series)
Production
rate
(up
to)
Dependent
on
feed
water
type
and
temp,
8.8
fl.oz
(260ml/min)
4.1Gallons/hr.
(15.6L/hr.)
Filter
Life
Expectance
Dependent
on
feed
water
type
and
temp,
528 Gallons
(2,000L)
Feed
Water
Type
Municipal
Potable/Tap
water
or
Well
water
meeting
government
drinking water
standards
Feedwater
Temperature
41-100°F
(5-38°C)
Rated
Voltage
110V
60Hz
AC
Rated
Power
30w
Dimensions
17.3x15.7
x
7.4
Inche
(440
x
400
x
188
mm)
Weight
14.81b
(6.7kg)
Storage
Reservoirs
1.3
Gal.
(5L)
Feed
water
Reservoir
0.4
Gal.
(1.5L)
Pure
water
Reservoir
Feed
Water
TDS*
Level
<500
ppm
*TDS
=
Total
Dissolved
Solids,
which
is
the
total
weight
of
all
solids
dissolved
in
a
given
volume
of
water,
expressed
in
units
of
mg
per
unit
volume
of
water (mg/L),
also
referred
to
as
parts-per-million
(ppm)
With
a
SimPure®
TDS
meter,
you
can easily
compare
the
system
outlet
quality
with
your
source
water
to
help
monitor
the
performance
of
the
System
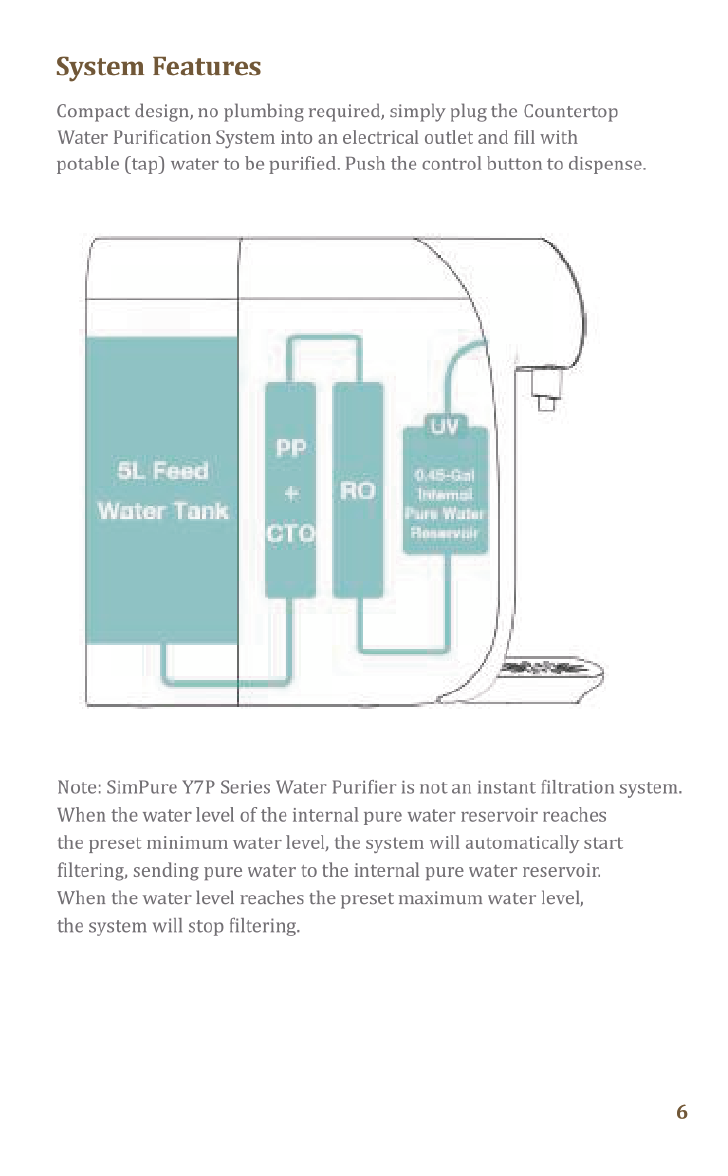
System
Features
Compact
design,
no
plumbing
required,
simply
plug
the
Countertop
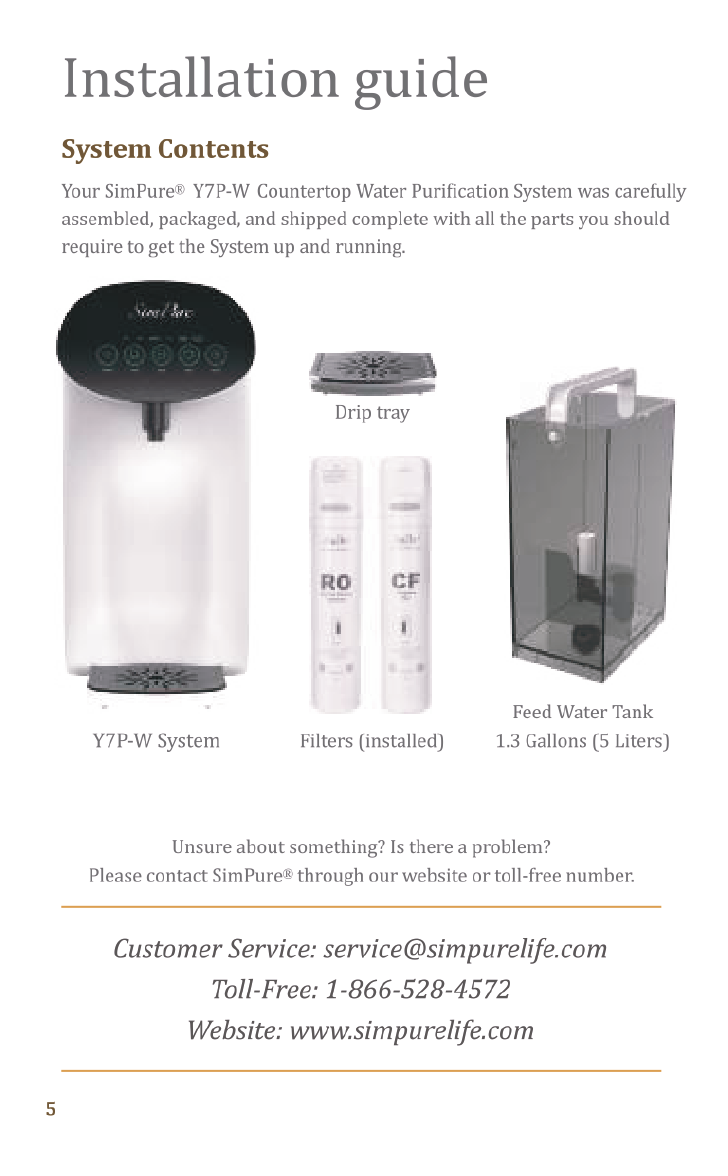
Installation
guide
Water
Purification
System
into
an
electrical
outlet
and
fill
with
System
Contents
potable
(tap)
water
to
be
purified.
Push
the
control
button
to
dispense.
Your
SimPure®
Y7P-W
Countertop
Water
Purification
System
was
carefully
assembled,
packaged,
and
shipped
complete
with
all
the
parts
you
should
require
to
get the
System
up
and
running.
Drip
tray
-
RO
CF
Feed
Water
Tank
Y7P-W
System
Filters
(installed)
1.3
Gallons
(5
Liters)
Note:
SimPure
Y7P
Series
Water
Purifier
is
not
an
instant
filtration
system.
When
the
water
level
of
the
internal
pure
water
reservoir
reaches
the
preset
minimum
water
level,
the
system
will
automatically
start
filtering,
sending
pure
water
to
the
internal
pure
water
reservoir.
When
the
water
level
reaches
the
preset
maximum
water
level,
the
system
will
stop
filtering.
Unsure
about
something?
Is
there
a
problem?
Please
contact
SimPure®
through
our
website
or
toll-free
number.
Customer
Service:
Toll-Free:
1-866-528-4572
Website:
www.simpurelife.com
System
Features
Compact
design,
no
plumbing
required,
simply
plug
the
Countertop
Installation
guide
Water
Purification
System
into
an
electrical
outlet
and
fill
with
System
Contents
potable
(tap)
water
to
be
purified.
Push
the
control
button
to
dispense.
Your
SimPure®
Y7P-W
Countertop
Water
Purification
System
was
carefully
assembled,
packaged,
and
shipped
complete
with
all
the
parts
you
should
require
to
get the
System
up
and
running.
Drip
tray
-
RO
CF
Feed
Water
Tank
Y7P-W
System
Filters
(installed)
1.3
Gallons
(5
Liters)
Note:
SimPure
Y7P
Series
Water
Purifier
is
not
an
instant
filtration
system.
When
the
water
level
of
the
internal
pure
water
reservoir
reaches
the
preset
minimum
water
level,
the
system
will
automatically
start
filtering,
sending
pure
water
to
the
internal
pure
water
reservoir.
When
the
water
level
reaches
the
preset
maximum
water
level,
the
system
will
stop
filtering.
Unsure
about
something?
Is
there
a
problem?
Please
contact
SimPure®
through
our
website
or
toll-free
number.
Customer
Service:
Toll-Free:
1-866-528-4572
Website:
www.simpurelife.com

Control
and
Display
Panel
RO
Fitering
Uv
Ghange
FueWatr
Flushing
180ml
350ml
450mI
Reset
CF
/RO
Indicates
when
the
user
needs
to
replace
the
filters.
Filtering
Indicates
System
is
filtering
water.
UV
(UV
wavelength
range:
260~280nm,
UV
dose:
35p]/cm?)
Indicates
that
the
Ultraviolet
light
is
working.
Change
Water
Indicates
the
Feed
Water
Tank
contents
must
be
emptied
and
refilled.
Pure
Water
Shortage
Indicates
that
there
is
not
enough
pure
water
in
the
interal
pure
water
reservoir,
need
to
wait
for
the
system
to
filter
Flushing
Indicates
the
System
is
flushing.
180ml
/
350ml
/
450ml
Dispense
Indicates
the
System
will
dispense
the
selected
amount
of
purified
water.
Reset
Indicates
when
the
filter
cartridges
are
exhausted
Please
refer
to
page
12
for
full
detailed
descriptions
of
each
function.
Connecting
up
the
System
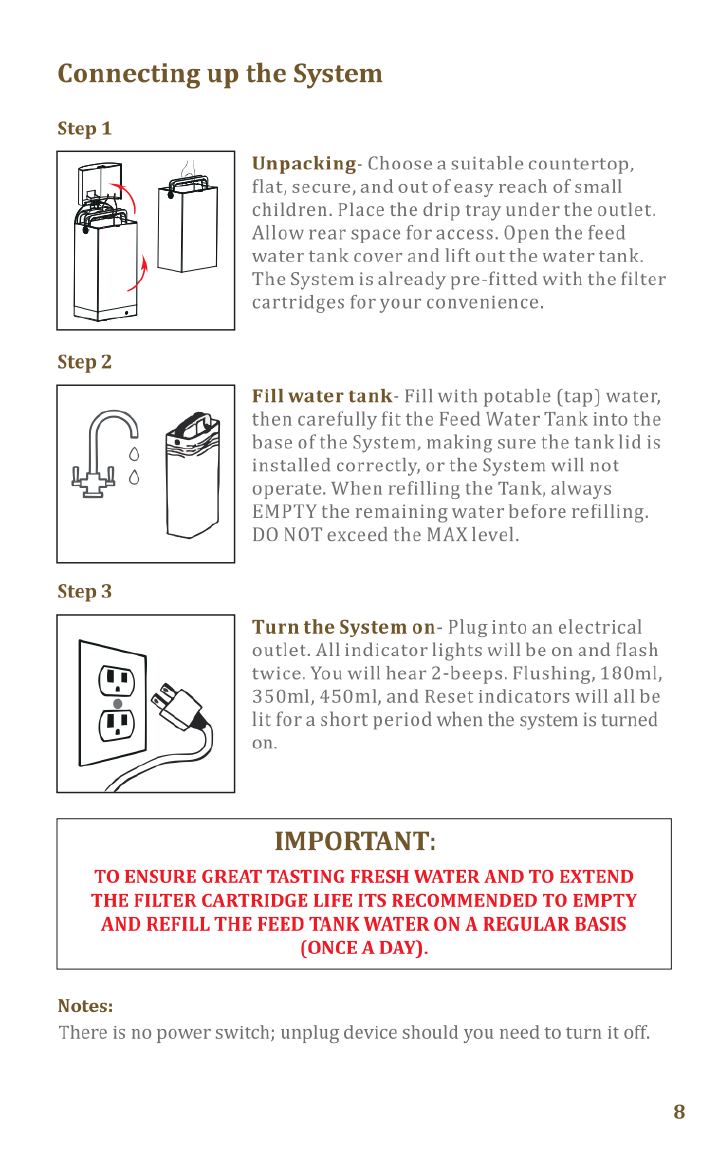
Unpacking-
Choose
a
suitable
countertop,
flat,
secure, and
out
of
easy
reach
of
small
children.
Place
the
drip
tray
under
the
outlet.
Allow
rear
space
for
access.
Open
the
feed
water
tank
cover
and
lift
out
the
water
tank.
The
System
is
already
pre-fitted
with
the
filter
cartridges
for
your
convenience.
Fill
water
tank-
Fill
with
potable
(tap)
water,
then
carefully
fit
the
Feed
Water
Tank
into
the
base
of
the
System,
making
sure
the
tank
lid
is
installed
correctly,
or
the
System
will
not
operate.
When
refilling
the
Tank,
always
EMPTY
the
remaining
water
before
refilling.
DO
NOT
exceed
the
MAX
level.
Step
3
Turn
the
System
on-
Pluginto
an
electrical
outlet.
All
indicator
lights
will
be
on
and
flash
@
twice.
You
will
hear
2-beeps.
Flushing,
180ml,
-
350ml,
450ml,
and
Reset
indicators
will
all
be
@
lit
for
a
short
period
when
the
system
is
turned
on.
IMPORTANT:
TO
ENSURE
GREAT
TASTING
FRESH
WATER
AND
TO
EXTEND
THE
FILTER
CARTRIDGE
LIFE
ITS
RECOMMENDED
TO
EMPTY
AND
REFILL
THE
FEED
TANK
WATER
ON
A
REGULAR
BASIS
(ONCE
A
DAY).
Notes:
There
is
no
power
switch;
unplug
device
should
you
need
to
turn
it
off.
Control
and
Display
Panel
RO
Fitering
Uv
Ghange
FueWatr
Flushing
180ml
350ml
450mI
Reset
CF
/RO
Indicates
when
the
user
needs
to
replace
the
filters.
Filtering
Indicates
System
is
filtering
water.
UV
(UV
wavelength
range:
260~280nm,
UV
dose:
35p]/cm?)
Indicates
that
the
Ultraviolet
light
is
working.
Change
Water
Indicates
the
Feed
Water
Tank
contents
must
be
emptied
and
refilled.
Pure
Water
Shortage
Indicates
that
there
is
not
enough
pure
water
in
the
interal
pure
water
reservoir,
need
to
wait
for
the
system
to
filter
Flushing
Indicates
the
System
is
flushing.
180ml
/
350ml
/
450ml
Dispense
Indicates
the
System
will
dispense
the
selected
amount
of
purified
water.
Reset
Indicates
when
the
filter
cartridges
are
exhausted
Please
refer
to
page
12
for
full
detailed
descriptions
of
each
function.
Connecting
up
the
System
Unpacking-
Choose
a
suitable
countertop,
flat,
secure, and
out
of
easy
reach
of
small
children.
Place
the
drip
tray
under
the
outlet.
Allow
rear
space
for
access.
Open
the
feed
water
tank
cover
and
lift
out
the
water
tank.
The
System
is
already
pre-fitted
with
the
filter
cartridges
for
your
convenience.
Fill
water
tank-
Fill
with
potable
(tap)
water,
then
carefully
fit
the
Feed
Water
Tank
into
the
base
of
the
System,
making
sure
the
tank
lid
is
installed
correctly,
or
the
System
will
not
operate.
When
refilling
the
Tank,
always
EMPTY
the
remaining
water
before
refilling.
DO
NOT
exceed
the
MAX
level.
Step
3
Turn
the
System
on-
Pluginto
an
electrical
outlet.
All
indicator
lights
will
be
on
and
flash
@
twice.
You
will
hear
2-beeps.
Flushing,
180ml,
-
350ml,
450ml,
and
Reset
indicators
will
all
be
@
lit
for
a
short
period
when
the
system
is
turned
on.
IMPORTANT:
TO
ENSURE
GREAT
TASTING
FRESH
WATER
AND
TO
EXTEND
THE
FILTER
CARTRIDGE
LIFE
ITS
RECOMMENDED
TO
EMPTY
AND
REFILL
THE
FEED
TANK
WATER
ON
A
REGULAR
BASIS
(ONCE
A
DAY).
Notes:
There
is
no
power
switch;
unplug
device
should
you
need
to
turn
it
off.
Flushing
System
If
you
are
commissioning
the
system
for
the
first
time
or
have
just
replaced
the
filter
cartridges,
please
follow
the
below
steps
for
3-5
TIMES
to
ensure
that
the
system
gets
adequately
flushed
before
using.
Step
01
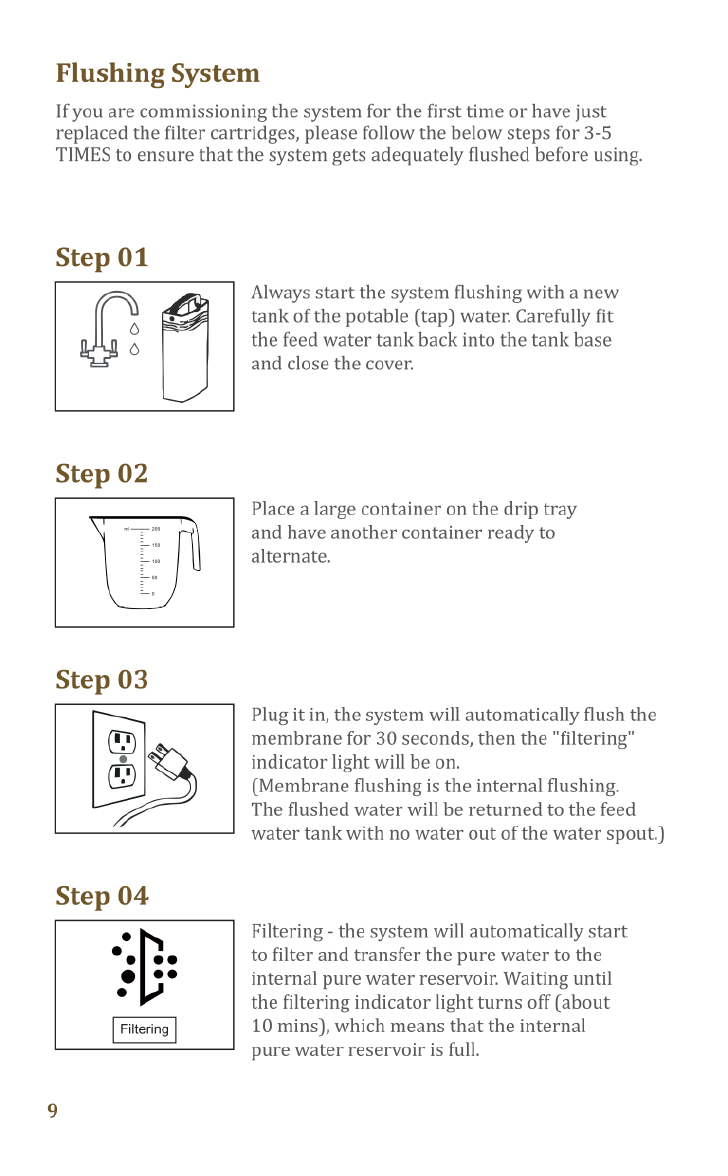
Always
start
the
system
flushing
with
a
new
tank
of
the
potable
(tap)
water.
Carefully
fit
the
feed
water
tank
back
into
the
tank
base
and
close
the cover.
oo
Step
02
Place
a
large
container
on
the
drip
tray
and have
another
container
ready
to
alternate.
Step
03
Plug
it
in,
the
system
will
automatically
flush the
@
membrane
for
30
seconds,
then
the
"filtering”
o
indicator
light
will
be
on.
@
(Membrane
flushing
is
the
internal
flushing.
The flushed
water
will
be
returned
to
the
feed
water
tank with
no
water
out
of
the
water
spout.)
Filtering
-
the
system
will
automatically
start
to
filter
and
transfer
the
pure
water
to
the
internal
pure
water
reservoir.
Waiting
until
the
filtering
indicator
light
turns
off
(about
10
mins),
which
means
that
the
internal
pure
water
reservoir
is
full.
Step
05
Push
1s
Empty
the
internal
pure
water
reservoir
to
flush
-
Push
the
"Flushing"
button:
the
pure
water
will
start
to
flow
from
the
outlet
until
the
internal
reservoir
is
empty.
The
system
will
continue
to
filter
when
the
internal
pure
water
reservoir
is
empty.
Waiting
until
the
"filtering"
indicator
light
turns
off
again
and
pushing
the
"Flushing"
button
again
to
empty
the
internal
pure
water
reservoir.
Push
15
Continue
repeating
the
steps
4-6
until
the
"Change
Water"
indicator
light
starts
‘m
flashing,
empting
the
remaining
water
in
the
Feed
Water
Tank.
Step
08
The
above
steps
1-7
are the
one
round
of
system
flushing process.
Please
repeat
these
steps
for
3-5
TIMES
to
complete
the
system
flushing.
Note:
1.
Every
water
supply
is
different.
Depending
on
your
feed
water
sourceand
quality,
you
can
adjust
the
flushing
frequency.
2.
New
system
may
have
air
bubbles,
particulates
or
slightly
poor
taste,
this
is
normal,
please
follow
these
flush
instructions
to
remedy
the
situation.
10

Flushing
System
If
you
are
commissioning
the
system
for
the
first
time
or
have
just
replaced
the
filter
cartridges,
please
follow
the
below
steps
for
3-5
TIMES
to
ensure
that
the
system
gets
adequately
flushed
before
using.
Step
01
Always
start
the
system
flushing
with
a
new
tank
of
the
potable
(tap)
water.
Carefully
fit
the
feed
water
tank
back
into
the
tank
base
and
close
the cover.
oo
Step
02
Place
a
large
container
on
the
drip
tray
and have
another
container
ready
to
alternate.
Step
03
Plug
it
in,
the
system
will
automatically
flush the
@
membrane
for
30
seconds,
then
the
"filtering”
o
indicator
light
will
be
on.
@
(Membrane
flushing
is
the
internal
flushing.
The flushed
water
will
be
returned
to
the
feed
water
tank with
no
water
out
of
the
water
spout.)
Filtering
-
the
system
will
automatically
start
to
filter
and
transfer
the
pure
water
to
the
internal
pure
water
reservoir.
Waiting
until
the
filtering
indicator
light
turns
off
(about
10
mins),
which
means
that
the
internal
pure
water
reservoir
is
full.
Step
05
Push
1s
Empty
the
internal
pure
water
reservoir
to
flush
-
Push
the
"Flushing"
button:
the
pure
water
will
start
to
flow
from
the
outlet
until
the
internal
reservoir
is
empty.
The
system
will
continue
to
filter
when
the
internal
pure
water
reservoir
is
empty.
Waiting
until
the
"filtering"
indicator
light
turns
off
again
and
pushing
the
"Flushing"
button
again
to
empty
the
internal
pure
water
reservoir.
Push
15
Continue
repeating
the
steps
4-6
until
the
"Change
Water"
indicator
light
starts
‘m
flashing,
empting
the
remaining
water
in
the
Feed
Water
Tank.
Step
08
The
above
steps
1-7
are the
one
round
of
system
flushing process.
Please
repeat
these
steps
for
3-5
TIMES
to
complete
the
system
flushing.
Note:
1.
Every
water
supply
is
different.
Depending
on
your
feed
water
sourceand
quality,
you
can
adjust
the
flushing
frequency.
2.
New
system
may
have
air
bubbles,
particulates
or
slightly
poor
taste,
this
is
normal,
please
follow
these
flush
instructions
to
remedy
the
situation.
10
Dispensing
Purified
Water
Step
01
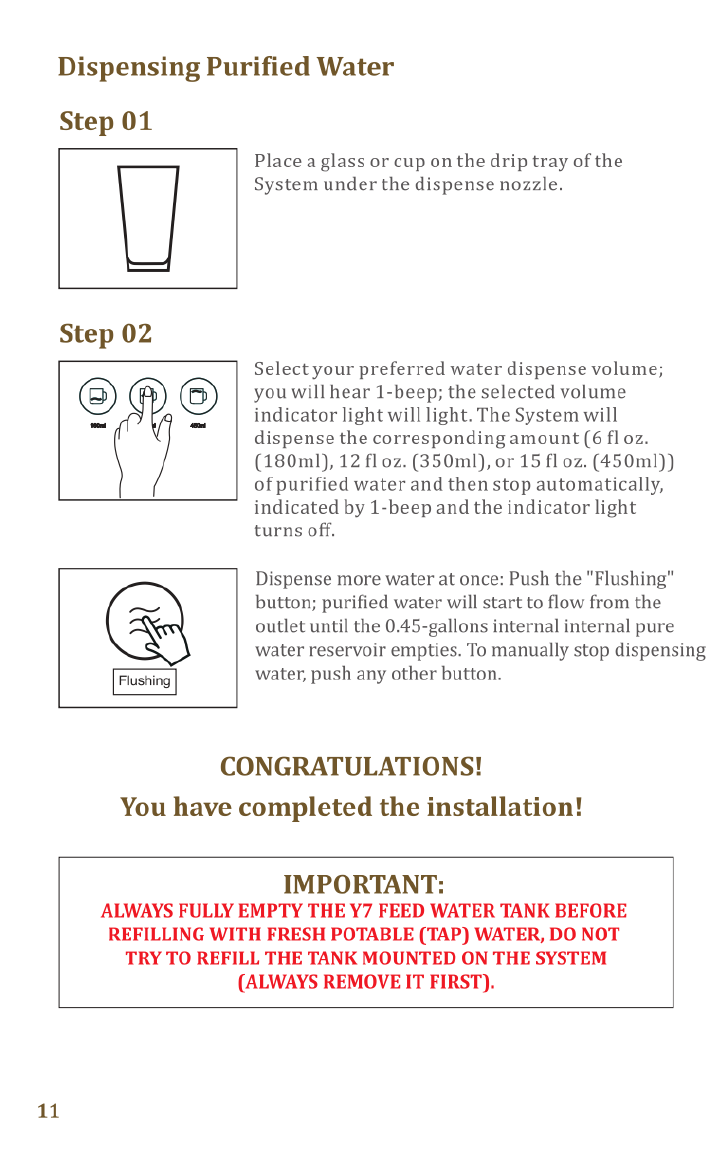
Place
a
glass
or
cup
on
the
drip
tray
of
the
D
System
under
the
dispense
nozzle.
Step
02
Selectyour
preferred water
dispense
volume;
@
you
will
hear
1-beep;
the
selected
volume
=
=
indicator
light
will
light.
The
System
will
dispense
the
corresponding
amount
(6
fl
oz.
(180ml),
12
fl
0z.
(350ml),
or
15
fl
0z.
(450ml))
of
purified
water
and
then
stop
automatically,
indicated
by
1-beep
and
the
indicator
light
turns
off.
Dispense
more
water
at
once:
Push
the
"Flushing"
button;
purified
water
will
start
to
flow
from
the
outlet
until
the
0.45-gallons
internal
internal
pure
water
reservoir
empties.
To
manually
stop
dispensing
water,
push
any
other
button.
CONGRATULATIONS!
You
have
completed
the
installation!
IMPORTANT:
ALWAYS
FULLY
EMPTY
THE
Y7
FEED
WATER
TANK
BEFORE
REFILLING
WITH
FRESH
POTABLE
(TAP)
WATER,
DO
NOT
TRY
TO
REFILL
THE
TANK
MOUNTED
ON
THE
SYSTEM
(ALWAYS
REMOVE
IT
FIRST).
11
Operational
Guide
Display
Indicators
Your
SimPure®
Y7P-W
uses
advanced
features
to
monitor
and
operate
your
System.
Sleep
Mode
If
there’s
no
operation
within
5
minutes,
the
system
will
enter
standby
(sleep)
mode,
the
brightness
of
the
button
ring
in
the
display
will
decrease,
and other indicators
will
go
out.
Push
any
button
to
exit
the
standby
mode,
the
indicator
light
will
display
normally,
and
push
the
button
again
to
activate
the
corresponding
function.
CF
/
RO
Indicator
Light
The two
indicators
lights
remind
the
user
when
to
replace
the
filters;
Steady
-
>90%
exhausted
-
order
new
filter
Flashing
-
2100%
exhausted,
you
will
also
hear
10-beeps. Replace
filter(s)
CF
=
Composite
Filter
RO
=
Reverse
Osmosis
Membrane
Lo
R
]
Filtering
Indicator
Light
Steady
-
This
signifies
that
the
System
is
filtering
water
Safety
Protection
-
If
the
internal
purified
water
tank
has
not
refilled
after
30
minutes,
@
the
System
will
enter
into
protection
mode,
L)
with
allindicator
lights
on, and
you
will
hear
@
10-beeps.
The
System
will
stop
filtering
water
(purified
water
can
still
dispense).
Reset
the
System
by
reconnecting
the
power.
12

Dispensing
Purified
Water
Step
01
Place
a
glass
or
cup
on
the
drip
tray
of
the
D
System
under
the
dispense
nozzle.
Step
02
Selectyour
preferred water
dispense
volume;
@
you
will
hear
1-beep;
the
selected
volume
=
=
indicator
light
will
light.
The
System
will
dispense
the
corresponding
amount
(6
fl
oz.
(180ml),
12
fl
0z.
(350ml),
or
15
fl
0z.
(450ml))
of
purified
water
and
then
stop
automatically,
indicated
by
1-beep
and
the
indicator
light
turns
off.
Dispense
more
water
at
once:
Push
the
"Flushing"
button;
purified
water
will
start
to
flow
from
the
outlet
until
the
0.45-gallons
internal
internal
pure
water
reservoir
empties.
To
manually
stop
dispensing
water,
push
any
other
button.
CONGRATULATIONS!
You
have
completed
the
installation!
IMPORTANT:
ALWAYS
FULLY
EMPTY
THE
Y7
FEED
WATER
TANK
BEFORE
REFILLING
WITH
FRESH
POTABLE
(TAP)
WATER,
DO
NOT
TRY
TO
REFILL
THE
TANK
MOUNTED
ON
THE
SYSTEM
(ALWAYS
REMOVE
IT
FIRST).
11
Operational
Guide
Display
Indicators
Your
SimPure®
Y7P-W
uses
advanced
features
to
monitor
and
operate
your
System.
Sleep
Mode
If
there’s
no
operation
within
5
minutes,
the
system
will
enter
standby
(sleep)
mode,
the
brightness
of
the
button
ring
in
the
display
will
decrease,
and other indicators
will
go
out.
Push
any
button
to
exit
the
standby
mode,
the
indicator
light
will
display
normally,
and
push
the
button
again
to
activate
the
corresponding
function.
CF
/
RO
Indicator
Light
The two
indicators
lights
remind
the
user
when
to
replace
the
filters;
Steady
-
>90%
exhausted
-
order
new
filter
Flashing
-
2100%
exhausted,
you
will
also
hear
10-beeps. Replace
filter(s)
CF
=
Composite
Filter
RO
=
Reverse
Osmosis
Membrane
Lo
R
]
Filtering
Indicator
Light
Steady
-
This
signifies
that
the
System
is
filtering
water
Safety
Protection
-
If
the
internal
purified
water
tank
has
not
refilled
after
30
minutes,
@
the
System
will
enter
into
protection
mode,
L)
with
allindicator
lights
on, and
you
will
hear
@
10-beeps.
The
System
will
stop
filtering
water
(purified
water
can
still
dispense).
Reset
the
System
by
reconnecting
the
power.
12

Flushing
Indicator
Light
&
Button
Push
1s
\
Emptying
function
hold
5s
V
Manual
membrane
flushing
13
Power
on
-
The
System
will
automatically
flush
the
membrane
for
the
first
30
seconds.
While
flushing,
the
indicator
light
will
be
on.
Emptying
function
-
Push
the
Flushing
button,
the
Flushing
button
will
flash;
purified
water
will
start
to
flow
from
the
outlet
until
the
internal
Tank
empties.
To
manually
stop
dispensing
water,
push
the
button
a
second
time,
the
blue
light
goes
off.time.
While
flushing,
the
indicator
light
will
be
on.
Manual
membrane
flushing
-
Push
and
hold
the
Flushing
button
for
5-seconds,
you
will
hear
1-beep,
the
Flushing
button
will
be
on,
and
the
System
will
flush
the
membrane
for
60
seconds
and
stop.
To
cancel
the
manual
flush,
push
the
button
a
second
time.
To
manually
stop
dispensing
water,
push
any
other
button,
the
blue
light
goes
off.
Complete
filtering
-
The
System
will
automatically
flush
the
membrane
for
18
seconds
after
complete
filtering.
While
flushing,
the
indicator
light
will
be
on.
Note:
Membrane
flushing
is
internal
flushing,
the
water
after
flushing
will
return
to
the
feed
water
tank
for
circulation,
and
this will
not
affect
the
quality
of
purified
water
after
filtering.
Also,
no
water
will
flow
out
of
the
water
outlet
during
this
process.
UV
Indicator
Light
Steady-
While
purifying
water,
the
UV
light
will
operate,
staying
on
a
further
1-hour
after
the
pure
water
tank
is
full.
Startup-
When
the
System
is
reconnected
to
the
power
outlet,
the
UV
will
function
for
the
first
3-hours
and
then
shut
off
automatically.
Filtering-
When
the
system
is
filtering
the
water,
the
UV
light
will
always
operate
to
help
maintain
microbial
control
of
the
purified
water.
Standby-
The
UV
light
will
operate
for
15
minutes
every
20
minutes
to
help
maintain
microbial
control
of
the
purified
water.
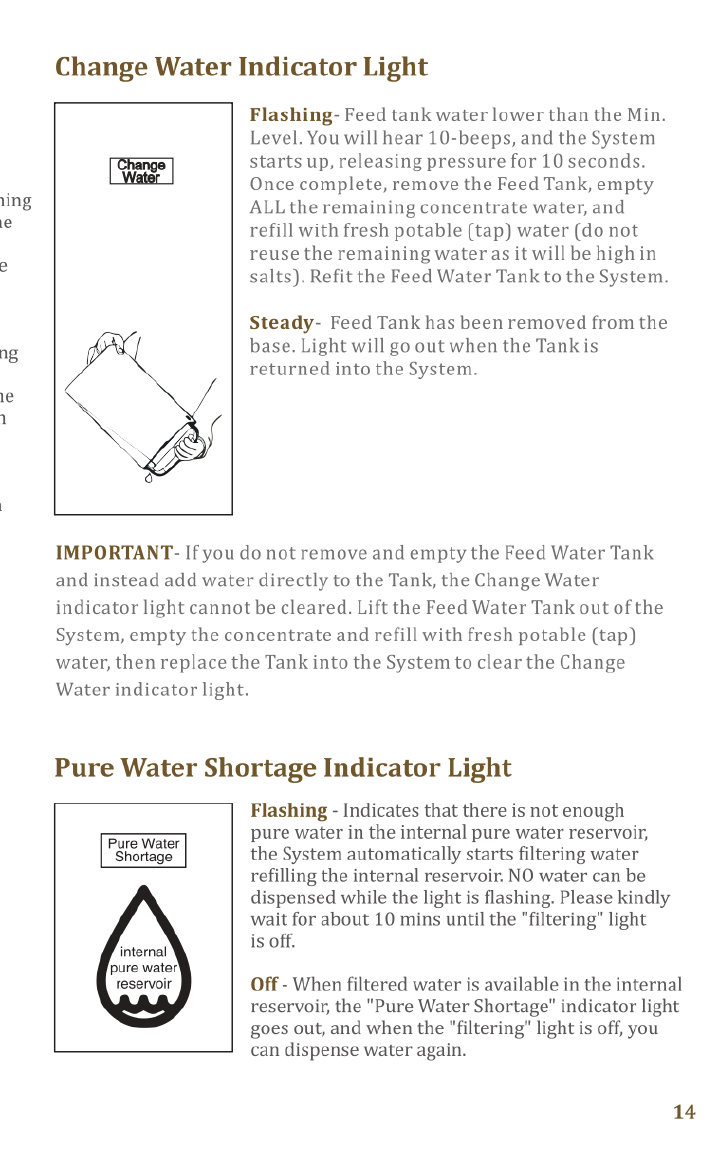
Change
Water
Indicator
Light
k=l
Flashing-
Feed
tank
water
lower
than
the
Min.
Level.
You
will
hear
10-beeps,
and
the
System
starts
up,
releasing
pressure
for
10
seconds.
Once
complete,
remove
the
Feed
Tank,
empty
ALL
the
remaining
concentrate
water,
and
refill
with
fresh
potable
(tap)
water
(do
not
reuse
the
remaining
water
as
it
will
be
high
in
salts).
Refit
the
Feed
Water
Tank
to
the
System.
Steady-
Feed
Tank
has
been
removed
from
the
base. Light
will
go
out
when
the
Tank
is
returned
into
the
System.
IMPORTANT-
If
you
do
not
remove
and
empty
the
Feed
Water
Tank
and
instead
add
water
directly
to
the
Tank,
the
Change
Water
indicator
light
cannotbe
cleared.
Lift
the
Feed
Water
Tank
out
of
the
System,
empty
the
concentrate
and
refill
with
fresh
potable
(tap)
water,
then
replace
the
Tank
into
the
System
to
clear
the
Change
Water
indicator
light.
Pure
Water
Shortage
Indicator
Light
internal
pure
water
reservoir
Flashing
-
Indicates
that
there
is
not
enough
pure
water
in
the
internal
pure
water
reservoir,
the
System
automatically
starts filtering
water
refilling
the
internal
reservoir.
NO
water
can
be
dispensed
while
the
light
is
flashing.
Please kindly
wait
for
about
10
mins
until
the "filtering"
light
is
off.
Off
-
When
filtered
water
is
available
in
the
internal
reservoir,
the
"Pure
Water
Shortage"
indicator
light
goes
out,
and
when
the
"filtering"
light
is
off,
you
can
dispense
water
again.
14
Flushing
Indicator
Light
&
Button
Push
1s
\
Emptying
function
hold
5s
V
Manual
membrane
flushing
13
Power
on
-
The
System
will
automatically
flush
the
membrane
for
the
first
30
seconds.
While
flushing,
the
indicator
light
will
be
on.
Emptying
function
-
Push
the
Flushing
button,
the
Flushing
button
will
flash;
purified
water
will
start
to
flow
from
the
outlet
until
the
internal
Tank
empties.
To
manually
stop
dispensing
water,
push
the
button
a
second
time,
the
blue
light
goes
off.time.
While
flushing,
the
indicator
light
will
be
on.
Manual
membrane
flushing
-
Push
and
hold
the
Flushing
button
for
5-seconds,
you
will
hear
1-beep,
the
Flushing
button
will
be
on,
and
the
System
will
flush
the
membrane
for
60
seconds
and
stop.
To
cancel
the
manual
flush,
push
the
button
a
second
time.
To
manually
stop
dispensing
water,
push
any
other
button,
the
blue
light
goes
off.
Complete
filtering
-
The
System
will
automatically
flush
the
membrane
for
18
seconds
after
complete
filtering.
While
flushing,
the
indicator
light
will
be
on.
Note:
Membrane
flushing
is
internal
flushing,
the
water
after
flushing
will
return
to
the
feed
water
tank
for
circulation,
and
this will
not
affect
the
quality
of
purified
water
after
filtering.
Also,
no
water
will
flow
out
of
the
water
outlet
during
this
process.
UV
Indicator
Light
Steady-
While
purifying
water,
the
UV
light
will
operate,
staying
on
a
further
1-hour
after
the
pure
water
tank
is
full.
Startup-
When
the
System
is
reconnected
to
the
power
outlet,
the
UV
will
function
for
the
first
3-hours
and
then
shut
off
automatically.
Filtering-
When
the
system
is
filtering
the
water,
the
UV
light
will
always
operate
to
help
maintain
microbial
control
of
the
purified
water.
Standby-
The
UV
light
will
operate
for
15
minutes
every
20
minutes
to
help
maintain
microbial
control
of
the
purified
water.
Change
Water
Indicator
Light
k=l
Flashing-
Feed
tank
water
lower
than
the
Min.
Level.
You
will
hear
10-beeps,
and
the
System
starts
up,
releasing
pressure
for
10
seconds.
Once
complete,
remove
the
Feed
Tank,
empty
ALL
the
remaining
concentrate
water,
and
refill
with
fresh
potable
(tap)
water
(do
not
reuse
the
remaining
water
as
it
will
be
high
in
salts).
Refit
the
Feed
Water
Tank
to
the
System.
Steady-
Feed
Tank
has
been
removed
from
the
base. Light
will
go
out
when
the
Tank
is
returned
into
the
System.
IMPORTANT-
If
you
do
not
remove
and
empty
the
Feed
Water
Tank
and
instead
add
water
directly
to
the
Tank,
the
Change
Water
indicator
light
cannotbe
cleared.
Lift
the
Feed
Water
Tank
out
of
the
System,
empty
the
concentrate
and
refill
with
fresh
potable
(tap)
water,
then
replace
the
Tank
into
the
System
to
clear
the
Change
Water
indicator
light.
Pure
Water
Shortage
Indicator
Light
internal
pure
water
reservoir
Flashing
-
Indicates
that
there
is
not
enough
pure
water
in
the
internal
pure
water
reservoir,
the
System
automatically
starts filtering
water
refilling
the
internal
reservoir.
NO
water
can
be
dispensed
while
the
light
is
flashing.
Please kindly
wait
for
about
10
mins
until
the "filtering"
light
is
off.
Off
-
When
filtered
water
is
available
in
the
internal
reservoir,
the
"Pure
Water
Shortage"
indicator
light
goes
out,
and
when
the
"filtering"
light
is
off,
you
can
dispense
water
again.
14
15
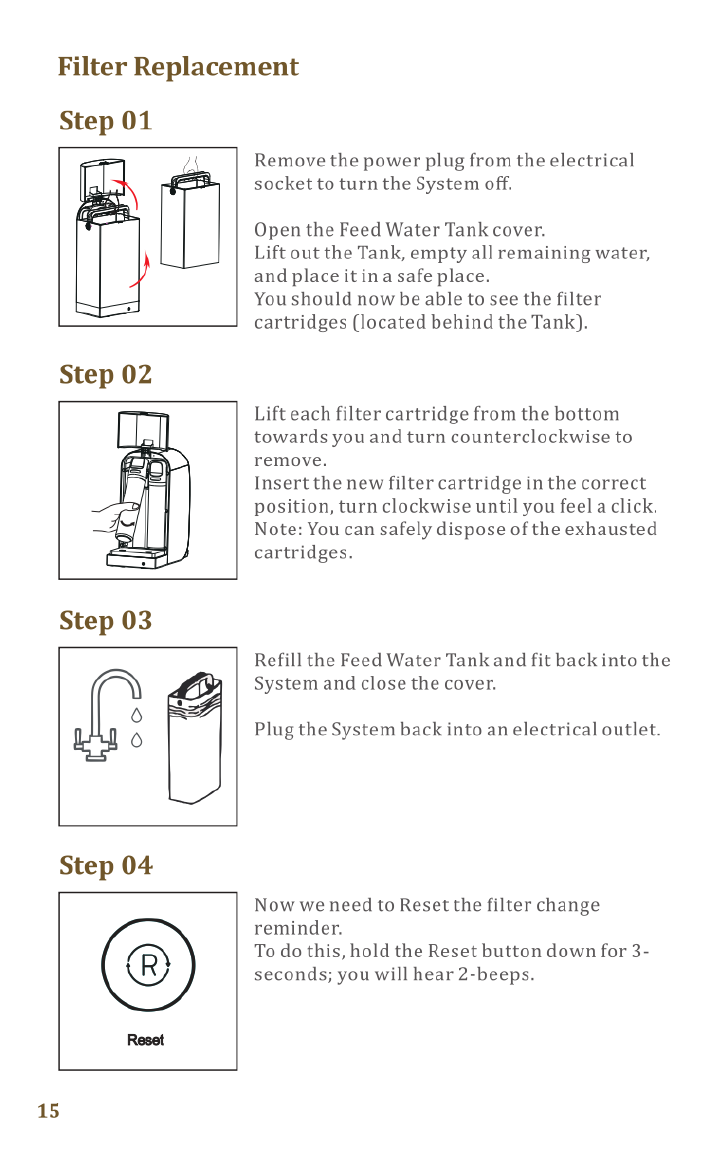
Filter
Replacement
Step
05
Push
the
Reset
button
again
to
select
the
filter
El
cartridge
you
have just
changed;
the
indicator
Remove
the
power
plug
from
the
electrical
light
will
be
lit.
socket
to
turn
the
System
off.
Open
the
Feed
Water
Tank
cover.
Step
06
Lift
out
the
Tank,
empty
all
remaining
water,
Hold
the
Reset
button
down
for
at
least
3-
and
placeitin
asafe
place.
seconds
to
complete
the
reset
process;
you
You
should
now
be
able
to
see
the
filter
will
hear
3-beeps,
and
the
System
will
return
cartridges
(located
behind
the
Tank).
toregular
operation.
Reset
Lift
each
filter
cartridge
from
the
bottom
towards
you
and
turn
counterclockwise
to
Note:
If
there
is
no
operation
within
10
seconds,
during
each
stage
of
the
filter
reset
process,
the
System
will exit
the
setting
state
remove.
Insert
the
new
filter
cartridge
in
the
correct
automatically.
position,
turn
clockwise
until
you
feel
a
click.
Note:
You
can
safely
dispose
of
the
exhausted
Step
07
cartridges.
Follow
the
system
flush
instructions
on
page
9
to
rinse
the
new
filter
cartridge.
Replacement
Filter
Part
Number
Refill
the
Feed
Water
Tank
and
fit
back
into
the
System
and
close
the
cover.
Plug
the
System
back
into an
electrical
outlet.
HEDPF3005_59
CF
Cartridge
Filter
6
Months
HEDPF4005_S9
Reverse
Osmosis
Membrane
|
6
Months
Note:
Due
to
the
difference
in
feed
water
quality,
the
above
is
an
estimate
only.
Please
contact
SimPure®
for
purchase
options:
Now
we
need
to
Reset
the
filter
change
reminder.
‘
To do
this,
hold
the
Reset
button
down
for
3-
Customer
Service:
Reset
seconds;
you
will
hear
2-beeps.
Toll-Free:
1-866-528-4572
Website:
www.simpurelife.com
16

15
Filter
Replacement
Step
05
Push
the
Reset
button
again
to
select
the
filter
El
cartridge
you
have just
changed;
the
indicator
Remove
the
power
plug
from
the
electrical
light
will
be
lit.
socket
to
turn
the
System
off.
Open
the
Feed
Water
Tank
cover.
Step
06
Lift
out
the
Tank,
empty
all
remaining
water,
Hold
the
Reset
button
down
for
at
least
3-
and
placeitin
asafe
place.
seconds
to
complete
the
reset
process;
you
You
should
now
be
able
to
see
the
filter
will
hear
3-beeps,
and
the
System
will
return
cartridges
(located
behind
the
Tank).
toregular
operation.
Reset
Lift
each
filter
cartridge
from
the
bottom
towards
you
and
turn
counterclockwise
to
Note:
If
there
is
no
operation
within
10
seconds,
during
each
stage
of
the
filter
reset
process,
the
System
will exit
the
setting
state
remove.
Insert
the
new
filter
cartridge
in
the
correct
automatically.
position,
turn
clockwise
until
you
feel
a
click.
Note:
You
can
safely
dispose
of
the
exhausted
Step
07
cartridges.
Follow
the
system
flush
instructions
on
page
9
to
rinse
the
new
filter
cartridge.
Replacement
Filter
Part
Number
Refill
the
Feed
Water
Tank
and
fit
back
into
the
System
and
close
the
cover.
Plug
the
System
back
into an
electrical
outlet.
HEDPF3005_59
CF
Cartridge
Filter
6
Months
HEDPF4005_S9
Reverse
Osmosis
Membrane
|
6
Months
Note:
Due
to
the
difference
in
feed
water
quality,
the
above
is
an
estimate
only.
Please
contact
SimPure®
for
purchase
options:
Now
we
need
to
Reset
the
filter
change
reminder.
‘
To do
this,
hold
the
Reset
button
down
for
3-
Customer
Service:
Reset
seconds;
you
will
hear
2-beeps.
Toll-Free:
1-866-528-4572
Website:
www.simpurelife.com
16

System
Maintenance
When
you
plan
to
not
use
the
system
for
a
period
of
time
(More
than
a
week).
Before
you
shut
it
off,
please
drain
the
internal
pure
water
tank
and
feed
water
tank.
And
placing
the
system
out
of
direct
sunlight
on
a
dry,
and
secure
surface
in
ambient
room
temperature.
Before
you
use
it
again.
To
ensure
the
freshness
of
the
drinking
water,
clean
the
feed
water
tank
first,
and
than
flush
the
system
once.
(Depending
on the
water
quality
of
your
water
source,
you
can
reduce
the
number
of
flushes
appropriately.)
Feed
Water
Tank
Cleaning
To
maintain
your
System,
it's
recommended
to
clean
the
Feed
Water
Tank
and
components
after
every
months
of
use;
this
helps
to
extend
the
service
life
of
the
filter
elements.
Check
the
Feed
Water
Tank
strainer,
diversion
sleeve,
and
two
check
valves
located
on
the
bottom
of
the
Tank
are
clean.
Feed
Water
Tank
Strainer
Filte
17
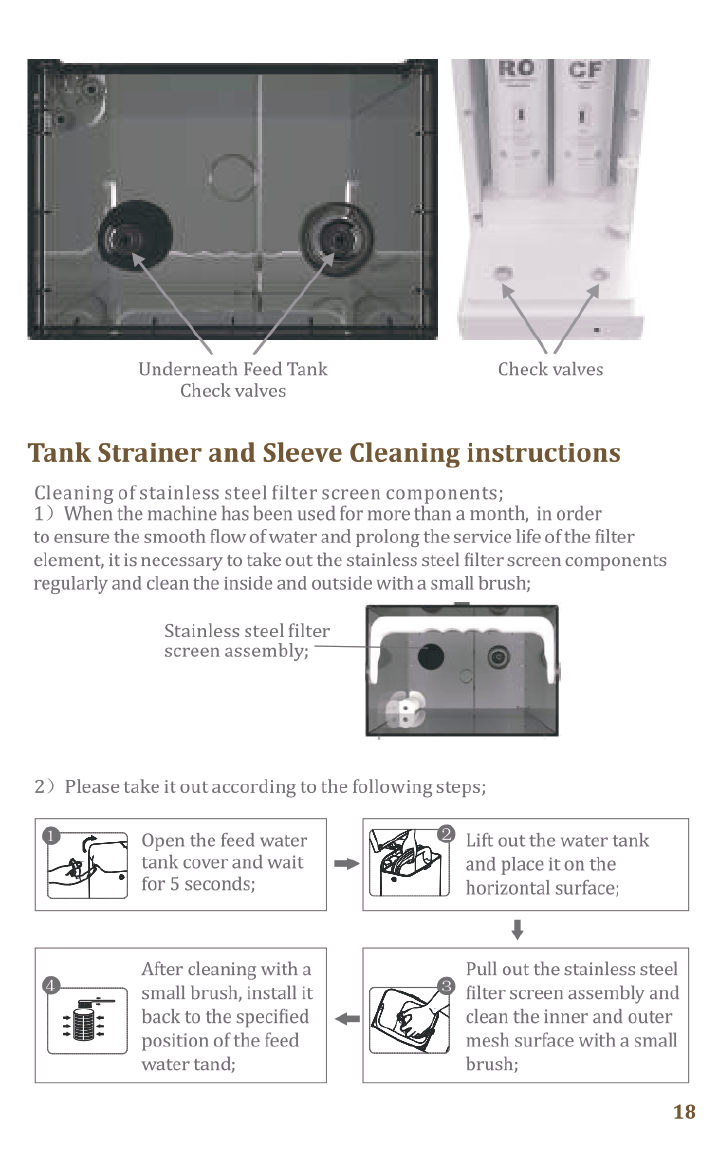
-
5
Check
valves
Underneath
Feed
Tank
Check
valves
Tank
Strainer
and
Sleeve
Cleaning
instructions
Cleaning
of
stainless
steel
filter
screen
components;
1)
When
the
machine
has
been
used
for
more
than
a
month,
in
order
to
ensure
the
smooth
flow
of
water
and
prolong
the
service
life
of
the
filter
element,
it
is
necessary
to
take out
the
stainless
steel
filter
screen
components
regularly
and
clean
the
inside
and
outside
with
a
small
brush;
Stainless
steel
filter
screen
assembly;
2)
Please
take
it
out
according
to
the
following
steps;
Lift
out
the
water
tank
and
place
it
on
the
horizontal
surface;
Open
the
feed
water
tank
cover
and
wait
for
5
seconds;
4
Pull
out
the
stainless
steel
filter
screen
assembly
and
back
to
the
specified
|
<
clean
the
inner
and
outer
position
of
the
feed
mesh
surface
with
a
small
water
tand;
brush;
After
cleaning
with
a
small
brush,
install
it
18
System
Maintenance
When
you
plan
to
not
use
the
system
for
a
period
of
time
(More
than
a
week).
Before
you
shut
it
off,
please
drain
the
internal
pure
water
tank
and
feed
water
tank.
And
placing
the
system
out
of
direct
sunlight
on
a
dry,
and
secure
surface
in
ambient
room
temperature.
Before
you
use
it
again.
To
ensure
the
freshness
of
the
drinking
water,
clean
the
feed
water
tank
first,
and
than
flush
the
system
once.
(Depending
on the
water
quality
of
your
water
source,
you
can
reduce
the
number
of
flushes
appropriately.)
Feed
Water
Tank
Cleaning
To
maintain
your
System,
it's
recommended
to
clean
the
Feed
Water
Tank
and
components
after
every
months
of
use;
this
helps
to
extend
the
service
life
of
the
filter
elements.
Check
the
Feed
Water
Tank
strainer,
diversion
sleeve,
and
two
check
valves
located
on
the
bottom
of
the
Tank
are
clean.
Feed
Water
Tank
Strainer
Filte
17
-
5
Check
valves
Underneath
Feed
Tank
Check
valves
Tank
Strainer
and
Sleeve
Cleaning
instructions
Cleaning
of
stainless
steel
filter
screen
components;
1)
When
the
machine
has
been
used
for
more
than
a
month,
in
order
to
ensure
the
smooth
flow
of
water
and
prolong
the
service
life
of
the
filter
element,
it
is
necessary
to
take out
the
stainless
steel
filter
screen
components
regularly
and
clean
the
inside
and
outside
with
a
small
brush;
Stainless
steel
filter
screen
assembly;
2)
Please
take
it
out
according
to
the
following
steps;
Lift
out
the
water
tank
and
place
it
on
the
horizontal
surface;
Open
the
feed
water
tank
cover
and
wait
for
5
seconds;
4
Pull
out
the
stainless
steel
filter
screen
assembly
and
back
to
the
specified
|
<
clean
the
inner
and
outer
position
of
the
feed
mesh
surface
with
a
small
water
tand;
brush;
After
cleaning
with
a
small
brush,
install
it
18
How
To
Descale
Your
Water
Purifier
Limescale
can
clog up
the
machine
and disrupt
water
flow.
If
you
start
experiencing
slow
water
flow
or
all
the
indicator
lights
flashing,
it
is
time
to
maintain
it.
1.Purpose:
To
clean
the
scale
in
the
RO
machine
system
(such
as
pipes,
valves,
pumps,
RO
membranes,
etc.)
2.
Maintenance
Frequency:
Good
tap
water
quality(TDS<150ppm):
every
6
months;
Fair
tap
water
quality(150<TDS<250ppm):
every
2
months;
Poor
tap
water
quality(250<TDS<450ppm):
every
month;
Bad
tap
water
quality(TDS>450ppm):
every
2
weeks.
3.
Maintenance
Steps
Step1:
Make
one
of
the
following
DIY
solutions
or
use
a
commercial
descaling
solution.
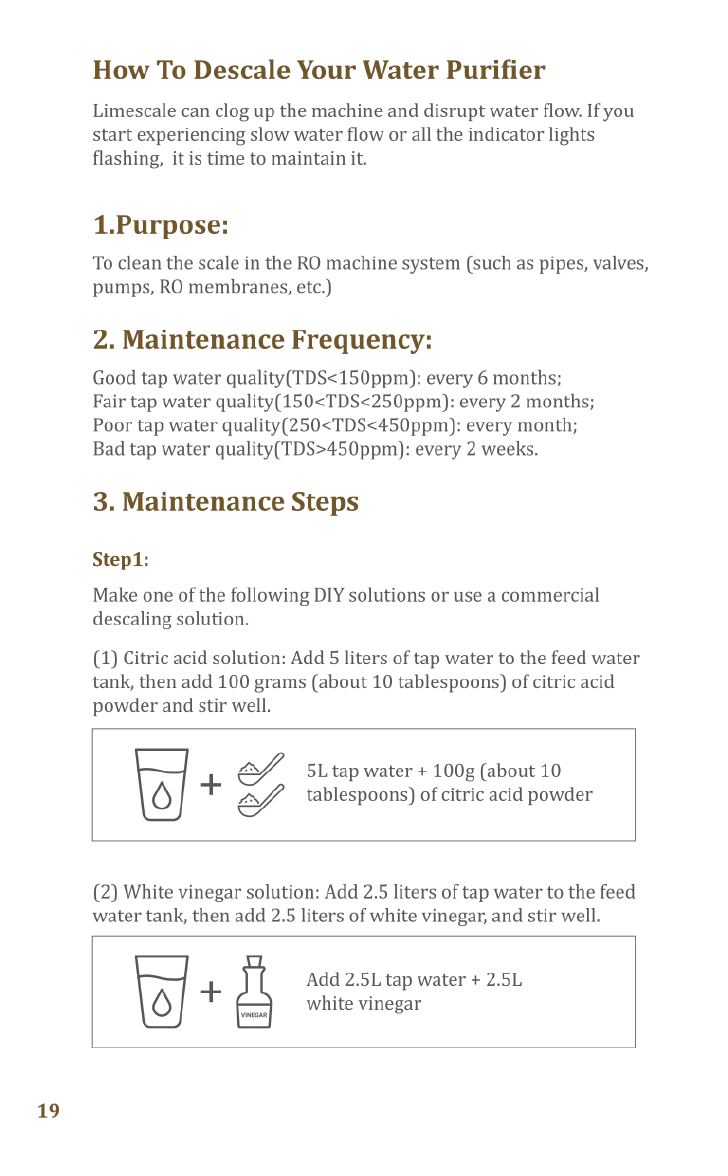
(1)
Citric
acid
solution:
Add
5
liters
of
tap
water
to
the
feed
water
tank,
then
add 100
grams
(about
10
tablespoons)
of
citric
acid
powder
and
stir
well.
M
5L tap
water
+
100g
(about
10
+
£
/
tablespoons)
of
citric
acid
powder
(2)
White
vinegar
solution:
Add
2.5
liters
of
tap
water
to
the
feed
water
tank,
then
add
2.5
liters
of
white
vinegar,
and
stir
well.
+
Add
2.5L
tap
water
+
2.5L
white
vinegar
Step2:
Put
the
feed
water
tank with
the
prepared
solution
back
on
the
machine
and
plug
it
in.
Step3:
Push
and
hold
the
Flushing
button
for
5s,
you
will
hear
1-beep,
the
Flushing
button
will
be
on,
and
the
System
will
flush
the
membrane
for
60
seconds
and
stop.
Repeat
this
flushing
step
five
times.
Step4:
Unplug
the
power
and
let
it
stand
for
2
hours.
Step5:
Remove
the
feed
water
tank,
empty
these
solutions,
and
clean
the
feed
water
tank
with
tap
water.
Step6:
Fill
the
feed
water
tank with
tap
water
and
put
it
back
in
the
correct
place,
then plug
in
the
power
supply
for
waiting
until
the
"filtering"
indicator
go
off;
press
the
"Flushing"
button
to
dispense
water
to
flushing
the
system,
which
removes
the
odor
or
taste
of
the
descaling
solution.
If
the
sour
taste
remains,
please
repeat
for
a
few
more
rounds
until
the
water
tastes
good.
Note:
If
the
scale
is
very
serious
or
the
problem
is
still
not
solved
after
maintenance,
please
repeat
steps
1-6
one
more
time.
20
How
To
Descale
Your
Water
Purifier
Limescale
can
clog up
the
machine
and disrupt
water
flow.
If
you
start
experiencing
slow
water
flow
or
all
the
indicator
lights
flashing,
it
is
time
to
maintain
it.
1.Purpose:
To
clean
the
scale
in
the
RO
machine
system
(such
as
pipes,
valves,
pumps,
RO
membranes,
etc.)
2.
Maintenance
Frequency:
Good
tap
water
quality(TDS<150ppm):
every
6
months;
Fair
tap
water
quality(150<TDS<250ppm):
every
2
months;
Poor
tap
water
quality(250<TDS<450ppm):
every
month;
Bad
tap
water
quality(TDS>450ppm):
every
2
weeks.
3.
Maintenance
Steps
Step1:
Make
one
of
the
following
DIY
solutions
or
use
a
commercial
descaling
solution.
(1)
Citric
acid
solution:
Add
5
liters
of
tap
water
to
the
feed
water
tank,
then
add 100
grams
(about
10
tablespoons)
of
citric
acid
powder
and
stir
well.
M
5L tap
water
+
100g
(about
10
+
£
/
tablespoons)
of
citric
acid
powder
(2)
White
vinegar
solution:
Add
2.5
liters
of
tap
water
to
the
feed
water
tank,
then
add
2.5
liters
of
white
vinegar,
and
stir
well.
+
Add
2.5L
tap
water
+
2.5L
white
vinegar
Step2:
Put
the
feed
water
tank with
the
prepared
solution
back
on
the
machine
and
plug
it
in.
Step3:
Push
and
hold
the
Flushing
button
for
5s,
you
will
hear
1-beep,
the
Flushing
button
will
be
on,
and
the
System
will
flush
the
membrane
for
60
seconds
and
stop.
Repeat
this
flushing
step
five
times.
Step4:
Unplug
the
power
and
let
it
stand
for
2
hours.
Step5:
Remove
the
feed
water
tank,
empty
these
solutions,
and
clean
the
feed
water
tank
with
tap
water.
Step6:
Fill
the
feed
water
tank with
tap
water
and
put
it
back
in
the
correct
place,
then plug
in
the
power
supply
for
waiting
until
the
"filtering"
indicator
go
off;
press
the
"Flushing"
button
to
dispense
water
to
flushing
the
system,
which
removes
the
odor
or
taste
of
the
descaling
solution.
If
the
sour
taste
remains,
please
repeat
for
a
few
more
rounds
until
the
water
tastes
good.
Note:
If
the
scale
is
very
serious
or
the
problem
is
still
not
solved
after
maintenance,
please
repeat
steps
1-6
one
more
time.
20
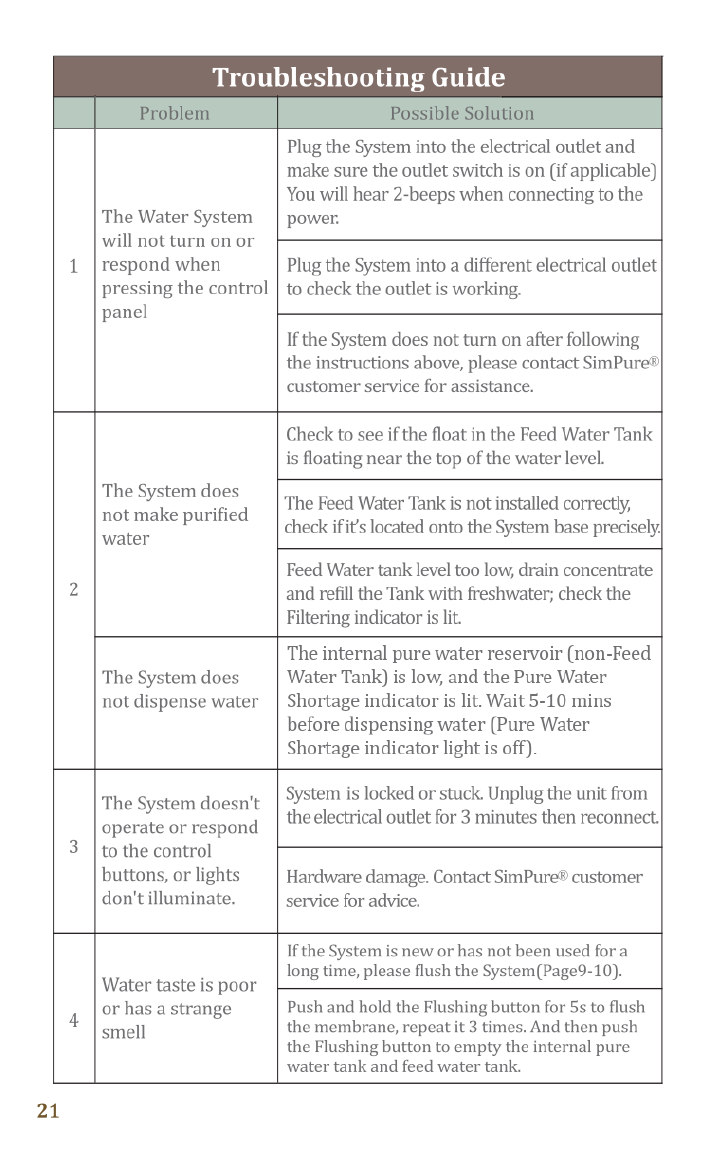
Troubleshooting
Guide
Troubleshooting
Guide
The
Water
System
will
not
turn
on
or
respond
when
pressing
the
control
panel
Plug
the
System
into
the
electrical
outlet
and
make
sure
the
outlet
switch
is
on
(if
applicable)
You
will
hear
2-beeps
when
connecting
to
the
power.
Plug
the
System
into
a
different
electrical
outlet
to
check
the
outlet
is
working.
If
the
System
does
not
turn
on
after
following
the
instructions
above,
please
contact
SimPure®|
customer
service
for
assistance.
The
System
makes
excessive
noise
during
operation
Note:
The
System
does
make
noise
when
processing
water;
this
is
normal.
The
Feed
Tank water
level
is
very
low.
Empty
the
Feed
Water
Tank
and
refill
with
fresh
potable
(tap)
water.
There's
an
air
blockage
in
the
water
production
system.
Unplug
the
unit
from
the
electrical
outlet
for
3
minutes
then
reconnect.
Flush
the
System
1-3
times
before
using (Page
9).
Water
quality
is
poor;
filters
have
been
blocked
early
(before
replacement
schedule).
Replace
both
filters.
The
System
does
not
make
purified
water
Check
to
see
if
the
float
in
the
Feed
Water
Tank
is
floating
near
the
top
of
the
water
level.
The
Feed
Water
Tank
is
not
installed
correctly,
check
ifit’s
located
onto
the
System
base
precisely,
All
the
lights
flashing
twice
Plug
it
in.
All
indicator
lights
will
be
on
and
flashing
twice,
this
is
a
self-check
program.
No
action
required
Feed
Water
tank
level
too
low,
drain
concentrate
and
refill
the
Tank
with
freshwater;
check
the
Filtering
indicator
is
lit.
The
System
does
not
dispense
water
The
internal
pure
water
reservoir
(non-Feed
‘Water
Tank)
is
low,
and
the
Pure
Water
Shortage
indicator
is lit.
Wait
5-10
mins
before
dispensing
water
(Pure
Water
Shortage
indicator
light
is
off).
The
System
doesn't
operate
or
respond
to
the
control
buttons,
or
lights
don'tilluminate.
System
is
locked
or
stuck.
Unplug
the
unit
from
the
electrical
outlet
for
3
minutes
then
reconnect.
Hardware
damage.
Contact
SimPure®
customer
service
for
advice.
All
the
lights
keep
flashing
If
the
system
continues
filtering
water
for
more
than
30
mins
"Safety
Protection"
is
activated,
will
beep
10x
and
all
lights
will
flash.
Reset
the
System
by
reconnecting
the
electrical
power.(Page
12]
The
stainless
steel
filter
of
the
feed
water
tank
inle]
is
clogged.
Please
follow
the
page
18
to
clean
it.
The
filter
elements
are
clogged
by
impurities.
Push
and
hold
the
Flushing
button
for
5s,
observe
whether
there
is
flushed
water
in
the
feed
water
tank
drain
out
from
the
water
outlet,
if
no
or
the
water
flow
is
low,
please
replace
both
filter
elements.
The
filter
elements
are
clogged
by
limescale.
Please
follow
the
page
19
to
maintain
it.
If
still
not
solve
it
after
following
the
instructions
above,please
contact
SimPure
customer
service
for
assistance.
Water
taste
is
poor
or
has
a
strange
smell
If
the
System
is
new
or
has not
been used
for
a
long
time,
please
flush
the
System(Page9-10).
Push
and
hold
the
Flushing
button
for
55
to
flush
the
membrane,
repeat
it
3
times.
And
then
push
the
Flushing
button
to
empty
the
internal
pure
water
tank
and
feed
water
tank.
21
Pure
Water
Shortage
light
keeps
flashing
when
the
feed
water
tank
is
full
SimPure
Y7P
Series
is
not
an
instant
filtration
system.
It
takes
time
to
allow
the
filter
system
inside
to
process
the
water.
Waiting
for
about
10
mins
until
the
"Pure
Water
Shortage"
light
is
off,
and
then
when
the
"filtering"
light
is
off,
means
the
filtering
operation
is
finished.
22
Table of contents
Other SimPure Water Filtration System manuals

SimPure
SimPure T1-400 User manual

SimPure
SimPure Y6 User manual

SimPure
SimPure T1 User manual

SimPure
SimPure Q3-600 User manual

SimPure
SimPure DB10 User manual

SimPure
SimPure Y5 User manual

SimPure
SimPure Q6 User manual

SimPure
SimPure T1-6 RO User manual

SimPure
SimPure V7 User manual

SimPure
SimPure Y7 User manual


Popular Water Filtration System manuals by other brands

Cylligan
Cylligan SY-750S Installation and operating instructions

Beko
Beko QWIK-PURE 100 Instructions for installation and operation

Marlo Incorporated
Marlo Incorporated MGT Series Installation, operation and maintenance manual

resideo
resideo Braukmann F76S installation instructions

ANI
ANI E/34 Operation and maintenance manual

Canature WaterGroup
Canature WaterGroup 89DF owner's manual


