Simulaids KIM User manual

KIM, KEVIN, AND
KYLE
Instructions for Use
The purpose of this instructional is to familiarize the user with the
function, care, and maintenance of the Simulaids’ Kyle, Kevin,
and Kim CPR training manikins. It is not meant to provide instruc-
tion in Cardiopulmonary Resuscitation (CPR) or other emergency
life support procedures. Please read it thoroughly before attempting
to use your manikin.
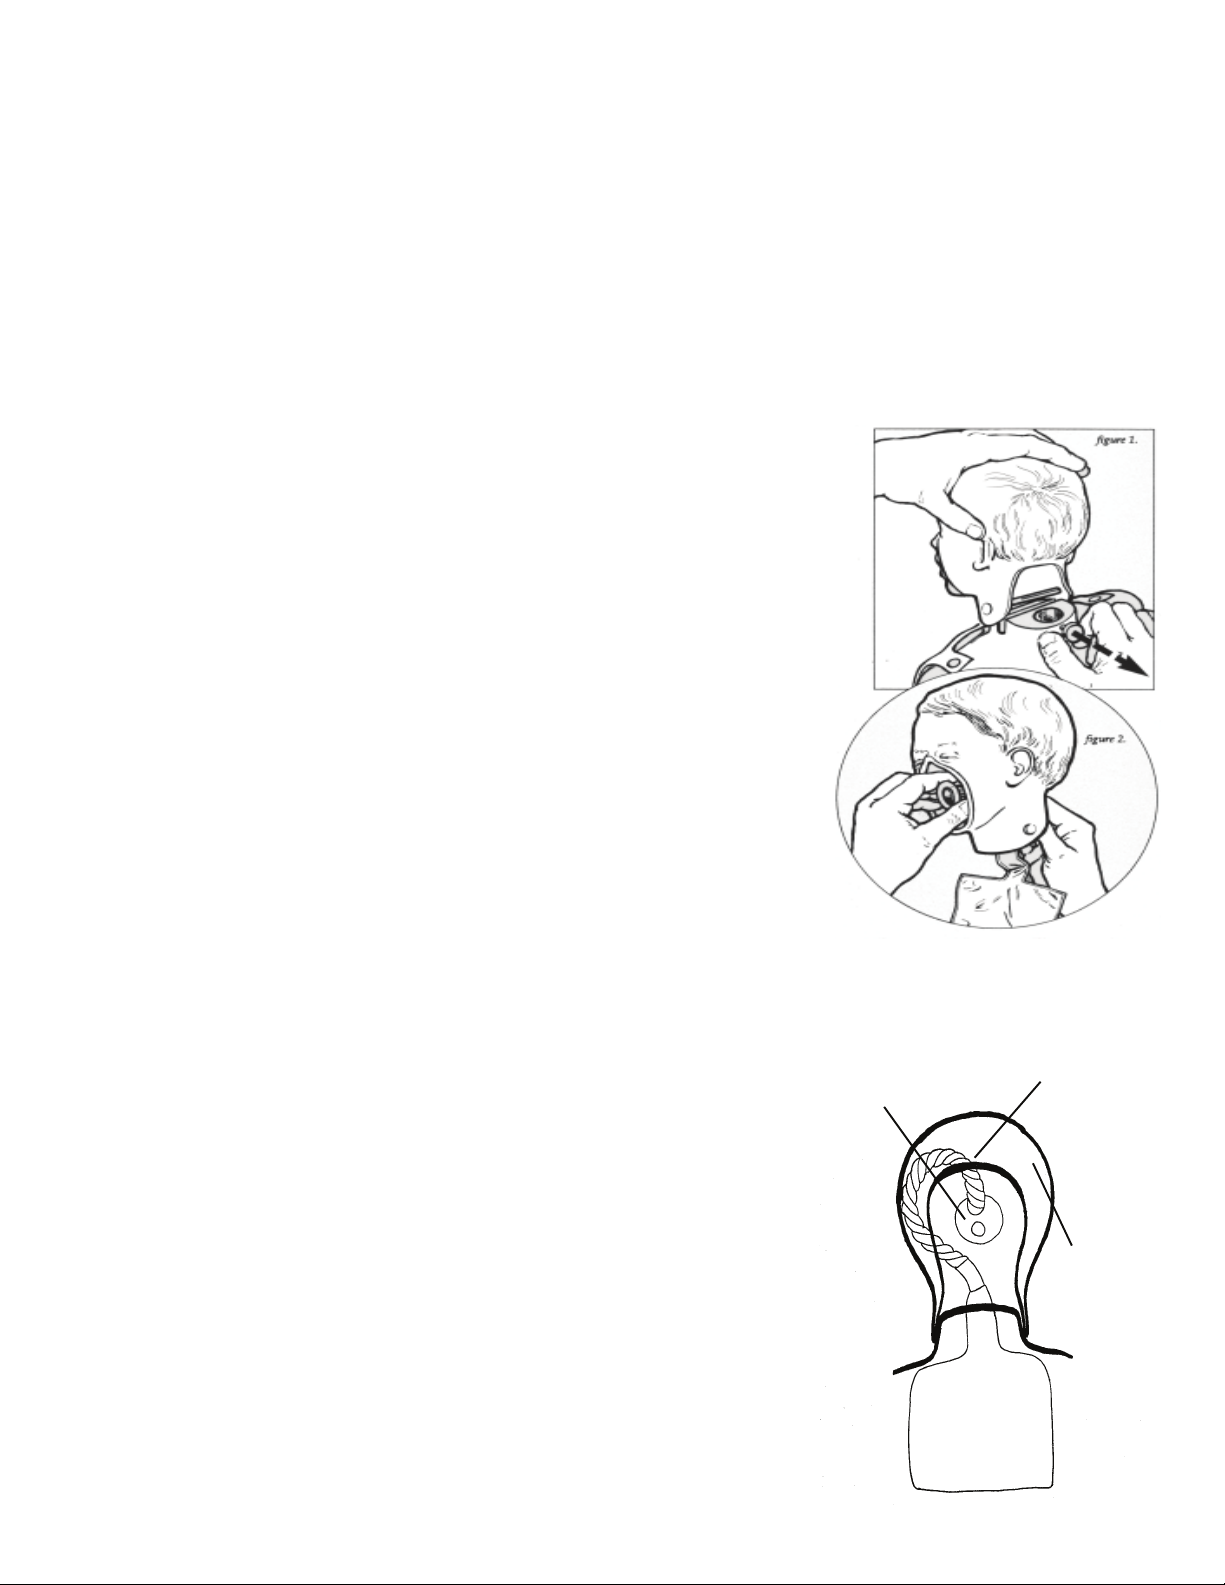
Back of
Head
Airway Removal
1. Unsnap chest overlay from manikin.
2. Pull back retaining pin located at the base of
the neck (fig.1) and lift the head off the body.
3. Remove mouth/ nosepiece from head.
4. Place hand inside head and grasp one-way
valve. With other hand twist and pull flanged
valve from the oropharyngeal opening in face
(fig.2).
5. Remove and discard airway/lung assembly and
flanged valve.
Airway Installation
1. Insert the non-re-breathing valve through back of the
face cavity and press (a slight twist when pressing
assists placement) the flanged valve (flange goes
toward mouthpiece) onto the non-re-breathing stem.
Replace the mouthpiece.
2. Loop the tubing inside of head for both the Kim
and Kevin airway installation (fig. 3).
3. Loop the lung over the front of the head pin. Position
the elbow joint so that it points straight down. Pull
the retaining pin back (fig. 1) and attach the head to
the body.
4. With the manikin head slightly tilted back, lay the
lung flat against the chest and snap the overlay in
place.
Tubing
Non-Rebreathing
Valve
Figure 3

CLEANING & DISINFECTING
The only components that require scrupulous disinfecting are
the mouth nosepieces.
The following procedure should be used:
1. Clean in mild soapy water.
2. Rinse thoroughly in clear water.
3. Disinfect as per C.D.C. protocols.
SHIPPING WEIGHTS & DIMENSIONS:
Kyle 9 lbs. 34”x11”x 7”
Kevin 5 lbs. 26" x 8" x 8"
Kim 4 lbs. 26" x 8" x 8"
REPLACEMENT COMPONENTS:
Part # Description
2955 Kyle Airway System 24 pk
2905 Kim, Kevin Airway System 24 pk
2082 Kyle Mouth/ Nose Pcs. 10 pk
2162 Kevin Mouth/ Nose Pcs. 10 pk
2068 Kim Mouth/ Nose Pcs. 10 pk
2083 Kyle African/American
Mouth/ Nose Pcs. 10 pk
2162B Kevin African/American
Mouth/ Nose Pcs. 10 pk
2069 Kim African/American
Mouth/ Nose Pcs. 10 pk
2252 Kevin/Kim Carry Bag
2260 Kyle Carry Bag
RETURN GOODS POLICY
Should it be necessary to return an item for any reason, contact our Customer Service Department to obtain a
RETURN AUTHORIZATION NUMBER. Merchandise cannot be accepted without prior return authoriza-
tion. Please refer to your invoice number when phoning in your request for returning merchandise. Should you
have any questions or wish further information on any product we manufacture or distribute, contact our
Customer Service Department.
PO Box 1289-16 Simulaids Dr
Saugerties NY 12477
Toll Free: (800)-431-4310 Fax: (845)-679-8996
www.simulaids.com 6/05
WARRANTY
Simulaids warrants this product to be free from any defect in materials and/or workmanship for a period of
three years from the date of purchase, as evidenced by the date of invoice when the product was shipped to
the end user. This warranty expressly does not cover abuse, accidental or purposeful damage, or any form of
modification to the product. Simulaids reserves the right to either repair or replace affected parts or the entire
unit, at their sole discretion, after investigating and reviewing the actual product and the damage. In most
instances, a digital photo of the product in question showing the damage will help qualify a product for return to
the factory. At no time will any product be accepted at the plant without proper return authorization issued by
Simulaids.
Freight and Shipping charges are the sole responsibility of the end user. No product will be received with
shipping charges due. Any product considered for warranty work must be identified by serial number and
invoice number from the agency through whom the product was purchased. Without this information the
product will not receive a return authorization number as required above.
This manual suits for next models
2
Table of contents


