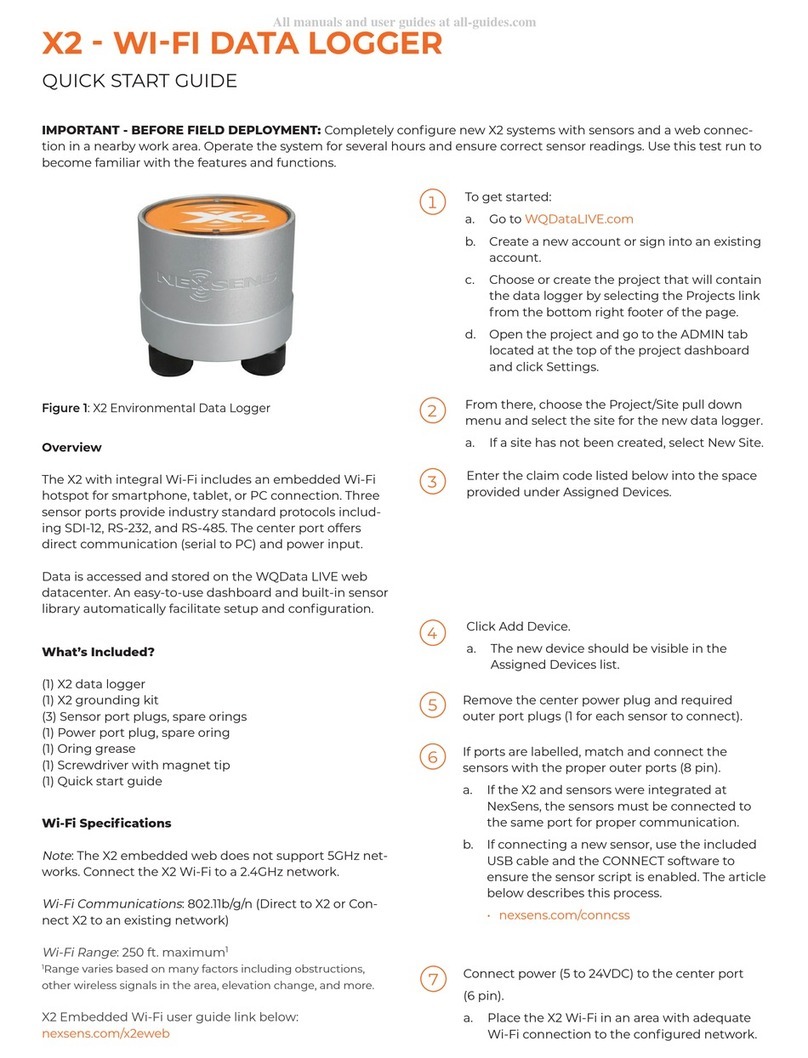
Sinapsi EQUOBOX User manual

S I N A P S I S . r . l .
V i a d e l l e Q u e r c e 1 1 / 1 3
0 6 0 8 3 B a s t i a U m b r a ( P G ) I t a l y
T . + 3 9 075 8011604 F . + 3 9 075 8014602
w w w. s in ap s it e c h. i t |i nf o @s i na p s it ec h . it
EQUOBOX RTU-ModBus
Datalogger for ModBus
devices
User Guide
Rev 2.2
This manual refers to the versions starting from:
Firmware 3.02.06 / Web 3.02.02 / Hardware 2.0

E Q U O B O X R T U - M o d B u s –U s e r G u i d e R e v . 2 . 2
S I N A P S I S . r . l. | V i a d e l l e Q u e r c e 1 1 / 1 3 - 0 6 0 8 3 B A S T I A U M B R A ( P G ) –I t a l y
T . + 3 9 075 8011604 - F . + 3 9 075 8014602| w w w . s in a ps i t ec h . i t -i nf o @ s in a p s i te c h . i t 2
TABLE OF CONTENTS
1. INTRODUCTION................................................................................................................................................................................4
1.1 Purpose of the document...................................................................................................................................................4
1.2 Content of the packaging...................................................................................................................................................4
2. RTU TECHNICAL DATA................................................................................................................................................................... 4
3. RTU APPEARANCE............................................................................................................................................................................ 5
3.1 Description of the RTU......................................................................................................................................................... 5
3.2 RTU............................................................................................................................................................................................... 5
4. GENERAL INFORMATION ABOUT ModBus ARCHITECTURE........................................................................................... 6
4.1 System overview..................................................................................................................................................................... 6
4.2 Addressing................................................................................................................................................................................ 7
5. INSTALLATION...................................................................................................................................................................................8
5.1 Mechanical assembly............................................................................................................................................................ 8
5.2 Electrical installation ............................................................................................................................................................. 8
5.3 Connection to a local PC via Ethernet (LAN)............................................................................................................... 9
5.4 Connection to a GPRS-UMTS modem/router...........................................................................................................10
5.5 Connecting the digital inputs to voltage free contacts ........................................................................................11
5.6 Connecting the digital inputs to positive voltage contacts ................................................................................11
5.7 Connecting the digital inputs to negative voltage contacts...............................................................................12
5.8 Digital output connection.................................................................................................................................................12
6. COMMISSIONING ..........................................................................................................................................................................13
7. SELECTING THE LANGUAGE.......................................................................................................................................................13
8. BUTTONS AND DISPLAY..............................................................................................................................................................14
8.1 Button description ...............................................................................................................................................................14
8.2 Display ......................................................................................................................................................................................14
8.3 Display –RTU INFO .............................................................................................................................................................15
8.4 Display - SETTINGS..............................................................................................................................................................16
9. CONNECTING THE RTU TO THE PC ........................................................................................................................................17
10. HOMEPAGE..................................................................................................................................................................................18
11. SETTINGS - SYSTEM .................................................................................................................................................................20
11.1 Plant Database ......................................................................................................................................................................20
11.2 System settings.....................................................................................................................................................................21
11.3 Maintenance...........................................................................................................................................................................21
12. SETTINGS - NETWORK ............................................................................................................................................................23
12.1 General Setup ........................................................................................................................................................................23

E Q U O B O X R T U - M o d B u s –U s e r G u i d e R e v . 2 . 2
S I N A P S I S . r . l. | V i a d e l l e Q u e r c e 1 1 / 1 3 - 0 6 0 8 3 B A S T I A U M B R A ( P G ) –I t a l y
T . + 3 9 075 8011604 - F . + 3 9 075 8014602| w w w . s in a ps i t ec h . i t -i nf o @ s in a p s i te c h . i t 3
12.2 Advanced Setup....................................................................................................................................................................24
12.3 Email Setup.............................................................................................................................................................................25
12.4 DynDNS....................................................................................................................................................................................26
13. DATA SAMPLING.......................................................................................................................................................................27
13.1 Defining sampling frequency and RAW data............................................................................................................27
14. DEFINING SUMMARY DATA .................................................................................................................................................28
14.1 Summary Data –None.......................................................................................................................................................28
14.2 Summary Data –Consumption.......................................................................................................................................28
14.3 Summary Data –Maximum..............................................................................................................................................29
14.4 Summary Data –Minimum ..............................................................................................................................................29
15. SETTINGS - DEVICES ................................................................................................................................................................30
15.1 Section 1 ..................................................................................................................................................................................31
15.2 Section 2 ..................................................................................................................................................................................31
15.3 Section 3 ..................................................................................................................................................................................32
16. SETTINGS - EVENTS..................................................................................................................................................................34
16.1 I/O Events................................................................................................................................................................................34
16.2 Events........................................................................................................................................................................................35
16.3 Condition set according to the maximum value acquired ..................................................................................36
16.4 Condition set according to the minimum value acquired ...................................................................................37
16.5 Condition set according to the value out of range ................................................................................................38
16.6 Condition set according to the Consumption threshold .....................................................................................39
17. EXPORTING DATA.....................................................................................................................................................................40
17.1 Create Reports.......................................................................................................................................................................40
17.2 Example of RAW data in xls format ..............................................................................................................................42
17.3 Example of Summary data in .xls and .csv format...................................................................................................43
17.4 Planning ...................................................................................................................................................................................43
17.5 Repository ...............................................................................................................................................................................44
18. ACCOUNT DATA........................................................................................................................................................................45
19. PLANT STATUS ...........................................................................................................................................................................46
19.1 Devices .....................................................................................................................................................................................46
19.2 Event summary......................................................................................................................................................................48
20. APPENDIX.....................................................................................................................................................................................49
20.1 ROUTER Configuration.......................................................................................................................................................49

E Q U O B O X R T U - M o d B u s –U s e r G u i d e R e v . 2 . 2
S I N A P S I S . r . l. | V i a d e l l e Q u e r c e 1 1 / 1 3 - 0 6 0 8 3 B A S T I A U M B R A ( P G ) –I t a l y
T . + 3 9 075 8011604 - F . + 3 9 075 8014602| w w w . s in a ps i t ec h . i t -i nf o @ s in a p s i te c h . i t 4
1. INTRODUCTION
1.1 Purpose of the document
This document is a guide to the installation, configuration, and commissioning of the EQUOBOX RTU, code
SIN.EQRTU3, hereinafter referred to as RTU. This document is intended for technical personnel with an average
knowledge of electrical engineering, IT, basic TCP/IP principles, and M-Bus systems.
The RTU has an embedded webserver and is a datalogging and consumption monitoring system for heating
and cooling systems equipped with meters that communicate using the ModBus protocol.
Please read carefully the following notes
•Place the system Firewall under covered and isolate it from the corporate network
•For remote access to the machine, we recommend the use of secure technologies such as Virtual Private
Networks (VPNs), recognizing VPN in the most secure way to connect to the device
The first section of this guide is dedicated to the description of the technical specifications of the RTU and its
commissioning. We will describe how to commission the plant, scanning and adding meters. Then, we will
describe the advanced configuration via web interface and, finally, how to generate consumption reports and
plans.
1.2 Content of the packaging
The RTU packaging contains:
•RTU datalogger
•Installation leaflet
2. RTU TECHNICAL DATA
The RTU is a hardware device with no moving parts, made in compliance with industrial standards, which can
be DIN-rail mounted inside an electrical panel. The main technical specifications of the device are shown below:
•Operating temperature range: [-20.. / +55 °C]
•Storage temperature range: [-25.. / +65 °C]
•Protection Rating: IP20 (EN60529)
•Fastening: 35mm DIN bar (EN60715)
•Dimensions: 4 DIN modules (90x72x62)
•Power Supply: 24Vdc +/- 10%, 24Vac (min 20Vac, max 40Vac)
•Power consumption: Max 3W

E Q U O B O X R T U - M o d B u s –U s e r G u i d e R e v . 2 . 2
S I N A P S I S . r . l. | V i a d e l l e Q u e r c e 1 1 / 1 3 - 0 6 0 8 3 B A S T I A U M B R A ( P G ) –I t a l y
T . + 3 9 075 8011604 - F . + 3 9 075 8014602| w w w . s in a ps i t ec h . i t -i nf o @ s in a p s i te c h . i t 5
3. RTU APPEARANCE
3.1 Description of the RTU
The RTU is one of the two dataloggers of the EQUOBOX family. The main functional features described in this
document are summarised below:
•Webserver-based datalogger
•Manages up to 250 M-Bus meters
•4GByte internal memory
•Data logfile of daily synthetic data for up to 10 years
•Daily readout logfile for 1 year
•Data logging interval between 15 minutes and 24 hours
•Remote system management, meter readout, report sending, alarm management, and event
management
•9-24 Vac/ Vdc power supply or Power Over Ethernet
•3 digital inputs for logic control and remote control
•2 relay outputs (Max 2A@230Vac) for logic control and remote control
•Maximum power consumption: 3W
•DIN rail mount (4 modules)
•128x96 pixel OLED display for local consultation and configuration
•6-key membrane keyboard
3.2 RTU
An image of the RTU with its main functional parts is shown below:
Figure 1 - View of the RTU
A. Display (16-level grayscale)
B. Navigation button (ESC)
C. 5-key navigation keyboard (UP-DOWN-LEFT-RIGHT-OK)
D. Operating status LEDs
E. Ethernet Port 1 (PoE)
F. Ethernet Port 2
G. ModBus devices connector
H. Power supply input connector
I. Output connector to relay 1 (normally open contact)
J. Output connector to relay 2 (normally open contact)
K. Digital input connector
L. Auxiliary voltage output connector for digital inputs

E Q U O B O X R T U - M o d B u s –U s e r G u i d e R e v . 2 . 2
S I N A P S I S . r . l. | V i a d e l l e Q u e r c e 1 1 / 1 3 - 0 6 0 8 3 B A S T I A U M B R A ( P G ) –I t a l y
T . + 3 9 075 8011604 - F . + 3 9 075 8014602| w w w . s in a ps i t ec h . i t -i nf o @ s in a p s i te c h . i t 6
4. GENERAL INFORMATION ABOUT ModBus ARCHITECTURE
4.1 System overview
ModBus is a serial communication protocol created by Modicon in 1979 . It became standard in industrial
communication , and is currently one of the most popular connection protocols in the world between industrial
electronic devices. The main reasons for such a high usage compared to other ModBus communication
protocols are:
•It is a protocol openly published and royalty-free
•Move raw bits and words without placing many restrictions on producers
The protocol defines the format and the communication mode between a "master" who manages the system
and one or more "slaves” that respond to the master. The Protocol defines how the master and the slaves and
disrupt communication, such as transmitter and receiver must be identified, such as messages need to be
exchanged and how the errors detected.
Only the master can start a transaction that can have the question/answer format directly to a single slave or
broadcast when the message is sent to all devices on the line that give no response. A transaction consists of
a single structure question/single answer or a single broadcast message/no answer. Some features of the
protocol are:
•Baud rate
•Parity
•Number of stop bits
•and size RTU (binary)
As mentioned above the transactions always involve the ModBus master, which operates the line, and one
slave at a time (except in the case of broadcast messages). To identify the recipient of the message is sent as
the first character a byte containing the numeric address of the selected slave device. Each slave will then be
assigned a different number of address that uniquely identifies it. Admissible address are from 1 to 254 , while
the address 0, which can’t be assigned to a slave, place on top of the message sent by the master indicates
that it is "broadcast", that is directed to all slaves simultaneously.
Below is showed a standard architecture for the physical connection of n ModBus devices.
Figure 2 - System architecture
In the RS485 signal cable laying be careful to
•Pass the cable away from the power cables to avoid interference EMI

E Q U O B O X R T U - M o d B u s –U s e r G u i d e R e v . 2 . 2
S I N A P S I S . r . l. | V i a d e l l e Q u e r c e 1 1 / 1 3 - 0 6 0 8 3 B A S T I A U M B R A ( P G ) –I t a l y
T . + 3 9 075 8011604 - F . + 3 9 075 8014602| w w w . s in a ps i t ec h . i t -i n f o @ s in a p s i te c h .i t 7
•Avoid the creation of star node
•Respect the distances as shown in the figure below
Figure 3 - Distance/Baudrate Ratio
To avoid / attenuate any EMI interference present in the field, we recommend using a cable
•AWG 20/22
•Characteristic impedance of 120 Ω
•Multi strand copper conductors, twisted
•Presence of braided shielding and protective insulation
4.2 Addressing
For addressing the single ModBus device always refer to the owner's Instruction manual

E Q U O B O X R T U - M o d B u s –U s e r G u i d e R e v . 2 . 2
S I N A P S I S . r . l. | V i a d e l l e Q u e r c e 1 1 / 1 3 - 0 6 0 8 3 B A S T I A U M B R A ( P G ) –I t a l y
T . + 3 9 075 8011604 - F . + 3 9 075 8014602| w w w . s in a ps i t ec h . i t -i n f o @ s in a p s i te c h .i t 8
5. INSTALLATION
Carefully follow these instructions to install the device, in order to be able to commission the system in the
best possible way. The device must be installed by qualified personnel, specialised in the installation of electrical
equipment.
5.1 Mechanical assembly
This device has been designed to be DIN-rail mounted; therefore, no other mounting options are allowed. The
DIN-rail mount consists of the following steps:
•Fasten the DIN rail to the bottom of the electrical panel (if it is not already provided with it)
•Remove all the terminals of the device before hooking it on the DIN rail
•Place the recess at the bottom of the device on the upper part of the DIN rail, keeping it at a 45° angle
with the rail. Turn the device until it engages with the rail.
Carefully read the following notes
To prevent mechanical stress on the terminals, which could damage the device, it is important to wire the terminals
disconnected from the device. Follow these instructions:
•Remove the terminals from the device pulling outwards
•Tighten the cables to the removed terminal complying with the right polarity
•Reinsert the terminal with the cables placing it in its correct position
5.2 Electrical installation
Verify the following before commissioning the device:
•Ensure that the electrical panel where the device is installed is powered off
•Verify the presence of power supply protection devices (fuses, circuit breakers, differential switches)
•Ensure that the supply voltage is within the operating limits of the device and that the supply power
is enough to ensure the proper operation of all the devices connected to it, verifying the maximum
power consumption of each one of them
•If you opt for a PoE (Power Over Ethernet), ensure that the network cable is connected to Eth1 and
that the PoE switch is suitable for the device.
•Ensure that the LC is connected properly to the M-Bus network and to the supply voltage (refer to the
installation manual)
•Ensure that the RTU is connected properly to the LC via the serial bus marked A-B-C
•Ensure that the modem router (if any) is installed according to the instructions of the manual
•In the event of data connection, ensure that the Ethernet cable is crimped properly and connected to
Eth1 or Eth2

E Q U O B O X R T U - M o d B u s –U s e r G u i d e R e v . 2 . 2
S I N A P S I S . r . l. | V i a d e l l e Q u e r c e 1 1 / 1 3 - 0 6 0 8 3 B A S T I A U M B R A ( P G ) –I t a l y
T . + 3 9 075 8011604 - F . + 3 9 075 8014602| w w w . s in a ps i t ec h . i t -i n f o @ s in a p s i te c h .i t 9
5.3 Connection to a local PC via Ethernet (LAN)
The device is equipped with two Ethernet ports ETH1 and ETH2 to connect it to a PC either connected to a LAN
network or directly via an Ethernet cable.
Figure 4 - LAN connection
To connect the device directly or via the LAN network of a PC, follow the instructions below:
•Use a standard T568A or T568B Ethernet cable (straight through or crossover) to connect the ETH1
or ETH2 port of the RTU to the Ethernet port of the computer or to an existing LAN socket. If you
use an existing LAN, connect the computer to another LAN socket
•Verify the RTU IP address from the display by accessing the RTU INFO menu (Chapter 8.3) and
ensure that that the ETH icon corresponding to the Ethernet connection indicates that the cable is
connected properly
Figure 5 - LAN configuration
The default RTU network settings are:
•IP address: 192.168.1.110
•Netmask: 255.255.255.0
•IP allocation: Static
•Configure the PC network interface with an IP address that belongs to the same subnet as the RTU.
The example in the figure shows that, in order for the computer to communicate via Ethernet with the
RTU, you must configure the IP address of the computer network adapter to which the RTU is
connected:

E Q U O B O X R T U - M o d B u s –U s e r G u i d e R e v . 2 . 2
S I N A P S I S . r . l. | V i a d e l l e Q u e r c e 1 1 / 1 3 - 0 6 0 8 3 B A S T I A U M B R A ( P G ) –I t a l y
T . + 3 9 075 8011604 - F . + 3 9 075 8014602| w w w . s in a ps i t ec h . i t -i n f o @ s in a p s i te c h .i t 10
•IP address: 192.168.1.XXX (With XXX being a number ranging between 1 and 254 and different
than 110)
•Netmask: 255.255.255.0
•IP allocation: Static
•To change the IP address of the computer network adapter, refer to the user manual of the Operating
System of your PC
•In the event that the PC and the RTU are connected via an existing LAN (company or domestic
network), make sure not to allocate the IP address of the RTU or of the PC
•For instructions on how to change the IP address of your PC, refer to your current OS
5.4 Connection to a GPRS-UMTS modem/router
A data connection to access the Internet ensures remote consultation of the webserver, sending of
consumption reports, and monitoring of the system. Should a LAN/ADSL connection not be available, you must
use a modem/router supplied as an option of the RTU.
The default settings of the RTU and SIN.ROUTER allow the connection of the two devices without having to
change their network parameters. The router is configured to use a TIM (Telecom Italia Mobile) SIM. In this
case, the user must carry out the following operations:
•Power off the router.
•Remove the front panel where the place to insert the SIM is indicated
•Ensure that the SIM PIN is disabled
•Insert the data SIM in the right direction
•Close the front panel
•Fasten the two GSM MAIN and AUX antennas to ensure sufficient transmission signal
•Wait for the router to connect to the mobile network
•Use a network cable to connect port LAN1 of the router to port ETH1 or ETH2 of the RTU
•Verify that the Internet connection is OK from the display (section RTU INFO, Chapter 8.3)
Should a TIM SIM not be available, the operator will have to change some router settings:
•Verify whether it is a Machine-To-Machine (M2M) SIM
•It is enabled for GPRS/UMTS traffic
•Check with the operator that it is bidirectional. i.e. that it allows access to port 80 for webserver
consultation
•Change the APN of the router with the one provided by the operator (e.g. ibox.tim.it /
m2mbis.vodafone.it)
Refer to the Appendix (Chapter 20) for in-detail information on router settings.

E Q U O B O X R T U - M o d B u s –U s e r G u i d e R e v . 2 . 2
S I N A P S I S . r . l. | V i a d e l l e Q u e r c e 1 1 / 1 3 - 0 6 0 8 3 B A S T I A U M B R A ( P G ) –I t a l y
T . + 3 9 075 8011604 - F . + 3 9 075 8014602| w w w . s in a ps i t ec h . i t -i n f o @ s in a p s i te c h .i t 11
5.5 Connecting the digital inputs to voltage free contacts
Follow the instructions below to connect the digital inputs to the device with voltage free contacts, such as
switches, interface relays, or anything else that does not require voltage:
Figure 6 - Digital input connection
•Connect the digital input common (7) to the Vout terminal (6)
•Connect the Vout (+15Vdc) terminal (5) to one of the poles of the contact you want to connect
•Connect the other pole to the desired digital input: (8) for I1, (9) for I2 e (10) for I3
5.6 Connecting the digital inputs to positive voltage contacts
Follow the instructions below to connect the digital inputs to the device with positive voltage (in the event of
closed contacts) and voltage free contacts (in the event of open contact):
Figure 7 - Positive voltage digital input connection
•Connect the common pole (negative) of the contact to the common terminal (7) of the device
•Connect the positive pole of the contact to terminal (8)/(9)/(10) for inputs I1/I2/I3
When the voltage at the ends of the connected input –for example between (7) and (10) –ranges between 0V
and 12V, the RTU input is considered open (OFF). When the voltage value ranges between 12V and 24V, it is
considered closed (ON).

E Q U O B O X R T U - M o d B u s –U s e r G u i d e R e v . 2 . 2
S I N A P S I S . r . l. | V i a d e l l e Q u e r c e 1 1 / 1 3 - 0 6 0 8 3 B A S T I A U M B R A ( P G ) –I t a l y
T . + 3 9 075 8011604 - F . + 3 9 075 8014602| w w w . s in a ps i t ec h . i t -i n f o @ s in a p s i te c h .i t 12
5.7 Connecting the digital inputs to negative voltage contacts
Follow the instructions below to connect the digital inputs to the device with negative voltage (in the event of
closed contacts) and voltage free contacts (in the event of open contact):
Figure 8 - Negative voltage digital input connection
•Connect the common pole (positive) of the contact to the common terminal (7) of the device
•Connect the negative pole of the contact to terminal (8)/(9)/(10) for inputs I1/I2/I3
When the voltage at the ends of the connected input –for example between (7) and (10) –ranges between 0V
and 12V, the RTU input is considered open (OFF). When the voltage value ranges between 12V and 24V, it is
considered closed (ON).
5.8 Digital output connection
The RTU is equipped with two relays that can be used as digital outputs. You can connect a load to them or
use them to activate other systems. Outputs O1 and O2 can be controlled both remotely and via web server
(Ref. Chapter 15). For connection to electrical loads follow the model in Figure 9 and the maximum values for
each relay shown below:
- 5A@30Vdc (Resistive Load)
- 2A@30Vdc (Inductive Load cosfi=0.4; L/R=7ms)
Figure 9 - Digital output connection

E Q U O B O X R T U - M o d B u s –U s e r G u i d e R e v . 2 . 2
S I N A P S I S . r . l. | V i a d e l l e Q u e r c e 1 1 / 1 3 - 0 6 0 8 3 B A S T I A U M B R A ( P G ) –I t a l y
T . + 3 9 075 8011604 - F . + 3 9 075 8014602| w w w . s in a ps i t ec h . i t -i n f o @ s in a p s i te c h .i t 13
6. COMMISSIONING
15system can be commissioned following the instructions below:
1
Access to
Webserver
(RECOMMENDED)
After scanning the bus, we recommend accessing the RTU’s webserver (see Chapter
Errore. L'origine riferimento non è stata trovata.) to complete the configuration,
adding the plant database and allocating the meters and settings to send the reports.
•Use a network cable to connect the RTU to the computer, as described in
Chapter 4.4
•Open your web browser, such as Chrome, Safari, Firefox (We recommend
Google Chrome)
•Type in the RTU’s IP address, indicated on the display, in the address bar, as
described in Chapter 4.4 (e.g. 192.168.1.110) and press “Enter”
2
Meter name
allocation
(RECOMMENDED)
To ensure easy consultation of the consumption through the reports or on the RTU
display, the user should assign at least a Device Name to identify a meter with its utility,
for example Apartment 1 or Apartment 12.
•See Chapter 15 allocate the name and add the description of the meters
3
Plant Database
(RECOMMENDED)
The plant database includes information on the property and location of the plant These
are shown in the heading of the reports generated by the datalogger.
•See Chapter 11 to set the plant database
4
Email settings
(RECOMMENDED)
To allow the datalogger to notify reports/events or anomalies/errors in a plant, we
recommend setting the Email section carefully.
•See Chapter 12.3 for the email settings
5
Display/Webserver
password changes
(HIGHLY
RECOMMENDED)
Before completing the commissioning stage, we highly recommend changing the default
password to access the display and webserver.
•See Chapter 18 for instructions to change the password to access the display
•See Chapter 18 for instructions to change the password to access the webserver
7. SELECTING THE LANGUAGE
You can select the language directly from the RTU or via the Web.
In the former case, upon entering the password in the main menus, such as RTU INFO, METERS, SEARCH, and
SETTINGS, all you have to do is press the arrows or to change the language. The available languages are
English and Italian
Refer to Chapter Errore. L'origine riferimento non è stata trovata. for instructions to change the language
via the Web.

E Q U O B O X R T U - M o d B u s –U s e r G u i d e R e v . 2 . 2
S I N A P S I S . r . l. | V i a d e l l e Q u e r c e 1 1 / 1 3 - 0 6 0 8 3 B A S T I A U M B R A ( P G ) –I t a l y
T . + 3 9 075 8011604 - F . + 3 9 075 8014602| w w w . s in a ps i t ec h . i t -i n f o @ s in a p s i te c h .i t 14
8. BUTTONS AND DISPLAY
8.1 Button description
The RTU is equipped with 6 navigation buttons, which allow browsing through the menus on the display. The
functions of the buttons may change according to the context of the displayed menu; in general, we can
summarise them as follows:
Button to confirm field and value changes
Button to access the submenus
Button to cancel field and value changes
Button to exit the submenus
Left: for main menu / data cursor
Right: for main menu / data cursor
UP:
To scroll pages up
Change/add letters from A to Z or numbers from 0 to 9
Changes the language between Italian and English in the RTU INFO, METERS, SEARCH, and
SETTINGS menus
Down:
To scroll pages down
Change/add letters from A to Z or numbers from 0 to 9
Changes the language between Italian and English in the RTU INFO, METERS, SEARCH, and
SETTINGS menus
8.2 Display
The RTU is equipped with a 96x128 pixel resolution OLED display (16-level greyscale), which allows the
consultation of the readouts and basic settings of the RTU. To minimise electricity consumption, the display
turns off automatically after 10 minutes of inactivity. To turn it on again, simply press one of the navigation
buttons.

E Q U O B O X R T U - M o d B u s –U s e r G u i d e R e v . 2 . 2
S I N A P S I S . r . l. | V i a d e l l e Q u e r c e 1 1 / 1 3 - 0 6 0 8 3 B A S T I A U M B R A ( P G ) –I t a l y
T . + 3 9 075 8011604 - F . + 3 9 075 8014602| w w w . s in a ps i t ec h . i t -i n f o @ s in a p s i te c h .i t 15
8.3 Display –RTU INFO
Press OK in the RTU INFO menu to access the submenu that displays the network parameters as shown in the
figure:
Figure 10 - RTU INFO
Each page, 1-1, 1-2, and 1-3 shows the model of the device and the current date and time. As for the content
of the single sections, we have:
•1-1
oSerial Number: Shows the serial number to be indicated in the event of technical support
oMeter DB Ver.; Shows the version of the meter database installed in the datalogger
•1-2
oLAN ETH status: Indicates the connection status of Ethernet ports ETH1 and ETH2. In the event at
least one of the two ports is connected, it shows the IP address of the network interface
oInternet status: Indicates whether the RTU can connect to the Internet or not. If an Internet
connection is available, the public IP address, with which the RTU can be viewed remotely, is
displayed
•1-3
oFirmware version: Indicates the current firmware
oWEB version: indicates the current version of the web interface
1
1-1
1-2
1-3

E Q U O B O X R T U - M o d B u s –U s e r G u i d e R e v . 2 . 2
S I N A P S I S . r . l. | V i a d e l l e Q u e r c e 1 1 / 1 3 - 0 6 0 8 3 B A S T I A U M B R A ( P G ) –I t a l y
T . + 3 9 075 8011604 - F . + 3 9 075 8014602| w w w . s in a ps i t ec h . i t -i n f o @ s in a p s i te c h .i t 16
8.4 Display - SETTINGS
The Display Settings section is divided into four subsections
•General
•Network
Refer to Chapter 8 (Buttons and Display) and to 11 to consult the various items.
Figure 11 - SETTINGS structure
Press OK for every field reached via the navigation buttons to select the fields to be modified and then press
OK again to change the values to enter using the navigation arrows, as shown in Chapter 8.

E Q U O B O X R T U - M o d B u s –U s e r G u i d e R e v . 2 . 2
S I N A P S I S . r . l. | V i a d e l l e Q u e r c e 1 1 / 1 3 - 0 6 0 8 3 B A S T I A U M B R A ( P G ) –I t a l y
T . + 3 9 075 8011604 - F . + 3 9 075 8014602| w w w . s in a ps i t ec h . i t -i n f o @ s in a p s i te c h .i t 17
9. CONNECTING THE RTU TO THE PC
Connect the RTU either to ETH1 or ETH2 using a T568A or T568B (straight through or crossover) Ethernet cable
as shown in Figure 12
Figure 12 - LAN connection
Set the network adapter of your PC in such a way as to allow communication between the two devices. Below
is a description of a possible configuration of the LAN between the two devices in the event that the RTU IP
address has not been changed, as shown in Chapter 5.3, 8.3
Carefully read the following notes
In order for the RTU and PC to communicate, the two devices must have an IP address within the same subnet.
The default RTU network settings are:
•IP address: 192.168.1.110
•Netmask: 255.255.255.0
•IP allocation: Static
In order for the computer to communicate with the RTU via Ethernet, the IP address of the computer’s network
adapter must be set as follows:
•IP address: 192.168.1.XXX (With XXX being a number ranging between 1 and 254 and different than 110)
•Netmask: 255.255.255.0
•IP allocation: Static
To change the IP address of your computer’ network adapter, refer to its Operating System user guide.
In the event that the PC and the RTU are connected via an existing LAN (company or domestic network),
make sure not to allocate the IP address of the RTU or of the PC.
In the event that the default IP address of the RTU has been changed, you can consult the current IP address
as described in Chapters 5.3, 8.3.

E Q U O B O X R T U - M o d B u s –U s e r G u i d e R e v . 2 . 2
S I N A P S I S . r . l. | V i a d e l l e Q u e r c e 1 1 / 1 3 - 0 6 0 8 3 B A S T I A U M B R A ( P G ) –I t a l y
T . + 3 9 075 8011604 - F . + 3 9 075 8014602| w w w . s in a ps i t ec h . i t -i n f o @ s in a p s i te c h .i t 18
10. HOMEPAGE
Connect the device as shown in Figure 12 and type in the address 192.168.1.110 in your browser
Figure 13 - Login
The data for the first access are:
•User Name: admin
•Password: admin
Press Login to access the Homepage appears as shown in the figure:
Figure 14 - Homepage
2
1
3

E Q U O B O X R T U - M o d B u s –U s e r G u i d e R e v . 2 . 2
S I N A P S I S . r . l. | V i a d e l l e Q u e r c e 1 1 / 1 3 - 0 6 0 8 3 B A S T I A U M B R A ( P G ) –I t a l y
T . + 3 9 075 8011604 - F . + 3 9 075 8014602| w w w . s in a ps i t ec h . i t -i n f o @ s in a p s i te c h .i t 19
The screen is divided into three sections:
•Path of the page being consulted
•Type of user connected
•Selected language (Italian or English)
•Plant status
oDisplay status
•Settings
oPlant
oNetwork
oDevices
oEvents
•Export Data
oCreate Report
oPlanning
oReport Archive
•User Account
oLogin
Shows the submenu with the items pertaining to the main menu (Section 2)
1
2
3

E Q U O B O X R T U - M o d B u s –U s e r G u i d e R e v . 2 . 2
S I N A P S I S . r . l. | V i a d e l l e Q u e r c e 1 1 / 1 3 - 0 6 0 8 3 B A S T I A U M B R A ( P G ) –I t a l y
T . + 3 9 075 8011604 - F . + 3 9 075 8014602| w w w . s in a ps i t ec h . i t -i n f o @ s in a p s i te c h .i t 20
11. SETTINGS - SYSTEM
The items that can be selected are:
•Settings
oPlant Database
oSystem settings
oMaintenance
•Network
oGeneral Setup
oAdvanced Setup
oEmail Setup
oDynDNS
•Devices
oMeter Setup
oSearch Setup
•Events
11.1 Plant Database
You can add only one plant for every RTU
Figure 15 - Plant data settings
Enter the plant data:
•Plant Name: enter the name of the plant
•Plant Address: enter the address of the plant
•Installer name: enter the name of the installer
•Customer Name: enter the name of the client
•Installation Date: if not entered, the RTU will enter the current date by default
Table of contents
