Singer ES110 User manual

Espresso-cappuccino machine
Καφετιέρα espresso-cappuccino
Кафе машина за еспресо-капучино
GB
INSTRUCTION MANUAL
GR
ΒΙΒΛΙΟ ΟΔΗΓΙΩΝ
BG
ИНСТРУКЦИИ ЗА ЕКСПЛОАТАЦИЯ

GB
ENGLISH......................................................... 3
GR
EΛΛΗΝΙΚΑ .................................................... 15
BG
БЪЛГАРСКИ................................................. 28

3
ENGLISH
Important safeguards
Please read these instructions carefully before use the appliance and save it for future reference.
1. This appliance can be used by children aged from 8 years
and above if they have been given supervision or instruction
concerning use of the appliance in a safe way and if they
understand the hazards involved. Children shall not play with
the appliance. Cleaning and user maintenance shall not be
made by children unless they are older than 8 and supervised.
Keep the appliance and its cord out of reach of children aged
less than 8 years.
2. The appliance can be used by persons with reduced physical,
sensory or mental capabilities or lack of experience and
knowledge if they have been given supervision or instruction
concerning use of the appliance in a safe way and understand
the hazards involved.
3. The appliance is not intended for use by persons (including
children) with reduced physical, sensory or mental capabilities,
or lack of experience and knowledge, unless they have
been given supervision or instruction concerning use of the
appliance by a person responsible for their safety. Children
should be supervised to ensure that they do not play with the
appliance.
4. Do not immerse the supply cord, plug, or appliance itself in
water or any other liquids.
5. Never let the machine operate while unattended.
6. The supply cord should be regularly examined for signs of
damage. If the supply cord is damaged, it must be replaced
by the manufacturer, its service agent or similarly qualified
persons in order to avoid a hazard.
7. Do not operate the appliance with a damaged cord or plug, or
after the appliance malfunctions, or has been damaged in any
manner, return appliance to the nearest authorized service
agent for examination, repair or adjustment.

4
ENGLISH
8. This appliance is intended for household use and similar
applications such as:
– staff kitchen areas in shops, offices and other working
environments;
– farm houses;
– by clients in hotels, motels and other residential type
environments;
– bed and breakfast type environments.
9. Only use the machine for its intended household purposes in
accordance with these instructions.
10. Make sure your mains voltage corresponds to that specified on the
appliance before plugging in. The appliance must be connected to
an earthed mains safety socket.
11. Do not use the appliance with a damaged socket-outlet.
12. Never use the appliance outdoors and always place it in a dry
environment.
13. Unplug
-Before filling with water.
-Before cleaning.
-After use.
14. Never use the appliance near hot surfaces.
15. Make sure the cord never comes into contact with the hot parts of
the appliance.
16. Never move the appliance by pulling the cord. Do not wind the cord
around the appliance or twist it.
17. Stand the appliance on a stable, flat surface.
18. Only use fresh and cold water. Do not use water contained in
bathtubs, washbasins or other reservoirs.
19. Never put too fine ground coffee or use torn pods in the appliance,
as this causes it to become blocked.
20. Never remove the filter holder whilst coffee is brewing or the coffee
and steam button is pressed down, steam could shoot out and
burn you.

5
ENGLISH
21. Don’t get burnt by:
- Hot parts, including the steam/hot water nozzle, cup warming
tray, filter holder and boiler outlet.
- Steam or hot water coming out of the steam/hot water nozzle or
boiler outlet.
22. Never fill the water tank above the MAX level marked. Never use
the machine when water overflow.
23. Never use without water, the pump will burn out. If you have a
programmable appliance, make sure to fill it with water before
programming it.
24. Always set any control to “off” before unplugging from the socket-
outlet.
25. Make sure the ambient temperature is at least 10°C, otherwise the
appliance does not function properly.
26. Do not use the machine at altitudes higher than 2200 metres above
sea level.
27. Never use without the drip tray and cup stand.
28. Never use accessories which are not recommended by the
producer. They could constitute a danger to the user and risk to
damage the appliance.
29. Do not forget that the temperature of the coffee prepared is high.
Handle with care your jug to avoid any risk of scald.
30. Make sure cool down before cleaning or storing the appliance.
Service & Repair
1. For service or repair under warranty, please contact the authorized service company that is
mentioned on the guarantee card that accompanies the product.
2. Do not operate any product with a damaged cord or plug. If the supply cord is damaged,
return the appliance to a SINGER service center for examination repair or adjustment. Do
not attempt to dismantle any part of the appliance. This should only be done at an authorized
SINGER service centre.
3. The partial or total non-respect of the safety instructions in the present instruction manual
will automatically release Singer of any type of responsibility in case of malfunction of the
machine or injuries to persons or animals.
4. In case of manipulation, repairing or any modification of the machine made by unqualified
persons or in case of improper use, the guarantee will be automatically cancelled.

6
ENGLISH
Technical data
Voltage/Frequency: 220-240VAC 50Hz
Power input: 900-1100W
Capacity of water tank: 1.5L
Know your espresso machine
1. Cup warming tray
2. Rail
3. Tank lid
4. Water tank
5. Steam/hot water knob
6. Ready light
7. Power light
8. Steam light
9. Coffee/hot water button
10. On/Off button
11. Steam button
12. Handle of filter holder
13. Float
14. Cup stand
15. Drip tray
16. Boiler outlet
17. Steam/hot water nozzle
18. Measuring spoon with tamper
19. Filter for 2 cups dose
20. Filter for 1 cup dose or coffee pod
Features
1. Powerful pump
The appliance is equipped with a powerful 15 bar pump capable of producing excellent
espresso and cappuccino.
2. Aluminum boiler
The appliance is equipped with a thick aluminum boiler that heats fast and has excellent
steam, hot water capacity.
3. Removable drip tray
The drip tray is removable for easy cleaning.
4. Detachable water tank
The 1.5L transparent water tank with hinged lid is detachable for easy cleaning and refilling.
5. Safety system
The appliance is equipped with pressure relief valve, thermal fuse and dual thermostat to
prevent from overheating and overpressure.
6. Froth enhancing function
The appliance is equipped with a froth-aid device; enjoy abundant milk froth for cappuccino
within minutes.

7
ENGLISH
Before using for the first time
1. Remove all packaging.
2. Wind excess cable around the storage slot on the bottom of the machine.
3. Wash the parts; please refer to “Cleaning”.
4. Flush the machine thoroughly with clean water in the following steps:
a) Make sure all the buttons are in the off position and that the steam/hot water knob is
closed by turning clockwise.
b) Lift out the tank, draw up the lid and fill with cold water up to the MAX level marked.
Alternatively draw up the lid and fill the tank whilst in position on the espresso machine.
We recommend using filtered water as it produces better coffee and reduces lime scale,
never use fizzy water.
c) Refit the tank, make sure that it is correctly located and apply light pressure if necessary
to ensure the valve at the bottom of the tank connects with the water inlet of the machine.
It is normal for water to remain in the compartment under the tank; this can be done using a
sponge.
d) Swing out the steam/hot water nozzle then attach the filter holder to the machine by
positioning it under the boiler outlet and turning to the right, place a bowl underneath.
e) Plug in the mains supply, Press down the On/Off button then the power light will glow.
f) Immediately press down the coffee/hot water button and wait until water drip from the filter
holder. This means the boiler has been filled with water.
Note: You have to operate this step as soon as possible; otherwise the boiler will be dry-boiled.
Important: You can not brew espresso if you have not flushed the machine at first, the flushing
cycle causes the boiler to fill with water. If you have not used the machine for a few days, you
have to flush it with fresh water before you use it again.
Preheating the espresso machine
To ensure your espresso coffee is brewed at the right temperature it is essential that the coffee
appliance is preheated.
1. Check that the steam/hot water knob is firmly closed (turn clockwise) and that there is water
in the tank.
2. Put a jug under the steam/hot water nozzle.
3. Fit the desired filter into the filter holder (without coffee) and attach to the machine by
positioning it under the boiler outlet and turning to the right, ensure is it firmly located.
4. Position two cups under the filter holder; if you use the same cup that the coffee will be
served in it will be preheated. Alternatively the cups can be preheated on the cups warming
tray.
5. Press the On/Off button and wait until the ready light glows.
6. Press down the coffee/hot water button and wait until two cups of water runs into the bowl.
7. Turn the steam/hot water knob anti-clockwise and allow a little amount of water to run into
the jug.

8
ENGLISH
8. Turn the steam/hot water knob clockwise and turn the all buttons to off setting.
9. Remove the filter holder and proceed to make coffee using either ground coffee or coffee
pods.
To make espresso using ground coffee
1. Preheat the appliance as above ‘Preheating the espresso machine’.
2. Check that there is water in the tank.
3. Select the desired filter and fit into the filter holder.
Use the smaller filter for making one cup of coffee (or when using coffee pods) and the larger
filter for 2 cups.
4. Add the coffee using the measuring spoon provided one full spoon per cup, level the surface
then lightly press with the tamper of the measuring spoon, wipe off any coffee around the
rim.
When buying ground coffee maker sure it is suitable for espresso machines.
Never press the coffee too firmly as the coffee will come out slowly and the cream will be of
a dank colour, however, if it is pressed too lightly ,the coffee will come out too fast and the
cream will be a light colour.
5. Attach the filter holder into the boiler outlet; turn it to the right to lock into position.
Put one or two cups underneath, if making one cup of coffee, centre your cup in the middle.
Ensure the On/Off button is pressed down then the power light will glow, wait until the ready
light glows, then press down the coffee/hot water button to maker espresso.
6. When you’ve enough coffee—not too much otherwise it will be too weak (optimum dosage
is 30ml per cup) release the coffee/hot water button to the off position. If you are not making
any more coffee, release the power button to the off position.
7. Remove the filter holder by turning to the left.
There will be water on the filter when you remove it, this is normal.
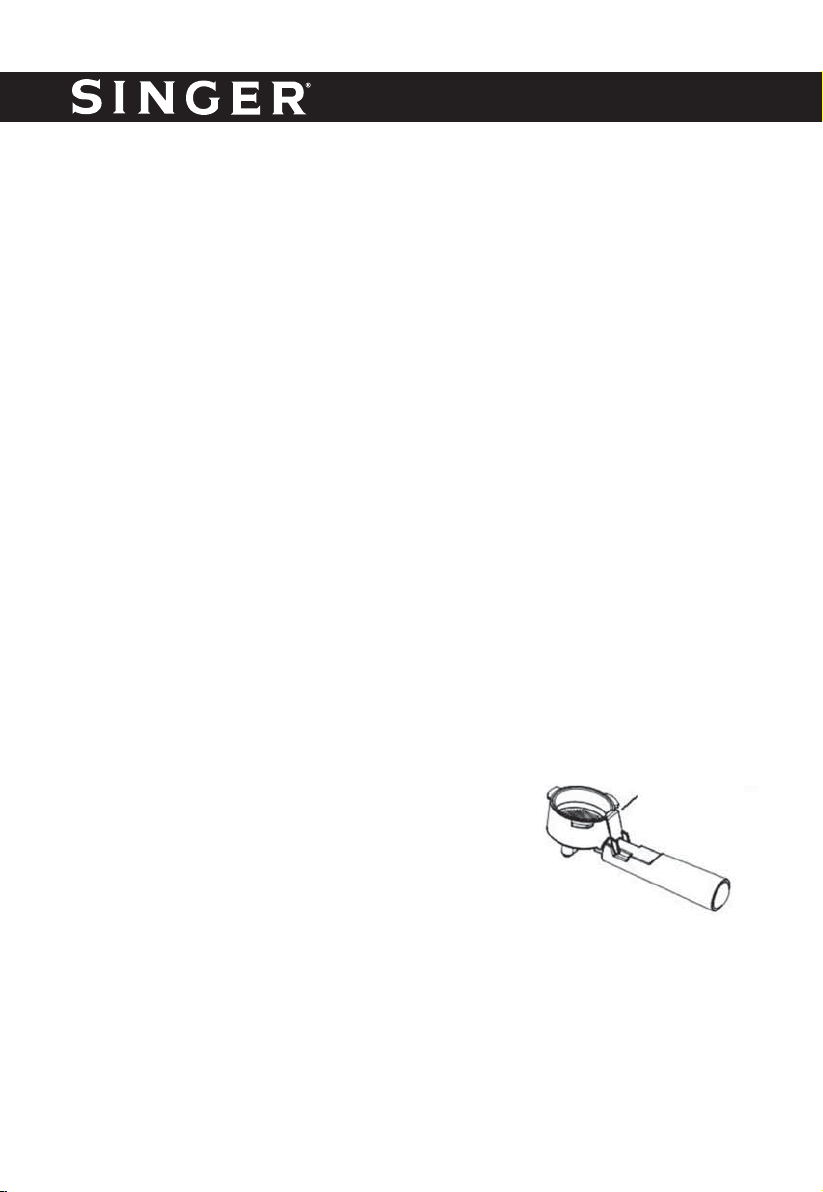
8. To remove the used coffee from the filter holder, please lift the plastic pressing block to press
the edge of filter as shown, then tip the filter holder upside down and tap out the grounds.
Important:
1) You can not start to make espresso until the ready light
glows because it means the water temperature is not
enough when the ready light goes out.
2) To avoid water leakages from the rim of filter holder and
to ensure optimum performance, it is necessary to clear
any ground coffee from around the boiler outlet. Take
care as the area may be hot.
To make espresso using filter pods
1. Preheat the machine as above ‘Preheating the espresso machine’. Fit the small filter into the
filter holder before fitting to the machine.
2. Place the coffee pod into the filter making sure the pod is facing the correct way.
3. Press the pod towards the lower part of the filter, making sure that the paper flaps adhere to
the inner part of the filter.
plastic pressing block

9
ENGLISH
4. The pod needs to be well centred and placed in the filter.
5. Fit the filter holder into the boiler outlet and turn to the right until it locks into position.
6. Follow as the steps 5 to 8 of the chapter ‘To make espresso using ground coffee’.
Important:
1) Use pods with 44-45 mm diameter.
2) Always follows the instruction on the package of the pods for the correct positioning of the
pods in the filter.
To froth milk for cappuccino
Prepare the espresso as previously described.
1. Make sure there is water in the tank.
2. Press down the steam button, the steam light will glow, wait until the ready light glows
indicating that the boiler has reached the correct temperature.
3. Partly fill a jug with milk - the milk may increase up to three times in volume so select a
suitably sized jug.
Cold semi skimmed milk gives the best results.
4. Position the jug under the steam/hot water nozzle.
5. Place the nozzle into the milk about 30mm deep and turn the steam/hot water knob in an
anti clockwise direction, the milk will begin to increase in volume and appear frothy. When
the volume of the milk has doubled, fully immerse the nozzle and continue heating the milk.
Once the desired temperature is reached (60oC is optimum), stop the steam by turning the
steam/hot water knob clockwise.
Note: When operation in steam mode and with the steam/hot water knob turned off, some
water may drop from the boiler outlet or the attached filter holder. This water collects
in the drip tray. Alternatively you can place a cup under the boiler outlet or the attached
filter holder.
6. Release the steam button to the off position, the steam light goes out.
7. Pour the frothed milk into the cups containing the espresso coffee.
Important:
1) Never operate the steam/hot water nozzle for longer than 2 minutes at one time.
2) Never allow the milk to boil as this will spoil the flavor of the coffee.
3) To prepare more than one cup of cappuccino, first make all the espresso coffees, then at the
end prepare the frothed milk for all the cappuccinos.
To make espresso after frothing milk
If you’re making espresso after frothing milk, you need to drain any overheated water that could
burn your coffee as following:
1. Place a container with at least 30mm depth of cold water underneath the steam/hot water
nozzle, immerge the nozzle into the cold water at least 10mm depth. Ensuring the steam
button is already released then turn the steam/hot water knob anti-clockwise, Press down
the coffee/hot water button and allow the water to flow out from the steam/hot water nozzle
until the ready light goes out.
2. Release the coffee/hot water button to off position to stop the water flowing from the steam/
hot water nozzle.

10
ENGLISH
Turn the steam/hot water knob in a clockwise direction to close.
3. The appliance is now ready to make coffee.
NOTE: Don’t raise the nozzle over water level before finish the operation, to avoid any risk of
scald by steam or hot water coming out of the steam/hot water nozzle rapidly.
To boil water for other drinks, tea, e.g.
1. Make sure all buttons are in the off position.
2. Check that there is water in the tank.
3. Press down the On/Off button.
4. Position a container under the steam/hot water nozzle.
5. When the ready light glows, turn the steam/hot water knob in an anti-clockwise direction
then press down the coffee/hot water button, hot water will come out of the steam nozzle.
6. Release the coffee/hot water button to off position to stop the flow of hot water, then turn the
steam/hot water knob in a clockwise direction to close.
NOTE:
1. Do not spout hot water from the steam nozzle for longer than 20 seconds in one operation.
2. To avoid any risk of scald, you have to use a handled container with enough depth, because
strong steam and rapid hot water will come out of the steam/hot water nozzle, especially at
the beginning of the above step 5.
Cleaning
1. Never immerse the cord, plug, or appliance itself in water or other liquids.
2. Always unplug the machine and make sure cool down before you clean it.
3. Don’t wash parts in the dishwasher.
Tank, lid, filter holder
Wash, rinse and allow drying.
Filter (one and two cup version)
1) Wash and dry after every use.
2) After approximately every 100 uses dismantle and clean more thoroughly as described
below:
Remove the metal filter from the filter holder. Clean the filter in hot water using a brush;
make sure the holes in the filter are not blocked, if necessary clean with a pin. Dry the parts
then reassemble; make sure the parts are correctly assembled.
Steam/hot water nozzle
1) Prior to cleaning allow some hot water to flow out of the nozzle (see ‘To boil water for other
drinks’) then unplug and allow cooling before proceeding.
2) Pull out the rubber tube downwards, and then wash thoroughly. Check that the hole in the
nozzle is not blocked, if necessary unblock them with a pin.
3) Revolve the rubber tube onto the nozzle.

11
ENGLISH
Cup stand, drip tray
Empty the drip tray regularly, you’ll know when it is full, the red float in the drip tray will rise and
become visible in the hole on the cup stand. Wash then dry.
Boiler outlet
Wipe away any coffee grounds from this area, at lease twice a year carry out the following
procedure.
1) using a screwdriver, unscrew the screw that holds the outlet of the boiler in place
2) Clean the boiler area with a damp cloth.
3) Clean the removed outlet thoroughly in hot soapy water using a brush, rinse thoroughly,
make sure the holes are not blocked, and if necessary use a pin to clean.
4) Reverse the above procedure to re-fit to the outlet; make sure the parts are correctly
assembled.
Descaling
The appliance has to be descaled regularly, otherwise the coffee taste will become bad and the
scale deposited inside in the machine may cause permanent and irreparable damage to the
machine. The frequency depends on the water hardness and the brewing frequency. Generally,
the descaling should be done in the following periodicity:
- With soft water, at least once every 2 months.
- With hard water, at least once every month.
In case of doubting to the water hardness, ask advice of your local tap water company.
Alternatively it is advisable to descale the appliance after 200 cups of coffee have been made.
If you begin to notice an increase in the brewing time, or there is excessive steaming, or a build-
up of white deposits on the surface of the boiler outlet, you have to descale. We recommend
purchasing a specific descaling for descaling espresso machines.
It is recommended to use only specific liquid descaler suitable for espresso machine, and read
carefully the instructions on its package or user manual before use.
NOTE:
1) In case of using solid descaler, make sure the descaler dissolves into cold water fully before
pouring into the water tank.
2) Never use a descaler based on mineral acids such as sulphuric acid, hydrochloric acid,
sulphamic acid and acetic acid (e.g. vinegar). These descalers may damage your machine.
1. Mix adequate descaler with cold water in a measuring jug as per its instructions. Fill the
water tank up to the Max level with the prepared descaling solution. Then put the water tank
back into the machine.
2. Make sure the filter holder is not attached and put a bowl with a capacity of at least 1500ml
under the boiler outlet to collect the descaling solution.
3. Press down the On/Off button and wait until the ready light glows.
4. Press down the coffee/hot water button and allow half the solution to flow out, seriatim
release the coffee/hot water button and the On/Off button to the off position to stop the flow.
5. Leave the machine to rest for 15 minutes, then seriatim press down the On/Off button and
the coffee/hot water button until the water tank is empty.

12
ENGLISH
6. Thoroughly rinse the tank.
7. Fill the water tank with cold fresh water up to the Max level again and repeat steps 2 to 5
without rest to rinse the appliance for a second time.
NOTE: Always rinse the machine by letting it empty at least two full water tanks.
8. Seriatim release the coffee/hot water button and the On/Off button to off position.
Important:
1) Never interrupt the descaling process.
2) Repairs caused by malfunctioning due to scale deposited inside the appliance are not
covered by the guarantee if the descaling process is not carried out properly.
Trouble Shooting
If you have a problem, you may find the solution in the table below. If the table does not provide
the solution to your problem, please contact with the nearest authorized service agent for
examination, repair or adjustment.
Problem Possible cause Solution
Espresso coffee
does not come out of
the machine.
The coffee is damp. Check that you are using ground
coffee suitable for espresso mak-
ers.
Pressed the coffee too firmly
into the filter.
Press the coffee more lightly in
the filter and change the grind if
necessary.
The holes in the filter holder
spouts are blocked.
Clean the holes in the spouts.
The boiler outlet is blocked. Clean the boiler outlet as indicated
in the chapter ‘cleaning’.
The tank is incorrectly fitted
and the valve at the bottom is
not open.
Press the tank lightly so as to open
the valve at the bottom.
The holes in the crema device
are blocked.
Dismantle the crema device and
clean parts thoroughly. See
‘Cleaning’.

13
ENGLISH
Espresso coffee
drips from the edges
of the filter holder,
instead of from the
holes.
The filter holder is incorrectly
attached to the machine.
Refit the filter holder, making sure
it is located correctly and turn to
the right.
Some powder remained on
the side of boiler outlet or the
gasket for boiler outlet.
Remove the powder from boiler
outlet and the gasket.
The holes in the filter holder
spouts are blocked.
Clean the holes in the spouts.
The gasket of the espresso
boiler has lost its elasticity.
Get the gasket replaced to contact
the nearest authorized service
agent
The espresso coffee
is cold
Preheating the machine was
not carried out.
Follow instructions on ‘preheating
the espresso machine’.
The cups were not preheated. Preheat the cups by rinsing with
hot water or placing on the cup
warming tray.
The Ready light was not
glowing when starting to brew
coffee.
Wait until the Ready light glows
before starting to brew coffee.
The pump is too
noisy.
The water tank is empty. Fill the tank with water.
The tank is incorrectly fitted
and the valve in the bottom is
not open.
Press the tank lightly so as to open
the valve at the bottom.
The coffee cream
is light in color and
is dispensed too
quickly.
The ground coffee has not
been pressed enough.
Press the coffee more firmly.
Insufficient ground coffee has
been used.
Increase the quantity of coffee as
7 grams (1 full spoon) per cup.
Too much coffee has been
dispensed.
Decrease the quantity of coffee
dispensed into the cup(s).
The coffee used is unsuitable. Use the coffee suitable for es-
presso machines.

14
ENGLISH
The coffee cream is
dark in color and is
dispensed too slowly.
The ground coffee has been
pressed too firmly.
Press the coffee less.
The boiler outlet is blocked. Clean the boiler outlet as ‘clean-
ing’.
Too much coffee has been
used.
Decrease the quantity.
The coffee is too finely ground. Use the coffee suitable for es-
presso machines.
The coffee used is unsuitable. Use the coffee suitable for es-
presso machines.
The coffee has an
acidic taste.
The machine was not rinsed
thoroughly after descaling.
Flush the machine with clean
water and rinse all components,
see ‘descaling’.
The milk does not
froth when making a
cappuccino.
The milk is not cold enough. Always use milk from the refrigera-
tor. And try milk with a different fat
content.
The Steam/hot water nozzle
is dirty.
Clean the Steam/hot water nozzle.
See ‘Cleaning’.
No water in boiler. Fill the boiler with water as ‘Before
using for the first time’.
Too much water
remains in the filter
after brewing.
The powder is not tightly
pressed on.
To press on the powder tightly.
The powder is not enough. Increase the quantity of coffee as
7 grams (1 full spoon) per cup.
Disposal of old Electrical & Electronic Equipment (Applicable in the European Union and
other European countries with separate collection systems).
This symbol on the product or on its packaging indicates that this product shall not
be treated as household waste. Instead it shall be handed over to the applicable
collection point for the recycling of electrical and electronic equipment. By ensuring
this product is disposed of correctly, you will help prevent potential negative conse-
quences for the environment and human health, which could otherwise be caused
by inappropriate waste handling ofthis product. The recycling of materials will help
to conserve natural resources. For more detailedinformation about recycling of this
product, please contact your local city office, your householdwaste disposal service
or the shop where you purchased the product.

15
ΕΛΛΗΝΙΚΑ
Σημαντικές οδηγίες ασφαλείας
Παρακαλούμε διαβάστε τις παρακάτω οδηγίες χρήσεως με προσοχή πριν την χρήση της
συσκευής και φυλάξτε τες για μελλοντική χρήση και αναφορά.
1. Αυτή ησυσκευή μπορεί να χρησιμοποιηθεί από παιδιά ηλικίας
από 8 ετών και πάνω εφόσον υπάρχει εποπτεία ήέχουν δοθεί
οδηγίες σχετικά με την χρήση της συσκευής με ασφαλή τρόπο
και κατανοούν τους κινδύνους που ενέχονται. Τα παιδιά πρέπει
να επιβλέπονται για να εξασφαλιστεί ότι δεν παίζουν με τη
συσκευή. Οκαθαρισμός και ησυντήρηση της συσκευής δεν
πρέπει να γίνεται από παιδιά εκτός και αν είναι μεγαλύτερα από
8 ετών και υπάρχει επίβλεψη ενηλίκου. Κρατήστε τη συσκευή
και το καλώδιο μακριά από παιδιά ηλικίας κάτω των 8 ετών.
2. Αυτή ησυσκευή μπορεί να χρησιμοποιηθεί από άτομα με
μειωμένες σωματικές, αισθητηριακές ή/και πνευματικές
δυνατότητες ήέλλειψη εμπειρίας και γνώσεων εφόσον υπάρχει
εποπτεία ήέχουν δοθεί οδηγίες σχετικά με την χρήση της
συσκευής με ασφαλή τρόπο και κατανοούν τους κινδύνους που
ενέχονται.
3. Αυτή ησυσκευή δεν προορίζεται για χρήση από άτομα
(συμπεριλαμβανομένων και των παιδιών) με μειωμένες φυσικές
και νοητικές και ικανότητες ήέλλειψη εμπειρίας και γνώσης,
εκτός αν υπάρχει επιτήρηση ήέχουν δοθεί οδηγίες για τη
χρήση της συσκευής από ένα άτομο υπεύθυνο για την ασφάλεια
τους. Τα παιδιά πρέπει να επιτηρούνται για να βεβαιωθεί ότι δεν
παίζουν με τη συσκευή.
4. Ποτέ μη βυθίζετε το καλώδιο ρεύματος, το φις ήτη συσκευή σε
νερό ήοποιοδήποτε άλλο υγρό.
5. Μην αφήνετε τη συσκευή να λειτουργεί εάν δεν υπάρχει
επιτήρηση.
6. Το καλώδιο ρεύματος θα πρέπει να εξετάζεται συχνά για σημάδια
φθοράς. Εάν το καλώδιο ήκάποιο άλλο εξάρτημα παρουσιάζουν
βλάβη, θα πρέπει να σταματήσετε αμέσως τη χρήση της
συσκευής και να επικοινωνήσετε με κάποιο Εξουσιοδοτημένο

16
ΕΛΛΗΝΙΚΑ
κατάστημα SINGER SERVICE για την επισκευή και την αποφυγή
τραυματισμού.
7. Μην λειτουργείτε τη συσκευή με φθαρμένο καλώδιο ήφις,
ήεάν ησυσκευή έχει παρουσιάσει βλάβη, ήαν έχει υποστεί
ζημιά με οποιονδήποτε τρόπο, επιστρέψτε τη συσκευή στο
κοντινότερο Εξουσιοδοτημένο κατάστημα SINGER SERVICE
για έλεγχο, επισκευή ήρύθμιση.
8. Αυτή ησυσκευή προορίζεται για οικιακή χρήση και παρόμοιες
εφαρμογές όπως:
- κουζίνες προσωπικού σε καταστήματα, γραφεία και άλλα
εργασιακά περιβάλλοντα;
- αγροκτήματα;
- από πελάτες σε ξενοδοχεία, μοτέλ και άλλους τύπους
οικιστικών χώρων;
- Ενοικιαζόμενα δωμάτια
9. Να χρησιμοποιείτε τη συσκευή μόνο για οικιακή χρήση και πάντα σύμφωνα με τις
οδηγίες που περιγράφονται σε αυτό το εγχειρίδιο χρήσης.
10. Ησυσκευή θα πρέπει να συνδέεται μόνο σε γειωμένη πρίζα. Ελέγξτε αν ητάση
που αναφέρεται στη βάση της συσκευής ανταποκρίνεται στην τοπική τάση πριν τη
συνδέσετε.
11. Μην χρησιμοποιείτε τη συσκευή με φθαρμένο καλώδιο, φις ήπρίζα.
12. Μην χρησιμοποιείτε τη συσκευή σε εξωτερικούς χώρους και πάντα να τοποθετείτε
τη συσκευή σε στεγνό περιβάλλον.
13. Αποσυνδέστε τη συσκευή από το ρεύμα:
-Πριν γεμίσετε με νερό.
-Πριν τον καθαρισμό.
-Μετά τη χρήση.
14. Μην αφήνετε τη συσκευή να ακουμπάει σε θερμές επιφάνειες ήνα έρχεται σε επαφή
με πηγές θερμότητας.
15. Μην αφήνετε το καλώδιο τροφοδοσίας της να ακουμπάει σε θερμές επιφάνειες ήνα
έρθουν σε επαφή με πηγές θερμότητας.
16. Μην αποσυνδέετε τη συσκευή τραβώντας το καλώδιο. Μην τυλίγετε το καλώδιο
γύρω από τη συσκευή και μην το περιστρέφετε.
17. Βεβαιωθείτε ότι έχετε τοποθετήσει τη συσκευή πάνω σε επίπεδη και σταθερή
επιφάνεια.
18. Χρησιμοποιείτε μόνο φρέσκο και κρύο νερό. Μην χρησιμοποιείτε νερό από μπανιέρες,
νεροχύτες ήάλλα δοχεία νερού.
19. Μην βάζετε στη συσκευή πάρα πολύ λεπτοκομμένο καφέ ήσκισμένες χάρτινες
μερίδες καφέ, γιατί αυτό μπορεί να μπλοκάρει τη συσκευή.
20. Ποτέ μην αφαιρείτε το φίλτρο του καφέ κατά τη διάρκεια παρασκευής του καφέ

17
ΕΛΛΗΝΙΚΑ
ήόταν οδιακόπτης του καφέ και του ατμού είναι σε λειτουργία διότι μπορεί να
πεταχτεί καυτός ατμός και να σας τραυματίσει.
21. Προσοχή μην καείτε από:
- Θερμαινόμενα μέρη της συσκευής, συμπεριλαμβανομένου του ρύγχους ατμού/
ζεστού νερού, βάση προθέρμανσης φλιτζανιών, φίλτρο καφέ και το εξωτερικό
μέρος του μπόιλερ.
- Από τον ατμό ήτο ζεστό νερό που βγαίνει από το ρύγχος ατμού/ζεστού νερού ήαπό
το εξωτερικό μέρος του μπόιλερ.
22. Ποτέ μην γεμίζετε το δοχείο νερού παραπάνω από την ένδειξη Max. Μην
χρησιμοποιήσετε τη συσκευή σε περίπτωση υπερχείλισης.
23. Μη θέτετε σε λειτουργία τη συσκευή εάν το δοχείο νερού είναι άδειο διότι θα καεί
ηαντλία της συσκευής. Εάν διαθέτετε μοντέλο με προγραμματισμό βεβαιωθείτε ότι
έχετε γεμίσει το δοχείο νερού πριν προγραμματίσετε τη συσκευή.
24. Πάντα να θέτετε όλους τους διακόπτες στη θέση “Off” πριν αφαιρέσετε το βύσμα από
την παροχή ρεύματος.
25. Βεβαιωθείτε ότι ηθερμοκρασία του χώρου είναι τουλάχιστον 10°C, διαφορετικά η
συσκευή δεν θα λειτουργεί σωστά.
26. Μην χρησιμοποιείτε της συσκευή σε μέρη με υψόμετρό πάνω από 2200 μέτρα από
την επιφάνεια της θάλασσας.
27. Ποτέ μην χρησιμοποιείτε τη συσκευή χωρίς το δοχείο συλλογής υγρών και το
προστατευτικό της βάσης προθέρμανσης φλιτζανιών.
28. Ποτέ μην χρησιμοποιείτε εξαρτήματα τα οποία δεν προτείνονται από τον
κατασκευαστή. Μπορούν να αποτελέσουν κίνδυνο για τον χρήστη και υπάρχει
κίνδυνος να βλάψουν τη συσκευή.
29. Μην ξεχνάτε ότι ηθερμοκρασία του καφέ είναι υψηλή. Χειριστείτε την κούπα με τον
καφέ με προσοχή για να αποφύγετε τραυματισμό ήέγκαυμα.
30. Αφήστε τη συσκευή να κρυώσει πλήρως πριν τον καθαρισμό και την αποθήκευση
της.
Συντήρηση & Επισκευή
1. Για συντήρηση ήεπισκευή εντός εγγύησης, παρακαλούμε επικοινωνήστε με τα
στοιχεία της εταιρίας service που αναφέρονται στο φύλλο εγγύησης που συνοδεύει
το προϊόν.
2. Μην λειτουργείτε τη συσκευή με φθαρμένο καλώδιο ήπρίζα, εάν το προϊόν
δυσλειτουργεί ήέχει πέσει ήέχει υποστεί βλάβη με οποιονδήποτε τρόπο. Θα
πρέπει να απευθυνθείτε σε ένα Εξουσιοδοτημένο Κατάστημα Σέρβις της SINGER
ήνα επικοινωνήσετε με το Κέντρο Εξυπηρέτησης Πελατών της SINGER. Μην
επιχειρήσετε να αποσυναρμολογήσετε οποιοδήποτε εξάρτημα της συσκευής. Αυτό
μπορεί να γίνει μόνο από ένα Εξουσιοδοτημένο Κατάστημα Σέρβις της SINGER.
3. Ημη τήρηση αυτών των κανονισμών και υποδείξεων που περιγράφονται στο παρόν
εγχειρίδιο απαλλάσσει τη Singer από κάθε ευθύνη σε περίπτωση κακής λειτουργίας
ήπρόκλησης βλάβης σε άτομα, ζώα, κλπ.
4. Ηκακή χρήση ήπαρέμβαση από το χρήστη που δεν επιτρέπονται, ακυρώνουν
αυτομάτως την εγγύηση του προϊόντος.

18
ΕΛΛΗΝΙΚΑ
Τεχνικές προδιαγραφές
Τάση/Ισχύς: 220-240VAC 50Hz
Ισχύς ρεύματος: 900-1100W
Χωρητικότητα δοχείου νερού: 1.5L
Γνωρίστε τη συσκευή σας
1. Δίσκος προθέρμανσης φλιτζανιών
2. Προστατευτική ράβδος
3. Καπάκι δοχείου νερού
4. Δοχείο νερού
5. Ρυθμιστής ροής ατμού/νερού
6. Λυχνία ετοιμότητας συσκευής
7. Λυχνία ένδειξης λειτουργίας
8. Λυχνία ένδειξης ατμού
9. Κουμπί καφέ/ζεστού νερού
10. Κουμπί On/Off
11. Κουμπί ατμού
12. Θήκη φίλτρου με λαβή
13. Δίσκος περισυλλογής καφέ
14. Δίσκος τοποθέτησης των φλιτζανιών
15. Δοχείο περισυλλογής υγρών
16. Μπόιλερ
17. Ακροφύσιο ατμού/ ζεστού νερού
18. Κουταλάκι μεζούρα
19. Βαθύ φίλτρο (για 2 φλιτζάνια)
20. Ρηχό φίλτρο για 1 δόση ήγια χάρτινη μερίδα καφέ
Χαρακτηριστικά συσκευής
1. Ισχυρή Αντλία
Ησυσκευή είναι εξοπλισμένη με αντλία 15bar, ιδανική για espresso και τέλειο cappuccino.
2. Μπόϊλερ από Αλουμίνιο
Ησυσκευή είναι εξοπλισμένη με μπόϊλερ από αλουμίνιο για γρήγορη επίτευξη
θερμοκρασίας, ατμό και ζεστό νερό.
3. Αποσπώμενο Δοχείο Περισυλλογής Υγρών
Αποσπώμενο δοχείο περισυλλογής υγρών για γρήγορο και εύκολο καθάρισμα.
4. Αποσπώμενο Δοχείο Νερού
Αποσπώμενο δοχείο νερού, χωρητικότητας 1,5lt για γρήγορο και εύκολο γέμισμα και
καθάρισμα.
5. Σύστημα Ασφαλείας
Σύστημα ασφαλείας κατά της υπερθέρμανσης και υπερβολικής πίεσης.
6. Λειτουργία δημιουργίας αφρού
Ησυσκευή είναι εξοπλισμένη με μία λειτουργία ειδική για τη δημιουργία αφρού, ώστε να
απολαμβάνετε υπέροχο αφρόγαλο για καπουτσίνο μέσα σε λεπτά.

19
ΕΛΛΗΝΙΚΑ
Πριν την Πρώτη Χρήση
1. Αποσυσκευάστε την καφετιέρα espresso.
2. Βεβαιωθείτε ότι έχετε ξετυλίξει όλο το καλώδιο που βρίσκεται κάτω από την
συσκευή.
3. Πλύνετε όλα τα εξαρτήματα (βλ. καθαρισμός συσκευής)
4. Λειτουργήστε τη συσκευή μόνο με νερό ακολουθώντας τα παρακάτω βήματα:
a) Βεβαιωθείτε ότι όλα τα πλήκτρα της συσκευής είναι απενεργοποιημένα και ότι ο
ρυθμιστής ροής ατμού είναι κλειστός.
b) Αφαιρέστε το αποσπώμενο δοχείο νερού, ανασηκώστε το καπάκι και γεμίστε με
κρύο νερό. Μην υπερβαίνετε ποτέ την ένδειξη MAX. Μπορείτε επίσης, να γεμίσετε
το δοχείο νερού χωρίς να το απομακρύνετε από την συσκευή, σηκώνοντας απλά
το καπάκι. Συνιστούμε τη χρήση φιλτραρισμένου νερού, καθώς παράγει καλύτερο
καφέ και μειώνει τα άλατα. Μην χρησιμοποιείτε ανθρακούχο νερό.
c) Επανατοποθετήστε το δοχείο νερού. Σιγουρευτείτε ότι έχετε τοποθετήσει
σωστά το δοχείο πάνω στην βαλβίδα της συσκευής (αν χρειαστεί πιέστε ελαφρά
το δοχείο). Είναι φυσικό να παραμένει λίγο νερό στο τμήμα της συσκευής που
βρίσκεται κάτω από το δοχείο νερού. Αν θέλετε μπορείτε να σκουπίσετε το νερό
με ένα σφουγγάρι.
d) Στρέψτε το ακροφύσιο ατμού δεξιά και τοποθετήστε ένα δοχείο από κάτω.
Εφαρμόστε τη θήκη φίλτρου πάνω στη συσκευή και στρέψτε τη λαβή προς τα
δεξιά μέχρι να ασφαλίσει. Τοποθετήστε ένα φλιτζάνι κάτω από τις οπές της θήκης.
e) Συνδέστε το καλώδιο ρεύματος στην πρίζα και πιέστε το πλήκτρο λειτουργίας “On/
Off”. Ηενδεικτική λυχνία λειτουργίας θα ανάψει.
f) Πιέστε το πλήκτρο ζεστού νερού, μέχρι να αρχίσει να τρέχει ζεστό νερό από την
θήκη φίλτρου. Αυτό σημαίνει ότι το μπόιλερ έχει γεμίσει με νερό.
Σημείωση:Προχωρήστε το συντομότερο δυνατόν σε αυτό το βήμα, ούτως ώστε να μην
λειτουργεί το μπόιλερ χωρίς νερό.
Σημαντικό: Δεν μπορείτε να παρασκευάσετε εσπρέσσο εάν δεν έχετε προηγουμένως
ακολουθήσει τα παραπάνω βήματα, επιτρέποντας στο μπόιλερ να γεμίσει με νερό. Εάν
δεν έχετε χρησιμοποιήσει τη μηχανή για κάποιες ημέρες, προτού τη χρησιμοποιήσετε
πάλι θα πρέπει να ακολουθήσετε τα παραπάνω βήματα ώστε να γεμίσει με φρέσκο νερό.
Προθέρμανση της Συσκευής
Για να επιτύχετε τη σωστή θερμοκρασία για την παρασκευή του καφέ εσπρέσσο, είναι
απαραίτητο ησυσκευή να έχει προθερμανθεί.
1. Βεβαιωθείτε ότι ορυθμιστής ροής ατμού/ζεστού νερού είναι καλά κλεισμένος
(στρέψτε δεξιόστροφα) και ότι υπάρχει νερό στο δοχείο.
2. Τοποθετείστε ένα μπρίκι κάτω από το ακροφύσιο ατμού/ζεστού νερού.
3. Τοποθετείστε το επιθυμητό φίλτρο στη θήκη φίλτρου (χωρίς καφέ) και προσαρμόστε
τη λαβή στη συσκευή, στρέφοντάς τη προς τα δεξιά. Βεβαιωθείτε ότι έχει ασφαλίσει
στη σωστή θέση.
4. Τοποθετείστε δύο φλιτζάνια κάτω από το φίλτρο. Εάν χρησιμοποιήσετε τα φλιτζάνια

20
ΕΛΛΗΝΙΚΑ
στα οποία θα σερβίρετε τον καφέ, θα προθερμανθούν. Εναλλακτικά, μπορείτε να
προθερμάνετε τα φλιτζάνια στον δίσκο προθέρμανσης φλιτζανιών.
5. Πιέστε το πλήκτρο λειτουργίας “On/Off” και περιμένετε έως ότου ηενδεικτική λυχνία
αρχίσει να αναβοσβήνει.
6. Πιέστε το πλήκτρο καφέ/ζεστού νερού και περιμένετε έως ότου 2 φλιτζάνια νερό
τρέξουν στο φλιτζάνι.
7. Στρέψτε το ρυθμιστή ροής ατμού/καυτού νερού αριστερόστροφα και αφήστε να
τρέξει λίγη ποσότητα νερού μέσα στο μπρίκι.
8. Στρέψτε το ρυθμιστή ροής ατμού/καυτού νερού δεξιόστροφα και θέστε όλα τα
κουμπιά στη θέση off.
9. Απομακρύνετε τη θήκη φίλτρου και προχωρήστε στην διαδικασία παρασκευής καφέ
χρησιμοποιώντας καφέ σε σκόνη ήχάρτινες μερίδες espresso.
Παρασκευή Espresso με τη χρήση αλεσμένου καφέ
1. Προθερμάνετε τη συσκευή όπως περιγράφεται παραπάνω.
2. Ελέγξτε ότι υπάρχει νερό στο δοχείο.
3. Επιλέξτε το επιθυμητό φίλτρο και προσαρμόστε το στη θήκη φίλτρου. Χρησιμοποιήστε
το μικρό φίλτρο για να φτιάξετε 1φλ. καφέ (ήγια να χρησιμοποιήσετε καφέ σε
μερίδα) και το μεγαλύτερο φίλτρο για 2φλ. καφέ.
4. Προσθέστε τον καφέ, χρησιμοποιώντας τη μεζούρα (περιλαμβάνεται στην
συσκευασία). Μια μεζούρα αντιστοιχεί σε ένα φλιτζάνι καφέ. Πιέστε ελαφρά την
επιφάνεια του καφέ με την άκρη της μεζούρας και αφαιρέστε την επιπλέον ποσότητα
καφέ από το χείλος της θήκης. Οσκοπός της ελαφριάς πίεσης του καφέ είναι να
δημιουργηθεί μια ομοιόμορφη επιφάνεια ώστε να μην συσσωρευτεί οκαφές κατά
τόπους.
Όταν αγοράζετε καφέ σε σκόνη, σιγουρευτείτε ότι είναι κατάλληλος για χρήση σε
μηχανή espresso. Μην ασκείτε υπερβολική πίεση γιατί ηροή του καφέ θα είναι πολύ
αργή επηρεάζοντας το χρώμα και τη γεύση του. Αν πιέσετε τον καφέ πολύ ελαφριά
τότε οκαφές θα ρέει πολύ γρήγορα και θα γίνει ελαφρύς.
5. Τοποθετήστε την θήκη φίλτρου στην κεφαλή της συσκευής και στρέψτε τη προς τα
δεξιά, έτσι ώστε να ασφαλίσει. Τοποθετήστε κάτω από την κεφαλή 1 ή2 φλιτζάνια
espresso. Εάν χρησιμοποιήσετε 1 φλιτζάνι, βεβαιωθείτε ότι το έχετε τοποθετήσει
κάτω από το κέντρο της λαβής. Βεβαιωθείτε ότι το πλήκτρο On/Off είναι πατημένο.
Ηλυχνία ένδειξης λειτουργίας θα ανάψει, περιμένετε λίγο έως ότου ανάψει και η
λυχνία ένδειξης ολοκλήρωσης λειτουργίας. Πατήστε το πλήκτρο καφέ/ζεστού νερού
για να φτιάξετε espresso.
6. Όταν έχετε φτιάξει αρκετή ποσότητα καφέ – όχι υπερβολικά πολύ διότι θα είναι
πολύ ελαφρύς (βέλτιστη δοσολογία 30ml/φλιτζάνι) πατήστε πάλι το πλήκτρο καφέ/
ζεστού νερού για να το θέσετε στη θέση off. Εάν δεν πρόκειται να κάνετε άλλο καφέ
πατήστε και το πλήκτρο λειτουργίας της μηχανής στη θέση off.
7. Αφαιρέστε τη θήκη φίλτρου στρέφοντάς τη προς τα αριστερά. Θα υπάρξει αρκετή
ποσότητα νερού μέσα στο φίλτρο. Αυτό είναι φυσιολογικό.
8. Για να αφαιρέσετε τον χρησιμοποιημένο καφέ μέσα από το φίλτρο, σηκώστε το
πλαστικό σημείο που εμποδίζει το φίλτρο από το να πέσει και πιέστε το όπως στη
φωτογραφία, γυρίστε το ανάποδα και χτυπήστε ελαφρά.
Table of contents
Languages:
Other Singer Coffee Maker manuals

Singer
Singer ES-851B User manual

Singer
Singer Meraki User manual

Singer
Singer CM-1000 PBL User manual

Singer
Singer MERAKI CHARISMA User manual

Singer
Singer SCARLET CM-1000 SCR User manual

Singer
Singer ES-850B User manual

Singer
Singer SFC828 User manual

Singer
Singer SFC610 User manual

Singer
Singer SFC-1810D User manual

Singer
Singer Meraki User manual