Sirius XM RAdio Lynx LV1 User manual

LV1 Vehicle Kit User Guide 121214a

Table of Contents
2
Introduction to Lynx Vehicle Dock................................................................................................ 3
Vehicle Dock Buttons and Controls .......................................................................................................................................... 3
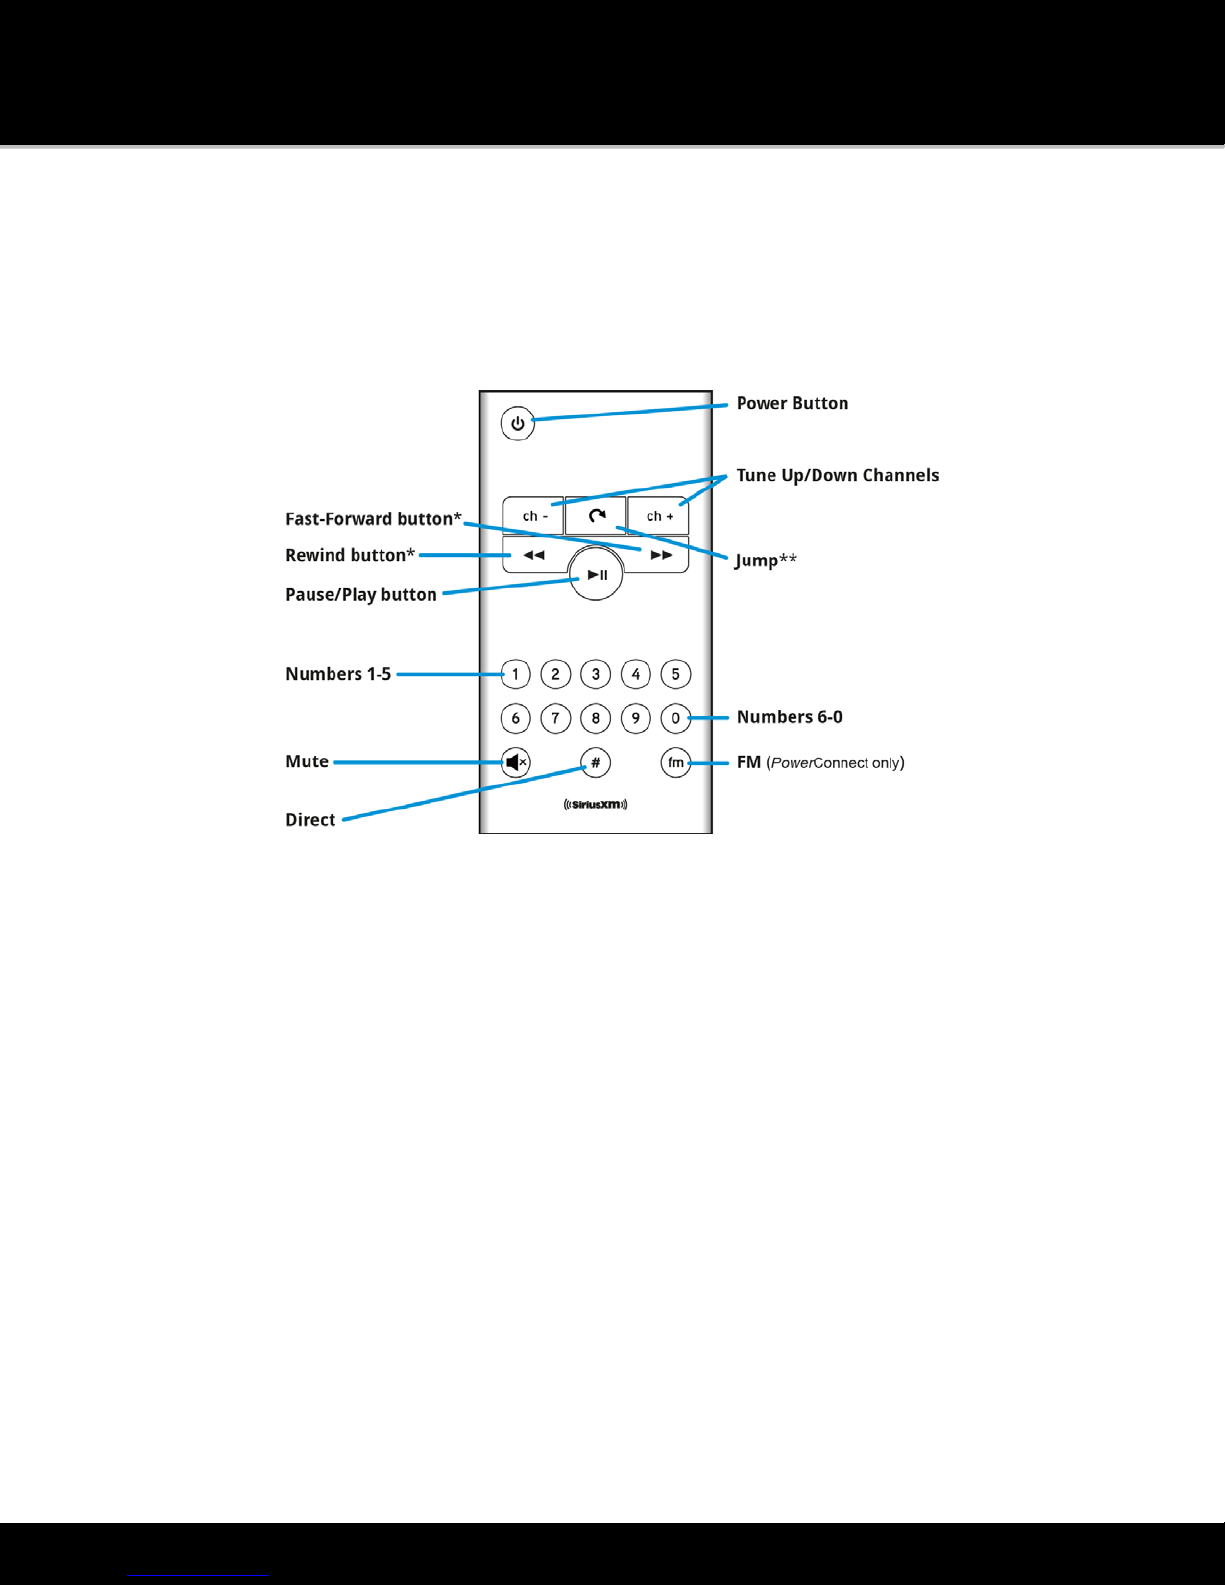
Remote Control .......................................................................................................................................................................... 5
Remote Control Button Functions ........................................................................................................................................ 5
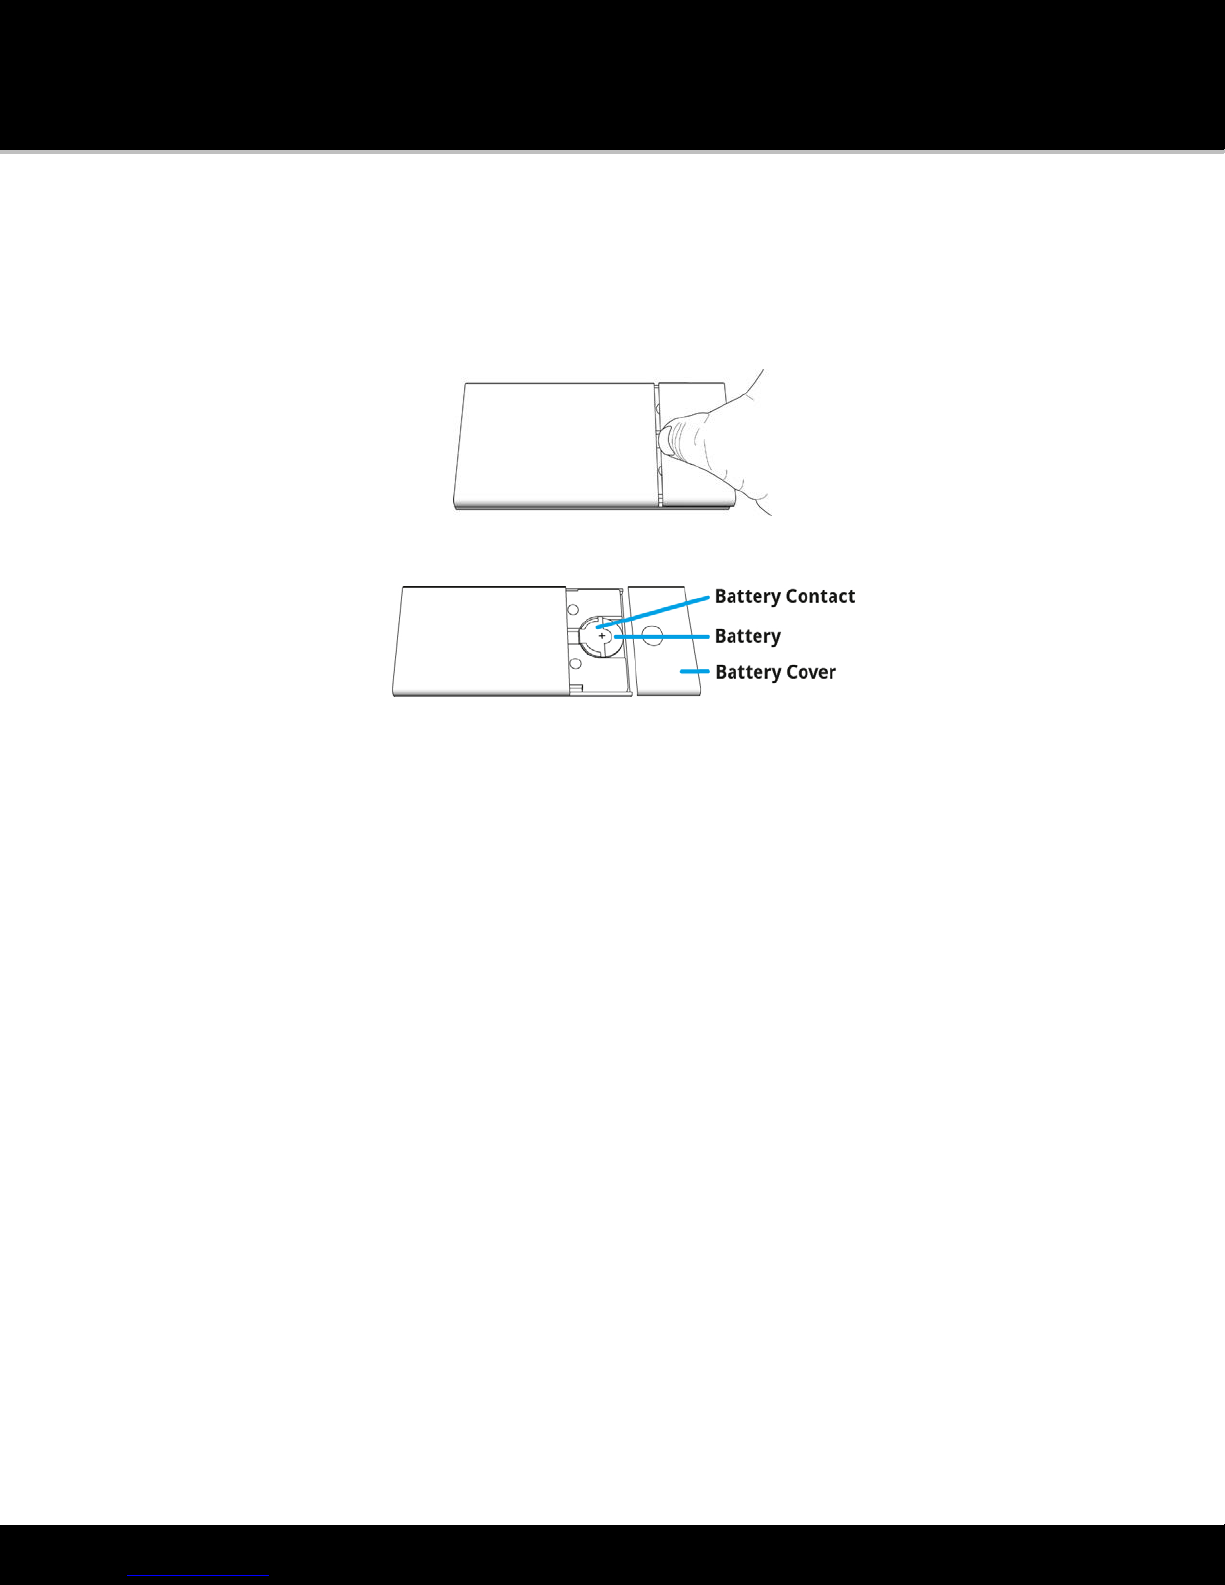
Remote Control Battery Replacement .................................................................................................................................. 6
Installation..................................................................................................................................... 7
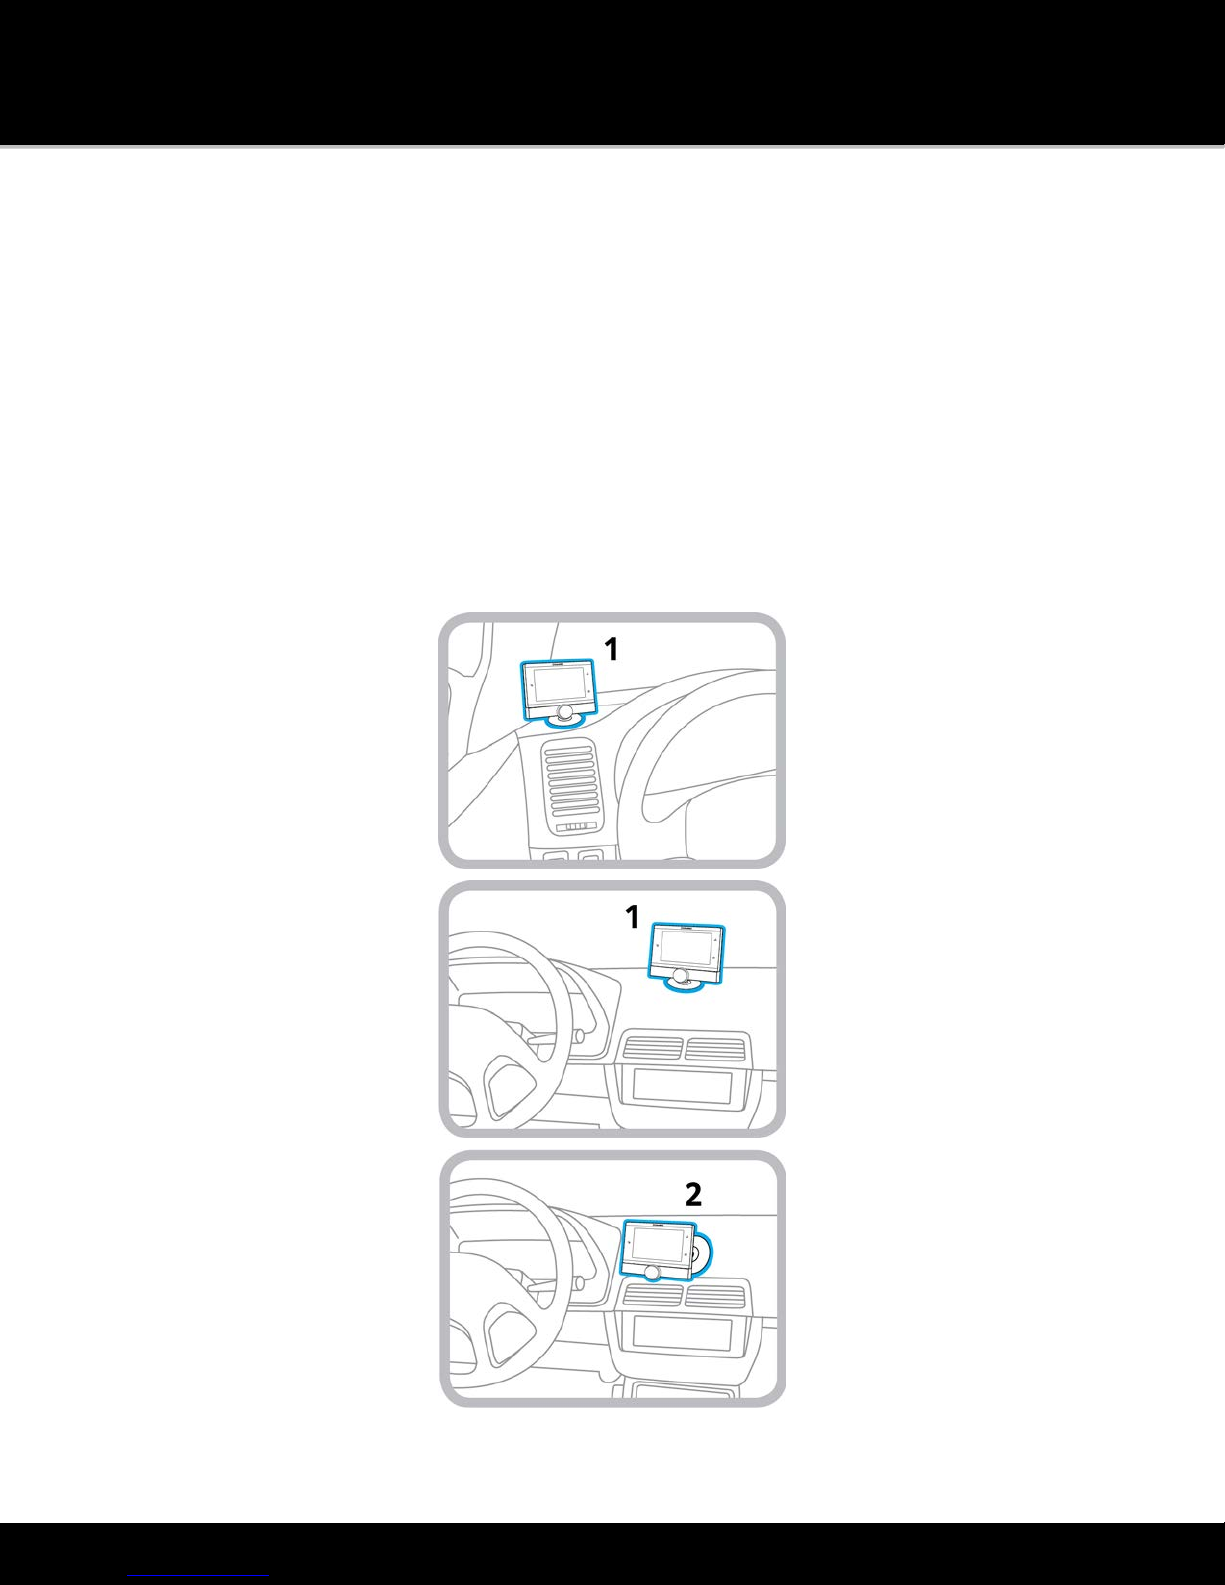
Choose a location for Lynx ........................................................................................................................................................ 7
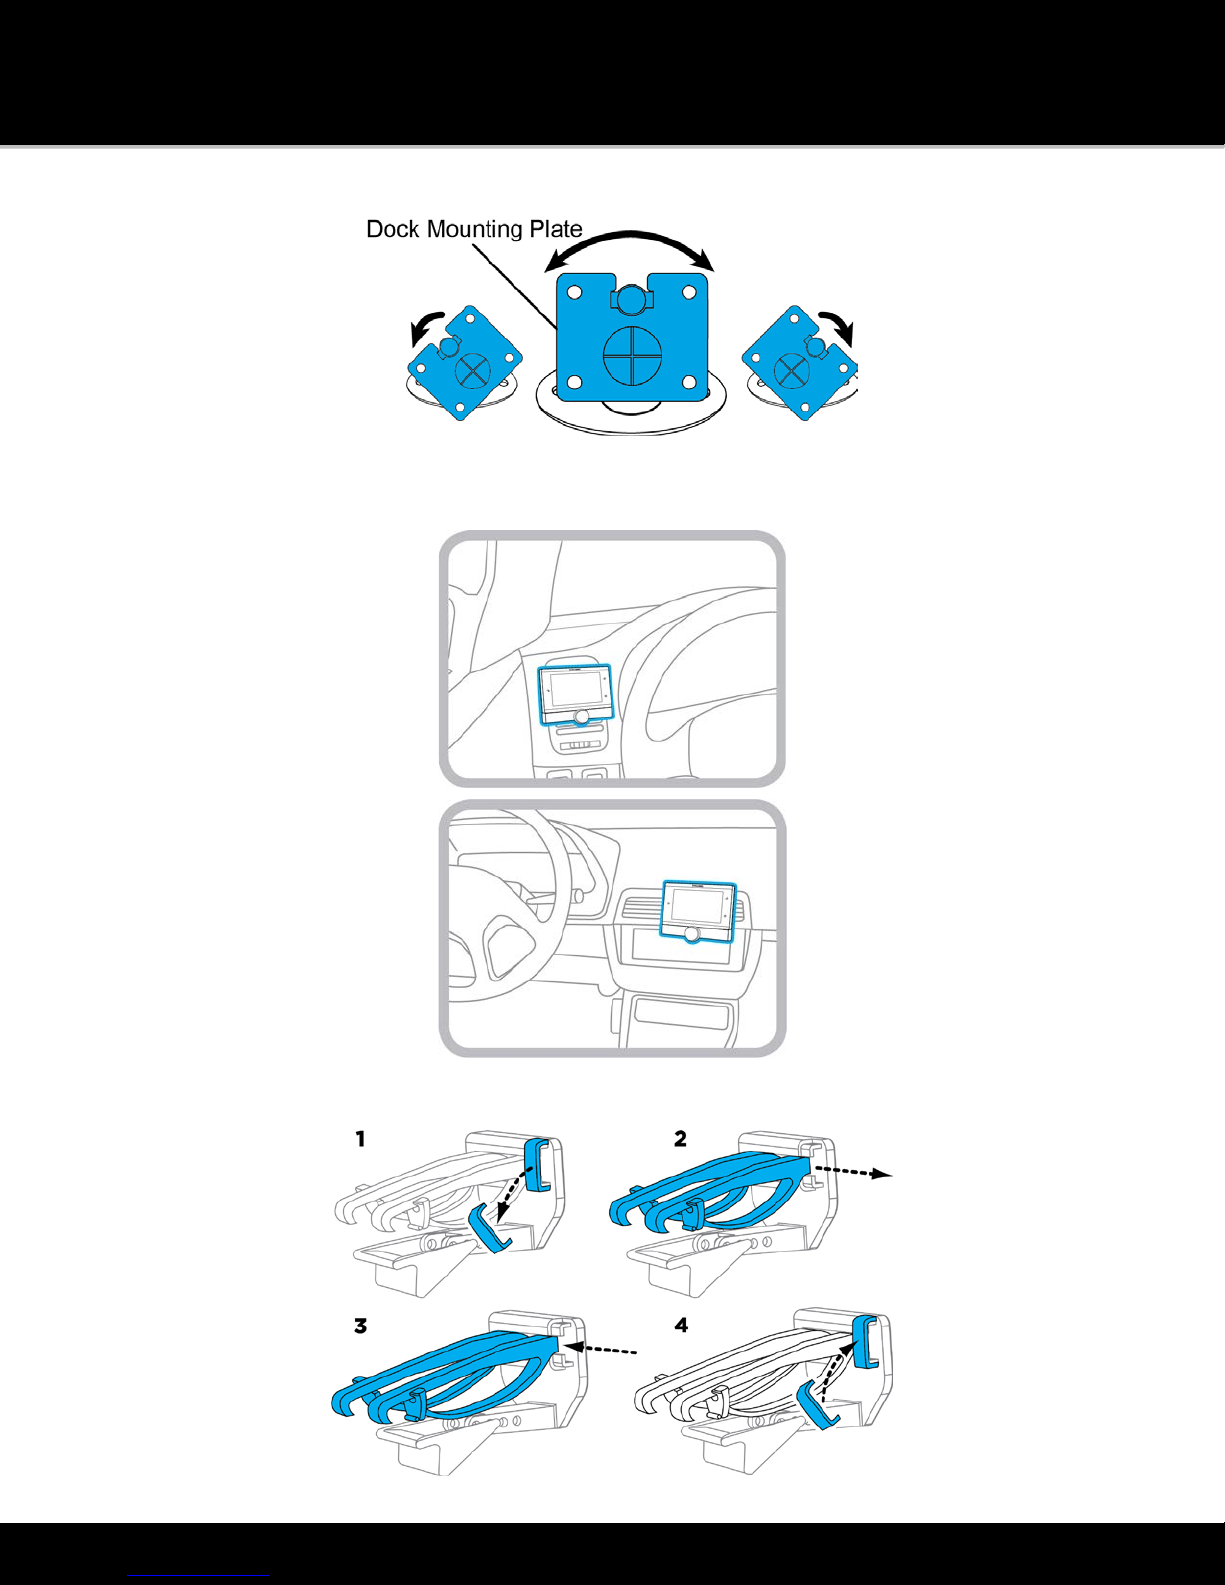
Dash Mount Method .............................................................................................................................................................. 7
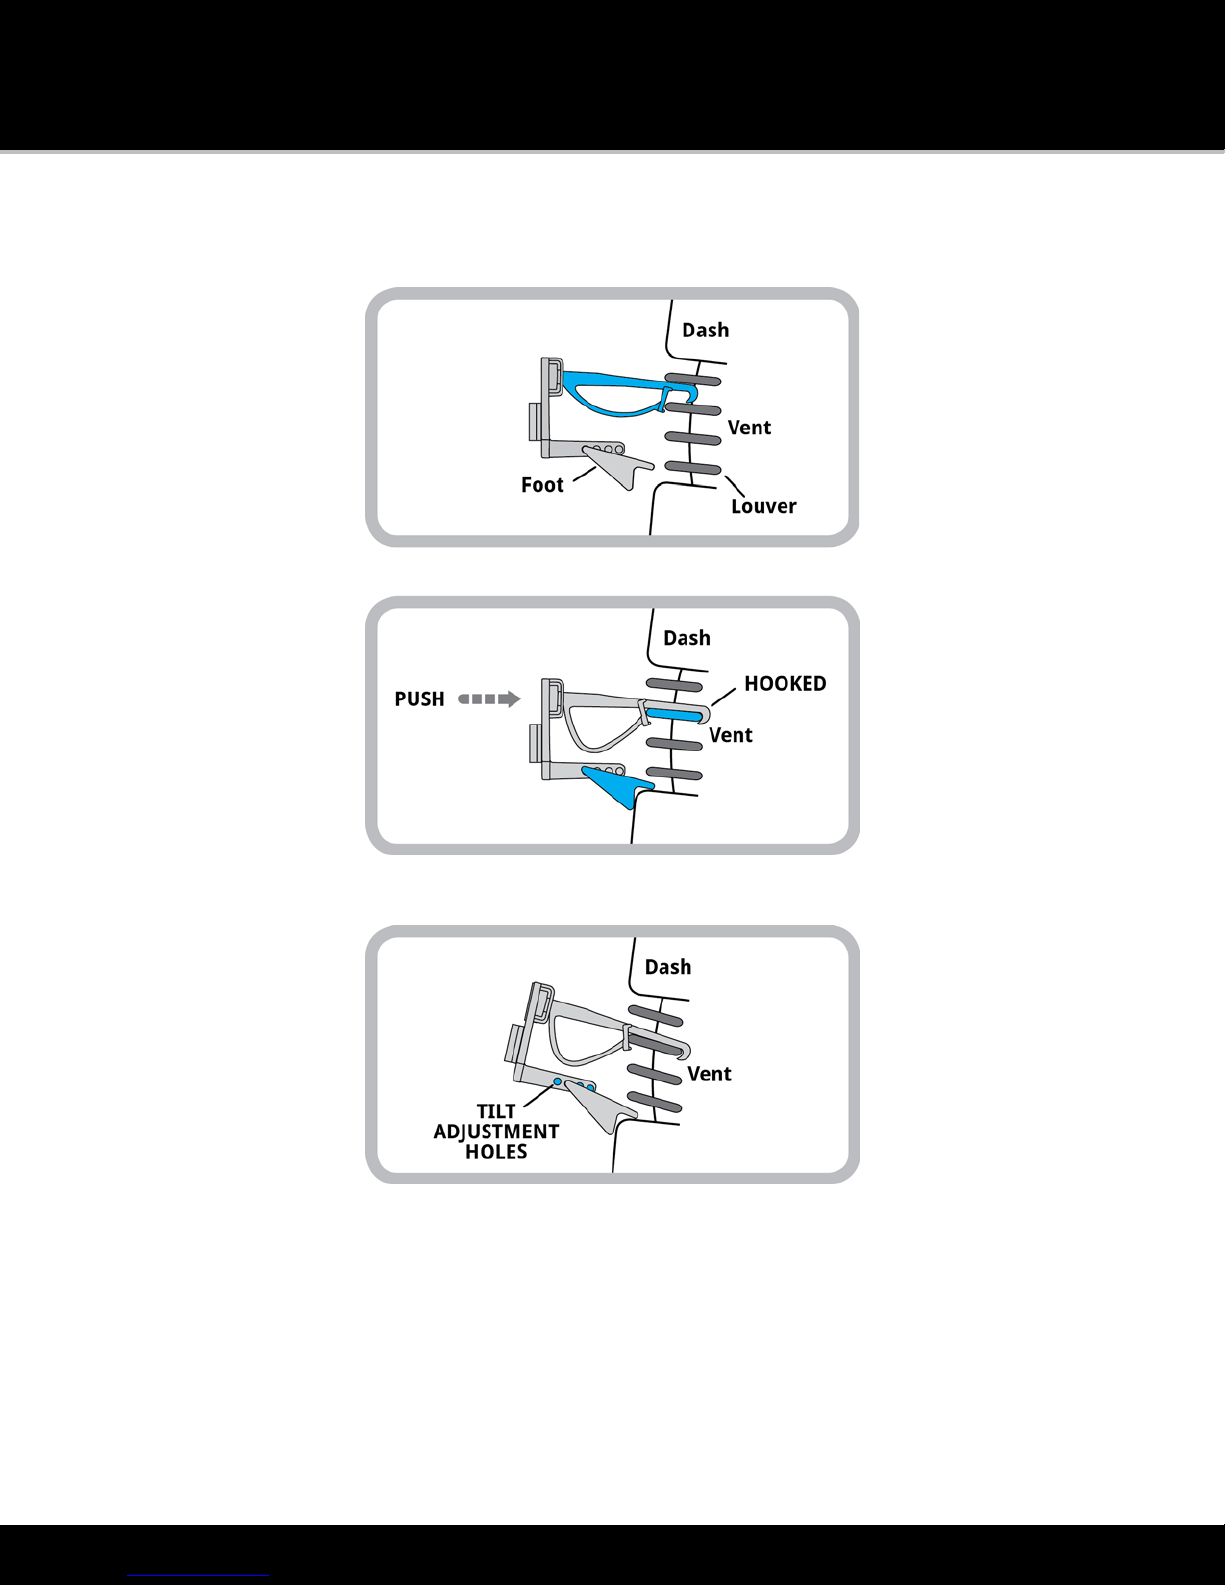
Vent Mount Method ............................................................................................................................................................... 9
Mount the Magnetic Mount Antenna ..................................................................................................................................... 11
To install the Magnetic Mount Antenna ............................................................................................................................. 11
Route the Magnetic Mount Antenna Cable ............................................................................................................................ 14
Sedan/Coupe With the Antenna Placed at the Rear of the Roof ...................................................................................... 17
Sedan/Coupe With the Antenna Placed at the Front of the Roof ..................................................................................... 18
SUV ........................................................................................................................................................................................ 18
Convertible............................................................................................................................................................................ 19
Pickup Truck.......................................................................................................................................................................... 19
Connect the Magnetic Mount Antenna and
Power
Connect Power Adapter ....................................................................... 20
Connect the Audio ....................................................................................................................... 23
Activation ..................................................................................................................................... 26
Using the Lynx Vehicle Dock........................................................................................................ 27
FM Channels ............................................................................................................................................................................. 27
Turning the
Power
Connect FM Transmitter On or Off...................................................................................................... 27
Selecting and Setting an FM Channel for
Power
Connect.................................................................................................. 27
Setting and Replacing FM Presets ....................................................................................................................................... 28
Selecting FM Presets ............................................................................................................................................................ 29
Bluetooth .................................................................................................................................................................................. 30
Brightness ................................................................................................................................................................................. 31
Audio Level ............................................................................................................................................................................... 32
Auto Off..................................................................................................................................................................................... 32
Troubleshooting........................................................................................................................... 34
Advisory Messages ................................................................................................................................................................... 34
Problem Troubleshooting........................................................................................................................................................ 35

Introduction to Lynx Vehicle Dock
3
Introduction to Lynx Vehicle Dock
Vehicle Dock Buttons and Controls
The buttons and controls of the Vehicle Dock are identified in the illustration below. The details of each begin below the
illustration.
Lock Tab:Secures Lynx in the Vehicle Dock. Push back to release Lynx from the dock.
Knob:
Multifunction: When listening to live Satellite Radio, turn the Knob to enter the Spectrum channel browsing mode,
and scroll through channels.
Press and release the Knob to select a channel and return to the Now Playing screen.
Power
Connect FM output mode only: When at the Now Playing screen, press and hold the Knob for two seconds
to display the FM Settings screen. Quickly select an FM preset by tapping a saved FM preset at the bottom of the
screen.

Introduction to Lynx Vehicle Dock
4
Turn the Knob to select an FM channel frequency. Tap +at the bottom of the screen to save the FM channel as a
new preset. Tap+hold an existing preset to replace it with a new FM channel.
AMPS Mounts: Mounting points for Dash Mount. Use the 4 provided screws.
Mounting Point: Mounting Point for Vent Mount.
ANT (Silver): Connection for the Magnetic Mount Antenna.
POWER (Red): Connection for the
Power
Connect Power Adapter.
AUDIO (Green): Connection for Aux In Cable or optional Cassette Adapter (sold separately).
FM OUT (Blue): Connection for optional FM Direct Adapter (sold separately).

Introduction to Lynx Vehicle Dock
5
Remote Control
Remote Control Button Functions
The buttons of the Remote Control are identified in the illustration below. The details of each begin below the
illustration.
Power Button: Press for 3 seconds to turn Lynx On; press and hold to turn Lynx Off.
Pause and Replay Buttons:
Pause/Play button: Pauses or resumes playing of the currently tuned channel.
Rewind button*: Rewinds through content so you can hear-that-again. Tap to rewind to the beginning of a song or
show segment. (Press+hold to continuously rewind through content.**)
Fast-Forward button*: Advances through content until live radio is reached. Tap to advance to the next song or
show segment. (Press+hold to continuously fast forward through content.**)
*Internet Radio and Radio Replays for music channels are limited to 1 rewind and up to 5 skip forwards per hour
(other channels may have same restrictions). **When listening to Satellite Radio.
Numbers 1-5 Buttons: Selects the corresponding favorite channel in the current favorite channel page on the Now
Playing screen.
Numbers 6-0 Buttons: Selects the favorite channel page, i.e., 6=page 1, 7=page 2, etc.
Mute Button: Silences the audio.
Direct Button:Directly tunes a channel by entering the channel number with the number buttons.
Tune Up/Down Channels Buttons: Immediately tunes up or down the channels.
Jump Button**: If configured for traffic/weather, jumps to the traffic/weather for the city you have selected. If
configured for last channel, jumps to the channel to which you had previously been listening.
FM Button (
Power
Connect only): Advances through the FM presets. If no FM presets have been set, it opens the FM
Settings screen.

Introduction to Lynx Vehicle Dock
6
Remote Control Battery Replacement
To replace the battery in the Remote Control, follow these steps:
1. Turn the Remote Control over and remove the battery cover. It is best if you remove the battery door by
inserting your fingernail in the center of the gap between the door and the back of the remote. Apply a little
pressure and the door will pop open.
2. Observe the orientation of the battery, then slide it out. The positive (+) side of the battery should face up,
matching the positive (+) on the battery contact.
3. Replace it with a CR2025 battery.
4. Replace the battery cover.

Installation
7
Installation
Choose a location for Lynx
For mounting the
Power
Connect™Vehicle Dock, you can select either the Dash Mount method or the Vent Mount
method. For the Vent Mount, wait until after you have connected all the cables to the Vehicle Dock before you attach it
to the mount.
Dash Mount Method
Note:The air temperature needs to be at least 60° F to install the Dash Mount. If needed, turn on the heater in your
vehicle.
1. Select a flat surface for the Dash Mount with ample room for the Vehicle Dock and Lynx. Avoid mounting on
leather surfaces.
2. Orient the adhesive foot so that the Vehicle Dock and Lynx are easily accessible. Loosen the knob, adjust the
adhesive foot, and then tighten it again.

Installation
8
3. Attach the Dash Mount to the
Power
Connect Vehicle Dock using the 4 provided screws.
4. Clean the surface where you are installing the Dash Mount with the alcohol preparation pad.
5. Once the surface is dry, remove the adhesive liner. Press and hold the Dash Mount in place for 30 seconds.
Allow the adhesive to cure for 2-4 hours.
6. You can adjust the dock mounting plate, tilting it in your preferred direction.

Installation
9
Vent Mount Method
1. Select a vent with ample room for Lynx and Vehicle Dock.
2. Some vents have recessed louvers. If yours are recessed, remove the regular vent clamps and install the
extended vent clamps as shown below.

Installation
10
3. Install the Vent Mount into the vehicle vent.
i. Insert the Vent Mount into the vent opening.
ii. Push until hooked on the rear of the vent louver. Rest the foot against the bottom of the vent.
iii. If necessary, adjust the tilt of the Vent Mount by repositioning the foot to a different tilt adjustment
hole.
4. Do not attach the Vehicle Dock to the mount at this time.

Installation
11
Mount the Magnetic Mount Antenna
Mount the Magnetic Mount Antenna on the outside of your vehicle, on a horizontal surface that will always face the sky.
The antenna contains a strong magnet which will stick to any metal part of your vehicle, but will not damage the vehicle.
To install the Magnetic Mount Antenna
1. Choose the best location for your antenna for your type of vehicle. Pay particular attention to any accessories
that you may have like luggage or ski racks, and how frequently you may use them.
Note:Consult a professional installer if your vehicle roof or hood is non-metallic (i.e., fiberglass), or if
you have difficulty finding a location for your antenna.
Sedan/Coupe: We recommend mounting the antenna just above either the front windshield or the back
window as shown.
SUV: We recommend mounting the antenna at the rear of the roof as shown.
Convertible: We recommend mounting the antenna at the leading edge of the trunk as shown.
Pickup Truck: We recommend mounting the antenna just above the front windshield as shown.

Installation
12
2. Clean the surface of the selected mounting location using the alcohol preparation pad and let it dry
thoroughly.
3. If you are installing the antenna at the roof edge, or hood edge, install the Cable Routing Adapter to direct the
antenna cable downward.
4. Place the antenna in the location you selected. Review the following tips and cautions.
Tip:Mount the antenna on the roof (for most vehicles) or trunk (for convertibles) where it has a clear view
of the sky in all directions.

Installation
13
Caution: Don’t mount the antenna inside the vehicle, for example, on the dashboard.
Caution: Don’t mount the antenna on any of the vehicle’s front, back or side pillars
Caution: Don’t mount the antenna close to a roof rack. Adjust the rack so it’s further away from the
antenna or move the antenna closer to the center of the roof.
Caution: Don’t mount the antenna close to another antenna. Mount it at least 3 inches away.

Installation
14
Route the Magnetic Mount Antenna Cable
Before you begin routing the antenna cable, read the general instructions which follow concerning how to route and
hide the antenna cable. Then route your antenna cable according to the more specific instructions which follow these,
for your specific type of vehicle.
Tip: Always be careful to include enough slack in your cable to accommodate open doors or trunk lids. Use things
typically found around the home, like electrical tape, to secure cables in areas so that hinges do not pinch the cable
with the door. Hide any excess cable in the trim.
General Instructions:

Installation
15

Installation
16

Installation
17
Vehicle Specific Instructions:
Sedan/Coupe With the Antenna Placed at the Rear of the Roof
1. Feed the antenna cable from the antenna underneath the rubber molding around the rear window. Use a
blunt plastic putty knife or similar blunt tool to lift the rubber molding around the rear window and tuck the
antenna cable underneath the molding. Route the antenna cable around and down the window to the lowest
point. If your rear window does not have rubber molding, we recommend consulting a professional installer.
2. Route the antenna cable out of the window molding and into the rubber weather stripping around the trunk
opening. Lift the weather stripping from the opening and tuck the cable inside it, then replace the weather
stripping. To avoid sharp bends in the cable, run the cable inside the weather stripping for a few inches, then
remove the cable from the weather stripping inside the trunk. Keep the cable away from hinges, gears, etc.,
that could damage it.
3. Route the cable out from the rubber weather stripping and along the trunk wall. Continue routing the cable
into the vehicle cabin through a conduit or along an existing wiring harness.
4. Route the cable through the main cabin area under the interior trim, towards the front of the vehicle. Use a
blunt plastic putty knife or similar blunt tool to lift the plastic trim just enough to tuck the cable underneath.
Avoid side airbag locations on back pillars and above the doors. Airbag locations are marked with “SRS” logos.
Be careful not to crimp or cut the cable.
5. Bring the cable out from the trim near the front of the cabin and route it under the carpet toward the
dashboard or console. Coil any excess cable in a hidden location, such as under the carpet, keeping it away
from any vehicle pedals or controls. Be careful not to kink the cable. Secure the excess cable with wire ties
(purchased separately).

Installation
18
6. Bring the end of the cable out at the PowerConnect Vehicle Dock location. Leave yourself enough cable so you
can easily connect it to the antenna connector of the dock.
7. Continue with the next section, Connect the Magnetic Mount Antenna and
Power
Connect Power Adapter.
Sedan/Coupe With the Antenna Placed at the Front of the Roof
1. Feed the antenna cable from the antenna underneath the rubber molding around the windshield. Use a blunt
plastic putty knife or similar blunt tool to lift the rubber molding around the windshield and tuck the antenna
cable underneath the molding. Route the antenna cable around and down the windshield to the lowest point.
2. At the lowest corner of the windshield, route the cable out of the windshield molding and into the rubber
weather stripping around the door opening. Lift the weather stripping from the opening and tuck the cable
inside it, then replace the weather stripping. Run the cable inside of the weather stripping to the bottom of
the door opening.
3. Pull the cable out of the weather stripping at the bottom of the door opening and route it under the carpet
toward the dashboard. Coil any excess cable in a hidden location, such as under the carpet, keeping it away
from any vehicle pedals or controls. Be careful not to kink the cable. Secure the excess cable with wire ties.
4. Bring the end of the cable out at the PowerConnect Vehicle Dock location. Leave yourself enough cable so you
can easily connect it to the antenna connector of the dock.
5. Continue with the next section, Connect the Magnetic Mount Antenna and
Power
Connect Power Adapter.
SUV
1. Feed the antenna cable underneath the rubber weather stripping of the rear tailgate window/door and route
the cable along the rear hatch. Lift the weather stripping from the opening and tuck the cable inside it, then
replace the weather stripping. Pull the cable out from weather stripping and route it into the cabin under the
interior trim. Avoid hinges or gears that could crimp or cut the cable.
2. Route the cable through the SUV’s main cabin area under the interior trim, towards the front of the vehicle.
Use a blunt plastic putty knife or similar blunt tool to lift the plastic trim just enough to tuck the cable
underneath. Avoid side airbag locations on back pillars and above the doors. Airbag locations are marked
with “SRS” logos. Be careful not to crimp or cut the cable.
3. Bring the cable out from the trim near the front of the cabin and route it under the carpet toward the
dashboard or console. Coil any excess cable in a hidden location, such as under the carpet, keeping it away
from any vehicle pedals or controls. Be careful not to kink the cable. Secure the excess cable with wire ties
(purchased separately).
4. Bring the end of the cable out at the PowerConnect Vehicle Dock location. Leave yourself enough cable so you
can easily connect it to the antenna connector of the dock.

Installation
19
5. Continue with the next section, Connect the Magnetic Mount Antenna and
Power
Connect Power Adapter.
Convertible
1. Bring the antenna cable from the antenna into the trunk at the front edge of the trunk lid. Keep any bends in
the cable loose. Tape or tie the cable along the inside of the trunk lid to the trunk lid hinge strut.
2. Allow enough slack in the cable so the trunk lid can easily open and close and keep the cable away from
hinges, gears, etc., that could crimp or cut it. Route the cable along the trunk wall and into the cabin through
a conduit or along an existing wiring harness.
3. Route the cable through the main cabin area under the interior trim, towards the front of the vehicle. Use a
blunt plastic putty knife or similar blunt tool to lift the plastic trim just enough to tuck the cable underneath.
Avoid side airbag locations on back pillars and above the doors. Airbag locations are marked with “SRS” logos.
Be careful not to crimp or cut the cable.
4. Bring the cable out from the trim near the front of the cabin and route it under the carpet toward the
dashboard or console. Coil any excess cable in a hidden location, such as under the carpet, keeping it away
from any vehicle pedals or controls. Be careful not to kink the cable. Secure the excess cable with wire ties
(purchased separately).
5. Bring the end of the cable out at the PowerConnect Vehicle Dock location. Leave yourself enough cable so you
can easily connect it to the antenna connector of the dock.
6. Continue with the next section, Connect the Magnetic Mount Antenna and
Power
Connect Power Adapter.
Pickup Truck
1. Use a blunt plastic putty knife or similar blunt tool to lift the rubber molding around the windshield and tuck
the antenna cable underneath it.
2. Continue tucking the cable underneath the windshield molding around the windshield to the lowest corner.
3. At the lowest corner of the windshield, route the cable out of the windshield molding and into the rubber
weather stripping around the door opening. Lift the weather stripping from the opening and tuck the cable
inside it, then replace the weather stripping. Run the cable inside of the weather stripping to the bottom of
the door opening.
4. Pull the cable out of the weather stripping at the bottom of the door opening and route it under the carpet
toward the dashboard. Coil any excess cable in a hidden location, such as under the carpet, keeping it away
from any vehicle pedals or controls. Be careful not to kink the cable. Secure the excess cable with wire ties.
5. Bring the end of the cable out at the PowerConnect Vehicle Dock location. Leave yourself enough cable so you
can easily connect it to the antenna connector of the dock.

Installation
20
6. Continue with the next section, Connect the Magnetic Mount Antenna and
Power
Connect Power Adapter.
Connect the Magnetic Mount Antenna and
Power
Connect Power Adapter
1. Plug the Magnetic Mount Antenna into the silver ANT connector on the
Power
Connect Vehicle Dock.
2. Plug the
Power
Connect Power Adapter into the red POWERconnector on the dock.
3. Insert the
Power
Connect Power Adapter into your vehicle’s cigarette lighter or power adapter socket.
4. Place Lynx into the Vehicle Dock and press the Power button for 3 seconds.
Other manuals for Lynx LV1
1
Table of contents
Other Sirius XM RAdio Automobile Electronic manuals
Popular Automobile Electronic manuals by other brands

Steel mate
Steel mate PTS400EX Installation and user manual

Car-Systems
Car-Systems Parktronic system Volkswagen Golf MK7 Assembly manual

USASPEC
USASPEC PA11-GM owner's manual

USASPEC
USASPEC PA10-FORD1 owner's manual

Peripheral Electronics
Peripheral Electronics PXDX-KD instruction manual

HIK VISION
HIK VISION DS-TCP345-K user manual