Sirius XM RAdio Onyx EZ User manual

Onyx EZ
Radio & Vehicle Kit
User Guide

2
Table of Contents
Introduction ....................3
Features.............................3
Safety and Care Information ...........4
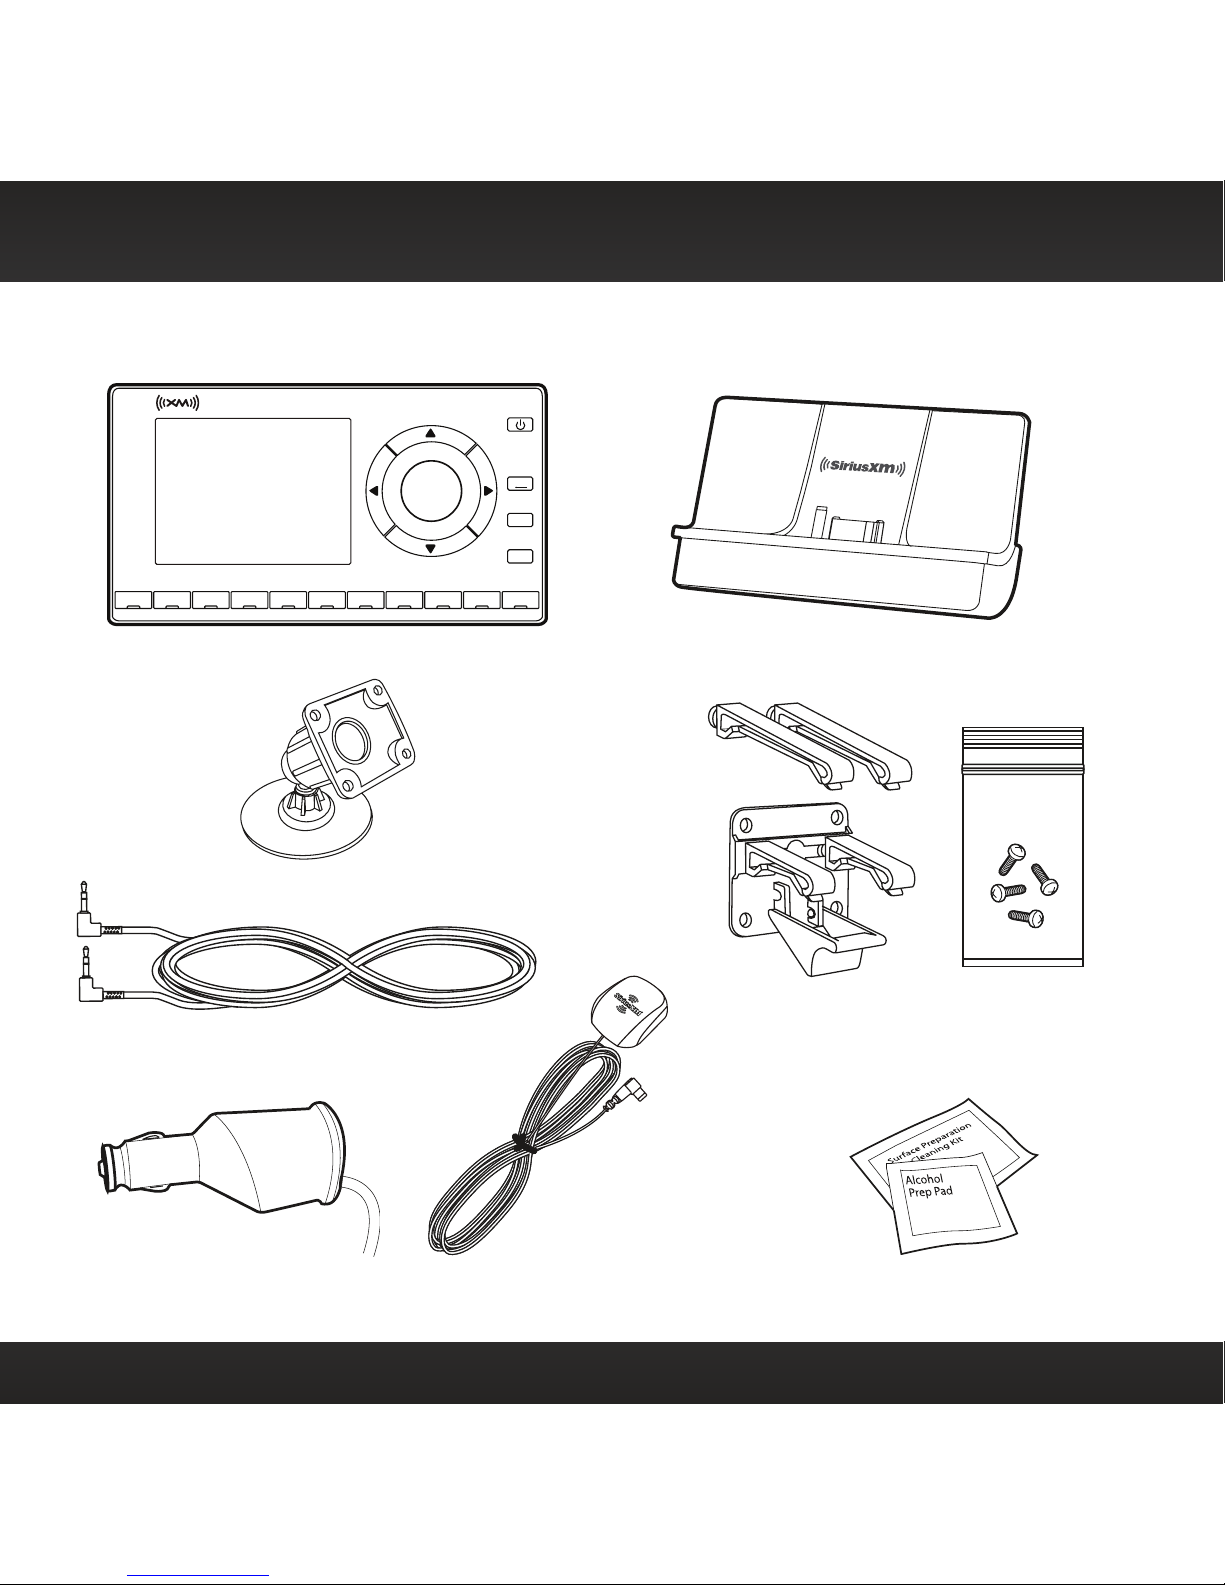
What’s in the Box? ....................6
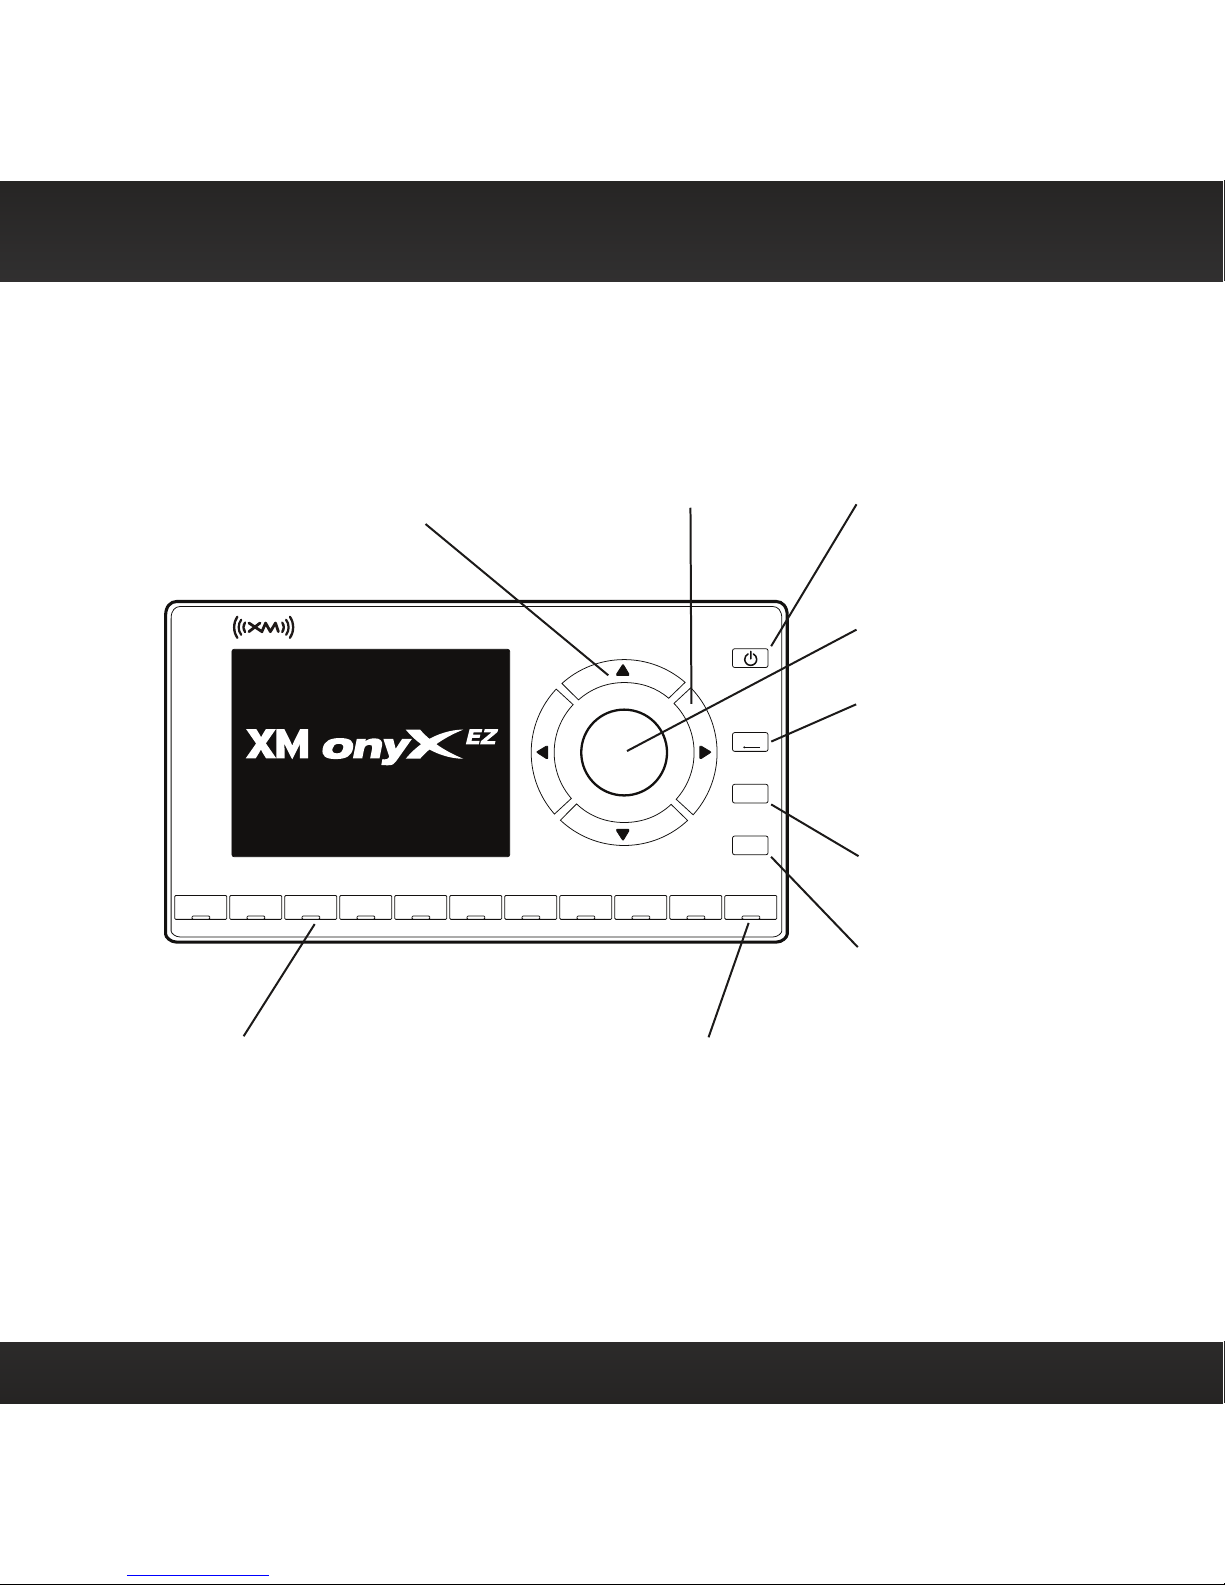
Onyx EZ Functions ....................7
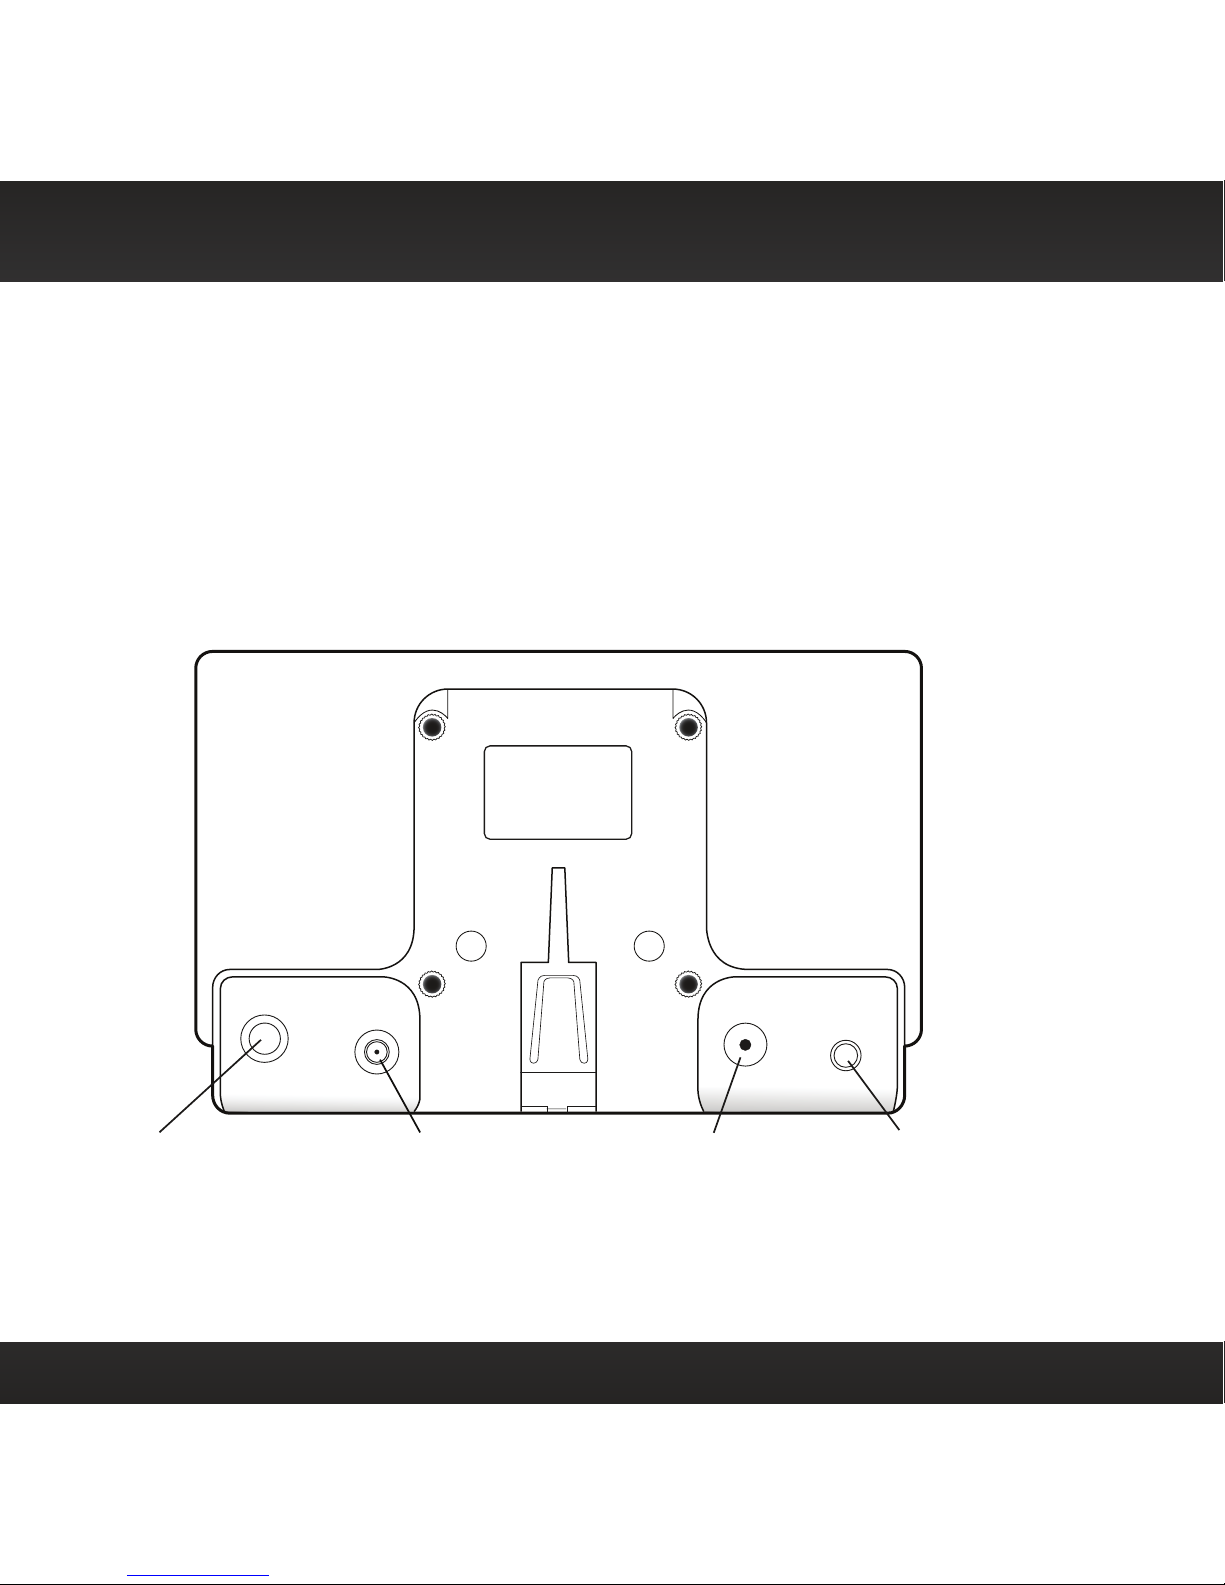
PowerConnect Vehicle Dock ............8
Vehicle Installation .............10
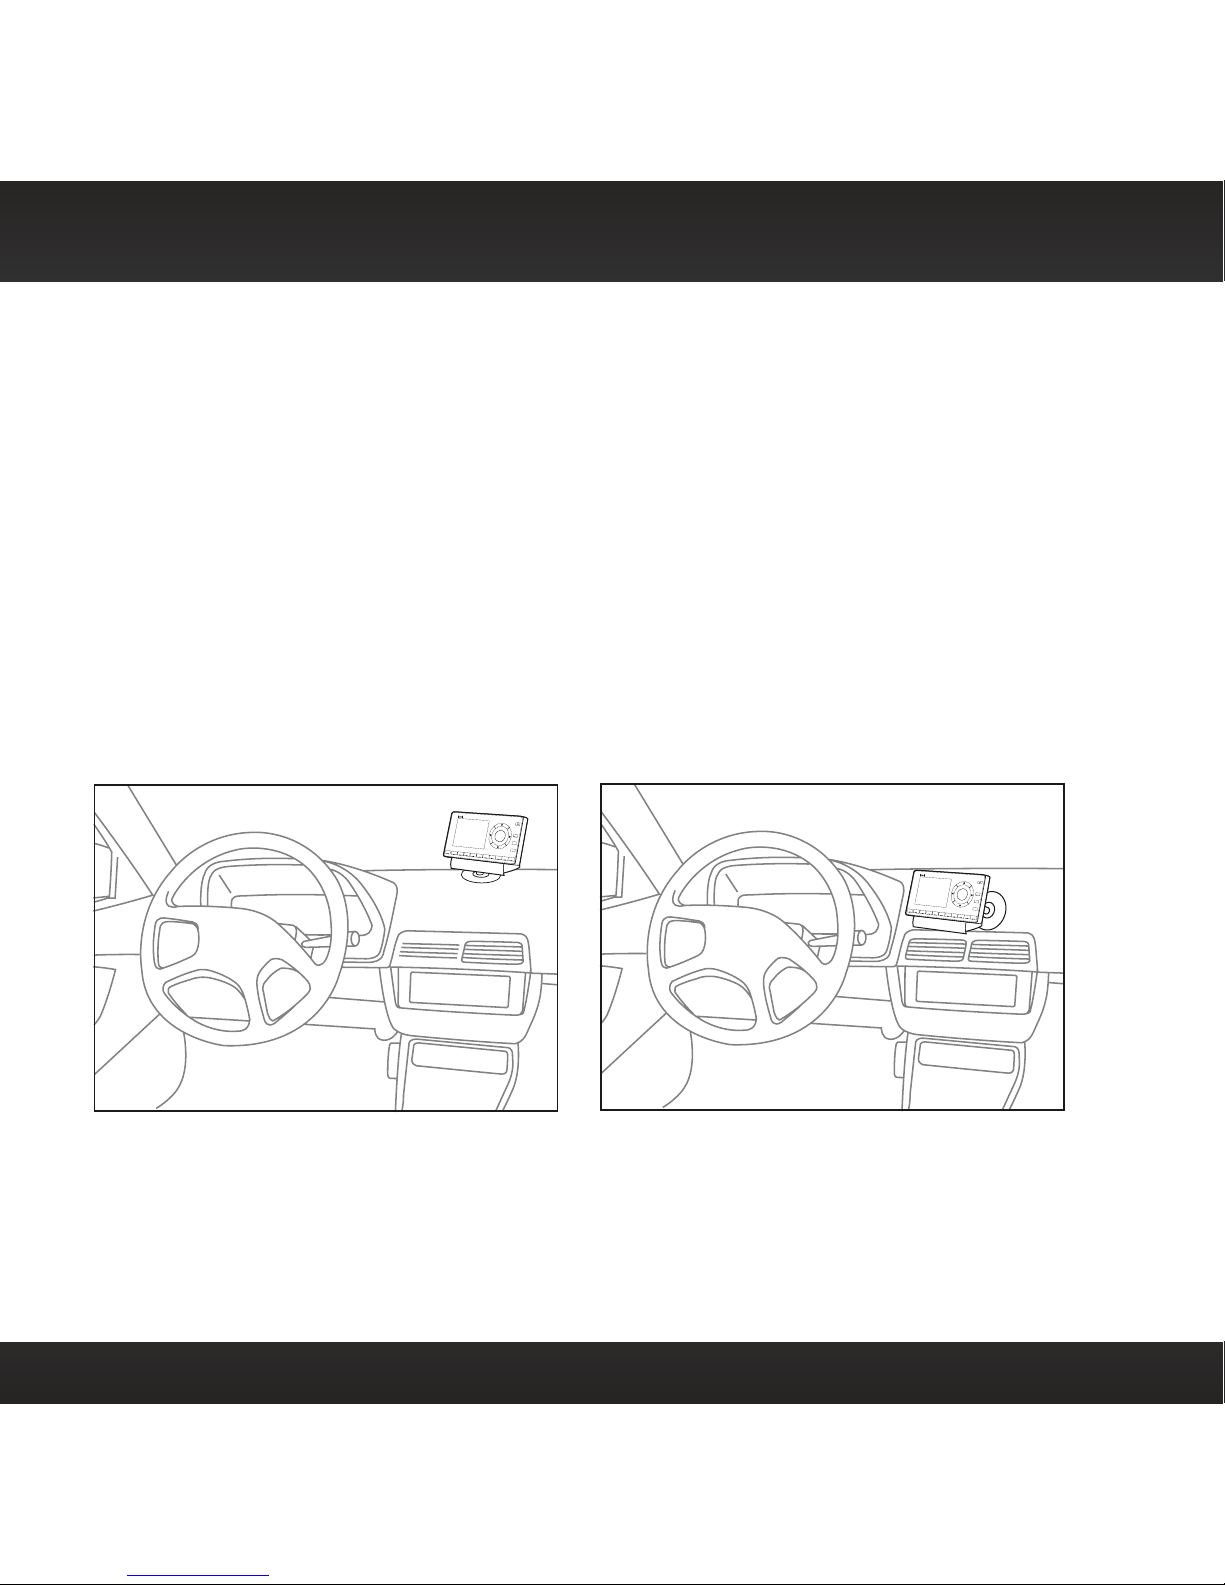
Step 1: Choose a Location for Your Radio 10
Step 2: Install the Dash or Vent Mount.. 12
Step 3: Mount the Magnetic Mount
Antenna .......................... 16
Step 4: Route the Magnetic Mount
Antenna Cable ..................... 21
Step 5: Connect the Magnetic Mount
Antenna and PowerConnect Power
Adapter...........................32
Step 6: Connect the Audio ............33
Activation.....................42
Using Your Onyx EZ.............44
The Main Display ....................44
Navigation Basics....................45
Listening to Satellite Radio ...........47
FM Presets .........................52
Special Features ...............53
Parental Controls ....................53
Configuring Your Onyx EZ .......58
Radio ID ............................58
Find Available FM Channels in Your
Area..............................59
Set and Select an FM Channel ......... 61
Set Brightness or Contrast............64
Set Audio Level .....................65
Signal Indicator .....................66
Factory Settings .....................67
Demo Mode .........................70
Auto Shut Off ........................71
Using the Vehicle Dock From the
Universal Xpress Car Kit ............72
Turn FM Transmitter On/Off ...........73
Troubleshooting ................75
Product Specifications ..........79
Patent and Environmental
Information ..................80
Patent Information ..................80
Environmental Information ...........80
FCC and IC Statement ...........81
Copyrights and Trademarks ......82
Owners Record .................83

3
Table of Contents
Features
Congratulations on your purchase of the Onyx EZ with Vehicle Kit!
The Onyx EZ has these exciting features to enhance your overall experience:
• Hear SiriusXM through your existing vehicle radio with easy, do-it- yourself
installation.
• View artist name, song title, and channel information on the large display.
• Store your favourite channels for one touch access.
• Easily lock and unlock channels with mature content.
• One-Touch Jump™ to your favourite channel.
• Listen in multiple vehicles, at home, in the office or outdoors - all with just
one subscription.
• Vehicle Kit included — add accessories for your home, office, or other
vehicles.
Please read the entire user guide before using your Onyx EZ!
Introduction

4
Safety and Care Information
IMPORTANT! Always read and understand all the instructions to avoid injury to
yourself and/or damage to your device. SiriusXM Canada Inc. disclaims all
responsibility for damage from data loss due to breakdown, repair, or other causes.
• Do not expose to extreme temperatures (above 60˚C or below
-20˚C, or above 140˚F or below -4˚F).
• Do not expose to moisture. Do not use device near or in water.
• Do not let any foreign matter spill into device.
• Do not store in dusty areas.
• Do not expose to chemicals such as benzene and thinners. Do not
use liquid or aerosol cleaners. Clean with a soft damp cloth only.
• Do not expose to direct sunlight for a prolonged period of time, and
do not expose to fire, flame, or other heat sources.
• Do not try to disassemble and/or repair device yourself.
• Do not drop your device or subject it to severe impact.
• Do not place heavy objects on device.
• Do not subject device to excessive pressure.
• If the LCD screen is damaged, do not touch the liquid crystal fluid.
Introduction

5
Warning!
• Opening the case may result in electric shock.
• If the liquid crystal fluid comes in contact with your skin, wipe the skin area
with a cloth and then wash the skin thoroughly with soap and running water.
If the liquid crystal fluid comes into contact with your eyes, flush the eyes
with clean water for at least 15 minutes and seek medical care. If the liquid
crystal fluid is ingested, flush your mouth thoroughly with water. Drink large
quantities of water, and induce vomiting. Seek medical care.
• Make sure that you insert the PowerConnect Power Adapter all the way into
the vehicle’s cigarette lighter or power adapter socket.
• Do not insert several devices into the same power socket.
• Use the PowerConnect Power Adapter and PowerConnect Vehicle Dock away
from water sources to avoid fire or electric shock.
• Do not touch the device with wet hands.
• When using this product, it is always important to keep your eyes on the road
and hands on the wheel. Not doing so could result in personal injury, death,
and/or damage to your device, accessories, and/or to your vehicle or other
property.
• Vehicle installation and radio configuration functions should not be
performed while driving. Park your vehicle in a safe location before beginning
installation.
Your device should be placed in your vehicle where it will not interfere with the
function of safety features, e.g., deployment of airbags. Failure to correctly place
device may result in injury to you or others, if the unit becomes detached during an
accident and/or obstructs the deployment of an airbag.
Introduction

6
What’s in the Box?
234567890
direct
jump
FM
menu
1
Onyx EZ Radio PowerConnect Vehicle Dock
Antenna & Dash Mount
Alcohol Preparation Pads
PowerConnect
Power Adapter
Screws (4)
Introduction
Dash Mount
Vent Mount
and Extended
Vent Clamps
Magnetic Mount
Antenna
Aux In Cable

7
234567890
direct
jump
FM
menu
1
Onyx EZ Functions
Power Button
Turn radio on and off.
Left and Right Arrows
Search for channels by
category.
Up and Down Arrows
Scroll through lists and
preview channels; also
highlight menu options.
Menu Button
Access advanced features
and configuration options;
also press and hold to
return to main display
screen.
Select Button
Press to confirm
selection for channel and
menu items.
FM Button
Access and cycle through
FM presets.
Jump
Jump back to the
previous channel to
which you were listening.
Direct Button
Press first before
entering the channel
number, to directly
tune to a channel.
Number Buttons
Select your favourite
channels; also enter
a channel number.
Introduction

8
Introduction
PowerConnect Vehicle Dock
Colour-Coded Connections
The colour-coded
Power
Connect Vehicle Dock makes it simple to connect.
Just match the colours on the cable ends to the colours on the dock to see
what goes where.
Rear View
ANT (Silver)
Connection for
the Magnetic
Mount Antenna.
AUDIO (Green)
Connection for Aux In
Cable or optional
Cassette Adapter
(sold separately).
PWR (Red)
Connection for
Power
Connect
Power Adapter.
FM (Blue)
Connection for
optional FM Direct
Adapter (sold
separately).
AUDIOANT PWRFM

9
Introduction
Wire Guide
The
Power
Connect Vehicle Dock has a wire guide at the top rear that can help
you to organize the cables and wires connected to the dock. If you need to bring
a cable or wire from one side of the dock to the other, utilize the wire guide by
looping the cable though the wire guide as shown.
Wi
re Guide

10
Step 1: Choose a Location for Your Radio
When installing the Onyx EZ in your vehicle, choose a location where it will not
block your vision, interfere with the controls, or obstruct the air bag. The location
should be easily accessible and provide good visibility of the display, and should
not be located where it will be in direct sunlight, which will affect the visibility of
the display screen.
Several examples of the Onyx EZ mounted in a vehicle are shown: Ais the on
dash method using the Dash Mount, and Bis the vent clip method using the Vent
Mount.
A.
A.
Option 1 Option 2
234567890
direct
jump
FM
menu
1
234567890
direct
jump
FM
menu
1
Vehicle Installation

11
Vehicle Installation
B.
A.
B.
Option 3
Option
4O
ption 5
234567890
direct
jump
FM
menu
1
jump
FM
menu
234567890
direct
1
jump
FM
menu
234567890
direct
1

12
Vehicle Installation
Step 2: Install the Dash or Vent Mount
Follow the instructions on the next several pages for the mounting method you
have selected.
NOTE! The PowerConnect Vehicle Dock included with the this Vehicle Kit is
compatible with the T-slot style Dash and Vent Mounts. If you have an existing Dash
Mount or Vent Mount in your vehicle, you can continue to use it with this dock, and
skip this step.
Installing the Dash Mount:
CAUTION! The adhesive used on the Adhesive Mount may be
difficult to remove. Do not install this mount on leather surfaces
(contact your automobile dealership if you are unsure about your
dash surface), and make sure the air temperature is at least 60°F
(15°C) during installation. If it’s not at least 60°F, turn on the
heater in your vehicle to bring the temperature up to 60°F.
1. Locate a flat surface for the Adhesive Mount. Make sure
there is ample room for the PowerConnect Vehicle Dock and Radio when
installed.
2. Set the orientation of the Adhesive Mount before adhering it. Loosen the
knob and adjust the adhesive foot for the location you selected in “Step 1:
Choose a Location for Your Radio” on page 10.
3. The dock mounting plate can be tilted in different directions. Adjust as
Option 1
Option 3
Option 2 Option 4

13
Vehicle Installation
necessary for your particular vehicle. When the orientation is correct,
tighten the knob.
4. Attach the Adhesive Mount to the
Power
Connect
Vehicle Dock using the 4 provided screws.
5. Before you attach the Adhesive Mount to the dash,
skip ahead and finish the remainder of the vehicle
installation so that the cables are attached to the
dock.
6. Once the cables have been attached to
the dock, clean the mounting surface in
the vehicle with the alcohol preparation
pad and let it dry thoroughly.
7. Peel off the adhesive liner. Position, press,
and hold the Adhesive Mount in place for
30 seconds.
IMPORTANT!
Allow the Adhesive Mount
adhesive to cure (dry) for a minimum of 2-4
hours before using the mount. The best
adhesion occurs after 24 hours.
TIP! To remove the Adhesive Mount, carefully lift the adhesive pad with your
fingers or a spoon. Warming the pad with a hair dryer for several minutes will help
soften the adhesive.
Knob Adhesive Foot
Dock Mounting Plate
UDIO ANT FM

14
Vehicle Installation
Installing the Vent Mount:
IMPORTANT! To make the cable connections easier, wait until after you have
connected all the cables to the dock before you attach the Vent Mount to a vent.
1. Locate a vent with horizontal louvers sturdy
enough to hold your PowerConnect Vehicle
Dock and Radio.
2. If the vent louvers in your vehicle are
recessed, you may need to use the longer
vent clamps with the Vent Mount. If so,
remove the shorter vent clamps and install
the longer ones into the Vent Mount. Be sure
to observe the orientation of the vent clamps
as shown, and replace both vent clamps.
Extended Vent Clamps
Short Vent
Clamps
Vent Mount
Rear View
Round End Orientation
V
ent Mount Rear View
Slide Left Clamp
to
Hole in Center Pull Clamp Out
Towards Yo u
Insert Round End
of the Extended
Clamp in the
Center Hole
Slide Clamp to Left
to Complete
Installation Repeat to Replac
e
Right Clamp

15
Vehicle Installation
3. Attach the Vent Mount to the
Power
Connect
Vehicle Dock using the 4 provided screws.
4. Before you attach the Vent Mount to the
vent, skip ahead and finish the remainder of
the vehicle installation so that the cables are
attached to the dock.
Note! For greater clarity, the next illustration
does not show the dock attached to the Vent
Mount, however, the dock should be attached
before continuing.
5. Once the cables have been attached to the dock, push the Vent Mount onto
the vehicle vent as shown (1) until it hooks on the rear of the vent louver (2).
6. Rest the foot against the bottom of the vent (2), and adjust the tilt of the Vent
Mount by repositioning the foot to the other adjustment hole (3).
TIP! To remove the Vent Mount, push the mount into the vent. Then lift up until
disengaged from the rear of the vent louver, and remove the Vent Mount.
Dash
Dash
PUSH
Dash
Vent
Louver
Vent Ve
nt
HOOKED
TILT
ADJUSTMENT
HOLES
FOOT
1 2 3
UDIO ANT FM

16
Step 3: Mount the Magnetic Mount Antenna
The Magnetic Mount Antenna contains a strong magnet which will stick to any
metal part of your vehicle, but will not damage the vehicle.
To install the Magnetic Mount Antenna:
1. Choose the best location for your antenna considering your
vehicle type. Pay particular attention to any accessories
that you may have like luggage racks and how frequently
you may use them.
Sedan/Coupe: We recommend mounting the antenna just above either
the front windshield or the back window as shown.
Vehicle Installation
Magnet

17
Vehicle Installation
SUV: We recommend mounting the antenna at the rear of the roof as
shown.
Convertible: We recommend mounting the antenna at the leading edge
of the trunk as shown.
Pickup Truck: We recommend mounting the antenna just above the
front windshield as shown.
2. Clean the surface of the selected mounting
location using the alcohol preparation pad and
let it dry thoroughly.

18
Vehicle Installation
TIP! Mount the antenna on the
roof (for most vehicles) or trunk
(for convertibles) where it has a
clear view of the sky in all
directions.
3. Place the antenna in the location you selected. Follow the Tips and Cautions
shown on the next several pages.

19
CAUTION! Don’t mount the antenna inside
the vehicle, for example, on the dashboard.
CAUTION! Don’t mount the antenna on any
of the vehicle’s front, back or side pillars.
CAUTION! Don’t mount the antenna close
to a roof rack. Adjust the rack so it’s further
away from the antenna or move the antenna
closer to the center of the roof.
Vehicle Installation

20
Vehicle Installation
CAUTION! Don’t mount the antenna
close to another antenna. Mount it at
least 7.5 cm (3 inches) away.
Other manuals for Onyx EZ
7
Table of contents
Other Sirius XM RAdio Automobile Electronic manuals
Popular Automobile Electronic manuals by other brands

iBeam
iBeam TE-SVC product manual

Inelmatic
Inelmatic XF800 Operation manual

Peripheral Electronics
Peripheral Electronics Aux2Car instruction manual

CANchecked
CANchecked VADpro VAD15 installation guide

Toyota
Toyota Sienna 2006 Technical service bulletin

VIA Technologies
VIA Technologies Mobile360 D700 user manual