Sit 630 EUROSIT 120 User manual

630 EUROSIT 120°C
ENGLISH-ITALIANO-DEUTSCH
Read the instructions before use. This control must be installed in accordance with the rules in force.
Leggere le istruzioni prima dell’uso. Questo controllo deve essere installato in accordo con le normative in vigore.
Lesen Sie die Anleitungen vor dem Gebrauch. Das Mehrfachstellgerät muss nach den geltenden Vorschriften installiert werden.
9.956.632 01
430114 Dati sintesi ordine
N° ordine. . . 9005267 O1
Fornitore. . . 104389 ESSEGI SYSTEM SERVICE SRL
Spedire a. . . 49190002 SIT LA PRECISA S.P.A.
Descrizione/ Costo Costo Costo
Cod. articolo Quantità Volume Unit totale
SCHEDA CCIETK 5,00 5,0000 1.200,00
SCHEDA ALIMENTATORE 5,00 5,0000 125,00
Tot. 10,0000 1.325,00
Imponibile ac. 1.325,00 @ 20,000 Im 265,00
Tot. ordine 1.590,00
F24=Altri tasti funzione
9956632_01_630 eurosit 120_locke1 1 11/10/2010 14.32.32
GB English 7
Italiano 12
IT
Deutsch
DE 17
13
3
8
9956632_01_630 eurosit 120_locke2 2 11/10/2010 14.32.32

INSTRUCTIONS FOR USE
AND INSTALLATION
a
b
c
Multifunctional control with modulating thermostat and additional on-off function. 630 EUROSIT is particularly suitable
for use in catering appliances, does not require electrical supply and is suitable for operation in ambient temperatures
up to 120°C.
MAIN CHARACTERISTICS
Control knob with positions for off, pilot and temperature selection (MS)
Thermoelectric flame supervision device with re-start interlock (GM)
Maximum gas flow adjustment (RQ)
Minimum (by pass) flow adjustment
Modulating thermostat with additional on-off function (TH)
Pilot outlet with pre-setting device of the gas flow (RQ)
Inlet and pilot filter (FL)
Inlet and Outlet pressure test points
Lateral or bottom main gas inlet and outlet
Main gas connections with threaded pipe or nut and olive.
GB
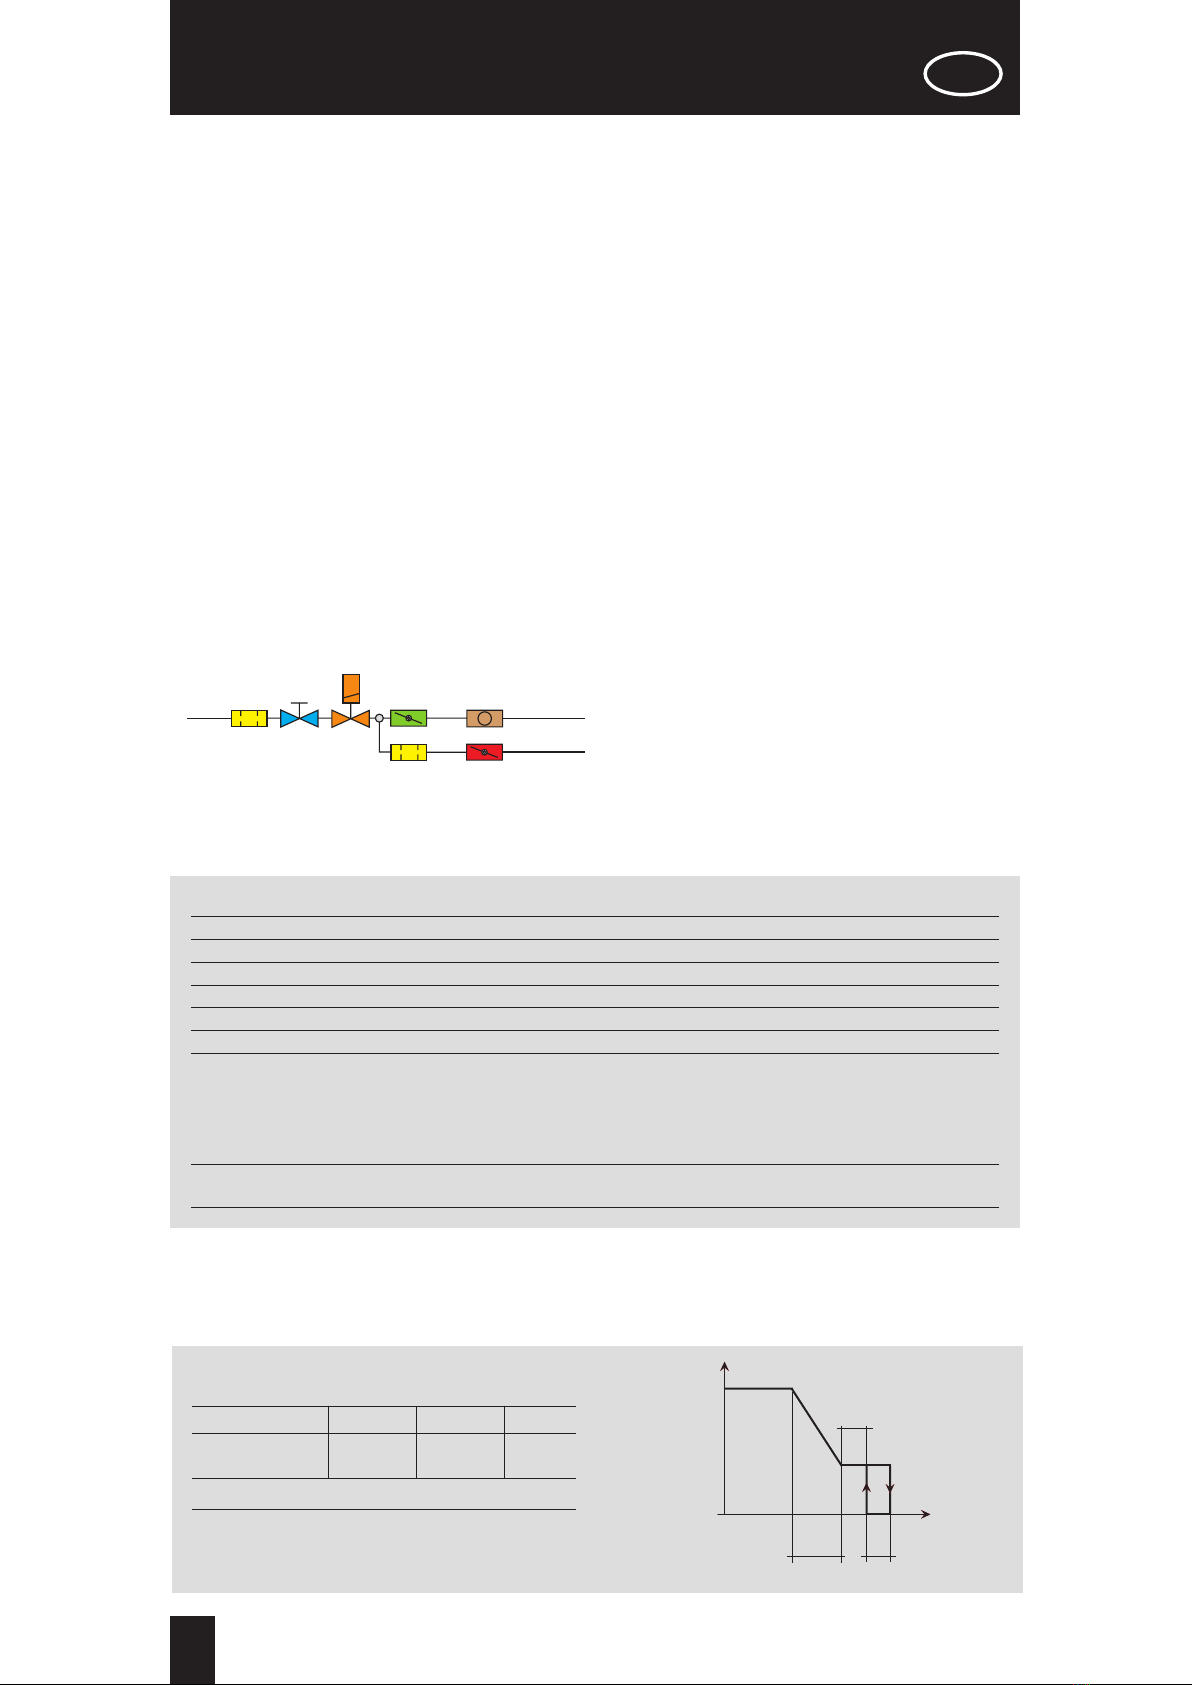
WORKING DIAGRAM
FL MS
THRQ
GM
FL RQ
MAIN
PILOT
GAS
INLET
BURNER
BURNER
TECHNICAL DATA
The technical data specified below refer to the European standard, EN 126 "Multi-functional controls for gas-burning appliances".
THERMOSTAT REGULATION SPECIFICATIONS
The regulation specifications of the modulating thermostat with on-off function are shown in the following drawing
and table:
Gas flow
Temperature
3
Thermostatic range a b c
110-190 °C10 10 5
100-340 °C 30 30 10
Other ranges are available on request
Main gas connections Rp 1/2 ISO 7
Assembly position any position
Gas families I, II and III
Max. gas inlet pressure 50 mbar
Outlet pressure setting range 3-18 mbar
Working temperature range 0-120 °C
Torsion and bending resistance Group 2
Flame supervision device
(using SIT series 200 or 290 thermocouples)
ignition time < 10 s
shut-off time < 60 s
number of cycles expected 5,000
Manual shut-off device
number of cycles expected 5,000
9956632_01_630 eurosit 120_locke3 3 11/10/2010 14.32.32

4
0 2 4 68
1
1.5
2
2.5
3
4.5
Q [m3/h, d=0,6]
∆P[mbar]
5
3.5
4
5
10 12 14 16 18
0
Gas flow Q (15 °C, 1013.25 mbar)
as a function of the pressure drop ∆p
between inlet and outlet with knob in
position 7 and cold bulb.
GAS FLOW
OPERATION
Ignition of pilot flame
Starting from OFF position (Fig. 1), push and at the same time turn the knob to the pilot position (Fig. 2).
Depress the knob and ignite the pilot flame (Fig. 2). Keep
the knob depressed for several seconds .
Release the knob and check that the pilot flame remains
alight (Fig. 3). If it goes out, repeat the ignition operation.
Temperature selection
Turn the knob to the point corresponding to the desired
temperature (Fig. 4 and Fig. 5).
Stand by position
To keep the main burner closed and the pilot flame alight,
turn the knob from the selected temperature position to the
pilot position (Fig. 3).
Extinguishing
Turn the knob to Off position, until the lock click (Fig. 1).
I Family (d=0.45) Q = 2.5 m3/h ∆p = 5 mbar
II Family (d=0.6) Q = 2.2 m3/h ∆p = 5 mbar
III Family (d=1.7) Q = 2.9 kg/h ∆p = 5 mbar
SIT
7
1
2
3
4
5
6
Fig. 1
POSIZIONE OFF
POSIONE PILOTA
POSIZIONE MAX
OFF POSITION WITH
BRASS KNOB
SIT
7
1
2
3
4
5
6
Fig. 2
POSIZIONE OFF
POSIONE PILOTA
POSIZIONE MAX
PRESSED PILOT POSITION
WITH BRASS KNOB
SIT
7
1
2
3
4
5
6
Fig. 3
POSIZIONE OFF
POSIONE PILOTA
POSIZIONE MAX
ARMED PILOT POSITION
WITH BRASS KNOB
SIT
7
1
2
3
4
5
6
Fig. 5
POSIZIONE OFF
POSIONE PILOTA
POSIZIONE MAX
POSIZIONE 1
MAXIMUM POSITION
WITH BRASS KNOB
SIT
7
1
2
3
4
5
6
Fig. 4
POSIZIONE OFF
POSIONE PILOTA
POSIZIONE MAX
POSIZIONE 1
n. 1 POSITION WITH
BRASS KNOB
CAUTION: The re-start interlock prevents ignition of the appliance throughout the closing time of the flame
supervision device (approx. 60 secs.).
CAUTION: In the brass knob version, the constructor of the appliance must garantee the correct position of the
simbols, defined by norm EN 1106:2001 § 6.4.1, on the knob coupled by himself, as shown in Fig. 1, 2, 4 and 5.
Those symbols must be according with norm EN 13611: 2000 § 7.8.6.
9956632_01_630 eurosit 120_locke4 4 11/10/2010 14.32.33
MECHANICAL CONNECTIONS
General recommendations
Do not tamper with sealed parts. Do not slacken assembly screws. Do not remove labels. Avoid blows (knocks, falls etc.).
Only remove dust caps when installing.
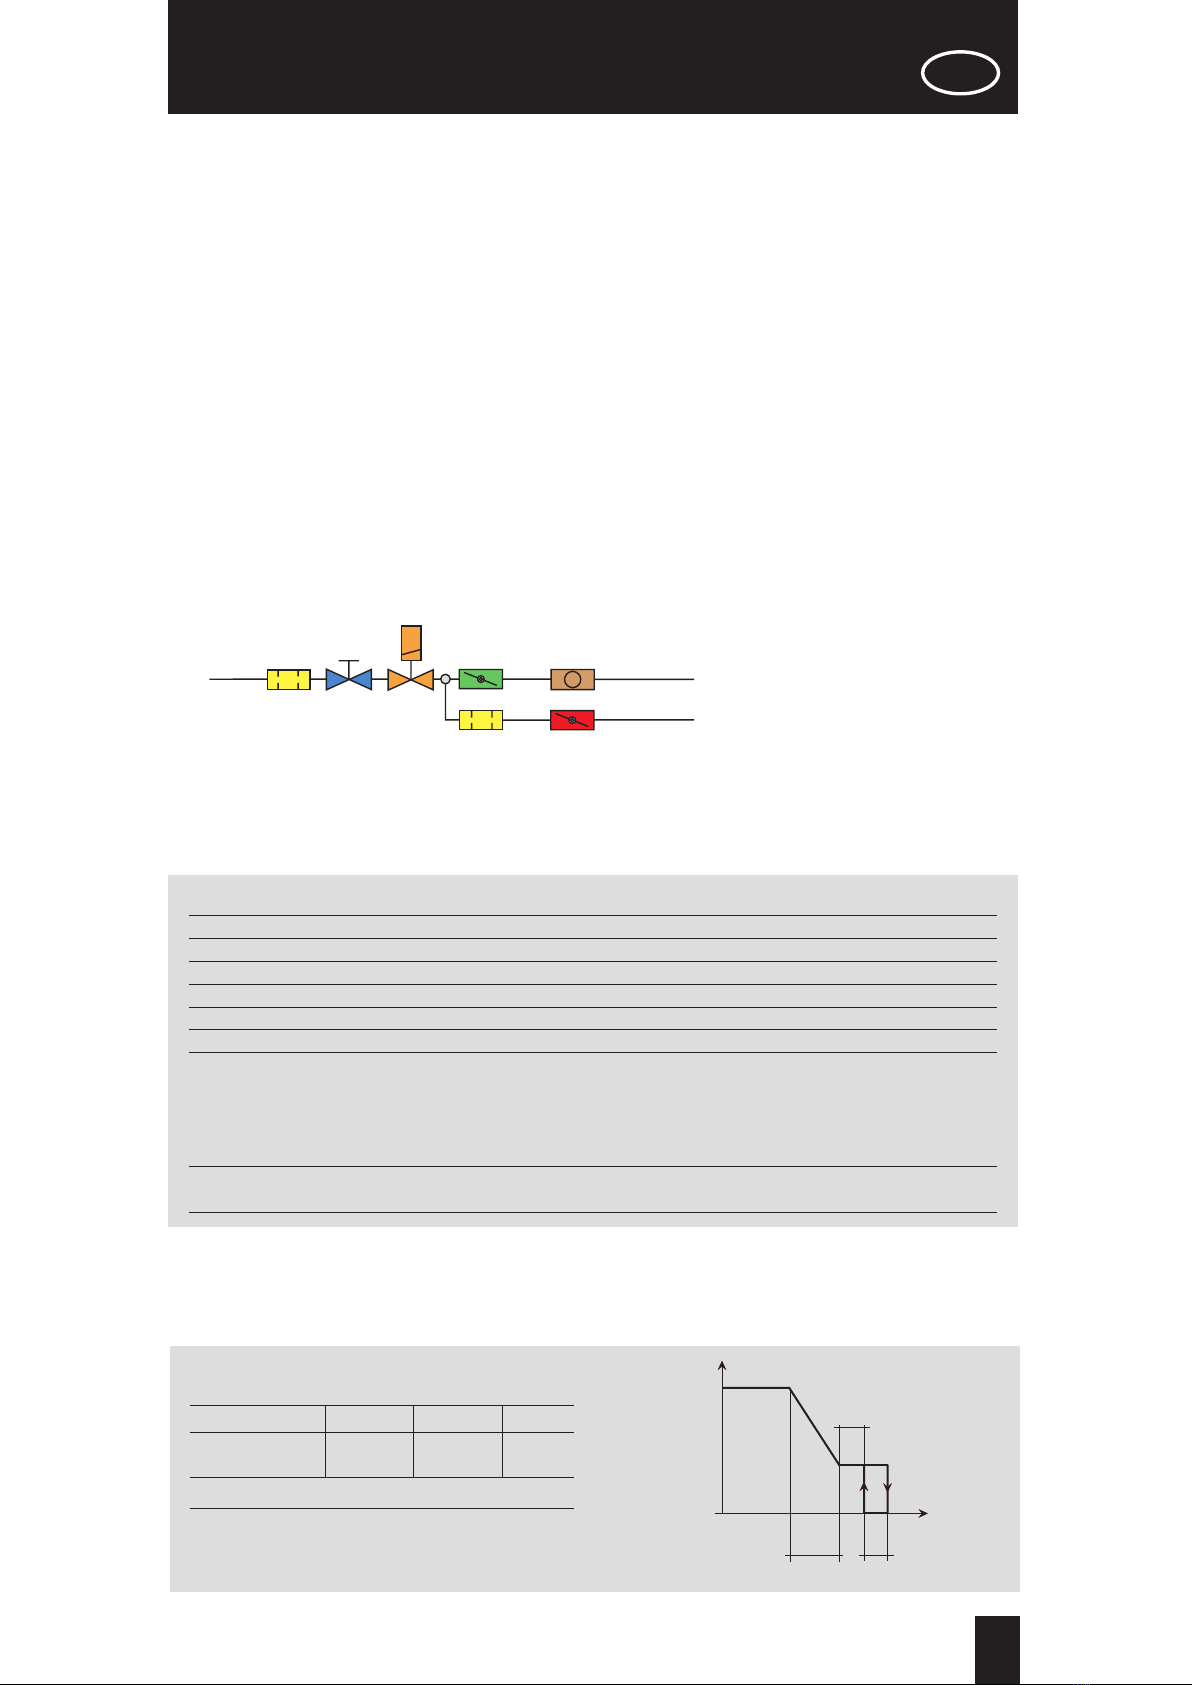
Do not exceed recommended torques. Ensure that the gas flows in the direction shown
by the arrow on the valve body. Prevent foreign matter from getting into the valve during installation.
In particular, check the cleanliness of the inlet and outlet pipes.
Do not subject the valve to bending in excess of 35 Nm and to torque in excess of 25 Nm.
Use only the specified spanner grips when making the connections.
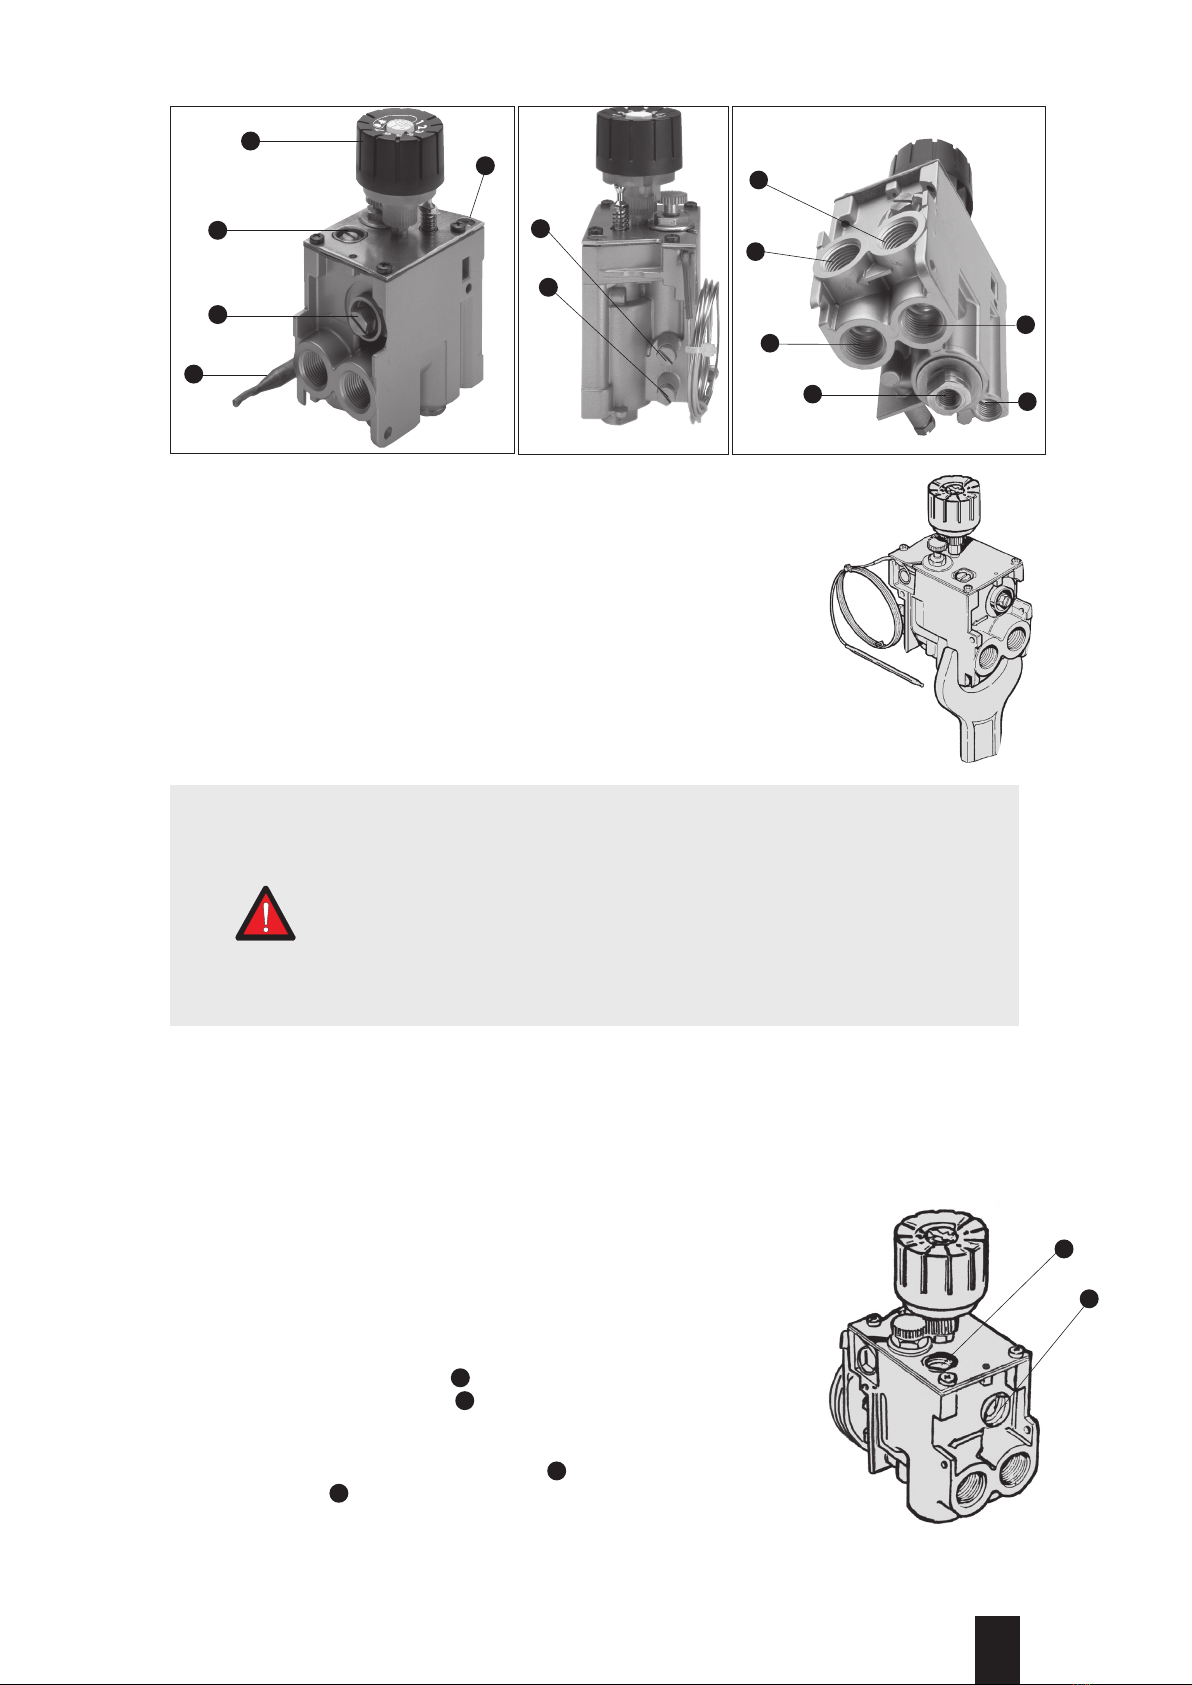
The valve has 3 pairs of attachment holes.
CAUTION
To allow personalisation of the product in the installation phase, some versions are supplied
without some components. Therefore, check that the valve is supplied complete with:
• minimum gas flow adjustment screw 3(fig. A)
• maximum gas flow adjustment screw 2(fig. A)
If not, assemble as follows:
• check that the component code is correct
• insert the minimum adjustment screw into opening
14
, the maximum screw or the pressure
regulator into opening
15
• insert the components and screw in fully.
Tightening torque:
- setting adjustment screws 7Nm
- pressure regulator: 1Nm
5
INSTALLATION
The 630 EUROSIT complies with current safety standards.
Nevertheless, its installation on appliances must be verified in accordance
with the specific standards for each installation. In particular, it is
necessary to ensure that the requirements relating to the class of
flame supervision device and, if present, the pressure regulator
are met. All the installation, setting and adjustment operations must be carried
out exclusively by qualified personnel on the basis of the specific characteristics
of the appliance. The valve must only be installed inside gas appliances
and is not suitable for outdoor use.
14
15
7
6
Fig. B
1
2
3
4
5
Fig. A
11
13
12
10
98
Fig. C
WARNING
DO NOT OPEN, INTERFERE WITH OR MODIFY THE VALVE.
DO NOT REMOVE THE CONTROL KNOB.
DO NOT REMOVE ANY COMPONENT CONNECTED TO THE
CONTROL KNOB.
9956632_01_630 eurosit 120_locke5 5 11/10/2010 14.32.34

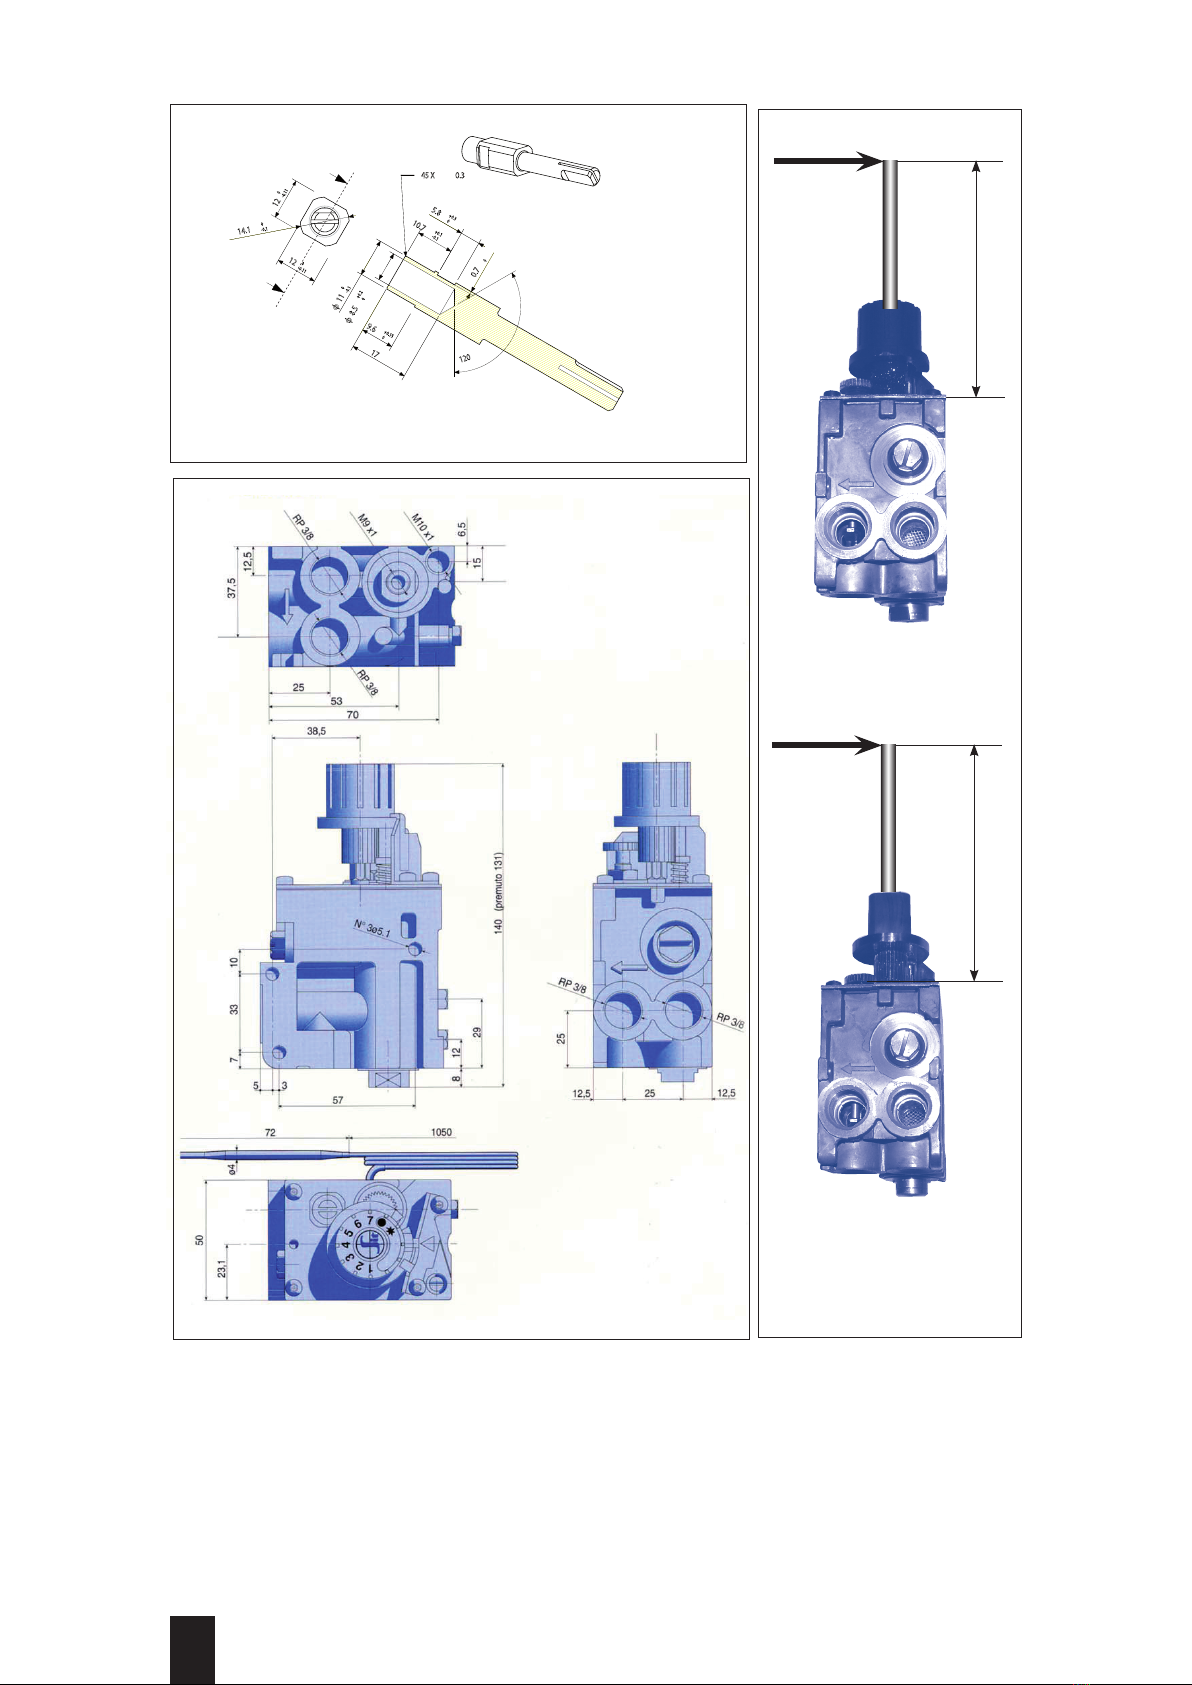
See Fig. D. Insert completely the coupling pin (made as
Fig. E, page 7) with the spline side (16) aligned with the
screw threaded M5 hole. Use it to fix the coupling pin with
a plane head screw.
Max. load admitted: see Fig. F, page 7.
POSIZIONE OFF
POSIONE PILOTA
POSIZIONE MAX
SCALA 6:5
Fig. D
16
REMOTE COMMAND FITTING
6
SETTINGS AND ADJUSTMENTS
All adjustments must be made on the basis of the specific characteristics of the appliance.
Check inlet and outlet pressure using the pressure test points and . After testing, carefully seal test points with
the provided screws. Recommended torque: 2.5 Nm.
Adjusting maximum and minimum outlet flow
These adjustments must be made when the thermostatic bulb is cold.
Maximum flow
Turn the knob 4to position 7. Screw in the adjustment screw 2fully, turn the adjustment screw anticlockwise to
increase the gas flow.
CAUTION: After screwing in fully, do not unscrew the adjustment screw more than two turns.
Overriding the flow adjustment function
Screw in the adjustment screw 2fully, unscrew it two complete turns and seal it. Alternatively, the gas flow
adjustment function may be excluded by substituting the adjustment screw 2with the plug code 0.972.057.
In this case the plug must be fixed firmly.
Minimum flow
Starting from position 7, slowly turn the knob clockwise to the minimum flow position (just before the main burner
shut-off). Turn screw 3anticlockwise to increase the flow. It is possible to use screws with calibrated holes (available
on request) to replace the maximum and minimum flow adjustment screws. In this case, it is necessary to tighten these
screws to a torque of 7 Nm.
Adjustment of gas flow to the pilot burner
Turn screw 5clockwise to reduce the flow.
Overriding the pilot flow adjustment function
Screw in adjustment screw 5fully and then unscrew it two complete turns.
Seal the adjustment.
Changing the gas family or group
Check that the appliance is suitable for operation with the gas family or group desired.
Following the instructions given above, adjust the outlet pressure to the values given in the appliance's instruction
booklet. With Family III gas: override the maximum flow adjustment or the pressure regulator according to the version.
Override the adjustment of the gas flow to the pilot burner.
IMPORTANT: At the end of all setting and adjustment operations, check gas seals and the efficiency of the appliance.
It is particularly important to check that flame lift or light back to minimum and maximum outlet pressures are absolutely
impossible. After carrying out all adjustments, fit the provided seals and/or block the setting screws with paint.
The only maintenance operation permitted is the replacement of the magnet unit. This operation must be carried
out by qualified personnel only and according to the instructions provided in the instruction leaflet supplied with
the spare parts.
MAINTENANCE
67
Main gas connection
The connection must be made using gas pipes with Rp 3/8 ISO 7 thread. Torque: 25 Nm.
Alternatively, it is possible to use the nut and bicone connection for Ø 12 mm pipe (codes 0.958.025 and 0.957.007)
(torque 15 Nm).
The valve has two main gas inlets ( 10 and 12 ) and two main gas outlets ( 11 and 13 ).
It is necessary to close the unused inlet and outlet screwing in the specified plug fully (code 0.972.058). Torque 7 Nm.
Connection to the pilot burner
outlet 8
Ø4 mm, Ø 6 mm or Ø1/4" pipes can be used.
Use appropriately sized nut and olive.
Tighten to 7 Nm torque.
CAUTION: After connecting to gas, check for gas leakage.
9956632_01_630 eurosit 120_locke6 6 11/10/2010 14.32.34
7
Calibrated maximum flow screws
Calibrated minimum flow screws
3/8 sealing plug for unused outlets 0.972.058
Nut and Olive connection for connection to pilot burner with pipes of: Ø4 mm 0.958.030
Ø6 mm 0.958.031
Ø1/4 0.958.032
Other accessories are available on request
ACCESSORIES
SEZIONE B-B
1 2 3 4 5 6 7 8
A
B
C
D
E
Sit Drawing N
Rev.
I.M.
Scale
La Precisa S.p.A.
35129 Padova (Italy) Viale dell'Industria 31/33
Frm.
This drawing may not be copied
or disclosed to third person
without permission of SIT.
We are the owner of this drawing.
Description
Technical Information
ISO
Release Level
General
Roughness
Q
C =
B
B
120
φ
8.5
+0.2
0
12
0
-0.11
12
0
-0.11
φ
11
0
-0.1
9.6
+0.15
0
φ
14.1
0
-0.1
17
5.8
+0.3
0
10.7
+0.1
-0.1
0.7
+0.1
0
45 X
0.3
MODIFICATION
Rev. Mod.N
Date Description
Name
B *** 25/11/04 MOD. POSIZIONE GOLA DE IULIO
0+
A3
UNI-EN 22768\1-m Tolerances for linear and angular dimensions without
individual tolerance indications"mechanical organs technical designs"
<= 6 >6 <=30
>30 <=120
>120
0.1 0.2 0.3 0.5
2
7120009
NOME FILE (.DRW)
ISO 3302\1-Rubber.Dimensiional tolerances for use with products
In mm
<=6.3 6.3˜10 10˜16 16˜25 25˜40 40˜63 63˜100 100˜160 >160
Classe M2
(Higt precision)
0.15 0.20 0.20 0.25 0.35 0.40 0.50 0.70 0.5%
7120009
B
XXX
Replaces
Dwg N
3:2
Ra
X.XX
CAMPIONATURA
Critical Dimensions
Sit Norm
Date Name
Drawn
03/09/04 De Iulio D.
PERNO AGGANCIO MANOPOLA OTTONE EUROSIT 120C
cliente ANGELO PO
Material
.
Material
Condition
BARRA QUADRA 12 h11- TN UNI 12167 CW614N
Heat Treatment
XXX
Surface Treatment
XXX
Sealing Surface Surface Hardness
HV HRC
Technical Drawings ISO 8015
General Tolerances UNI-EN 22768 \2-K
Fig. E
Fig. F
L
Fmax (Kg) = 500/L (mm)
Fmax (Kg) = 500/L (mm)
L
Fig. F
9956632_01_630 eurosit 120_locke7 7 11/10/2010 14.32.36
a
b
c
Valvola multifunzionale monocomando con controllo termostatico combinato modulante-tutto o niente.
630 EUROSIT è particolarmente adatta ad essere utilizzata su apparecchi per la ristorazione collettiva, non
necessita di alimentazione elettrica ed è adatta a funzionare a temperature ambiente fino a 120 °C.
CARATTERISTICHE PRINCIPALI
Manopola di comando con posizione spento,pilota, regolazione (MS)
Dispositivo termoelettrico di rilevazione di fiamma con blocco al riarmo (GM)
Dispositivo di preselezione della portata massima di gas (RQ)
Vite di preselezione della portata di minimo (by pass)
Termostato combinato modulante-tutto o niente (TH)
Uscita pilota con vite di preselezione della portata di gas (RQ)
Filtro in ingresso e pilota (FL)
Prese di pressione in ingresso e uscita
Entrata ed uscita gas principali laterali o dal basso
Collegamenti principali gas con tubo filettato o tramite raccordo a bicono
8
IT
SCHEMA DI FUNZIONAMENTO
ISTRUZIONI D’USO
E DI INSTALLAZIONE
FL MS
THRQ
GM
FL RQ
BRUCIATORE
BRUCIATORE
ENTRATA
GAS
PRINCIPALE
PILOTA
DATI TECNICI
I dati tecnici di seguito riportati si riferiscono alla normativa EN 126 "Dispositivi multifunzionali per apparecchi a gas".
CARATTERISTICHE DI REGOLAZIONE DEL TERMOSTATO
Le caratteristiche di regolazione del termostato combinato modulante- tutto o niente sono illustrate nel grafico e nella
tabella seguenti:
Campo termostatico a b c
110-190 °C 10 10 5
100-340 °C 30 30 10
Altri campi sono disponibili a richiesta
Portate di gas
Temperatura
Connessioni gas Rp 3/8 ISO 7
Posizione di montaggio qualsiasi
Famiglie di gas di funzionamento I, II e III
Pressione massima di ingresso gas 50 mbar
Campo di taratura della pressione di uscita 3-18 mbar
Temperatura ambiente di utilizzo 0-120 °C
Resistenza alla flessione e alla torsione Gruppo 2
Dispositivo di rilevazione di fiamma
(alimentato da termocoppie SIT serie 200 o 290)
tempo di accensione < 10 s
tempo di spegnimento < 60 s
numero di cicli previsto 5.000
Dispositivo di chiusura manuale
numero di cicli previsto 5.000
9956632_01_630 eurosit 120_locke8 8 11/10/2010 14.32.36

9
I Famiglia (d=0.45) Q = 2.5 m3/h ∆p = 5 mbar
II Famiglia (d=0.6) Q = 2.2 m3/h ∆p = 5 mbar
III Famiglia (d=1.7) Q = 2.9 kg/h ∆p = 5 mbar
0 2 4 68
1
1.5
2
2.5
3
4.5
Q [m3/h, d=0,6]
∆P[mbar]
5
3.5
4
5
10 12 14 16 18
0
Portata di gas Q (15 °C, 1013.25 mbar)
in funzione della caduta di pressione ∆p
fra ingresso e uscita.
Manopola in posizione 7 e bulbo freddo.
PORTATE DI GAS
FUNZIONAMENTO
Accensione della fiamma pilota
Partendo dalla posizione OFF (Fig. 1), premere e contemporaneamente ruotare la manopola fino all'arresto in
posizione pilota (Fig. 2). Premere a fondo la manopola ed accendere la fiamma pilota (Fig. 2). Mantenere la manopola
premuta a fondo per alcuni secondi . Rilasciare la manopola e verificare che la fiamma pilota rimanga accesa (Fig. 3). In
caso di spegnimento, ripetere le operazioni di accensione.
Selezione della temperatura
Ruotare la manopola fino al punto corrispondente alla
temperatura desiderata (Fig. 4 e Fig. 5).
Posizione di Stand by
Per mantenere chiuso il bruciatore principale e la fiamma
pilota accesa, dalla posizione corrispondente alla
temperatura selezionata ruotare la manopola in posizione
pilota (Fig. 3).
Spegnimento
Ruotare la manopola in posizione Off , fino a sentire lo
scatto di arresto (Fig. 1).
POSIZIONE OFF
POSIZIONE PILOTA
POSIZIONE BRUCIATORE
POSIZIONE STANDBY
SIT
7
1
2
3
4
5
6
Fig. 1
POSIZIONE OFF
POSIONE PILOTA
POSIZIONE MAX
POSIZIONE OFF CON
MANOPOLA IN OTTONE
SIT
7
1
2
3
4
5
6
Fig. 2
POSIZIONE OFF
POSIONE PILOTA
POSIZIONE MAX
POSIZIONE PILOTA PREMUTO
CON MANOPOLA IN OTTONE
SIT
7
1
2
3
4
5
6
Fig. 3
POSIZIONE OFF
POSIONE PILOTA
POSIZIONE MAX
POSIZIONE PILOTA ARMATO
CON MANOPOLA IN OTTONE
SIT
7
1
2
3
4
5
6
Fig. 5
POSIZIONE OFF
POSIONE PILOTA
POSIZIONE MAX
POSIZIONE 1
POSIZIONE MAX CON
MANOPOLA IN OTTONE
SIT
7
1
2
3
4
5
6
Fig. 4
POSIZIONE OFF
POSIONE PILOTA
POSIZIONE MAX
POSIZIONE 1
POSIZIONE N. 1 CON
MANOPOLA IN OTTONE
ATTENZIONE: il dispositivo di blocco al riarmo impedisce la riaccensione dell'apparecchio per tutto il tempo di sicurezza
del dispositivo di rilevazione di fiamma (circa 60 s).
ATTENZIONE: nella versione con manopola in ottone, il costruttore dell’apparecchio deve garantire il corretto
posizionamento delle simbologie, definite dalla normativa EN 1106:2001 § 6.4.1, sulla manopola da lui abbinata, come da
Fig. 1, 2, 4 e 5. Tali simbologie devono risultare in accordo alla normativa EN 13611: 2000 § 7.8.6
9956632_01_630 eurosit 120_locke9 9 11/10/2010 14.32.37

INSTALLAZIONE
630 EUROSIT è conforme alle norme di sicurezza vigenti.
L’installazione sugli apparecchi di utilizzazione va comunque verificata a fronte delle norme
specifiche relative a ciascuna installazione. In particolare deve essere verificato che
siano soddisfatte le richieste relative alla classe del dispositivo di rilevazione di fiamma
e, se presente, del regolatore di pressione. Tutte le operazioni di installazione, taratura,
regolazione, devono essere eseguite esclusivamente da personale qualificato ed in
base alle caratteristiche specifiche dell’apparecchio di utilizzazione. La valvola non
è adatta a funzionare all’aperto.
COLLEGAMENTI MECCANICI
Avvertenze generali
Non manomettere gli organi sigillati, non svitare le viti di assiemaggio, non rimuovere
le marcature. Evitare alla valvola qualsiasi shock (urti, cadute, ecc.). Togliere i
tappi parapolvere solo all'atto dell'installazione. Non superare le coppie di serraggio
consigliate. Assicurarsi che il flusso di gas sia conforme alla freccia riportata sul corpo della
valvola. Evitare che durante le operazioni di montaggio entrino nella valvola sostanze estranee.
In particolare verificare la pulizia dei tubi di ingresso e di uscita. Non assoggettare la valvola a sforzi di
flessione superiori a 35 Nm ed a sforzi di torsione superiori a 25 Nm. Per effettuare i collegamenti bloccare la
valvola usando unicamente la presa di chiave prevista. La valvola dispone di 3 coppie di fori di fissaggio.
ATTENZIONE
Per permettere la personalizzazione del prodotto in fase di installazione, alcune versioni vengono fornite prive
di alcuni componenti. Verificare quindi che la valvola sia fornita completa di:
•
vite di regolazione della portata minima 3(fig. A)
•
vite di regolazione della portata massima 2(fig. A).
In caso contrario provvedere al loro assiemaggio come segue:
•
verificare che il codice del componente sia corretto
•
inserire la vite di regolazione del minimo nell'alloggiamento
14
, la vite del massimo nell’allog-
giamento
15
.
•
spingere a fondo i componenti ed avvitarli a battuta.
Coppie di serraggio:
- viti di regolazione calibrate: 7 Nm
- regolatore di pressione: 1 Nm
Collegamento principale gas
Il collegamento va effettuato utilizzando tubi gas con filettatura Rp 3/8 ISO 7.
Coppia di serraggio: 25 Nm.
In alternativa è possibile utilizzare il collegamento a dado e bicono per tubo Ø12 mm. (codici
0.958.025 e 0.957.007) (coppia di serraggio 15 Nm).
La valvola è provvista di due entrate ( 10 e 12 ) e due uscite ( 11 e 13 ) principali gas.
E' necessario provvedere alla chiusura dell'entrata e dell'uscita non utilizzate avvitando
a battuta l'apposito tappo (codice 0.972.058). Coppia di serraggio 7 Nm.
Collegamento al bruciatore pilota
uscita 8
Possono essere utilizzati tubi da Ø4 mm; Ø6 mm; Ø1/4.
Usare raccordo e bicono di adatte dimensioni.
Serrare il raccordo con coppia di 7 Nm.
Dopo aver effettuato i collegamenti gas, verificare la tenuta ed il corretto funzionamento dell'apparecchio.
10
14
15
7
6
Fig. B
1
2
3
4
5
Fig. A
11
13
12
10
98
Fig. C
9956632_01_630 eurosit 120_locke10 10 11/10/2010 14.32.38

11
Viti calibrate di preselezione della portata massima
Viti calibrate di preselezione della portata minima
Tappo 3/8 di chiusura delle uscite non utilizzate 0.972.058
Raccordo a bicono per collegamento al bruciatore pilota con tubo da: ø 4 mm 0.958.030
ø 6 mm 0.958.031
ø 1/4 0.958.032
Altri accessori sono disponibili a richiesta
ACCESSORI
L'unica operazione di manutenzione ammessa è la sostituzione del gruppo magnetico. L'operazione deve essere
svolta esclusivamente da personale qualificato secondo le istruzioni fornite a corredo delle parti di ricambio.
MANUTENZIONE
TARATURE E REGOLAZIONI
Tutte le regolazioni vanno fatte in base alle specifiche caratteristiche dell'apparecchio di utilizzazione.
Verificare le pressioni in ingresso ed in uscita mediante le apposite prese di misura 6e 7previste allo scopo.
A controllo effettuato tapparle a tenuta con le apposite viti. Coppia di serraggio consigliata: 2.5 Nm.
Regolazione della portata massima e minima di uscita
Queste regolazioni devono essere effettuate con il bulbo termostatico freddo.
Portata massima
Girare la manopola 4in posizione 7. Avvitare la vite di regolazione 2a battuta, ruotare la vite di regolazione in senso
antiorario per aumentare la portata di gas.
ATTENZIONE: Dalla posizione di battuta, non svitare la vite di regolazione per più di 2 giri.
Messa fuori servizio della funzione di regolazione della portata
Avvitare la vite di regolazione 2a battuta, svitarla di due giri completi e sigillarla. In alternativa la funzione
di regolazione della portata di gas può essere esclusa sostituendo la vite di regolazione 2con il tappo
codice 0.972.057. In questo caso il tappo deve essere fissato a battuta.
Portata minima
Partendo dalla posizione 7, ruotare lentamente la manopola in senso orario fino alla posizione di minima portata
(appena prima dello scatto di chiusura). Ruotare la vite 3in senso antiorario per aumentare la portata. E' possibile
utilizzare viti con fori calibrati (disponibili a richiesta) da sostituire alle viti di regolazione della portata massima
e di minimo. In questo caso è necessario fissare la vite calibrata in battuta con coppia di 7 Nm.
Regolazione della portata di gas al bruciatore pilota
Ruotare la vite 5in senso orario per diminuire la portata.
Messa fuori servizio della funzione di regolazione della portata pilota
Avvitare la vite di regolazione 5a battuta e poi svitarla di due giri completi
Provvedere alla sigillatura della regolazione
Cambiamento della famiglia o del gruppo di gas di utilizzo
Verificare che l'apparecchio sia idoneo al funzionamento con la famiglia o il gruppo di gas di interesse.
Seguendo le istruzioni sopra riportate, regolare la pressione di uscita ai valori richiesti dall'apparecchio di utilizzo.
Con gas della terza famiglia: provvedere all'esclusione della regolazione della portata massima o del regolatore
di pressione a seconda delle versioni. Escludere la regolazione della portata di gas al bruciatore pilota.
IMPORTANTE: Terminate le operazioni di taratura e regolazione, controllare la tenuta del circuito gas ed il buon
funzionamento dell'apparecchio di utilizzazione. In particolare accertarsi che alle pressioni di uscita di minimo e di
massimo non si verifichi il distacco di fiamma o la retroaccensione. A regolazioni effettuate applicare gli appositi sigilli
e/o bloccare con vernice le viti di regolazione.
Si veda fig. D. Inserire a fondo il perno (dati costruttivi in Fig.
E, pag. 12) con il lato scanalato (16) in corrispondenza del
foro filettato M5, da utilizzare per il fissaggio con grano ad
estremità piana.
Massimo carico ammesso: si veda Fig. F, pag.12.
MONTAGGIO COMANDO A DISTANZA
POSIZIONE OFF
POSIONE PILOTA
POSIZIONE MAX
SCALA 6:5
Fig. D
16
9956632_01_630 eurosit 120_locke11 11 11/10/2010 14.32.38
12
SEZIONE B-B
1 2 3 4 5 6 7 8
A
B
C
D
E
Sit Drawing N
Rev.
I.M.
Scale
La Precisa S.p.A.
35129 Padova (Italy) Viale dell'Industria 31/33
Frm.
This drawing may not be copied
or disclosed to third person
without permission of SIT.
We are the owner of this drawing.
Description
Technical Information
ISO
Release Level
General
Roughness
Q
C =
B
B
120
φ
8.5
+0.2
0
12
0
-0.11
12
0
-0.11
φ
11
0
-0.1
9.6
+0.15
0
φ
14.1
0
-0.1
17
5.8
+0.3
0
10.7
+0.1
-0.1
0.7
+0.1
0
45 X
0.3
MODIFICATION
Rev. Mod.N
Date Description
Name
B *** 25/11/04 MOD. POSIZIONE GOLA DE IULIO
0+
A3
UNI-EN 22768\1-m Tolerances for linear and angular dimensions without
individual tolerance indications"mechanical organs technical designs"
<= 6 >6 <=30
>30 <=120
>120
0.1 0.2 0.3 0.5
2
7120009
NOME FILE (.DRW)
ISO 3302\1-Rubber.Dimensiional tolerances for use with products
In mm
<=6.3 6.3˜10 10˜16 16˜25 25˜40 40˜63 63˜100 100˜160 >160
Classe M2
(Higt precision)
0.15 0.20 0.20 0.25 0.35 0.40 0.50 0.70 0.5%
7120009
B
XXX
Replaces
Dwg N
3:2
Ra
X.XX
CAMPIONATURA
Critical Dimensions
Sit Norm
Date Name
Drawn
03/09/04 De Iulio D.
PERNO AGGANCIO MANOPOLA OTTONE EUROSIT 120C
cliente ANGELO PO
Material
.
Material
Condition
BARRA QUADRA 12 h11- TN UNI 12167 CW614N
Heat Treatment
XXX
Surface Treatment
XXX
Sealing Surface Surface Hardness
HV HRC
Technical Drawings ISO 8015
General Tolerances UNI-EN 22768 \2-K
Fig. E
Fig. F
L
Fmax (Kg) = 500/L (mm)
Fmax (Kg) = 500/L (mm)
L
Fig. F
9956632_01_630 eurosit 120_locke12 12 11/10/2010 14.32.39
13
a
b
c
Mehrfachstellgerät mit modulierender Temperaturregelung über Thermostat und zusätzlicher EIN-
AUS-Schaltung. 630 EUROSIT wird vorzugsweise auf Großküchengeräten angewendet, bedarf keiner
Hilfsenergie und eignet sich für Umgebungstemperaturen bis 120°C.
HAUPTEIGENSCHAFTEN
Bedienknopf mit Position AUS-Schaltung, Zünden und Temperatureinstellung (MS)
Thermoelektrische Zündsicherung mit Wiedereinschaltverriegelung (GM)
Voreinstellglied für maximalen Gasdurchfluss (RQ)
Voreinstellglied für minimalen Gasdurchfluss (Bypass)
Kombinierter Temperaturregler mit zusätzlicher EIN-AUS-Schaltung (TH)
Voreinstellglied für Gasdurchfluss zum Zündbrenner (RQ)
Gasfilter am Eingang und Zündbrenner (FL)
Messstutzen am Ein- und Ausgang
Ein- und Ausgänge für Hauptgas wahlweise an der Seite oder am Boden
Hauptgasanschlüsse mit Gewinderohr oder Doppelkegelringverschraubung
DE
FUNKTIONSSCHALTBILD
GEBRAUCHS- UND
INSTALLATIONSVORSCHRIFTEN
FL MS
THRQ
GM
FL RQ
Hauptbrenner
Zündbrenner
Gaseingang
TECHNISCHE DATEN
Die im nachhinein genannten technischen Daten beziehen sich auf EN126 "Mehrfachstellgeräte für Gasgeräte".
EIGENSCHAFTEN DER TEMPERATURREGELUNG
Die Eigenschaften der modulierenden Temperaturregelung über Thermostat mit zusätzlicher EIN-AUS-Schaltung sind
in nachstehender Zeichnung und Tabelle angegeben:
Regelbereich a b c
110-190 °C 10 10 5
100-340 °C 30 30 10
Weitere Regelbereiche auf Anfrage
Gasdurchfluss
Temperatur
Gasanschlüsse Rp 3/8 ISO 7
Einbauposition beliebig
Betrieb mit Gasfamilien I, II und III
Max. Gaseingangsdruck 50 mbar
Ausgangsdruck-Einstellbereich 3-18 mbar
Umgebungstemperatur 0-120°C
Biege- und Drehfestigkeit Gruppe 2
Zündsicherung
(mit Thermoelementen SIT Serie 200 oder 290)
Zündzeit < 10 s
Abschaltzeit < 60 s
vorgesehene Schaltfolgen 5.000
Handabschaltung
vorgesehene Schaltfolgen 5.000
GEBRAUCHS- UND
INSTALLATIONSVORSCHRIFTEN
9956632_01_630 eurosit 120_locke13 13 11/10/2010 14.32.40

14
I Familie (d=0.45) Q = 2.5 m3/h ∆p = 5 mbar
II Familie (d=0.6) Q = 2.2 m3/h ∆p = 5 mbar
III Familie (d=1.7) Q = 2.9 kg/h ∆p = 5 mbar
0 2 4 68
1
1.5
2
2.5
3
4.5
Q [m3/h, d=0,6]
∆P[mbar]
5
3.5
4
5
10 12 14 16 18
0
Gasdurchfluss Q (15°C, 1013.25 mbar)
in Abhängigkeit der Druckdifferenz ∆p
zwischen Ein- und Ausgang.
Knopf auf Position 7 und kalter Kugel.
GASDURCHFLUSS
FUNKTIONSWEISE
Zünden der Pilotflamme
Von der Position AUS (Abb. 1) den Knopf drücken und gleichzeitig bis zum Anschlag in Zündposition (Abb.
2) drehen. Den Knopf ganz eindrücken und somit die Pilotflamme zünden (Abb. 2). Den Knopf einige Sekunden lang
gedrückt halten. Den Knopf loslassen und überprüfen, ob die Zündflamme brennt (Abb. 3). Sollte sie erlöschen, den
Zündvorgang wiederholen.
Temperatureinstellung
Den Knopf auf die gewünschte Temperatur drehen (Abb.
4 und Abb. 5).
Standby-Position
Für die Funktion bei geschlossenem Hauptbrenner und
eingeschalteter Zündflamme den Knopf von der
eingestellten Temperatur auf die Position Pilotflamme
(Abb. 3) drehen.
Abschalten
Den Knopf auf AUS drehen, bis das Ausrastgeräusch
hörbar ist (Abb. 1).
SIT
7
1
2
3
4
5
6
Abb. 1
POSIZIONE OFF
POSIONE PILOTA
POSIZIONE MAX
AUS-POSITION MIT
MESSINGKNOPF
SIT
7
1
2
3
4
5
6
Abb. 2
POSIZIONE OFF
POSIONE PILOTA
POSIZIONE MAX
GEDRÜCKTE POSITION
ZÜNDFLAMME MIT MESSINGKNOPF
SIT
7
1
2
3
4
5
6
Abb. 3
POSIZIONE OFF
POSIONE PILOTA
POSIZIONE MAX
BEREITSCHAFTSPOSITION
ZÜNDFLAMME MIT MESSINGKNOPF
SIT
7
1
2
3
4
5
6
Abb. 5
POSIZIONE OFF
POSIONE PILOTA
POSIZIONE MAX
POSIZIONE 1
MAX. POSITION MIT
MESSINGKNOPF
SIT
7
1
2
3
4
5
6
Abb. 4
POSIZIONE OFF
POSIONE PILOTA
POSIZIONE MAX
POSIZIONE 1
POSITION 1 MIT
MESSINGKNOPF
ACHTUNG:
die Wiedereinschaltverriegelung verhindert eine erneute Inbetriebnahme für die gesamte Ansprechzeit der
Zündsicherung (ca. 60 s).
ACHTUNG:
in der Version mit Messingknopf muss der Hersteller des Gasgeräts die einwandfreie Ausrichtung der
gemäß EN 1106:2001 § 6.4.1 definierten Symbole auf dem installierten Knopf gewährleisten (siehe Abb. 1, 2, 4 und 5).
Diese Symbole müssen EN 13611: 2000 § 7.8.6 entsprechen.
9956632_01_630 eurosit 120_locke14 14 11/10/2010 14.32.41

15
INSTALLATION
630 EUROSIT entspricht den geltenden Sicherheitsvorschriften.
Die Installation auf die Gasgeräte muss aber auf jeden Fall nach den für die einzelnen Anwendungen
einschlägigen Vorschriften geprüft werden. Insbesondere müssen die Anforderungen an die
Klasse der Zündsicherung und, sofern vorhanden, des Druckreglers erfüllt sein. Sämtliche
Installations-, Einstellungs- und Regeleingriffe dürfen ausschließlich durch Fachpersonal
sowie unter Berücksichtigung der Eigenschaften des Gasgeräts erfolgen. Das Stellgerät
ist nicht für den Betrieb in Außenbereichen ausgelegt.
MECHANISCHE ANSCHLÜSSE
Allgemeine Hinweise
Versiegelte Bauteile dürfen nicht manipuliert, Montageschrauben nicht
gelockert und Aufkleber nicht entfernt werden. Das Stellgerät vor Schlägen
(Stöße, Herabfallen usw.) schützen. Die Staubverschlüsse nur bei der
Installation abnehmen. Die empfohlenen Anzugsmomente nicht überschreiten.
Die Entsprechung des Gasdurchflusses mit dem Pfeil auf dem Gehäuse des Stellgeräts
sicherstellen. Bei der Montage unbedingt den Einschluss von Fremdkörpern in das Stellgerät
vermeiden. Insbesondere die Reinigung der Ein- und Ausgangsleitungen nachweisen. Das
Stellgerät keinen Biegebelastungen über 35 Nm und keinen Drehbelastungen über 25 Nm aussetzen.
Beim Ausführen der Anschlüsse das Stellgerät ausschließlich an der vorgesehenen Schlüsselaufnahme
halten. Das Stellgerät verfügt über 3 Paar Befestigungsbohrungen.
ACHTUNG
Zur individuellen Installationsgestaltung des Produkts werden einige Versionen ohne bestimmte
Bauteile geliefert. Daher überprüfen, ob im Lieferumfang des Stellgeräts folgende Teile enthalten
sind:
•
Einstellschraube für minimalen Gasdurchfluss 3(Abb. A)
•
Einstellschraube für maximalen Gasdurchfluss 2(Abb. A).
Andernfalls müssen diese Teile folgendermaßen eingebaut werden:
•
Die richtige Bestellnummer des Bauteils überprüfen
•
Die Einstellschraube des minimalen Gasdurchflusses in die Aufnahme
14
einsetzen,
die Schraube für maximalen Gasdurchfluss in die Aufnahme
15
.
•
Die Teile ganz eindrücken und bis zum Anschlag festziehen.
Anzugsmomente:
- Geeichte Einstellschrauben: 7 Nm
- Druckregler: 1 Nm
Hauptgasanschluss
Der Anschluss wird mit den Gewinderohren Rp 3/8 ISO 7 hergestellt. Anzugsmoment: 25 Nm.
Als Anschlussalternative kann die Doppelkegelringverschraubung für Rohre mit Durchmesser Ø 12 mm
eingesetzt werden (Bestellnummern 0.958.025 und 0.957.007) (Anzugsmoment 15 Nm). Das Mehrfachstellgerät verfügt
über zwei Eingänge ( 10 und 12 ) und zwei Ausgänge ( 11 e 13 ) für das Hauptgas. Der jeweils nicht verwendete Ein-
und Ausgang muss durch Festziehen des entsprechenden Schraubverschlusses (Bestellnummer 0.972.058) abgedichtet
werden. Anzugsmoment 7 Nm.
Anschluss an Zündbrenner
Ausgang 8
Es können Rohre mit Ø 4 mm, Ø 6 mm und Ø 1/4" verwendet werden. Anschluss und Doppelkegelringverschraubung
geeigneter Größe verwenden. Den Anschluss mit einem Anzugsmoment von 7 Nm festziehen. Nach Fertigstellung der
Gasanschlüsse die Dichtheit und Funktion des Mehrfachstellgeräts überprüfen.
14
15
6
1
2
3
4
5
Abb. A
11
13
12
10
98
Abb. C
7
Abb. B
9956632_01_630 eurosit 120_locke15 15 11/10/2010 14.32.41

16
EINSTELLUNGEN UND REGELUNGEN
Sämtliche Einstellungen sind an die spezifischen Eigenschaften des Gasgeräts gebunden. Den Ein- und
Ausgangsdruck anhand der entsprechenden Messstutzen 6und 7überprüfen. Die Stutzen nach der Messung mit
den vorgesehenen Schrauben abdichten. Empfohlenes Anzugsmoment: 2.5 Nm.
Einstellung des max. und min. Ausgangsdurchflusses
Diese Einstellungen müssen bei kalter Thermostatkugel durchgeführt werden.
Max. Gasdurchfluss
Den Knopf 4auf Position 7 drehen. Die Einstellschraube 2auf Anschlag drehen, sie dann gegen den Uhrzeigersinn
drehen, um den Gasdurchfluss zu erhöhen.
ACHTUNG: Die Schraube nach dem Festziehen nicht mehr als 2 Drehungen lockern.
Aufhebung der Funktion Durchflusseinstellung
Die Einstellschraube 2auf Anschlag drehen, sie dann um 2 Drehungen lockern und versiegeln. Als Alternative
kann die Funktion der Gasdurchflusseinstellung durch Austausch der Einstellschraube 2gegen den Verschluss
Bestellnummer 0.972.057 aufgehoben werden. In diesem Fall muss der Verschluss auf Anschlag festgezogen werden.
Min. Gasdurchfluss
Von Position 7 aus den Knopf langsam im Uhrzeigersinn auf die Position des min. Durchflusses (knapp vor
Abschaltrastung) drehen. Die Schraube 3gegen den Uhrzeigersinn drehen, um den Durchfluss zu erhöhen. Es
können Schrauben mit geeichten Düsen (auf Anfrage erhältlich) anstatt der Einstellschrauben für maximalen und
minimalen Gasdurchfluss verwendet werden. In diesem Fall muss die geeichte Schraube mit einem Anzugsmoment
von 7 Nm auf Anschlag festgezogen werden.
Einstellung des Gasdurchflusses zum Zündbrenner
Die Schraube 5im Uhrzeigersinn drehen, um den Durchfluss zu verringern.
Aufhebung der Funktion Durchflusseinstellung am Zündbrenner
Die Einstellschraube 5bis zum Anschlag eindrehen und dann um 2 Drehungen lockern. Die Einstellung versiegeln.
Umstellung auf andere Gasart
Überprüfen, ob das Gerät für den Betrieb mit der gewünschten Gasart geeignet ist. Gemäß den vorgenannten
Anweisungen den Ausgangsdruck auf die Werte des Gasgeräts abstimmen. Bei Gas der Familie III: je nach Version
entweder die Einstellung des max. Gasdurchflusses oder des Druckreglers aufheben. Gleiches gilt für die Einstellung
des Gasdurchflusses an den Zündbrenner.
WICHTIGER HINWEIS: Nach der Einstellung die Dichtheit der Gasanschlüsse und den vorschriftsmäßigen Betrieb
des Gasgeräts überprüfen. Insbesondere sicherstellen, dass beim min. und max. Ausgangsdruck die Flamme nicht
abhebt oder Rückzündungen eintreten. Im Anschluss an die Einstellungen die vorgesehenen Siegel anbringen bzw.
die Einstellschrauben mit Lack sichern.
Geeichte Voreinstellschrauben für den maximalen Gasdurchfluss
Geeichte Voreinstellschrauben für den minimalen Gasdurchfluss
Schraubverschluss 3/8 der nicht verwendeten Ausgänge 0.972.058
Doppelkegelringverschraubung für Anschluss an Zündbrenner mit Rohr: ø 4 mm 0.958.030
ø 6 mm 0.958.031
ø 1/4 0.958.032
Weiteres Zubehör auf Anfrage erhältlich
ZUBEHÖR
Als Wartungseingriff ist lediglich der Austausch der Magneteinheit zulässig. Der Vorgang muss ausschließlich durch
Fachpersonal und gemäß den im Lieferumfang der Ersatzteile enthaltenen Anleitungen erfolgen.
WARTUNG
Siehe Abb. D. Den Stift (Baueigenschaften in Abb. E auf
Seite 17) mit der Keilseite (16) in die zur Befestigung des
Stifts mit flacher Stiftschraube verwendete Gewindebohrung
M5 einschieben.
Max. zulässige Belastung: siehe Abb. F, Seite 17.
EINBAU DER FERNBEDIENUNG
POSIZIONE OFF
POSIONE PILOTA
POSIZIONE MAX
SCALA 6:5
Abb. D
16
9956632_01_630 eurosit 120_locke16 16 11/10/2010 14.32.42

17
SEZIONE B-B
1 2 3 4 5 6 7 8
A
B
C
D
E
Sit Drawing N
Rev.
I.M.
Scale
La Precisa S.p.A.
35129 Padova (Italy) Viale dell'Industria 31/33
Frm.
This drawing may not be copied
or disclosed to third person
without permission of SIT.
We are the owner of this drawing.
Description
Technical Information
ISO
Release Level
General
Roughness
Q
C =
B
B
120
φ
8.5
+0.2
0
12
0
-0.11
12
0
-0.11
φ
11
0
-0.1
9.6
+0.15
0
φ
14.1
0
-0.1
17
5.8
+0.3
0
10.7
+0.1
-0.1
0.7
+0.1
0
45 X
0.3
MODIFICATION
Rev. Mod.N
Date Description
Name
B *** 25/11/04 MOD. POSIZIONE GOLA DE IULIO
0+
A3
UNI-EN 22768\1-m Tolerances for linear and angular dimensions without
individual tolerance indications"mechanical organs technical designs"
<= 6 >6 <=30
>30 <=120
>120
0.1 0.2 0.3 0.5
2
7120009
NOME FILE (.DRW)
ISO 3302\1-Rubber.Dimensiional tolerances for use with products
In mm
<=6.3 6.3˜10 10˜16 16˜25 25˜40 40˜63 63˜100 100˜160 >160
Classe M2
(Higt precision)
0.15 0.20 0.20 0.25 0.35 0.40 0.50 0.70 0.5%
7120009
B
XXX
Replaces
Dwg N
3:2
Ra
X.XX
CAMPIONATURA
Critical Dimensions
Sit Norm
Date Name
Drawn
03/09/04 De Iulio D.
PERNO AGGANCIO MANOPOLA OTTONE EUROSIT 120C
cliente ANGELO PO
Material
.
Material
Condition
BARRA QUADRA 12 h11- TN UNI 12167 CW614N
Heat Treatment
XXX
Surface Treatment
XXX
Sealing Surface Surface Hardness
HV HRC
Technical Drawings ISO 8015
General Tolerances UNI-EN 22768 \2-K
Fig. E
Fig. F
L
Fmax (Kg) = 500/L (mm)
Fmax (Kg) = 500/L (mm)
L
Fig. F
9956632_01_630 eurosit 120_locke17 17 11/10/2010 14.32.43

9956632_01_630 eurosit 120_locke18 18 11/10/2010 14.32.43

9956632_01_630 eurosit 120_locke19 19 11/10/2010 14.32.43

9956632_01_630 eurosit 120_locke20 20 11/10/2010 14.32.43
Table of contents
Languages:
Other Sit Control Unit manuals


Popular Control Unit manuals by other brands


RTR Energia
RTR Energia 12kVAr Technical user's manual

CBC
CBC SC101 user manual

Vaillant
Vaillant Control Center VR 65 installation instructions

U-Line
U-Line H-3449 manual

Victaulic
Victaulic FireLock NXT 769N Series Installation, Maintenance, and Testing Manual

Bardiani Valvole
Bardiani Valvole B925 Instruction, use and maintenance manual