manuals.online logo
Brands
  1. Home
  2. •
  3. Brands
  4. •
  5. SK
  6. •
  7. Thermometer
  8. •
  9. SK SATO PC-9230 User manual

SK SATO PC-9230 User manual

Instruction Manual of
Waterproof Digital Thermometer Model PC-9230 / 9235
These products are designed to measure temperature. Do not use them for other
purposes. Read this manual thoroughly before use, and keep it for future reference.
Features
Fast response achieved by ultra-narrow sensor needle with a diameter of 1.5 mm
Display orientation can be right side up / left side up
Maximum / minimum temperature shown by a single press
Waterproof body resists water splashes
Important Notices
Beware of Explosion
PC-9230 and PC-9235 are not explosion-proof. Never use them in an atmosphere
containing flammable gases.
Cautions
To use the thermometer properly, follow the instructions below.
Do not use the device as a clinical thermometer.
Hold the device in your hand while in use. Leaving the device in a hot pot or the
like may result in a deformation or malfunction.
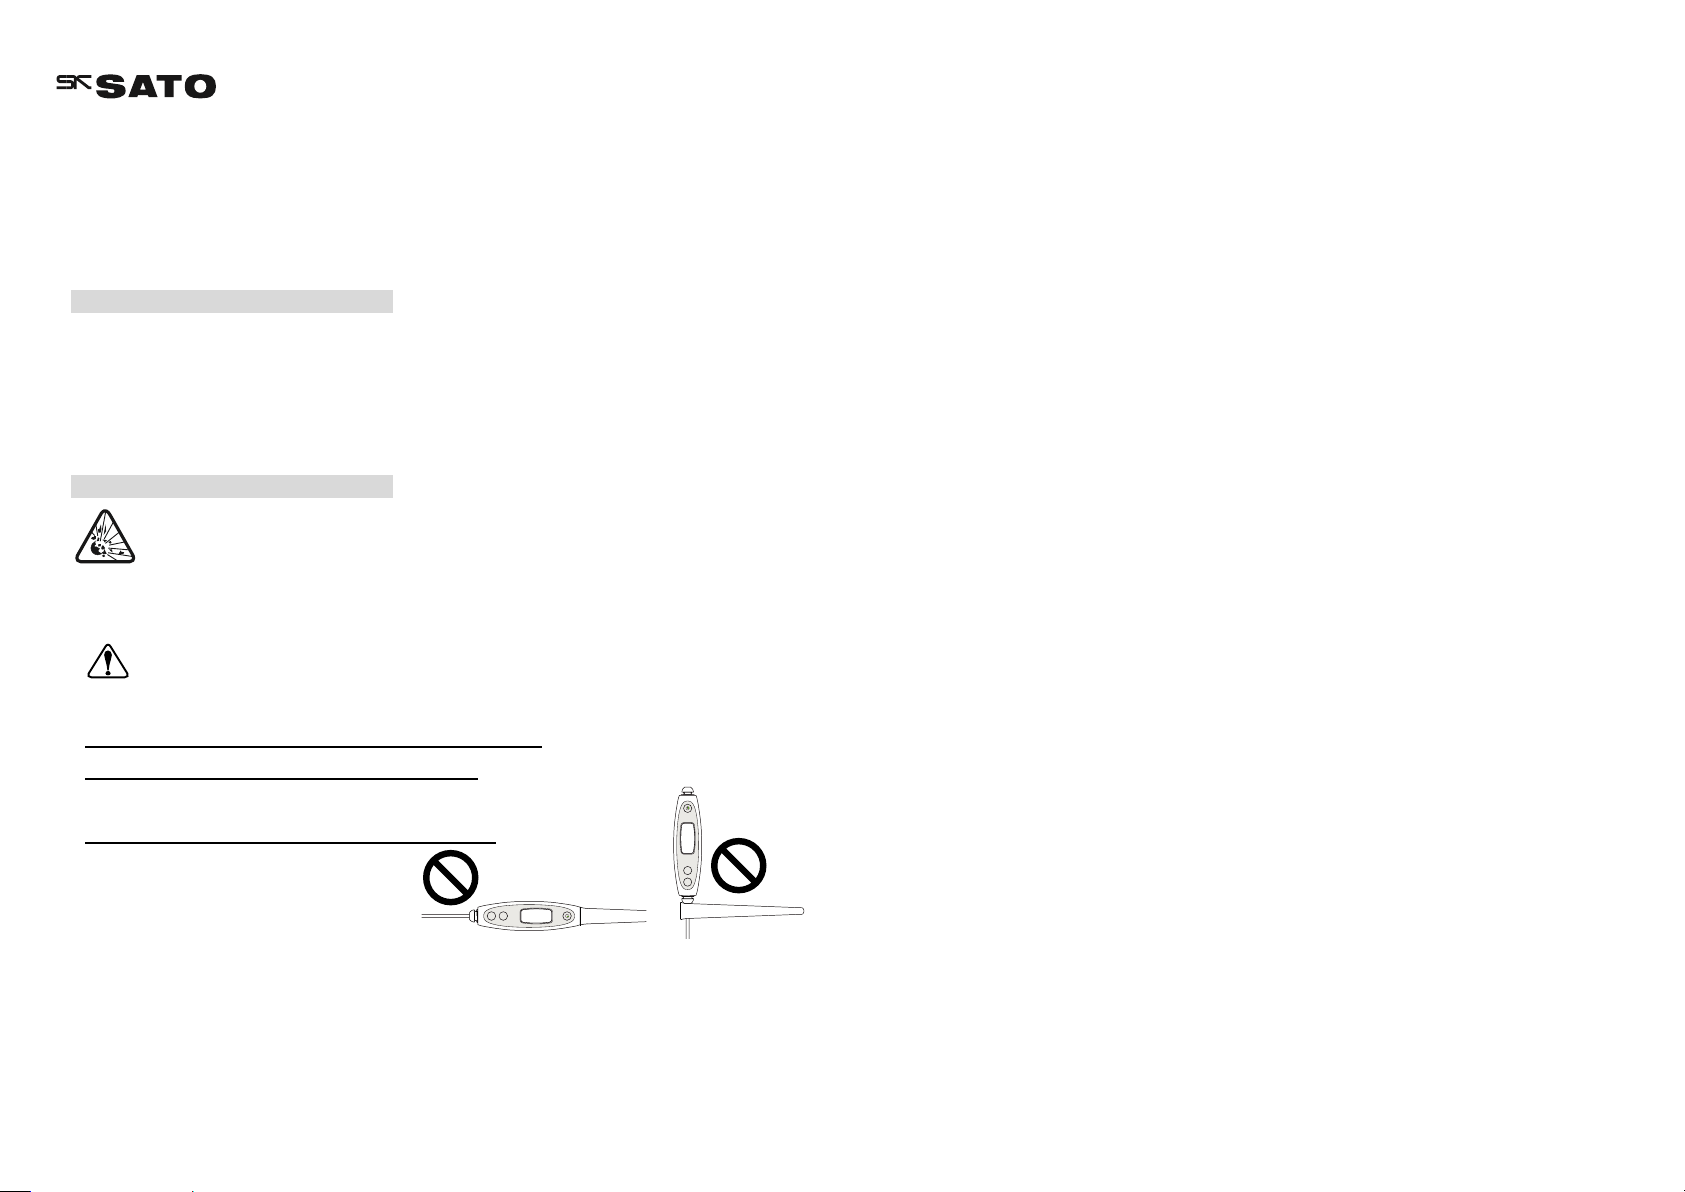
Do not use the sensor sheath as a handgrip, or the device may
fall and get broken.
Sensor sheaths are made only to
protect sensor needles when not in
use.
Do not drop or give a shock to the device, as it is a sensitive instrument.
Do not use the device under direct sunlight or aside a heat source, or it may worsen
the measurement accuracy and result in a deformation or malfunction.
Do not use the device in an environment with electrical noise, or the display may
become unstable or the measurement error may increase. Some induction
cooktops may affect the measurement, although the device is designed to resist
them.
Do not measure temperature out of the measurable range, or it may result in
malfunctions.
To eliminate the effect from ambient temperature and improve accuracy, insert the
needle in a target for 20 times as long as the diameter of the sensor needle, thus
30 mm.
Do not remain the needle inserted in a target for more than a minute if it is hot, or
the heat may reach the main body and lead to a measurement error or deformation.
For your reference, PC-9230 and PC-9235 needs only 10 seconds to finish
measurement when the needle in a room temperature is inserted in boiling water.
Stay distant from the target and be sure not to burn yourself when it is hot.
After measuring high temperature, wait until the needle cools down before
installing the sensor sheath.
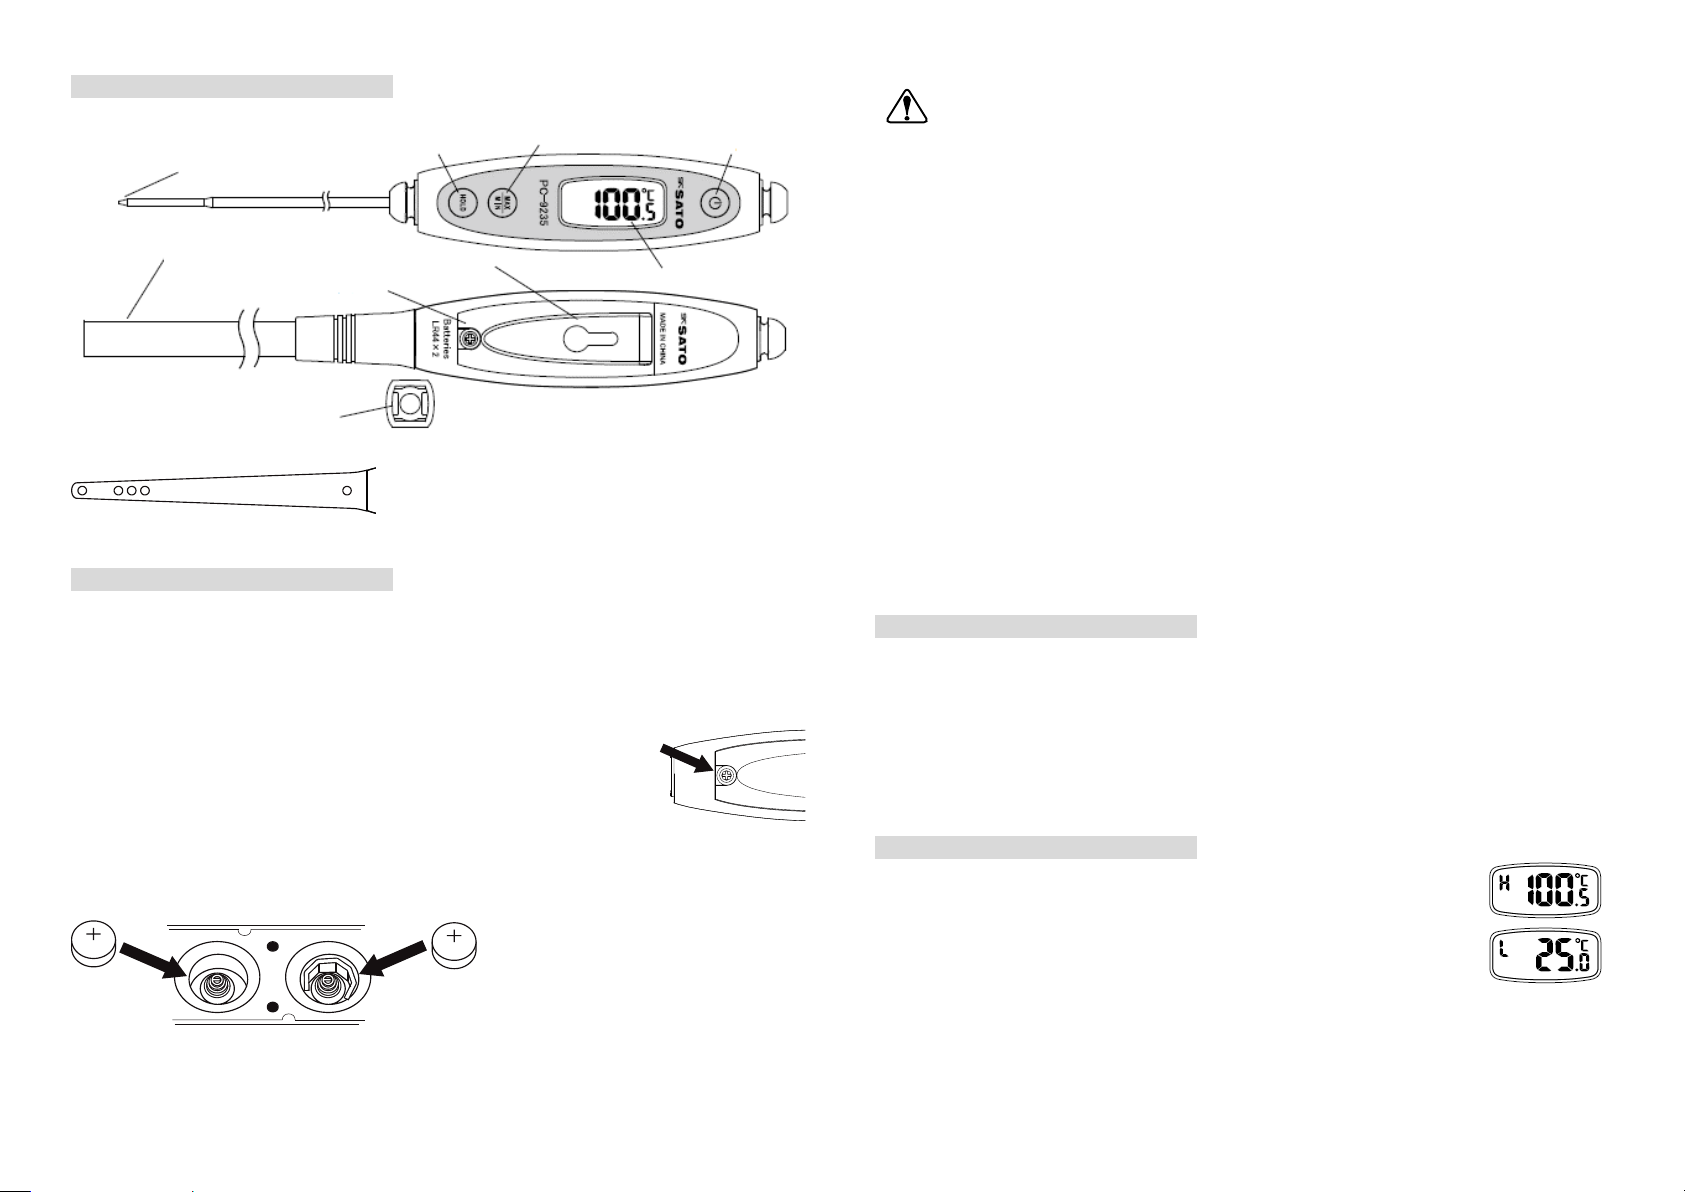
For PC-9230, round holes on the sensor sheath faces up when it covers the needle.
For PC-9235, a projection on the sensor sheath faces up when it does the same.
Do not leave the device in a place like an automobile on a fine summer day, or the
extreme heat may damage the thermometer.
Remove batteries if the device is not used for a long period of time. Otherwise, the
batteries may leak resulting in malfunctions.
Wet hands or water splashes do not affect the function of the device. However,
underwater use is forbidden.
Do not disassemble or customize the device, or it may cause a fatal malfunction.
PC-9230 and PC-9235 can be fully rinsed with tap water unless they are kept
submerged in water. After washing, wipe out with a dry cloth thoroughly.
Do not wash or wipe the device with alcohol, thinner, or other organic solvents. Do
not throw it in a dryer, either.
For repair or calibration, contact us or a retailer from which you have purchased.
Names of Sections
Replacement of Batteries
When the device is used for the first time or the battery is low, install or replace it as
described below. For your reference, the display starts blinking when the battery
voltage gets low, and then shows “---” when it is critically low.
1. If the device is wet, wipe it out first.
2. Turn the battery lid screw anticlockwise to loosen it and
remove the lid. The screw is designed not to drop from the lid.
3. Place LR44 batteries on electrode springs so that the positive
side faces up.
4. Confirm that the packing seal is firmly put into the groove, then tighten the screw
to close the lid. If the seal is wet or dirty, wipe it out before closing the lid.
Cautions Related to Batteries
Replacement batteries must be new and of the same type. Mixed use of different
types or new and old batteries may cause an explosion or leakage.
If the battery fluid leaks out, wipe it away immediately without touching it directly.
When it is split on your skin or clothing, wash it off with clean water. In case the
fluid gets into your eyes, see a doctor immediately after washing it off with water.
Do not solder, short-circuit, disassemble, heat or fire a battery. Doing so may cause
an exothermic heat, explosion, or leakage.
Do not dispose of batteries in a fire, or it may explode to hurt you.
For environmental conservation purposes, dispose of batteries in compliance with
local rules and regulations.
Keep batteries out of the reach of children. If they are swallowed accidentally,
consult a doctor immediately.
Wrap batteries with a tape to insulate when they are stored or disposed. Collision
with other metals or batteries may lead to a fire or explosion.
How to Use
Follow the instruction in “Replacement of Batteries” for the initial use.
1. Press the Power key to turn on the power.
2. Penetrate the needle into a target carefully.
3. Press the Power key again to turn off after use. Also, it turns off automatically
when no key is touched for 10 minutes.
Max/Min Key
1. Pressing the Max/Min key when a measured value is indicated
shows a sign of “H” and a maximum temperature.
2. Pressing the Max/Min key when a maximum temperature is
indicated shows a sign of “L” and a minimum temperature.
Display of maximum or minimum temperature lasts 5 seconds and turns back to that
of a current temperature.
Sensor needle
Hold key
Max/Min key
Power key
Hanging hook
Battery lid screw
Sensor sheath (PC-9235)
Projection
(Insertion part in sensor sheath, PC-9235 only)
Display
Sensor sheath (PC-9230)
Memory of maximum and minimum temperatures are reset in the cases below:
when batteries are replaced.
when the Max/Min key is pressed for 5 seconds until a sign of ________ is lit while
either maximum or minimum temperature is displayed.
To reset both the maximum and minimum, follow the procedure above for each.
Hold Key
Pressing the Hold key fixes the display with a sign of “h” blinking in the left.
Re-pressing the same key makes the display show a current temperature again.
Rotation of Display Orientation
When the Max/Min key is pressed for 2 seconds while a measured value is shown,
the display turns upside down. Pressing the key again for 2 seconds turns the
indication back to the original.
Warranty Policy
Our products are warranted to be free from defects in materials and workmanship
for a period of one year from date of delivery. If repair is necessary and has not been
the result of misuse, force majeure, or transportation arranged by yourself within the
one-year period, please return the products on freight prepaid basis. Correction of
the defect will be made without charges. We alone will determine if the product
problem is due to deviations or customer misuse.
Out-of-warranty products will be repaired for a fee.
Before returning, request for our acknowledgement first.
For details, contact us or a retailer from which you have purchased.
SATO KEIRYOKI MFG. CO., LTD.
3-4, Kanda-kajicho, Chiyoda-ku, Tokyo 101-0045, Japan
https://www.sksato.co.jp/en/
Specifications
Product name
Waterproof Digital Thermometer
Model no.
PC-9230
PC-9235
Catalog no.
1756-00
1758-00
Measuring range
−50 to 240°C
Resolution
0.1°C
Accuracy
±0.7°C (−10.0 to 100.0°C),
±1.2°C (−20.0 to −10.1°C, 100.0 to 200.0°C),
±2.0°C (200.1 to 240.0°C),
±2.5°C (−50.0 to −20.1°C)
Sampling time
Approx. 2 seconds
Operation ambient
0 to 40°C, less than 90%rh without condensing
Power
LR44 button cell x 2
Battery life
7 months if used for 10 minutes a day
Attached batteries are for test purpose and may last shorter.
Waterproofness
IPX7 (watertight)
No harmful effect shall occur when it is immersed in water of room
temperature as deep as 1 m for 30 minutes.
Materials
ABS resin, stainless steel SUS304
Dimensions
Whole part includes
sensor needles.
Whole part:
181 x 23 x 23 mm (L, W, D)
Sensor needle:
Ø 1.5 x 18 mm (end) +
Ø 2.5 x 70 mm (root)
Whole part:
393 x 23 x 23 mm (L, W, D)
Sensor needle:
Ø 1.5 x 18 mm (end) +
Ø 2.5 x 281 mm (root)
Weight
28 g including batteries
30 g including batteries
Accessories
Sensor sheath x 1, LR44 button cell x 2
Specifications and appearance are subject to change for improvement.
Visit our website https://www.sksato.co.jp/en/ for the latest information.
Ver. U.12
As of Aug. 2022

This manual suits for next models

1

Popular Thermometer manuals by other brands

Auber Instruments AT210 instruction manual

Auber Instruments

Auber Instruments AT210 instruction manual

ThermoWorks MTC operating instructions

ThermoWorks

ThermoWorks MTC operating instructions

Williams-Sonoma Outdoor BBQ Fork Thermometer user manual

Williams-Sonoma

Williams-Sonoma Outdoor BBQ Fork Thermometer user manual

La Crosse Technology 308-147 manual

La Crosse Technology

La Crosse Technology 308-147 manual

Coburn 1030-331 user manual

Coburn

Coburn 1030-331 user manual

Lufft LFE200IR operating manual

Lufft

Lufft LFE200IR operating manual

Eco4us EK-MT2 operating instructions

Eco4us

Eco4us EK-MT2 operating instructions

Taylor 1446 operating instructions

Taylor

Taylor 1446 operating instructions

B.Well WF-2000 manual

B.Well

B.Well WF-2000 manual

AEMC CA876 user manual

AEMC

AEMC CA876 user manual

ADE WS 1813 operating instructions

ADE

ADE WS 1813 operating instructions

Ames Instruments 63980 Owner's manual & safety instructions

Ames Instruments

Ames Instruments 63980 Owner's manual & safety instructions

Extech Instruments 421502 user manual

Extech Instruments

Extech Instruments 421502 user manual

Braun BET 1000 instruction manual

Braun

Braun BET 1000 instruction manual

Lumiscope 2220 instruction manual

Lumiscope

Lumiscope 2220 instruction manual

General IRT850K user manual

General

General IRT850K user manual

A&D DT-105 user manual

A&D

A&D DT-105 user manual

Oregon Scientific RGR126 user manual

Oregon Scientific

Oregon Scientific RGR126 user manual

manuals.online logo
manuals.online logoBrands
  • About & Mission
  • Contact us
  • Privacy Policy
  • Terms and Conditions

Copyright 2025 Manuals.Online. All Rights Reserved.