Skinact Palma User manual
Toll Free: 1.800.418.0830 www.skinact.com
www.spaandequipment.com International: 818.834.6640
Palma Electric Medical Spa Treatment Table
User Manual

Toll Free: 1.800.418.0830 www.skinact.com
www.spaandequipment.com International: 818.834.6640
Copyright © 2022 Spa and Equipment, All Rights Reserved
NOTICE
No part of this document may be photocopied, repro-
duced, or translated into any other language without
prior written consent of Spa and Equipment/SkinAct.
The information in this document is subject to change
without notice at any time and should not be construed
as a commitment by Spa and Equipment/SkinAct.
Spa and Equipment/SkinAct assumes no responsibility for
any errors that may be in this document, nor does it make
expressed or implied warranty with regard to this materi-
al, including, but not limited to, the implied warranties of
merchantability and fitness for a particular purpose.
Spa and Equipment/SkinAct shall not be liable for inci-
dental or consequential damages arising out of the fur-
nishing, performance, or use of this document and the
program material which it describes.
P.2
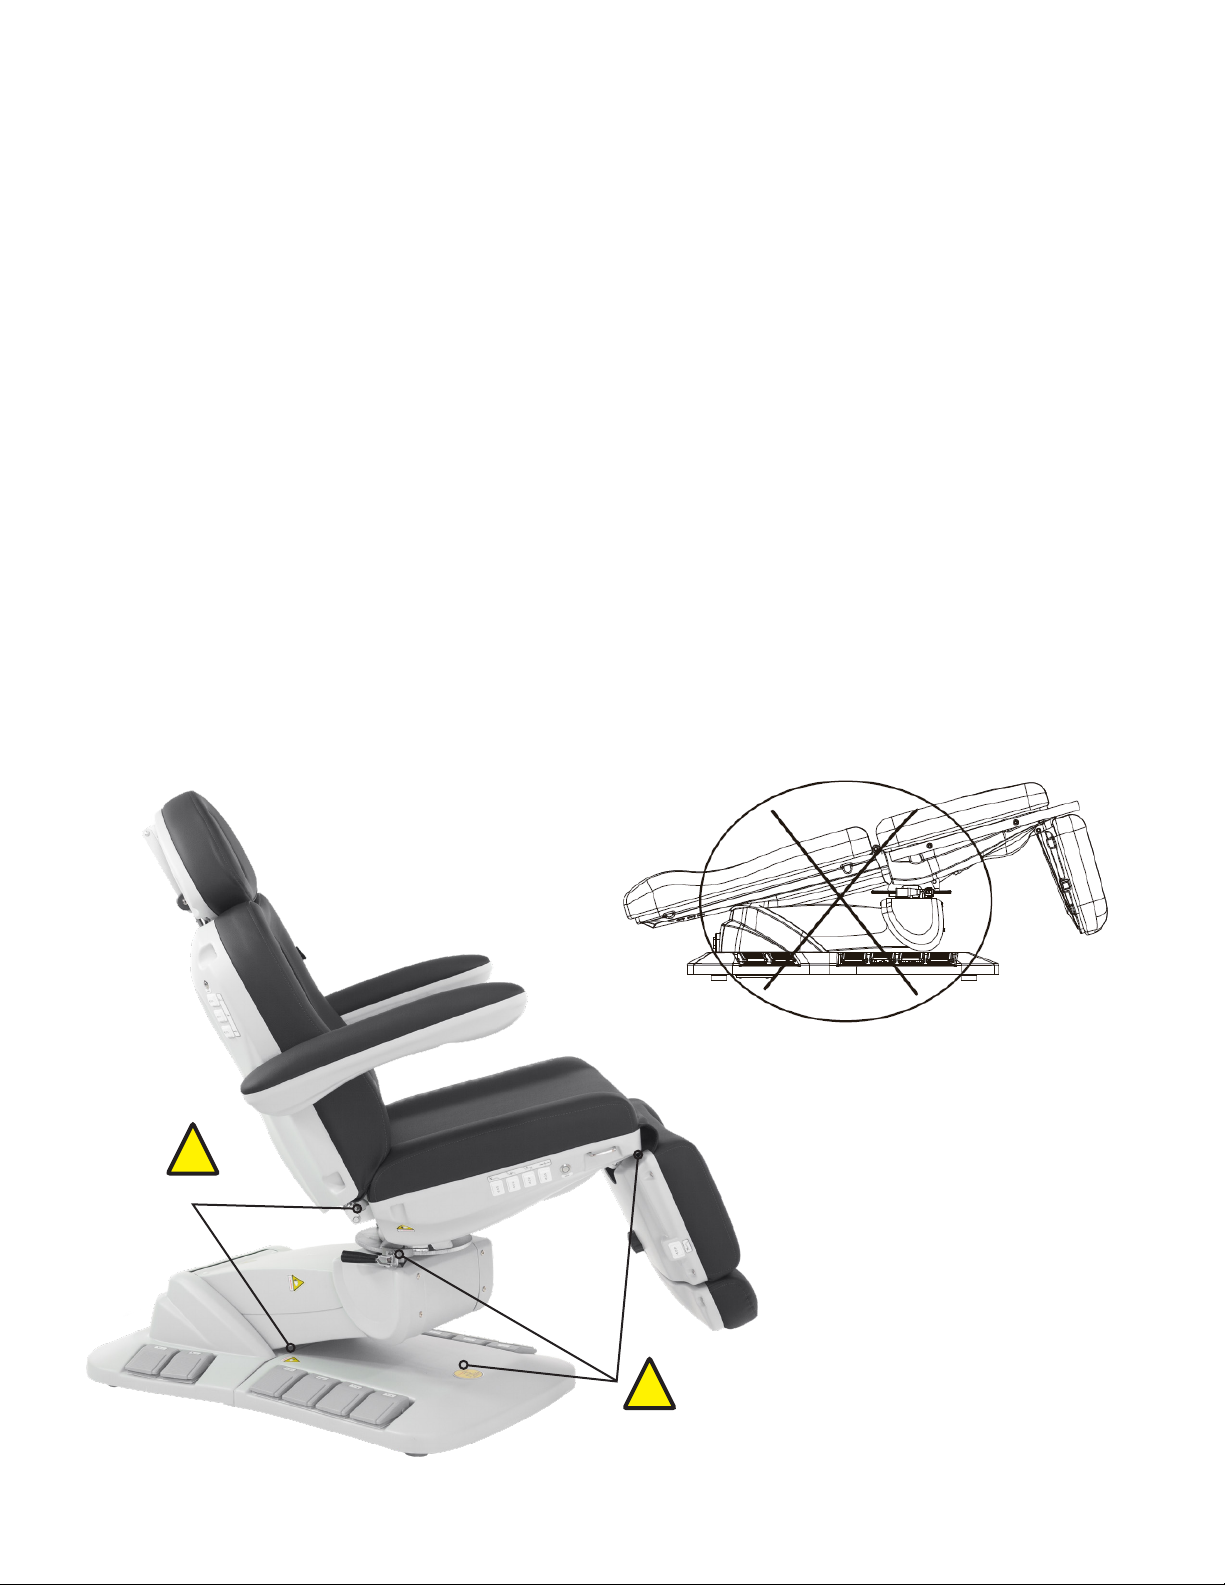
Pinch Points
!
Pinch
Points
!
P.3
Precautions
• Read this manual carefully before installation and operation.
• No one should ever sit on the foot rest or backrest areas.
• This unit should only be operated by trained professionals.
• Keep children from using or playing on the unit.
• Do not stand on any portion of the unit.
• Ensure the unit is kept dry and free of water. Also, make sure any at-
tachments like remote controls are free of water.
• When operating the unit, ensure that your and your clients’ hands or
other body parts cannot be pinched by the moving parts (see pinch
points below).
• When in decline position use caution when lowering the unit for dam-
age.
• If you have gone through the troubleshooting steps in this manual and
an issue persists, please call Spa and Equipment/SkinAct for further assis-
tance: 1(800)418-0830
• OPERATE AT YOUR OWN RISK AND USE COMMON SENSE: OWNER/OPERA-
TOR IS RESPONSIBLE FOR HIS/HER OWN SAFETY AS WELL AS ANYONE NEAR
OR ON THE UNIT.
Cut from
inside
Lay the side
down
Scan to see
video
Cut from in-
side
the box
P.4
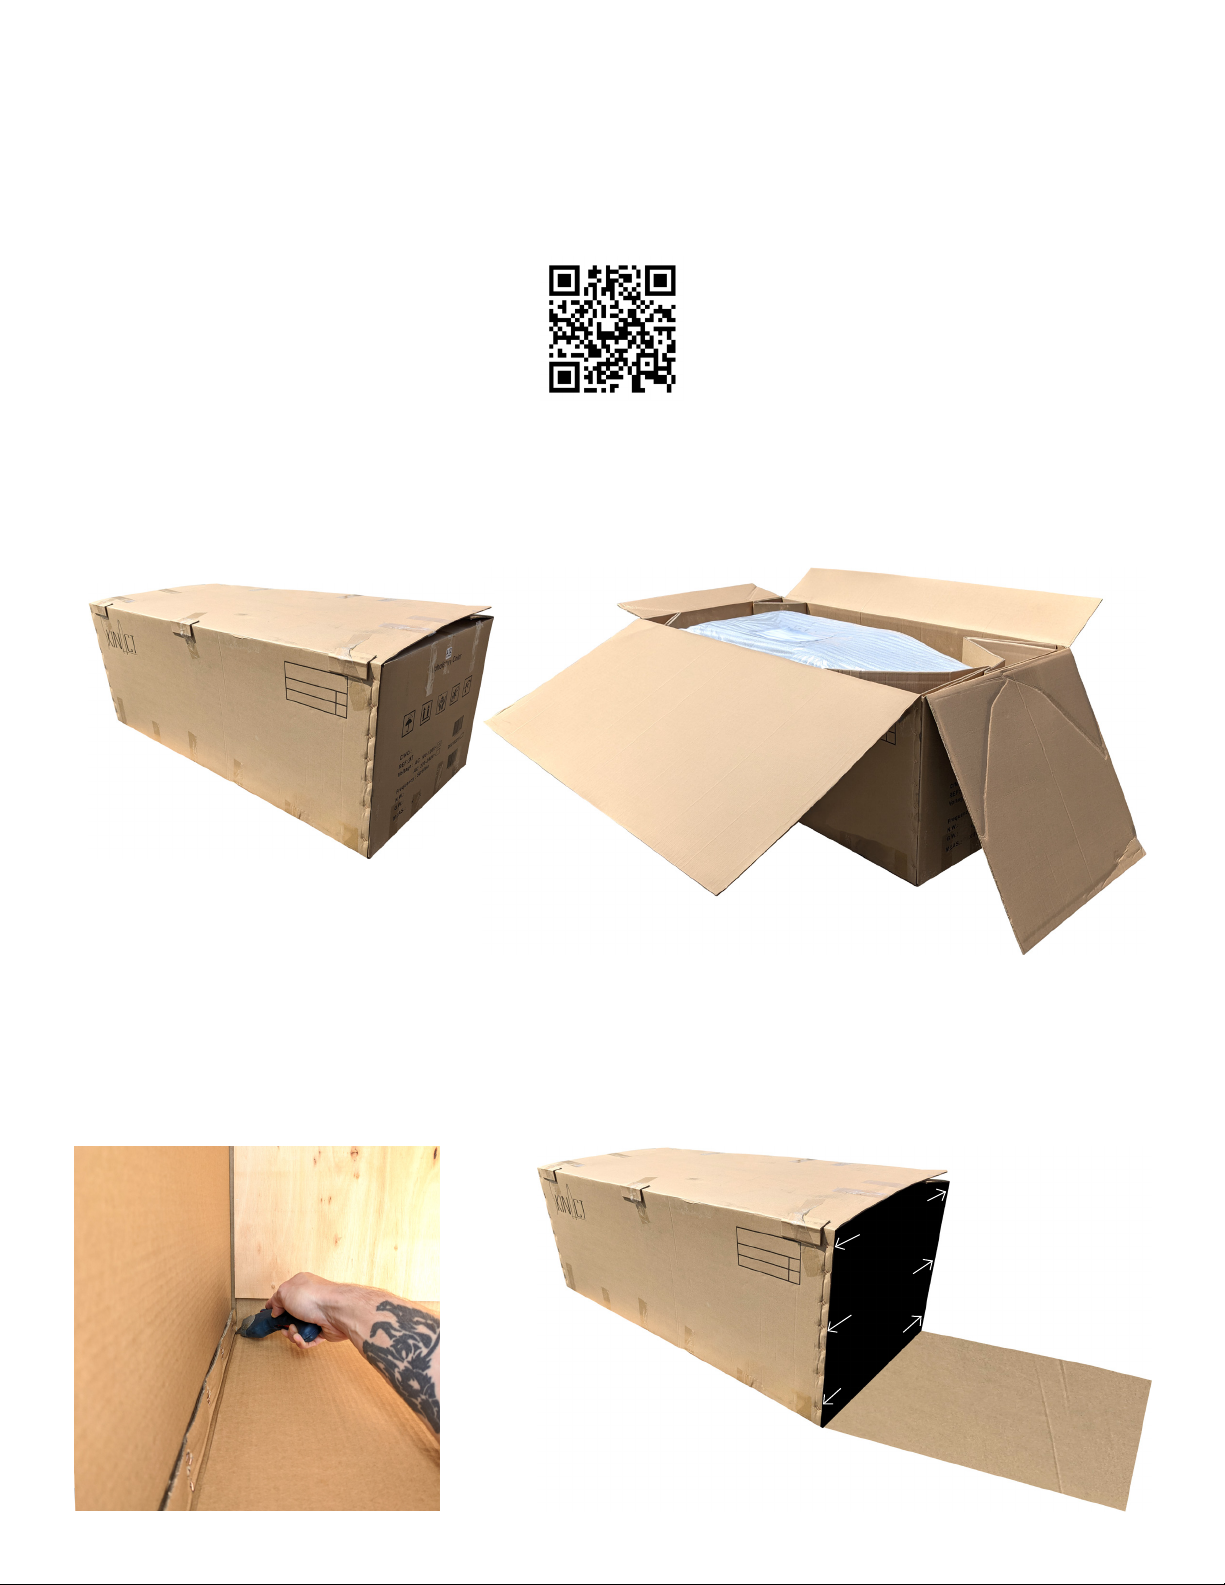
INSTRUCTIONS
• When you receive the box, carefully cut the tape on the
top flaps and open the top (see photo below).
• To see a video about removing your item from the box,
visit https://youtu.be/PVmo-zSiupg or scan the QR code
below.
• Then you can cut one short side of the box and lay it
down. This makes it easier to carry the item out of the
box.
• Make sure to cut from the inside of the box. This helps to
protect from accidentally cutting your unit.
Removing From The Box
Furniture
Dolly
Pallet Jack
P.5
Removing From The Box
• Please keep all packaging materials. This helps in the
event that you need to return the unit for whatever rea-
son.
• TEAM LIFT: Make sure to have at least two people to lift
and move the unit.
• Do not lift from the head rest or foot rest areas.
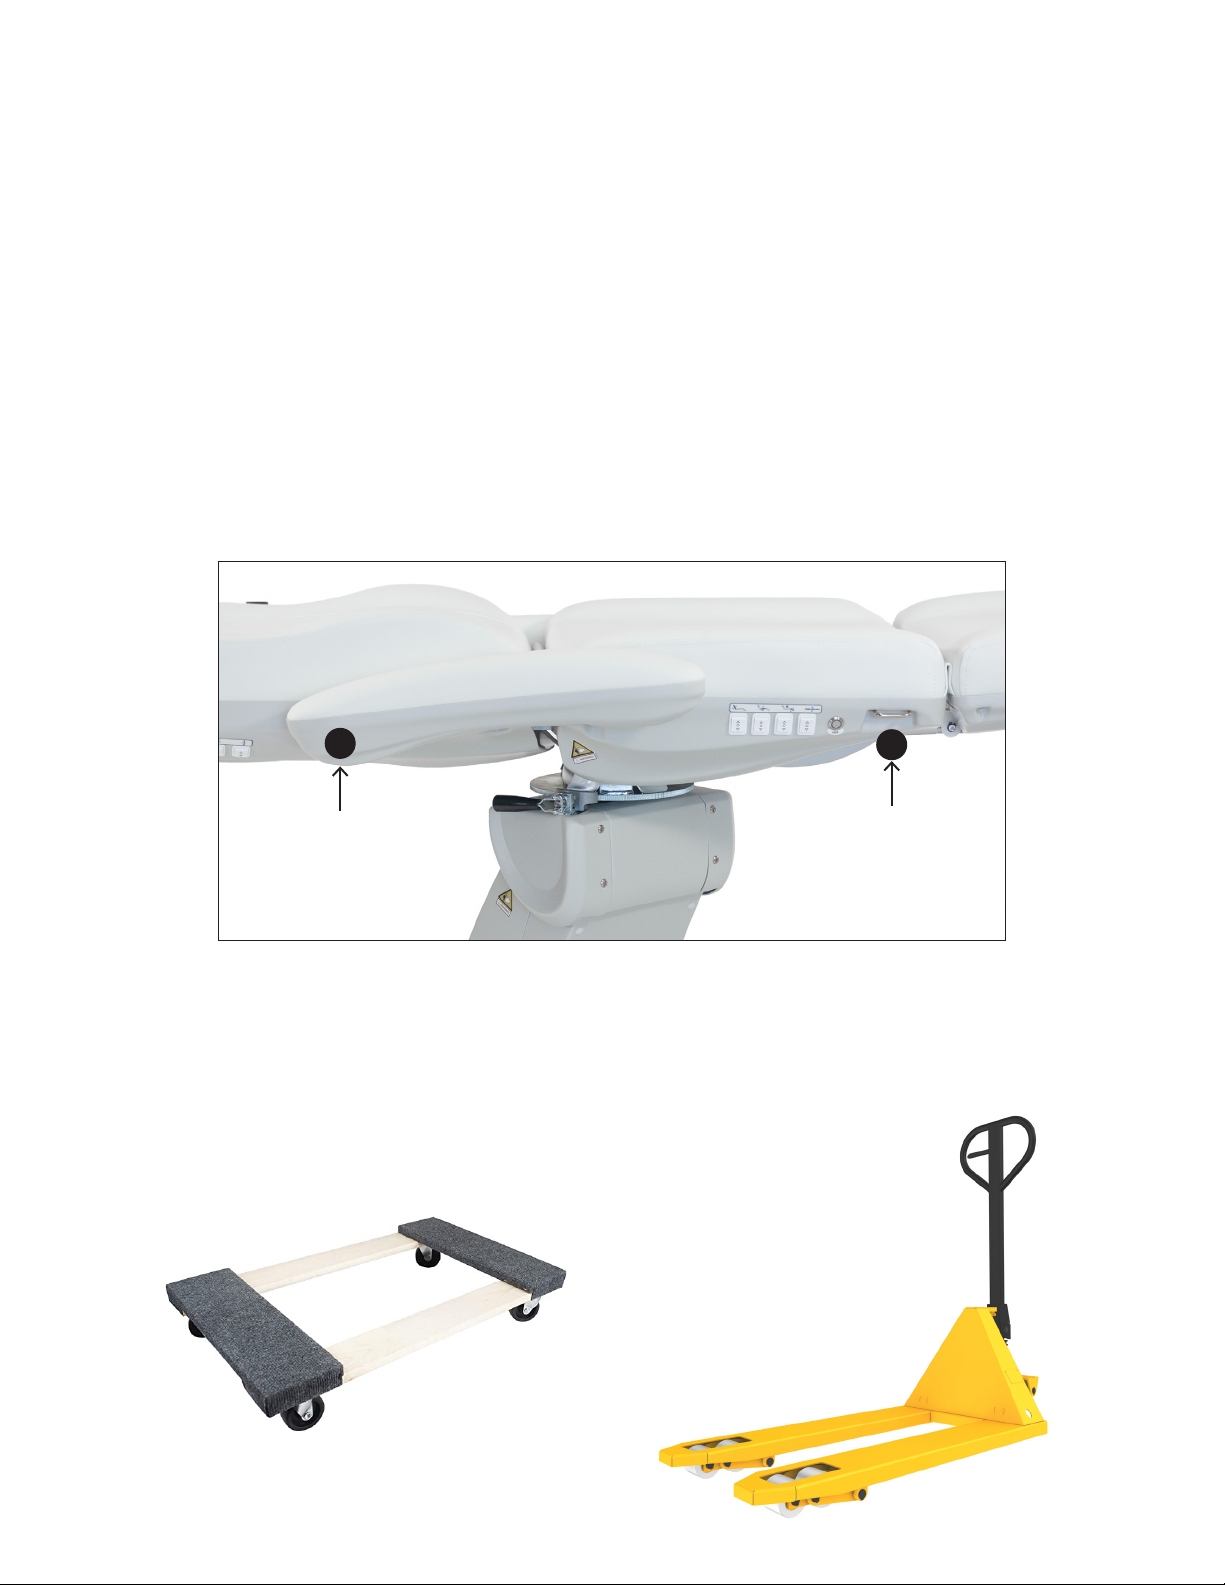
• For this unit, it is best to lift with one hand on the metal
where the arm rest connects to the unit (1) and anoth-
er hand under where the hand remote goes (2). Do not
grab the metal hook that the hand remote hooks onto.
• Lift the unit with your partner and walk it out of the box.
• We recommend setting the unit on a furniture dolly or pallet
jack when and where it is practical to use one. Otherwise,
you can carry the unit to your desired location.
One hand here
One hand here
2
1
P.6
Installation
• Please keep all packaging until you test all the functions.
• Place the unit in the desired location in your space.
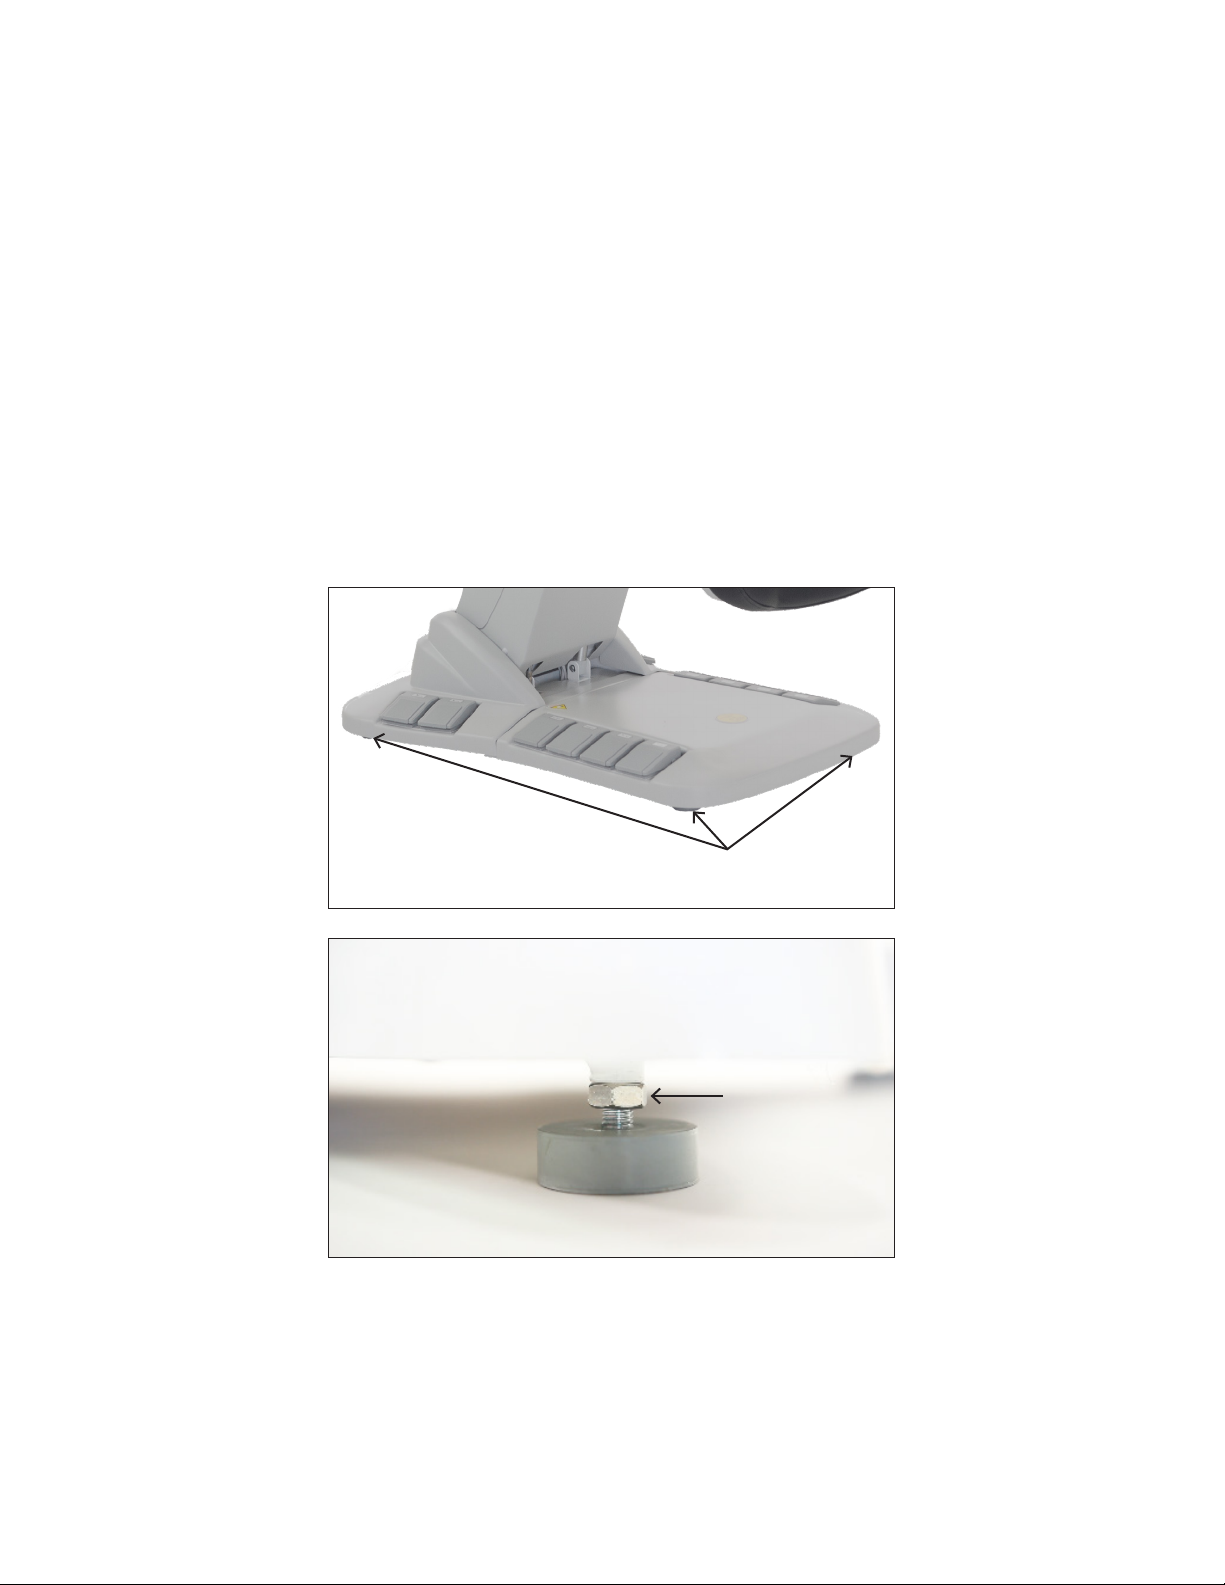
• Ensure the ground below the bed is flat and not wet or slippery.
• If the bed wobbles on your floor, adjust the leveling feet (photo
below) by spinning them to raise or lower them. The foot that the
clears the floor when you rock the table is the one that will need
adjustment.
• Once you have extended one of the feet to fix the wobbling, if
your feet have an adjustable nut like in the photo below, you can
spin the nut up until it reaches the metal of the base.
• Ensure the power cable is connected to the unit and
plug it into an appropriate wall outlet.
• Test all of the motor functions on the unit. Ensure the hand
remote works as it should.
Lock foot
with nut
Leveling
feet
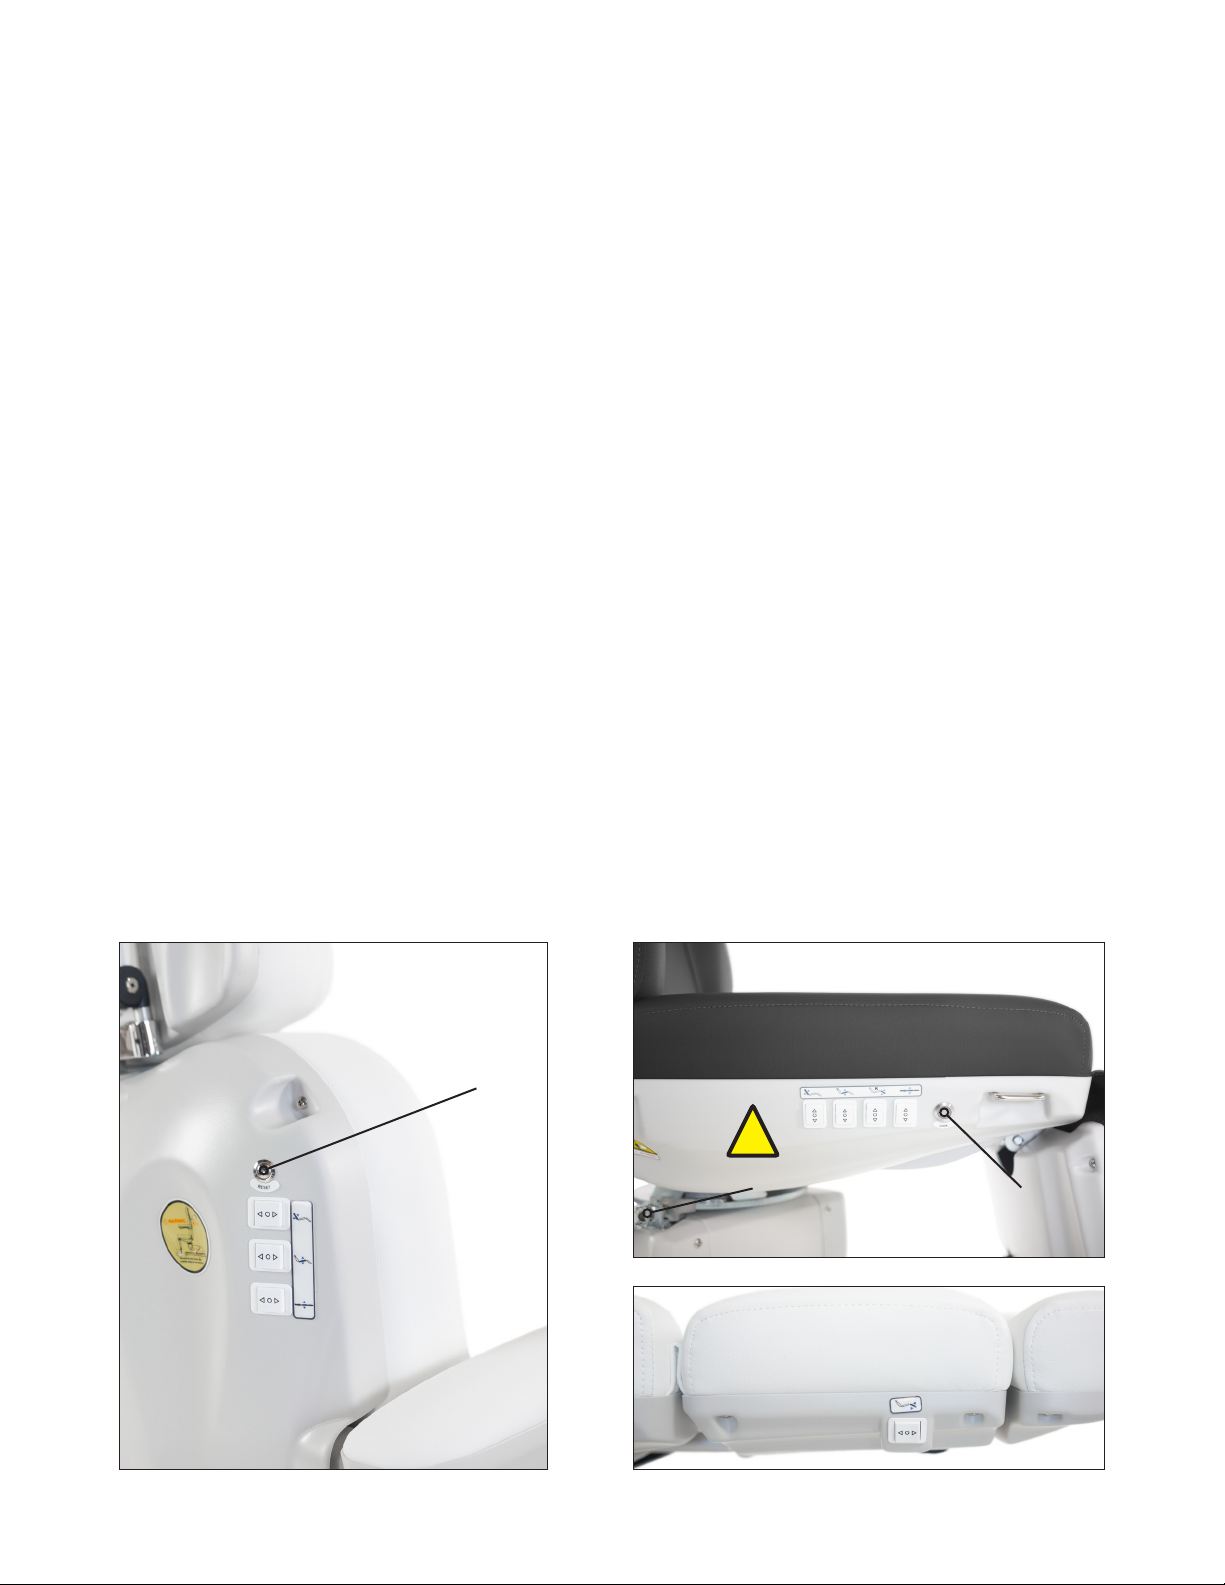
Reset
Button
Lock
Button
Chair Rotation Lock
!
P.7
• On the backrest there are controls for the backrest, seat tilt,
and table height.
- Above the controls on the backrest is a reset button (see
below). When the reset button is pressed, the unit automat-
ically returns to the seated chair position and lowest height.
It is recommended the chair be in this position when a cli-
ent gets on or o the chair.
- Also, when a client gets on or o, ensure the chair rotation
is locked (see below).
- Another thing to help a client get on or o is to swing one
of the arm rests out of the way for him or her.
• On the seat cushion there are controls for the backrest, seat
tilt, leg rest angle, and table height.
- Next to the controls on the seat cushion is a lock button
(see below). Press and hold the button for 3 seconds to
lock all motors on the chair. No motors will work to move
the chair. Press and hold the lock button again for 3 sec-
onds to unlock the motors. All motor functions will return.
• On the leg cushion there is a button for the leg rest angle.
Motor Controls on the Palma
P.8
* Press and hold the lock button for 3 seconds. The motors will be
locked and no buttons will work to move the bed. Press and hold
the lock button again to unlock the motors.
** Reset button automatically returns the unit to the seated chair
position and lowest height. It is recommended the chair be in this
position when a client gets on or o the chair.
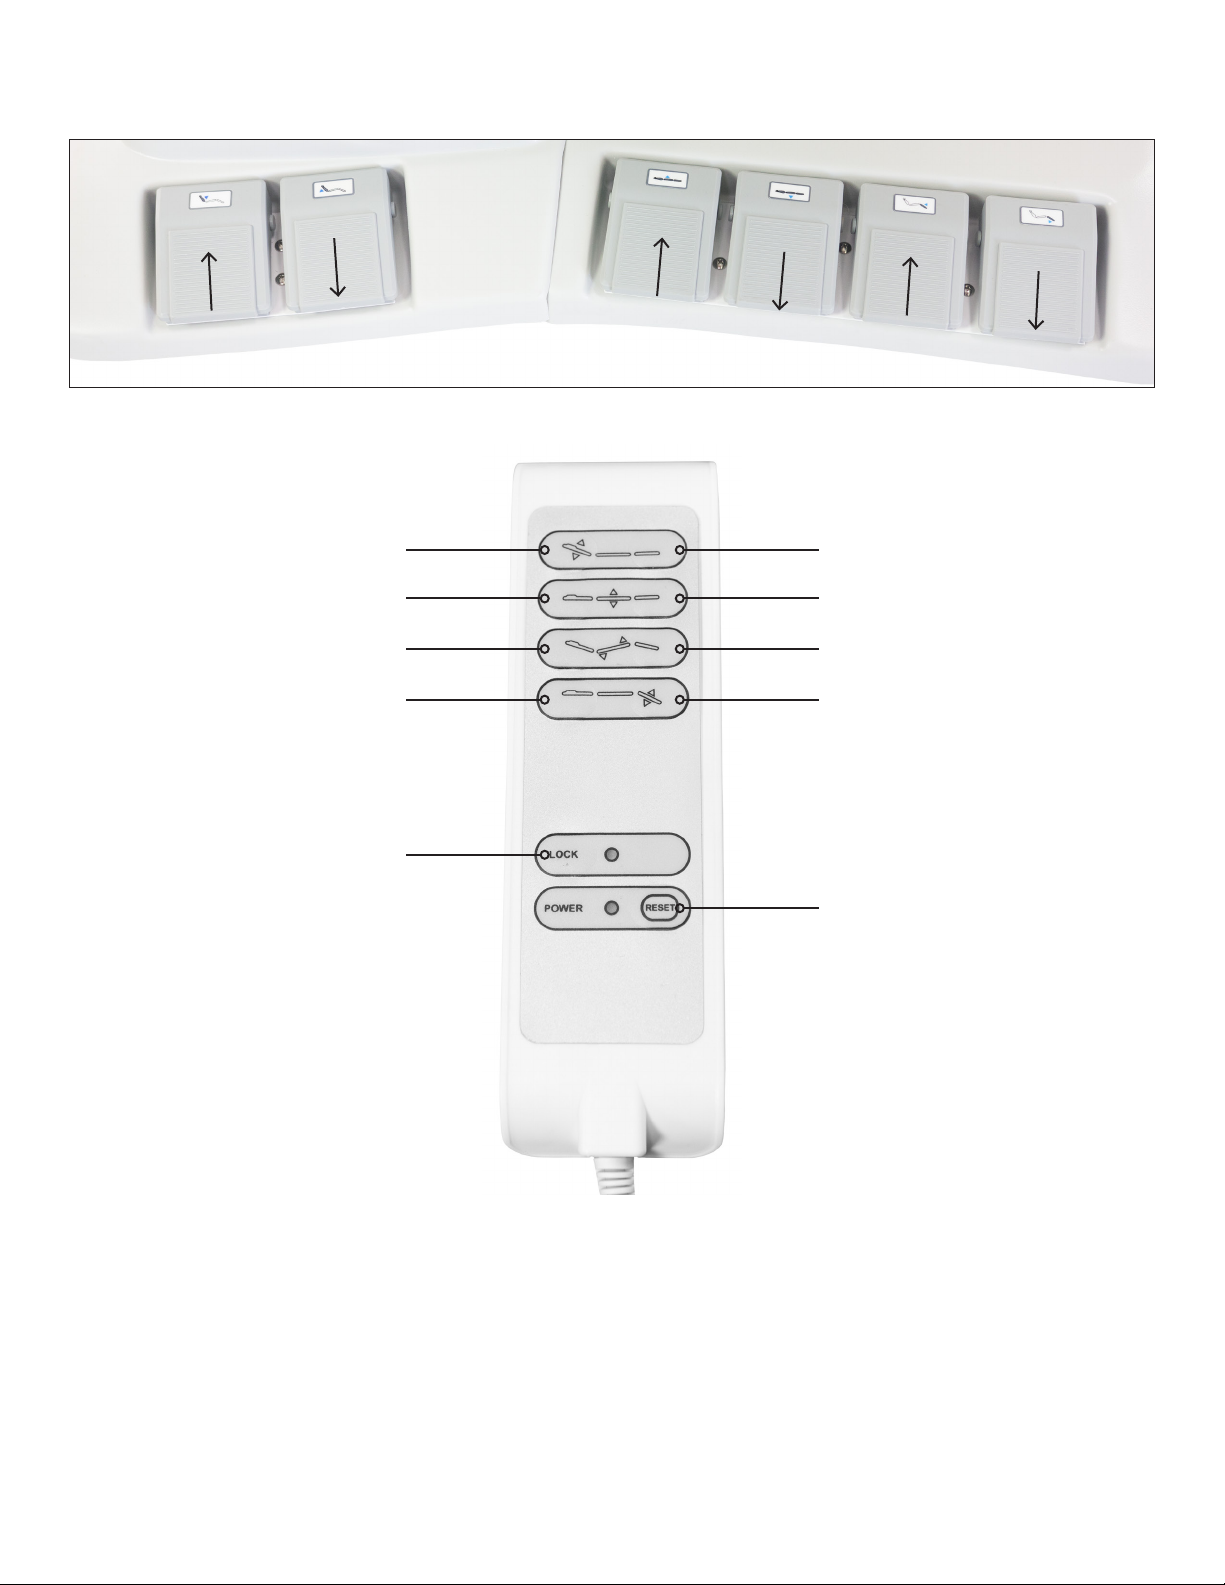
Hand Remote Use
Backrest up Backrest down
Table height up Table height down
Seat tilt back Seat tilt forward
Leg rest up
* Same as lock button
Leg rest down
** Same as reset button
Foot Pedal Controls
Backrest
Table
height
Table
height
Backrest
Leg rest Leg rest

74” W/ head rest and foot rest on
80.5” W/ head rest and foot rest extended
57.5” W/O head rest and foot rest on
39” 24” in Front
28.5” in Back
Adjustable
Height:
25”-37”
P.9
Measurements
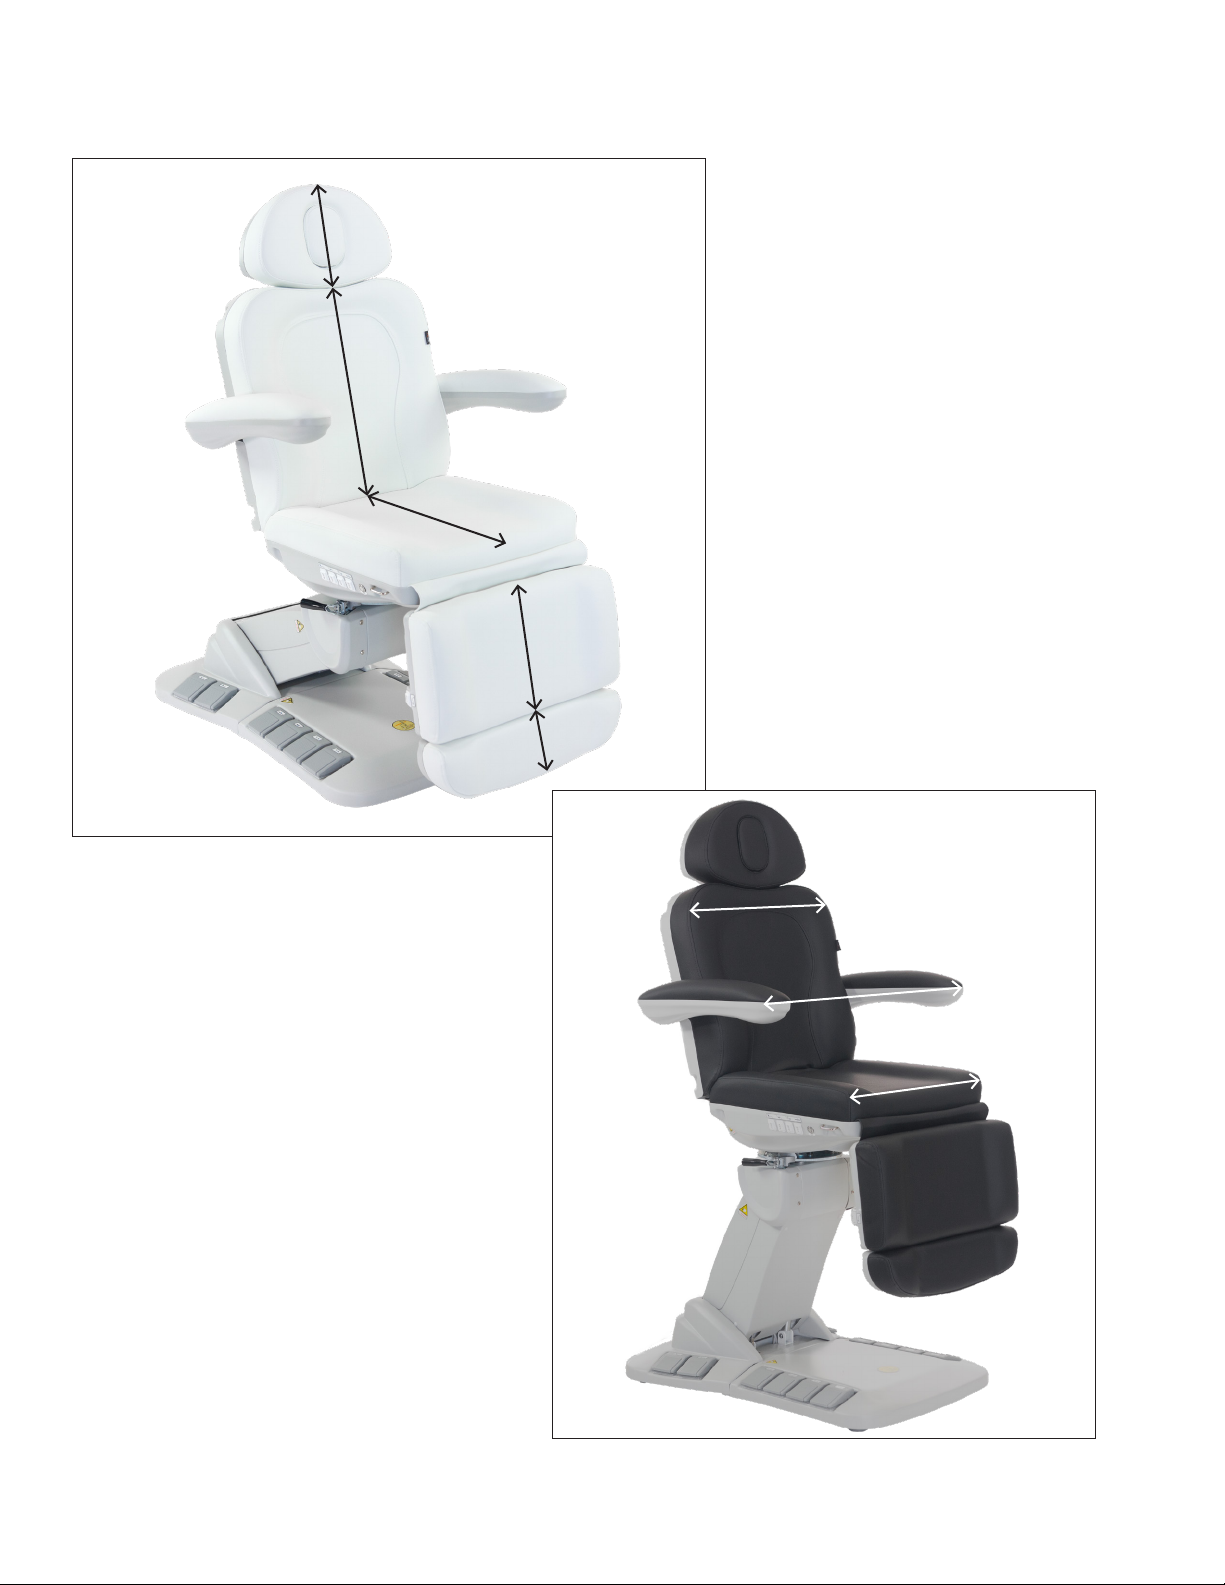
10.5”
22”
21”
12”
6”
24”
32”
23.5”
P.10
Measurements

P.11
Dimensions/Specications
Maintenance
• Length without leg rest or head rest attached: 57.5”
• Length with leg rest extension and head rest on: 74”
• Length with leg rest extension and head rest out: 80.5”
• Width without arm rests: 24”
• Width with arm rests: 32”
• Heights: 25” - 37”
• BASE ONLY Dimensions: 39” L x 24” W in front: 28.5” W in
back
• Backrest angle: 0° flat to 90° inclined
• Leg rest angle: 0° flat to 85° declined
• Seat tilt angle: 0° to 10°
• Rotation: 150° (75° to the left, 75° to the right)
• Capacity of 350 lbs
• Colors available: Black, White, or Grey
* All height measurements are from ground to top of cush-
ion *
** All measurements have a 0.25 to 0.75 inch tolerance **
*** Hand remote control sold separately ***
• When cleaning and sanitizing, do not use bleach, Bar-
bicide, or other harsh chemicals. Using harsh chemicals
can damage the upholstery.
• Simple Green or upholstery cleaners work great for clean-
ing the upholstery. We recommend using Lysol Wipes for
sanitizing the upholstery.
• Clean and sanitize the upholstery after each treatment.
• Every six months, visually inspect the parts of the unit. If
there are any abnormal noises or vibrations during oper-
ation, call Spa and Equipment/SkinAct and describe the
situation.

P.12
Troubleshooting
Warranty
Issue Possible Reason Solution
Motorized sections
not moving.
The power cord is not
connected properly.
1) Ensure outlet is
working.
2) Ensure cord is con-
nected well.
Hand (or foot) remote
is not working.
1) Ensure hand
(or foot) remote is
plugged in well.
2) Replace the hand
(or foot) remote.
Control box not work-
ing.
1) Contact Spaand-
equipment/SkinAct
Technical Depart-
ment: 1(800)418-0830
Abnormal sounds or
vibrations.
Parts need lubricating
oil.
1) Add lubricating oil.
Motor quality issues. 1) Contact Spaand-
equipment/SkinAct
Technical Depart-
ment: 1(800)418-0830
• This item has a 1-year limited warranty for malfunctions
and manufacture defects only (parts, labor, and ship-
ping not included). THIS WARRANTY IS VOID IN THE EVENT
EQUIPMENT IS DAMAGED BY IMPROPER USE.
• To read the full Warranty Policy, please visit https://www.
spaandequipment.com/Return-Warranty-Repair-Policy.
html or scan the QR code below.
Scan for
warranty
Table of contents
Other Skinact Spa Accessories manuals


Popular Spa Accessories manuals by other brands


Takara Belmont
Takara Belmont YUME ESPOIR installation instructions

COVANA
COVANA EVOLUTION COVER owner's manual

Leisure Concepts
Leisure Concepts Covermate Vanish XL installation instructions

Gecko
Gecko BAHAMA SPAS Quick reference card

Takara Belmont
Takara Belmont YUME SWING installation manual

MAR PLAST SPA
MAR PLAST SPA KOMPATTO SPRAY SENSOR Use and maintenance manual