Sky Master DCI 35 User manual
Digital Satellite Receiver
DCI 35
19725
OPERATING INSTRUCTIONS
DCI 35
CD 31
5
2
6
107
9
12
8
13
15
19
23
12
11
14
16
20
18
22
17
11
21
15 4 36 7 982
16 2
34 5 7 8
A
B
TV
230 V
DISH
4
HiFi
VCR
AC3/SURROUND


GB 2
1. Content
Congratulations! You have purchased a quality receiver from our SKYMASTER®range. Our products are subject to continuous, strict quality checks
which guarantee product satisfaction. Welcome to the new era of digital television!
The SKYMASTER®DCI 35 is a receiver for the reception of digital TV channels and can be additionally extended by two card readers (not included)
for the reception of coded digital TV channels of the respective channel providers. Please note that a satellite antenna which is suitable for digital
reception is required to operate the SKYMASTER®DCI 35. This has to be equipped with a digital LNB for the reception of ASTRA or EUTELSAT.
1. Content . . . . . . . . . . . . . . . . . . . . . . . . . . . . . . 2
2. Safety information . . . . . . . . . . . . . . . . . . . . . . 3
3. Receiver Operating Elements (see packaging) . . 3
4. Remote control . . . . . . . . . . . . . . . . . . . . . . . . 3
Start . . . . . . . . . . . . . . . . . . . . . . . . . . . . . . . . 4
5. Daily Use . . . . . . . . . . . . . . . . . . . . . . . . . . . . 4
Select channel . . . . . . . . . . . . . . . . . . . . . . . . . . . . . . . . . . . 4
Volume and audio settings . . . . . . . . . . . . . . . . . . . . . . . . . . 5
Teletext . . . . . . . . . . . . . . . . . . . . . . . . . . . . . . . . . . . . . . . . 5
The OSD . . . . . . . . . . . . . . . . . . . . . . . . . . . . . . . . . . . . . . . 6
6. The OSD – Overview . . . . . . . . . . . . . . . . . . . . 6
7. The OSD – Channel Administration . . . . . . . . . . 7
Channel administration . . . . . . . . . . . . . . . . . . . . . . . . . . . . . 7
Favourite channels . . . . . . . . . . . . . . . . . . . . . . . . . . . . 7
Delete channel . . . . . . . . . . . . . . . . . . . . . . . . . . . . . . . 7
Move channels . . . . . . . . . . . . . . . . . . . . . . . . . . . . . . . 8
Lock channel . . . . . . . . . . . . . . . . . . . . . . . . . . . . . . . . 8
Option menu . . . . . . . . . . . . . . . . . . . . . . . . . . . . . . . . . 8
Rename favourites groups and channels . . . . . . . . . . . . 8
Sort channels . . . . . . . . . . . . . . . . . . . . . . . . . . . . . . . . 8
Radio stations . . . . . . . . . . . . . . . . . . . . . . . . . . . . . . . . . . . 7
The OSD – Programme Guide . . . . . . . . . . . . . . 9
The OSD – Time and Timer Settings . . . . . . . . . 10
Set the time . . . . . . . . . . . . . . . . . . . . . . . . . . . . . . . . . . . . 10
Set the timer . . . . . . . . . . . . . . . . . . . . . . . . . . . . . . . . . . . 10
The OSD – User Installation . . . . . . . . . . . . . . 11
4.1 Antenna setting . . . . . . . . . . . . . . . . . . . . . . . . . . . . . . 11
Permanent installation . . . . . . . . . . . . . . . . . . . . . . . . . 11
DiSEqC 1.2 rotor control . . . . . . . . . . . . . . . . . . . . . . . 12
USALS rotor control . . . . . . . . . . . . . . . . . . . . . . . . . . 12
4.2 Channel search . . . . . . . . . . . . . . . . . . . . . . . . . . . . . . 13
4.3 System setting . . . . . . . . . . . . . . . . . . . . . . . . . . . . . . 14
4.4 Download via satellite . . . . . . . . . . . . . . . . . . . . . . . . . 14
4.5 Parental lock . . . . . . . . . . . . . . . . . . . . . . . . . . . . . . . . 15
4.6 Factory setting . . . . . . . . . . . . . . . . . . . . . . . . . . . . . . 15
The OSD – Coding System . . . . . . . . . . . . . . . 16
The OSD – Receiver Information . . . . . . . . . . . 16
8. Troubleshooting . . . . . . . . . . . . . . . . . . . . . . . 17
9. Performance Features . . . . . . . . . . . . . . . . . . 18
10. Technical data . . . . . . . . . . . . . . . . . . . . . . . . 18
11. Service . . . . . . . . . . . . . . . . . . . . . . . . . . . . . 18

GB 3
2. Safety information
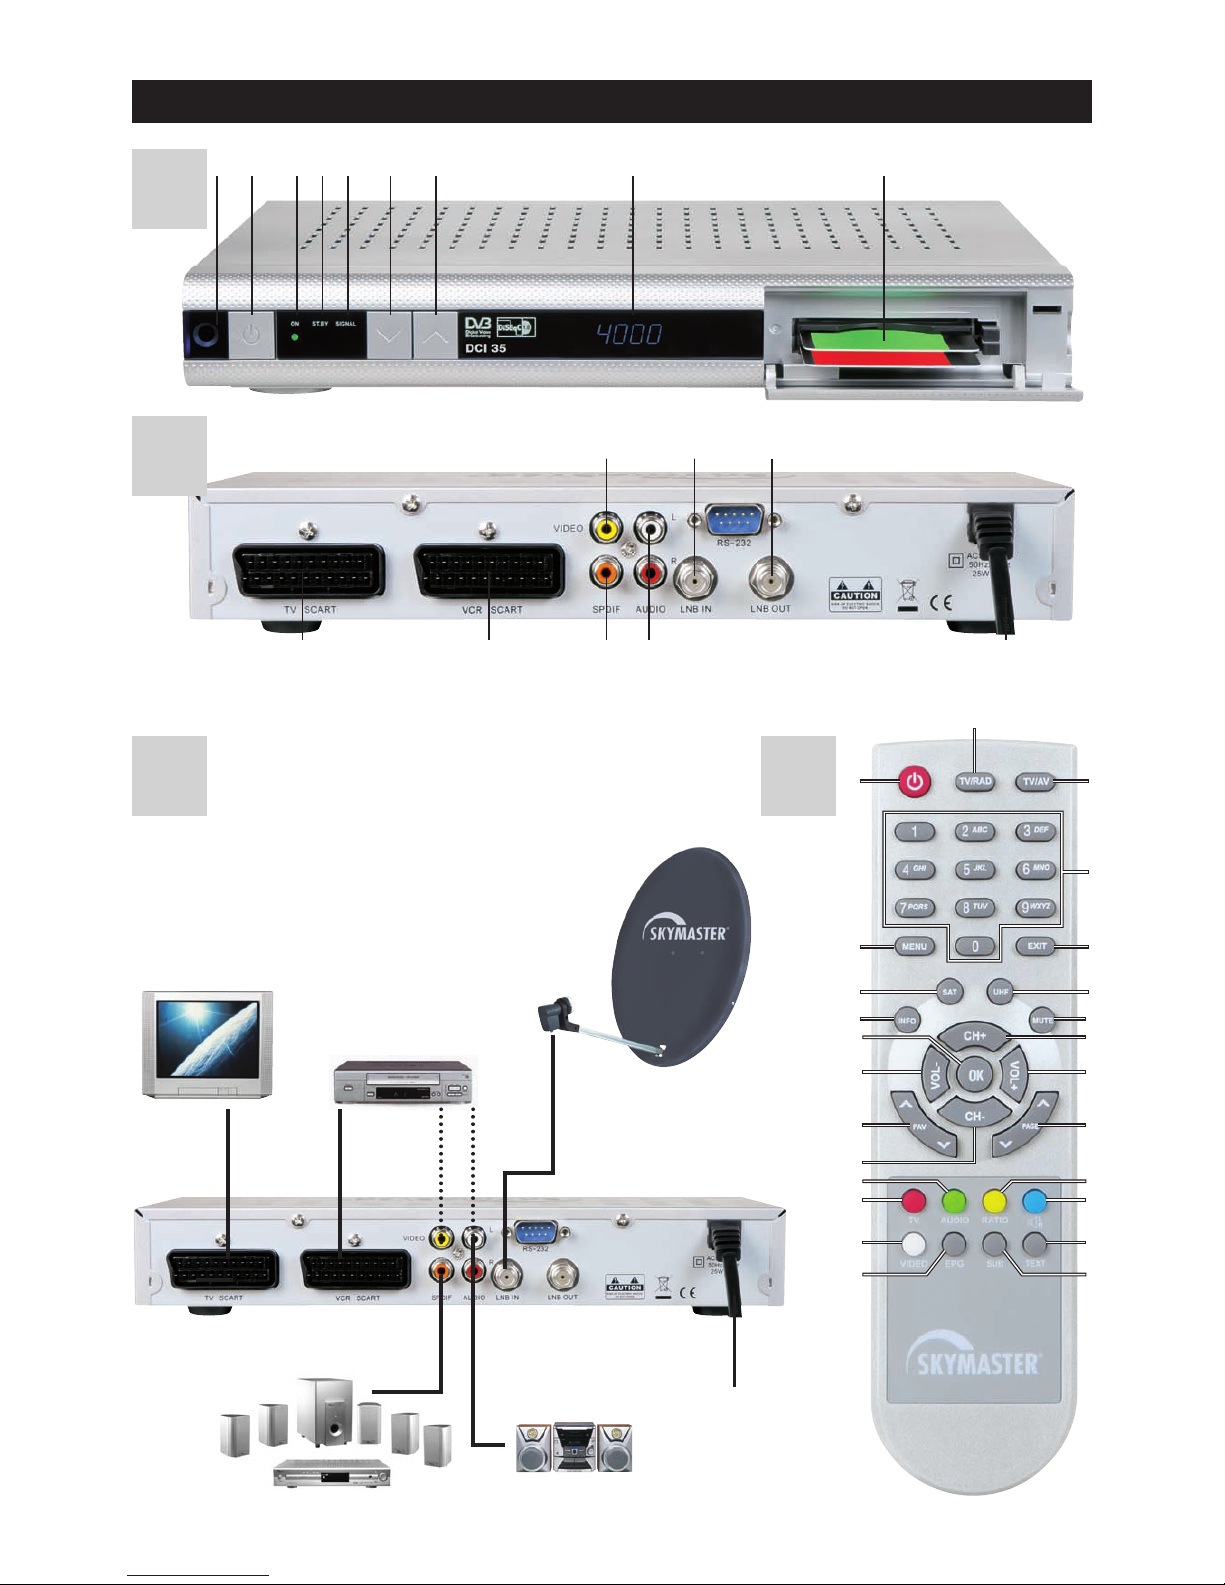
3. Receiver Operating Elements
1. CI slot
2. IR receiver for the remote control
3. Satellite signal indicator
4. Stand-by (stand-by display)
5. On (receiver switched on)
6. On/Off switch
7. Changing channels, upwards
8. Changing channels, downwards
9. Channel position display
1. Connection for satellite system
2. Connection for analogue satellite receiver (loop through operation
only in stand-by mode)
3. Stereo audio output, for connecting a stereo system or a TV/VCR
(sound only)
4. Scart jack, for connecting a TV set
5. Scart jack, for connecting a VCR
6. Separate video output
7. SPDIF/Digital sound output
8. Mains connection cable 230V
A B
Please read this safety information thoroughly before commissioning the device! Prolonged absence: In the event of prolonged
absence or thunderstorms, remove the mains plug of the device from the wall socket. Also disconnect the antenna connections to
avoid storm damage.
SM Electronic GmbH hereby declares that Article No. 19725 complies with the basic requirements and other relevant regulations of directives
2004/108/ECand 2006/95/EC.
Cleaning: Remove the mains plug before cleaning the device. Use a
dry or damp cloth and make sure that no moisture penetrates the
device!
Objects in the device: Make sure that no objects can enter the
ventilation slots. There is risk of death through electric shock!
Repair: Repairs must be performed by qualified experts. In the event
of improper intervention by a third party, the warranty will be voided
and the safety of the device can no longer be guaranteed! Never open
the housing of the device yourself: Even when disconnected from the
mains, there is an acute risk of death through electric shock. Internal
components can be damaged if touched.
Place of installation: Place the device on a straight and even
surface. To protect the surface from being discoloured as a result of
the natural heat generated by the device, place the device on a
suitable underlay.
Adequate ventilation: The ventilation slots on the device must never
be covered. Ensure that the device has a clearance of at least 10 cm at
the sides and top, and that the heat can be dissipated upwards
unimpeded.
External influences: Never expose the device to moisture
(e.g. condensation or splash water) or direct sunlight. Do not place the
device in the vicinity of heat sources, such as e.g. heaters or devices
that heat up.
Mains voltage: Use the equipment with the voltage specified on
the case only! Do not plug the equipment into the mains until all
connection and installation work has been completed.
Earthing: Antenna systems must always be earthed, paying heed to
the pertinent local and VDE regulations.
ASTRA, EUTELSAT, TÜRKSAT, DiSEqC and Skymaster are registered trademarks.
4. Remote control
1. On/Off (stand-by) · This button switches the receiver on
or off or into stand-by mode
2. TV/Radio · Toggles between TV and radio mode
3. TV/AV · Sends VCR signal to the TV set
4. Number buttons 0 - 9 · Use these buttons to switch to a
certain channel, to enter numeric values and passwords or
to change channel names and favourites lists
5. MENU – OSD · Opens the OSD via which it is possible to
set all the receiver and channel settings
6. EXIT – Exit menu · Closes the current OSD and displays
the higher-level menu or the TV picture
7. INFO · Displays channel information
8. SAT · Opens the satellite list
9. UHF · optional/without function
10. Mute · Mutes the sound. Press again to reactivate the
sound
11. Control buttons Channel/Channel switching · For
navigating within the OSD (up/down) or switching channels
(up/down)
12. Control buttons VOL /volume control · For navigating
within the OSD (left/right) or controlling the volume
13. OK/confirmation button · Press the OK button to confirm
executed changes or to execute an action
14. FAV / · Opens the first favourites list and toggles
between others
15. PAGE / – Channel list upwards and downwards
· With displayed channel, favourites or other lists for leafing
through page-by-page
16. T V · optional/without function
17. Audio · Displays all the available audio channels
18. RATIO · Changes the video format
19. · Audio channels right / left
20.VIDEO · Toggles between FBAS and RGB
21. EPG – Programme information · Opens the EPG
(Electronic Program Guide)
22.SUB · Displays subtitles for the current programme
23.Text · Opens Teletext pages
❮
❮
❮
❮
Please ensure correct polarity when inserting the batteries!
The polarity is marked in the battery compartment.
Batteries: 2 pieces, Size: AAA, UM-4, Micro or R03. Used batteries are
special waste – please dispose of them correctly! Range approx. 6m.
C

GB 4
Start
5. Daily Use
The most important basic functions and displays (OSD) are described in detail below.
While watching a TV channel or listening to a radio station, various information and symbols are
displayed for the channel/station. The actual content and scope of this information depends on the
channel provider, e.g. Teletext or AC3 digital sound. Further useful functions of your receiver are
explained later on in these instructions.
After changing the channel, the following information is displayed at the bottom of the TV screen:
Number of the channel position
Name of the channel
Programme times and title of the current programme
Teletext availability
Part of a favourites groups (symbol)
Audio channel (stereo, left or right)
Audio mode, current language, AC3 sound availability
Date
Time
Satellite
Reception parameters (frequency, level)
Select channel:
There are several possibilities to select a channel. To change channels (upwards/downwards), use
the / buttons at the front of the receiver or the CH+ / CH- buttons on the remote control.
In addition to the functions described above there is (for the high number of receivable channels) a
more practical channel selection function:
While watching a TV channel or listening to a radio station, it is possible to open a channel list via
the OK button. Hide the list via EXIT. Use the CH+ and CH- buttons to select the desired channel
from the list and the OK button to switch to the channel. Since the channel lists usually contain
hundreds of channels, it is also possible to use the PAGE and PAGE buttons to leaf through
the channel list faster.
❮
❮
❮
❮
Guided installation
After first installation of receiver or after reset the sub menu “guided installation” appears on screen
in german language.
The receiver is pre-set for program on Astra 19,2°, Hotbird 13° and Türksat 1C 42° east. If no other
satellite position is requested, please push the green knob on remote control (saving) and leave the
main menu with “EXIST”.
The receiver switch automatically to first satellite position (ASTRA 19.2°).
If other satellite positions should be received which are pre-set, select new satellite and push red
knob on remote control. The receiver turns automatically into program installation menu and start
program setting.

GB 5
5. Daily Use
Additionally, you can select which channels are to be displayed:
Favourite: Select one of 6 favourites lists (Note: If the favourites lists are empty, no channels are
listed!).
Satellite: Only the channels of the selected satellite are listed. Press the SAT button to open an
overview of all the previously stored satellites. If several satellites have been stored, select a
position and press the OK button.
Volume and audio settings
Volume:
Use the VOL- and VOL+ buttons on the remote control to control the volume.
Note: The volume can be controlled in 18 steps.
Set the basic volume of your TV set in a way which ensures that an ideal control range is achieved
via the remote control of your receiver.
Muting:
Press the MUTE button to mute the sound. Press the button again to reactivate the sound at the
same volume level.
Audio mode:
Press the BLUE button repeatedly to successively open the 3 possible audio settings “Left”, “Right”
and “Stereo”. The active setting is displayed in the OSD (channel information).
Language selection:
Press the AUDIO button repeatedly to successively open the different languages for the TV picture.
The number of languages is determined by the channel provider. If only one language is broadcast,
the button is without function. Note: A surround amplifier is required to provide the AC3 sound.
Teletext
Most channels broadcast additional information and services.
Teletext pages are “electronic magazines” which provide the latest news, sports results, weather
forecasts, commercial offers and much more. The quantity and content is determined by the channel
provider. Page 100 always displays the table of contents, which provides an overview of further
subpages (e.g. page 200, sports overview). Always enter the three-digit page number or use the
CH+/CH-, VOL+/VOL- and PAGE / PAGE navigation buttons.
Press the INFO button to receive detailed information on the reception parameters of a channel and
to rename a channel. Press the red button to rename a channel und save changes via the green
button.
❮
❮
GB 6
5. Daily Use
6. The OSD – Overview
The OSD
Once installation has been completed and the satellite receiver has been connected to all the
devices, a preset ASTRA satellite TV channel is displayed after switching on.
Open the main menu by pressing the MENU button on the remote control to change the default
settings.
The main menu displays the following selection items:
Channel administration
EPG (Electronic Programme Guide)
Timer
Installation
Coding system (Common Interface)
Receiver information
Use the CH+/CH- and VOL-/VOL+ control buttons to navigate in the main menu.
Activate the desired menu item or open another submenu by pressing the OK button. At the bottom
of many menus there is an overview of all the buttons which can execute functions in the current
menu. In the displayed graphic it is possible to execute the functions “Delete”, “Favourite”, “Move”
and “Lock” via the coloured buttons.
Exit a displayed menu by pressing the EXIT button. Press the EXIT button to go from a submenu to
a higher-level menu or to return to the TV picture.
Setting changes are usually automatically accepted after exiting menus. Sometimes a safety query,
e.g. “Do you really wish to change the start channel?”, appears. Use the control buttons to select
the desired option “OK” or “Cancel”. The option highlighted in yellow is executed by pressing the
OK button.
Channel administration TV channels Favourite channels Page 7
Delete channel 7
Move channels 8
Lock channel 8
Option menu Rename favourites groups and channels 8
Rename channels 8
Sort channels 8
Radio stations 7
Programme guide 9
Time and Timer Settings Set the time 10
Set the timer 10
User installation Antenna setting Permanent installation 11
DiSEqC 1.2 rotor control 12
USALS rotor control 12
Channel search 13
System setting 14
Download via satellite 14
Parental lock 15
Factory setting 15
Coding system 16
Receiver Information 16
GB 7
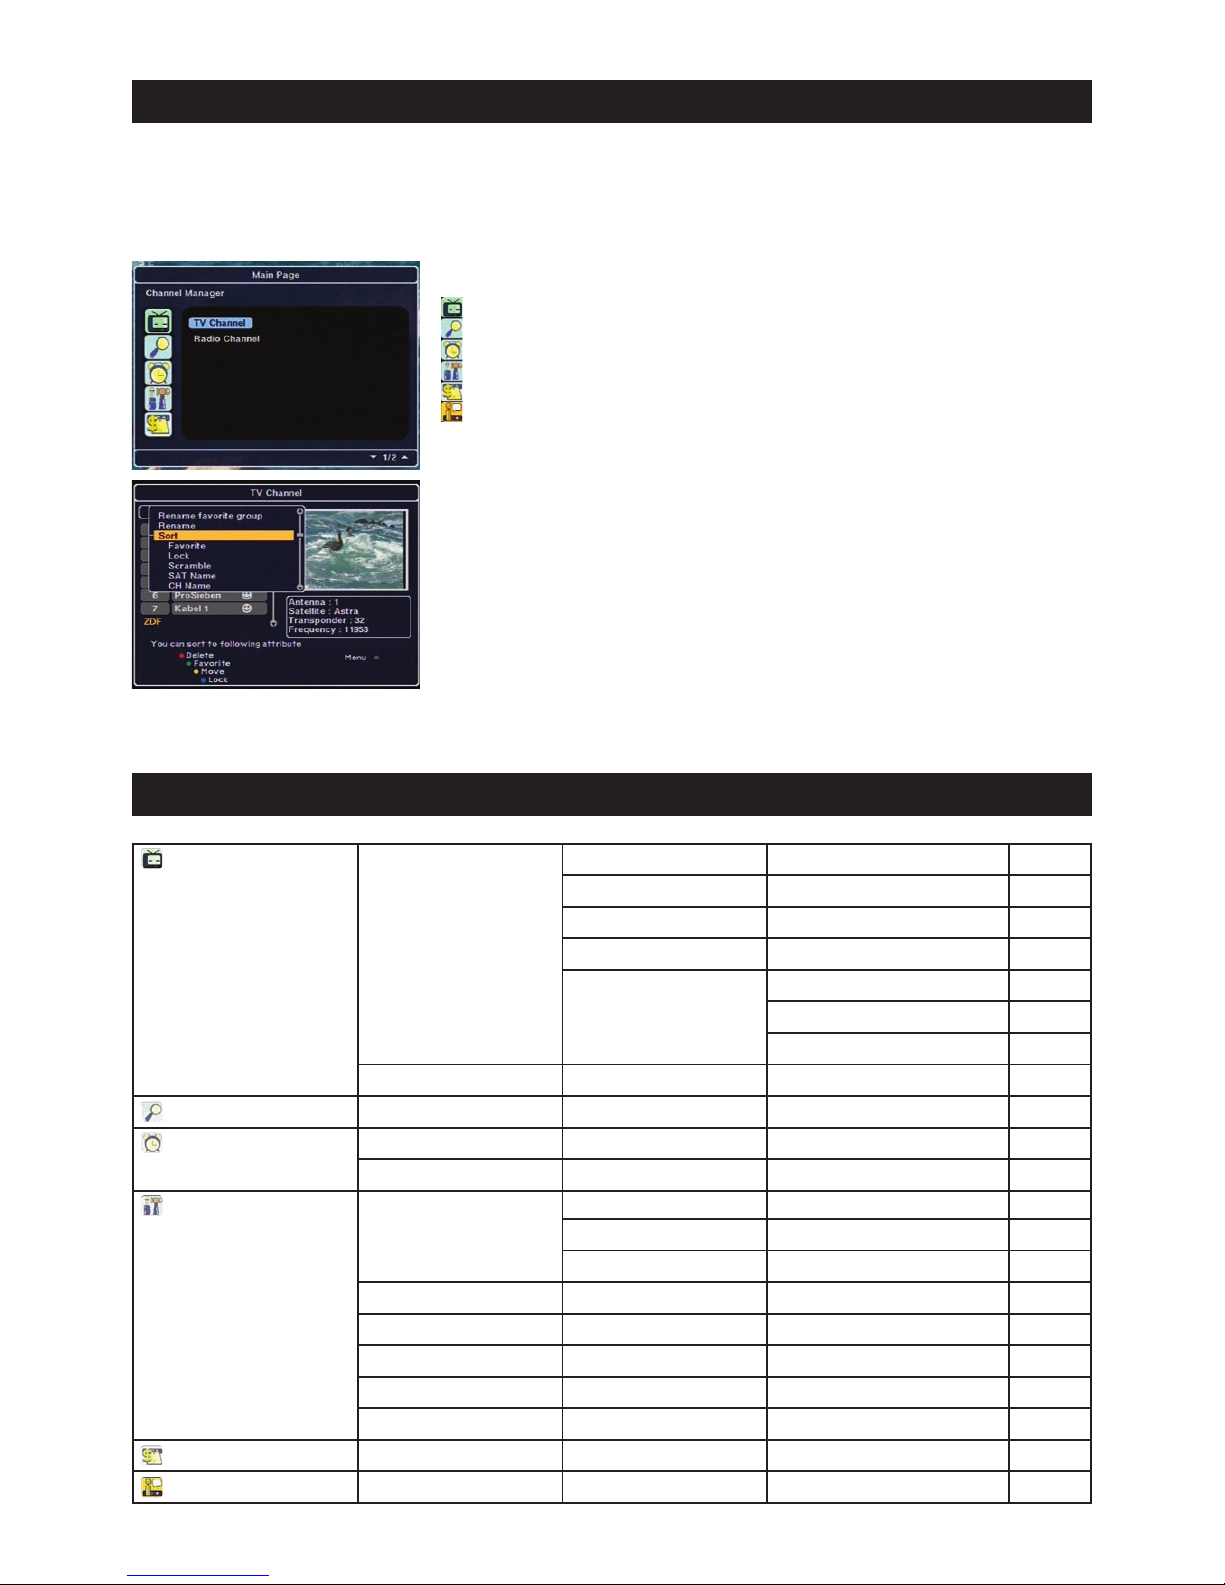
7. The OSD – Channel Administration
1. Channel administration
The simple, extensive and convenient administration of your channels is an outstanding feature of
your satellite receiver. Due to the ever increasing number of new satellites and channels the
sorting of interesting and less interesting channels demands increased flexibility.
The item “Channel administration” in the main menu contains two selection possibilities
“TV channels” and “Radio stations”.
Note: The use of the radio station administration is identical to TV channel administration! The
functions are described in more detail below on the basis of TV channel administration.
On the left-hand side there is an overview of the stored channels.
Five options are available in the bottom line:
RED: Delete
GREEN: Favourite 1-6
YELLOW: Move
BLUE: Lock
MENU: Further options for channel administration
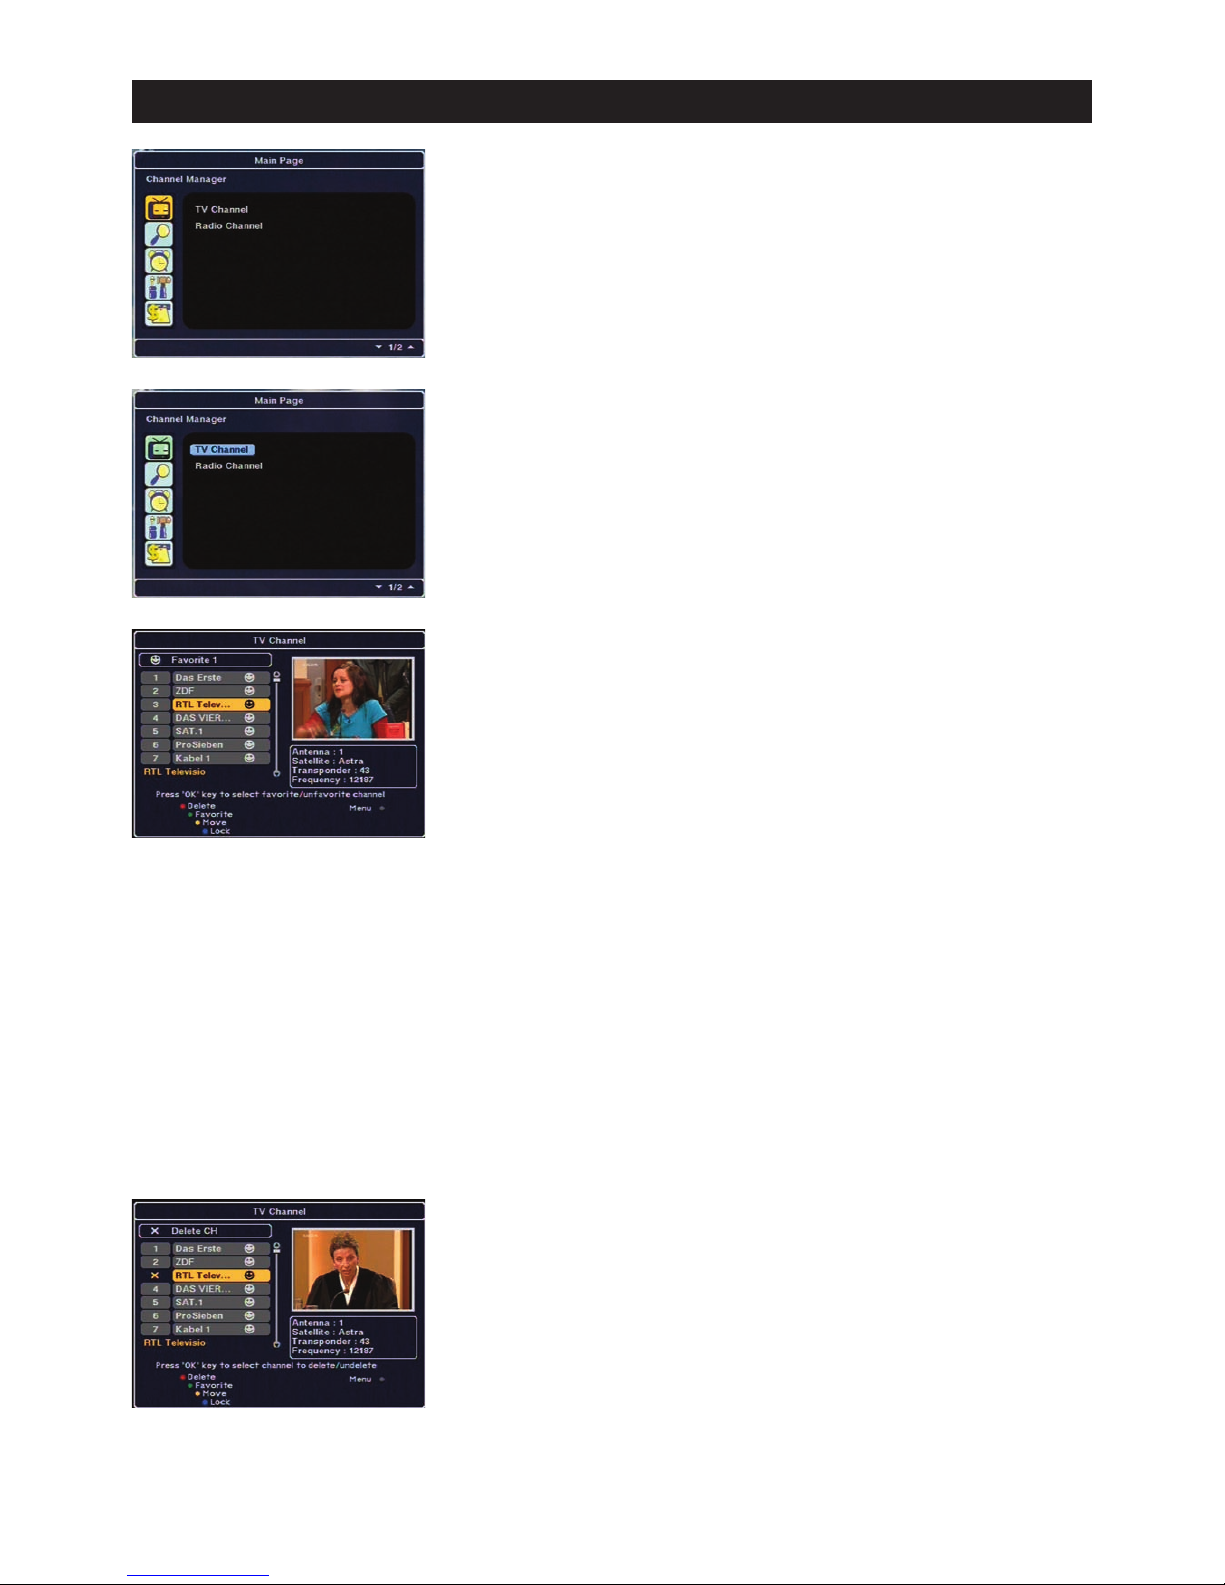
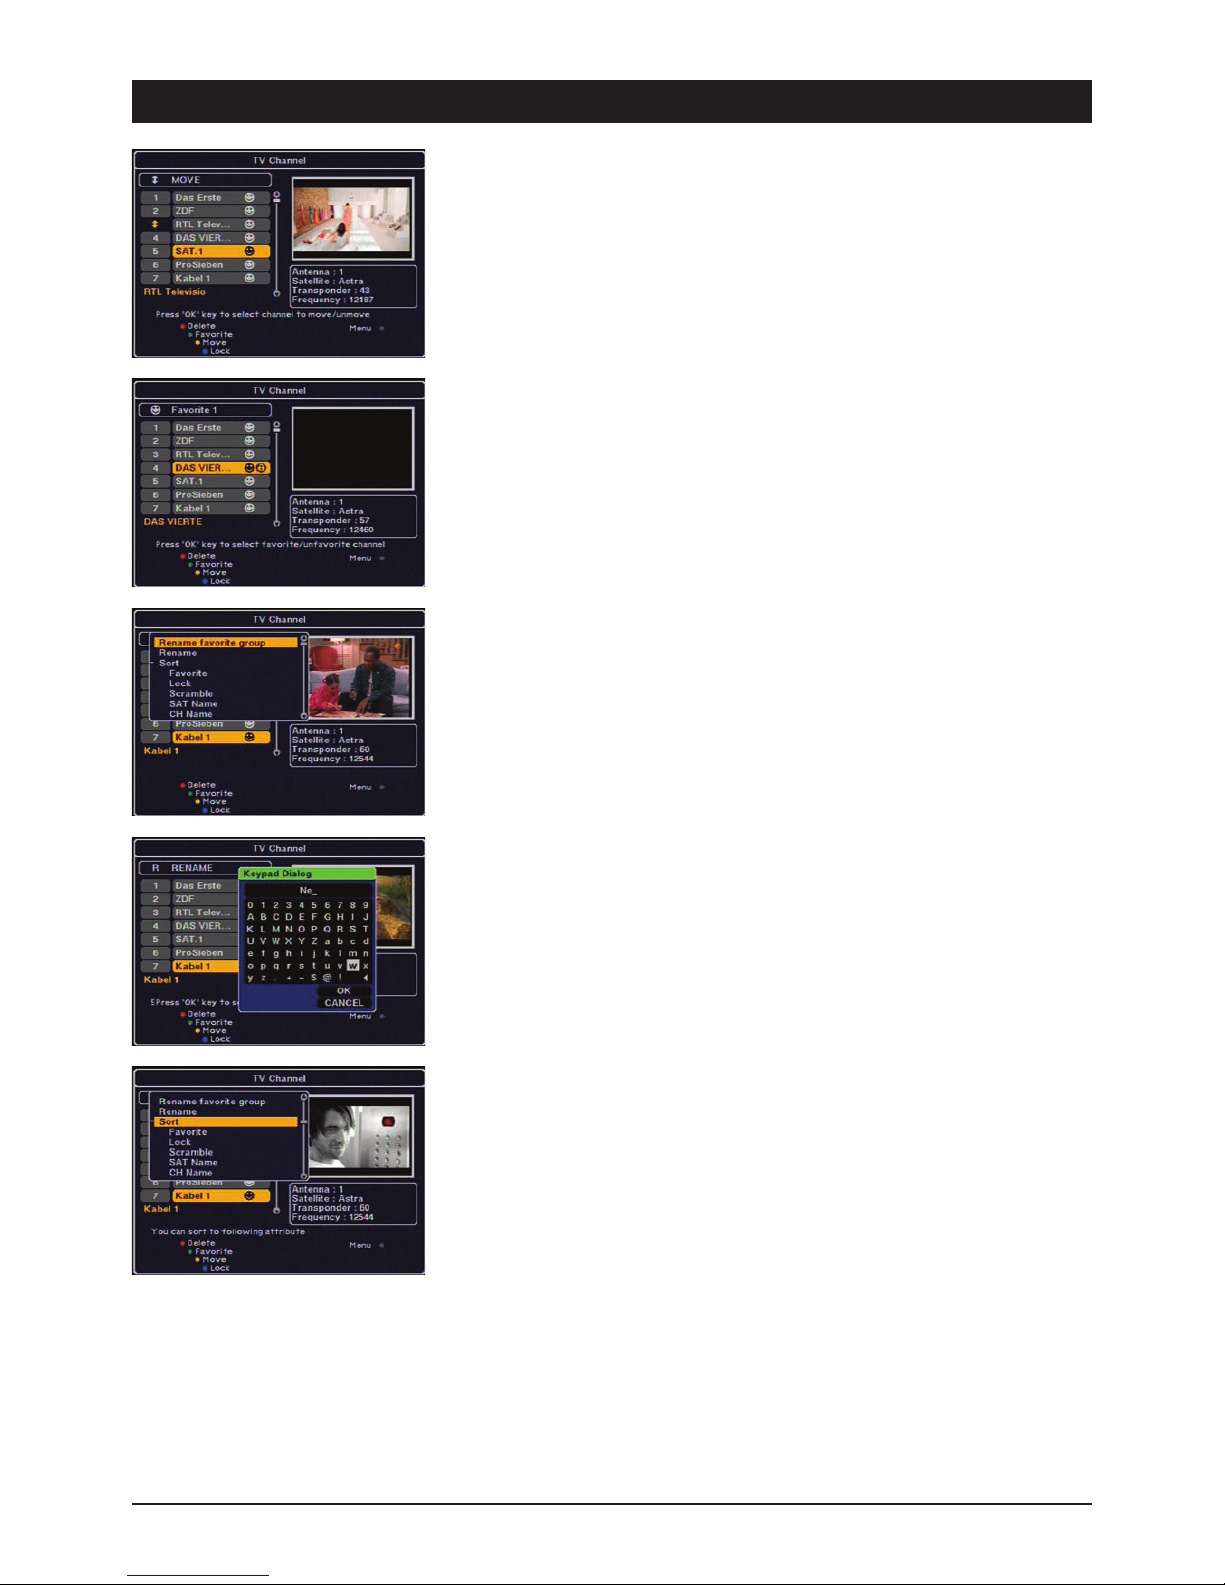
Favourite channels:
Favourites lists: You can accept your favourite channels in 6 channel lists to provide a better
overview. Sort, e.g., all news channels in “Favourite 2” and all sports channels in “Favourite 3”.
Note: Press the GREEN button in the channel administration menu repeatedly to select one of the
6 favourites lists.
Select your favourite channels from this channel list one after the other and press the OK button.
A symbol is subsequently displayed next to the selected channel. If you wish to remove this
channel from your favourites list, press the OK button again.
Once you have highlighted all the favourite channels, press EXIT once to return to the main menu
and again to close the main menu. Press the FAV button on the remote control to open the
favourite channels and select one of the 6 favourites lists.
Delete channel
Open the TV channel administration menu and select one of the desired deletion options by pres-
sing the RED button. These functions enable you to delete individual channels, all the channels of
a transponder, a satellite or all the satellites. Highlight all the channels to be deleted via “OK”. The
“X” symbol is displayed next to the channels. Once you have finished selecting, press the EXIT
button. Confirm the safety query with OK to delete the objects.
GB 8
7. The OSD – Channel Administration
Move channels
Open the TV channel administration menu and press the YELLOW button to “move” channels. Use
this function to move any channel within the channel list. Select the channel first and then press
the OK button. Use the CH+ and CH- buttons to move the channel to the new channel position.
Press OK once the new position has been reached.
Lock channel
Open the TV channel administration menu and press the BLUE button. Use this function to lock
any channel against unauthorised access. Select the channel to be locked first and then press the
OK button. A lock symbol is displayed next to the channel.
Note: Always enter the 4-digit code to lock or unlock one or more channels. Locked channel
positions, e.g. with contents which are inappropriate for young viewers, can only be viewed after
entering the code (default setting 0000).
Option menu
Press the MENU button to open the option menu. The following selection options are available:
Sort (change channel sequence)
Rename FAV (rename favourites list)
Rename channels
Select the desired option and press the OK button.
You can rename the favourites list or channels according to your requirements. You could, e.g.,
rename the favourites lists 1 to 4 as father, mother, daughter and son, and the lists 5 - 6 as films
and music.
Rename favourites groups and channels
Select the option “Rename FAV” or “Rename”. It is possible to allocate a new name to the
respective favourites category or a channel via the keyboard dialogue.
Sort channels
If the “TV channel administration” is open, press the MENU button. “Sort” contains the various
possibilities to sort the channel list. For example, all the channels are sorted in alphabetical order
under “Channel name”.
Overview of the sorting criteria:
Favourite: All the favourite channels at the first positions.
Lock: Locked channel positions are grouped.
Coded: Sorting according to coded and FTA channels.
Satellite name: Sorting in alphabetical order according to satellite designation.
Channel name: Alphabetical sorting of the channel designations
Note: After sorting, the original preset order can only be re-established via the function “Factory
setting”!

GB 9
7. The OSD – Programme Guide
2. Programme guide
The EPG is an electronic programme guide for TV channels and radio stations which provides you
with additional information on the respective channel package. It displays, e.g., the title of the
current programme or radio station. The EPG also provides a preview of future programmes of the
respective channel provider.
Note: Not all channel packages are broadcast with the EPG!
Press the EPG button on the remote control or select the EPG in the main menu. The EPG
overview subsequently appears on the screen.
At the bottom of the picture there are five channel names and on the right-hand side the
programmes with the respective air times (time bar at the top).
Select a channel and press the OK button.
If no programmes are displayed (“No data available”), press the OK button again.
The loading process can, depending on the quantity of information, take up to 1 minute. If no
information is displayed, it is probable that this transponder does not broadcast the EPG!
Select a channel and set the mark at the height of the programme whose information you wish to
display. The colour of the selected programme changes. If the desired programme has been
highlighted, press the BLUE button. Detailed information on the programme is now displayed on
the screen.
Note: The option “Details” is not available for all programmes and is only available after the EPG
data has been fully read.
Navigate forwards and backwards in 6 hour steps via the GREEN / YELLOW buttons.
Press the RED button to record a programme via a VCR or DVD recorder. If necessary, adjust the
recording data in the “Timer reservation” menu which appears.

GB 10
7. The OSD – Time and Timer Settings
3. Time and timer settings
Set the time
Open the main menu to set the time and date. The “Timer” selection includes two menus. Select
“Set the time”. It is possible to carry out the local time settings in the timer menu which appears.
Set the difference to Central European Time (CET) when setting the time zone. Find respective
cities or regions at the bottom of the menu. Subsequently set the year, month, day and time.
Note: If the time is displayed incorrectly, check the “Summertime” setting. This has to be changed
every six months.
Set the timer
There are various ways to program the timer in order to record one or more programmes. The
simple operation of the timer is one of the outstanding features of the satellite receiver. Select
“Yes” and enter the switching on and off time to activate automatic switching on/off of the receiver.
Note: The receiver displays the times sent by the satellite. Consider the time differences when
programming the timer.
Select “Yes” and enter the switching on and off time and select the desired channel to activate
automatic switching on/off of the receiver. This timer menu allows for extensive settings of up to
10 pre-programmings.
Each pre-programming can be set once, daily, weekly or monthly.

GB 11
7. The OSD – User Installation
4. User installation
The selection INSTALLATION contains the following 6 submenus:
Antenna setting
Channel search
System setting
Download via satellite
Parental lock
Factory setting
4.1 Antenna setting
Further setting possibilities are displayed at the bottom of the picture – depending on the antenna
configuration. Press the coloured buttons for the following possibilities:
Red: Antenna alignment help for calculating the angle of elevation and direction for permanently
aligned satellite antennas.
Green: DiSEqC 1.2 rotor or permanently aligned satellite antenna.
Yellow: For USALS rotors, for the automatic calculation of all satellite positions.
Antenna setting – Permanent installation
Open the antenna configuration menu to set a permanently installed antenna and select type
“Standard” to open the menu shown on the left.
1) Antenna: It is possible to carry out up to 16 different antenna configurations in connection
with various satellite selectors.
2) Type: Select antenna type “Standard”, for rotatable antennas “DiSEqC 1.2” or “USALS”.
3) Satellite: Selection of the satellite which is to be received.
4) LNB type (default setting Digital-/DiSEqC-LNB): If you are using an older or uncommon
LNB, you have to enter the changes manually. Only change the values if you know the
technical data of the LNB!
5) LNB freq. 1 and 2: Display of the LNB frequencies (lower and upper oscillator frequency of
the LNB). The values for common digital and DiSEqC LNBs are 9750 (Osc. fr. LNB1) and
10600 (Osc. fr. LNB2). Please only change these values if it is expressly specified in the
assembly instructions of the satellite system!
6) 22kHz: Here it is possible to set whether the 22kHz signal for controlling 22kHz selectors or
special LNBs should be switched on or off. 22kHz selectors are no longer relevant for digital
reception systems. To prevent malfunctioning, set the setting for both selector types to “No”.
The 22kHz signal is automatically activated depending on the LNB type.
7) Satellite switch DiSEqC: Use a 2-way or 4-way DiSEqC switch; set here via which input of
the DiSEqC switch the satellite is to be received. The inputs of the DiSEqC selector are
marked accordingly (1, 2, 3, 4 or A, B …).
8) C/Ku band: To prevent malfunctioning, leave the setting as “No”. The C band is
predominantly received in the Middle East or Russia.
After carrying out changes, press the EXIT button. All changes are accepted after exiting the
menu.
Millimetre accurate antenna alignment to the satellite is the prerequisite for reception. It is
possible to use the function “Calculate antenna alignment” to align the antenna. The result of the
calculations is the precise angle of elevation and direction (elevation and azimuth).
Procedure:
Open the “Antenna setting” menu and press the red button.
1. Select the desired satellite (e.g. Astra 19.2° East).
2. Enter the longitude of your location (e.g. Hamburg 10.0° EAST).
3. Enter the latitude of your location (e.g. Hamburg 53.6° NORTH).
Refer to an atlas for the longitude and latitude values of your location.
4. Finally select “Calculate”. You will then receive the angle of elevation and direction values.
Angle of elevation: Satellite antennas have a scaling behind the reflector (“dish”) which usually
goes from 20°-50°. In northern Germany the elevation values are approx. 28°, in southern Germany
approx. 35°.
Note: The antenna mast has to be installed vertically!
Azimuth angle: The azimuth is the angle of direction; use a compass for the degree graduation.
Note that compasses often display inaccurate results due to external influences (metallic objects
or magnetic fields).

GB 12
7. The OSD – User Installation
Antenna setting – DiSEqC 1.2 rotor control
Skip this chapter if you do not possess a DiSEqC 1.2 rotor. Note: When using a rotor, connect it to
a DiSEqC LNB.
1) Antenna: It is possible to carry out up to 16 different antenna configurations in connection
with various satellite selectors.
2) Type: Select the antenna type “DiSEqC 1.2”.
3) Satellite: Selection of the satellite which is to be received.
4) LNB type (default setting Digital-/DiSEqC-LNB): If you are using an older or uncommon
LNB, you have to enter the changes manually. Only change the values if you know the
technical data of the LNB!
5) LNB freq. 1 and 2: Display of the LNB frequencies (lower and upper oscillator frequency of
the LNB). The values for common digital and DiSEqC LNBs are 9750 (Osc. fr. LNB1) and
10600 (Osc. fr. LNB2). Please only change these values if it is expressly specified in the
assembly instructions of the satellite system!
6) 22kHz: Here it is possible to set whether the 22kHz signal for controlling 22kHz selectors or
special LNBs should be switched on or off. 22kHz selectors are no longer relevant for digital
reception systems. To prevent malfunctioning, set the setting for both selector types to “No”.
The 22kHz signal is automatically activated depending on the LNB type.
7) Satellite switch DiSEqC: Deactivate this function when using a rotor.
8) C/Ku band: To prevent malfunctioning, leave the setting as “No”. The C band is
predominantly received in the Middle East or Russia.
9) Set limit: Press the respective coloured button to open the following menu. Use this function
to set the most eastern and western swivel range of the rotatable DiSEqC 1.2 or USALS
antenna. This prevents the antenna from being damaged during rotation due to obstacles
(e.g. house wall, branches).
Rotate the antenna by pressing the left volume button VOL- and confirm the position via OK.
Subsequently, a question is displayed which has to be answered with either “OK” or “Confirm”.
Repeat the process to set the western limits by pressing and holding the right volume button
VOL+ until the most western position of the antenna has been reached. Confirm the
subsequent question with OK.
10) Delete limits: To delete the stored eastern and western limits, select the option “Delete limit”
and press the OK button.
Caution: The DiSEqC rotor can now move unlimited again! The antenna might be damaged by
obstacles, e.g. railings, branches or house walls!
After carrying out all the changes, press the Exit button and confirm the safety query via OK to
activate all the changes.
Antenna setting – USALS rotor control
If you possess a USALS rotating system, all satellite positions can be automatically calculated. The
receiver requires the precise location of the antenna as the calculation basis.
Set limits: Press the respective coloured button to set the limits for the rotor. The procedure is
described in the previous chapter (Set DiSEqC 1.2 limits).
USALS setup: Press the green button to carry out the USALS settings. The antenna should be
exactly aligned to a satellite position (e.g. Astra 19.2° East).
Enter the following data for Hamburg:
Latitude: 53.6 North
Longitude: 10.0 East
After saving, the receiver is able to calculate all the distances of the satellites to each other and
approach the positions precisely. Prerequisite for this is 100% alignment of the USALS antenna!
Please refer to the assembly instructions of your rotating system if it is not possible to receive all
the available satellites!

GB 13
7. The OSD – User Installation
4.2 Channel search
It is possible to add or delete channels or satellites via the Channel Search menu. If your receiver
is connected to a system which can receive several satellites (e.g. multifeed systems) or to a
rotatable antenna rotor, it is possible to add additional satellite positions. Each satellite position
has several transponders (TP) which usually contain a channel package with several TV channels
and radio stations. After a satellite or transponder search, the channels which have been found are
accepted in the channel list.
Channel search
1) Antenna: Select one of the 16 antenna configurations.
2) Satellite: Press the volume buttons to select the desired satellite or the OK button to display
a selection list.
Note: If the desired satellite is neither in the list nor configured, it is possible to add a new
satellite position in the antenna configuration menu.
3) Position (only with antenna configuration DiSEqC 1.2): After selecting the satellite,
select “Position”. Press and hold the VOL- or VOL+ buttons until the best possible satellite
reception is displayed by the two bars (signal strength and quality). The colour of the bars
changes to yellow once the satellite has been found. The height of the values depends on the
reception strength of the satellite being searched in the respective region and can vary greatly.
IMPORTANT: Please adhere to the assembly instructions of the DiSEqC rotor!
Before you search for the satellite positions the angle of elevation and direction of the antenna
and rotor has to be set to the specified starting position. If assembly has not been carried out
professionally, satellites which are further east or west are not received!
4) Transponder: Here it is possible to select a stored transponder of the selected satellite. This
is necessary if you only wish to search for a certain transponder.
Input mode
If you wish to change the pre-programmed values of a transponder, e.g. frequency, symbol rate or
polarisation, press the red button. Now it is possible to select and change all the available
selection options via the control buttons.
When changing or adding a transponder manually, you have to know the frequency (5-digit in MHz),
polarisation horizontal or vertical (H/V) and the symbol rate (SR, usually 5-digit 27500 or 22000).
These values can be obtained from the satellite operator or TV and trade magazines.
PID input
This option is usually only required for the reception of unusual satellites. For the sake of
completeness the purpose of this option should be explained briefly: There are often several
channels on one transponder (same frequency, same symbol rate, etc.). Each channel of the
transponder has a different address for picture, sound and data to ensure that the satellite receiver
can differentiate between the channels. These addresses can be entered manually – after pressing
the green button.
GB 14
7. The OSD – User Installation
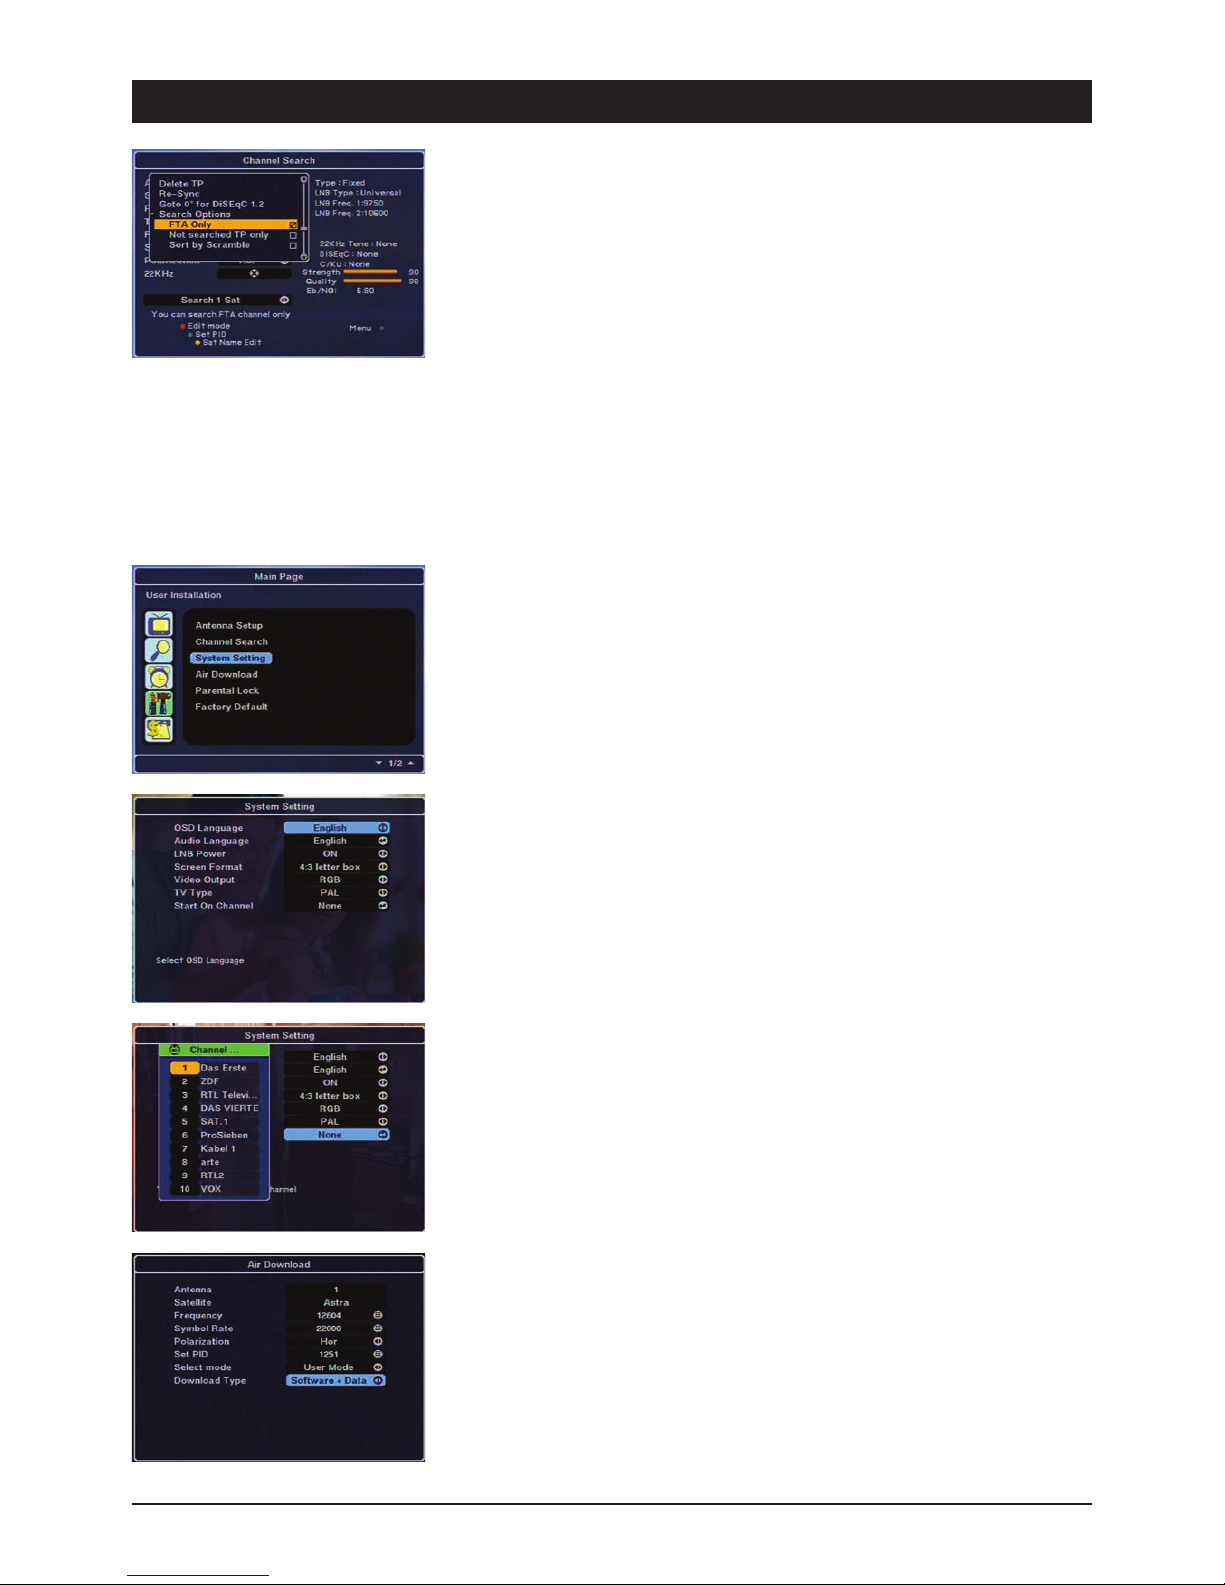
Press the MENU button for more possibilities:
In addition to this, you have the choice between deleting the displayed transponder (“Delete TP”),
re-synchronising the positions of all the stored satellites (“Recalculate”), rotating the antenna rotor
to the mean position (south) and setting special options for the upcoming search.
Search options: It is possible to exclusively search for free-to-air channels (FTA) and/or
transponders which have not yet been searched. If you select the option “Sorting according to
coding”, all the found coded channels are added to the end of the channel list.
Start search run: To start the search, go to “Search this sat.” or press the volume buttons to
select further search options:
Search TP: Only the displayed transponder is searched for new channels.
All satellites: All the set satellites are completely searched.
Network search: Some satellites, e.g. Astra or Hotbird, broadcast a Network Information Table
(NIT). This is an up-to-the-minute and complete channel table which can be read via the receiver.
Search for: Selection satellite or transponder or channel ID.
The search is started after pressing the OK button.
4.3 System setting
In this menu it is possible to change the OSD default setting and to adjust the receiver to its
“technical environment” (TV/VCR…).
Carry out the selection and changes via the control buttons and the OK button.
OSD language: Select a language for displaying all the on-screen menus.
Audio language: Here it is possible to set the sequence of certain languages you wish to hear in
case of multilingual programmes.
LNB voltage: The LNB supply voltage should always be switched on. This ensures that the
receiver supplies the LNB, selectors and distributors with the required switching and supply
voltages. Only select the option LNB voltage OFF if this is expressly stated in the instructions of
your satellite system!
Screen format: Set the screen format of your TV set here. You can choose between 16:9, 4:3
and 4:3 (Letterbox).
Video output: For setting the output signal at the Scart jacks. FBAS (also: Composite) is
compatible with all common TV sets and VCRs; the quality of RGB is better, but it is not supported
by each TV set.
TV set type: The video standard in Europe is – with a few exceptions – PAL. NTSC is used in the
USA and Japan.
Start channel: Press the OK button to open a channel list. Select the channel which should be
displayed first each time the receiver is switched on. With the default setting, the last viewed
channel is always displayed when the receiver is switched on.
4.4 Download via satellite
Software upgrade
To add new features or to carry out error corrections you can load, if necessary, new receiver
software via ASTRA position 19.2° East.
Note: This software is transmitted in a weekly or daily cycle with software for other Skymaster
models. Find detailed information at www.skymaster.de.
After starting the OTA software update, it is checked whether a more recent version is available.
Loading of the software might take a few minutes. Do not switch off the receiver during this period!
Always follow the on-screen instructions.
GB 15
7. The OSD – User Installation
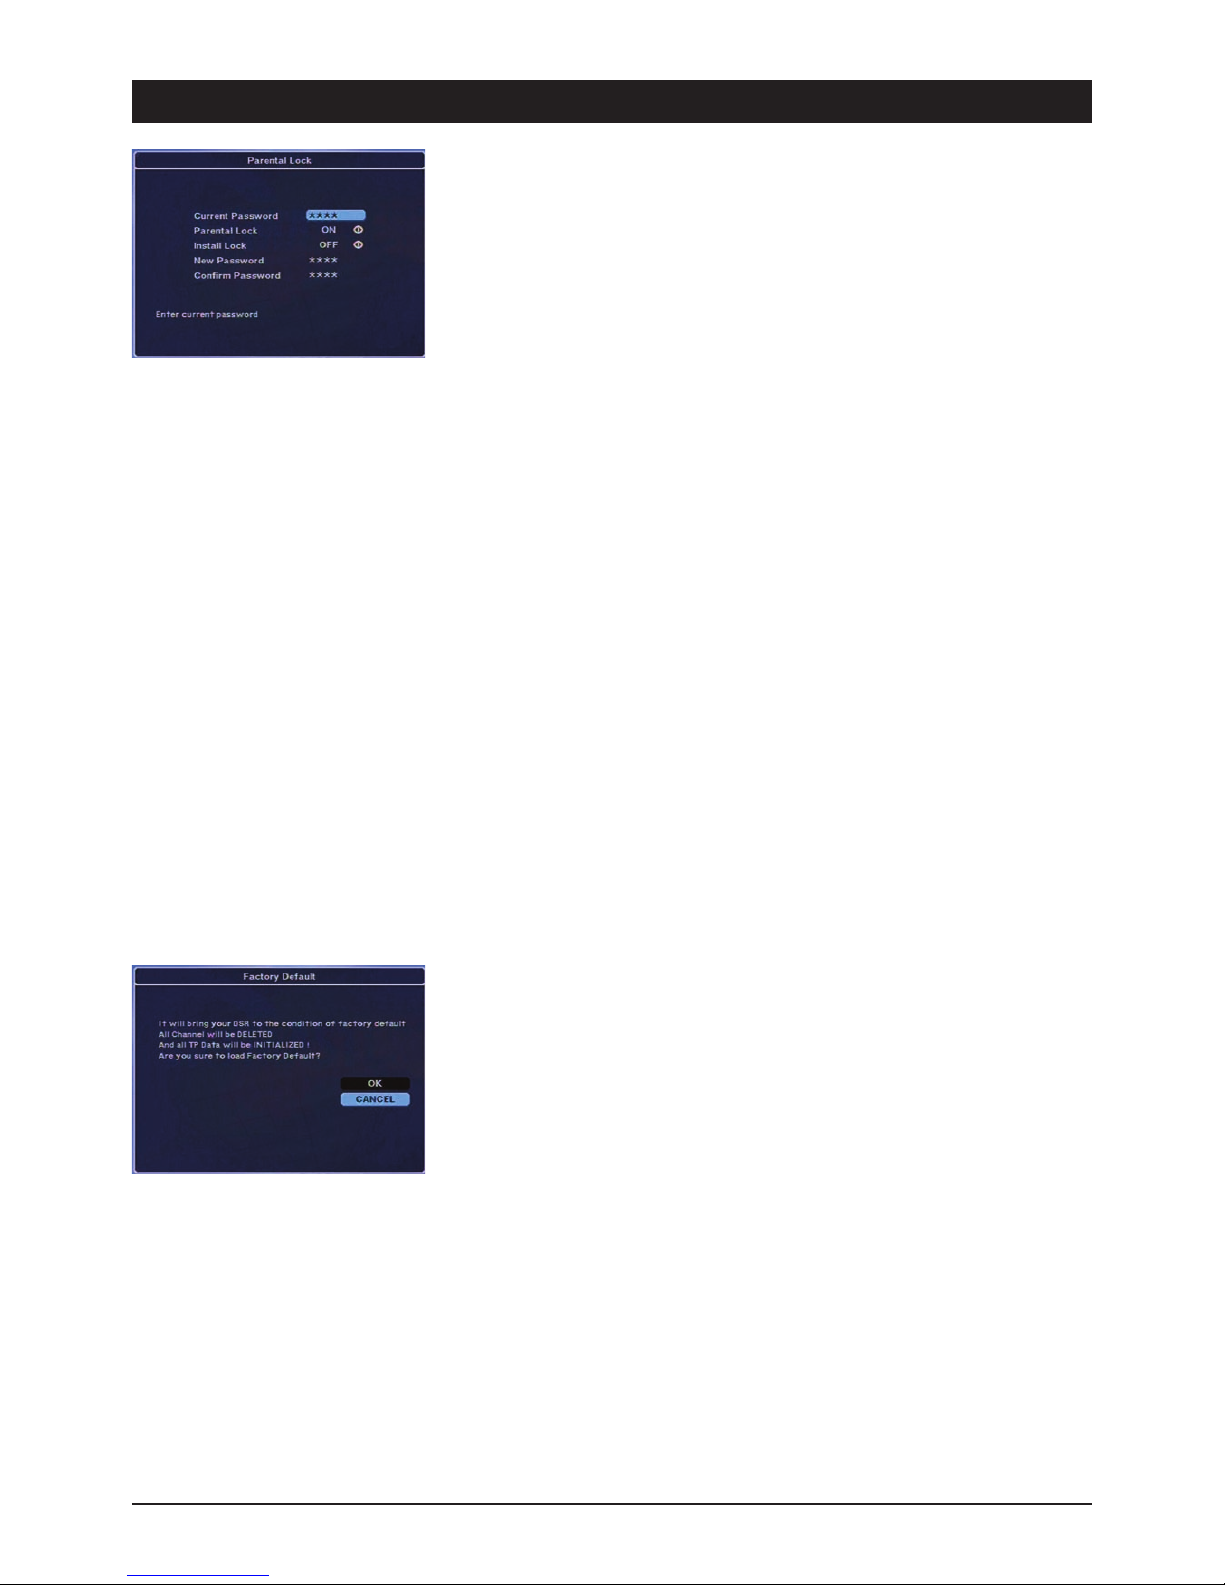
4.5 Parental lock
It is possible to lock channels with contents which are inappropriate for young viewers via a
password. It is also possible to protect the installation menu and your personal settings against
unauthorised access. The protection of minors consists of two parts. Firstly, the locking of certain
channels and, secondly, the locking of certain menus to prevent unauthorised usage.
Set the basic requirements, e.g. password, in the Parental lock menu.
Changing the password:
1) Enter your current password
2) Set the parental lock and the installation lock to YES
3) Enter the new password
4) Confirm your changes by re-entering the new password.
Note: The factory default password is 0000.
Caution: Please note down the new password and keep it in a safe place.
Using the parental lock:
5) After activating the parental lock functions, open the Channel administration menu.
6) Press the blue button (“Lock”).
7) Select the channel you wish to lock.
8) Press the OK button. The lock is displayed via a lock symbol.
9) Exit the menu.
Note: To deactivate the parental lock for the locked channels, enter the password.
Installation lock
Protect settings against unauthorised access:
1. Enter the password.
2. Go to “Lock installation” and select “ON”.
3. If necessary, enter a new password.
4. Confirm the new password by re-entering it.
5. Close the menus and switch off the receiver.
6. Switch on the receiver and press the MENU button.
7. Select any menu and press the OK button.
8. A request to enter the password is displayed on the screen.
9. If the password is incorrect, access to the menu is denied.
Note: The factory default password is 0000. Please note down the new password and keep it in a
safe place.
4.6 Factory setting
It is possible to reset the device to the delivery status. If you confirm the device reset, all the
channel settings and changes which have been carried out since initial setup are deleted.
GB 16
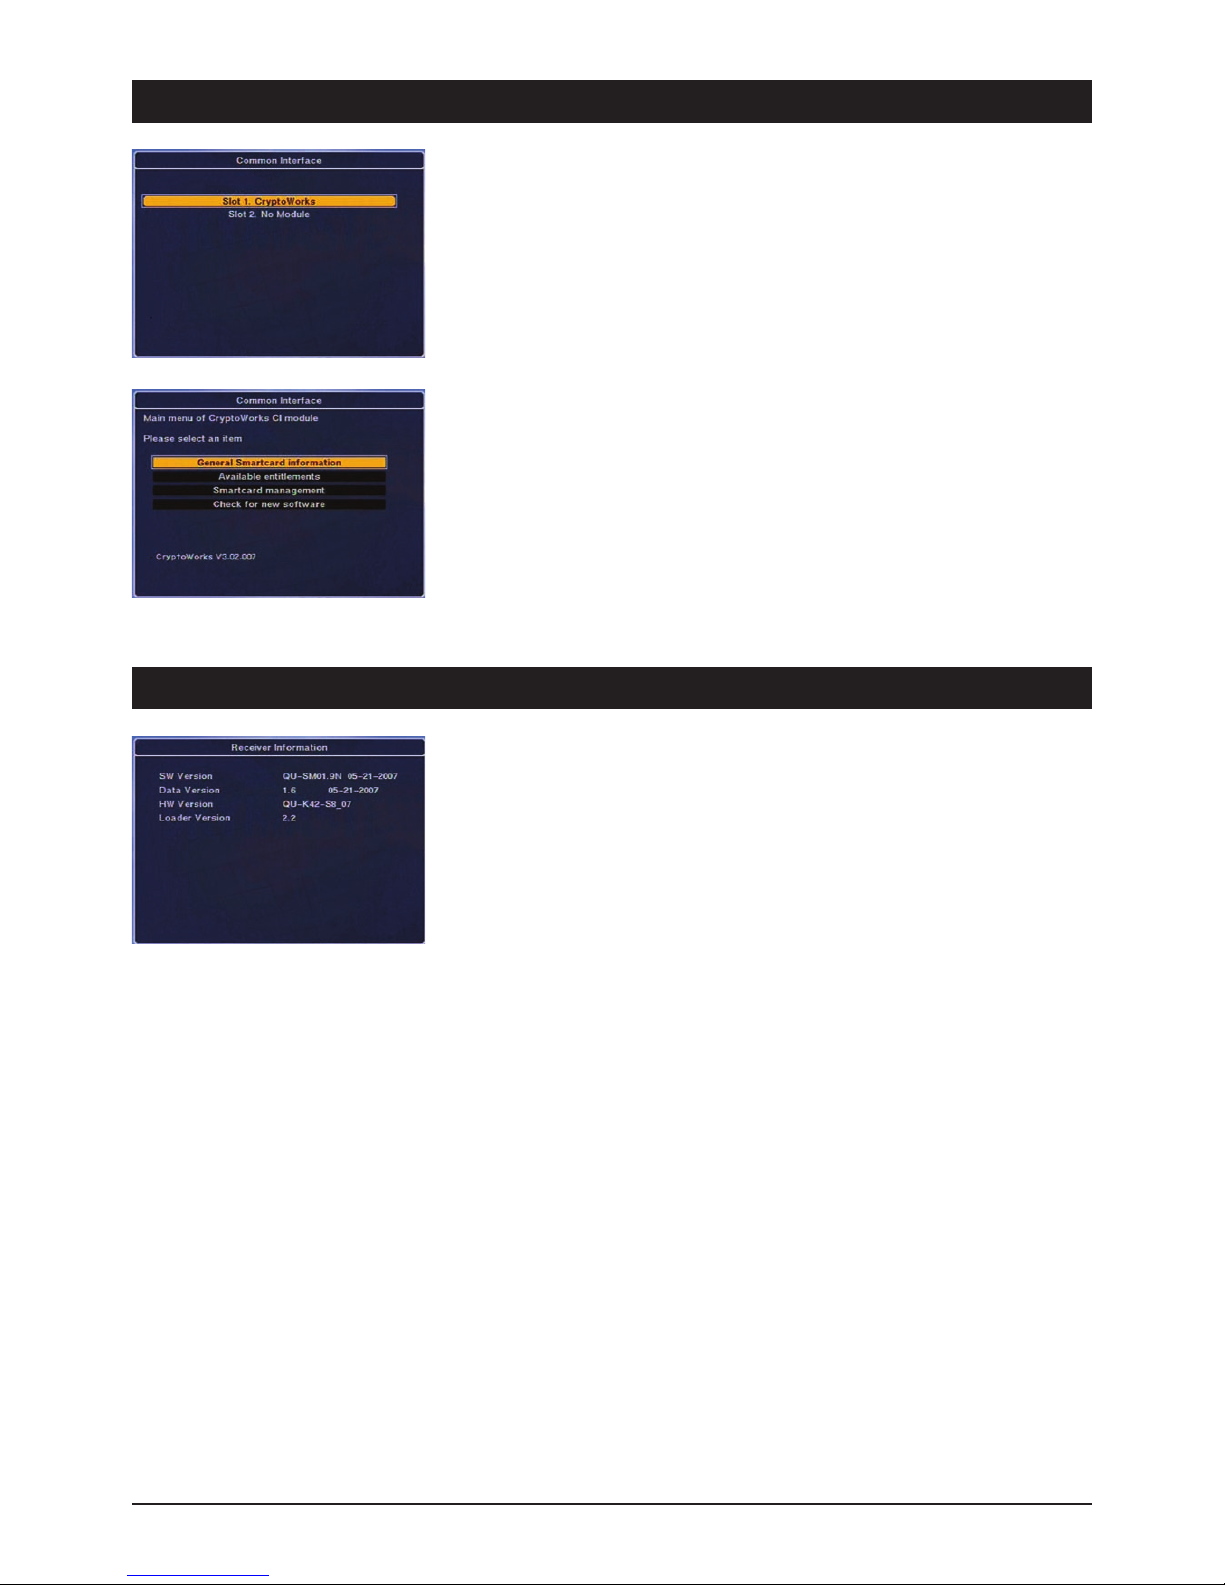
7. The OSD – Coding System
5. Coding system
Common interface & Smartcard (option)
It is possible to also receive coded channels via special Conditional Access Modules (CAM). This
receiver currently supports various coding systems, e.g. Alphacrypt, Aston/Seca, Irdeto,
VIACCESS, Nagravision, CONAX and CryptoWorks.
Common Interface Modules and Smartcards can be obtained from your specialist dealer. If CAM is
not used, only FTA channels can be received.
The displayed menus are generated by the Conditional Access Modules and differ greatly
depending on the module type and software status.
6. Receiver Information
Information
This menu page provides you with all the important address, hardware and software information.
This data is extremely useful if you need to contact our Technical Hotline.
7. The OSD – Receiver Information

GB 17
8. Troubleshooting
Not functioning Check the position of the mains switch and, if necessary, switch on the device
(3. Operating elements receiver, A, page 3, point 6).
No antenna signal (no signal indicator at the device and via the signal indicators in the OSD):
1. Check the antenna cable: The screening braid and the aluminium foil should have contact with the F plug, but
should not touch the inner conductor!
2. Check the LNB settings. LNB1 should be set for ASTRA satellites. If you are using a common digital LNB, the
values 9750 MHz and 10600 MHz have to be set for the lower and upper frequencies. For troubleshooting
directly connect the LNB to the receiver and remove the selector and distributor.
Malfunctioning 1. The device displays incorrect programme times in the EPG or the wrong time: After switching on the receiver, the
data has to be read and evaluated first. Depending on the transponder, this procedure can take a certain amount
of time. Sometimes it may even be necessary to re-open the EPG or to change the channel position.
2. The device does not respond: The receiver has to process a large amount of data and sometimes reacts like any
home PC: It crashes. Switching when receiving EPG data or “incomprehensible” data from the channel provider
can cause the receiver to crash. Just disconnect the mains plug and wait a few seconds before switching the
device on again. If a software fault occurs, you can load a software update into the receiver via satellite within a
short period of time.
Only a few channels 1. The antenna has been aligned to an incorrect satellite position. During antenna alignment it is possible to receive
one of the numerous satellites which transmit on similar frequencies and address the receiver’s signal indicators.
This results in foreign channels and the message “No signal” often appearing when switching channels. It is
usually sufficient to rotate the antenna just a few degrees – eastwards or westwards – to receive the desired
channels.
2. Check whether you have activated the correct channel list. To achieve this, press the SAT button to open the
satellite list. Press the CH+ or CH- buttons to select the desired satellite.

GB 18
9. Performance Features
10. Technical data
11. Service
Dear Customer!
Please bear in mind that unjustified complaints will cost you money! Please consult our telephone HOTLINE if you need assistance. Here experts will
provide you with speedy advice and tips on localising the cause of a fault. If it transpires that the problem is actually a defective device, please send
it in for repair with a precise description of the fault.
Our HOTLINE:
(D) 0900 1 512 532 (€ 0,25/Min.from German landline)
(A) 0900 400 222 (€ 0,68/Min.from Austrian landline)
Monday to Sunday from 8.00 - 22.00
SM ELECTRONIC GmbH
Retourenzentrum
Großer Kamp 9
D-22885 Barsbüttel
Internet: www.skymaster.de
E-Mail: [email protected]
Subject to technical changes • ASTRA, EUTELSAT, TÜRKSAT, DiSEqC and Skymaster are registered trademarks.
• 4000 channel storage locations
• Two integrated interfaces (CI) for connecting two CAM modules
• 2x Scart connection
• Software update via satellite (OTA)
• (OSD) multilingual user-friendly OSD
• Electronic Program Guide (EPG) with channel name and extensive
display of channel contents
• 500 page programme memory
• Timer function
• DiSEqC®1.0 and 1.2
• 4-digit channel position display
• Stereo audio output
• Video output for connecting recording devices or video senders
• Digital sound output, coaxial
• LNB short circuit-proof
• Power saving mains switch at the front of the device
• Supports CAMs with the following coding methods: Viaccess,
Alpha Crypt, Conax, Crypto Works, Irdeto, Aston/Seca, etc.
HF INPUT
• IEC jack
• F plug
• Bandwidth 8 / 7 MHz
• Tuner loop through operation
• 4000 storage positions
VIDEO DECODER
• MPEG-2
• Data transfer rate up to 15 Mbps
• Screen formats 4:3, 16:9
AUDIO DECODER
• MPEG-2 layer I & II mono / stereo / dual channel
• Data rate up to 384 Kbps
AV OUTPUTS
• RGB
• Stereo
CPU & MEMORY
• 32 bit RISC
• 2M Flash
• 8M SDRAM
DIMENSIONS
• Width 280 mm x Depth 168 mm x Height 42 mm
POWER SUPPLY:
• 230V ~ +/- 15% 50/60Hz
• Power consumption: 9W stand-by
12W operation
Waste electrical and electronic equipment is classed as recyclable waste and does not belong in domestic refuse!
We therefore request you to actively support the conservation of resources and environmental protection and to dispose of this device
at responsible take back points – if possible.
Table of contents
Other Sky Master Receiver manuals

Sky Master
Sky Master DS 66 User manual

Sky Master
Sky Master DX 7 User manual

Sky Master
Sky Master DXR 8000 User manual

Sky Master
Sky Master DCI 9410 User manual

Sky Master
Sky Master DVR 9200 User manual

Sky Master
Sky Master DXH 90 User manual

Sky Master
Sky Master DCX 10 CI User manual

Sky Master
Sky Master DVR 9600 User manual

Sky Master
Sky Master DCI 9210 User manual

Sky Master
Sky Master DVR 7500 User manual


