sky rider DRC376 User manual

User’s Guide for Model DRC376 v1648-01
QUADCOPTER DRONE WITH VIDEO CAMERA

Warnings & Precautions
Important Safety Instructions
• Readandfollowallinstructions.
• Keeptheseinstructionsforfuturereference.
• HeedallWarnings.
• Intendedforchildrenages14andhigher.Adult
supervisionisrequired.
• Onlyuseattachments/accessoriesspeciedbythe
manufacturer.
• Beforeying,alwayscheckthebody,rotors,and
batteryforanydamageorobstructions.
• Batteryshouldbefreefromcracksorswelling.
• Keeptherotorsclearofanyobstructionsandbody
partstoavoidpotentialdamageandinjury.
• Manufactureranddealerassumenoliabilityfor
accidentaldamagesfromimproperuseorinstallation
ofparts,orfromdamageincurredfromwornor
brokenparts.
• Pilotsareresponsiblefortheiractionsandany
damagecausedfromimproperuse.
• Pilotsshouldkeepthecraftinsightatalltimes
duringight.Ifyoulosesightofthecraftatanytime,
powerdownandceaseightimmediately.
• Onlyyinlarge,openareasthatarefreefrom
obstaclesorpotentialhazards,suchastrees,power
lines,ceilingfans,andthelike.
• Flyingoverbodiesofwaterisnotrecommended.
• Flyingatnightisnotrecommended.
• Nevertrytoretrievethecraftfromareasyoucannot
safelyreach,suchasrooftopsortrees.
• Neverlaunchthecraftfromyourhand.
• Neverleavethecraftunattendedwhileitispowered
onorwhilethebatteryischarging.
FCC Warnings
Warning:Changesormodicationstothisunitnot
expresslyapprovedbythepartyresponsiblefor
compliancecouldvoidtheuser’sauthoritytooperate
theequipment.
NOTE:Thisequipmenthasbeentestedandfoundto
complywiththelimitsforaClassBdigitaldevice,
pursuanttoPart15oftheFCCRules.Theselimitsare
designedtoprovidereasonableprotectionagainstharmful
interferenceinaresidentialinstallation.Thisequipment
generates,uses,andcanradiateradiofrequencyenergy
and,ifnotinstalledandusedinaccordancewiththe
instructions,maycauseharmfulinterferencetoradio
communications.However,thereisnoguaranteethat
interferencewillnotoccurinaparticularinstallation.If
thisequipmentdoescauseharmfulinterferencetoradio
ortelevisionreception,whichcanbedeterminedby
turningtheequipmentoffandon,theuserisencouraged
totrytocorrecttheinterferencebyoneormoreofthe
followingmeasures:
• Reorientorrelocatethereceivingantenna.
• Increasetheseparationbetweentheequipmentand
receiver.
• Connecttheequipmentintoanoutletonacircuit
differentfromthattowhichthereceiverisconnected.
• Consultthedealeroranexperiencedradio/TV
technicianforhelp.
Additional Warnings & Precautions
• WARNING:Toreducetheriskofreorelectric
shock,donotexposethisapparatustorain,moisture,
dripping,orsplashing.
• CAUTION:Useofcontrolsoradjustmentsor
performanceofproceduresotherthanthosespecied
mayresultinpersonalinjury.
• WARNING:Changesormodicationstothisunit
notexpresslyapprovedbythepartyresponsiblefor
compliancecouldvoidtheuser’sauthoritytooperate
theequipment.
• CAUTION:Dangerofexplosionifbatteryis
incorrectlyreplaced.Replaceonlywiththesameor
equivalenttype.
• Lithiumbatteries,likeallrechargeablebatteries,are
recyclableandshouldberecycledordisposedof
accordingtostateandlocalguidelines.Theyshould
neverbedisposedofinnormalhouseholdwaste,
andtheyshouldneverbeincinerated,astheymight
explode.Contactyourlocalgovernmentfordisposal
orrecyclingpracticesinyourarea.
• WARNING:Shockhazard-DoNotOpen.
• Batteryshallnotbeexposedtoexcessiveheatsuchas
sunshine,re,orthelike.
Keepnewandusedbatteriesawayfromchildren.If
thebatterycompartmentdoesnotclosesecurely,stop
usingtheproductandkeepitawayfromchildren.
• Ifyouthinkbatteriesmighthavebeenswallowedor
placedinsideanypartofthebody,seekimmediate
medicalattention.
• Donotmixoldandnewbatteries.
• Completelyreplacealloldbatterieswithnewones.
• Donotmixalkaline,standard(carbon-zinc),or
rechargeable(ni-cad,ni-mh,etc)batteries.
• Batteriesshouldberecycledordisposedofasper
stateandlocalguidelines.
• WARNING:Thisproductmaycontainchemicals
knowntotheStateofCaliforniatocausebirth
defects,orotherreproductiveharm(CaliforniaProp
65).Washhandsafterhandling.
• ThisproductmeetsandcomplieswithallFederal
regulations.

3
Table of Contents
FAA Registration – 4
Which UAS Must Be Registered?
Who Can Register?
What Do You Need to Register?
Additional Info
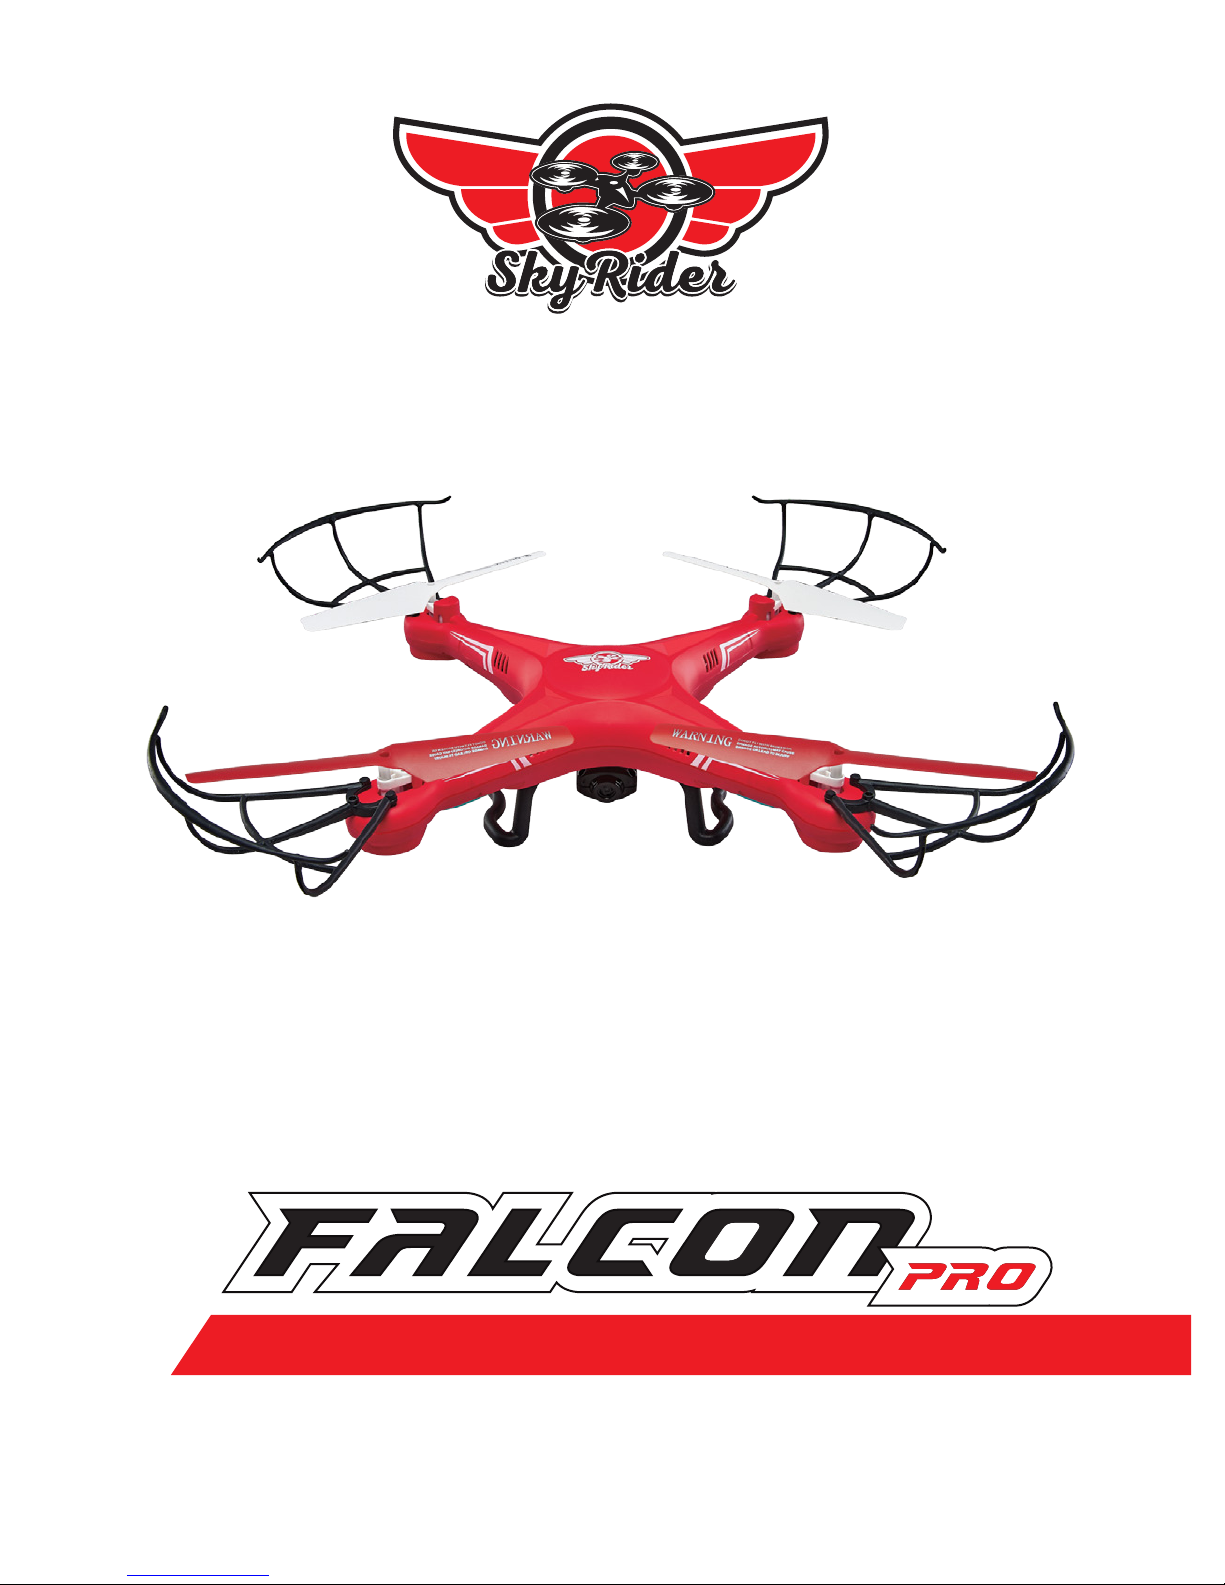
Sky Rider Falcon Pro – 5
Features
Includes
Orientation – 6
Overview
Remote Control
Camera – 8
Attach Camera
Functions
Batteries & Charging – 10
Battery Charging Procedure
Remote Control Battery Installation
Pre-Flight Calibration – 13
Craft/Remote Link
When You’re Done Flying...
Trim Adjustment – 15
Setting Trim & Countering Drift
Flying Tips & Features – 17
Tips for Safe Operation
Speed Setting
Flips & Tricks
Headless Mode
Auto-Reverse
Factory Default Settings
Troubleshooting – 20
Repair – 21
Rotor Replacement
Parts – 22
Parts Replacement
Parts List
Company Information – 24
Contact Information
International Support
Warranty

4
FAA Registration
As of December 21, 2015, the U.S. Federal Aviation Administration (FAA) has
mandated that all Unmanned Aircraft Systems (UAS) of a certain weight must be
registered with the FAA before ying outdoors. This includes aircraft commonly
referred to as drones, quadcopters, Unmanned Aerial Vehicles (UAV), and the like.
The Online Registration fee is $5, but will be credited back to your account if the
registration is completed within the rst 30 days of ownership. Once completed, the
registration is valid for 3 years.
Which UAS Must Be Registered?
The Online Registration requirement applies to all UAS that weigh between 0.55 lbs
(250g) and 55 lbs (25kg).
The Sky Rider Falcon Pro meets this requirement, and must be registered, with the
Registration Number permanently afxed to the craft.
Who Can Register?
• Anyone 13 years of age or older. A person who does not meet this age
requirement must have their UAS registered by someone 13 years of age
or older.
• A US citizen or legal permanent resident.
What Do You Need to Register?
When registering online, you will need:
• A valid email address
• A Credit or Debit Card
• A physical and mailing address (if different from physical address).
Additional Info
For the latest information on the FAA and the registration process, visit the web links
listed below.
• FAA Home Page - http://www.faa.gov/
• UAS Registration Page - http://www.faa.gov/uas/registration/
• UAS Registration FAQs - http://www.faa.gov/uas/registration/faqs/

5
Features
• 360° ips & tricks
• 2 speed settings
• 6-axis gyroscope
• .3 MP Camera (photo & video) with SD card slot
• Control distance: up to 150 feet
• Headless Mode
• Auto-Reverse
• LED navigation lights
• Operating time: 6-8 minutes
• Charge time: 60-80 minutes
Includes
• 2.4 GHz remote control: requires 6 AA batteries (not included)
• Built-in rechargeable lithium polymer battery
• USB cable for battery recharge
• 4GB SD card
• Screwdriver
• 4 replacement rotors
• User’s guide & warranty
Sky Rider Falcon Pro

6
Orientation
Rotor Guard
Landing Skids
Formation Lights
(underside)
Red LEDs indicate
front of craft
Battery Bay/
Camera Mount
(underside)
Overview
Rotors
Red rotors indicate
front of craft.

7
Remote Control
Left Control Stick
Increase Throttle:
push forward
Decrease Throttle:
pull backward
Yaw/Spin:
push left or right
Auto-Reverse:
press down
Right Control Stick
Pitch:
push forward/
backward
Roll/Bank:
push left/right
Headless Mode:
press down
Reset/Speed
Press to change craft
speed setting.
Press and hold to reset
craft to factory settings.
Photo
Press to take a
photo.
Video
Press to take video.
Flip
Press and
move the Right
Thumbstick to
perform a ip.
Roll Trim
Correct left/
right drift.
Yaw Trim
Correct
left/right
rotational
drift.
Pitch Trim
Correct
forward/
backward
drift.
Power Switch
& Indicator

8
Camera
Attach Camera
Mount the camera to the battery door by
aligning the tab on the camera to the slot
on the battery door.
Tighten the camera to the door using the
included screws and screwdriver. Close
the door when complete.
Open the battery door with the camera
attached to access the inside of the door.
Attach the camera’s power cable to the
plug on the body.
Be sure to match the plugs correctly or
damage may occur.

9
Functions
Make sure the remote and the craft have been successfully paired (indicated by a red
light on the remote) before attempting to use the camera.
Video
To record video, press the Video button on the remote. The indicator light will turn
green for as long as the camera is recording. Press the video button again to stop
recording video, the light will turn back to red.
Photos
To take a single image, press the Photo button once. The indicator light will turn from
red to green, then back to red.
Press and hold the Photo button to take a 3 photo burst. The indicator light will
icker green 3 times, then switch back to red.
Photo
Video Indicator Light

10
Batteries & Charging
Battery Charging Procedure
The craft’s lithium-polymer (Li-Po) battery must be charged before the unit can be
own. Before charging, be sure the craft and remote control are powered off. Failure
to do so may result in injury.
Step 1
Make sure the craft is powered OFF, then
remove the battery cover.
Step 3
Attach the plug on the battery to the
plug on the charging cable.
Be sure to match the plugs correctly or
damage may occur.
Step 2
Disconnect the power plugs connecting
the battery to the craft. It is strongly
recommended to remove the battery
when charging. This will reduce the
chance of damage or injury.

11
Step 5
When charging is complete, reinstall the
battery in its bay, reconnect the power
plugs from the battery to the craft, and
close the battery cover.
Be sure to match the plugs correctly or
damage may occur.
Reminder:
Do not charge batteries overnight.
Do not leave batteries unattended while charging.
Step 4
Plug the charging cable into the USB port
of a powered ON computer or USB power
adapter (not included). The battery will
now charge.
LIGHT STATUS
Red Light ON Charging
Red Light OFF Ready
AC/DC Charger Status

12
Batteries & Charging
6 x AA
Batteries
Insert 6 x AA Batteries
(not included).
Use screwdriver (not included)
and remove battery cover.
Remote Control Battery Installation

13
Pre-Flight Calibration
Craft/Remote Link
Before ying, the craft and the remote must be linked together, and the gyroscopes
on the craft must be allowed to calibrate to ensure smooth and level ight.
Begin with the craft and remote powered OFF.
Step 3
Power the remote control ON. The light
on the remote will blink as it searches
for the signal from the craft. An audible
chime will sound when the remote and
the craft have successfully linked with
each other.
Step 1
Place the craft on a at and level surface.
Step 2
Power the craft ON. The LED formation
lights will blink in unison as the craft
searches for a signal from the remote.

14
Pre-Flight Calibration
Step 4
Push the Left Control Stick directly
forward, wait for a chime to sound, then
pull the stick directly backward, and wait
for a second chime.
When this last chime has sounded,
the craft is calibrated and ready to y.
Step 5
Attempt a stable hover, low to the
surface you started on. If you notice
a tendency to drift, you may need to
adjust the trim controls to ne tune the
handling (see Trim Adjustment, pg.15).
When You’re Done Flying...
After safely landing, keep the throttle in the lowest position (OFF) and wait for the
rotors to stop spinning. Power OFF the remote rst. This will ensure that no signals
are accidentally sent to the craft, reducing the chance of injury. After this is done, it is
safe to pick up and power OFF the craft.

15
Trim Adjustment
Setting Trim & Countering Drift
Even after the craft is calibrated, it may show a tendency to drift while airborne.
Adjusting the trim will help counter this effect and allow you to better control the
craft. To avoid potential damage, adjust the trim while in a stable hover, and do not
make any sudden movements with the ight controls. Adjust one trim setting at a
time to avoid confusion.
Remember, the red LEDs /red rotors indicate the front of the craft.
While adjusting the trim will help with drift, it is not guaranteed to eliminate it
entirely. Physical, mechanical, and environmental factors (ex: a gust of wind) may
still inuence the craft’s direction and ight..
Drift Type Solution
Craft yaws/spins in place. Adjust Yaw Trim.

16
Trim Adjustment
Drift Type Solution
Craft pitches/angles
forward or backward.
Adjust Pitch Trim.
Craft banks/rolls
left or right.
Adjust Roll Trim.

17
Flying Tips & Features
Tips for Safe Operation
• Only y in large, open spaces, such as a eld or a very large indoor area, free of
obstacles like power lines, trees, ceiling fans, etc.
• When ying indoors, avoid walls and ceilings, as the craft will be drawn towards
them if closer than 2 to 3 feet.
• Stand behind the craft when rst taking off, so that it and you are facing the
same “forward” direction. This will make it easier to determine which direction
it is ying. Also, remember that the blue LED lights/red rotors indicate the front
of the craft.
• Practice basic ight operations like take off, hovering, and landing.
• Flying inside, at low speed and low to the ground will reduce the chance of
turbulence that can negatively affect the stable ight of the craft.
• Novice pilots should move the controls slowly and deliberately, using one
control at a time, to get used to the craft’s ying characteristics. Next, try
combining the pitch and roll controls (forward/backward and left/right on the
Right Control Stick) to y the craft similar to the way an airplane ies. After
mastering this, try the yaw controls (left/right on the left thumbstick) to spin the
craft in place and perform more complex maneuvers.
• If anything obstructs the rotors for any reason, throttle down IMMEDIATELY and
safely clear the obstruction. Check for possible damage before ying again.
Speed Setting
The craft has two speed settings for the responsiveness of the ight controls. The
default setting is slower and intended for novice pilots. The higher setting allows for
faster, more precise control and is intended more experienced pilots.
Change the speed setting with a short press of the Reset button. A chime will sound
to indicate the change.
NOTE: A long press of the Reset button will restore the factory default settings.
Be careful not to do this while the craft is in ight. See page 21 for more information.

18
Flying Tips & Features
Craft will perform ip in the
desired direction.
Press the Flip button then move the
Right Control Stick in any direction.
Headless Mode
Headless Mode disables the default orientation of the craft, where the red LEDs and
rotors indicate the front of the craft. Instead, the craft will reorient its “front” based
on the rst Right Control Stick input from the user. This can be useful if you become
disoriented while ying, or cannot visually determine which direction is “true front”.
To activate Headless Mode, press the Right Control Stick once.Press again to
deactivate Headless Mode. A chime will sound to indicate when Headless Mode is
active or inactive.
Flips & Tricks
Before attempting any stunts, be sure that there is ample clear space around the
craft, ideally 9 to 10 ft. in every direction. It is not recommended to attempt to ip
around or through any obstacles, as this may result in unintended damage.
To perform a ip, follow the diagram below.
Auto-Reverse
To enable Auto-Reverse, press the Left Control Stick once. The remote will emit a
chime, and the craft will begin ying in the reverse of the direction it was originally
ying. Throttle control will still function, but any directional change from the Right
Control Stick will disable Auto-Reverse ight.

19
Factory Default Settings
If the craft is experiencing difculty ying or is behaving erratically, the craft and
remote may need to have the factory default settings restored. Do not attempt to do
this while ying. Safely land the craft before attempting this procedure.
Press and hold the Reset button for 2-3 seconds. The formation lights will begin
blinking, when they have stopped blinking and are solid again the factory reset is
complete and the craft is ready to y.
Factory Reset

20
Troubleshooting
If you are experiencing problems using or ying the hexacopter, consult this table.
PROBLEM POSSIBLE CAUSES SOLUTION
Craft is unresponsive • No power to remote
or craft
• Poor contact between
power plugs
• Craft is out of receiver
range
• Check remote batteries,
replace if needed
• Check craft’s battery, be
sure it is fully charged
• Be sure the power
plugs are rmly
connected
• Be sure the remote has
an unobstructed line of
sight to the craft
• Remain within the
remote’s 150 ft. range
Craft ies erratically • Gyroscopes may
be misaligned
• Recalibrate gyroscopes
(see next page)
• Perform Pre-Flight
Calibration again
(see pg. 13)
• Perform factory reset
(see next page)
Craft drifts
while in ight
• Trim not set or needs
adjustment
• Adjust trim settings
(see pg. 15)
Craft suffers from
mechanical
difculty or
vibrates excessively
• Damage to body,
rotors, or other major
components
• Check to make sure
the craft has not taken
signicant damage
• Replacement parts
may be needed
(see pg. 22)
Formation lights ON,
but craft no
longer responds to
throttle inputs
• Low battery power • Recharge the battery
Table of contents
Other sky rider Quadcopter manuals

sky rider
sky rider Eagle 3 Pro User manual

sky rider
sky rider FALCON 2 PRO User manual

sky rider
sky rider X-02 Astro User manual

sky rider
sky rider Drone-asaur DR397 v1903-01 User manual

sky rider
sky rider Metal Alloy Drone User manual

sky rider
sky rider HAWK DR176 User manual

sky rider
sky rider Pegasus User manual

sky rider
sky rider eagle pro series User manual

sky rider
sky rider X-11 Stratosphere User manual

sky rider
sky rider Micro User manual