Skyrush Teryx 450 User manual

INSTRUCTION MANUAL
450
4 CHANNEL OUTDOOR 450 COAXIAL HELICOPTER
TERYX Manual
1
SPECIFICATIONS:
Motors: 2x 2826 000KV brushless Outrunner
Speed controller: 2x 20A brushless
Servo: 2x 9g analogue
Rotor Blades: 280mm EZ carbon
Main Rotor Mast: 6mm SUS 04 Stainless Steel
Battery: (optional) 11.1V 2200mAh 20C
Flight time: Basic Version w/o Body - 15+ minutes
with 400g Payload - 10+ minutes
Maximum Lift: 0 N
Maximum Side wind: 8m/s with body, 15m/s barebone
Flight Stabilization: Gyro stabilized on axis, Mechanic Stabilization
Radio Control (optional): 4 Channel
TABLE OF CONTENTS
Spezifications 1
Table of Contents 1
1. Thank you 3
2. Important Notes prior to first use 3
3. Description of Pro uct 4
3.1 Purpose of Use 4
3.2 Mo els 4
3.3 Contents 4
3.4 Description of Functions 4
4. Safety Notes 5
4.1 Glossary 5
4.2 Common Notes 6
4.3 Safety against Injury or Damage 6
4.4 Safety of your Chil ren 7
4.5 Safety against electric shock 7
4.6 Use an Han ling of Batteries 8
5. Denomination of Parts 8
6. Get rea y for flying 9
6.1 Getting the Mo el rea y 9

TERYX Manual
2
6.2 A justing the Mo el 10
7. Use an A justment of Ra io Control – Mo e 2 11
7.1 Throttle 11
7.2 Yaw 11
7.3 Pitch 12
7.4 Roll 12
7.5 Notes on 3 Axis Gyro 12
8. Flying 12
8.1 Prepare helicopter 13
8.2 Flight Practise 13
8.3 In Case of Crash 15
9. Han ling of the Battery – Charging 15
9.1 Important Information 15
9.2 Safety 16
9.3 Charging the Battery 16
10. A justing the 5in1 unit 17
11. Spare part list 17
12. Elektronic Wiring Diagram 18
13. Spare Parts 19
14. Explosion Drawing 20
15. Weights an Sizes 21

TERYX Manual
1. THANK YOU
Thank you for your confi ence in the pro uct. We congratulate you on your choice to purchase a
quality pro uct, which results from a long time evelopment.
The TERYX 450 is readily mounted (plug and play) and was test flown and adjusted at the production site.
It is necessary though to connect a receiver and a battery to it, correctly. The power is delivered from a
Lithium Ion Polymer Battery (LiPo-Battery) which is the latest standard in the industry.
Flying model helicopters is not a simple task. Even the product was adjusted and pre-flown at the
production site, the success will depend on the pilot after all. It is important that you read and understand
this manual entirely prior to the first flight. The products of Decent Devil are subject to continuous quality
control and hence provide top functionality and fun with the product. Technical perfection and Solutions
are our top directive. Experience, the feedback from clients and subsequent development of ideas and
innovations makes it possible to provide state of the art products to our clients. The synergy of modern
technology and the demand on high quality and paragon design lead to a long service life of our products.
We wish you a lot of fun with our helicopter!
2. IMPORTANT NOTICES PRIOR TO FIRST USE
This manual helps you to use your TERYX 450 in a safe manner. Every person, who operates, repairs,
cleans or disposes of this TERYX 450 must have read and understood the entire content of this instruction
manual.
Please keep this instruction manual well stored, to be handy in case you need it.
If you sell or present this product to others, please pass this instruction manual along so that the next user
is also able to use this product in a safe manner.
This manual helps you to have a safe first flight. All steps are explained in this manual.:
Get to know the functions of your TERYX 450 : read „ . Description of product”
Read the Safety Notes ( „4. Safety Notes” )
Charge the batteries („9. Handling of the Battery - Charging” )
Prepare the TERYX 450 („6. Getting ready for flying” ).
Start to your maiden flight ( „8. Flying” )

TERYX Manual
4
3. DESCRIPTION OF PRODUCT
.1 PURPOSE OF USE
This TERYX 450 is a radio controlled helicopter model, which can fly indoors and also outdoors in calm
wind conditions.
This model is not suitable for high speed or acrobatic outdoor flights.
The TERYX 450 is not a toy. It is a powerful but yet delicate and complicated aircraft. If handled
inaccurately it can lead to personal injury or damage of property. The responsibility for safe operation is
completely with you!
This product is intended for private use only and not for any commercial purpose.
.2 MODELS
Model Name: TERYX 450 Item Number: CH-450-PNP - The product is available with different scale
fuselages.
. CONTENTS
TERYX 450 helicopter model
Instruction manual
.4 DESCRIPTION OF FUNCTIONS
The TERYX 450 is a completely controllable helicopter model, suitable for outdoor operation. Thanks to a
stabilization bar and two coaxially counter rotating rotors, it doesn’t need a tail rotor. The helicopter flies
extremely stable.
The power supply is provided by a Lithium-Ion-Polymer-Battery (LIPO), it is recommended to use a regular
11.1V 2200mAh 20C Battery with T-type plug (Deans).
The coaxial systems rotors counter rotate. The produced momentums are therefore balanced and in flight
the helicopter is not turning into any direction.
A helicopter with a single main rotor disc needs to balance the momentum of the main rotor as well,
hence a tail rotor is necessary to produce the needed counter-momentum.
If you add throttle to a helicopter in flight, the rotations per minutes on the rotors increase equally, so the
momentum stays balanced.
If you want to yaw left or right, the RPM on one rotor disc layer slightly increases, while it decreases on
the other layer, the resulting imbalance of momentum turns the helicopter accordingly to the right or left.

TERYX Manual
5
The controls of pitch and roll are accomplished by cyclic swash plate inputs through two servo motors
connected to the lower rotor disc. This is a flybarless control input method. The upper rotor disc is not
controlled cyclically, it is available as a upgrade system.
The „5 in 1“- unit consists of a axis gyro controller, which is state of the art. It is readily mounted,
connected the ESCs and Servos and adjusted in the factory.
4. SAFETY NOTES
This product was constructed and is produced according to actual industry standards. All common
security directives and conformity requirements are met. Yet danger can come from the use of the
product.
Your own safety should be worth 5 minutes of your time. It won’t take longer to read through our safety
notes. Probably you do know most of these, but please read through them anyway, so you won’t miss a
aspect unknown to you, which could protect you from harm.
4.1 GLOSSARY
You will find the following terms in this instruction manual:
Warning!
High risk. Ignoring this warning can cause injury and / or damage to property.
Caution!
Medium risk. Ignoring this warning can cause damage to the product.
Note:
Low risk. Issues which should be followed while using this product.

TERYX Manual
6
4.2 COMMON NOTES
We want to inform you that it is required by law to purchase a liability insurance to operate a model
helicopter.
Prior to use, read this instruction manual completely and thoroughly. This manual is part of the product
and must be kept available at any time.
Do only use the product for its intended purpose („ .1 Purpose of use“ on page 4) .
Check if the supply voltage (check the type label on the charger) matches the supply voltage of the public
electric network. (Optional Accessory)
Please understand that any warranty or liability cannot be assumed if parts are used which are not
recommended in this manual or if in case of repairs parts other than the original are used. This also
includes repairs assessed by unqualified personnel.
Please do follow the safety instructions while handling the battery (check „9.2 Safety“ on page 16).
(Optional Accessory)
Like all RC helicopters locking elements – metal against metal – must be secured against loosening with
blue Loctite® #222 thread lock. Accordingly all ball bearings have to be secured against slop in their
bearing blocks with red Loctite® #641 bearing lock.
4. SAFETY AGAINST INJURY OR DAMAGE
Warning!
The TERYX 450 is not a toy. It is a powerful but yet delicate and complicated aircraft. If handled
inaccurately it can lead to personal injury or damage of property. The responsibility for safe operation is
completely with you!
This helicopter contains two counter rotating rotors, which produce enormous force in flight. Persons,
Animals and any obstacles must be kept off them. Parts of the body can be injured or cut off. If anything
hits the operating rotors, the rotors and the object hitting it will be damaged or even destroyed. In case of
a crash or after damaging the rotors, the helicopter has to be entirely checked and repaired. Otherwise
the helicopter would become an unpredictable aircraft. Generally a continuous inspection and service of
the helicopter is necessary, as this model consists of parts that do wear in flight. Prior to each flight a
check must be performed, so that problems with the products can be solved prior to flight. Make sure
that the batteries in your radio control transmitter are sufficiently charged, otherwise you may loose the
control over your aircraft and the machine would fly uncontrolled and unpredictable. Radio controlled
helicopters can become unpredictable if the radio control signal is jammed. The helicopter could suddenly
move in any direction by itself in this case. Before you fly this product, it is necessary that you have read
and understand this manual completely. Before flying, visit a hobby club or talk to an experienced RC
model pilot. Changes in the construction of the model other than shown in the manual are not to be
performed. As manufacturer and seller do not have any influence on the proper build and use of the
product, all dangers that can result from use are clearly stated and not liability can be assumed from the
use of this product.

TERYX Manual
7
The minimum distance for indoor use should be meters. The allowed temperature range for operation is
between +10 °C and +40 °C. Do not expose the model to direct sunlight longer than necessary, humidity
or dust. Do not fly the helicopter near persons or animals. Start your flight always with a fully charged
battery. Have in mind that parts of the helicopter can warm up considerably.
4.4 SAFETY OF YOUR CHILDREN
Warning!
Children often are not able to evaluate dangers properly and are therefore subject to injure themselves
easily. Therefore:
This model helicopter must not be operated by children under the age of 14. If operated by minors, it has
to be operated only while an experienced adult is monitoring it. Make sure that the product is kept out of
reach of children. Never place a portion of the product or the packaging in your mouth, it can cause
severe injury or death.
4.5 SAFETY AGAINST ELECTRIC SHOCK
Warning!
The following safety notes should protect you against the risk of electric shock:
If the charger or the cable is damaged, it must not be used anymore. In this case, the item must be
repaired by qualified personnel. Never let the helicopter or the charger get wet, or expose them to rain or
other liquids, or to high humidity:
– Do not fly in rainy conditions;
– Do not fly in very humid conditions;
– Do not fly near open water
Do not touch charger, the power cord or the power plug with wet hands. Pull only the plug out of the
socket, do not pull on the cord. Makes sure not to bend or squeeze the power cord. Keep the power cord
clear of hot surfaces. If you do not use the charger for a longer period, unplug it. Only then the charger is
not consuming power. Avoid the use of power prolonging cords. If necessary, please make sure that:
- The prolonging wire is suitable for the required amperage;
- The prolonging wire is not damaged.

TERYX Manual
8
4.6 USE AND HANDLING OF BATTERIES
If batteries are empty, or if you do not intend to use the item for a longer period, the batteries have to be
removed. Leaking batteries can damage the product. Dispose of empty batteries not properly, according
to your local regulations.. Make sure that you install batteries with correct polarity as shown (+/–)..
Batteries must not be charged while inside the remote control, nor are to be thrown into a fire, in both
cases the batteries may explode. Use only the nominated battery type (type AA, 1,5V). Check the charge
level of the batteries prior to each flight. The radio control does have a voltage indicator for this purpose.
5. DENOMINATION OF PARTS
TERYX Contents
Plug & play Version:
1. TERYX RTF mechanic with mounted motors and servos
2. One set of carbon rotor blades (2x upper, 2x lower)
. Elektronic, preinstalled (2 ESCs, 5in1 axis gyro)
4. Battery accessories (Velcro)

TERYX Manual
9
6. GET READY FOR FLYING
6.1 GETTING THE MODEL READY
1. Take the TERYX 450 and all accessories out of the packaging.
2. Connect your receiver to the 5in1 unit. The unit comes with 4 labeled servo plugs, which
have to be connected to the receiver. The labels are named so you can easily connect them
to your radio control receiver ports. These are:
AIL – Aileron / Roll (usually port 1)
ELE – Elevator/Pitch (usually port 2)
RUD – Rudder/Yaw (usually port 4)
THR – Throttle/Climb and sink (usually port )
The assigning of those control function, but not their direction, are a standard in the rc
industry, it might be necessary that the travel direction of one or several channels must be
inverted. This channel inversion is a basic function of any RC radio control, on basic models
there are switches on the front side which are labeled NOR and INV or REV, on more
sophisticated radio controls the inversion of channels or servo travel direction is part of a
programming menu. Make sure that the levers on your radio control are assigned to the
correct channels, turn off all mixing and swash plate programs. In this manual, the lever
configuration known as Mode 2 (Throttle-Yaw on the left) is the one the further steps refer
to. Please make sure that in other configurations the control responses are different!
. Charge the batteries. Note: More on charging the batteries and correct handling you will
find at „9. Battery handling and charging” on page 16.
4. Place the fully charged battery in the battery holder so that it can be connected easily to
the helicopter. Caution! Do not yet connect the battery, the TERYX might take off
uncontrolled.
5. Lift the TERYX 450 up on the balance bar.
6. Move the battery so that the TERYX 450 is hanging leveled. Use
the supplied Velcro to fix the battery in the proper position.
Prior to connecting the battery, you have to connect the
receiver and setup the radio control properly.
7. Caution! The following steps must be carefully executed, so
that your TERYX 450 does not take off as soon as the battery is
connected and the radio control switched on:
.Throttle lever and its trimmer must be in the lowest
position (Motor off);
.All other levers and trims must be in center position;
8. Turn on the radio control. Caution! In any case switch on the radio control prior to

TERYX Manual
10
connecting the battery to the model. Jamming signals may result in an undesired takeoff or
any other uncontrolled reaction of the model.
9. Place the TERYX 450 on a plain surface, and make sure it is not moved during powering it up.
10. Connect the battery to the helicopter. It is necessary on power up that the channel
inversions are properly set up. The 5in1 unit features a couple of safety mechanisms, which
should prevent an undesired take off. As the model is considerably big and powerful a
couple of conditions must be met so that the control unit releases the motors and servos.
a) All channels have to be connected. If one plug is not connected to the receiver, the
5in1 unit will not release the helicopter.
b) The throttle channel (THR) has to provide a 0% signal (throttle off).
c) The Yaw channel (RUD) has to be moved out of its center position to full deflection left
(Lever on the radio to full left) and returned to its center position.
11. Only if those conditions are met, the light on the 5in1 unit will turn on. Caution! If the TERYX
450 is moved during this initializing phase, gyros may not be setup correctly.
12. If the light will not come on after deflecting the rudder to full left after this procedure, the
channels are wrongly assigned. Please check systematically, check the assignment of the
channels again (plugs properly connected) and then the inversion of the channels. You may
want to connect a single servo to check the situation at your receiver.
1 . As soon as the light is constantly on, the setup is correct.
14. Move the throttle lever a little bit, so that the rotors start to spin slowly.
15. Check the reaction of the swash plate, move the levers for pitch and roll. The swashplate
must move with the input of those lever inputs.
16. Check the yaw function, if you move the lever to the left, the upper rotor must spin slower
as the lower one, or even come to a still stand at low rotations.
6.2 ADJUSTING THE MODEL
Now you have to adjust your TERYX 450. This means, that
the radio control must be adjusted in a manner, that the
TERYX 450 keeps flying leveled and balanced. Put the
helicopter at a distance of 2 meter from you on a hard,
flat and if possible slippery ground. Move the throttle
lever carefully up. First the lower rotor starts to spin, then the upper rotor. Move the throttle
lever further upwards, but do not let the helicopter take off. In this stage the helicopter will
probably try to turn or drift into some direction. Make sure that you pull down the throttle lever
in case the helicopter is near to tipping over. To balance this drifting, you need to use the trims
on your radio control (small levers next to the big control levers):
If the TERYX 450 tilts back or forwards, move the trim lever of the pitch function in the other
direction, until it stops.
If the TERYX 450 twists left or right, move the trim lever of the yaw function in the other
direction, until it stops.
If the TERYX 450 tilts right or left, move the trim lever of the roll function in the other direction,
until it stops.
TERYX Manual
11
If your trim efforts in the counter direction just worsen the behavior, you might want to check if
the channel is correctly inverted. Please also have in mind, that the helicopter will react itself on
any movement of the helicopter, this means that the motors and servos react by themself or
sudden movements of the helicopter, while in flight. The gyro system is inactive with the main
rotors stopped.
Once you trimmed the model properly, pull down the throttle lever. Rotors will come to a
standstill.
The TERYX 450 is now completely trimmed and ready to fly. Please have in mind that you may
only be able to perform this trim and adjustment above a certain rotor head speed. This speed is
reached shortly before the helicopter would take off.
7. USE AND ADJUSTMENT OF RADIO CONTROL - MODE 2
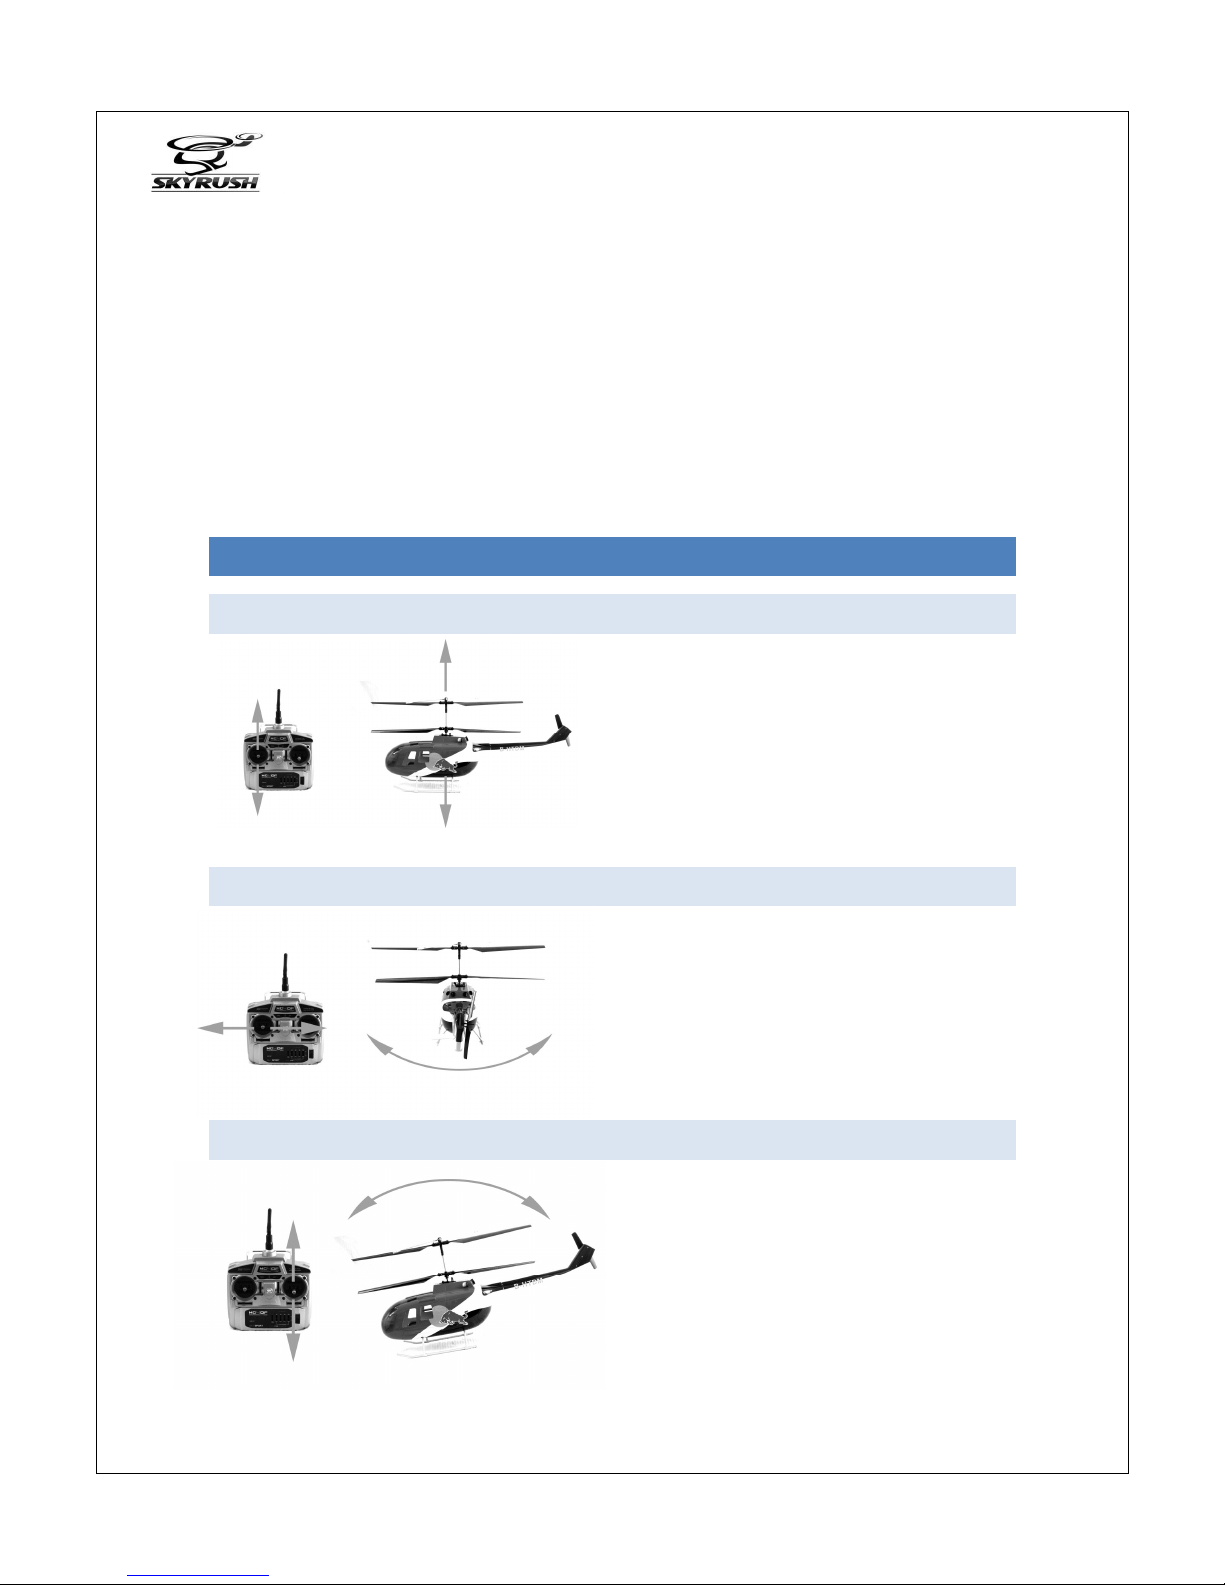
7.1 THROTTLE
Left lever up/down: helicopter rises and sinks.
7.2 YAW
Yaw is the rotation of the helicopter around its
main shaft. The helicopter will fly in the
direction the nose points at:
Left lever left/right: Helicopter twists sidewards.
7. PITCH
Pitch means to pitch the helicopters nose up
and down. Through pitching it, it starts flying
forward and backwards.
Right lever up/down: Helicopter flies
forwards/backwards.
TERYX Manual
12
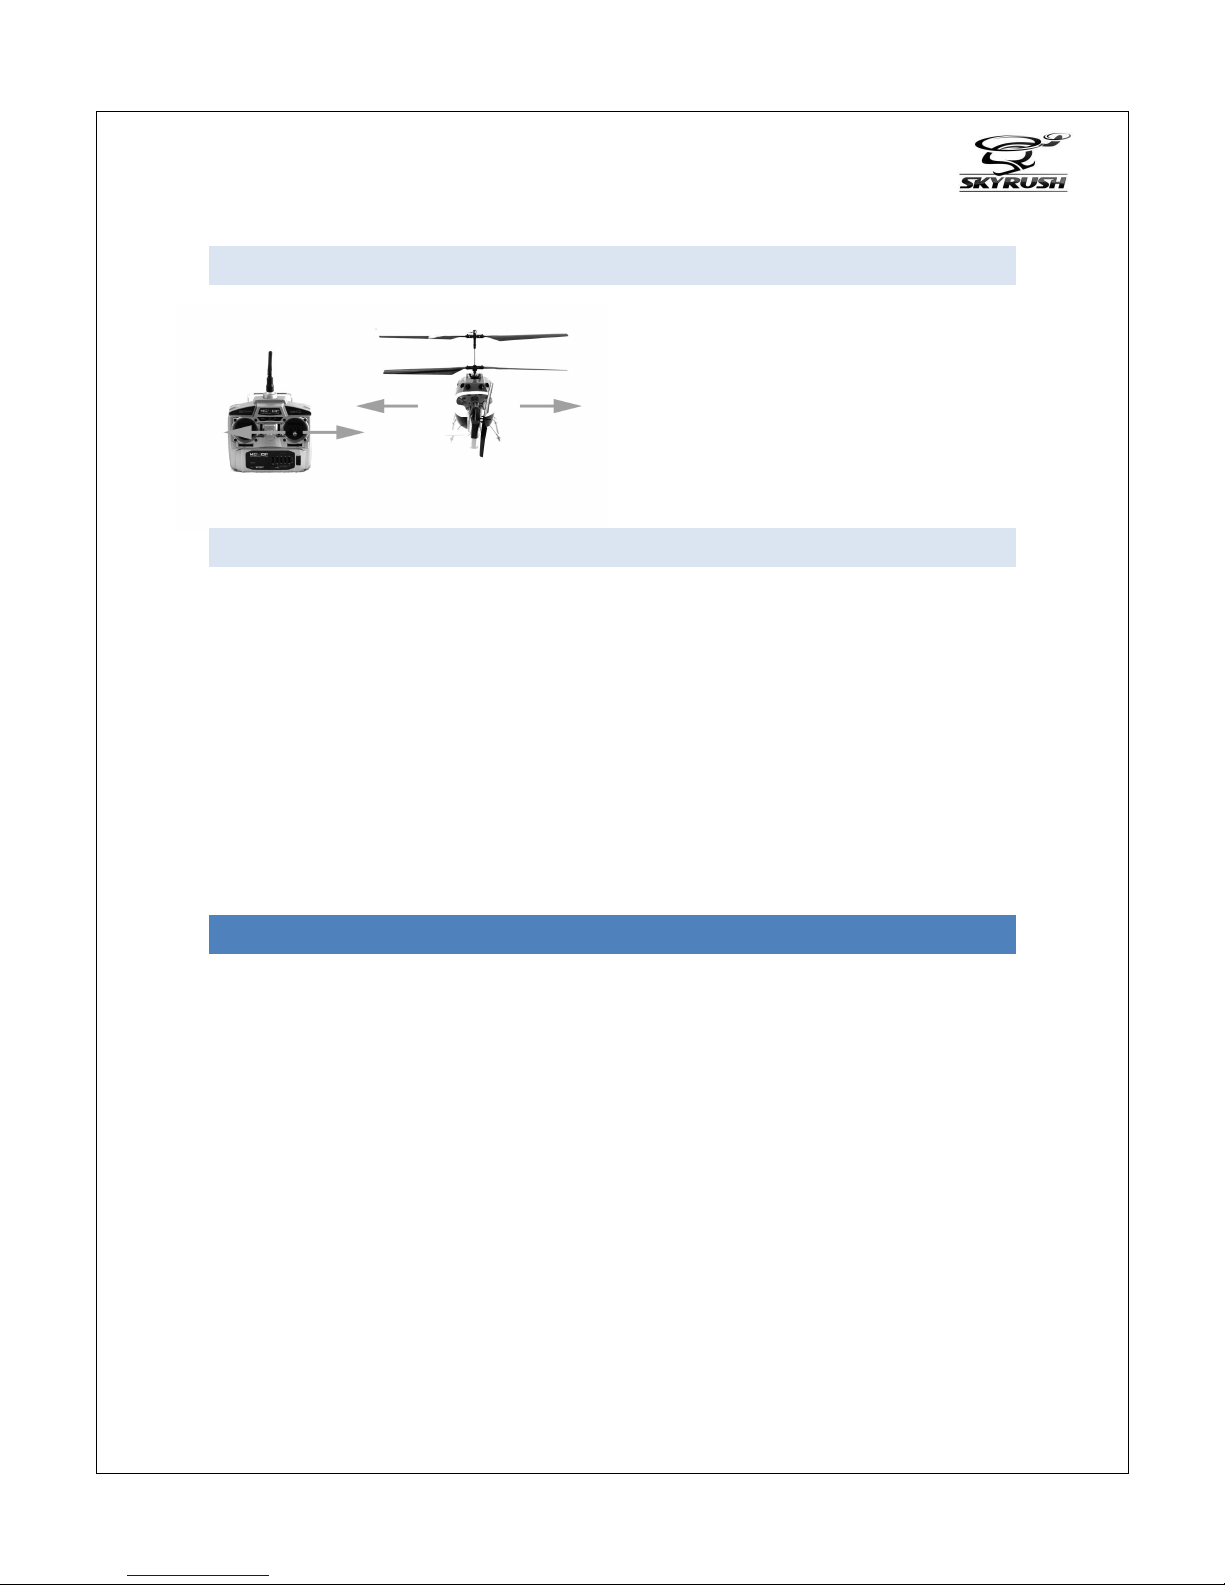
7.4 ROLL
Roll means to fly the helicopter sideways.
Through this function the helicopter flies left
and right to the side:
Right lever left/right: Helicopter banks to the
left/right.
7.5 NOTES ON THE AXIS GYRO
The supplied control unit comes along with a couple of safety features, which are not common
in other RC helicopters. After connecting the battery pack, the system will show no reaction at
all, unless a chain of security dependencies is fulfilled. Just after those dependencies are fulfilled,
the LED on the unit will start to turn on. All outputs of the unit are turned off, including the
servos, until you start flying. Hence there is no reaction from the gyros. The unit is calibrated
properly in the factory, it doesn’t require any adjustment of the gyroscopes. But we want to
mention at this point, that a change in the sensibility of the gyros will take effort after powering
the unit off and on again. During power on, any changes on the gain pots are not taken into
account. The unit can be programmed, outputs can be inverted, the gyroscopes can be inverted,
and the travel limits of the servos calibrated – to make both ESCs spin at the same speed. A
complete and thorough manual you can find for download on our website.
8. FLYING
If you are a rc helicopter beginner, please make sure you are flying under the supervision of an
experienced pilot. The spinning rotor blades produce enormous forces. Make sure that no
children, animals or any other thing comes into the proximity of the helicopter, to avoid
personal injury or damage of property. Make sure while flying indoors that the room is big
enough. If you are flying outdoors make sure not to fly in windy conditions. The helicopter can
cope with a certain amount of wind, but it still requires pilot skill to fly in windy conditions. We
do not assume liability for any improper use of the product.
Caution! A helicopter consists of various parts which wear, such as gears, motors, bearings,
linkages etc. A continuous maintenance is necessary to ensure safe operation. Like on real
aircraft, a preflight check has to be performed to be able to find out problems prior to flight, so
that they could not become the reason for a crash.

TERYX Manual
1
8.1 PREPARE HELICOPTER
Note:
Choose a rather slippery ground for first flights, so that the helicopter can slide on it rather than
tipping over instantly. Make sure that the tail of the helicopter always points towards you (you
are exactly behind it). If not, you have to turn around the control commands in your head and
imagine you are in the helicopter, which is considerably more complicated. The throttle lever
should never be moved quickly. First of all you should practice taking off and landing the
helicopter.
If you lose control over the model, you should pull the throttle off. Beginners tend to push the
throttle up, to regain control over the model.
– Bring the radio in takeoff position:
– Throttle to minimum (throttle off);
– All other levers to center;
– Leave the trims in the positions you adjusted (check „6.2 Adjust model“ ) .
– Connect the battery. Move the Yaw lever to complete left deflection and return it to the
center position, and check the LED on the 5in1 unit has turned on. The TERYX 450 is now ready
for takeoff.
8.2 FLIGHT PRACTISE
Note: The most important rule is not to move the levers quickly on your radio control.
1. Put the helicopter on the ground.
2. Stand with the radio about 2 meters behind the
helicopter.
. Slowly move the throttle levers up and see the rotors starting to turn.
4. Increase the throttle slowly until the model starts to take off and hovers a few centimeters
above ground.
If the helicopter will drift or turn strongly into one direction, you should repeat the
adjustments (check „6.2 Adjust model“). Small adjustments can also be performed while
flying by moving the trim levers accordingly.
TERYX Manual
14
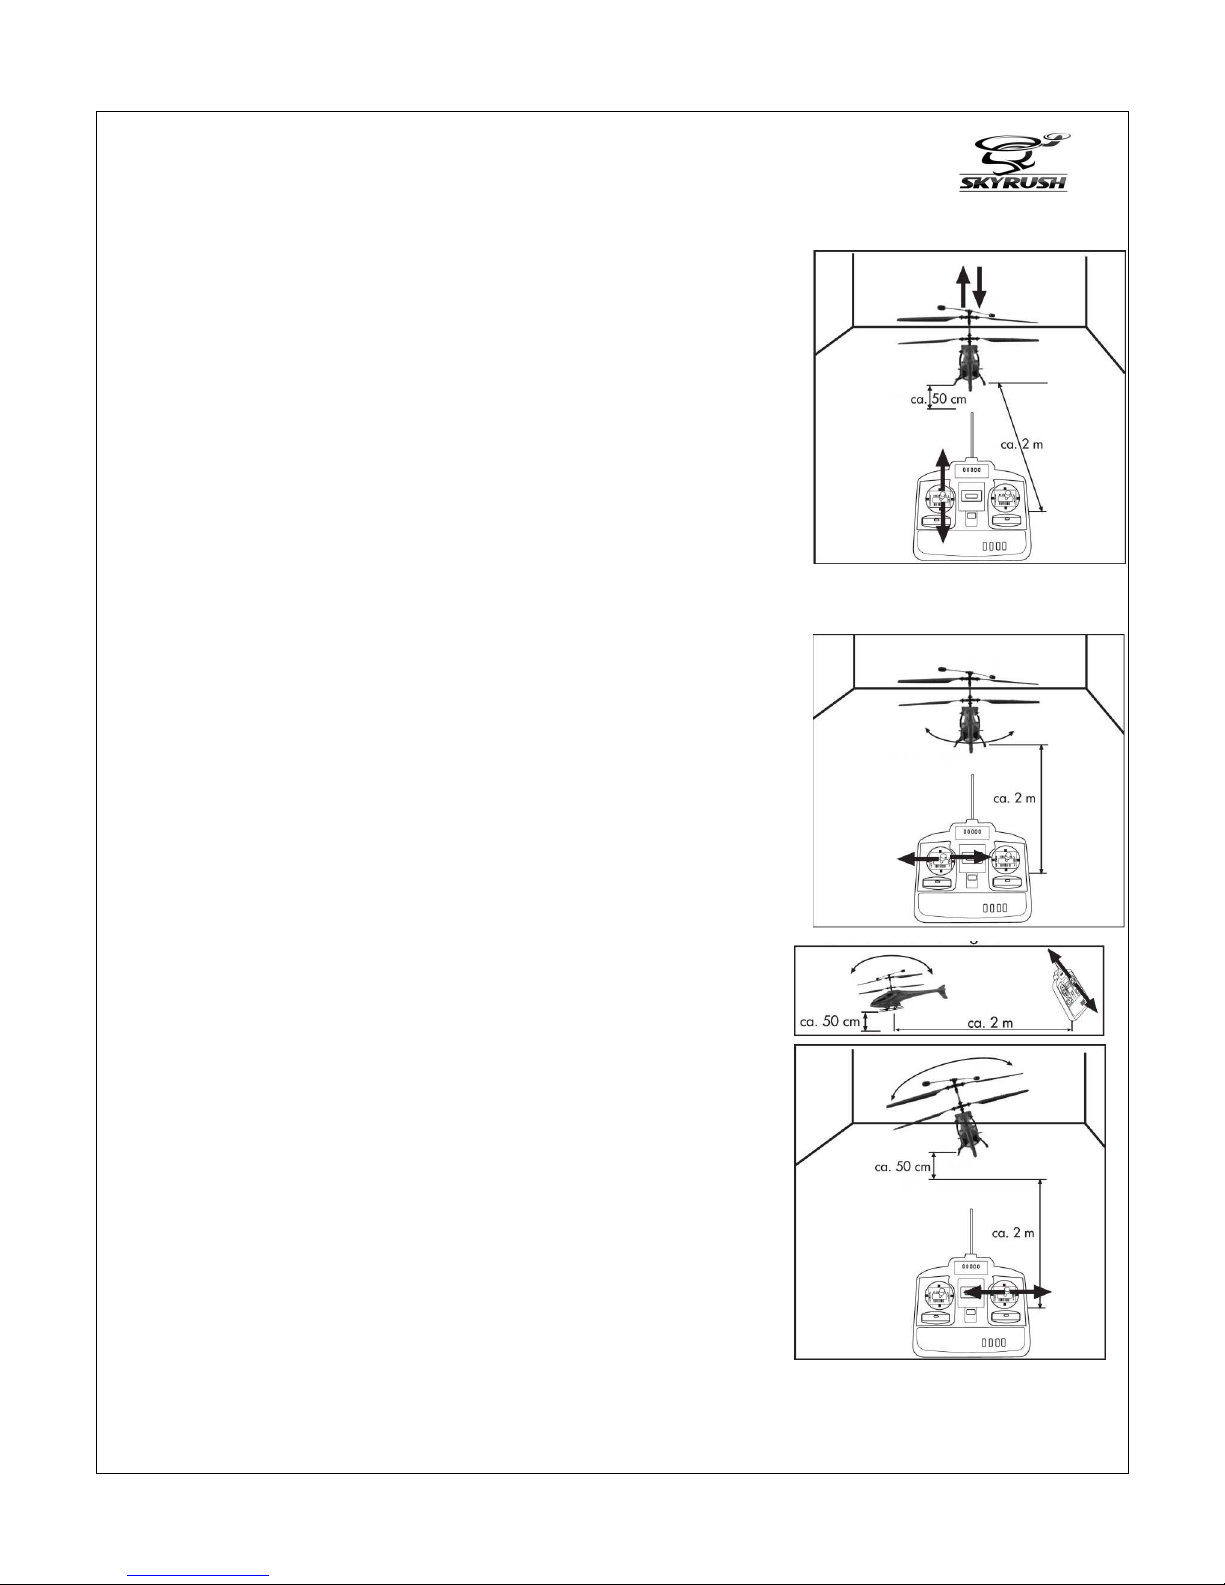
5. Practise taking off and landing again a couple of times, until you feel safe with this exercise.
6. Then start to hover the model about 50 cm above ground.
Note: Above 0cm of ground clearance, the so called bottom
effect is less strong. A kind of air cushion is built up below the
helicopter, this disappears at heights beyond 50cm and the
helicopter will hover much more stable and smoothly. The
helicopter is now in hover. If in any stage you feel that you are
losing the control over the model, pull down the throttle lever
gently and land the helicopter safely. Repeat this exercise until
you feel comfortable controlling a hover flight. You will have to
learn how to correct with small inputs how to keep the helicopter
in a spot, without drifting and turning.
7. Now try to yaw the TERYX 450 to the left and to the right:
8. Then try to fly forwards and backwards with the helicopter:
9. Finally try to fly sideways to the left and right (roll it):
Repeat these exercises as many times as necessary until you really
handle the helicopter well. After that, you may start flying the
helicopter around in any direction.

TERYX Manual
15
8. IN CASE OF CRASH
If the helicopter is out of control and about to crash, pull back the throttle lever entirely. Once
the rotors come to a standstill, disconnect the battery, then switch off the radio control. If you
don’t react in case of crash, further damage may come to the model.
9. BATTERY HANDLING / CHARGING
As Decent Devil cannot supervise the proper way of charging and discharging the lipo batteries,
any liability for defective batteries cannot be assumed.
9.1 IMPORTANT INFORMATION
Lithium-Polymer-Batteries (LiPo-Batteries) are the newest generation of rechargeable batteries:
High Energy Density: In comparison to other technologies, like NiCd, LiPo batteries can carry up
to three times the energy at the same cell weight. No Memory-Effect: LiPo-batteries can be
charged anytime and at any given charge level. They do not require a metal housing, the
electrodes are embedded in a plastic foil housing. LiPo batteries do not contain a liquid
electrolyte, but the electrodes are embedded in a plastic polymer and therefore can be
produced in any size and shape. The nominal capacity diminishes with each charge-discharge
cycle, which is a normal. LiPo batteries will provide after 50 cycles a capacity of about 40-80% of
the capacity of a new battery.
9.2 SAFETY
LiPo-Batteries can cause – in case of improper handling – the following reactions: Explosion, Fire,
Smoke.
Therefore one must follow this instruction manual, even lesser defects can result from improper
handling, such as deformations or quickly diminishing capacities.
Improper storage reduces the battery capacity, therefore:
Protect LiPo Battery against direct sunlight and other heat sources and store at a temperature
range from 0 °C - 50 °C. Charging the batteries must be monitored at all times! For charging,
only certified LiPo battery charger must be used. While charging the battery must not be placed
on a flammable or heat sensitive surface. Additionally, the surface should not be conducting
electric currents. Easily flammable substances or items have to be kept at proper distance. Do
not connect the batteries with wrong polarity to the charger (+/–). Lipo batteries should be
stored at a capacity level of at least 10%. A deep discharge or storing them discharged will lead
to the complete damage of the battery. Therefore also make sure that you never fly the
batteries once they are depleted. Do not short circuit the batteries, the high currents may
destroy it. Do not use sharp objects in the proximity of the battery, the soft housing can easily
TERYX Manual
16
be pinched and destroyed. If air can enter into the battery, it will be completely destroyed. The
battery should be mounted in a manner, that in case of a crash it will take no or minimum
damage. As the battery does not have a metal housing, do not drop the battery and make sure
that nothing will deform the surface of the battery. Damaged batteries are not to be used
anymore and are to be disposed of properly. Make sure that the cells are completely discharged
before disposing of them. Do not throw the batteries into open fire, nor let them get wet or in
contact with any liquid. LiPo batteries are no toys for children and have to be kept out of their
reach. If a part of the battery has been taken into the mouth, a doctor should be consulted
immediately. Lipo batteries are not to be exposed to air pressures not suitable for humans, and
are not to be placed into a microwave oven in any case. They are not to be disassembled, as this
may lead to personal injury. The LiPo contains metals which are extremely poisonous. If any part
of the electrolytes gets into contact with the skin or other body parts, a doctor must be
consulted immediately. If the product is not in use, the battery has to be disconnected and take
out of the model. The battery is not to be stored inside the model.
9. CHARGING THE BATTERIES
The battery and the charger are optional equipments and a separate manual is supplied with
explaining the charging procedures. This manual does not address the process of charging.
TERYX Manual
17
10. ADJUSTING THE 5IN1 UNIT
The 5in1 control unit has been properly adjusted by a technician at our production facilities and
does not require further adjustments. If you wish to choose other components, which are
behaving differently and require readjustments, you will find a complete manual for download
on our homepage. The adjustment of the 5in1 unit is complex and only recommended to
experienced hobbyists.
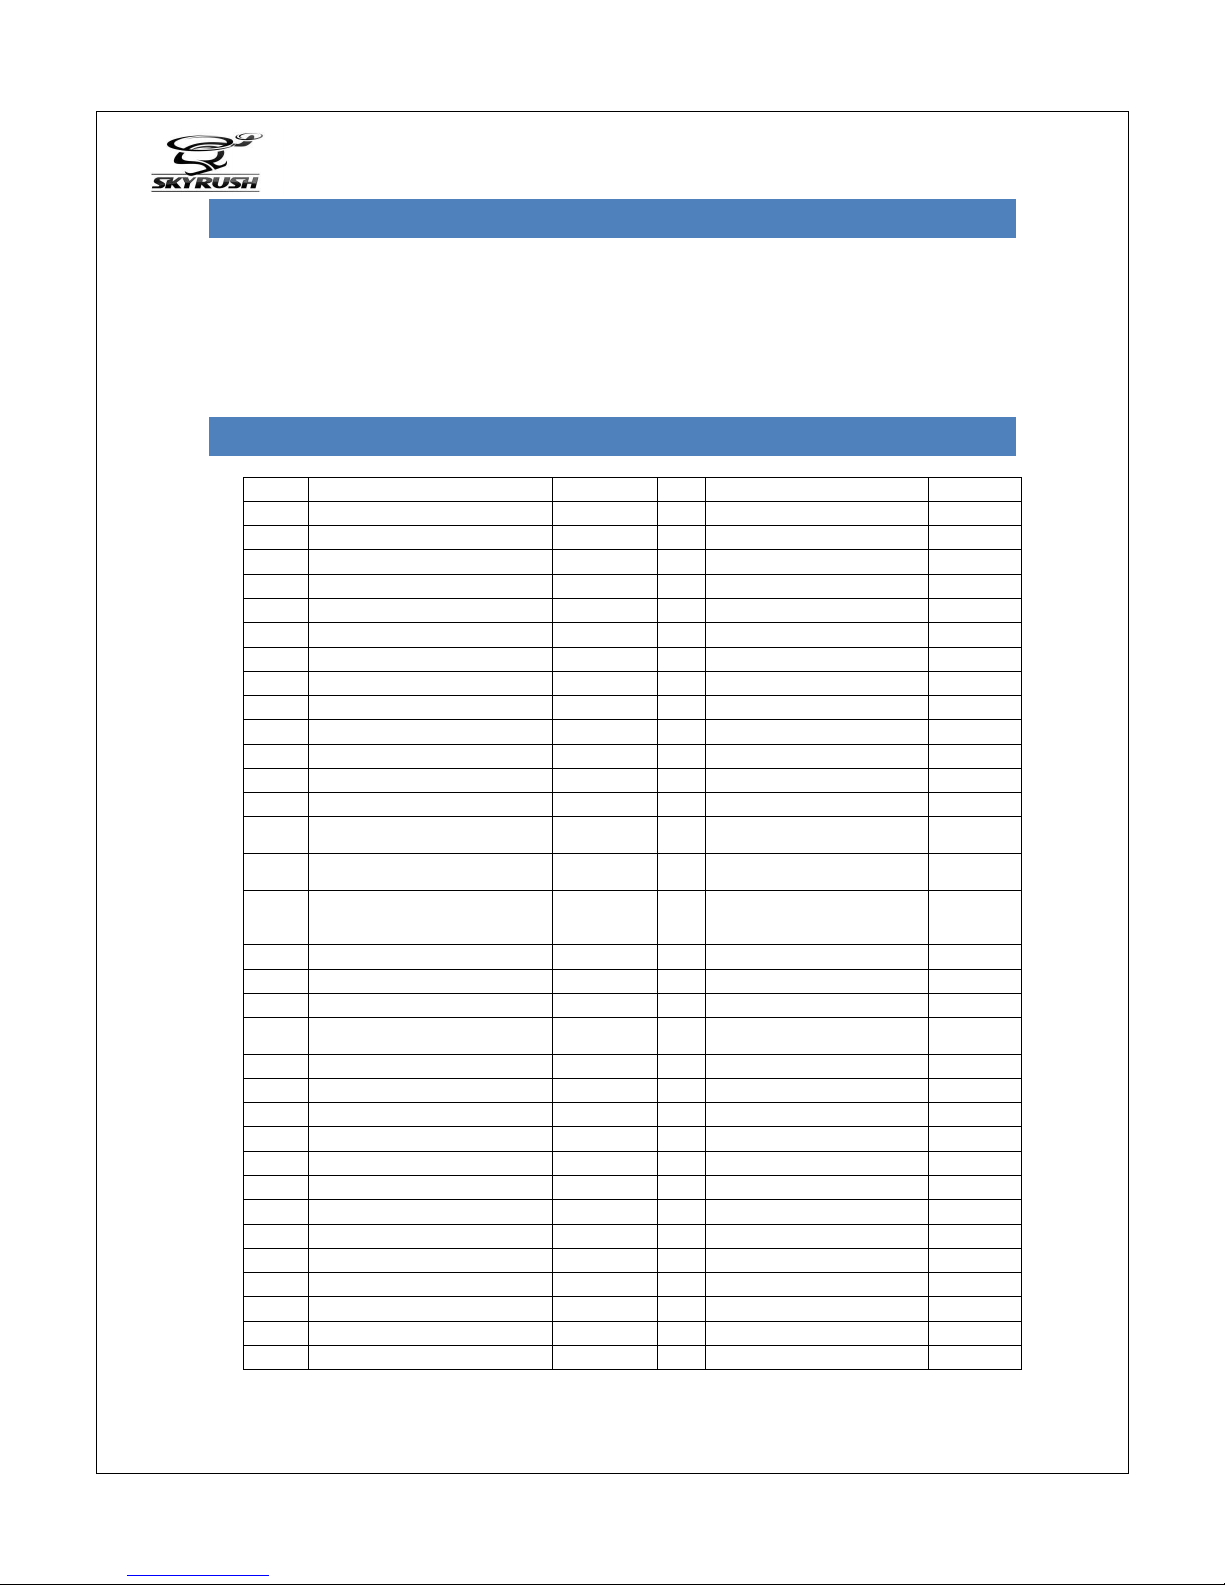
11. SPAREPART LIST
No Description Sparepart No Description Sparepart
001 Main Frame DD10-006 0 4 Swashplate Assy B DD10-015
002 Main Shaft Holder DD10-005 0 5 Bearing 12x18x4 DD10-015
004 Main Frame Holder DD10-007 0 6 Ball 6x9 DD10-015
004-1 Frame Holder Screw M x8 DD10-007 0 7 Lower Hub DD10-01
005 Left Servo Holder DD10-007 0 8 Swashplate linkage DD10-015
006 Right Servo Holder DD10-007 0 9 Lower Rotorblade Grip DD10-01
006-1 Servo Holder Screw A2x5 DD10-007 040 Upper Rotorblade Grip DD10-014
007 Motor Pinon Gear 12T DD10-004 041 Balance Frame DD10-02
008 Brushless Motor DD10-004 042 Balance Linkage DD10-010
009 Motor Screw M x6 DD10-004 04 Balance Bar DD10-010
010 Shaft Holder Screw M x6 DD10-005 044 Balance Weight DD10-010
011 Servo 9g DD10-019 045 Pushrod DD10-022
012 Servo Screw A2x5 DD10-007 046 Lower spindle DD10-01
014 Ball link
DD10
-
022
DD10-02 047 Bearing 2x5x2 DD10-010
015 Ball link Screw M2x7
DD10
-
022
DD10
-
02
048 Screw M2x6 DD10-010
016 Screw M2x8
DD10
-
012
DD10-01
DD10-014
049 Washer 2x .8x1. DD10-011
018 Anti Rotation Lever DD10-012 050 Upper Hub bushing DD10-011
019 Upper Main Gear DD10-012 051 Lower Main Blade DD10-009
019-1 Inlay f. L019 DD10-012 052 Upper Main Blade DD10-008
020 Outer Shaft DD10-012 05 Blade Grip Screw M2x12
DD10
-
01
DD10
-
014
021 Bearing Holder DD10-011 054 Hub Bolt DD10-011
022 Bearing x7x DD10-011 055 Spring Holder 2x6
02 Upper Hub DD10-011 056 Screw M2x16
024 Inner Shaft DD10-011 057 Spring 4x5x5
025 Upper Spindle DD10-014 058 ESC DD10-002
026 Ball head link DD10-022 059 Conversion Board DD10-001
027 Bearing 6x10x DD10-012 060 Camera Holder Set DD10-00
028 Outer Shaft Collar DD10-015 061 LIPO Battery DD10-017
029 Set Screw M x DD10-015 062 Balance Charger DD10-018
0 0 Lower Main Gear DD10-016 06 RX DD10-020
0 1 Inner Shaft Collar DD10-016 064 TX DD10-021
0 2 Screw M2x4 DD10-016
0 Swashplate Assy A DD10-015

TERYX Manual
18
12. WIRING DIAGRAM

TERYX Manual
19
1 . SPAREPART PICTURES
Table of contents
Other Skyrush Toy manuals

Popular Toy manuals by other brands

GWS
GWS PT-17 instruction manual

Fisher-Price
Fisher-Price Laughtop Fun2Learn J6958 instruction sheet

Heli-Professional
Heli-Professional REVOLUTION 500E Assembly instruction and manual

NINCOAIR
NINCOAIR EC-135 EUROCOPTER G 180 PALM G Handbook

Startright
Startright Smart Creata Pen My Link ? Learn Globe user manual

GRAUPNER
GRAUPNER KULT Champ Elektro manual


