Slime 50129 User manual

PART#50129 | REV040618ART
ATTENTION! READ ALL INSTRUCTIONS CAREFULLY
FAILURE TO FOLLOW WARNING INSTRUCTIONS CAN RESULT IN FIRE,
PERSONAL INJURY OR PROPERTY DAMAGE.
POWER SOURCE
• Plugs into 12 volt,
15 amp power outlet
• 10ft. (3m) length
ON/OFF
SEALANT/
AIR HOSE
ENGLISH
REPLACEABLE SLIME
SEALANT CARTRIDGE
# 10180
SELECT MODE
AIR OR
AIR + SEALANT
DIAL GAUGE
Measures PSI/BAR
PRESSURE RELEASE
Deflates tyre
if it has too much air
VALVE
DEPRESSOR*
ADAPTERS
PRESTA
VALVE
BALL INFLATABLES
* VALVE DEPRESSOR IS TO BE USED WITH ACCESSORY ADAPTERS (SEE PAGE 2)
CAUTION: HOT • DO NOT HOLD IN HAND WHILE OPERATING • PLACE INFLATOR ON A HARD, CLEAN
SURFACE.
1. DO NOT run vehicle while inflator is operating. You may need to be in “accessory” or “on” position.
Please make sure emergency brake is set and car is in park. Always ensure the valve connector is
fully seated to depress the core of the valve stem for proper inflation.
2. DO NOT use inflator continuously for more than 10 minutes. Allow unit to cool approximately 25
minutes between uses. Do not leave inflator unattended.
3. ALWAYS use a pressure gauge to check tyre pressure. DO NOT overinflate.
4. Soft inflatables (i.e. rafts, balls, etc.) may not have recommended pressure markings. Be careful
not to inflate items beyond their capacity.
5. While operating, never block the inflator input or output.
6. Keep inflator out of reach of children.
7. For use with 12 volt DC power outlets rated 15 amps or higher. Do not use with older 8 amp
cigarette lighter receptacles.

IMPORTANT!
When using the supplied inflatable adapters, the valve
depressor adapter (fig. X) must be used in conjunction with the
inflatable adapters. Failure to use the supplied valve depressor adapter
with inflatable adapters will result in over-pressurization and failure of
the Flat Tyre Repair Kit. To install, remove the valve depressor adapter
assembly from the back of the Flat Tyre Repair Kit. Unscrew the Presta
valve adapter and set aside. Thread the valve depressor adapter into the
air hose of the Flat Tyre Repair Kit (fig. Y) until fully seated. Thread on
the desired inflatable adapter until snug and inflate item.
Fig. X
Fig. Y
AIR ONLY INSTRUCTIONS:
Check your tyre warranty prior to installation of this product.
The AIR ONLY mode can also be used for bicycles, sports balls, rafts and other inflatables.
Screw air/sealant hose onto tyre’s valve stem.
Select AIR ONLY.
NOTE: Lay Flat Tyre Repair Kit
on the ground facing upward.
Plug inflator into 12 volt accessory power outlet. Do not run
vehicle while inflator is operating. You may need to be in
“accessory” or “on” position. Please make sure emergency brake
is set and car is in park.
Push green button to turn system on. Fill to desired pressure.
Turn system off and check tyre pressure. Once correct tyre
pressure has been achieved, disconnect air hose and power
plug.
1
2
3
4

PRESSURE RELEASE
The PRESSURE RELEASE ensures optimum PSI pressure. Push the area to deflate
the tyre if it has been overinflated, or if there is too much air prior to inflation.
Check your gauge for the desired PSI level. NOTE: Correct tyre pressure can be
found in your vehicle’s owner’s manual or driver side doorjamb.
SEALANT CARTRIDGE REMOVAL INSTRUCTIONS:
Unwrap
air/sealant hose.
Pull cartidge out
horizontally.
Lift off cartridge
cover.
Rotate cartridge
to upright position.
31 2 4
FLAT TYRE REPAIR (AIR + SEALANT) INSTRUCTIONS:
Check your tyre warranty prior to installation of this product.
NOTE: Seals punctures up to 1/4in. (6mm) in tread area for flat tyre repair.
Correct tyre pressure can be found in your vehicle’s owner’s manual or driver side doorjamb.
Screw air/sealant hose onto tyre’s valve stem.
Select AIR + SEALANT.
NOTE: Lay Flat Tyre Repair Kit
on the ground facing upward.
Plug inflator into 12 volt accessory power outlet. Do not run
vehicle while inflator is operating. You may need to be in
“accessory” or “on” position. Please make sure emergency brake is
set and car is in park.
Push green button to turn system on. Gauge pressure will initially
be high until the sealant bottle is emptied. Once bottle is empty
the gauge pressure will drop and tyre inflation begins. Fill to
desired pressure. Turn system off and check tyre pressure. Once
correct tyre pressure has been achieved, disconnect air hose and
power plug.
1
2
3
4
Drive two miles with speeds less than 25 miles per hour to disperse sealant throughout the
tyre, allowing it to seek out and seal the puncture. Recheck tyre pressure to verify that the
puncture has been sealed.
At your earliest opportunity take your vehicle to a tyre repair facility for a permanent
professional repair. Inform tyre repair specialist that Slime Sealant is in the tyre.

Warranty: For the period of one year from date of purchase, manufacturer guarantees that this
Product will meet the specifications when used as directed. Manufacturer’s sole liability and
Customer’s sole remedy under any warranty claim is limited to a Manufacturer’s coupon for a
replacement product upon return of unit and proof of purchase.
QUESTIONS OR COMMENTS: Call 1-888-457-5463 or visit www.slime.com
ITW Global TIre Repair • 125 Venture Drive, Suite 210, San Luis Obispo, CA 93401 USA
Slime® is a trademark of Illinois Tool Works, Inc., registered in the U.S. and other countries.
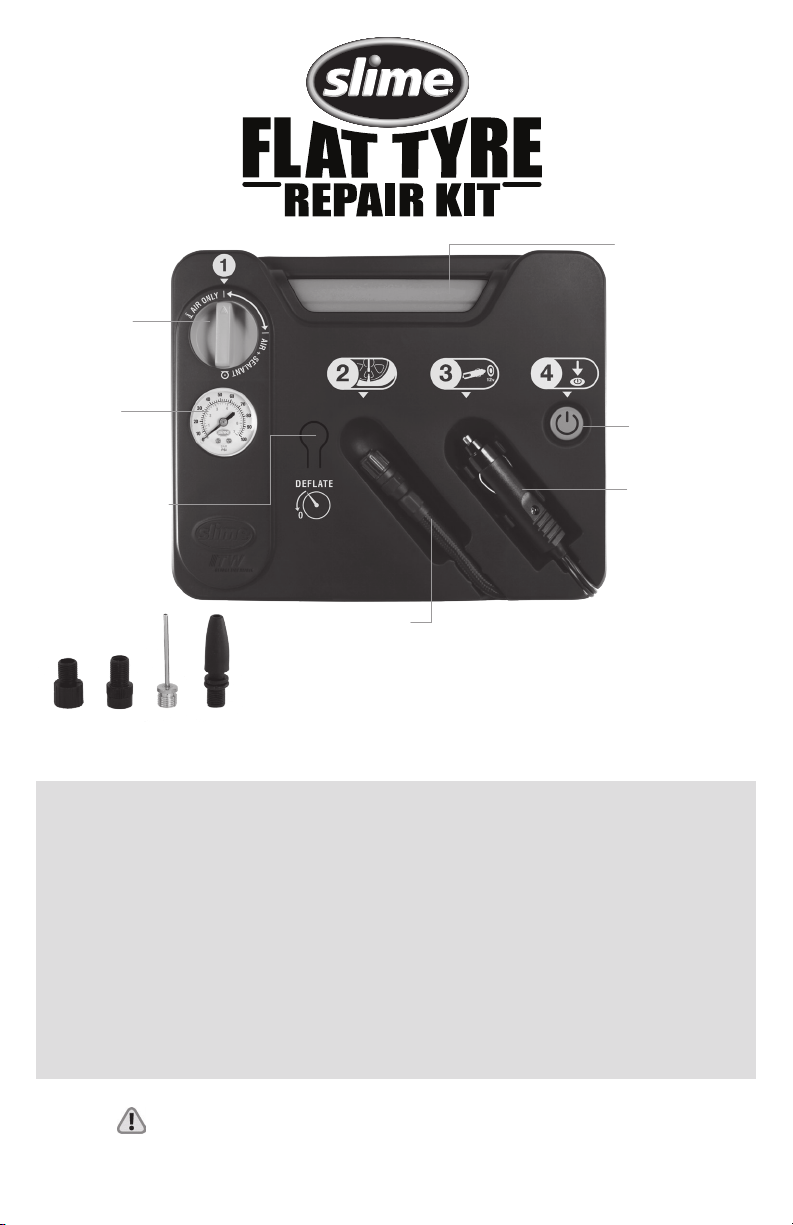
NOTE: If tyre is totally deflated, it is possible that the tyre could separate from the rim allowing air to
leak out when trying to inflate. In the event this situation occurs, you will have to jack up the tyre prior
to inflation.
TROUBLESHOOTING:
Inflator fails to operate when plugged in:
1. Check fuse in power cord.
2. Check vehicle fuse.
3. Check vehicle’s battery charge.
4. Ensure connection is secure.
5. Check receptacle and plug terminals for dirt (particularly tobacco). Use a non-conductive probe (not
fingers or metal) to dislodge and remove debris.
Inflator runs but does not inflate:
1. Be sure the connector is tightly screwed on the valve stem as far as possible.
2. Check tyre for leaks, and check hose for breaks and leaks at fittings.
Inflator runs slowly:
1. If overheated from excessive use, shut it off and allow to cool for 25 minutes.
2. Voltage too low, check condition of vehicle’s battery.
Sealant cartridge refills available • PART# 10180
WARNING: IRRITANT TO SKIN AND EYES. MAY CAUSE ALLERGIC SKIN REACTION. Avoid
ingestion. Avoid eye and skin contact. Wash hands after use. Use only as directed. KEEP
OUT OF REACH OF CHILDREN.
FIRST AID: In case of eye contact, rinse eyes for 15 minutes with cool water, lifting
eyelids occasionally. If on skin, wash with soap and water. If inhaled, seek fresh air. If
ingested, DO NOT INDUCE VOMITING; drink plenty of water and contact a physician or
hospital. Contains Glycerol, Natural latex rubber, Water, Ethoxylated isotridecanol, Poly
(dicyclopentadiene-co-p-cresol).
Call ChemTel: +1-800-255-3924 or 1-813-248-0573
Reference product name: PART#50129 or #10180 (Refill)
Table of contents
Other Slime Service Equipment manuals