manuals.online logo
Brands
  1. Home
  2. •
  3. Brands
  4. •
  5. SLV Elektronik
  6. •
  7. Lantern
  8. •
  9. SLV Elektronik DISPLAY ADL GU10 User manual

SLV Elektronik DISPLAY ADL GU10 User manual

1. Bestimmungsgemäße Verwendung:
Dieses Produkt dient nur Beleuchtungszwecken und darf:
 nur mit einer Spannung von 230V ~50Hz betrieben werden.
 nur in trockenen, also nicht:
 in feuchten oder schmutzgefährdeten Räumen.
 im Bereich hoher Luftfeuchtigkeit betrieben werden.
 keinen starken mechanischen Beanspruchungen oder starker
Verschmutzung ausgesetzt werden.
 nach einer feuchten oder verschmutzenden Lagerung erst nach
einer Zustandsprüfung betrieben werden.
 nicht verändert oder modifiziert werden.
Sollten diese zuvor genannten Punkte nicht eingehalten werden, so
kann es zum Kurzschluss oder elektrischen Schlag kommen.
2. Technische Daten:
Betriebsspannung: 230V ~50Hz
Schutzklasse: II
Leuchtmittel: QPAR51, GU10, max. 50W
Länge: 46 cm
Schwenk-/Drehbereich: 90°/200°
Gewicht: 0,3 kg
Importeur: SLV Elektronik GmbH
3. Montage
Achtung: Schalten Sie die Stromversorgung bzw. die
Anschlussleitung spannungsfrei, bevor Sie jegliche Arbeiten
vornehmen! Verwenden Sie nur Teile, die mit dem Produkt mitgeliefert
oder definitiv als Zubehör beschrieben werden! Andernfalls kann die
Anlage, als auch das Produkt nicht ausreichend sicher sein!
Montageort
Achten Sie darauf, dass das Produkt auf einem stabilen, ebenen,
kippfesten Untergrund montiert wird.
Der Lichtaustritt des Produkts sollte mindestens soweit entfernt sein von
der angestrahlten Fläche, wie der auf dem Typenschild der Leuchte
angegebene Mindestabstand: 0,5 m. Besondere Vorsicht gilt bei leicht
entzündlichen Gegenständen (z. B.: Vorhänge, Gardinen, etc.).
Einzelne Montageschritte
 Befestigen Sie die Leuchte sicher an der Montagefläche.
Elektrischer Anschluss
 Der elektrische Anschluss darf nur durch einen Elektro-Fachmann
durchgeführt werden, der mit den geltenden Richtlinien vertraut ist!
 Das Produkt muss durch eine allpolige Trennung von der
Stromversorgung getrennt werden können.
 Öffnen Sie die Anschlussbox.
 Zum elektrischen Anschluss verbinden Sie die schwarze oder braune
Ader (Außenleiter) der Anschlussleitung mit der Klemme L und die
blaue Ader (Neutralleiter) der Anschlussleitung mit der Klemme N.
 Schliessen Sie wieder die Anschlussbox.
 Einsetzen des Leuchtmittels: Mit einer Viertelumdrehung nach rechts
wird das Leuchtmittel in die Fassung gedreht.
 Achten Sie auf den sicheren Halt der Leuchte!
 Das Produkt ist nun betriebsbereit.
4. Betrieb:
Informationen für den Betreiber:
Betreiben Sie das Produkt nur, wenn es einwandfrei funktioniert. Im
Fehlerfall schalten Sie das Produkt sofort aus und betreiben es erst wieder
nach Überprüfung durch einen Elektro-Fachmann. Dies ist der Fall, wenn:
 sichtbare Beschädigungen auftreten.
 das Produkt nicht einwandfrei arbeitet.
 es qualmt, dampft, oder bei hörbaren Knistergeräuschen.
 eine Überhitzung zu erkennen ist.
Reparaturen des Produktes oder Arbeiten an netzspannungsführenden
Teilen dürfen nur Fachkräfte des Elektrohandwerks vornehmen.
Achtung: Hier besteht sonst Lebensgefahr durch elektrischen Schlag!
So vermeiden Sie Störungen und Brandgefahren:
 Decken Sie das Produkt nicht ab. Beeinträchtigen Sie nicht die
Luftzirkulation.
 Hängen und befestigen Sie nichts an dem Produkt,
insbesondere keine Dekoration.
Lassen Sie Kinder nicht unbeaufsichtigt mit elektrischen Produkten
spielen! Kinder können Gefahren im Umgang mit elektrischer Energie nicht
immer richtig einschätzen.
D Gebrauchsanweisung
ENG Instruction Manual
F Mode d'emploi
E Instrucciones de montaje
NL Gebruiksanwijzing
für/for/pour/para/voor
DISPLAY ADL GU10
Was ist zu tun, wenn ein Leuchtmittel defekt ist oder nicht
funktioniert?
 Schalten Sie erst das Produkt spannungsfrei, bevor Sie das
Leuchtmittel (Lampe) austauschen.
LN
1
2
 Vorsicht: Lassen Sie nach vorangegangenem Betrieb erst
das Leuchtmittel abkühlen – andernfalls besteht wegen der
heißen Oberfläche Verletzungsgefahr.
 Ersetzen Sie nur Leuchtmittel mit den gleichen Daten wie
Sockel, Spannung und Wattage - jede andere Art von
Leuchtmittel kann zu Beschädigungen der Leuchte führen.
 Leuchtmittelwechsel: s. Montage.
5. Was ist sonst noch zu beachten?
Schalten Sie erst das gesamte Produkt spannungsfrei, bevor Sie...
 Reinigungs- oder Pflegearbeiten ausführen.
 Arbeiten an dem Produkt oder seinen Komponenten
vornehmen (nur Elektro-Fachmann).
146332A 07/2005 by SLV Elektronik GmbH
Technische Änderungen vorbehalten. Vervielfältigung verboten !
DGebrauchsanweisung DISPLAY ADL GU10
ENG Instruction Manual DISPLAY ADL GU10
1. Use as directed:
This product serves exclusively lighting purposes and may:
 only be used with a voltage of 230V ~50Hz.
 only be used in dry condition,
 not in damp or dirt-endangered rooms.
 not in areas of high air humidity.
 not be exposed to strong mechanical loads or to strong
contamination.
 only be installed and operated after a condition inspection if the
product is dirty or has been moistened through storage.
 not be modified or converted.
If these points named above are not adhered to, a short circuit or
electrical shock may occur!
2. Technical Data:
Operating voltage: 230V ~50Hz
Safety class: II
Bulb: QPAR51, GU10, max. 50W
Length: 46 cm
Swivel-/Rotary range 90°/200°
Weight: 0,3 kg
Importeur: SLV Elektronik GmbH
3. Installation
Attention: Switch off the power of the mains supply line or
respectively of the connection lead before doing any works. Use only
parts, which are supplied with the product or are described as accessories!
Otherwise the product or the installation might not be sufficiently safe.
Installation place:
Make sure that the product is mounted on a stable, even and tilt-fixed
background.
The light exit should be placed at least so far from the illuminated surface,
as indicated as minimum distance on the type plate of the luminaire: 0,5
m. Pay special caution to easily inflammable objects (e.g. curtains).
Separate Installation Steps
 Fasten the fitting securely on the mounting surface (1).
Electrical Connection
 The electric connection may be executed only by an electric expert
who is familiar with the valid directives!
 The product must be able to be separated by an all pole separation from
the current supply.
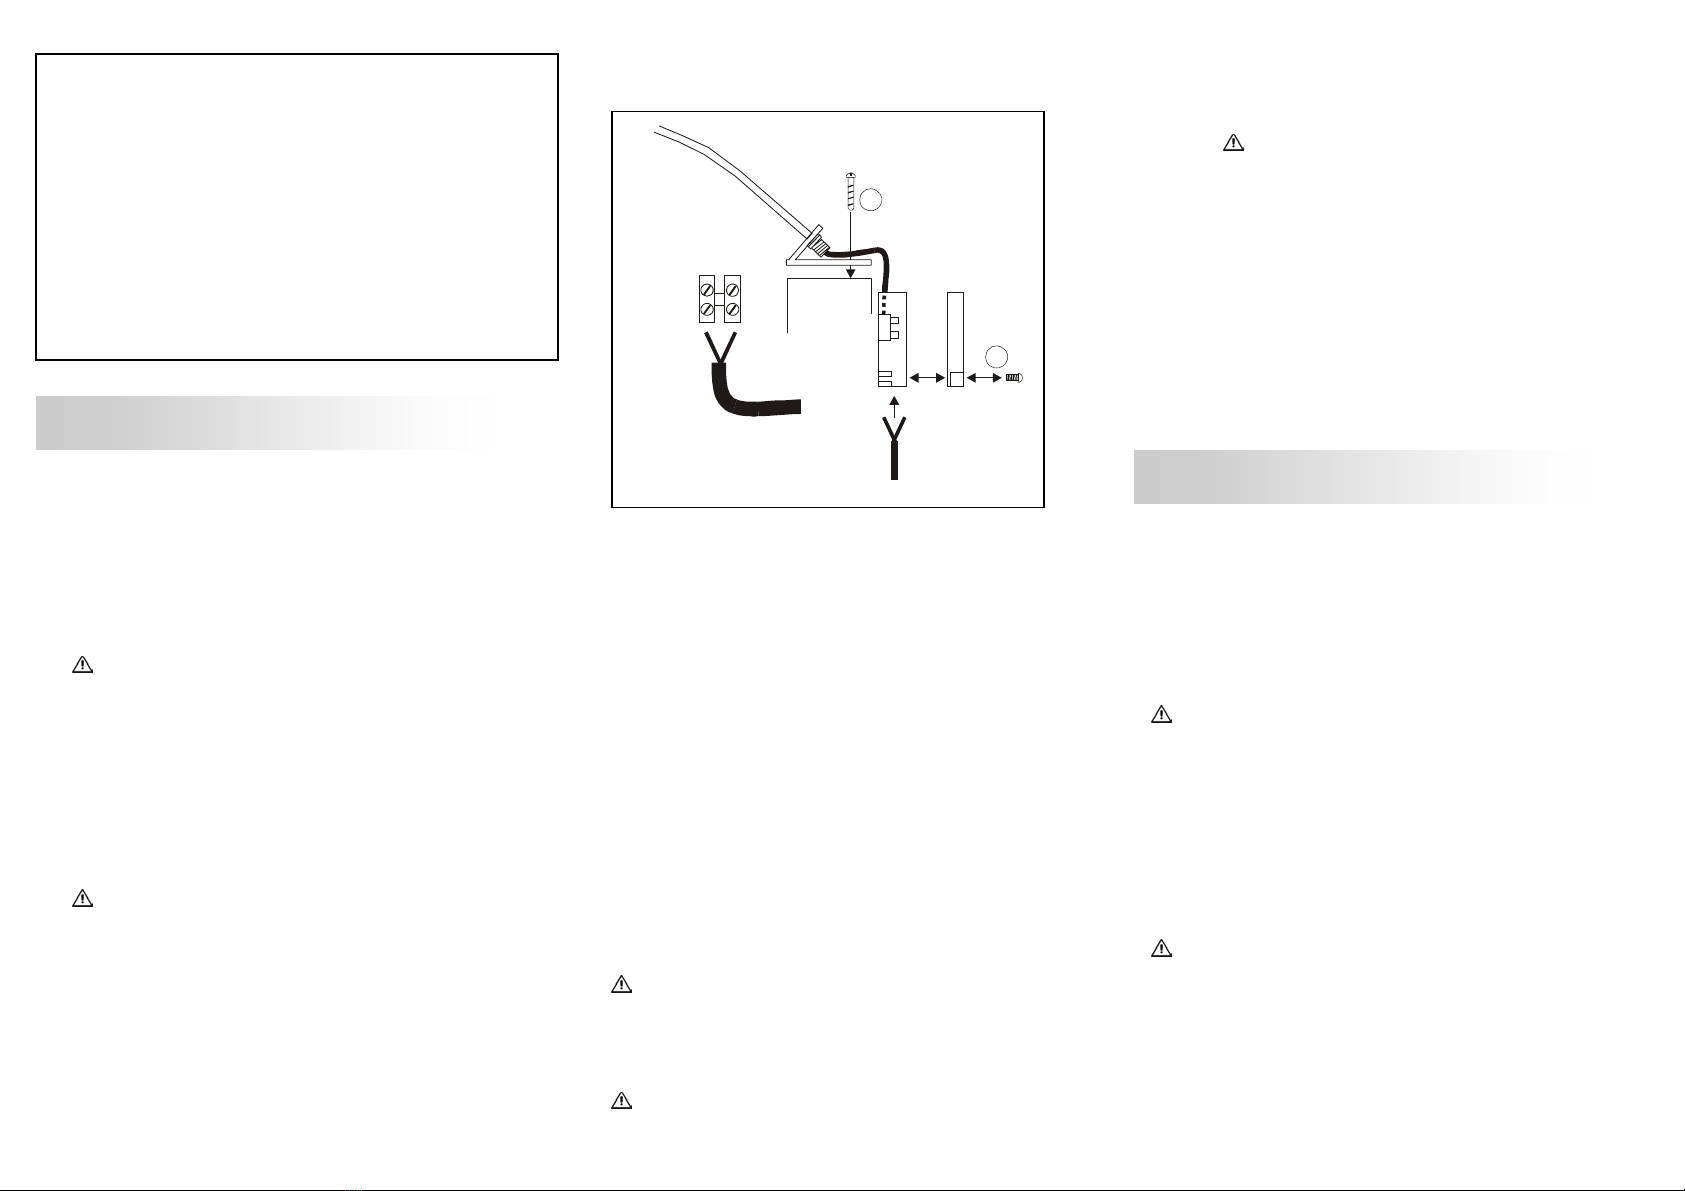
 Open the connection box (2).
 For electric connection attach the black or brown wire (live conductor) of
the mains supply with the clamp L and the blue wire (neutral conductor)
of the mains supply with the clamp N.
 Close the connection box.
 Inserting the bulb: Insert the bulb with a quarter-turn to the right.
 Ensure that the light fixture holds securely!
 The product is now ready for operation.
4. Operation:
Information for the user:
Operate the product only if it is working correctly. Switch off the product
with a malfunction immediately and operate it again only after examination
by an electrical specialist. This is the case, when:
 visible damages appear.
 the product does not work.
 smoke, steam or crackling sounds appear.
 an overheating is recognisable.
Repairs of the product or work on mains voltage-prominent sections may
only be carried out by qualified electricians.
Attention: Here exists mortal danger from an electric shock!
How to avoid failure and fire risk:
 Do not cover the product - provide free air circulation!
 Do not hang or fasten anything on the product, especially no
decoration.
Never let children play unsupervised with electric products! Children
can not always estimate dangers in dealing with electric energy correctly.
What is to do if a bulb is defect or does not work?
 Disconnect the product from power, before you exchange
the bulbs.
 Caution: Let the bulb cool down first before replacement –
otherwise considerable risk of injury exists because of the hot
surface.
 Replace the bulbs only with bulbs of the same data like socket,
power and capacity. Every other sort of bulb can lead to
damages of the light.
 Replacing the bulb: see Installation.
5. What else has to be considered?
Disconnect the product from power, before you…
 clean or maintain the product.

do any works on the product or its components (electric expert).
1. A utiliser comme indiqué :
Ce produit ne sert qu’à éclairer:
 il est prévu pour une tension de 230V ~50Hz.
 il peut uniquement être utilisé dans un endroit sec et surtout pas :
 dans un environnement poussièreux ou humide
 dans un environnement d'air humide
 il ne doit être soumis ni aux efforts mécaniques importants ni à un
encrassement important.
 il ne doit être utilisé qu’après examen si le produit a été stocké dans un
entrepôt humide ou sale.
 il ne doit pas être modifié.
Un non-respect de ces points peut causer un court-circuit ou une
décharge électrique!
2. Informations techniques:
Tension d'alimentation: 230V ~50Hz
Classe de protection: II
Ampoule: QPAR51, GU10, max. 50W
Longueur: 46 cm
Course d’orientation: 200°
Portée d’inclinaison: 90°
Poids: 0,3 kg
Importeur: SLV Elektronik GmbH
3. Installation
Attention: Mettez l’alimentation électrique ou le raccordement au
secteur hors tension avant de travailler!
Utilisez seulement des pièces qui ont été livrées avec le produit ou qui sont
uniquement décrites comme accessoires ! Sinon, l’installation ainsi que le
produit ne peuvent pas être garantis.
Lieu d'installation
Veillez à ce que le produit soit monté de manière stable et résistante au
basculement.
La distance entre la sortie de lumière et la face illuminée devrait au moins
être tant que la distance minimale indiquée sur l’étiquette du type du
lumière: 0,5 m. Soyez prudent avec les matières inflammables (comme
rideaux etc.).
FMode d'emploi DISPLAY ADL GU10
Etapes successives pour installer le luminaire
 Fixez fermement la lampe à la face de montage (1).
Raccordement électrique:
 La connection électrique doit être exécutée par un professionnel,
lequel est familier des normes en vigueur!
 Ce système doit pouvoir être coupé du réseau individuellement.
 Ouvrez le box de raccordement (2).
 Pour réaliser le raccordement électrique, connectez le fil électrique noir
ou brun (la phase) du réseau électrique de la maison à la borne L et le
fil électrique bleu (fil neutre) du réseau électrique de la maison à la
borne N.
 Fermez le box de raccordement.
 Installation d'ampoule: Mettez l’ampoule dans la douille en la tournant
d’un quart de tour à droite.
 Faites attention à ce que la lampe soit bien fixée!
 Maintenant, on peut utiliser le produit.
4. Opération
Informations pour l’exploitant
Utilisez le luminaire uniquement dans le cas où il fonctionne correctement.
Dans le cas contraire, éteindrez tout de suite le luminaire et ne l’utilisez
qu’après avoir fait appel à un professionnel.
C’est à dire, dans les cas où :
 des dommages sont visibles
 le produit ne fonctionne pas
 le produit dégage des fumées épaisses,
 le produit surchauffe (la surchauffe est reconnaissable à son
bruit de grésillement)
LN
1
2
Toute autre réparation sur l'installation ou sur son alimentation ne doit être
effectuée que par un professionnel.
Attention: Rappelons qu'un choc électrique peut être mortel!
Comment éviter les problèmes et les risques d’incendies:
 Ne couvrez pas le produit. N’empêchez pas l’air de circuler.
 N’accrochez ni ne fixez rien au produit, surtout pas de
décoration.
Ne laissez pas les enfants jouer avec des produits électriques sans
surveillance! Ils ne sont pas toujours capables d’estimer les dangers
causés par l’électricité.
Quoi faire quand une lampe est défectueuse ou ne fonctionne plus ?
 D’abord éteignez le luminaire, puis changez l’ampoule.
 Attention : Faites d’abord refroidir la lampe – sinon - il y a
des risques de brûlures au contact de la surface brûlante.
 Ne remplacez que par des ampoules ayant les mêmes
caractéristiques techniques (culot, tension électrique,
puissance) car toute autre sorte d’ampoule pourrait
endommager le luminaire.
 Changement d’ampoule: voir Installation.
146332A 07/2005 by SLV Elektronik GmbH
Technical Details are subject to change. Duplication prohibited ! 5. D’autres points à respecter:
Eteignez le produit avant d’effectuer des travaux de nettoyage ou
d’entretien, ou bien, d’autres travaux sur le luminaire ou sur les
composants (à faire réaliser par un professionnel).
146332A 07/2005 by SLV Elektronik GmbH
Les détails techniques sont sujet à des changements. Reproduction interdite!
1. Empleo Según Normativas
Este producto sirve únicamente para fines de iluminación y sólo puede:
 utilizarse con una tensión de 230V~50Hz,
 utilizarse en ambientes secos y sin riesgos de suciedad:
 no utilizarse en un ámbito con elevada humedad del aire.
 No debe exponerse a exigencias mecánicas excesivas o fuertes
suciedades;
 Después de un almacenamiento húmedo o contaminante, no utilizar sin
previa verificación
 No debe ser cambiado o modificado.
En caso de no respetarse los puntos previamente señalados, podrá
producirse un cortocircuito o una descarga eléctrica.
2. Datos técnicos:
Tensión de servicio: 230V ~50Hz
Clase de protección: II
Luminaria: QPAR51, GU10, max. 50W
Longitud: 46 cm
Ángulo de giro/ de rotación: 90°/200°
Peso: 0,3 kg
Importador: SLV Elektronik GmbH
3. Montaje
Atención: Desconecte la línea de alimentación antes de realizar
cualquier trabajo.
Utilice exclusivamente piezas que fueran suministradas con el producto o
que son descritas definitivamente como accesorios. De lo contrario, el
producto puede no ser lo suficientemente seguro.
Lugar de montaje
Preste atención a que el producto sea montado sobre una base firme,
plana y estable.
La salida de luz debería estar a una distancia de la superficie iluminada
igual a la distancia mínima: 0,5 m indicada en la placa de características
de la luminaria. Precaución especial: se aplica para objetos fácilmente
inflamables (p.ej. telones, cortinas, etc.).
Pasos de montaje
 Sujete la lámpara de forma segura a la superficie de montaje (1).
Conexión eléctrica
 La conexión eléctrica sólo puede realizarla personal autorizado
y con las normas vigentes.
 El producto debe poder desconectarse de la alimentación de corriente a
través de un interruptor multipolar.
 Abre la caja de conexión (2).
 Para la conexión eléctrica conecte el conductor negro o marrón
(conductor exterior) del cable de alimentación con el borne L y el
conductor azul (conductor neutro) del cable de alimentación con el
borne N.
 Cierre de nuevo la caja de conexión.
 Colocación de la luminaria: La bombilla se enrosca en el
portalámparas mediante un cuarto de vuelta hacia la derecha.
 Preste atención a la fijación segura de la luminaria.
 El producto está listo para su funcionamiento.
4. Funcionamiento:
Información para el usuario:
Utilice el producto únicamente si funciona de forma perfecta. En caso
de fallo, desconecte inmediatamente el aparato y hágalo revisar por
un electricista. Por ejemplo:
 aparecen daños visibles;
 el producto no funciona perfectamente;
 desprende humo o se sobrecalienta.
Todas las reparaciones deben ser realizadas por electricistas.
Atención: De lo contrario, aquí puede haber peligro de muerte
por descarga eléctrica.
Consejos para evitar averías e incendios:
 No cubra el producto, no obstruya la circulación de aire.
 No cuelgue ni fije nada en el producto, especialmente ningún
tipo de decoración.
No permita que los niños jueguen sin vigilancia con los productos
eléctricos. Los niños no son conscientes del peligro de la energía
eléctrica.
¿Qué debo hacer si una luminaria está defectuosa o no
funciona?
 En primer lugar, desconecte el producto antes de cambiar la
luminaria (lámpara).
 Atención: Si la lámpara esta en funcionamiento, déjela
enfriar. De lo contrario, existe peligro de quemadura.
 Reemplace únicamente las lámparas que posean las mismas
características técnicas como tensión y potencia en vatios. Otro
tipo de lámpara puede provocar daños en la luminaria.
 Cambio de la luminaria: Ver Montaje.
5. ¿Qué otra cosa debe tenerse en cuenta?
Desconecte en primer lugar el producto antes de ...
 llevar a cabo tareas de limpieza y cuidado;
 realizar trabajos en el producto o en sus componentes (sólo
electricistas).
E Instrucciones de montaje DISPLAY ADL GU10
NL Gebruiksanwijzing DISPLAY ADL GU10
1. Gebruik aangepast aan de doeleinden:
Dit product dient alleen voor verlichting en mag slechts in de
volgende situaties gebruikt worden:
 Met een netspanning van 230V~50Hz .
 Alleen in droge omstandigheden, dus niet:
 in vochtige ruimten of plaatsen waar het vuil kan worden.
 op plaats met een hoge luchtvochtigheid.
 Mag niet aan zware mechanische belasting of sterke vervuiling
worden blootgesteld.
 Mag, na weigering in een vochtige of vervuilende opslagplaats,
pas gebruikt worden nadat het grondig werd nagekeken
 Het product mag niet veranderd of gewijzigd worden.
Wanneer de hiervoor genoemde punten niet in acht worden genomen,
kan er een kortsluiting of een elektrische schok optreden!
2. Technische Gegevens:
Netspanning : 230V ~50Hz
Beschermingsklasse: II
Lichtbron: QPAR51, GU10, max. 50W
Lengte: 46 cm
Zwenk-/ Draaibereik: 90°/200°
Gewicht: 0,3 kg
Importeur: SLV Elektronik GmbH
3. Montage
Opgepast: Schakel de spanning op de aansluitleiding uit alvorens gelijk
welk werk uit te voeren!
Gebruik slechts onderdelen die met het product geleverd werden of die
definitief als accessoire voor dit product beschreven werden. Zoniet is het
product niet voldoende veilig voor gebruik!
Montageplaats
LN
1
2
Let erop dat het product op een stabiele, effen ondergrond (die niet kan
omvallen) gemonteerd wordt.
De Lichtbundel moet minstens zover van het oppervlak dat bestraald
wordt verwijderd zijn als de minimale afstand die wordt aangegeven: 0,5
m. Extra voorzichtig zijn met licht ontvlambare dingen (bijvoorbeeld
gordijnen, draperieën, etc…).
Afzonderlijke stappen in de montage
 Bevestig de verlichting op een veilige manier an het montagevlak
(1).
Elektrische aansluiting
 De elektrische aansluiting mag alleen door een
gediplomeerd elektricien gebeuren, die bekend is met de
geldende richtlijnen.
 Het product moet door een veelpolige scheiding van het
elektriciteitsnet gescheiden kunnen worden.
 Open de aansluitingsbox (2).
 Voor de elektrische aansluiting verbindt u de zwarte of bruine
draad (buitenleiding) van de huisaansluiting met klemmetje L en
de blauwe draad (neutrale leiding) van de huisaansluiting met
klemmetje N.
 Sluit de aansluitingsbox.
 Inzetten van de verlichting: Met een kwartdraai naar rechts wordt
de verlichting in de fitting gedraaid.
146332A 07/2005 by SLV Elektronik GmbH
Nos reservamos el derecho a modificaciones técnicas. ¡Reproducción prohibida!  Let op een veilige befestiging van de lamp!
 Het product is nu klaar voor gebruik.
4. Gebruik:
Informatie over het product:
Het product slechts gebruiken wanneer het probleemloos
functioneert. Wanneer er een probleem optreedt, het product
onmiddellijk uitschakelen en het pas weer gebruiken nadat het
grondig gecontroleerd werd door een erkend elektricien Dat moet
gebeuren wanneer:
 er zichtbare beschadigingen zijn.
 het product niet naar behoren functioneert.
 het rookt, walmt of wanneer er duidelijk knisperende geluiden
worden waargenomen.
 wanneer het product oververhit is.
Reparatie van het product of werken aan de onderdelen die met de
netspanning in verbinding staan, zijn voorbehouden voor de vakman.
Opgelet: Er kan levensgevaar tengevolge van een elektrische
schok optreden.
Zo vermijdt u storingen en brandgevaar:
 Het product niet afdekken. De luchtcirculatie niet beperken.
 Niets aan het product hangen of bevestigen, zeker geen
versieringen.
Laat kinderen niet zonder supervisie met elektrische producten
spelen! Kinderen kunnen het gevaar van de omgang met elektrische
producten niet altijd correct inschatten.
Wat moet er gebeuren wanneer de lamp stuk is of wanneer ze
niet functioneert?
 Eerst het product uit het stopcontact halen, alvorens u de
verlichting (de lamp) verwisselt.
 Opgepast: Laat het product eerst afkoelen na gebruik, anders
bestaat er gevaar voor verwondingen door het hete oppervlak.
 De lamp slechts door een andere met dezelfde technische
kenmerken, zoals sokkel, netspanning, en wattage vervangen.
Elke andere vervanging kan tot beschadiging leiden.
 Verwisselen van lampen: zie montage.
5. Waar moet u nog op letten?
Het product uit het stopcontact halen, alvorens u...
 reinigings- of onderhoudswerkzaamheden uitvoert.
 Arbeid verricht aan het product of onderdelen vervangt (alleen
erkend elektricien).
LN
1
2
146332A 07/2005 by SLV Elektronik GmbH
Behoudens technische wijzigingen. Dupliceren verboden !

Other SLV Elektronik Lantern manuals

SLV Elektronik BERET 162141 User manual

SLV Elektronik

SLV Elektronik BERET 162141 User manual

SLV Elektronik BELPA II User manual

SLV Elektronik

SLV Elektronik BELPA II User manual

SLV Elektronik 230862 User manual

SLV Elektronik

SLV Elektronik 230862 User manual

SLV Elektronik ALDA User manual

SLV Elektronik

SLV Elektronik ALDA User manual

SLV Elektronik TRAIL-LITE User manual

SLV Elektronik

SLV Elektronik TRAIL-LITE User manual

SLV Elektronik DEWI DESK User manual

SLV Elektronik

SLV Elektronik DEWI DESK User manual

SLV Elektronik Dasar ES111 User manual

SLV Elektronik

SLV Elektronik Dasar ES111 User manual

SLV Elektronik WETSY LED DISK 300 User manual

SLV Elektronik

SLV Elektronik WETSY LED DISK 300 User manual

SLV Elektronik N-TIC ROUND User manual

SLV Elektronik

SLV Elektronik N-TIC ROUND User manual

SLV Elektronik 160571 User manual

SLV Elektronik

SLV Elektronik 160571 User manual

Popular Lantern manuals by other brands

IMG LIGHTING WIND user manual

IMG LIGHTING

IMG LIGHTING WIND user manual

esotec Disk Using instructions

esotec

esotec Disk Using instructions

Prismatibro Prisma Light Ellie manual

Prismatibro

Prismatibro Prisma Light Ellie manual

VEVOR JY5152 manual

VEVOR

VEVOR JY5152 manual

IKEA FRYEBO manual

IKEA

IKEA FRYEBO manual

Cree Essentia FP Series installation instructions

Cree

Cree Essentia FP Series installation instructions

Linergy VIP LED VD15F10EGR manual

Linergy

Linergy VIP LED VD15F10EGR manual

Outsunny 867-151V00 manual

Outsunny

Outsunny 867-151V00 manual

Walmart HYPER TOUGH Q01DA0429-08 instructions

Walmart

Walmart HYPER TOUGH Q01DA0429-08 instructions

Patriot Lighting 343-1474 installation manual

Patriot Lighting

Patriot Lighting 343-1474 installation manual

Nitecore LR40 user manual

Nitecore

Nitecore LR40 user manual

KYOWA KW-9125 instruction manual

KYOWA

KYOWA KW-9125 instruction manual

CALIMA 46002 operating instructions

CALIMA

CALIMA 46002 operating instructions

BEGA 77 814 Instructions for use

BEGA

BEGA 77 814 Instructions for use

SunSynk ECLIPSE Series Installation & operating instructions

SunSynk

SunSynk ECLIPSE Series Installation & operating instructions

Portfolio Outdoor VEL-1005-7W-PIR manual

Portfolio Outdoor

Portfolio Outdoor VEL-1005-7W-PIR manual

Soltech Sunlike 30W PRO user manual

Soltech

Soltech Sunlike 30W PRO user manual

Ambros Huber A-Light S user manual

Ambros Huber

Ambros Huber A-Light S user manual

manuals.online logo
manuals.online logoBrands
  • About & Mission
  • Contact us
  • Privacy Policy
  • Terms and Conditions

Copyright 2025 Manuals.Online. All Rights Reserved.