Smalvic Built-In Beer Dispenser User manual

Built-In Beer Dispenser
USER MANUAL
IT Istruzioni per l’uso e la manutenzione.
GB Instructions for use and maintenance.

Built-In Beer Dispenser –USER MANUAL
D0035-00
Introduzione
Grazie per aver acquistato questo Spillatore della Birra per l’incasso
domestico. Una volta che sarà installato, servirà Voi e la vostra famiglia
con anni di ottimo servizio.
Questo Spillatore è progettato per erogare birra dal maggior numero di
fusti 5 litri, nelle prestazioni di uno Spillatore professionale.
Se stai leggendo questo manuale di istruzioni, probabilmente avete già
estratto l'unità. Si raccomanda di conservare l'imballaggio in caso di
necessità per il trasporto in sicurezza di questa unità in futuro.
Introduction
Thank you for purchasing this Beer Dispenser for household built-in. Once
it is installed, it will serve you and your family with years of good service.
This Dispenser is designed to dispense beer from the largest number of 5
liter kegs (mini keg), in the performance of a professional dispenser.
If you are reading this manual, you've probably already extracted the unit.
You should keep the packaging in case of need for the safe transport of this
unit in the future.
INDICE
DOTAZIONE
SPECIFICHE TECNICHE
DESCRIZIONE DEL PRODOTTO
SICUREZZA ED ISTRUZIONI
SICUREZZA TECNICA
SMALTIMENTO DELL’ELETTRODOMESTICO
INSTALLAZIONE
CONNESSIONE E SOSTITUZIONE DEL FUSTO Co2
CONNESSIONE E SOSTITUZIONE DEL FUSTO BIRRA
USO
REGOLAZIONE DELLA PRESSIONE Co2
SPILLATURA
MANUTENZIONE
LAVAGGIO E DISINFEZIONE DEL CIRCUITO
PULIZIA PRODOTTO
Pag. 3
Pag. 3
Pag. 4
Pag. 5
Pag. 5
Pag. 6
Pag. 7
Pag. 8
Pag. 9
Pag. 11
Pag. 12
Pag. 13
Pag. 14
Pag. 16
CONTENTS
ITEM SUPPLIED
TECHNICAL SPECIFICATION
PRODUCT DESCRIPTION
SAFETY AND INSTRUCTION
TECHNICAL SAFETY
DISPOSAL OF HOUSEHOLD APPLIANCE
INSTALLING THE DISPENSER
CONNECTING AND REPLACING THE CO2 CYLINDER
CONNECTING AND REPLACING THE BEER KEG
USE
REGULATING THE CO2 PRESSURE
SERVING BEER
MAINTENANCE
WASHING AND DISINFECTING THE DISPENSER
CLEANING AND CARING FOR THE PRODUCT
Pag. 3
Pag. 3
Pag. 4
Pag. 5
Pag. 5
Pag. 6
Pag. 7
Pag. 8
Pag. 9
Pag. 11
Pag. 12
Pag. 13
Pag. 14
Pag. 16
Built-In Beer Dispenser –USER MANUAL
D0035-00
DOTAZIONE
GUARNIZIONI PER FUSTO = UNA BUSTA CON 2 GUARNIZIONI
DI RICAMBIO
NR 1 FUSTO PER DISINFEZIONE
PASTIGLIE PER DISINFEZIONE = UN BLISTER CON 4 PASTIGLIE
VITI PER INSTALLAZIONE = Nr. 4 VITI PER LEGNO Ø4X16, 2 VITI
M3X8 E 6 VITI M4X12.
ITEM SUPPLIED
BEER KEG SEALS = A BAG WITH 2 SEALS SPARE
NR 1 KEG FOR THE DISINFECTING
TABS FOR DISINFECTING = A BAG WITH 4 TABS.
SCREWS FOR INSTALLING = A BAG WITH 8 SCREW FOR WOOD Ø4X16, 2
SCREWS M3X8 AND 6 SCREWS M4X12.
SPECIFICHE TECNICHE
Alimentazione elettrica nominale = 230V-AC / 50Hz
Assorbimento nominale = 130 Watt.
Dimensioni LxHxP = 595x460x450 mm.
Peso = 25 kg circa.
TECHNICAL SPECIFICATION
Operating voltage = 230V-AC / 50Hz
Absorbed power = 130 Watt.
Dimensions WxHxD = 595x460x450 mm.
Weight = 25 kg approx.
Built-In Beer Dispenser –USER MANUAL
D0035-00
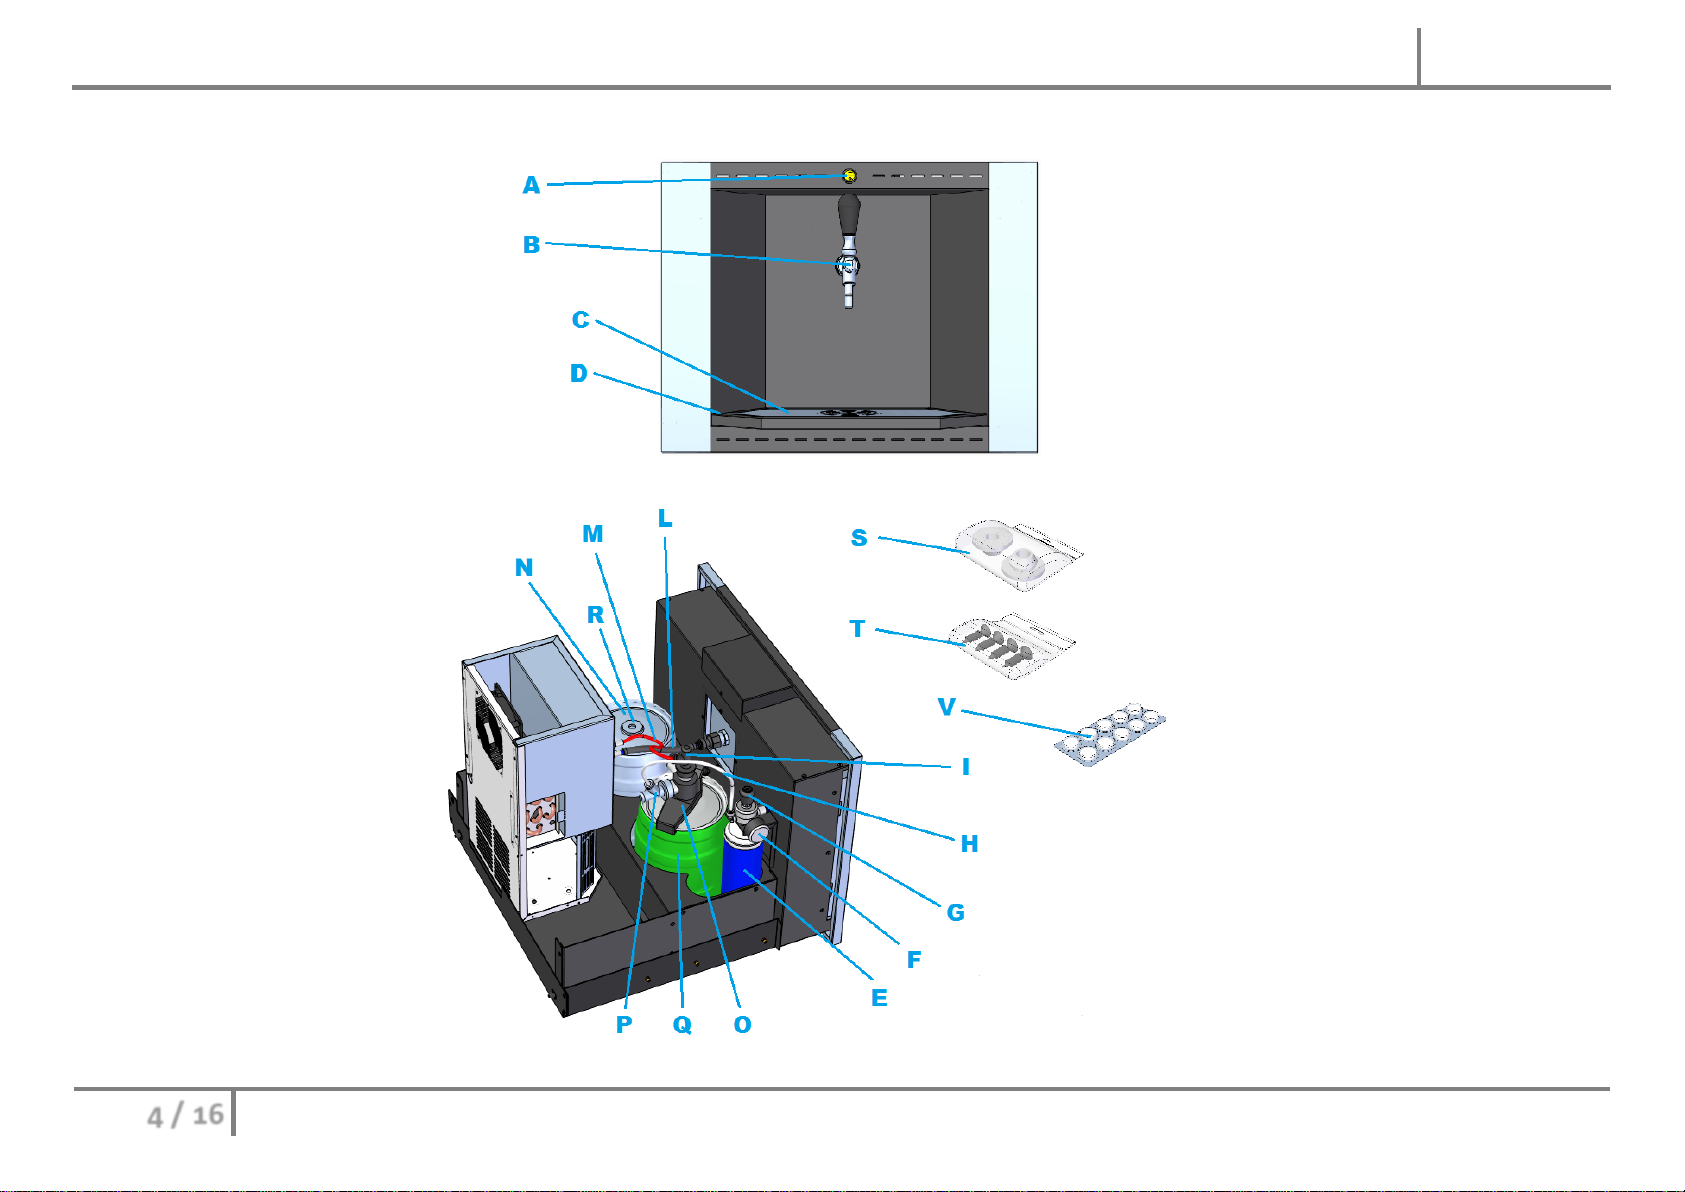
DESCRIZIONE DELLA
MACCHINA
A–Interruttore On/Off
B–Rubinetto spillatura birra
C–Griglia ripiano bicchiere
D–Vaschetta raccogli gocce
E–Cilindro CO2(600gr)
F–Quadrante pressione CO2
G–Rubinetto regolazione
pressione CO2
H–Tubo CO2 (bianco)
I–Connessione tubo birra in
entrata
L–Tubo birra in uscita (blu)
M–Tubo birra in entrata (rosso)
N–Fusto 5lt vuoto per
sanificazione
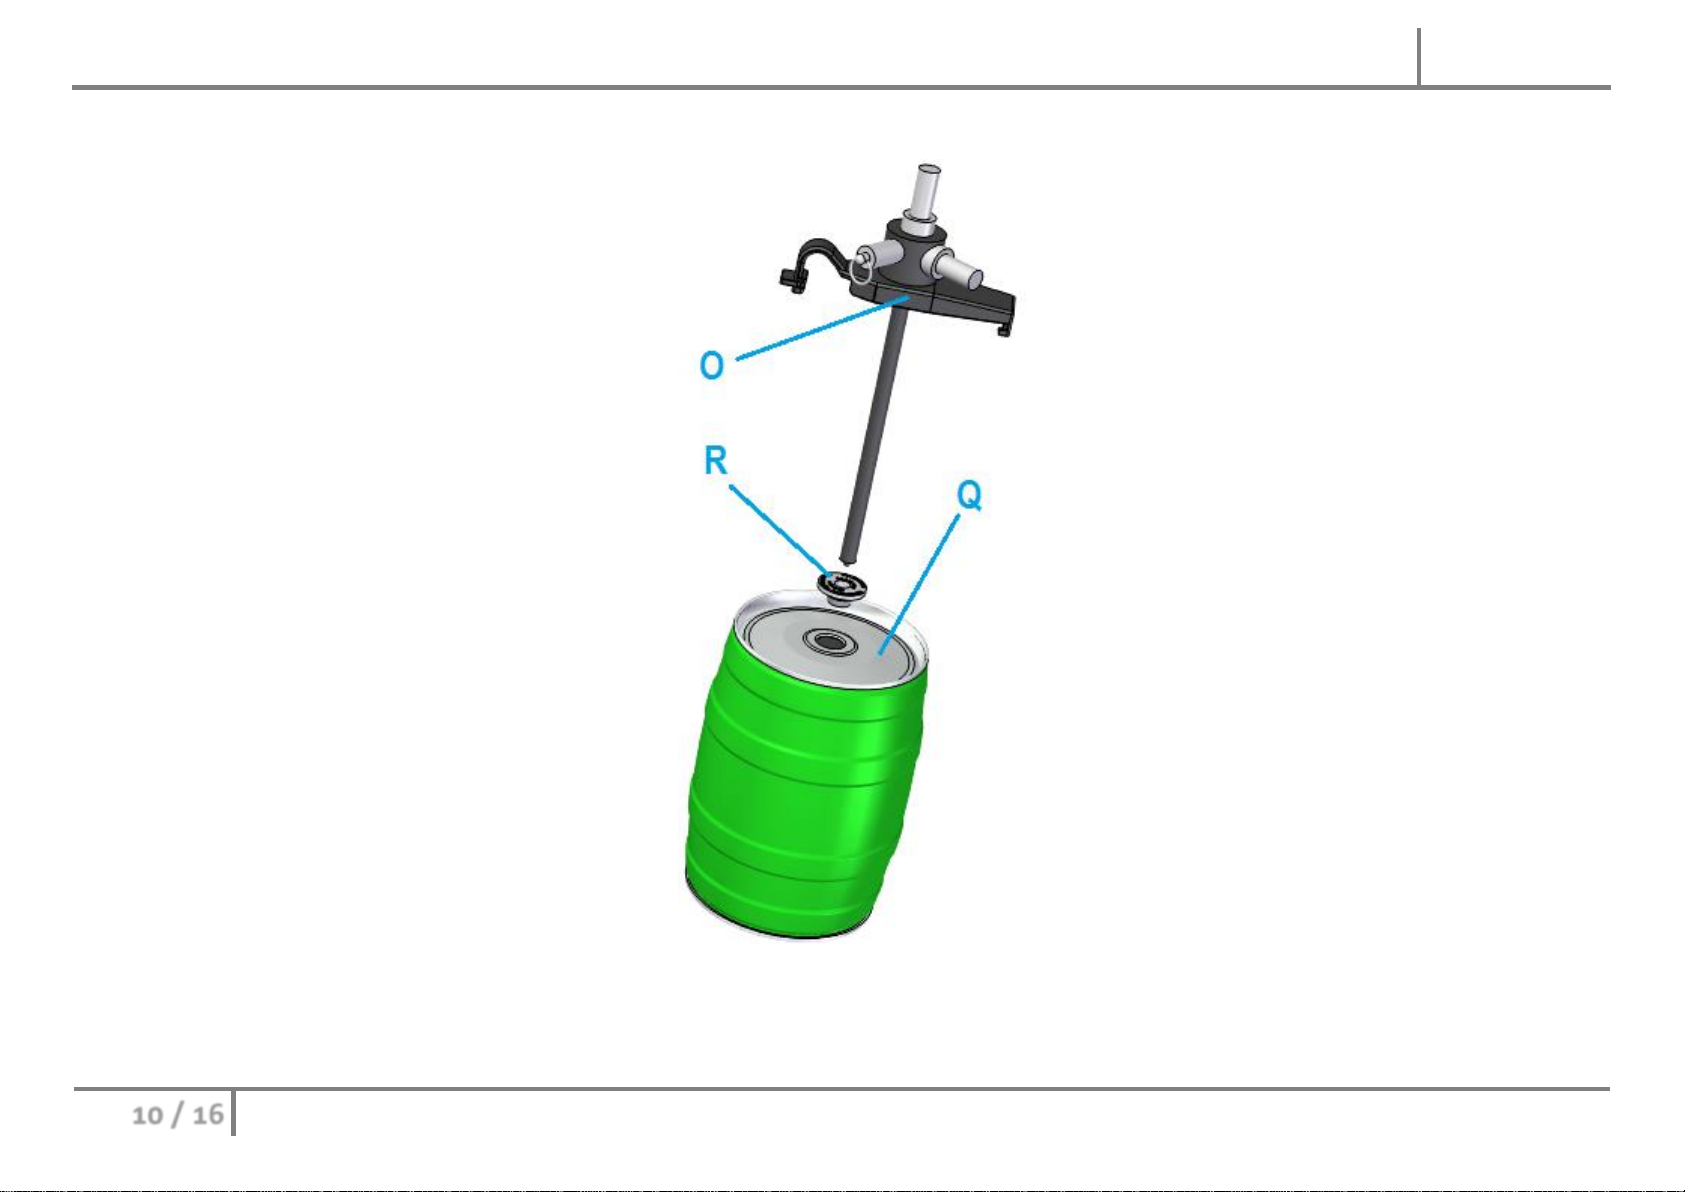
O–Testa di erogazione
P–connessione tubo CO2
Q–fusto birra (non in dotazione)
R–guarnizione di adattamento
connessione
S–sacchetto guarnizioni
universali
T–sacchetto viti per installazione
su mobile.
V–pastiglie detergenti.
Fig.1
PRODUCT DESCRIPTION
A–On/Off switch
B–Beer tap
C–Grid
D–Beer drip tray
E–CO2cylinder (600 gr)
F–CO2cylinder pressure gauge
G–CO2cylinder tap
H–CO2pipe (white)
I- Connection beer hose incoming
L –Beer hose output (blue)
M–Beer hose incoming (red)
N–empty keg for sanification
O–Dispense head
P–Connection CO2hose
Q–beer keg (not supplied)
R–connection adapter seal
S–bag with seal adapter
T–bag with screws for installation in the
housing.
V–detergent tabs.
Built-In Beer Dispenser –USER MANUAL
D0035-00
ISTRUZIONI E SICUREZZA
Questo distributore è conforme alle vigenti norme di sicurezza. L'uso
improprio del distributore può causare danni a persone e / o cose. Leggere
attentamente le istruzioni per l'uso prima di utilizzare il dispenser. Le
istruzioni contengono informazioni importanti sulla sicurezza, uso e
manutenzione per proteggere voi e la macchina. Il distributore è stato
progettato esclusivamente per servire la birra. Qualsiasi altro utilizzo non è
permesso e può essere pericoloso.
Il costruttore non può essere ritenuto responsabile in alcun modo per
danni causati a persone o cose a causa di un uso improprio e / o
scorretto del distributore.
SAFETY AND INSTRUCTIONS
This dispenser conforms to current safety regulations. Improper use of the
dispenser may cause damage to people and/or objects. Carefully read the
instructions for use before operating the dispenser.
The instructions include important information on safety, use and maintenance
to protect you and the machine. The dispenser has been exclusively designed
for serving beer. Any other use is not permitted
and may be hazardous.
The manufacturer shall not be held liable in any way for damage caused to
people or objects as a result of improper and/or incorrect use of the
dispenser.
SICUREZZA TECNICA
Prima di collegare il distributore alla rete elettrica, assicurarsi che la
tensione e la frequenza sulla targhetta siano compatibili con il sistema
elettrico.
La sicurezza del dispenser è garantita solo se è collegato ad un conduttore
terrestre standard.
Il costruttore non può essere ritenuto responsabile in alcun modo per
danni causati a persone o cose a seguito di funzionamento difettoso del
conduttore di messa a terra (ad esempio il rischio di scosse elettriche).
Non usare prolunghe per collegare il distributore. Prolunghe non
garantiscono condizioni di sicurezza necessarie per il distributore (per
esempio il rischio di surriscaldamento).
Se il cavo di collegamento del distributore è danneggiato, deve essere
sostituito da personale qualificato, per evitare qualsiasi rischio.
Per prevenire i danni per l'utente, l'installazione, la manutenzione e le
riparazioni devono essere effettuate esclusivamente da personale
qualificato.
Per scollegare il distributore dalla rete, togliere la spina dalla presa di
TECHNICAL SAFETY
Before connecting the dispenser to the mains, make sure the voltage and
frequency on the rating plate are compatible with the electrical system.
The safety of the dispenser is only guaranteed if it is connected to a standard
earthling conductor.
The manufacturer shall not be held liable in any way for damage caused to
people or objects as a result of faulty operation of the earthling conductor
(for example the risk of electric shock).
Do not use extension leads to connect the dispenser. Extension leads do not
guarantee safety conditions required for the dispenser (for example the risk of
overheating).
If the mains lead connecting the dispenser is damaged, it must be replaced by
qualified personnel, to prevent any risks. To prevent considerable harm to the
user, installation, maintenance and repairs must be undertaken exclusively by
qualified personnel.
To disconnect the dispenser from the mains, remove the plug from the socket
without pulling the lead.
Do not open the dispenser cover, under any circumstances. Do not touch live

Built-In Beer Dispenser –USER MANUAL
D0035-00
corrente senza tirare il cavo.
Non aprire il coperchio del distributore, in nessun caso. Non toccare le
parti elettriche o cavi e non cambiano la struttura elettrica del
distributore, in quanto ciò potrebbe provocare una scossa elettrica.
Il cilindro contiene gas CO ² ad alta pressione, pressurizzato a circa 36
bar. Maneggiare il cilindro con la massima cura e chiudere sempre il
rubinetto "G" (figura 1 e 3), anche quando il cilindro è vuoto. Questo
rubinetto deve essere tenuto chiuso, anche quando la macchina non
viene utilizzata.
Il costruttore non può essere ritenuto responsabile in alcun modo per
danni causati a persone o cose in conseguenza della mancata osservanza
di quanto sopra.
electrical parts or leads and do not change the electrical structure of the
dispenser, as this may result in electric shock.
The cylinder contains high pressure CO² gas, pressurized to approximately 36
G
1 and 3) even when the cylinder is empty. This tap should be kept closed,
even when the machine is not used.
The manufacturer shall not be held liable in any way for damage caused to
people or objects as a result of failure to comply with the above.
Secondo la Direttiva Europea 2002/96/CE sui rifiuti di
apparecchiature elettriche ed elettroniche (RAEE), gli
elettrodomestici non possono essere smaltiti in normali discariche.
Gli apparecchi dismessi devono essere raccolti separatamente per
ottimizzare il recupero e il riciclaggio dei materiali e per evitare
potenziali danni per la salute e per l'ambiente. Il simbolo di un
bidone con una croce è affisso su tutti i prodotti, per ricordare agli
utenti che devono smaltire il prodotto separatamente. Per ulteriori
informazioni sulle modalità di smaltimento degli elettrodomestici,
gli utenti devono rivolgersi ad un ente pubblico o loro concessionari.
DISPOSAL OF HOUSEHOLD APPLIANCES
Under the European directive 2002/96/EC on waste from electrical and
electronic equipment (WEEE), household appliances may not be disposed
of at normal landfill sites. Old appliances must be collected separately to
optimize the recovery and recycling of their materials and to prevent
potential harm to health and the environment. The symbol of a bin with a
cross is affixed on all products, to remind users that they must dispose of
the product separately. For further information on how to dispose of
household appliances, users should contact a public authority or their
dealers.

Built-In Beer Dispenser –USER MANUAL
D0035-00
INSTALLAZIONE DEL DISTRIBUTORE
Assicurarsi che l’elettrodomestico di birra possa
andare bene nel vano del mobile (figura 2).
Assicurarsi che il mobile ove si debba installare
il prodotto, sia disposto per una libera
circolazione della “colonna d’aria” (fig.2), dallo
zoccolo alla parete posteriore in prossimità del
muro.
Fissare il distributore alla base con le 4 viti in
dotazione, inserite nei due fori del deposito
gocciolatoio.
Attentamente collegare raccordo "H" (figura 1),
posto all'estremità della linea di flusso birra "G"
(figura 1), al raccordo della birra testa dosatrice
"I" (figura 1).
Attentamente collegare raccordo "K" (figura 1),
posto all'estremità della linea di flusso di CO²
"M" (figura 1), al CO² connessione di ingresso
della testa dosatrice "I" (figura 1).
Montare la testa dosatrice sull'allegato fusto e
fissare abbassando la leva di erogazione testa e
fare in modo che sia posizionata correttamente
al fine di evitare perdite di birra e di Co².
Guardando l’esempio di figura 3, agganciare
prima il lato sinistro (1), poi premere per
agganciare il lato destro (2), facendo
attenzione che i ganci abbiano preso sotto il
limite del ricciolo del fusto.
Fig.2
Fig.3
INSTALLING THE DISPENSER
Make sure the beer dispenser can fit the cabinet (figure 2).
Ensure that the cabinet where you want to install the
product, is willing to allow the free circulation of the
"column of air" (Fig. 2), from the base to the wall.
Secure the dispenser to the base using the 2 screws
provided, inserted in the two holes in the drip tray
storage area.
Carefully connect fitting “H” (figure 1), positioned at
the end of the beer flow line “G” (figure 1), to the beer
outlet connection of the dispense head “I” (figure 1).
Carefully connect fitting “K” (figure 1) , positioned at
the end of the CO² flow line “M” (figure 1), to the CO²
inlet connection of the dispense head “I” (figure 1).
Fit the dispense head on the keg attachment and
secure lowering the dispense head lever and making
sure it is fitted properly to avoid beer and CO² leaks.
Seeing the example on figure 3, Make sure that the
hooks have taken below the limit of the edge of the keg
(see Figure 3). Looking at the example of Figure 3, fix
first the left side (1), then press to hang the right side
(2), taking care that the hooks have taken below the
limit of the curl of the keg.
COLLEGAMENTO E SOSTITUZIONE DEL
Fig.3
CONNECTING AND REPLACING THE CO2
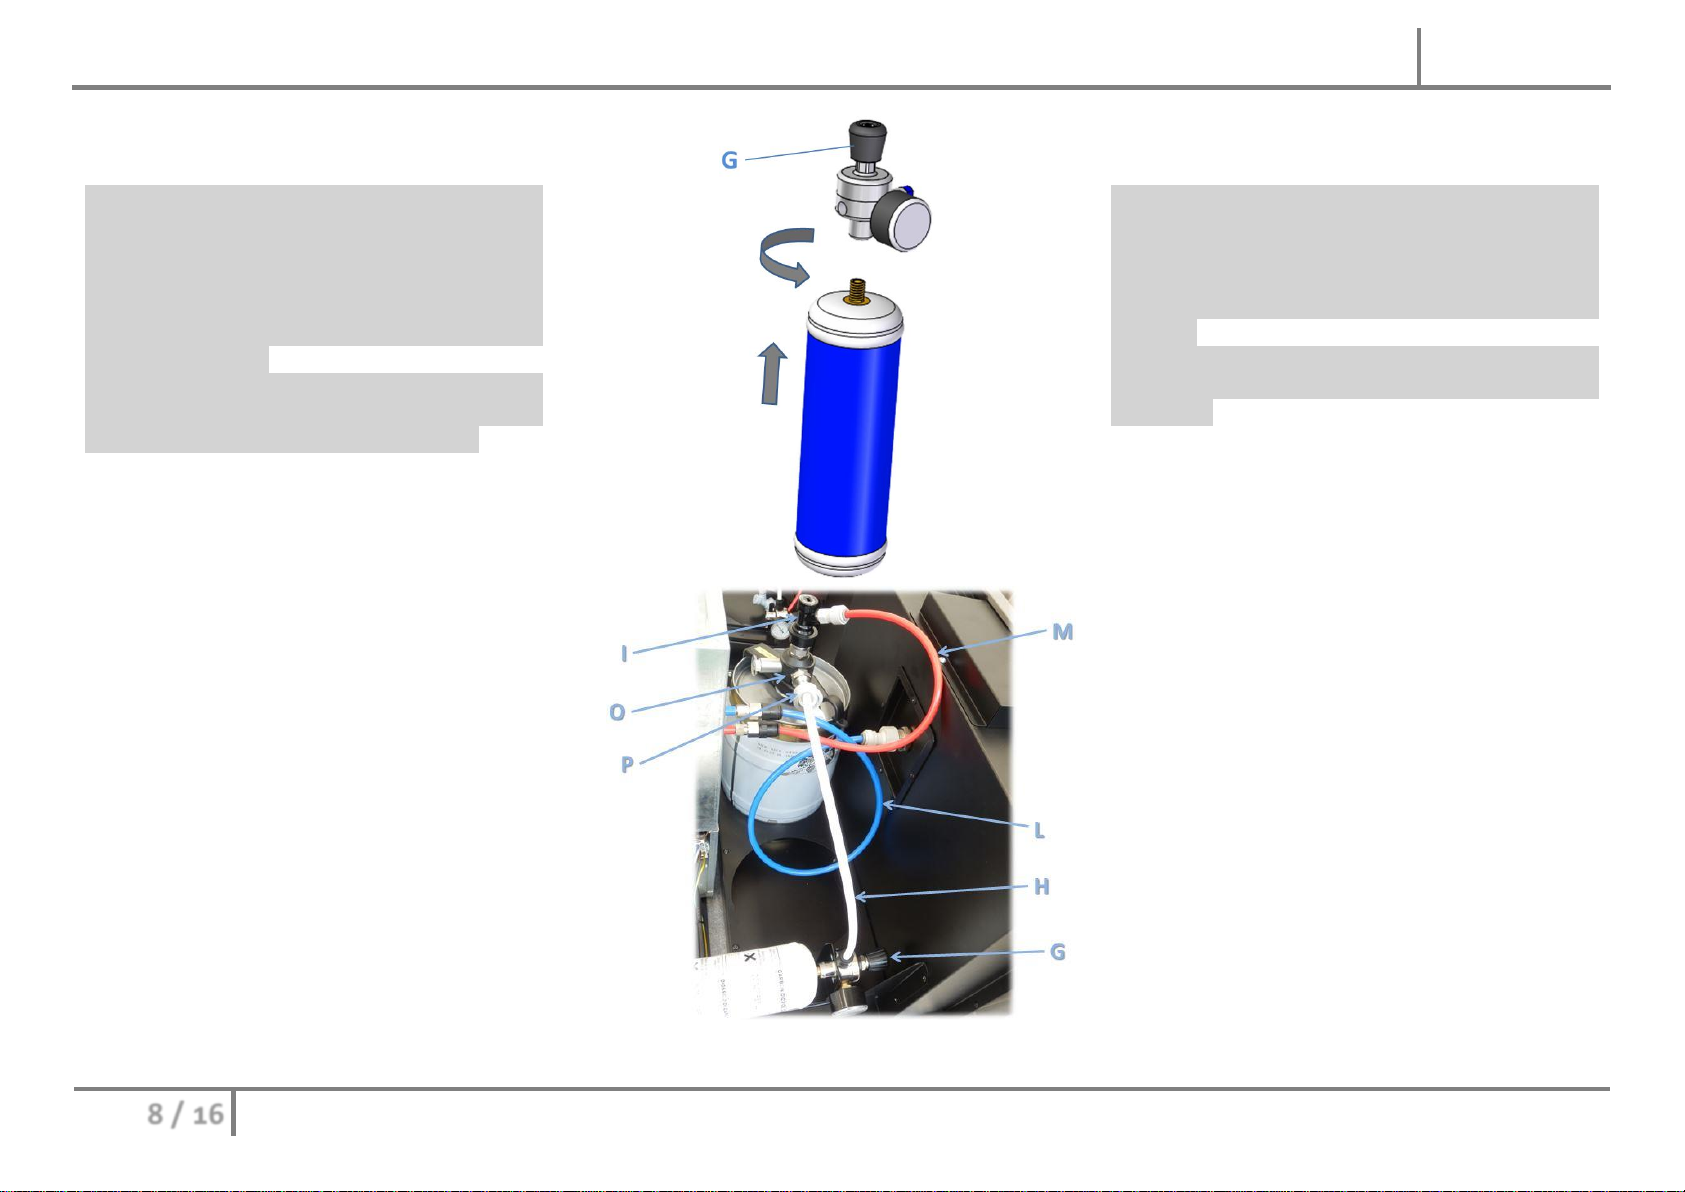
Built-In Beer Dispenser –USER MANUAL
D0035-00
FUSTO CO2
ATTENZIONE: Il cilindro contiene gas CO2 ad alta
pressione, pressurizzato a circa 36 bar.
Maneggiare il cilindro con la massima cura e
chiudere sempre il rubinetto "G" (figura 3), anche
quando il cilindro è vuoto. Il rubinetti "G" deve
essere tenuto chiuso, anche quando la macchina
non viene utilizzata.
Non aprire il rubinetto della bombola (valvola)
fino a quando tutti gli elementi, tra cui la testa
dosatrice "O" (figura 1) sono stati collegati.
Per rimuovere la bombola vuota, procedere come
segue:
Chiudere il rubinetto "G" (valvola) (fig. 1, 3,
4).
Svitare manualmente il cilindro fino a
quando è completamente rilasciato.
Per collegare la bombola CO2, procedere come
segue:
Assicurarsi che il rubinetto "O" (valvola)
(figura 1, 3, 4) sia chiuso.
Rimuovere il sigillo dal cilindro.
Montare l’ugello di uscita CO2del cilindro
sul fissaggio filettato del rubinetto.
Stringere con attenzione, avvitando
manualmente il bloccaggio del dispositivo
manuale fino a quando non è fissato
saldamente.
Aprire il rubinetto "G" (valvola).
Fig.4
CYLINDER
CAUTION: The cylinder contains high pressure CO2
gas, pressurized to approximately 36 bar. Handle the
cylinder with the utmost care and always close tap
G3) even when the cylinder is empty. Taps
G
not used.
Do not open the cylinder tap (valve) until all items,
connected.
To remove the empty cylinder, proceed as follow:
Close tap “G” (valve) (figure 1, 3, 4).
Remove the cylinder by hand until it is fully
released.
To connect the CO2cylinder, proceed as follow:
Make sure tap “G” (valve) (figure 1, 3, 4) is
closed.
Remove the seal from the cylinder.
Fit the CO2outlet nozzle of the cylinder to the
attachment with the reducer manual clamp.
Tighten carefully, screwing down the manual
clamp device until it is firmly secured.
Open tap “G” (valve).

Built-In Beer Dispenser –USER MANUAL
D0035-00
COLLEGAMENTO E SOSTITUZIONE DEL FUSTO
BIRRA
ATTENZIONE: I fusti birra, sono generalmente caricati in
tubo
erogatore, potrebbe fuoriuscire birra in pressione. Eseguire
le operazioni di installazione e sostituzione, avendo cura di
non posizionare gli occhi in vicinanza della guarnizione, e
senza dispositivi elettrici in prossimità.
Combinazioni delle sigillature originali
Normalmente le chiusure delle sigillature originali dei fusti
consistono di due parti, di una guarnizione e di un tappo,
quest’ultimo che deve essere premuto all’interno del fusto. I
diversi produttori di birra, adottano diversi tipi di chiusura.
Fusti con le chiusura qui rappresentate da 5 a 7 sono adatti
all’immediato utilizzo su questo prodotto.
Fig.5
Fig.6
Fig.7
CONNECTION AND REPLACEMENT THE BEER KEG
CAUTION: The beer kegs, are generally loaded under pressure,
which is why during installation of the spray pipe, may leak
beer under pressure. Perform installation and replacement,
taking care not to place the eyes near the seal, and no
electrical equipment in the vicinity.
Combinations of the original seals
Normally the closures of the original sealing of kegs consist of
two parts, a gasket and a cap, the latter which must be pressed
into the keg. The different beer producers adopt different types
of closure.
Kegs with closing here represented by 5 to 7 are suitable for the
immediate use of this product.
Nel caso di sigilli di forma simile a quelli rappresentati da
8 a 9, la differenza tra i due è minima, ma solo quello
rappresentato in fig.8 è adatto all’immediato uso col
prodotto. La differenza è maggiormente evidente senza il
coperchio (vedi fig.e 8b e 9b), dove si nota la presenza o
meno nella parte interna di un ulteriore corpo in plastica
(fig.8b), che deve essere spinto con il tubo della
connessione “O”; la simile guarnizione senza questo
componente (fig.9b), non farà perfetta tenuta nel tubo
della connessione “O”.
Nell’eventualità che il sigillo di chiusura del fusto di birra
acquistato sia ulteriormente diverso da quelli qui
rappresentati, rimuoverlo con l’uso della pinza in
dotazione, ed inserire la guarnizione universale “R”
(fig.1) inserita nella busta “S” (fig.1).
Fig.
8a 8b
9a 9b
In the case of seals of a shape similar to those represented
by 8 to 9, the difference between the two is minimal, but
only the part shown in fig.8 is suitable for immediate use
with the product.
The difference is more evident without the lid (see Fig.s 8b
and 9b), where we note the presence or not in the inner
part of a further plastic body (fig.8b), which must be
pushed with the tube of connection "O ", while the seal
without this component (Fig.9b), it will not leak-proof on
the connection with the pipe “O".
In the event that the seal closing the purchased keg is
different than those represented here, remove it using the
provided clamp, and install the gasket universal "R" (Fig. 1)
inserted into the envelope "S" (Fig. 1).
Built-In Beer Dispenser –USER MANUAL
D0035-00
Per sostituire il fusto Birra, procedere come
segue:
Assicurarsi che l’elettrodomestico sia spento.
Assicurarsi che il rubinetto del gas CO2sia chiuso.
Sganciare le clip dell’adattatore dal bordo del
fusto.
Estrarre completamente il tubo dell’adattatore
dal fusto.
Se inserita la guarnizione universale “R”,
rimuoverla manualmente la guarnizione dal fusto
vuoto.
Per collegare il fusto Birra, procedere come
segue:
Rimuovere la guarnizione del fusto nel caso
corrisponda a modelli tipo fig.8 o diversi, con
l’apposita pinza “U” (fig. 1).
Inserire la guarnizione universale “R” (vedi fig. 1)
nel nuovo fusto.
Posizionare il fusto pieno ed inserire il tubo
dispensatore nella guarnizione.
Spingere in basso il tubo dispensatore, fino ad
avvenuta connessione dei ganci della staffa in
plastica “O” (figura 1 e 10) nei bordi del fusto
birra.
Aprire il rubinetto del CO2“G”.
Aprire il rubinetto della birra “B” (figura 1) e
lasciare defluire la schiuma fino a che la birra
esce, ad una portata costante.
La macchina è pronta per l'uso.
Fig.10
To replace the keg beer, proceed as follows:
•Make sure the appliance is switched off.
•Make sure that the CO2valve is closed.
•Release the clip the adapter from the edge of the
keg.
•Pull the adapter tube from the keg.
•If it is inserted the universal seal “R”, remove it
from the empty keg, with the hand.
To connect the new full keg beer, proceed as
follows:
•In the case the seal is similar to the showed in
fig.8, or different, remove it, using the tong “U”
(fig.1).
•Replace seal with the universal seal “R” (fig.1).
•Position the full keg and introduce the dispense
head to the seal, and secure the fixing in the keg
by the climp of the plastic bracket “O” (fig. 1, 10)
on the edge of the keg.
•Open the CO2valve “G”.
•Open the beer tap “B” (figure 1) and let the
froth flow out until the beer comes out at an
even, constant flow rate.
•The appliance is now ready for use.
Built-In Beer Dispenser –USER MANUAL
D0035-00
USO
Importante: La birra non è una bevanda per i bambini. I bambini
dovrebbero avere accesso al distributore sotto la stretta sorveglianza
dei genitori o adulti responsabili.
Se i bambini sono a casa da soli, chiudere i rubinetti "O" e "S" (figura 1)
e rimuovere la testa dosatrice "I" (figura 1) dal fusto.
La birra si conserva per circa 5 giorni dopo che un fusto nuovo è stato
aperto, e avendo una temperatura ambiente vicina ai 20°C (temperature
più basse aiutano l’aumento del tempo di conservazione).
La birra si deteriora rapidamente, fatto che rappresenta un rischio
(sviluppo di batteri), motivo per cui il distributore deve essere
costantemente lavato e disinfettato.
Questo dovrebbe preferibilmente essere fatto ogni volta che si cambia il
fusto o almeno ogni 7 giorni, quando si faccia un uso continuativo del
dispenser.
Residui di birra stagnanti nel dispenser generano un cattivo odore e
danno alla birra un gusto sgradevole. La birra in un fusto nuovo,
collegata ad un erogatore sporco, viene rapidamente contaminata in
presenza di batteri, e anche se il fusto collegato è nuovo, la birra acquista
un sapore sgradevole.
Seguire attentamente le istruzioni per "il lavaggio e la disinfezione
dell'erogatore", nei capitoli seguenti.
Il costruttore non può essere ritenuto responsabile in alcun modo per
danni causati a persone o cose in conseguenza della mancata
osservanza di quanto sopra.
USE
Important: Beer is not a drink for children. Children should only have
access to the dispenser under the strict supervision of their parents or
responsible adults.
If children are at home
Beer will keep for around 5 days after a new keg has been opened,
having an ambient temperature near to 20°C (lower temperatures
help to increase the preservation time).
Beer quickly deteriorates, posing a hazard (bacteria develop), so the
dispenser should be washed and disinfected regularly.
This should preferably be done every time the keg is changed or at
least every 7 days, when you make a continued use of the dispenser.
A dispenser with stale beer residues can smell unpleasant and give
the beer an unpleasant taste. The beer in a new keg, connected to a
dirty dispenser, is quickly contaminated if bacteria are present, and
even if a new keg is connected, the beer acquires an unpleasant
taste.
Carefully follow the instructions for “washing and disinfecting the
dispenser”, in the following chapters.
The manufacturer shall not be held liable in any way for damage
caused to people or objects as a result of failure to comply with the
above.

Built-In Beer Dispenser –USER MANUAL
D0035-00
REGOLAZIONE PRESSIONE DEL CO2
Attenzione: Non smontare o manomettere il riduttore di pressione.
L'alta pressione di CO2viene abbassata ad un valore impostato mediante
la vite di regolazione "R" (figura 1) sul riduttore di pressione.
In mancanza di specifiche indicazioni nel fusto sull'utilizzo di pressione, è
consigliata un impostazione costante a 1,2 bar.
È fortemente sconsigliato di impostare pressioni superiori o uguali a 2 bar.
La regolazione sbagliata della pressione comporterà una birra troppo
schiumosa o poco gassata.
•Aprire i rubinetti "S" e "O" (figura 1).
•Verificare che tutti i raccordi siano a tenuta e che non vi siano
perdite di CO2. Se ci sono perdite, chiudere i rubinetti "O" e "S"
(figura 1) e controllare la causa della perdita.
•Controllare la pressione sul quadrante: la pressione è indicata
dall’indice sul manometro "Q" (figura 1).
•Ruotare la manopola di regolazione in senso orario o in senso
antiorario fino a quando la lancetta del manometro di pressione
"Q" (figura 1) raggiunge il valore sopra indicato.
N.B. Il manometro "U" (figura 1) indica la pressione del cilindro. Quando
la mano (con il rubinetto "O" (fig.1) aperto) scende dalla pressione
desiderata, senza la possibilità di tornare al valore superiore, il cilindro è
vicino a vuoto. Un cilindro pieno di 600gr servirà circa 50 fusti.
Per la sostituzione, utilizzare lo stesso tipo di cilindro, disponibile presso
il vostro rivenditore o centro di assistenza.
Prima di rimuovere il cilindro vuoto, chiudere il rubinetto "O" (figura 1).
Il costruttore non può essere ritenuto responsabile in alcun modo per
danni causati a persone o cose in conseguenza della mancata osservanza
di quanto sopra.
REGULATING CO2PRESSURE
Caution: Do not disassemble or tamper with the pressure reducer.
The high pressure of CO2is lowered to a set value using the adjusting screw “R”
(figure 1) on the pressure reducer.
In the absence of specific instructions on the use of pressure in the keg, it is
recommended a constant setting of 1.2 bar.
It is strongly not recommended to set pressures greater than or equal to 2 bar.
The wrong pressure regulation will make the beer too frothy or undercarbonated
(dull beer or with little froth).
Open taps “S” and “O” (figure 1).
Make sure all fittings and connections are properly sealed and that there
are no CO2 leaks. If there are leaks, close taps “O” and “S” (figure --) and
check the cause of the leak.
Check the pressure on the display: the pressure is indicated by the hand
on the pressure gauge “Q” (figure 1).
Turn the adjusting knob clockwise or anticlockwise until the hand on the
pressure gauge “Q” (figure 1) is on the above indicated value.
N.B. The 1) indicates cylinder pressure. When the
the possibility to return at the upper value, the cylinder is near to empty. A full
cylinder of 600gr will serve approximately 50 kegs.
To replace, use the same type of cylinder, available from your dealer or service
center.
1).
The manufacturer shall not be held liable in any way for damage caused to
people or objects as a result of failure to comply with the above
Built-In Beer Dispenser –USER MANUAL
D0035-00
SPILLATURA DELLA BIRRA
Dato che il distributore consuma poca energia, quando il fusto è installato,
si consiglia di lasciarlo acceso. Così la birra nei circuiti non riscalda e non si
deteriorano. Oltre a un gusto sgradevole, i batteri nocivi per la salute
potrebbe crescere.
•Premere il pulsante "A" (fig. 1), in posizione 1 (la spia è accesa).
•Dopo circa 5 minuti, il dispenser è pronto a servire birra a
temperatura di circa 4 °C.
! Si consiglia di risciacquare i bicchieri con acqua fredda (bagnarli piuttosto
che asciugarli), prima di servire la birra.
Questo raffredderà la birra e manterrà la sua temperatura più a lungo.
Servire la birra - metodo lento:
•Mettete il bicchiere sotto il rubinetto birra e inclinatelo di circa 45°.
•Inclinate il rubinetto verso di voi, in modo rapido e con fermezza.
•Non lasciare il rubinetto a metà strada, così da far uscire solo la
schiuma.
•Gradualmente raddrizzare il bicchiere mentre viene riempito, finché
non è quasi in posizione verticale.
•Mettete il bicchiere sulla griglia e attendere che la schiuma di
stabilirsi a circa 4 cm dal bordo.
•Ripetere finché il bicchiere è pieno, con la quantità di schiuma
desiderata.
Servire la birra - metodo veloce (consigliato):
Questo metodo riempie il bicchiere in un solo passaggio.
•Inclinare il rubinetto del tutto verso di voi, in modo rapido e con
fermezza.
•Quando il rubinetto si ferma, posizionate il beccuccio nella parte
inferiore del bicchiere in posizione inclinata.
•Questo ha bisogno di un po’ di pratica, dato che dovrebbe essere
eseguito in fretta.
•Gradualmente raddrizzare il bicchiere mentre viene riempito, finché
SERVING BEER
As the dispenser consumes little energy, when the keg is installed, we
recommend leaving it turned on. The beer in the circuits will not heat up
and will not deteriorate. Besides an unpleasant taste, bacteria harmful to
health could grow.
•Push the button "A" (fig.1), on position 1 (the light is on).
•After around 5 minutes, the dispenser is ready to serve beer at
temperature of approximately 4°C.
! We recommend rinsing glasses with cold water (draining them rather than
drying them), before serving the beer.
This will cool the beer and maintain its serving temperature for longer.
Serving beer - slow draught:
•Put the glass under the beer tap and tilt by approximately 45°.
•Pull the tap towards you, quickly and firmly.
•Do not leave the tap halfway as only froth will flow out.
•Gradually straighten the glass while it is being filled, until it is nearly in
an upright position.
•Put the glass on the rack and wait for the froth to settle to a head of
approximately 4 cm.
•Repeat until the glass is full, with the amount of desired froth.
Serving beer - quick draught (recommended):
This method fills the glass in one step.
•Pull the tap entirely towards you, quickly and firmly.
•When the tap stops, put the glass underneath and tilt.
•This needs a little practice, as it should be done quickly.
•Gradually straighten the glass while it is being filled, until it is nearly in
an upright position.
slightly towards the machine, so only froth will come out.
Important: When the dispenser is not in use, it must be washed and
Built-In Beer Dispenser –USER MANUAL
D0035-00
non sarà quasi in posizione verticale.
N.B. Se volete una "decorazione" con la schiuma, o una schiuma
spostare il rubinetto leggermente verso la macchina, in modo che esca solo
schiuma.
Importante: Quando l'erogatore non è in uso, deve essere lavato e
disinfettato (vedere la sezione successiva "LAVARE E DISINFETTARE IL
DISPENSER") e svuotati i circuiti.
LAVAGGIO E DISINFEZIONE DEL DISPENSER
(utilizzare le pastiglie in dotazione, o di simile composizione, e leggere
attentamente le istruzioni riportate di seguito).
Prodotto alcalino per l'industria chimica e la disinfezione e la pulizia dei
distributori di birra.
Contenuto: dicloroisocianurato al di sotto del 5%, fosfati, carbonato di
sodio, citrato di sodio, agenti ausiliari.
Norme di sicurezza:
Non utilizzare in combinazione con altri prodotti (acidi e prodotti per la
pulizia contenenti acidi) per evitare il rischio di vapori nocivi (gas cloro)
che formano. Nocivo se ingerito.
Irritante per gli occhi e le vie respiratorie. Tenere fuori dalla portata dei
bambini.
In caso di contatto con gli occhi, lavare immediatamente e
abbondantemente con acqua e consultare un medico.
Tossico per gli organismi acquatici, può causare effetti negativi a lungo
termine per l'ambiente acquatico.
Conservare in un luogo asciutto.
La birra si conserva per circa 5 giorni dopo che un fusto nuovo è stato aperto,
e avendo una temperatura ambiente vicina ai 20°C (temperature più basse
WASHING AND DISINFECTING THE DISPENSER
(use the tabs provided, or with similar composition, and carefully read the
following instructions).
Alkaline product for the chemical disinfection and cleaning of beer
dispensers.
Contents: Dichloroisocyanurate below 5 %, phosphates, sodium carbonate,
sodium citrate, auxiliary agents.
Safety instructions:
Do not use in conjunction with other products (acids and cleaning products
containing acids) to avoid the risk of harmful vapors (chlorine gases)
forming. Harmful if ingested.
Irritating to eyes and the respiratory system. Keep out of reach of children.
In case of contact with eyes, rinse immediately with plenty of water and
seek medical advice.
Toxic for aquatic organisms, may cause long-term adverse effects in the
aquatic environment.
Store in a dry place.
Beer will keep for around 5 days after a new keg has been opened, having an
ambient temperature near to 20°C (lower temperatures help to increase the
preservation time).

Built-In Beer Dispenser –USER MANUAL
D0035-00
aiutano l’aumento del tempo di conservazione).
La birra si deteriora rapidamente, fatto che rappresenta un rischio (sviluppo
di batteri), motivo per cui il distributore deve essere costantemente lavato e
disinfettato.
Questo dovrebbe preferibilmente essere fatto ogni volta che si cambia il fusto
o almeno ogni 7 giorni.
Residui di birra stagnanti nel dispenser generano un cattivo odore e danno
alla birra un gusto sgradevole. La birra in un fusto nuovo, collegata ad un
erogatore sporco, viene rapidamente contaminata in presenza di batteri, e
anche se il fusto collegato è nuovo, la birra acquista un sapore sgradevole.
Lavare lo spillatore come descritto:
riempire di acqua sanitaria il fusto “N” (fig.1) in dotazione, ed inserirvi una
pastiglia disinfettante della confezione “V” (fig.1), o di simile composizione.
Installare la testa di erogazione “O” nel suddetto fusto di sanificazione,
avendo prima accertato che il rubinetto “G” del CO2sia chiuso.
Aprire il rubinetto del CO2, ed spillare continuativamente il composto di
sanificazione, senza la necessità di accendere il prodotto, ed avendo cura di
proteggere gli occhi da eventuali schizzi di tale liquido così erogato.
Completata l’erogazione dei 5 lt di liquido di sanificazione, ripetere
l’operazione, ma stavolta con sola acqua introdotta nel fusto “N”, necessaria
qui per ripulire l’eccesso di cloro dai condotti (è sufficiente spillare almeno 2lt
di acqua).
Beer quickly deteriorates, posing a hazard (bacteria develop), so the dispenser
should be washed and disinfected regularly.
This should preferably be done every time the keg is changed or at least every
7 days.
A dispenser with stale beer residues can smell unpleasant and give the beer
an unpleasant taste. The beer in a new keg, connected to a dirty dispenser, is
quickly contaminated if bacteria are present, and even if a new keg is
connected, the beer acquires an unpleasant taste.
Wash the dispenser as described:
fill with water the keg "N" (Fig. 1) provided, and insert a sanitizing tab "V" (Fig.
1), or similar composition.
Install the dispense head "O" in that keg of sanification, having first
ascertained that the tap "G" of CO2is closed.
Open the valve of the CO2, and continuously dispense the compound
sanitizing, without the need to turn on the appliance, and taking care to
protect the eyes from splashes of the liquid.
Completed the dispense of 5 liters of sanitizer liquid, repeat the procedure,
but this time with only hot water introduced into the keg "N", which is
necessary here to clean up the excess chlorine from the pipes (just dispense at
least 2 lt of water).

Built-In Beer Dispenser –USER MANUAL
D0035-00
PULIZIA E CURA DEL PRODOTTO
Una pulizia regolare del prodotto garantisce che funzioni correttamente e
garantisca una lunga durata. Rimuovere la vaschetta raccogli-goccia “D”
(fig.1) dal distributore e pulire le superfici con prodotto non aggressivi per
la pulizia commerciale.
Pulire le parti in acciaio con un opportuno, dolce, prodotto per la pulizia
commerciale.
Non utilizzare in nessun caso corrosivi, prodotti abrasivi per la pulizia.
La vasca di raccolta e rack devono essere svuotati e lavati tutti i giorni per
evitare di birra essiccazione, che è difficile da rimuovere, lasciando un
cattivo odore sgradevole.
Il costruttore non può essere ritenuto responsabile in alcun modo per
danni causati a persone o cose in conseguenza della mancata osservanza
di quanto sopra.
CLEANING AND CARING FOR THE DISPENSER
Regularly cleaning the dispenser will guarantee it works properly and ensure a
long life. Remove the drip tray “D” (fig.1) from the dispenser and clean the
surfaces with a suitable, gentle, commercial cleaning product.
Clean steel parts with a suitable, gentle, commercial cleaning product.
Do not under any circumstances use harsh, abrasive cleaning products.
The drip tray and rack should be emptied and washed daily to avoid beer drying
up, which is hard to remove, leaving a bad, unpleasant smell.
The manufacturer shall not be held liable in any way for damage caused to
people or objects as a result of failure to comply with the above.
NOTE:
____________________________________________________________________________________________________
____________________________________________________________________________________________________
____________________________________________________________________________________________________
____________________________________________________________________________________________________
____________________________________________________________________________________________________
____________________________________________________________________________________________________
____________________________________________________________________________________________________
____________________________________________________________________________________________________
____________________________________________________________________________________________________
____________________________________________________________________________________________________
____________________________________________________________________________________________________
____________________________________________________________________________________________________
Popular Dispenser manuals by other brands


Santint
Santint M3 user manual

Miomare
Miomare MES 330 A1 operating instructions

Stern Engineering
Stern Engineering TRENDY FOAM Installation and maintenance guide

Multi-Clean
Multi-Clean 421330 manual

Lacava
Lacava EX02A owner's manual

Follett
Follett Chewblet 7 Series Installation, operation and service manual


