Smart Lift SL 400 Skylifter User manual


Engelsk SL 400 Skylifter - N2.14 Revision 1.1
2
Contents
1.0 - Introduction.....................................................................................................................................................3
2.0 - EC Declaration of Conformity ..........................................................................................................................4
3.0 - Unpacking Skylifter..........................................................................................................................................5
3.1 - Transport/Handling .........................................................................................................................................6
3.2 - Commissioning ................................................................................................................................................6
3.3 -Storage ............................................................................................................................................................6
4.0 - Technical data..................................................................................................................................................7
4.1 - Load capacity...................................................................................................................................................7
4.2 - Weight .............................................................................................................................................................7
4.3 - Physical dimensions when Skylifter is on transportation bracket without mounting bracket/adapter .........7
4.3.1 Physical dimensions on machine without transportation bracket and mounting bracket/adapter..............7
4.4 - Operating time ................................................................................................................................................7
4.5 - Power supply ...................................................................................................................................................8
4.5.1 - Battery lifetime.............................................................................................................................................8
4.5.2 - External operating battery charger ..............................................................................................................8
4.5.3 - Charging time ...............................................................................................................................................8
4.5.4 - Remote control unit range ...........................................................................................................................8
5.0 - General safety regulations and the operator's responsibilities ......................................................................9
5.1 - Important terms and definitions .....................................................................................................................9
6.0 - General description and main components..................................................................................................10
7.0 - Operating SL 400 Skylifter .............................................................................................................................11
7.1 - Starting Skylifter ............................................................................................................................................11
7.2 - Manoeuvring Skylifter/remote control unit..................................................................................................12
7.3 - Precision manoeuvring..................................................................................................................................12
7.4 - Reversing the functions.................................................................................................................................12
7.5 - Positioning/adjusting the vacuum yoke ........................................................................................................13
7.6 - Attaching the load .........................................................................................................................................13
8.0 - Switches and alarms......................................................................................................................................15
9.0 - Breakdown and faults on the machine .........................................................................................................15
10.0 - Vacuum diagram .........................................................................................................................................16
11.0 - Electrical diagram ........................................................................................................................................18
Bilag 1 - Fitting of mounting bracket/adapter.......................................................................................................22
Bilag 2 - Skylifter accessories.........................................................................................................................23

Engelsk SL 400 Skylifter - N2.14 Revision 1.1
3
1.0 - Introduction
Congratulations on becoming the proud owner of the new SL 400 Skylifter. We're convinced that you will be
completely satisfied with your purchase. When we developed Skylifter, we did our utmost to "keep it simple".
We believe we have succeeded in designing a very simple and reliable machine.
Skylifter is an implement which has to be attached to a carrier machine, e.g. telescopic handler, mobile crane,
forklift truck, or similar. The carrier provides mobility. And of course, the right choice of carrier depends on the
work you do. There are essentially no limits as to how high or far the Skylifter can reach as these movements
depend on your choice of carrier.
When Skylifter is mounted on the carrier and the load is securely attached to the suction pads on Skylifter, the
carrier performs the long and large movements which bring the load close to the desired position. Skylifter
holds and manoeuvres the load gently and safely into its final position. The only requirement is that the load
can be attached to suction pads with vacuum.
If you are uncertain whether Skylifter is suitable for your specific task or if you want to know if Skylifter can be
mounted on a specific type of carrier, please contact your local sales representative to ask about the options
available to you and how we can help find a solution.
If your Skylifter is defective or if you use the machine incorrectly, hazardous situations can occur,
which entail a risk of serious personal injury or irreparable damage to equipment. To avoid accidents,
it is important that the operator is well acquainted with operating and maintaining the Skylifter and
appropriate safety measures. The operator must know how to react to warning signals and comply
with the applicable safety regulations.
Don't work harder – work smarter

Engelsk SL 400 Skylifter - N2.14 Revision 1.1
4
2.0 - EC Declaration of Conformity
The manufacturer responsible for the technical dossier:
Smartlift A/S
N.A. Christensensvej 39
7900 Nykøbing Mors, Denmark
declares herewith that
the following machine: Vacuum Lifting Yoke
Model/type: SL 400 Skylifter
Serial no.:__________________Production month__________________ YEAR 2016
is manufactured in compliance with the following EC Directives:
-Machinery Directive 2006/42EC
-Low Voltage Directive 2006/95/EC
-EMC Directive 2014/30/EU
The following standards are applied:
DS/EN ISO 12100-1:2009 (Safety of machinery – general principles)
DS/EN ISO 12100-2:2009 (Safety of machinery – general principles)
DS/ISO/TR14121-2:2012 (Risk assessment guidance and methods)
DS/EN 13857:2008 (Safety of machinery – Hazard zones and safety distances)
DS/EN 13155/A1+A2:2009 (Cranes – Safety – Non-fixed load lifting attachments)
DS/EN 60204-32:2008 (Electrical equipment of machines – Part 32: Requirements for hoisting machines)
Date: Signature:
_____________ _____________________________________
Managing Director Nicolai T. Jørgensen

Engelsk SL 400 Skylifter - N2.14 Revision 1.1
5
3.0 - Unpacking Skylifter
On arrival, check Skylifter for damage caused in transit.
Carefully remove the packaging from the machine. Take care when using a knife or scissors. The soft suction
pads and hoses etc. can easily be damaged.
Unscrew and remove both bolts which secure the machine to the pallet.
When unpacking, please check that the machine is intact and that all parts have been delivered. If you find
visible damage or defects on your Skylifter, notify your local sales representative immediately, so that he can
take steps to remedy the situation.
1 x SL 400 Skylifter comprises the following components/parts:
•1 x SL 400 Skylifter
•2 x traverses
•4 sets suction pads with hoses
•2 x supporting legs
•1 x aluminium box containing:
1 x radio transmitter
1 x battery charger for radio transmitter
2 x rechargeable batteries
1 x Lithium-ion operating battery
1 x charger for operating battery
1 x instructions for use
1 x parts lists
You will also need 1 x mounting bracket (adapter). As the mounting bracket is specially designed for use with a
specific type of telescopic loader, crane, etc., it is not part of the standard Skylifter but should be ordered
separately.
If the mounting bracket is ordered with the machine, it will be fitted on delivery.
Example:
mounting
bracket for
Manitou.

Engelsk SL 400 Skylifter - N2.14 Revision 1.1
6
3.1 - Transport/Handling
SL 400 Skylifter is engineered with lifting brackets. The machine must only be lifted using the lifting brackets.
When the machine is not is use, it should rest on the supporting legs (supplied). The machine must be stored
and transported on the supporting legs.
Use the lifting brackets to secure the machine during transport. Protect the machine from rain and snow.
Never lift the machine using a forklift truck or similar machine.
3.2 - Commissioning
You must read and understand the instructions for use before using the machine for the first time. If you have
questions, contact your local sales representative.
Mount the mounting bracket (adapter) onto Skylifter. The mounting bracket must be suitable for use on the
specific type of carrier used.
Always use original mounting brackets. If the mounting brackets used are not original, the guarantee on the
machine is null and void.
Original mounting brackets are CE-marked by SmartLift.
For bolt positions and torque, see Appendix 1.
Keep the instruction manual with the machine!
3.3 - Storage
Switch off the machine and disconnect the battery.
Store the machine in dry, preferably heated conditions.
The battery which powers the machine and remote control unit should be charged so that the battery is fully
charged when the machine is put into storage.
NB! Recharge the batteries at 4-week intervals – even when the machine is in storage.

Engelsk SL 400 Skylifter - N2.14 Revision 1.1
7
4.0 - Technical data
4.1 - Load capacity
Skylifter can lift and hold a maximum load of: 400 kg
The machine has a dual-circuit vacuum system. Each vacuum circuit can lift and hold the maximum load.
4.2 - Weight
Without mounting bracket and supporting legs 375 kg
Weight of supporting legs (2 x detachable legs) 15 kg
Weight of mounting bracket/adapter: The weight depends on the type of carrier, with which Skylifter will
be used, see Appendix 1.
4.3 - Physical dimensions when Skylifter is on transportation bracket without
mounting bracket/adapter
Functions folded Functions extended to max.
Length: 0.80 m 1.48 m
Width (without traverse): 1.20 m 0.88 m
Height: 1.20 m 1.20 m
4.3.1 Physical dimensions on machine without transportation bracket and mounting
bracket/adapter
Functions folded Functions extended to max.
Length: 0.80 m 1.48 m
Width (without traverse) 0.88 m 0.88 m
Height: 0.80 m 1.00 m
4.4 - Operating time
Maximum operating time is relative and depends on how the machine is used, battery level and ambient
temperature.
At 23oC with a new, fully charged battery, the machine's operating capacity is:
4 hours continuous operation with a 400 kg load or
8 hours of 50% operation with a 400 kg load.
If Skylifter is to be used for a longer period of time, we recommend you purchase an extra battery, which can
be replaced in seconds.
Engelsk SL 400 Skylifter - N2.14 Revision 1.1
8
4.5 - Power supply
Skylifter has 1 x lithium-ion battery, 24 V, 20.25 Ah.
Battery capacity at different temperatures:
-10oC 60 %
0oC 80 %
23oC 100 %
55oC 95 %
A new, fully charged battery provides 29 V power. The battery cuts out when it is discharged to 21 V.
4.5.1 - Battery lifetime
Batteries deteriorate over time and after many recharging cycles. After 1000 recharging cycles, this battery
retains 80 % of its original capacity.
4.5.2 - External operating battery charger
Connect to mains power supply: 220V-50Hz
4.5.3 - Charging time
4 hours using standard charger.
The battery is suitable for top-up charging, which means that you can recharge for short periods (e.g. in
breaks, etc.) You can also charge the battery while it is in use on the Skylifter. Recharging while in use is not
recommended as the cable may obstruct mounting work and get crushed during operation.
4.5.4 - Remote control unit range
The remote control unit has a range of up to 200 m as the crow flies. However, range may be impaired by a
compact building mass, large steel constructions, etc. We recommend that you check that the range is
satisfactory before beginning work (and especially in a compact building or when there are large steel
constructions).
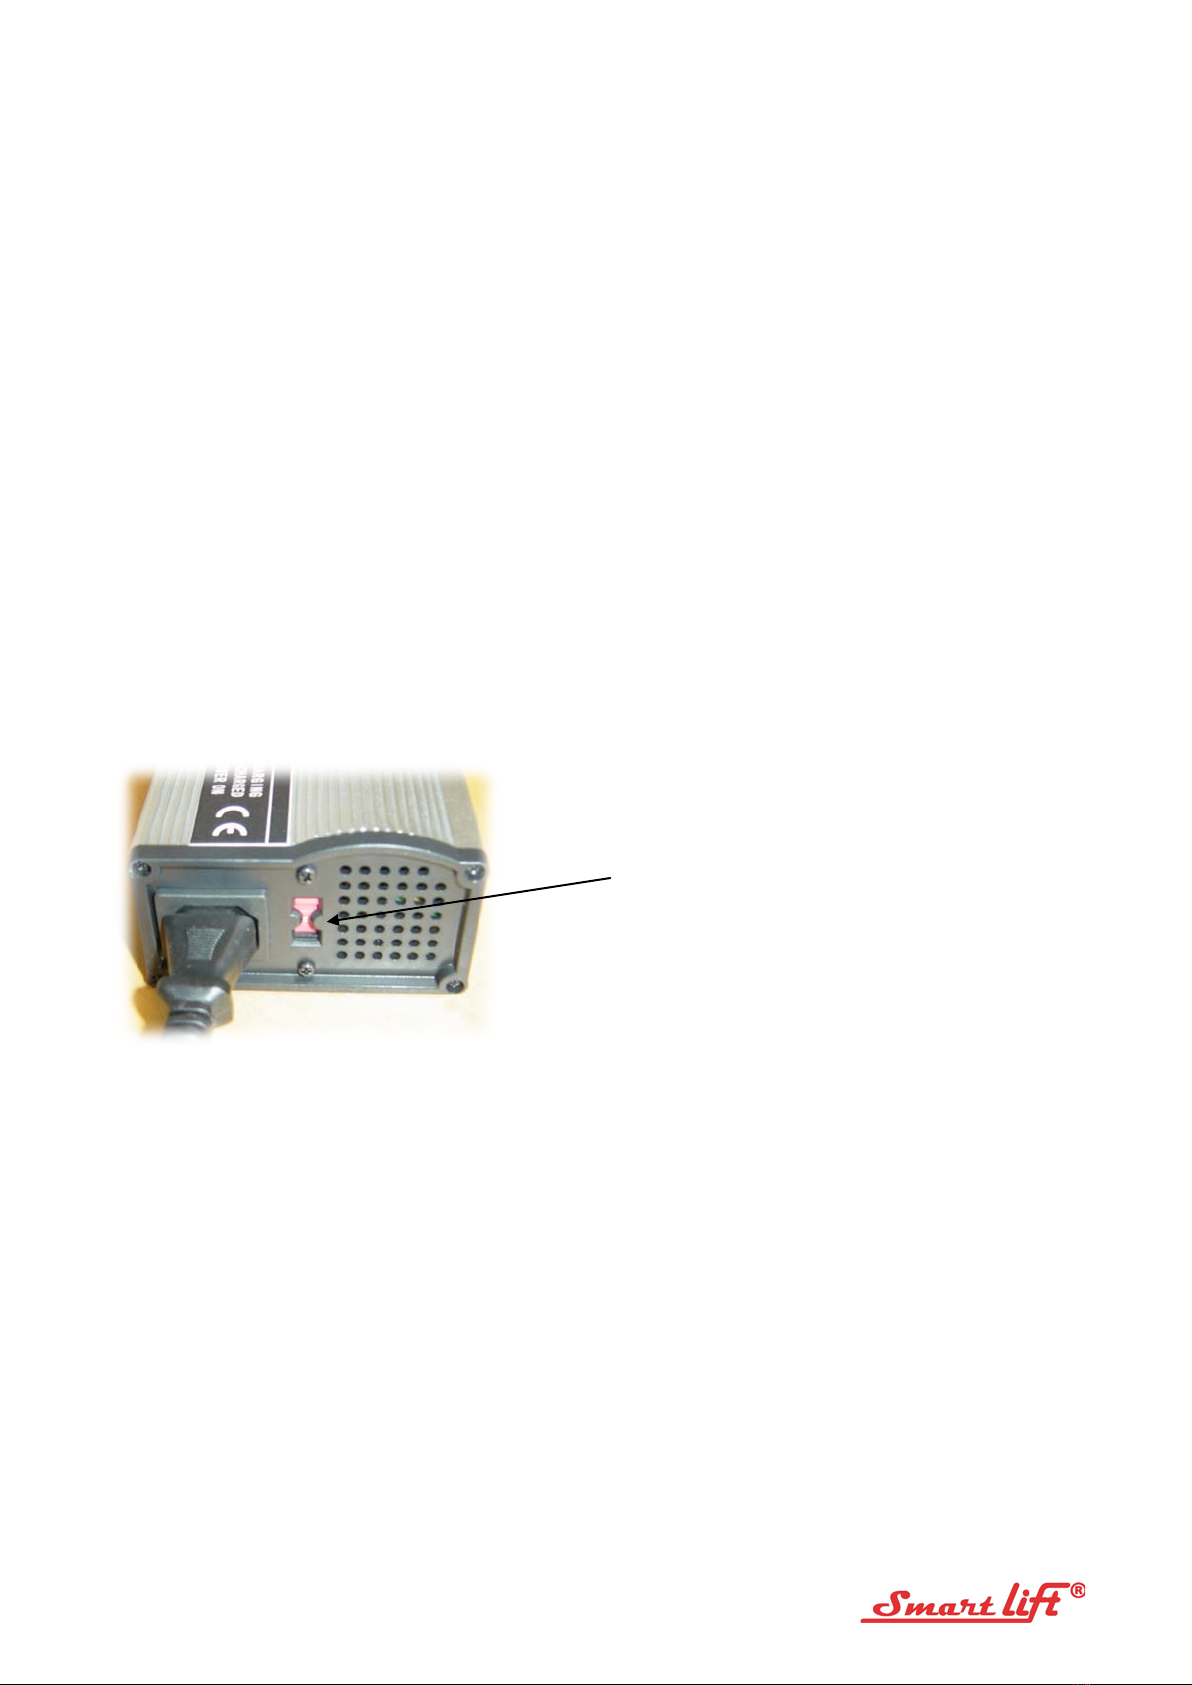
The charger can be switched to 110V, 60Hz.
Flip switch to select.

Engelsk SL 400 Skylifter - N2.14 Revision 1.1
9
5.0 - General safety regulations and the operator's
responsibilities
The operator is responsible for ensuring compliance with the following safety
measures:
SL 400 Skylifter may only be operated by an operator who has been specially trained in the use of the machine
and its safety functions.
Never exceed maximum load capacity 400 kg (SWL 400 kg).
SL 400 Skylifter may only be used with an original mounting bracket/adapter, which is specially designed and
approved for use with the carrier in question.
To prevent material falling from the machine, the operator must ensure before using the machine that there
are no loose objects, snow and ice on the machine.
WARNINGS:
It is dangerous to operate the machine if any of the safety measures are defective.
NEVER lift or manoeuvre items unless they are securely attached and the green control
light is flashing. STOP if the lamp flashes red and the audible alarm is triggered.
NEVER lift wet or slippery items using the suction pads.
Before using the machine, ALWAYS check that the suction pad brackets are securely
fastened.
The machine must NOT be used in an ATEX zone (explosive atmosphere).
PROHIBITED! DANGER!
NEVER leave the machine with its load suspended on the suction pads.
Standing under the load during lifting and under the machine is strictly prohibited.
The work zone must be suitably cordoned off to prevent unauthorised access.
Only personnel who are directly involved in manoeuvring and attaching the load may stand
close to the machine. Operator and fitters must wear a safety helmet.
Must NOT be used to lift people. NEVER play on the machine.
5.1 - Important terms and definitions:
RED TEXT = important safety instructions which MUST be complied with.
Load - an item which can be manoeuvred using suction pads, e.g. Windows, wall elements, etc.
Carrier - the machine to which Skylifter is attached to achieve mobility
Driver - the person operating the carrier
Operator - the person operating the Skylifter
Vacuum yoke - collective term to describe the main carrying arm, traverses and suction pads
Engelsk SL 400 Skylifter - N2.14 Revision 1.1
10
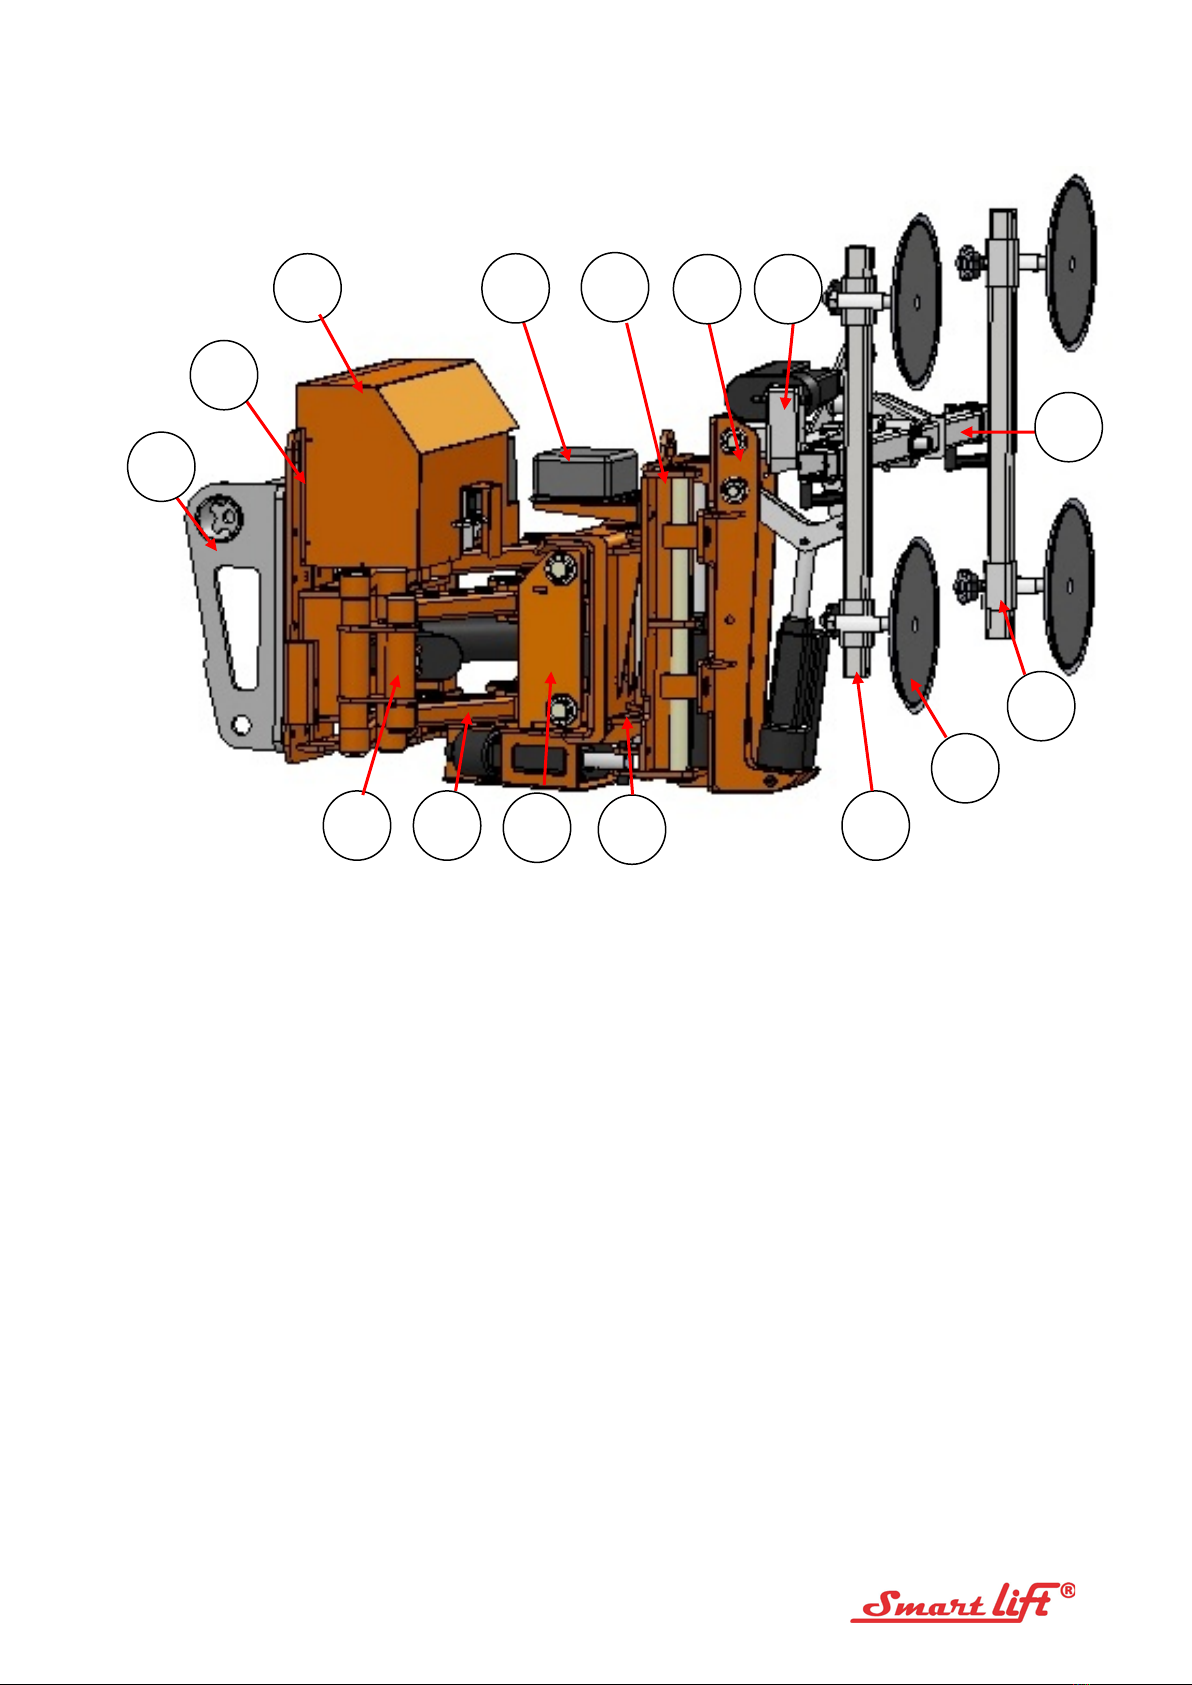
6.0 - General description and main components
Pos Description
1 Mounting bracket/adapter
2 Chassis
3 Main cabinet
4 Radio receiver
5 Turn unit
6 Lifting unit
7 Tilt unit
8 Rotation unit (main boom)
9 Elbow joint
10 Carrying arm
11 Front unit
12 Parallel side shift
13 Traverse
14 Suction pad
15 Pad holder
Other components are shown on the parts list.
14
15
12
5
9
10
7
2
11
4
8
3
1
6
13
© 2006 Copyright. www.smartlift.dk
Engelsk SL 400 Skylifter - N2.14 Revision 1.1
11
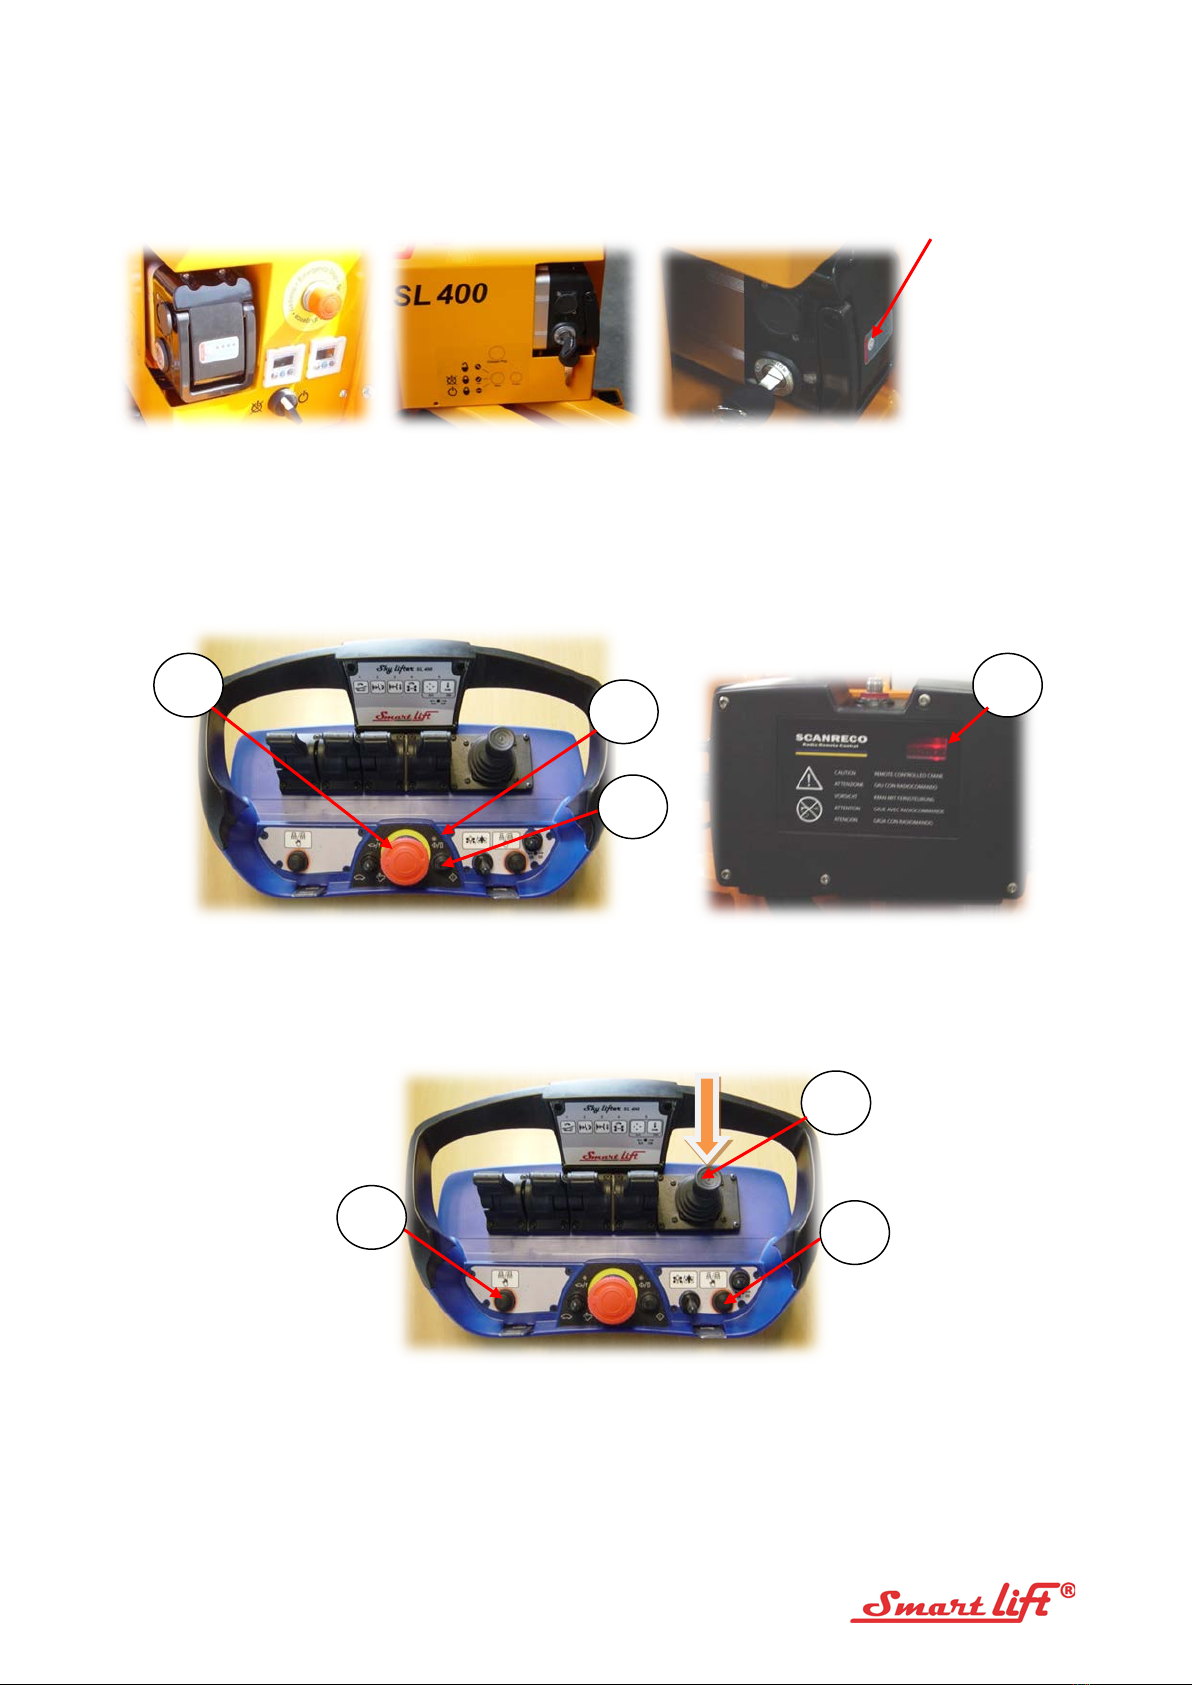
7.0 - Operating SL 400 Skylifter
7.1 - Starting Skylifter
1. To start the machine, turn main switch to ON
2. Place the battery in the unit and lock with the key
3. To start the machine, using the same key, turn to ON.
4. Press emergency stop button (1) to the right until the top moves upwards. To start remote control
unit, press briefly on button (2). Lamp (3) flashes red and the remote control unit receiver display (4)
lights up.
5. To establish a connection with the remote control unit receiver, activate the joystick (6) briefly in the
direction of the arrow.
Skylifter is now switched on and ready for use. To operate the vacuum system, see section 8.5.
1
3
2
4
5
6
Battery indicator.
Press ON. Battery
level indicated by
green diodes. If only
one green diode lights
up, recharge the
battery.
5
Engelsk SL 400 Skylifter - N2.14 Revision 1.1
12
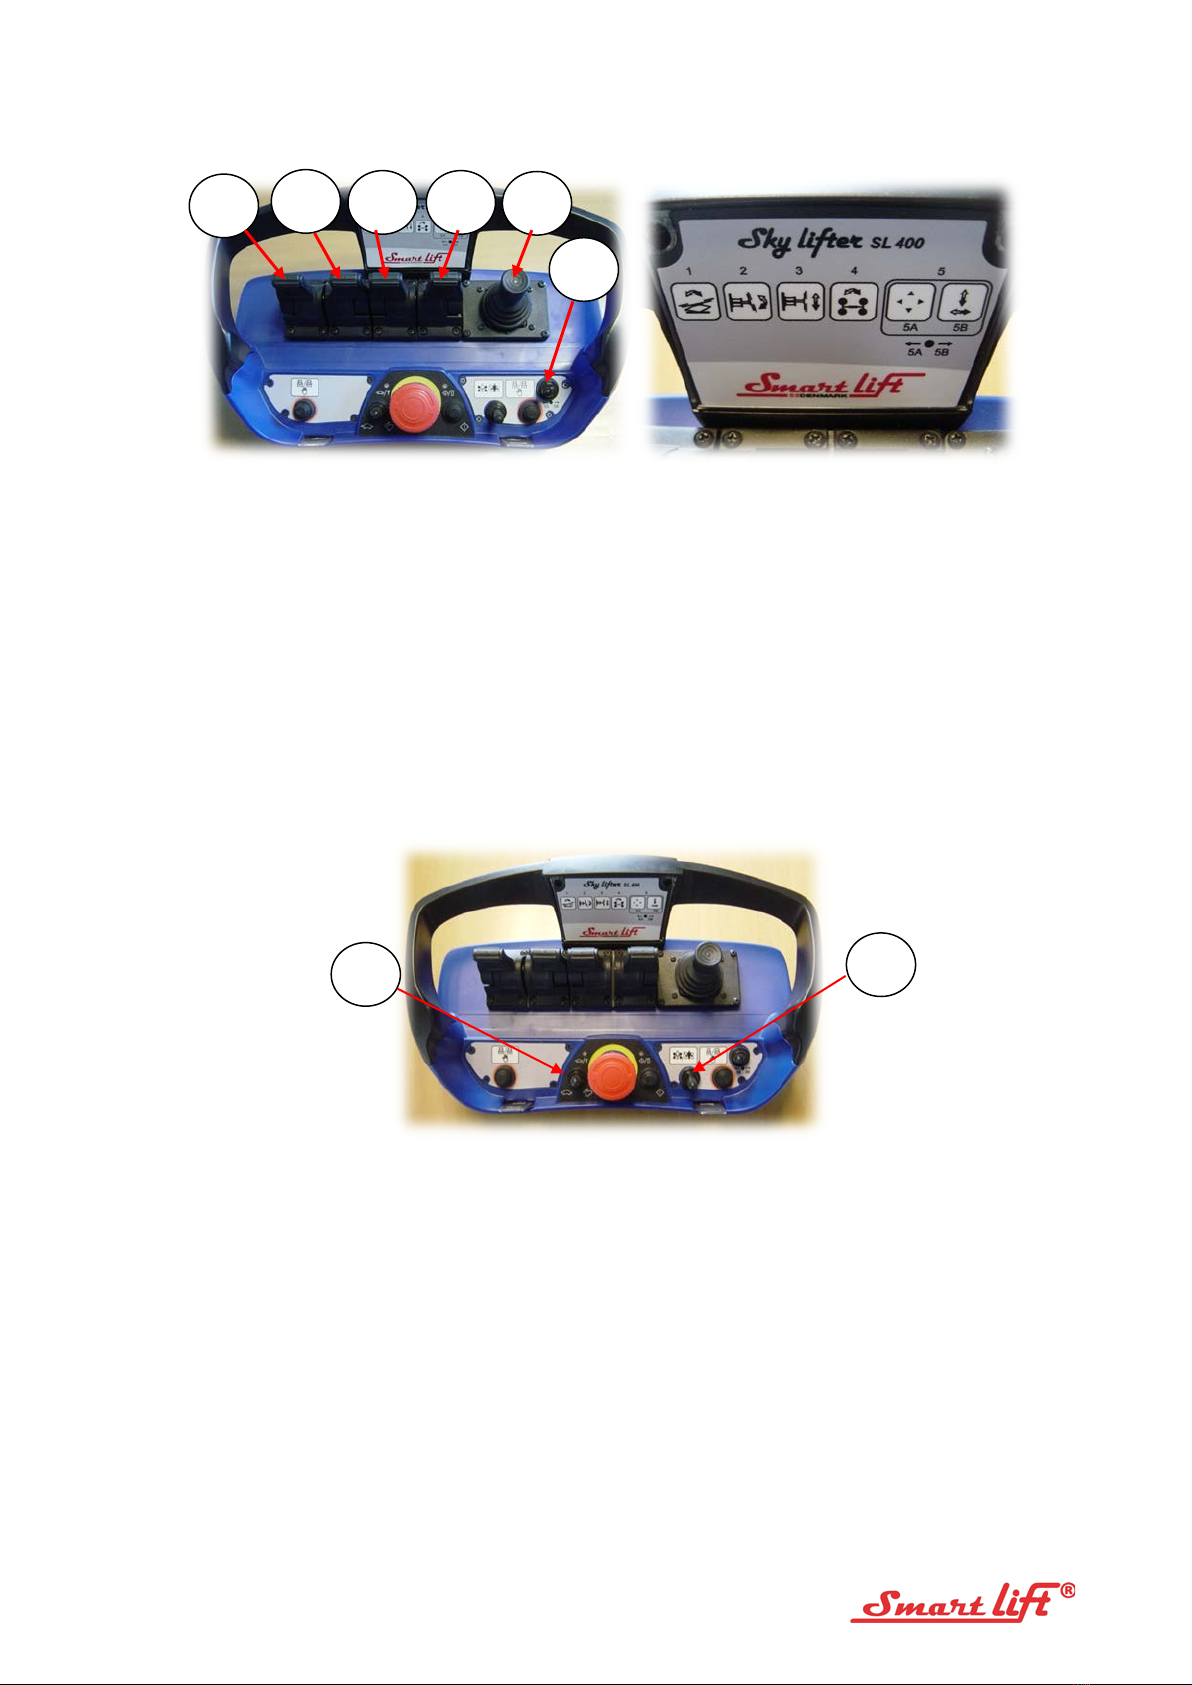
7.2 - Manoeuvring Skylifter/remote control unit
1. The remote control unit has 4 manoeuvring keys and a joystick. All movements are speed-controlled
which means that the further you move the key from the central position, the faster the load moves.
Slow speed = small movement of key/joystick.
2. The keys control the different movements shown in the photo above.
1 - Pivot (right/left) Forward pivots the load to the right - Back pivots the load to the left
2 - Tilt (forward/back) Forward tilts the load forward - Back tilts the load back
3 - Raise/lower Forward lowers the load - Back raises the load
4 - Rotate Forward rotates the load clockwise - Back rotates the load anti-clockwise
5 - Horizontal level The joystick moves the load to horizontal. The load follows the joystick's
movements.
When the load is horizontal, it can be shifted sideways. To activate, press button 6.
7.3 - Precision manoeuvring
Precision manoeuvring (at slow speed) can be activated stepwise, i.e. all manoeuvring speeds are reduced
further. There are three steps. To activate, press button 7. 1 x touch to the left reduces speed to step 1. 2 x
touches reduces speed to step 2 and 3 x touches reduces speed to step 3. To cancel speed reduction, touch
the same button once to the left.
The red lamp above button 6 flashes repeatedly (once, twice or three times according to indicate speed step
selected).
7.4 - Reversing the functions
The remote control unit is engineered to control movements as seen from the behind Skylifter. For example,
when the operator stands behind Skylifter, a movement to the right on the remote control unit moves the load
1
5
4
3
2
7
8
6

Engelsk SL 400 Skylifter - N2.14 Revision 1.1
13
to the right. If, instead, the operator is standing in front of Skylifter, the functions can be reversed. To reverse
functions, push button (8) forward.
Once the functions are reversed, Skylifter will again move the load to the right when the operator activates the
key/joystick to the right.
7.5 - Positioning/adjusting the vacuum yoke
1. First rotate the vacuum yoke to the most appropriate position, depending on whether you want to
rotate the load during manoeuvring. Note that the rotation movement on Skylifter is limited.
The load must always be positioned so that the centre of gravity of the load is centred on the machine.
2. Depending on the shape and dimensions of the load, the traverses must be positioned as far from
each other as possible. The same applies to 4 x suction pads: they should be positioned as far from
each other as possible.
A large distance between the suction pads ensures that the lift is as safe, balanced and stable lifting as
possible and minimises sensitivity, e.g. to gusts of wind.
The suction pads must be positioned at a distance of min. 25 mm from frames and edges.
3. Check that each suction pad has both a red and a blue hose. If this is not the case, replace the suction
pads before attaching the load. Tighten the 6 finger screws manually.
Skylifter is now ready to attach the load using vacuum.
7.6 - Attaching the load
1. Using the remote control unit, move the vacuum yoke slowly until it just touches the load. Correct the
position of the yoke until all 4 suction pads press lightly against the load. It will often be easier and
faster to tip the load towards the suction pads.
2. To start both vacuum systems, press one of the buttons on the remote control unit marked with a red
circle. The load is now firmly attached to the suction pads.
NB: Now check the load! See instructions at the end of this section.

Engelsk SL 400 Skylifter - N2.14 Revision 1.1
14
3. When the alarms stop and the green lamp flashes, the load is securely attached and can be shifted and
manoeuvred as required. See photo above.
4. The driver raises Skylifter and the load until they are unobstructed.
5. The operator operates the Skylifter scissor lift system backwards and manoeuvres the load into the
desired position. NB: Consider how best to position/turning the load to bring it into the easiest
position for mounting.
6. The driver drives the carrier to the work zone area and lowers the carrier's supporting legs so that it is
stable.
7. The driver then carefully manoeuvres Skylifter and the load as close to the final position as he can
safely achieve. The driver then signals that the operator can take over.
8. The operator carefully manoeuvres the load into place. When the load is secured, to release the
vacuum, the operator presses and holds down both buttons marked with a red circle for 3 seconds.
See photo above.
9. The vacuum pumps shut off and the vacuum valve releases the vacuum on the suction pads. It takes
only a few seconds to release the load.
10. When the suction pads have released the load, the operator manoeuvres Skylifter away from the
mounting area. The operator fully retracts the Skylifter's scissor system and signals to the driver that
he can remove Skylifter from the work zone.
Important: Check the following:
•When attaching the load, the operator must check that the alarm sounds and the red lamp
flashes at the start. If this is not the case, the machine is defective. The machine must not be
used until the defect is located and rectified.
•When the vacuum pumps stop, pressure should be -0.62 ±0.02 bar. See vacuum gauge display.
The pressure must be stable. It must not increase. If the pressure increases, the machine is
defective and must not be used until it has been repaired. NB: When a vacuum circuit is
defective, the pressure increases from -0.2 to 0 bar. The alarms are triggered at -0.5 bar.
The green lamp
in the light
tower flashes
when the
vacuum is
secure for
lifting.
The red lamp
flashes and the
alarm sounds
when the vacuum
circuit is
defective.

Engelsk SL 400 Skylifter - N2.14 Revision 1.1
15
WARNING!
If the green lamp does NOT flash, DO NOT USE the machine.
If, during manoeuvring, the red light flashes and/or acoustic alarm is triggered, bring
the load IMMEDIATELY into a safe position.
8.0 - Switches and alarms
The light tower has three functions:
Audible alarm = STOP! There is a fault.
Red lamp rotating = STOP! There is a fault.
Green lamp rotating = OK! All is well.
The alarm is fitted with a swivel screen.
The volume is adjustable. Adjust the volume to the ambient noise level.
Never completely shut down the screen as the operator may overhear the alarm.
If the red lamp flashes and the alarm does not sound, the battery is running low. The machinery will continue
to work for a few minutes before stopping. Replace or recharge the battery as soon as possible. Do not mount
anything until the battery is replaced or fully recharged.
9.0 - Breakdown and faults on the machine
9.1 - Radio-controlled battery replacement
Push the battery to the right and then raise to release.
To insert battery, press the battery to the far right, press down and release.

Engelsk SL 400 Skylifter - N2.14 Revision 1.1
16
9.2 - Fault in radio control system
No connection to radio receiver! Reset radio control, press and hold button for 5 seconds.
Reset remote control unit,
press and hold button for 5
seconds.
Engelsk SL 400 Skylifter - N2.14 Revision 1.1
17
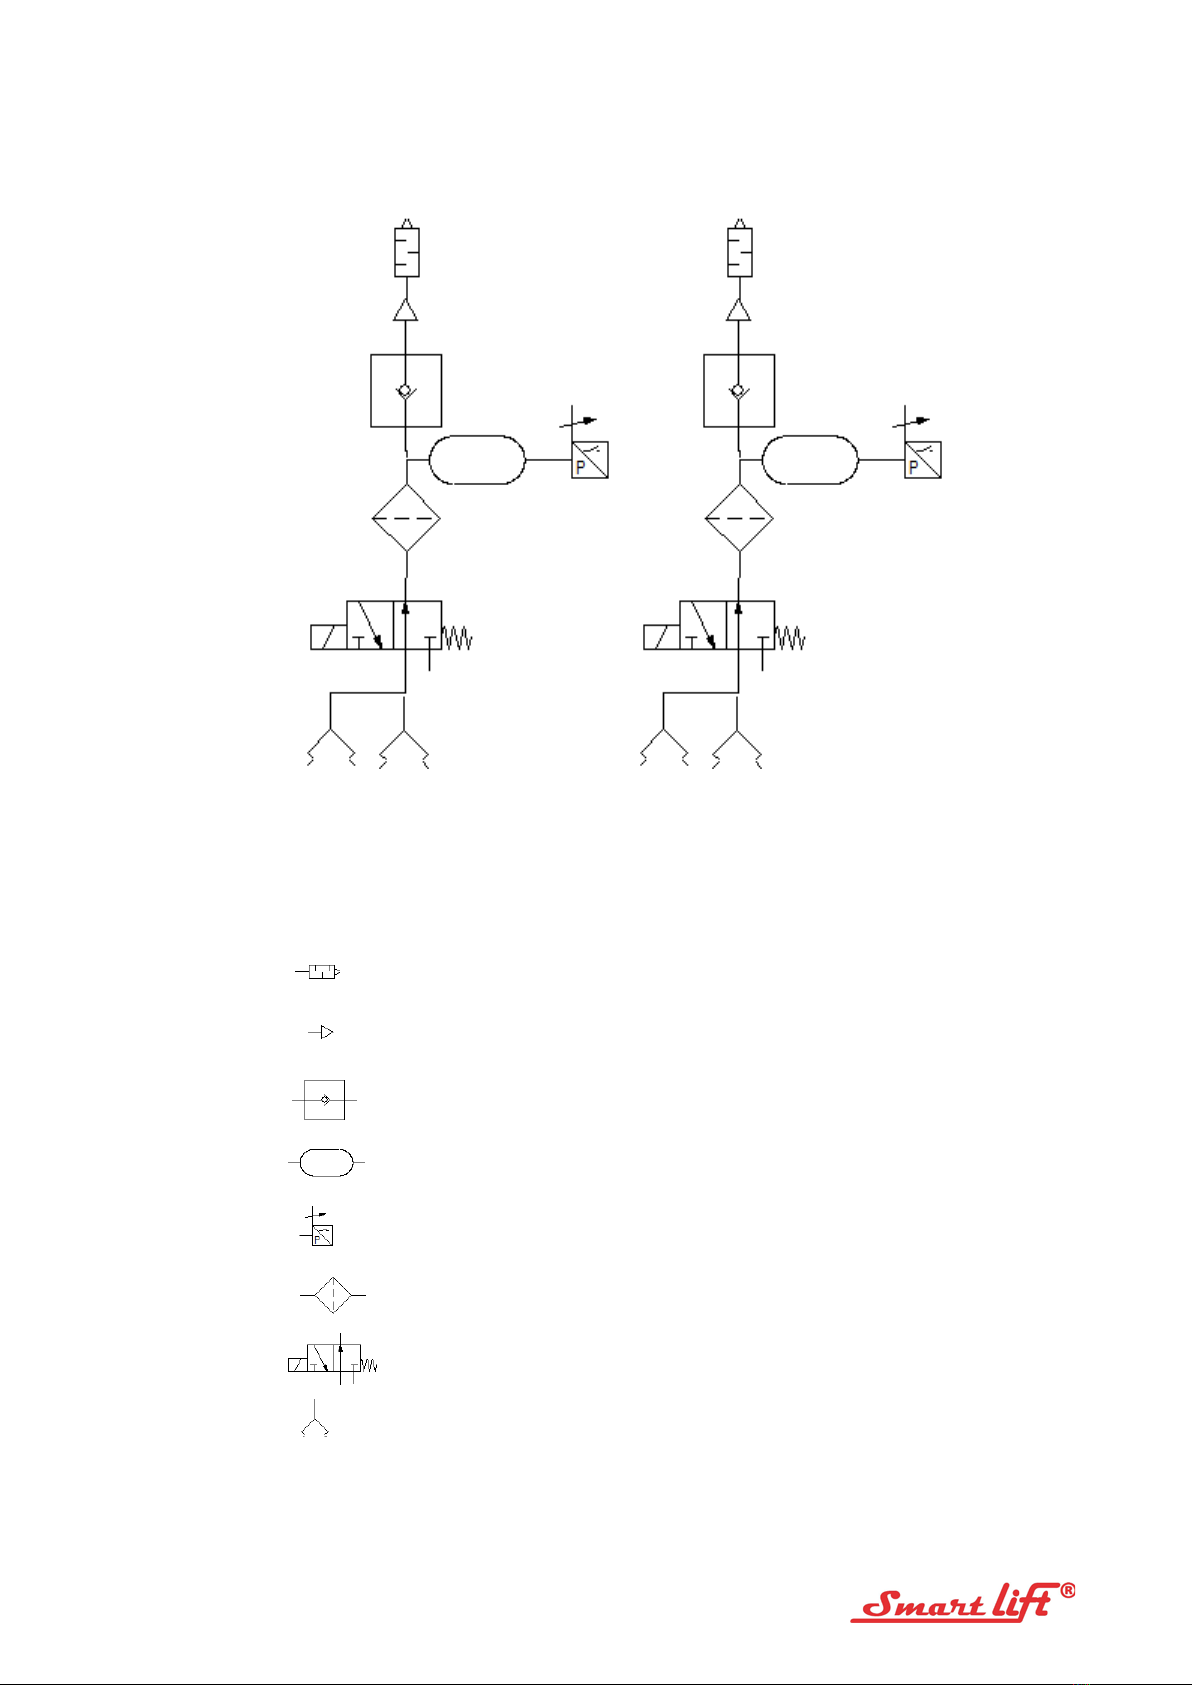
10.0 - Vacuum diagram
Circuit 1 Circuit 2
Key to symbols
Noise reducer
Vacuum pump
Check valve
Tank
Vacuum gauge with display
Filter
Magnet valve 3/2 NO
Vacuum pad
Engelsk SL 400 Skylifter - N2.14 Revision 1.1
18
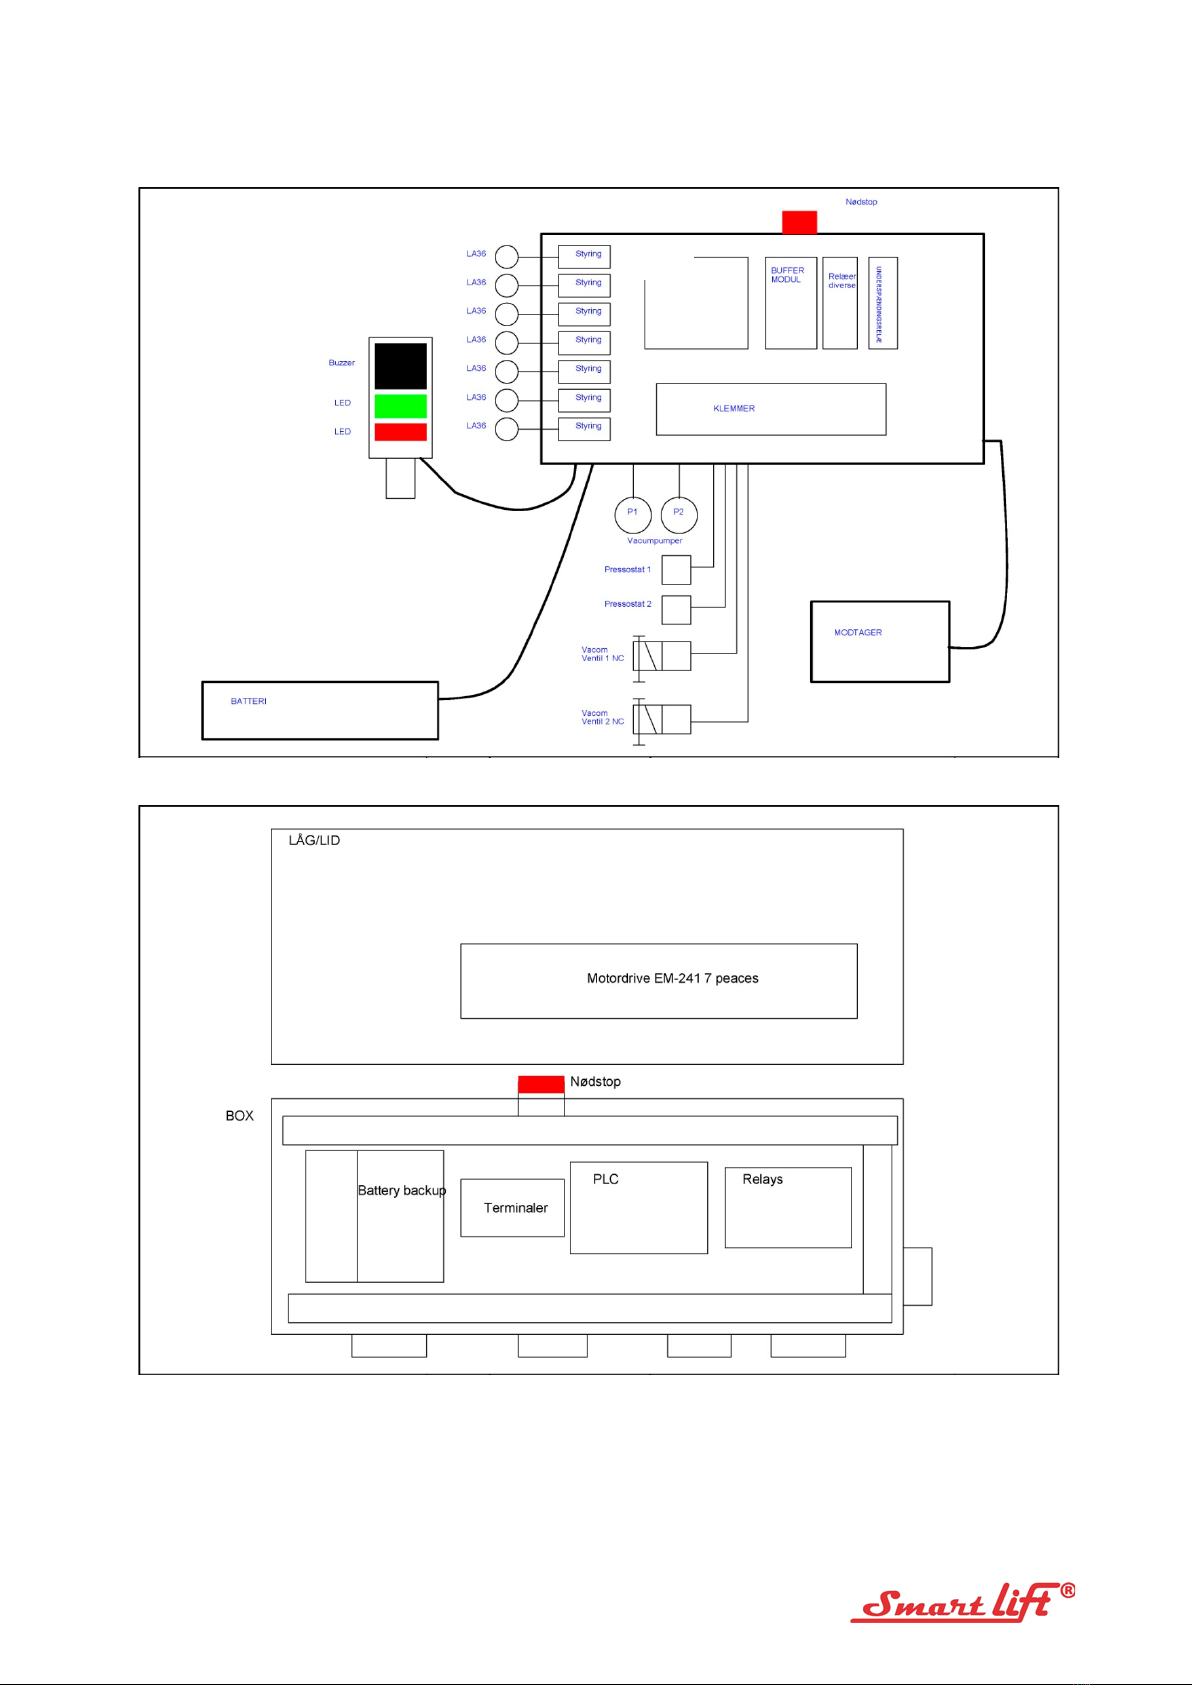
11.0 - Electrical diagram

Engelsk SL 400 Skylifter - N2.14 Revision 1.1
19

Engelsk SL 400 Skylifter - N2.14 Revision 1.1
20
Table of contents
Other Smart Lift Lifting System manuals


Popular Lifting System manuals by other brands

Dhollandia
Dhollandia DH-LSP SeriesDH-LSP.05 Operation manual

Simon, Evers & Co
Simon, Evers & Co K 658791 operating manual

Byron Originals
Byron Originals ULTRALIFT Undermount Assembly, Installation Instructions & Parts List

Avanti
Avanti DOLPHIN A-V164 Original instructions

Bend-Pak
Bend-Pak HDS-18E Service manual

Hillrom
Hillrom Liko Golvo 7000 Series Service manual


