Smart Witness CP4S User manual

CP4S
4 Channel HD Recorder
Installation Guide
Model #: CP4S-NA, CP4S-EU
v1.0.1
WARNING: SmartWitness installations should be performed by a qualified individual or installation professional
only. Working with a vehicle's power system can be dangerous to both you and your vehicle. This installation is
intended only to be a guide since vehicle designs and power/input sources can vary significantly
from vehicle to vehicle.
If you need to schedule a professional installation service in the USA for your
SmartWitness device(s), please visit https://smartwitness.com/scheduleinstall and submit the online form.
All cellular-enabled CP4S devices must use the installation wizard for proper onboarding and activation,
please visit https://install.smartwitness.com to register, login, and use the SmartInstall wizard.

pg. 2
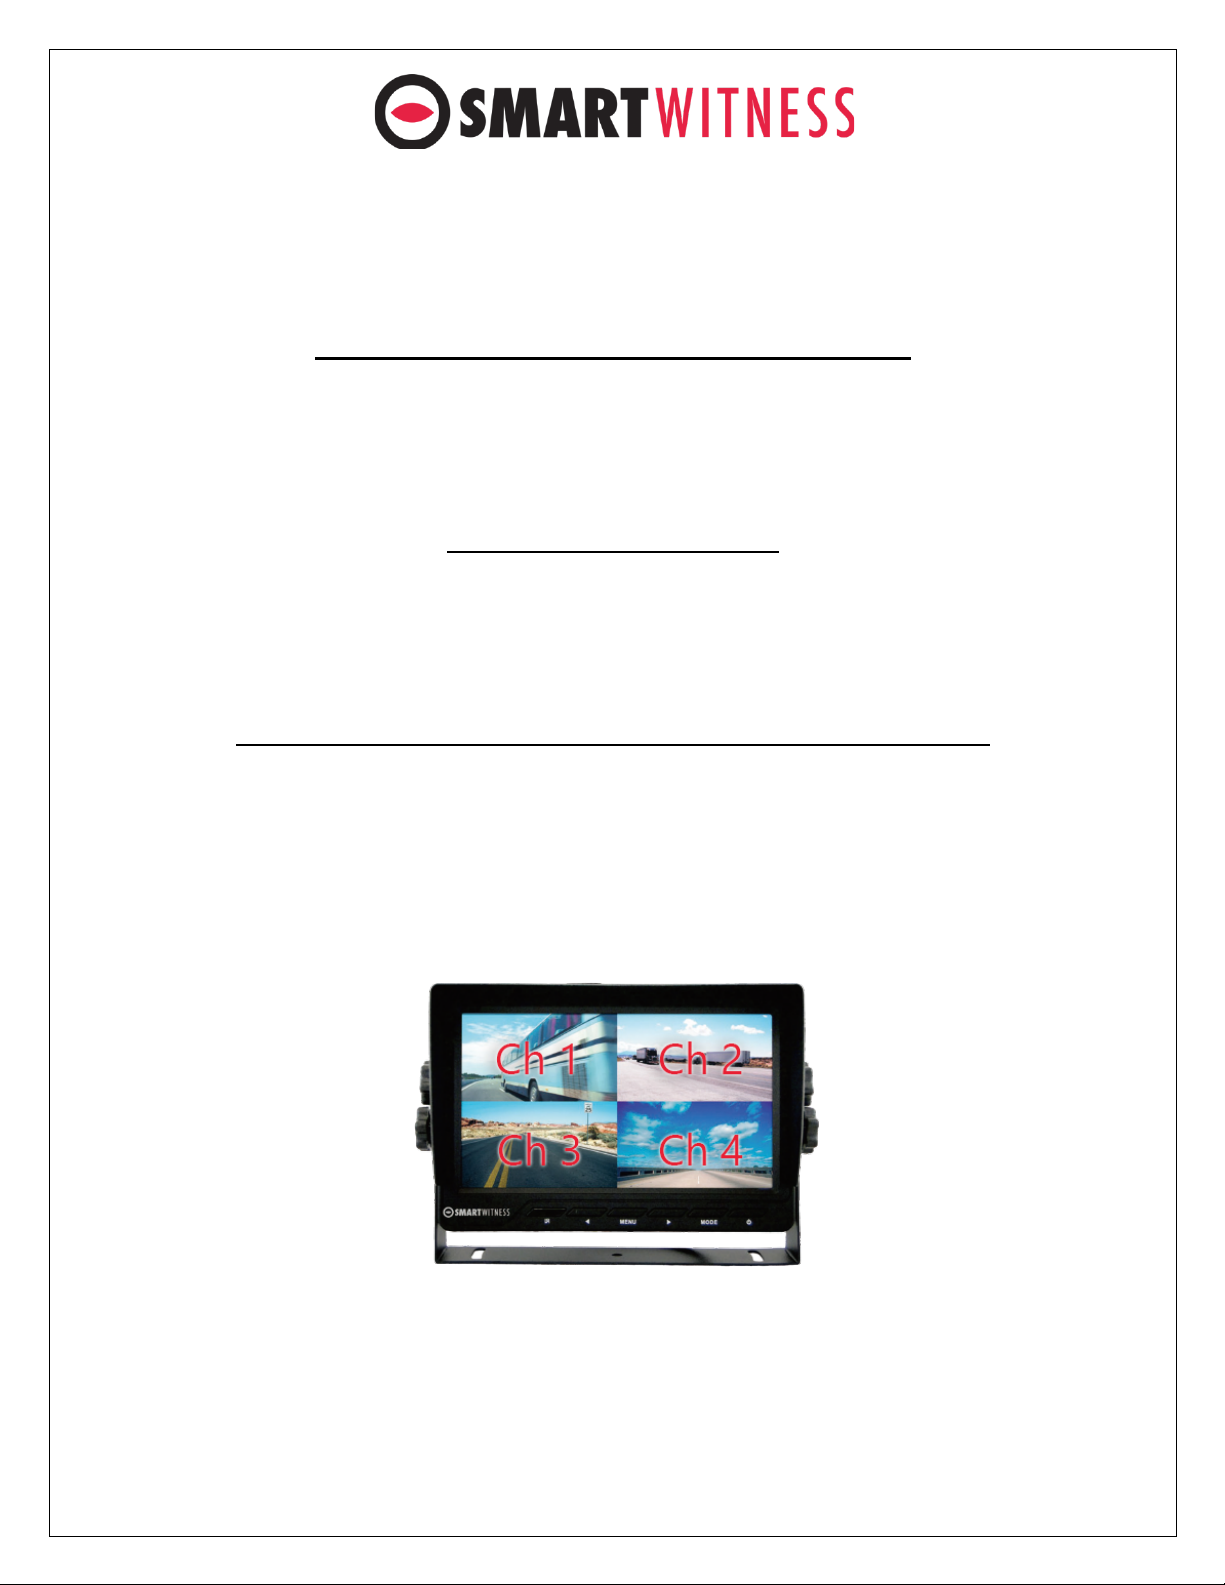
1. Overview
The SmartWitness CP4S is the world’s smallest 4 channel LTE-enabled vehicle recorder. CP4S, an in-vehicle drive
recorder, offers commercial vehicle owners an effective risk reducing means to aid in the investigation process,
decrease collateral damages associated with car accidents, encourage safe driving, monitor driving behaviors, and
enhance the overall safety on the road. CP4S features 4 camera inputs for connecting 1, 2, 3, or 4 cameras. A 6-Axis G-
Sensor, Microphone, SD card (up to 256GB capacity), panic button, cellular modem, & GPS receiver are included. CP4S
is powered up on vehicle ignition and automatically begins recording. Various camera options are available, making
the amount of possible CP4S system combinations nearly endless.
CP4S is small, lightweight, easy to use, and simple to install compared to other complex and expensive mobile DVRs.
CP4S can be easily installed inside a glove box or purchased with a locking case to prevent unauthorized access to the
recorded data. An LCD monitor is not required for use, but can be added to provide added visibility in and around the
vehicle for added security and safer operation.
Ø Features
Playback & Analysis Features
PC Analysis Software Included, which can be downloaded at:
support.smartwitness.com
Compatible with SmartWitness Smart API for AVL/Telematics
Integration.
Filter Data Search by Time/Date, Event, Vehicle Speed, G-Force
level.
MP4 Conversion Tool. Data Remains Watermarked.
Google Maps Integration for Route Tracking.
Google Earth Export Tool for Advanced Route Tracking and
Archiving.
Privacy masking feature for blurring out faces or license plate
numbers.
31-day Vehicle Tracking History, showing vehicle location,
speed and driving style regardless if event video was recorded
or not.
Optional LCD monitor connected, view all four cameras at
once or playback recorded videos in the vehicle
OTA Software & Firmware Updates. Save/Print Event Reports.
Recording Features
1080p recording on channel 1.
720p recording on channels 2~4.
256GB SD storage capacity, record up to 270 hours of footage
on 4 camera setup.
Various camera options: wide angle, weatherproof, infrared,
dome, side view, rugged, reverse cameras, etc.
Dual Record mode (Continuous + Event).
Optional Audio Recording.
Connects directly to vehicle ignition power, automated
operation.
Tamper-Resistant locking case available; Key required to access
SD card Data.
GPS data records full time to provide location data, vehicle
speed, and accurate time/date.
Three 12V alarm input triggers for advanced event recording.
Delay power shutdown feature enables recording for up to 24
hours after ignition off.
Built-in temperature logic for improved performance in high-
temp environments.
Adjustable Resolution & Frame Rate. Built-in G-Shock Sensor
and Gyro (adjustable sensitivity).
Auto SD card format feature. CP4S automatically detects SD
error/corruption and auto-formats itself and begins recording
again.

pg. 3
Ø Package Contents
Product Name
Image
CP4S Vehicle Recorder
SD and SIM cards pre-inserted
(if applicable)
Power Cable
BAT(+), IGN+, BAT(-)
Remote Controller (Panic Button)
with 3M adhesive
Video Output Cable and I/O triggers
Camera Input Cable
(4x input)
GPS Antenna Module
Audio Microphone

pg. 4
Torx Screw (x2) and Torx screwdriver
Mounting Bracket and 4x self-tapping
screws
x4
2x 3G/LTE Stubby Antennas
2. CP4S Hardware Overview
Watch 360° Hardware Overview Video here: https://youtu.be/cLmUPGLnqSM
Ø Dimensions
Built-in
microphone
4.75”
3.55”

pg. 5
Ø Front View
Ø Rear View

pg. 6
3. Installation:
Park the vehicle on a flat service. Turn of the engine before installing the CP4S.
Ø The SD card and SIM is usually pre-inserted, but if it’s not, you should be
notified by the service provider and have been provided SIMs/SDs separately.

pg. 7
Find installation location for recorder and locking case (if applicable).
o The default axis adjustments by device position is set as shown below.
Ø Install all the interior and exterior cameras with 3M dual sided adhesive or hard
mounting screws (confirm with customer as to the desired installation method).
o All the four cameras will be connected to the CP4S recorder via the Camera
Input Cable.
Ø Install remote control onto dash next to the steering wheel and within reach of
the driver.
Ch4
Ch3
Ch2
Ch1
Ch1: 1080p
Ch2: 720p
Ch3: 720p
Ch4: 720p
Connect to the camera.

pg. 8
Ø Run camera cable(s) and secure in headliner and or other area so no cables are exposed. Use
provided wire clips if necessary.
Ø Connect all cables to CP4S Recorder. Secure the windshield mounted camera cables into the
headliner and down the A-Pillar.
Ø Route the GPS cable and LTE Antenna cable (if applicable) up the side panel and on the
dashboard, in view of the windshield (so it can have a view of the sky to acquire GPS signal).
o Activate the product in an area without large buildings to improve GPS reception.
o The temperature ranges for optimum operation of the GPS receiver in your car is -10 ~ 50°C.
CP4S GPS antenna properly installed on the Vehicle Dash

pg. 9
Ø Camera Types
o CP4S has various camera models offered which should be installed in the
appropriate location. Here is a reference guide for the common models.
Model #
Picture
Installation Location
Notes
SVA055-AM
Road + Driver Facing Dual
Camera
Road facing camera is
1080p. Driver Facing
camera is 720p. Driver
camera has IR LEDs.
SVA027-A
Weatherproof Side Mount
Camera
720p weatherproof
camera, IR LEDs
SVA037-A
Rear View Camera
720p weatherproof
camera, IR LEDs
SVA050-A
Driver facing camera
720p, IR LEDs
SVA041-AM
Road facing camera
1080p
*NOTE: Older model accessory cameras are compatible with CP4S. To connect an older
model accessory camera, please utilize adapter SVA-CNVRT-B.
pg. 10
Ø Camera Channel inputs
o CP4S has some rules on which cameras can be connected to each input
(1~4).
Connecting one 1080p camera and 3x 720p cameras
Resolution FPS
CH1 1080p 15
CH2 720p 10
CH3 720p 10
CH4 720p 10
Connecting 4x 720p cameras
Resolution FPS
CH1 720p 15
CH2 720p 15
CH3 720p 15
CH4 720p 15
If using D1 (720x480 or VGA) camera, it must be connected to Ch4
Resolution FPS
CH1 720p 15
CH2 720p 15
CH3 720p 15
CH4 D1 30
LCD Camera Channel Display
order (Quad View)

pg. 11
4. CP4S Power Cable and Wiring
Make sure the vehicle is off, then connect the required wires to the vehicle, as shown below in the
wiring diagram.
Ø Power Connection
Ø Video Output Cable & I/O Harness (optional)
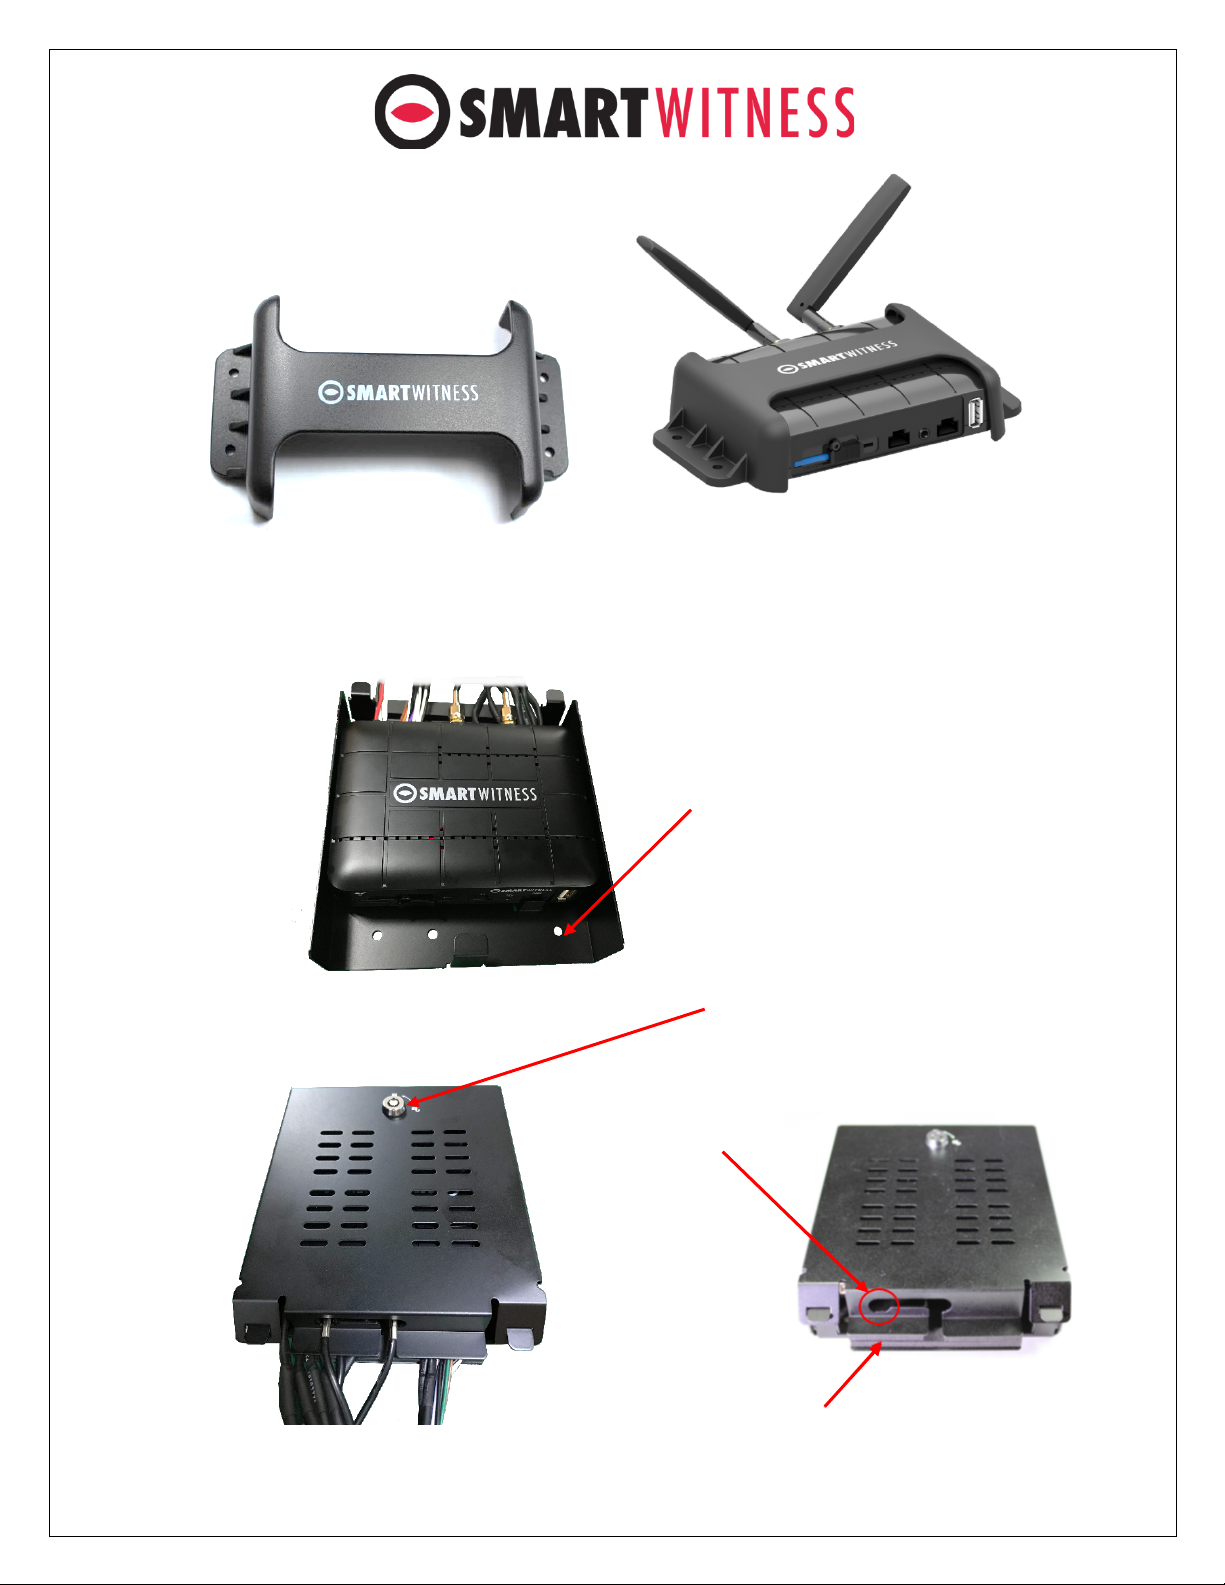
5. Mounting Bracket Installation
a. Place the CP4S inside the mounting bracket and secure to vehicle using the 4
provided self-tapping screws.
Power Specifications
Input: DC 10˞32V, 2000 mA
Output: DC5V, 2500 mA
Video output for connecting
LCD monitor (BNC female)
IMPORTANT NOTE
True Ignition source
should be used to connect
the white wire.
pg. 12
6. Locking Enclosure (Optional)
a. Front View (open)
b. Rear View (Closed)
Screw holes for
mounting
Security Lock
Holes for LTE
Antenna Connectors
Foam padding for securing
cables and tension relief
pg. 13
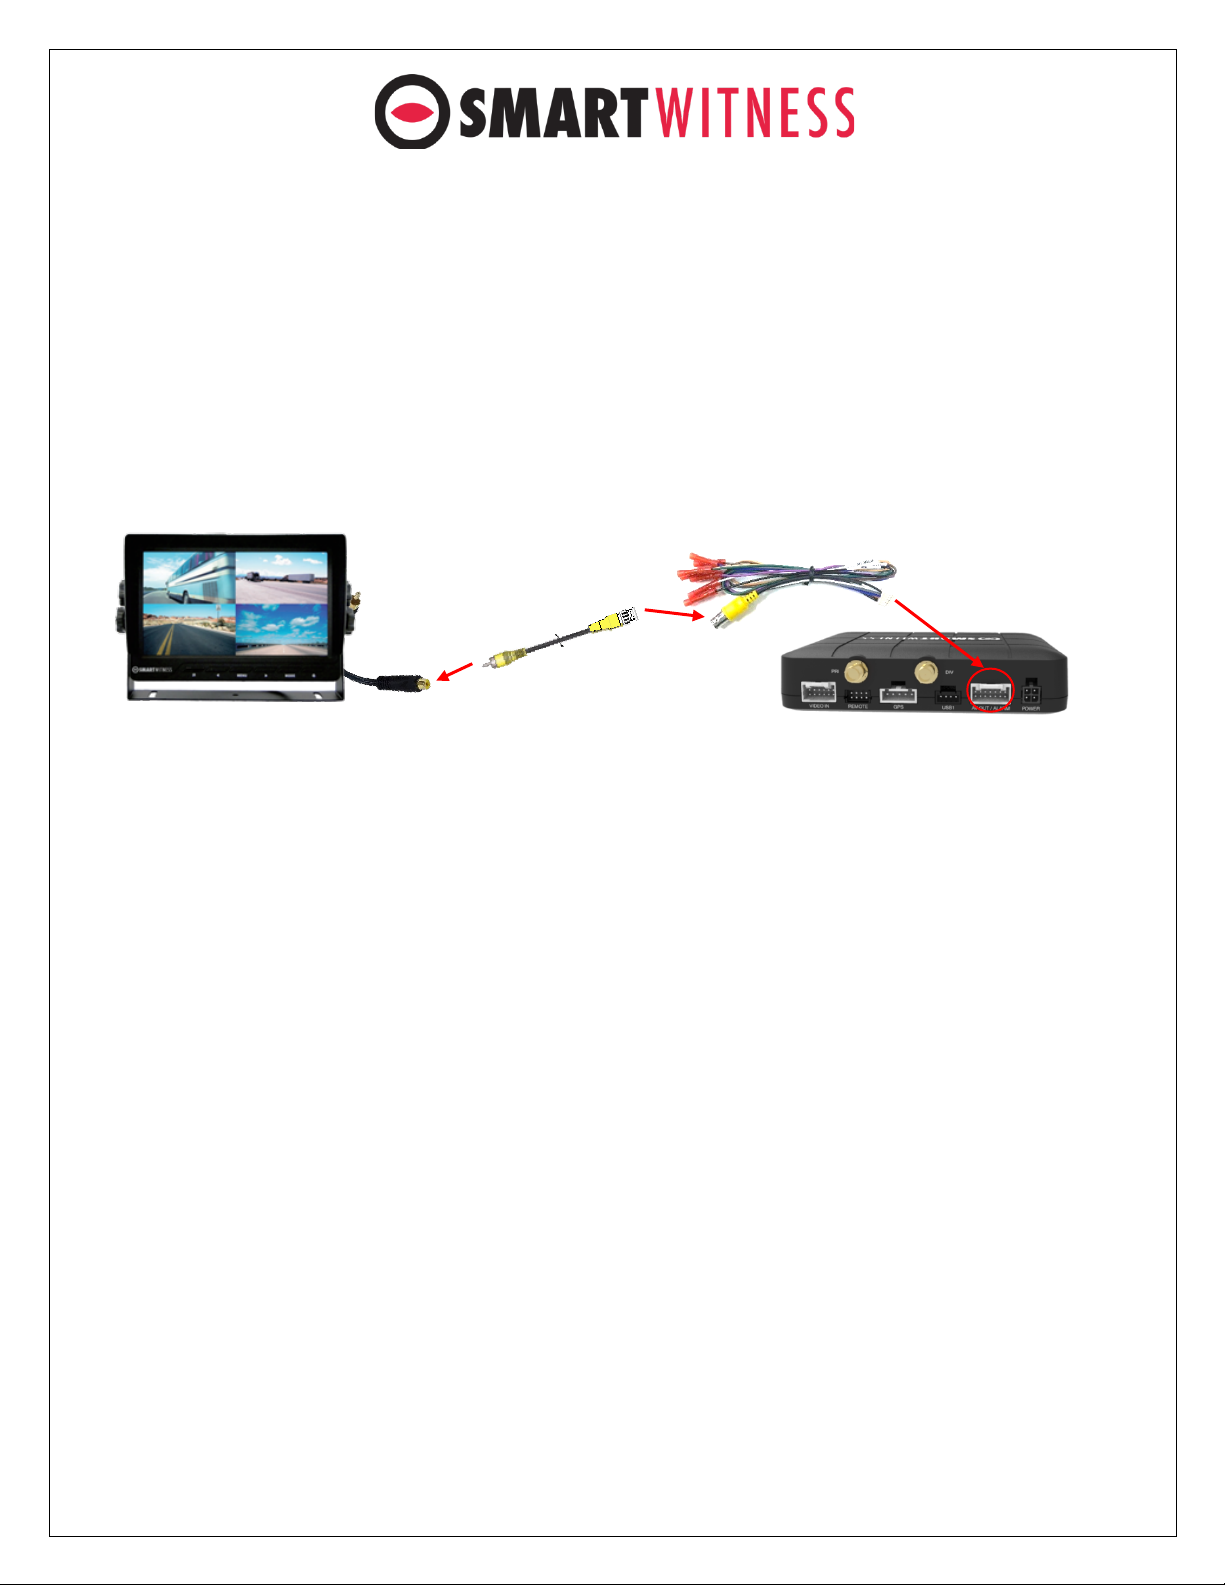
7. Connecting LCD monitor with Video Output cable (optional)
The following displays can only be seen when a monitor is connected.
1. Connect BNC/RCA cable (included with SmartWitness LCD monitor ) to CP4S
Video output (BNC female) and LCD V1 input (RCA female)
2. LCD monitor should be installed in the cab. (download LCD monitor guide from
install.smartwitness.com, a printed copy is also included in the LCD package)
3. Connect LCD power cable to a true ignition (IGN+) source and Ground to BAT(-).
The default display is Quad view (2x2) with all cameras shown, to change the video
display channel, press the [M2] button to select which camera to view. Each press will
change the camera on display with the last option being all camera views.

pg. 14
8. Final steps
After installation of the CP4S and accessories into the vehicle you can turn on the
ignition and CP4S recorder will power on. There will be a sequence of red, blue &
green LED lights on the Remote/Panic Button during the boot-up process.
o Once boot-up is complete, the red light will turn off and there will be only a
solid blue & green (only for connected device) light on. This indicates proper
operation and recording. If the red light is blinking, then there is an error, then
contact your supplier or visit support.smartwitness.com to create a support
ticket. Please see section 10 for more details on LED status indicators.
o Login to install.smartwitness.com and complete the installation wizard to
validate the installation and generate the installation report.
Ø G-Sensor Calibration
G-sensor calibration is needed after installing the CP4S.
a) Turn on the unit and wait until it starts recording.
b) Press and hold M1 button (located at the remote controller) for more than 2
seconds.
c) You will hear a beep when you press M1, and then you will hear another
beep after 2 seconds. Upon the second beep, you can release M1 button.
d) Then the calibration will be done within 2 seconds.
NOTE: To access install.smartwitness.com, you must first go through mandatory
training with SmartWitness. One you complete the training (about a 30-minute
webinar), you will be provided login credentials. To schedule training, please
complete the online form here: https://www.smartwitness.com/become-installer
M1 Button for G-Sensor
Calibration

pg. 15
9. Troubleshooting
• The CP4S has a solid red light on as well as solid green and blue.
o Solid red LED indicates that one of the connected cameras is not
receiving view signal. Please check the camera’s connection.
• The CP4S red LED is blinking
o There is an SD card error/corruption. Please replace the SD card or
contact SmartWitness.
§ The new SD card must be initialized with the CP4S Configuration Tool
for the device to function properly, and the right settings must be
applied.
§ IF SD card is blank (not initialized), the CP4S will automatically initialize
the SD card, apply the latest NAND settings, during the rebooting
process.
o There is a power issue. Please verify proper voltage and amperage is
being supplied to the Red (BAT+) & White (IGN+) cables on the power
harness and that the black cable is properly connected to BAT(-)
• The CP4S green LED is blinking or off.
o The SIM card is not registered with the cellular network. Please verify the
SIM is inserted correctly.
o If it looks to be inserted correctly, please remove and re-insert the SIM
card and try again
o Power cycle the camera.
10. Remote Controller Indicators & LEDs Specifications

pg. 16
This manual suits for next models
2
Table of contents
Other Smart Witness Measuring Instrument manuals


Popular Measuring Instrument manuals by other brands


Miros
Miros SM-140 Series user manual

Reed Instruments
Reed Instruments R9260 instruction manual

Navico
Navico F-52 instruction manual

Grace
Grace R-3W-SR Installation Guide & Operating Instructions

Endress+Hauser
Endress+Hauser Levelflex FMP51 Safety instruction

Jenoptik
Jenoptik JenLas D2 Series installation instructions


